


 Download code from GitHub
Coin Dash – Build Your First 2D Game
This first project will guide you through making your first Godot Engine game. You will learn how the Godot editor works, how to structure a project, and how to build a small 2D game using some of Godot’s most commonly used nodes.
Why start with 2D?
In a nutshell, 3D games are much more complex than 2D ones. However, many of the underlying game engine features you’ll need to know are the same. You should stick to 2D until you have a good understanding of Godot’s workflow. At that point, the jump to 3D will feel much easier. You’ll get a chance to work in 3D in this book’s later chapters.
Don’t skip this chapter, even if you aren’t a complete newcomer to game development. While you may already understand many of the concepts, this project will introduce Godot’s features and design paradigms – things you’ll need to know going forward.
The game in this chapter is called Coin Dash. Your character must move around the screen, collecting as many coins as possible while racing against the clock. When you’re finished, the game will look like this:

Figure 2.1: The completed game
In this chapter, we’ll cover the following topics:
- Setting up a new project
- Creating character animations
- Moving a character
- Using
Area2Dto detect when objects touch - Using
Controlnodes to display information - Communicating between game objects using signals
Technical requirements
Download the game assets from the following link below and unzip them into your new project folder: https://github.com/PacktPublishing/Godot-4-Game-Development-Projects-Second-Edition/tree/main/Downloads
You can also find the complete code for this chapter on GitHub at: https://github.com/PacktPublishing/Godot-4-Game-Development-Projects-Second-Edition/tree/main/Chapter02%20-%20Coin%20Dash
Setting up the project
Launch Godot, and in the Project Manager, click the + New Project button.
You first need to create a project folder. Type Coin Dash in the Project Name box and click Create Folder. Creating a folder for your project is important to keep all your project files separate from any other projects on your computer. Next, you can click Create & Edit to open the new project in the Godot editor.
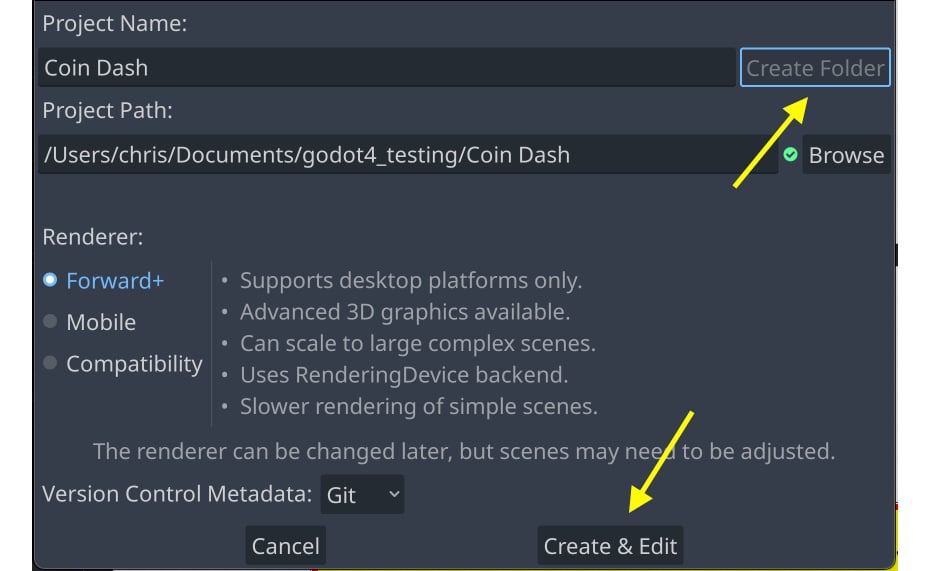
Figure 2.2: The new project window
In this project, you’ll make three independent scenes – the player character, the coin, and a display to show the score and clock – all of which will be combined into the game’s “main” scene (see Chapter 1). In a larger project, it might be useful to create separate folders to organize each scene’s assets and scripts, but for this relatively small game, you can save all of your scenes and scripts in the root folder, which is referred to as res:// (res is short for resources). All resources in your project will be located relative to the res:// folder. You can see the project’s files in the FileSystem dock in the lower-left corner. Because it’s a new project, it will be empty except for a file called icon.svg, which is the Godot icon.
You can download a ZIP file of the art and sounds (collectively known as assets) for the game here: https://github.com/PacktPublishing/Godot-Engine-Game-Development-Projects-Second-Edition/tree/main/Downloads. Unzip this file in the new project folder you created.
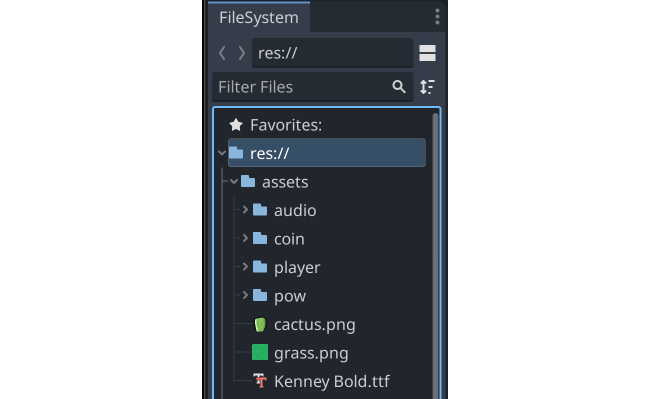
Figure 2.3: The FileSystem tab
For example, the images for the coin are located in res://assets/coin/.
Since this game will be in portrait mode (taller than it is wide), we’ll start by setting up the game window.
Click Project -> Project Settings from the menu at the top. The settings window looks like this:
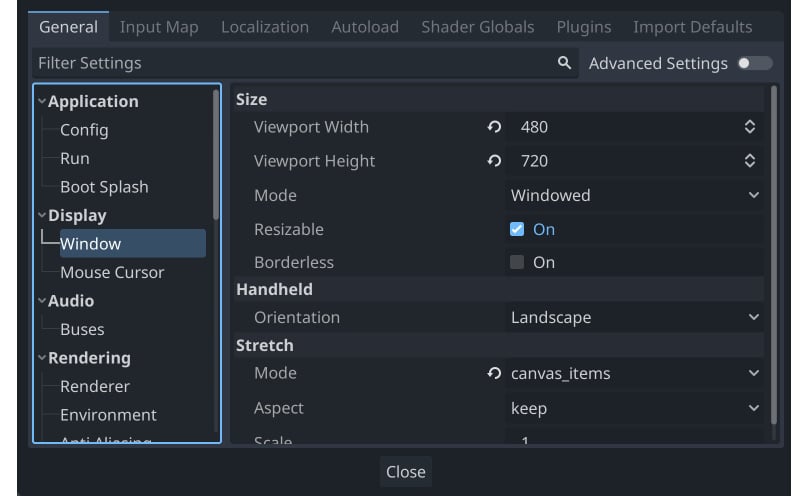
Figure 2.4: The Project Settings window
Look for the Display -> Window section and set Viewport Width to 480 and Viewport Height to 720, as shown in the preceding figure. Also in this section, under Stretch, set Mode to canvas_items and Aspect to keep. This will ensure that if a user resizes the game window, everything will scale appropriately and not become stretched or deformed. You can also uncheck the Resizable box under Size to prevent the window from being resized at all.
Congratulations! You’ve set up your new project, and you’re ready to start making your first game. In this game, you’ll make objects that move around in 2D space, so it’s important to understand how objects are positioned and moved using 2D coordinates. In the next section, you’ll learn how that works and how to apply it to your game.
Vectors and 2D coordinate systems
This section is a very brief overview of 2D coordinate systems and vector math as it’s used in game development. Vector math is an essential tool in game development, so if you need a broader understanding of the topic, see Khan Academy’s linear algebra series (https://www.khanacademy.org/math/linear-algebra).
When working in 2D, you’ll use Cartesian coordinates to identify locations in the 2D plane. A particular position in 2D space is written as a pair of values, such as (4, 3), representing the position along the x and y axes, respectively. Any position in the 2D plane can be described in this way.
In 2D space, Godot follows the common computer graphics practice of orienting the x axis to the right and the y axis downward:
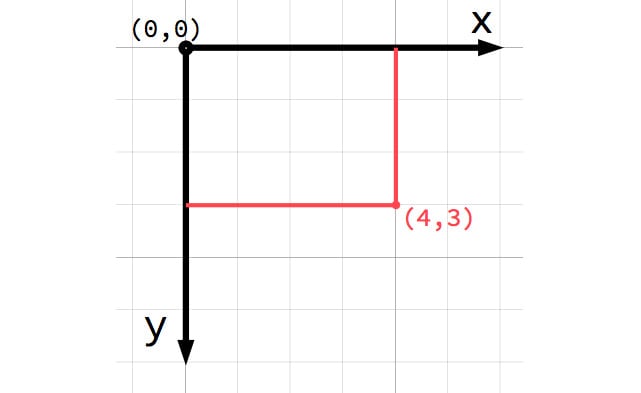
Figure 2.5: A 2D coordinate system
That’s not what my math teacher taught me!
If you’re new to computer graphics or game development, it might seem odd that the positive y axis points downward instead of upward, which you likely learned in math class. However, this orientation is very common in computer graphics applications.
Vectors
You can also think of the (4, 3) position as an offset from the (0, 0) point, or origin. Imagine an arrow pointing from the origin to the point:
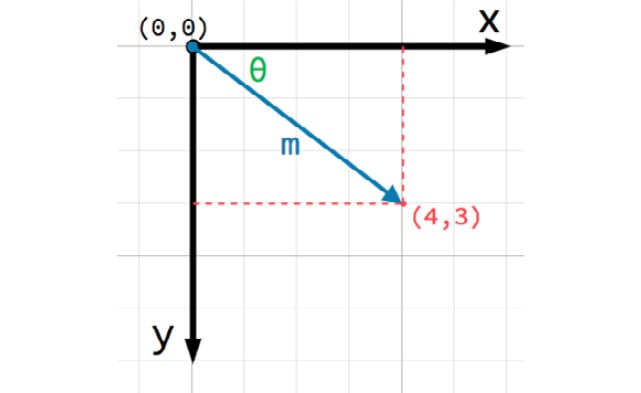
Figure 2.6: A 2D vector
This arrow is a vector. It represents a great deal of useful information, including the point’s location, its distance or length (m), and its angle from the x axis (θ). More specifically, this type of vector is referred to as a position vector – that is, one that describes a position in space. Vectors can also represent movement, acceleration, or any other quantity that has a size and a direction.
In Godot, vectors have a wide array of uses, and you’ll use them in every project in this book.
You should now have an understanding of how the 2D coordinate space works and how vectors can help to position and move objects. In the next section, you’ll create the player object and use this knowledge to control its movement.
Part 1 – the player scene
The first scene you’ll make is the player object. One of the benefits of creating a separate scene for the player (and other objects) is that you can test it independently, even before you’ve created other parts of a game. This separation of game objects will become more and more helpful as your projects grow in size and complexity. Keeping individual game objects separate from each other makes them easier to troubleshoot, modify, and even replace entirely without affecting other parts of the game. It also means your player can be reusable – you can drop this player scene into an entirely different game and it will work just the same.
Your player scene needs to do the following things:
- Display your character and its animations
- Respond to user input by moving the character
- Detect collisions with other game objects such as coins or obstacles
Creating the scene
Start by clicking the Add/Create a New Node button (the keyboard shortcut is Ctrl + A) and selecting an Area2D. Then, click on the node’s name and change it to Player. Click Scene -> Save Scene (Ctrl + S) to save the scene.
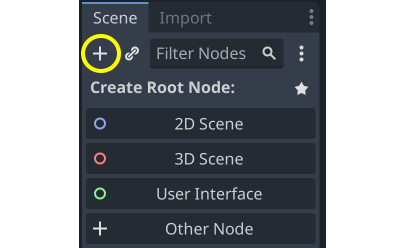
Figure 2.7: Adding a node
Take a look at the FileSystem tab and note that the player.tscn file now appears. Whenever you save a scene in Godot, it will use the .tscn extension – this is the file format for Godot’s scenes. The “t” in the name stands for “text” because these are text files. Feel free to take a look at it in an external text editor if you’re curious, but you shouldn’t edit one by hand; otherwise, you run the risk of accidentally corrupting the file.
You’ve now created the scene’s root or top-level node. This node defines the overall functionality of the object. We’ve chosen Area2D because it’s a 2D node, so it can move in 2D space, and it can detect overlap with other nodes, so we’ll be able to detect the coins and other game objects. Choosing which node to use for a particular game object is your first important decision when designing your game objects.
Before adding any child nodes, it’s a good idea to make sure you don’t accidentally move or resize them by clicking on them. Select the Player node and hover your mouse on the icon next to the lock, Group Selected Node(s):

Figure 2.8: Toggle the node grouping
The tooltip says Make selected node’s children not selectable., and that’s good – it will help avoid mistakes. Click the button, and you’ll see the same icon appear next to the player node’s name:
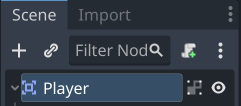
Figure 2.9: The node grouping icon
It’s a good idea to always do this when creating a new scene. If an object’s child nodes become offset or scaled, it can cause unexpected errors and be difficult to troubleshoot.
Sprite animation
With Area2D, you can detect when other objects overlap or run into a player, but Area2D doesn’t have an appearance on its own. You’ll also need a node that can display an image. Since the character has animations, select the player node and add an AnimatedSprite2D node. This node will handle the appearance and animations for the player. Note that there’s a warning symbol next to the node. AnimatedSprite2D requires a SpriteFrames resource, which contains the animation(s) it can display. To create one, find the Frames property in the Inspector window and click on <empty> to see the dropdown. Select New SpriteFrames:
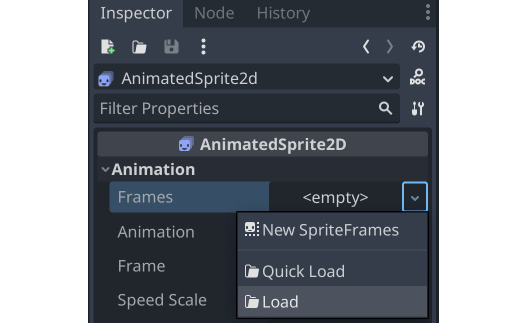
Figure 2.10: Adding a SpriteFrames resource
Next, in the same location, click the SpriteFrames label that appeared there to open a new panel at the bottom of the screen:

Figure 2.11: The SpriteFrames panel
On the left is the list of animations. Click the default one and rename it run. Then, click the Add Animation button, and create a second animation named idle and a third named hurt.
In the FileSystem dock on the left, find the run, idle, and hurt images in the res://assets/player/ folder and drag them into the corresponding animations:
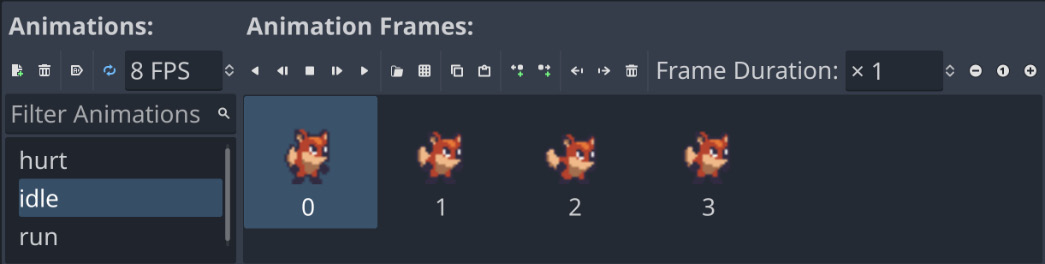
Figure 2.12: Setting up player animations
Each new animation has a default speed setting of 5 frames per second. This is a little too slow, so select each of the animations and set Speed to 8.
To see the animations in action, click the Play button ( ). Your animations will appear in the Inspector window in the dropdown for the Animation property. Choose one to see it in action:
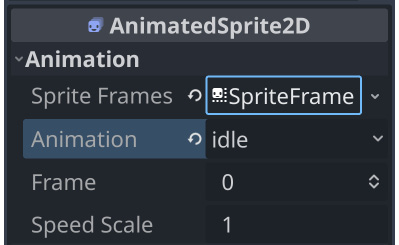
Figure 2.13: The Animation property
You can also choose an animation to play by default. Select the idle animation and click the Autoplay on Load button.

Figure 2.14: Setting animation to autoplay
Later, you’ll write code to select between these animations, depending on what the player is doing. However, first, you need to finish setting up the player’s nodes.
The player image is a bit small, so set the Scale property of AnimatedSprite2D to (2, 2) in order to increase it in scale. You can find this property under the Transform section in the Inspector window.
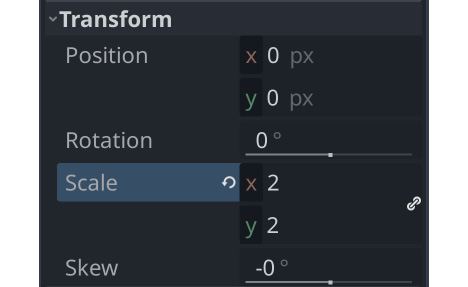
Figure 2.15: Setting the Scale property
Collision shape
When using Area2D or one of the other collision objects, you need to tell Godot what the shape of the object is. Its collision shape defines the region it occupies and is used to detect overlaps and/or collisions. Shapes are defined by the various Shape2D types and include rectangles, circles, and polygons. In game development, this is sometimes referred to as a hitbox.
For convenience, when you need to add a shape to an area or physics body, you can add CollisionShape2D as a child. Then, you can select the type of shape you want and edit its size in the editor.
Add CollisionShape2D as a child of the Player node (make sure you don’t add it as a child of AnimatedSprite2D). In the Inspector window, find the Shape property and click <empty> to select New RectangleShape2D.
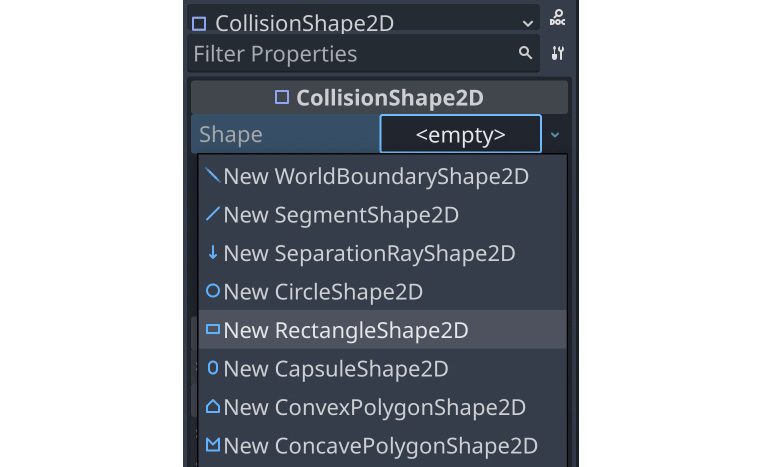
Figure 2.16: Adding a collision shape
Drag the orange handles to adjust the shape’s size to cover the sprite. Hint – if you hold the Alt key while dragging a handle, the shape will size symmetrically. You may have noticed that the collision shape is not centered on the sprite. That is because the sprite images themselves are not centered vertically. You can fix this by adding a small offset to AnimatedSprite2D. Select the node and look for the Offset property in the Inspector window. Set it to (0, -5).
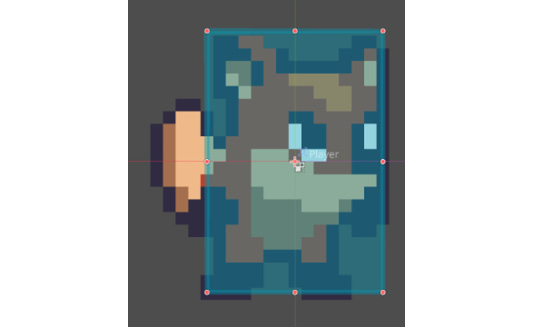
Figure 2.17: Sizing the collision shape
When you’re finished, your Player scene should look like this:
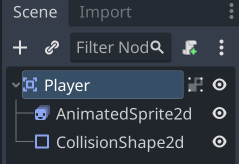
Figure 2.18: The Player node setup
Scripting the player
Now, you’re ready to add some code to the player. Attaching a script to a node allows you to add additional functionality that isn’t provided by the node itself. Select the Player node and click the new script button:
Figure 2.19: The new script button
In the Attach Node Script window, you can leave the default settings as they are. If you’ve remembered to save the scene, the script will be automatically named to match the scene’s name. Click Create, and you’ll be taken to the script window. Your script will contain some default comments and hints.
The first line of every script describes what type of node it is attached to. Just after that, you can start defining your variables:
extends Area2D
@export var speed = 350
var velocity = Vector2.ZERO
var screensize = Vector2(480, 720)
Using the @export annotation on the speed variable allows you to set its value in the Inspector window, just like any other node property. This can be very handy for values that you want to be able to adjust easily. Select the Player node, and you’ll see the Speed property now appears in the Inspector window. Any value you set in the Inspector window will override the 350 speed value you wrote in the script.
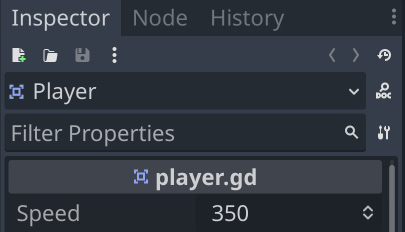
Figure 2.20: The exported variable in the Inspector window
As for the other variables, velocity will contain the character’s movement speed and direction, while screensize will help set the limits of the character’s movement. Later, you’ll set this value automatically from the game’s main scene, but for now, setting it manually will allow you to test that everything is working.
Moving the player
Next, you’ll use the _process() function to define what the player will do. The _process() function is called on every frame, so you can use it to update elements of your game that you expect to change often. In each frame, you need the player to do three things:
- Check for keyboard input
- Move in the given direction
- Play the appropriate animation
First, you need to check the inputs. For this game, you have four directional inputs to check (the four arrow keys). Input actions are defined in Project Settings under the Input Map tab. In this tab, you can define custom events and assign keys, mouse actions, or other inputs to them. By default, Godot has events assigned to the keyboard arrows, so you can use them for this project.
You can detect whether an input action is pressed using Input.is_action_pressed(), which returns true if a key is held down and false if it is not. Combining the states of all four keys will give you the resulting direction of movement.
You can do this by checking all four keys separately using multiple if statements, but since this is such a common need, Godot provides a useful function called Input.get_vector() that will handle this for you – you just have to tell it which four inputs to use. Note the order that the input actions are listed in; get_vector() expects them in this order. The result of this function is a direction vector – a vector pointing in one of the eight possible directions resulting from the pressed inputs:
func _process(delta):
    velocity = Input.get_vector("ui_left", "ui_right",
        "ui_up", "ui_down")
    position += velocity * speed * delta
After that, you’ll have a velocity vector indicating which direction to move in, so the next step will be to actually update the player’s position using that velocity.
Click Run Current Scene (F6) at the top right, and check that you can move the player around using all four arrow keys.
You may notice that the player continues running off the side of the screen. You can use the clamp() function to limit the player’s position to minimum and maximum values, preventing them from leaving the screen. Add these two lines next, immediately after the previous line:
    position.x = clamp(position.x, 0, screensize.x)
    position.y = clamp(position.y, 0, screensize.y)
About delta
The _process() function includes a parameter called delta that is then multiplied by velocity. What is delta?
The game engine attempts to run at a constant 60 frames per second. However, this can change due to computer slowdowns, either in Godot or from other programs running on your computer at the same time. If the frame rate is not consistent, then it will affect the movement of objects in your game. For example, consider an object that you want to move at 10 pixels every frame. If everything runs smoothly, this will mean the object moves 600 pixels in one second. However, if some of those frames take a bit longer, then there may have been only 50 frames in that second, so the object only moved 500 pixels.
Godot, like many game engines and frameworks, solves this by passing you a value called delta, which is the elapsed time since the previous frame. Most of the time, this will be very close to 0.016 seconds (around 16 milliseconds). If you then take your desired speed of 600 px/second and multiply it by delta, you’ll get a movement of exactly 10 pixels. If, however, delta increased to 0.3 seconds, then the object would move 18 pixels. Overall, the movement speed remains consistent and independent of the frame rate.
As a side benefit, you can express your movement in units of pixels per second rather than pixels per frame, which is easier to visualize.
Choosing animations
Now that the player can move, you need to change which animation AnimatedSprite2D is playing, based on whether the player moves or stands still. The art for the run animation faces to the right, which means it needs to be flipped horizontally (using the Flip H property, which you can see in the Inspector window – go ahead and try toggling it) when moving to the left. Add this code to your _process() function after the movement code:
if velocity.length() > 0:
    $AnimatedSprite2D.animation = "run"
else:
    $AnimatedSprite2D.animation = "idle"
if velocity.x != 0:
    $AnimatedSprite2D.flip_h = velocity.x < 0
Getting nodes
When using the $ notation, the node name is relative to the node running the script. For example, $Node1/Node2 would refer to a node (Node2) that is a child of Node1, which is itself a child of the node that runs the script. Godot’s autocomplete will suggest node names as you type. Note that if the name contains spaces, you must put quote marks around it – for example, $"My Node".
Note that this code takes a little shortcut. flip_h is a Boolean property, which means it can be true or false. A Boolean value is also the result of a comparison, such as <. Because of this, you can directly set the property equal to the result of the comparison.
Play the scene again and check that the animations are correct in each case.
Starting and ending the player’s movement
The main scene will need to inform the player when the game has started and ended. To do that, add a start() function to the player, which will set the player’s starting position and animation:
func start():
    set_process(true)
    position = screensize / 2
    $AnimatedSprite2D.animation = "idle"
Also, add a die() function to be called when the player hits an obstacle or runs out of time:
func die():
    $AnimatedSprite2D.animation = "hurt"
    set_process(false)
Using set_process(false) tells Godot to stop calling the _process() function every frame. Since the movement code is in that function, you’ll no longer be able to move when the game is over.
Preparing for collisions
The player should detect when it hits a coin or an obstacle, but you haven’t made those objects yet. That’s OK because you can use Godot’s signal functionality to make it work. Signals are a way for nodes to send out messages that other nodes can detect and react to. Many nodes have built-in signals to alert you when events occur, such as a body colliding or a button being pressed. You can also define custom signals for your own purposes.
Signals are used by connecting them to the node(s) that you want to listen for them. This connection can be made in the Inspector window or in code. Later in the project, you’ll learn how to connect signals in both ways.
Add the following lines to the top of the script (after extends Area2D):
signal pickup
signal hurt
These lines declare custom signals that your player will emit when they touch a coin or obstacle. The touches will be detected by Area2D itself. Select the Player node, and click the Node tab next to the Inspector tab to see a list of signals the player can emit:

Figure 2.21: The node’s list of signals
Note your custom signals there as well. Since the other objects will also be Area2D nodes, you’ll want to use the area_entered signal. Select it and click Connect. In the window that pops up, click Connect again – you don’t need to change any of those settings. Godot will automatically create a new function called _on_area_entered() in your script.
When connecting a signal, instead of having Godot create the function for you, you can also give the name of an existing function that you want to use instead. Toggle the Make Function switch off if you don’t want Godot to create the function for you.
Add the following code to this new function:
func _on_area_entered(area):
    if area.is_in_group("coins"):
        area.pickup()
        pickup.emit()
    if area.is_in_group("obstacles"):
        hurt.emit()
        die()
Whenever another area object overlaps with the player, this function will be called, and that overlapping area will be passed in with the area parameter. The coin object will have a pickup() function that defines what the coin does when picked up (playing an animation or sound, for example). When you create the coins and obstacles, you’ll assign them to the appropriate group so that they can be detected correctly.
To summarize, here is the complete player script so far:
extends Area2D
signal pickup
signal hurt
@export var speed = 350
var velocity = Vector2.ZERO
var screensize = Vector2(480, 720)
func _process(delta):
    # Get a vector representing the player's input
    # Then move and clamp the position inside the screen
    velocity = Input.get_vector("ui_left", "ui_right",
        "ui_up", "ui_down")
    position += velocity * speed * delta
    position.x = clamp(position.x, 0, screensize.x)
    position.y = clamp(position.y, 0, screensize.y)
    # Choose which animation to play
    if velocity.length() > 0:
        $AnimatedSprite2D.animation = "run"
    else:
        $AnimatedSprite2D.animation = "idle"
    if velocity.x != 0:
        $AnimatedSprite2D.flip_h = velocity.x < 0
func start():
    # This function resets the player for a new game
    set_process(true)
    position = screensize / 2
    $AnimatedSprite2D.animation = "idle"
func die():
    # We call this function when the player dies
    $AnimatedSprite2D.animation = "hurt"
    set_process(false)
func _on_area_entered(area):
    # When we hit an object, decide what to do
    if area.is_in_group("coins"):
        area.pickup()
        pickup.emit()
    if area.is_in_group("obstacles"):
        hurt.emit()
        die()
You’ve completed setting up the player object, and you’ve tested that the movement and animations work correctly. Before you move on to the next step, review the player scene setup and the script, and make sure you understand what you’ve done and why. In the next section, you’ll make some objects for the player to collect.
Part 2 – the coin scene
In this part, you’ll make coins for the player to collect. This will be a separate scene, describing all the properties and behavior of a single coin. Once saved, the main scene will load this one and create multiple instances (that is, copies) of it.
The node setup
Click Scene -> New Scene and add the following nodes. Don’t forget to set the children to not be selectable, as you did with the Player scene:
Area2D(namedCoin):AnimatedSprite2DCollisionShape2D
Make sure to save the scene once you’ve added the nodes.
Set up AnimatedSprite2D as you did in the player scene. This time, you only have one animation – a shine/sparkle effect that makes the coin look dynamic and interesting. Add all the frames and set the animation speed to 12 FPS. The images are also a little too large, so set the Scale value of AnimatedSprite2D to (0.4, 0.4). In CollisionShape2D, use CircleShape2D and resize it to cover the coin image.
Using groups
Groups provide a tagging system for nodes, allowing you to identify similar nodes. A node can belong to any number of groups. In order for the player script to correctly detect a coin, you need to ensure that all coins will be in a group called coins. Select the Coin node, click the Node tab (the same tab where you found the signals), and choose Groups. Type coins in the box and click Add:
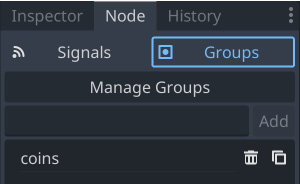
Figure 2.22: The Groups tab
Coin script
Your next step is to add a script to the Coin node. Select the node and click the new script button, just like you did with the Player node. If you uncheck the Template option, you’ll get an empty script without any comments or suggestions. The code for the coin is much shorter than the code for the player:
extends Area2D
var screensize = Vector2.ZERO
func pickup():
    queue_free()
Recall that the pickup() function is called by the player script. It defines what the coin will do when collected. queue_free() is Godot’s method for removing nodes. It safely removes the node from the tree and deletes it from memory, along with all its children. Later, you’ll add visual and audio effects here, but for now, just having the coin disappear is good enough.
Removing nodes
queue_free() doesn’t delete the object immediately, but rather adds it to a queue to be deleted at the end of the current frame. This is safer than immediately deleting the node because other code running in the game may still need the node to exist. By waiting until the end of the frame, Godot can be sure that all code that can access the node has completed and the node can be removed safely.
You’ve now completed the second of the two objects needed for this game. The coin object is ready to be placed randomly on the screen, and it can detect when it’s touched by the player, so it can be collected. The remaining piece of the puzzle is how to put it all together. In the next section, you’ll create a third scene to randomly create coins and allow the player to interact with them.
Part 3 – the Main scene
The Main scene is what ties all the pieces of the game together. It will manage the player, the coins, the clock, and all the other pieces of the game.
Node setup
Create a new scene and add a Node named Main. The simplest type of node is Node – it doesn’t do much at all on its own, but you’ll use it as the parent for all the game objects and add a script that will give it the functionality you need. Save the scene.
Add the player as a child of Main by clicking the Instantiate Child Scene button and choosing your saved player.tscn:
Figure 2.23: Instantiating a scene
Add the following nodes as children of Main:
- A
TextureRectnode namedBackground– for the background image - A
Timernode namedGameTimer– for the countdown timer
Make sure Background is the first child node by dragging it above the player in the node list. Nodes are drawn in the order shown in the tree, so if Background is first, that ensures it’s drawn behind the player. Add an image to the Background node by dragging the grass.png image from the assets folder into the Texture property. Change Stretch Mode to Tile, and then set the size to Full Rect by clicking the layout button at the top of the editor window:
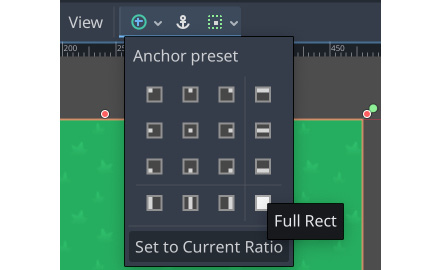
Figure 2.24: Layout options
Main script
Add a script to the Main node and add the following variables:
extends Node
@export var coin_scene : PackedScene
@export var playtime = 30
var level = 1
var score = 0
var time_left = 0
var screensize = Vector2.ZERO
var playing = false
The Coin Scene and Playtime properties now appear in the Inspector window when you select the Main node. Drag coin.tscn from the FileSystem panel and drop it into the Coin Scene property.
Initializing
To start things off, add the _ready() function:
func _ready():
    screensize = get_viewport().get_visible_rect().size
    $Player.screensize = screensize
    $Player.hide()
Godot automatically calls _ready() on every node when it’s added. This is a good place to put code that you want to happen at the beginning of a node’s lifetime.
Note that you’re referring to the Player node by name using the $ syntax, allowing you to find the size of the game screen and set the player’s screensize variable. hide() makes a node invisible, so you won’t see the player before the game starts.
Starting a new game
The new_game() function will initialize everything for a new game:
func new_game():
    playing = true
    level = 1
    score = 0
    time_left = playtime
    $Player.start()
    $Player.show()
    $GameTimer.start()
    spawn_coins()
In addition to setting the variables to their starting values, this function calls the player’s start() function that you wrote earlier. Starting GameTimer will start counting down the remaining time in the game.
You also need a function that will create a number of coins based on the current level:
func spawn_coins():
    for i in level + 4:
        var c = coin_scene.instantiate()
        add_child(c)
        c.screensize = screensize
        c.position = Vector2(randi_range(0, screensize.x),
            randi_range(0, screensize.y))
In this function, you create multiple instances of the Coin object and add them as children of Main (in code this time, rather than by manually clicking on the Instantiate Child Scene button). Whenever you instantiate a new node, it must be added to the scene tree using add_child(). Lastly, you choose a random position for the coin, using the screensize variable so that they won’t appear off screen. You’ll call this function at the start of every level, generating more coins each time.
Eventually, you’ll want new_game() to be called when the player clicks the start button on the menu. For now, to test that everything is working, add new_game() to the end of your _ready() function and click Run Project (F5). When you are prompted to choose a main scene, select main.tscn. Now, whenever you play the project, the Main scene will be started.
At this point, you should see your player and five coins appear on the screen. When the player touches a coin, it disappears.
Once you’re done testing, remove new_game() from the _ready() function.
Checking for remaining coins
The main script needs to detect whether the player has picked up all the coins. Since the coins are all in the coins group, you can check the size of the group to see how many remain. Since it needs to be checked continuously, put it in the _process() function:
func _process(delta):
    if playing and
    get_tree().get_nodes_in_group("coins").size() == 0:
        level += 1
        time_left += 5
        spawn_coins()
If no more coins remain, then the player advances to the next level.
This completes the main scene. The most important thing you learned in this step was how to dynamically create new objects in code using instantiate(). This is something that you will use again and again in building many types of game systems. In the last step, you’ll create one more scene to handle displaying game information, such as the player’s score and the time remaining.
Part 4 – the user interface
The final element your game needs is a user interface (UI). This will display information that the player needs to see during gameplay, which is often referred to as a heads-up display (HUD) because the information appears as an overlay on top of the game view. You’ll also use this scene to display a start button after the game ends.
Your HUD will display the following information:
- The score
- The time remaining
- A message, such as Game Over
- A start button
Node setup
Create a new scene and add a CanvasLayer node named HUD. A CanvasLayer node creates a new drawing layer, which will allow you to draw your UI elements above the rest of the game so that it doesn’t get covered up by game objects, such as the player or coins.
Godot provides a variety of UI elements that can be used to create anything from indicators, such as health bars, to complex interfaces, such as inventories. In fact, the Godot editor that you use to make this game is built using the Godot UI elements. The basic nodes for a UI are all extended from Control and appear with green icons in the node list. To create your UI, you’ll use various Control nodes to position, format, and display information. Here’s what the HUD will look like when complete:
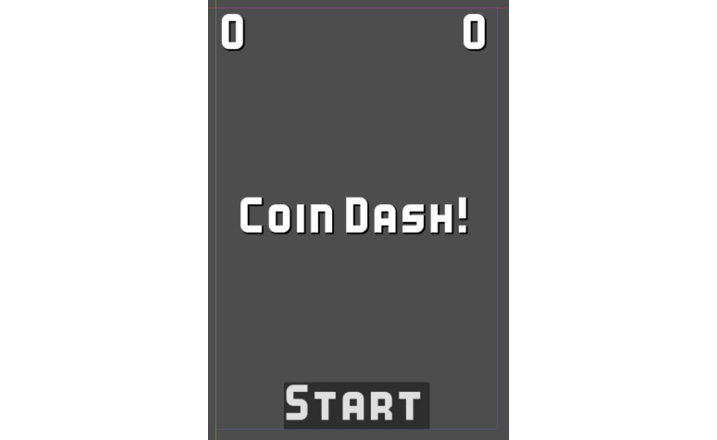
Figure 2.25: The HUD layout
Message label
Add a Label node to the scene and change its name to Message. This label will display the game’s title as well as Game Over when the game ends. This label should be centered on the game screen. You can drag it with the mouse, or set the values directly in the Inspector window, but it’s easiest to use the shortcuts provided in the layout menu, which will set the values for you.
Select HCenter Wide from the layout menu:
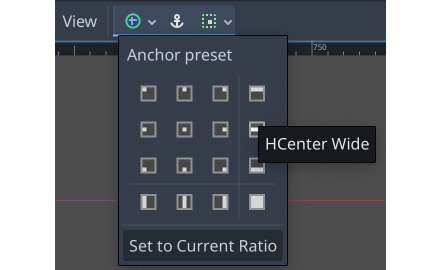
Figure 2.26: Positioning the message
The label now spans the width of the screen and is centered vertically. The Text property sets what text the label displays. Set it to Coin Dash!, and set Horizontal Alignment and Vertical Alignment both to Center.
The default font for Label nodes is very small and unattractive, so the next step is to assign a custom font. In the Label Settings property, select New LabelSettings and then click it to expand.
From the FileSystem tab, drag the Kenney Bold.ttf font file and drop it into the Font property, and then set Size to 48. You can also improve the appearance by adding a shadow – try the settings shown in the following screenshot, or experiment with your own:
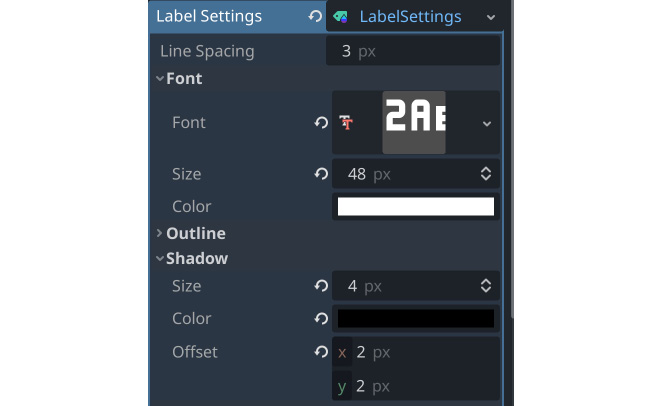
Figure 2.27: Font settings
Score and time display
The top of the HUD will display the player’s score and the time remaining on the clock. Both of these will be Label nodes, arranged at opposite sides of the game screen. Rather than position them separately, you’ll use a container node to manage their positions.
Containers
Godot’s Container nodes automatically arrange the positions and sizes of their child Control nodes (including other containers). You can use them to add padding around elements, keep them centered, or arrange them in rows and columns. Each type of Container has special properties that control how they arrange their children.
Remember that containers automatically arrange their children. If you try to move or resize a Control that’s inside a Container node, you’ll get a warning from the editor. You can manually arrange controls or arrange them with a container, but not both.
Score and time display
To manage the score and time labels, add a MarginContainer node to the HUD. Use the layout menu to set the anchors to Top Wide. In the Theme Overrides/Constants section of the Inspector window, set the four Margin properties to 10. This will add some padding so that the text isn’t against the edge of the screen.
Since the score and time labels will use the same font settings as Message, you can save time by duplicating it. Select Message and press Ctrl + D twice to create two duplicate labels. Drag them both and drop them onto MarginContainer to make them its children. Name one child Score and the other Time, and set the Text property to 0 for both. Set Vertical Alignment to Center on both, and Horizontal Alignment to Right on Score but Left on Time.
Updating the UI via GDScript
Add a script to the HUD node. This script will update the UI elements when their properties need to change, such as updating the Score text whenever a coin is collected. See the following code:
extends CanvasLayer
signal start_game
func update_score(value):
    $MarginContainer/Score.text = str(value)
func update_timer(value):
    $MarginContainer/Time.text = str(value)
The Main scene’s script will call these two functions to update the display whenever there is a change in a value. For the Message label, you also need a timer to make it disappear after a brief period.
Add a Timer node as a child of HUD, and set Wait Time to 2 seconds and One Shot to On. This ensures that, when started, the timer will only run once, rather than repeating. Add the following code:
func show_message(text):
    $Message.text = text
    $Message.show()
    $Timer.start()
In this function, you will display the message and start the timer. To hide the message, connect the timeout signal of Timer (remember that it will automatically create the new function):
func _on_timer_timeout():
    $Message.hide()
Using buttons
Add a Button node to HUD and change its name to StartButton. This button will be displayed before the game starts, and when clicked, it will hide itself and send a signal to the Main scene to start the game. Set the Text property to Start, then scroll down to Theme Overrides/Fonts, and set the font as you did with Message.
In the layout menu, choose Center Bottom to center the button at the bottom of the screen.
When a button is pressed, it emits a signal. In the Node tab for StartButton, connect the pressed signal:
func _on_start_button_pressed():
    $StartButton.hide()
    $Message.hide()
    start_game.emit()
Game over
The final task for your UI script is to react to the game ending:
func show_game_over():
    show_message("Game Over")
    await $Timer.timeout
    $StartButton.show()
    $Message.text = "Coin Dash!"
    $Message.show()
In this function, you need the Game Over message to be displayed for two seconds and then disappear, which is what show_message("Game Over") does. However, you then want to show the start button and game title once the message has disappeared. The await command pauses the execution of a function until the given node (Timer) emits a given signal (timeout). Once the signal is received, the function continues, and everything will be returned to its initial state so that you can play again.
Adding HUD to Main
The next task is to set up the communication between Main and HUD. Add an instance of HUD to Main. In Main, connect the timeout signal of GameTimer and add the following so that every time GameTimer times out (every second), the remaining time is reduced:
func _on_game_timer_timeout():
    time_left -= 1
    $HUD.update_timer(time_left)
    if time_left <= 0:
        game_over()
Next, select the instance of Player in Main and connect its pickup and hurt signals:
func _on_player_hurt():
    game_over()
func _on_player_pickup():
    score += 1
    $HUD.update_score(score)
Several things need to happen when the game ends, so add the following function:
func game_over():
    playing = false
    $GameTimer.stop()
    get_tree().call_group("coins", "queue_free")
    $HUD.show_game_over()
    $Player.die()
This function halts the game and also uses call_group() to remove all remaining coins by calling queue_free() on each of them.
Finally, pressing StartButton needs to activate Main’s new_game() function. Select the instance of HUD and connect its start_game signal:
func _on_hud_start_game():
    new_game()
Make sure you’ve removed new_game() from Main’s _ready() function (remember, that was only there to test), and add these two lines to new_game():
$HUD.update_score(score)
$HUD.update_timer(time_left)
Now, you can play the game! Confirm that all parts are working as intended – the score, the countdown, the game ending and restarting, and so on. If you find a part that’s not working, go back and check the step where you created it, as well as the step(s) where it may have been connected to the rest of the game. A common mistake is to forget to connect one of the many signals you used in different parts of the game.
Once you’ve played the game and confirmed that everything works correctly, you can move on to the next section, where you can add a few additional features to round out the game experience.
Part 5 – finishing up
Congratulations on creating a complete, working game! In this section, you’ll add a few extra things to the game to make it a little more exciting. Game developers use the term juice to describe the things that make a game feel good to play. Juice can include things such as sound, visual effects, or any other addition that adds to the player’s enjoyment, without necessarily changing the nature of the gameplay.
Visual effects
When you pick up the coins, they just disappear, which is not very appealing. Adding a visual effect will make it much more satisfying to collect lots of coins.
What is a tween?
A tween is a way to interpolate (change gradually) some value over time using a particular mathematical function. For example, you might choose a function that steadily changes a value or one that starts slow but ramps up in speed. Tweening is also sometimes referred to as easing. You can see animated examples of lots of tweening functions at https://easings.net/.
When using a tween in Godot, you can assign it to alter one or more properties of a node. In this case, you’re going to increase the scale of the coin and also cause it to fade out using the Modulate property. Once the tween has finished its job, the coin will be deleted.
However, there’s a problem. If we don’t remove the coin immediately, then it’s possible for the player to move onto the coin again – triggering the area_entered signal a second time and registering it as a second pickup. To prevent this, you can disable the collision shape so that the coin can’t trigger any further collisions.
Your new pickup() function should look like this:
func pickup():
    $CollisionShape2d.set_deferred("disabled", true)
    var tw = create_tween().set_parallel().
        set_trans(Tween.TRANS_QUAD)
    tw.tween_property(self, "scale", scale * 3, 0.3)
    tw.tween_property(self, "modulate:a", 0.0, 0.3)
    await tw.finished
    queue_free()
That’s a lot of new code, so let’s break it down:
First, CollisionShape2D’s disabled property needs to be set to true. However, if you try setting it directly, Godot will complain. You’re not allowed to change physics properties while collisions are being processed; you have to wait until the end of the current frame. That’s what set_deferred() does.
Next, create_tween() creates a tween object, set_parallel() says that any following tweens should happen at the same time, instead of one after another, and set_trans() sets the transition function to the “quadratic” curve.
After that come two lines that set up the tweening of the properties. tween_property() takes four parameters – the object to affect (self), the property to change, the ending value, and the duration (in seconds).
Now, when you run the game, you should see the coins playing the effect when they’re picked up.
Sound
Sound is an important but often neglected piece of game design. Good sound design can add a huge amount of juice to your game for a very small amount of effort. Sounds can give a player feedback, connect them emotionally to the characters, or even be a direct part of gameplay (“you hear footsteps behind you”).
For this game, you’re going to add three sound effects. In the Main scene, add three AudioStreamPlayer nodes and name them CoinSound, LevelSound, and EndSound. Drag each sound from the res://assets/audio/ folder into the corresponding node’s Stream property.
To play a sound, you call the play() function on the node. Add each of the following lines to play the sounds at the appropriate times:
$CoinSound.play()to_on_player_pickup()$EndSound.play()togame_over()$LevelSound.play()tospawn_coins()(but not inside the loop!)
Powerups
There are many possibilities for objects that give the player a small advantage or powerup. In this section, you’ll add a powerup item that gives the player a small time bonus when collected. It will appear occasionally for a short time, and then disappear.
The new scene will be very similar to the Coin scene you already created, so click on your Coin scene and choose Scene -> Save Scene As and save it as powerup.tscn. Change the name of the root node to Powerup and remove the script by clicking the Detach script button – <IMG>.
In the Groups tab, remove the coins group by clicking the trash can button and add a new group called powerups instead.
In AnimatedSprite2D, change the images from the coin to the powerup, which you can find in the res://assets/pow/ folder.
Click to add a new script and copy the code from the coin.gd script.
Next, add a Timer node named Lifetime. This will limit the amount of time the object remains on the screen. Set its Wait Time value to 2 and both One Shot and Autostart to On. Connect its timeout signal so that the powerup can be removed at the end of the time period:
func _on_lifetime_timout():
    queue_free()
Now, go to your Main scene and add another Timer node called PowerupTimer. Set its One Shot property to On. There is also a Powerup.wav sound in the audio folder that you can add with another AudioStreamPlayer. Connect the timeout signal and add the following to spawn a powerup:
func _on_powerup_timer_timeout():
    var p = powerup_scene.instantiate()
    add_child(p)
    p.screensize = screensize
    p.position = Vector2(randi_range(0, screensize.x),
        randi_range(0, screensize.y))
The Powerup scene needs to be linked to a variable, as you did with the Coin scene, so add the following line at the top of main.gd and then drag powerup.tscn into the new property:
@export var powerup_scene : PackedScene
The powerups should appear unpredictably, so the wait time of PowerupTimer needs to be set whenever you begin a new level. Add this to the _process() function after the new coins are spawned with spawn_coins():
Now, you will have powerups appearing; the last step is to give the player the ability to collect them. Currently, the player script assumes that anything it runs into is either a coin or an obstacle. Change the code in player.gd to check what kind of object has been hit:
func _on_area_entered(area):
    if area.is_in_group("coins"):
        area.pickup()
        pickup.emit("coin")
    if area.is_in_group("powerups"):
        area.pickup()
        pickup.emit("powerup")
    if area.is_in_group("obstacles"):
        hurt.emit()
        die()
Note that now you emit the pickup signal with an additional argument that names the type of object. The corresponding function in main.gd must now be changed to accept that argument and decide what action to take:
func _on_player_pickup(type):
    match type:
        "coin":
            $CoinSound.play()
            score += 1
            $HUD.update_score(score)
        "powerup":
            $PowerupSound.play()
            time_left += 5
            $HUD.update_timer(time_left)
The match statement is a useful alternative to if statements, especially when you have a large number of possible values to test.
Try running the game and collecting the powerup (remember, it won’t appear on level 1). Make sure the sound plays and the timer increases by five seconds.
Coin animation
When you created the coin, you used AnimatedSprite2D, but it isn’t playing yet. The coin animation displays a “shimmer” effect, traveling across the face of the coin. If all the coins display this at the same time, it will look too regular, so each coin needs a small random delay in its animation.
First, click on AnimatedSprite2D and then on the SpriteFrames resource. Make sure Animation Looping is set to Off and Speed is set to 12 FPS.
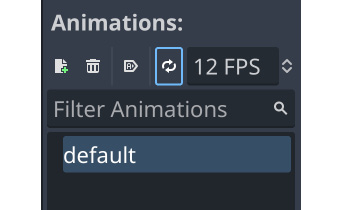
Figure 2.28: Animation settings
Add a Timer node to the Coin scene and then add this to the coin’s script:
func _ready():
    $Timer.start(randf_range(3, 8))
Then, connect the Timer’s timeout signal and add this:
func _on_timer_timeout():
    $AnimatedSprite2d.frame = 0
    $AnimatedSprite2d.play()
Try running the game and watching the coins animate. It’s a nice visual effect for a very small amount of effort, at least on the part of the programmer –the artist had to draw all those frames! You’ll notice a lot of effects like this in professional games. Although subtle, the visual appeal makes for a much more pleasing experience.
Obstacles
Finally, the game can be made more challenging by introducing an obstacle that the player must avoid. Touching the obstacle will end the game.
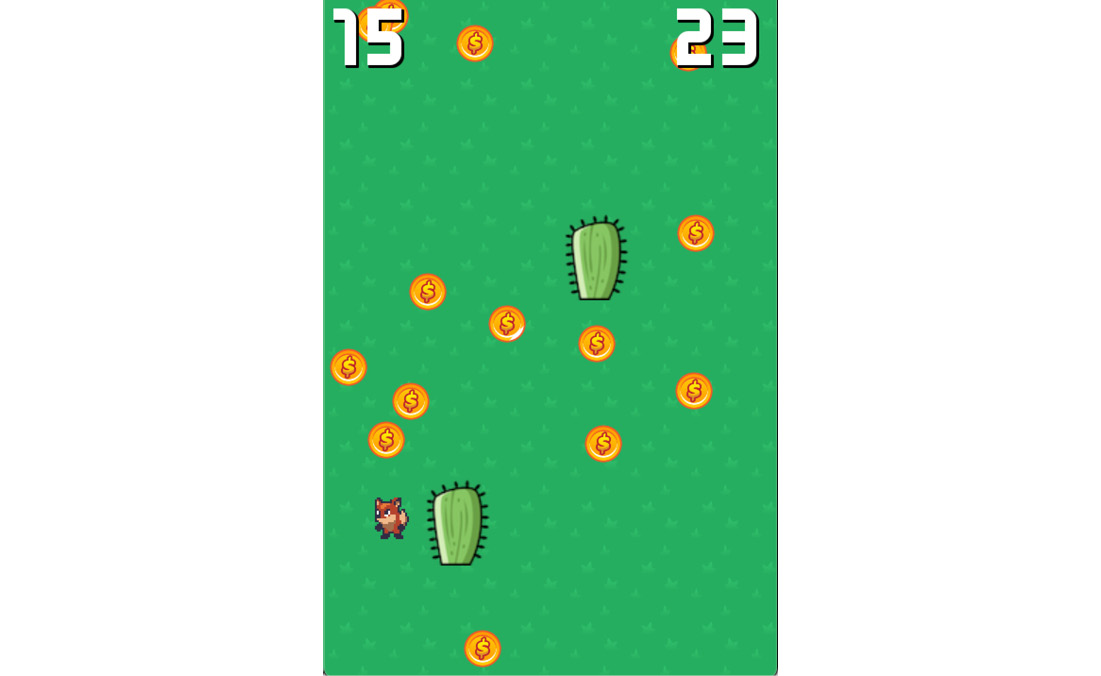
Figure 2.29: Example game with obstacles
Create a new Area2D scene and name it Cactus. Give it Sprite2D and CollisionShape2D children. Drag the cactus texture from FileSystem into the Texture property of Sprite2D. Add RectangleShape2D to the collision shape and size it so that it covers the image. Remember when you added if area.is_in_group("obstacles"?) to the player code? Add Cactus to the obstacles group using the Node tab. Play the game and see what happens when you run into the cactus.
You may have spotted a problem – coins can spawn on top of the cactus, making them impossible to pick up. When the coin is placed, it needs to move if it detects that it’s overlapping with the obstacle. In the Coin scene, connect its area_entered signal and add the following:
func _on_area_entered(area):
    if area.is_in_group("obstacles"):
        position = Vector2(randi_range(0, screensize.x),
            randi_range(0, screensize.y))
If you added the Powerup object from the previous section, you’ll need to do the same in its script.
Play the game, and test that the objects all spawn correctly and that they don’t overlap with an obstacle. Running into an obstacle should end the game.
Do you find the game challenging or easy? Before moving on to the next chapter, take some time to think about other things you might add to this game. Go ahead and see whether you can add them, using what you’ve learned so far. If not, write them down and come back later, after you’ve learned some more techniques in the following chapters.
Summary
In this chapter, you learned the basics of the Godot Engine by creating a small 2D game. You set up a project and created multiple scenes, worked with sprites and animations, captured user input, used signals to communicate between nodes, and created a UI. The things you learned in this chapter are important skills that you’ll use in any Godot project.
Before moving to the next chapter, look through the project. Do you know what each node does? Are there any bits of code that you don’t understand? If so, go back and review that section of the chapter.
Also, feel free to experiment with the game and change things around. One of the best ways to get a good feel for what different parts of the game do is to change them and see what happens.
Remember the tip from Chapter 1? If you really want to advance your skills quickly, close this book, start a new Godot project, and try to make Coin Dash again without peeking. If you have to look in the book, it’s OK, but try to only look for things once you’ve tried to figure out how to do it yourself.
In the next chapter, you’ll explore more of Godot’s features and learn how to use more node types by building a more complex game.

