


The Unreal Development Kit (UDK), the free version of Epic Games' Unreal Engine 3, is truly a sight to behold.
There are plenty of tutorials available on creating specific things in games, but in my experience there have been very little in terms of explaining how games are created in the actual game industry. In this book, I plan to expose those processes while creating a game from scratch using the Unreal Development Kit, including things that most tutorials leave out, such as creating menus, custom GUI, and publishing your game.
The game that we will be creating will be a basic third-person shooter / Tower Defense hybrid game using the default UDK assets. Tower Defense games have been quite popular on game sites, and we will be creating gameplay similar to that found in the popular titles Monday Night Combat and Dungeon Defenders, both of which were created using Unreal.
In this chapter, we will be creating the first playable version of our game. It will be split into five tasks. It will be a simple step-by-step process from beginning to end. Here is the outline of our tasks:
Block out simple-level geometry
Enable third-player mode
We will first approach the project using nothing but the UDK Editor and Kismet.
Before we start, let's make sure that we have the latest version of the UDK (February 2013 as of this writing), which can be downloaded at http://www.unrealengine.com/udk/downloads/. When installing the program, make sure that the UT Sample Game option is checked.
Aside from that, all of the assets used in this project should already be included within the base UDK install.
For those wanting to know more about basic movement, please see Epic's UDN page at http://udn.epicgames.com/Three/EditorButtons.html that lists hotkeys that may be useful.
That being said, I'll do my best to be as descriptive as possible about how to make a playable version of the game.
A fitting start to our project would be to create a new level and create the area in which we want to base our game.
Before we start working on the project, we must first create a new map. To do this, we must first navigate to File | New Level..., and from the pop up that comes up, select one of the top four options (I selected Midday Lighting, but it doesn't matter which option you choose).
Now that we have a base level to work with, let's start building our game! Perform the following steps:
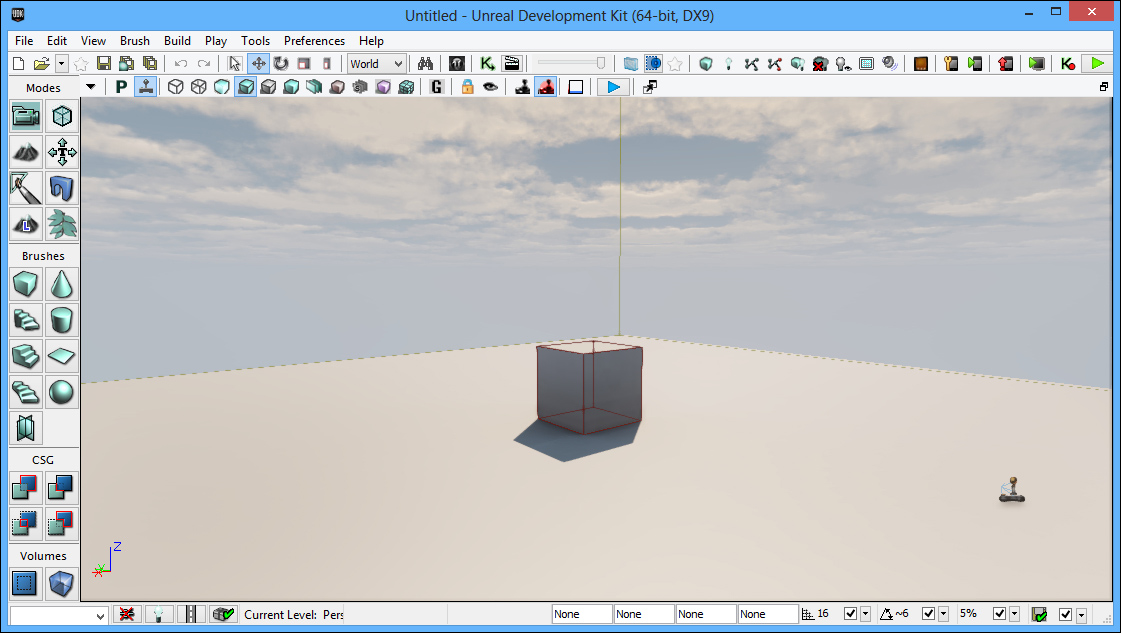
If your viewport is zoomed in like the previous screenshot, click on the restore viewports button on the top right of each of the viewports (the icon that looks like two windows). Upon creating our level, we are greeted with a nice scene with two meshes. Let's delete this; we don't want it messing with our stuff. Make sure you click on the actual mesh and not the (red) builder brush when deleting the two objects. To delete an object, simply click on it and press the Delete key.
Note
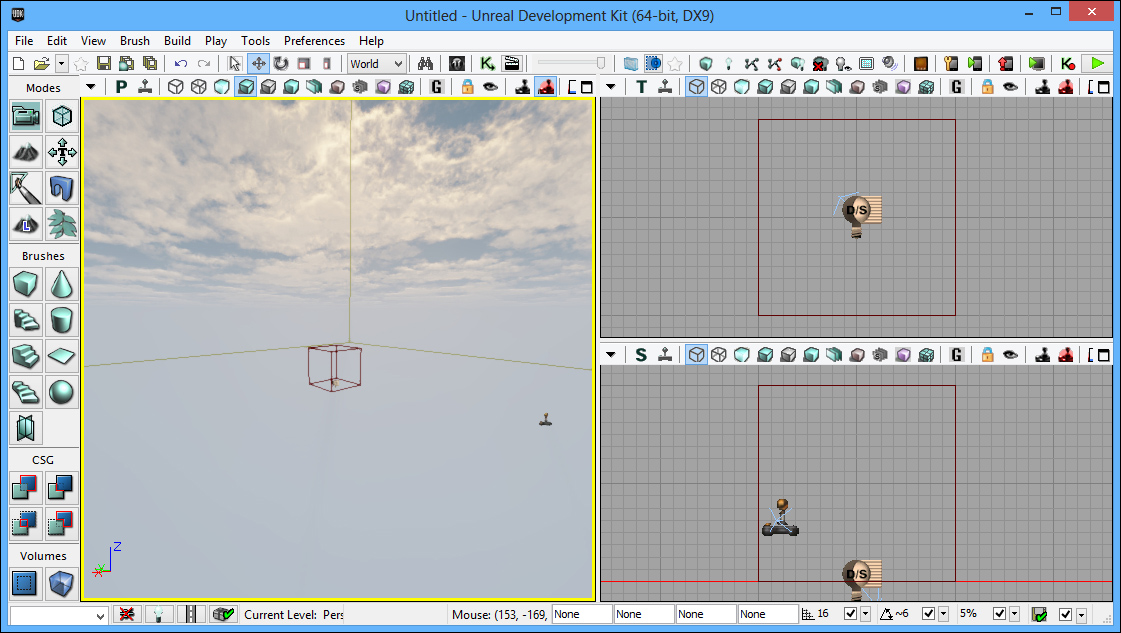
There are many different options that you can choose from to determine how the UDK is displayed and how it works for you. I encourage you to take time to figure out what you like and don't like. While having a front viewport may be nice, I like having a larger screen space for the perspective view so I have a better idea about what the area I'm creating looks like. This is more my personal preference than anything, but it is what I will be using from here on out. If you wish to follow me, navigate to View | Viewport Configuration | 1 x 2 Split from the top menu. For those of you using multiple monitors, you can also make use of the Floating Viewport option by navigating to View | New Floating Viewport.
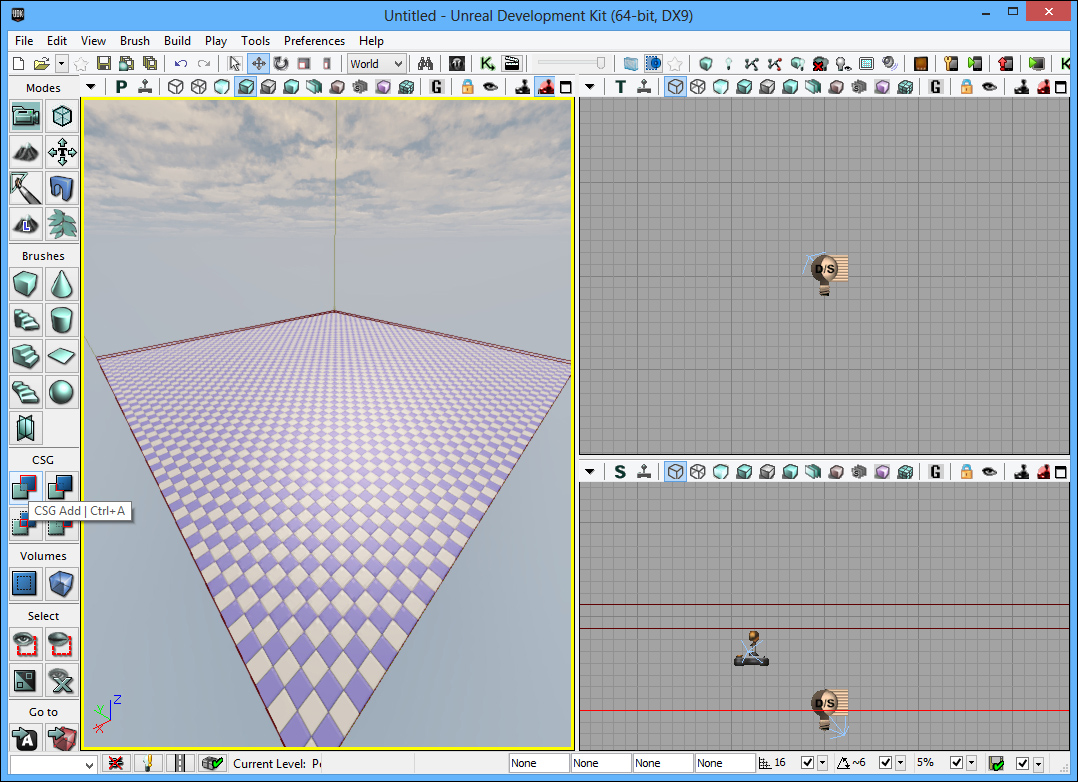
Once the two previous objects are destroyed, right-click on the Cube button on the top left of the Brushes section and bring up its dialog box. Fill in the values to create our level's floor. I used
4096as the length (X) and width (Y) of my level with32for the height (Z).You can change it to whatever number you want, but I'd suggest you stick with a number that is a power of two (32, 64, 128, 256, 512, ...) as computers work best with them.Click on the CSG Add button, which is on the top left of the CSG section in the left toolbar, in order to add the brush to our level:
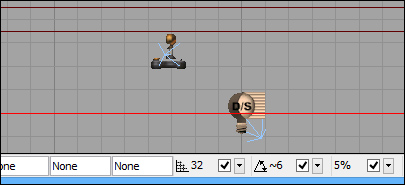
Next, change the Grid Locking amount to
32by either using the drop-down menu or pressing ] until you see it there from the menu on the bottom-right of the screen. Also, make sure that Drag Grid Snap is enabled by making sure the box next to it is checked.Grid snapping is very useful when working on projects with the UDK. Grid snapping enables people to build brushes, making sure they are seamless with no holes in the game environment; this can make building levels much easier. You should always make sure the drag grid is enabled when working with brushes and make sure that you keep the vertices of your brushes on this grid at all times.
Press the B key to hide the builder brush as we will not be using it any more. Select the brush that we first created, and from the side viewport, zoom into its top-left edge and right-click on it to snap it to the grid.

After that, drag it down to right below the red line you can see in the side viewport (the red line is the KillZ trigger—if a character goes below it they die automatically). Then, hold Alt and drag it onto the vertical axis to create a copy that is exactly on top of the previous one.
Now, change the Grid Snap to
256by pressing ] until it gets to the correct value. Click on the Geometry Mode button that is located on the top right of the Modes section of the left toolbar. Select the two dots in the side viewport by doing a marquee selection. Once selected, drag them to the left till the block is 256 units away from the center of the level (one of the grid lines).Tip
A marquee selection is a quick way to select or deselect a group of actors within a certain area. This type of selection involves holding down a combination of keys, clicking one of the mouse buttons, and dragging the mouse cursor to create a box. All the actors within the box will be selected or deselected depending on the combination of keys and the mouse button that is clicked. The possible combinations and their effects are as follows:
Ctrl + Alt +left-click: Replaces the current selection with the actors contained in the box.
Ctrl + Alt + Shift +left-click: Adds the actors contained in the box to the current selection.
Ctrl + Alt + Shift +right-click: Removes any selected actors in the box from the current selection.
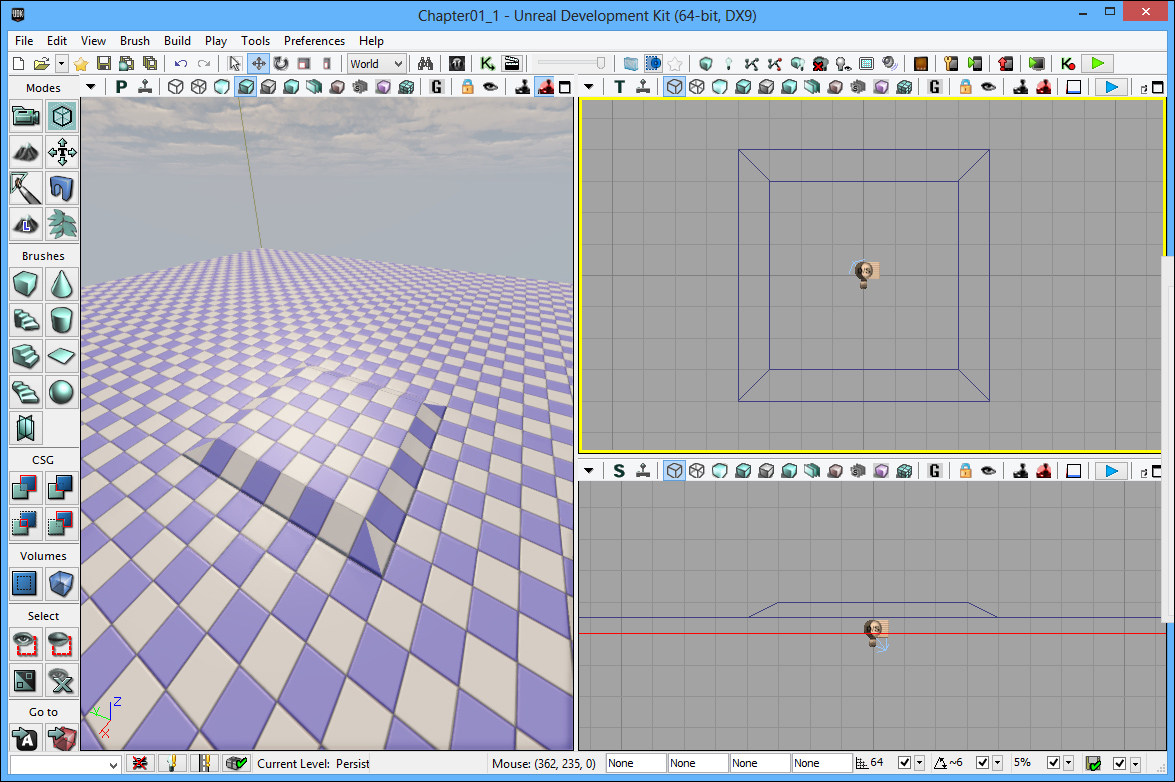
Do the same for the right-hand side. Then do the same thing for the top and bottom. By doing this, we will have created a
512x512x32block in the center of the level. Build your geometry to see your changes by navigating to Build | Build Geometry for Current Level.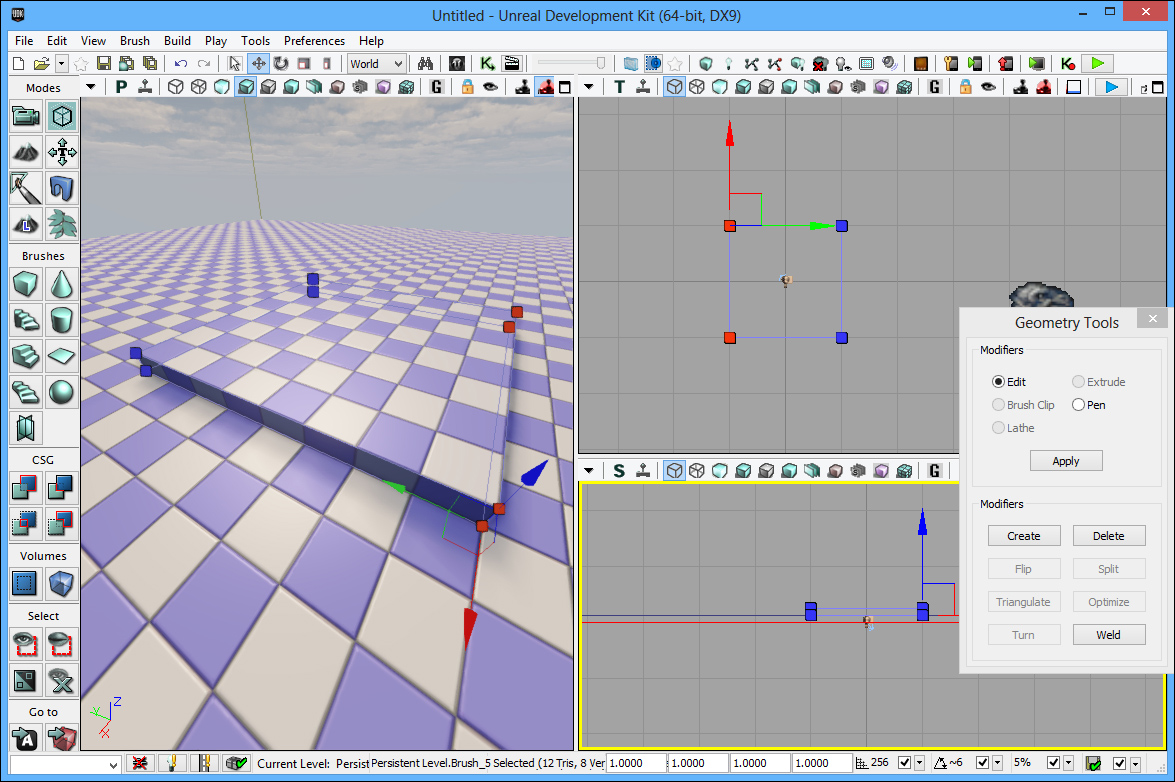
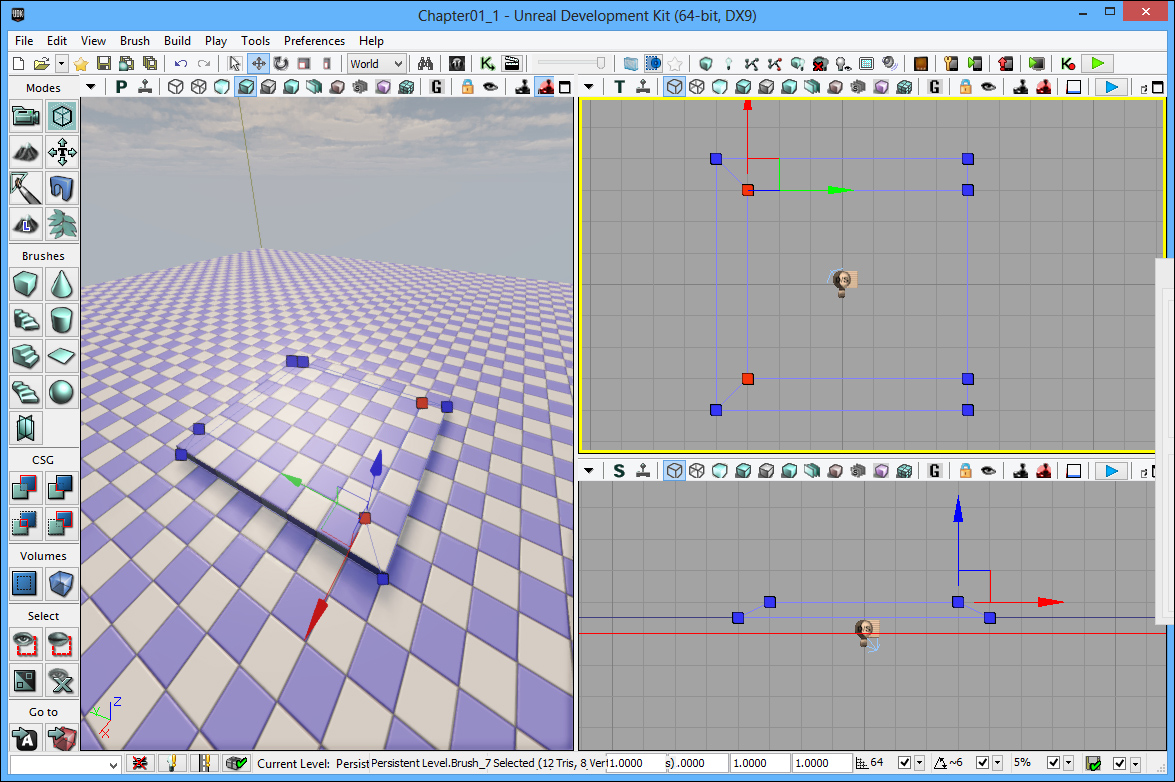
Now change the Grid Snap to
64by pressing the [ key. Now in the side viewport, left-click on only the top-left vertex (the blue box) to turn it red. Move it to the right by 64 pixels (one box).
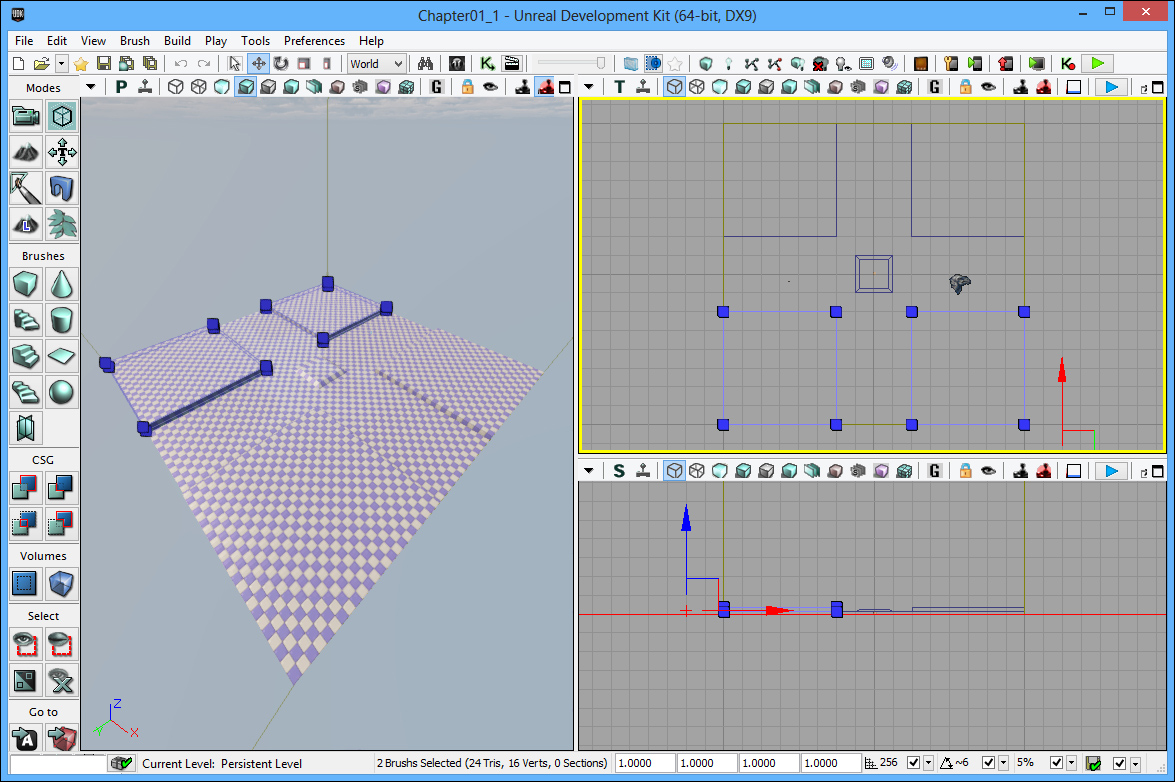
Now do the same with the right-hand side. After that, go to the top viewport and select the two inner vertexes on the left-hand side of the platform by a marquee selection, once again holding Alt + Ctrl and dragging the red box that appears over them, and move it to the left.
Now do the same on the right-hand side and then rebuild the geometry by navigating to Build | Build Geometry for Current Level.
Bring up the World Properties menu by navigating to View | World Properties from the menu bar at the top of the UDK interface. Type
Game Typein the search bar at the top of the World Properties menu. That will bring up the Game Type menu and the options relevant to us. From there, change the drop-down menus of both Default Game Type and Game Type for PIE to UTDeathmatch.Now that we have the pedestal completed, let's create higher pedestals that will be the areas that the enemies cannot enter.
Change the grid lock back to
32and then make another copy of the base brush, and use the geometry tools to make it 64 blocks high (two blocks at a 32-pixel snap) and drag it till it fits in the top-left corner of the level with the end around 256 pixels away from the end of the pedestal.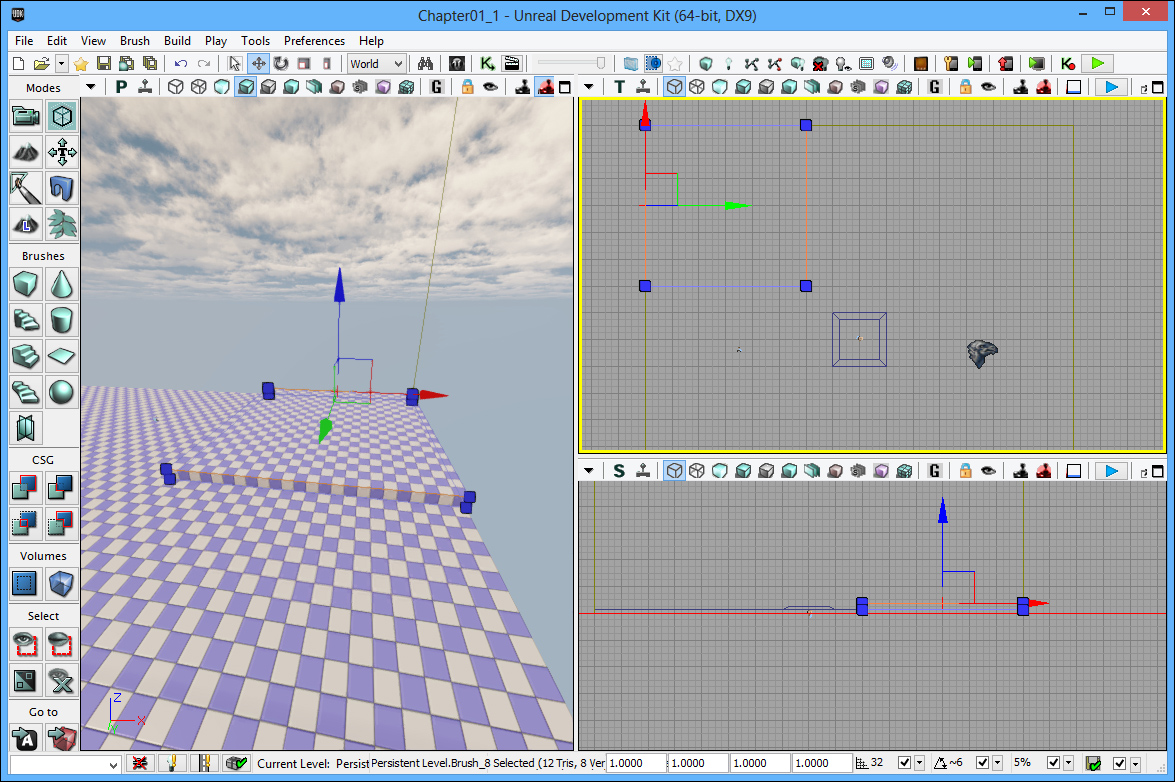
After creating the pedestal, hold Alt and move the object to the right-hand side, creating a copy of it. Click on Ctrl and then click on both of them, and then clone them to the bottom half in the same way. Then build everything by navigating to Build | Build All.
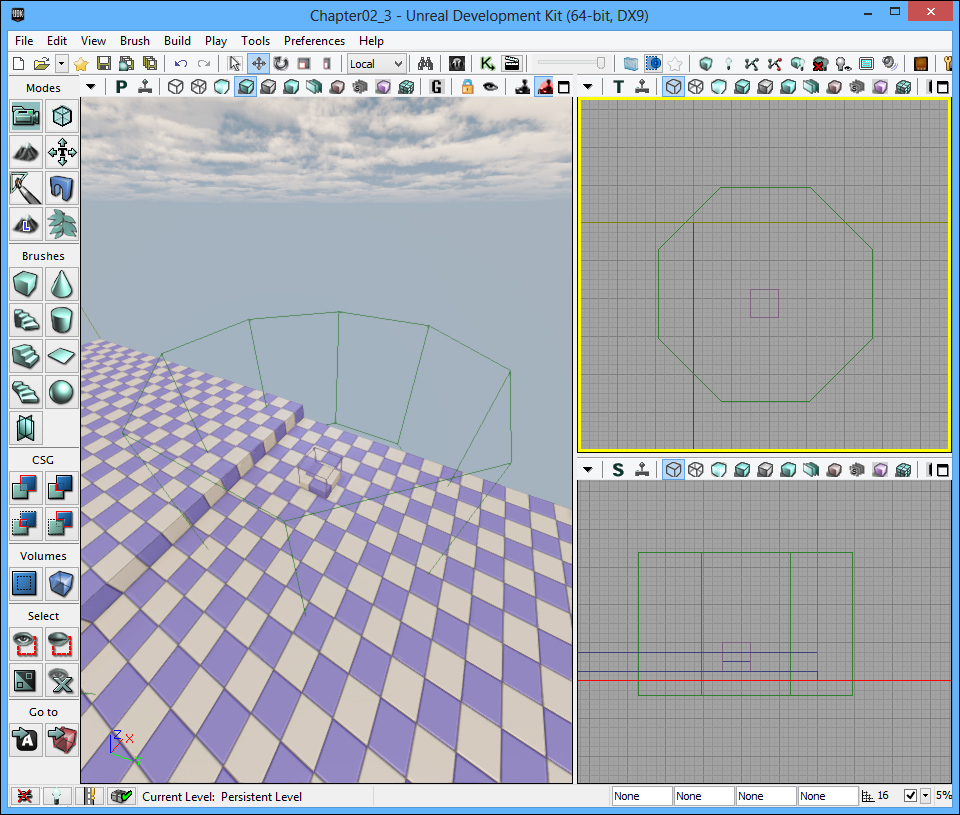
Now we need some way for our game to know if any enemies have gotten to our base. In order to do this, we need to add a trigger volume in the middle of our map. Press B so that we can see our builder brush again and then click on the Go to Builder Brush button that is on the right of the Go to section of the left toolbar. Right-click on the cylinder brush (second row on the right of the Brushes section of the left toolbar). In the window that pops up, set Outer Radius to
192and click on Build.
Move this brush to the middle of the map on the center pedestal. Now create a trigger volume by left-clicking on the Add Volume button (right-hand side of the Volumes option in the left toolbar) and then selecting Trigger Volume. Exit out of the Geometry mode if you are in it by left-clicking on X in the window that pops up. Press B to once again hide the builder brush.

Finally, we're going to make pedestals to place the turrets on. Select one of the brushes that you've created already and create a copy and scale it with the geometry tools till it is
96x96x32. Place it on the left-hand side of one of the rows. Go to the side view and make a copy of it, and scale it in the Z axis until it is 96 pixels high. Right-click on the brush and navigate to Convert | Convert To Volume | Blocking Volume, and you should see it turn pink. Build the geometry to make sure that everything looks fine.
After this, make copies of the trigger volume we made for the base and place one at the center of the pedestal; scale it up so it is about twice as big as it was before. (This will be used to tell when enemies enter the tower's range, so you can make an adjustment based on where you want them to be.)
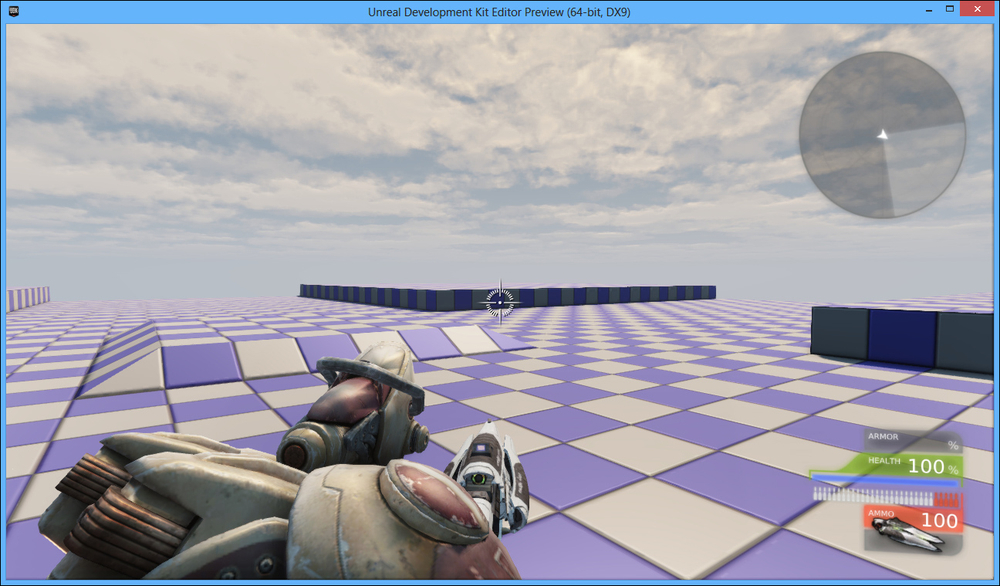
Build your level by navigating to Build | Build All. Save your project (File | Save) and start your game by either pressing F8 or navigating to Play | In Editor on the main toolbar.

We have just created a very basic version of the gameplay arena that we are looking for. We've touched upon the Geometry mode and used it to create something really quickly.
Now that we've used the interface to create objects in our world, let's learn how to change the default gameplay. The simplest default gameplay for the people who are just starting out is Kismet.
Kismet is a system of visual scripting in the UDK that makes it possible for people to affect the game world and design gameplay events. For teams without a programmer, Kismet can be a godsend. It makes it possible for someone without any coding knowledge to do things that would otherwise require the use of UnrealScript, the scripting language of the Unreal Engine.
In order to create a sequence of events, you will connect a series of sequence objects together. This, in turn, generates code when the game is run, which causes it to do the things that you said it should do. We will be discussing the creation of more and more complex sequences as the book progresses.
Now that we've learned what Kismet is and what it can do for us, let's see it used in action and see how easy it is to get results!
The default perspective given to players in the UDK is first person. Let's say we want it to be in third person instead. It will be quite easy to do so due to Epic's console command that does just that. Perform the following steps:
Open up the Kismet interface by clicking on the K-shaped icon at the top of the UDK interface on the main toolbar. You should see a new window pop up. It may look a bit daunting, but it's not too bad once you know what everything is.

Underneath the menu bar, you will see a large area with an image of a bunch of 1's and 0's on it. This is our workspace where we will be placing all of the sequence objects we will be creating.
The bottom two bars are the Properties and Sequences windows. The Properties window will hold all of the data that we want to set within the sequence objects that we will be creating; they can be accessed by being left-clicked on.
Right-click anywhere inside the large area in the upper portion of the interface. Choose to create a Player Spawned event by navigating to New Event | Player | Player Spawned from the menu that pops up.
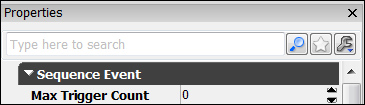
Left-click on the Player Spawned event to have the properties window come up and change the value of Max Trigger Count to
0.
Right-click under the Instigator connection (the purple/pink arrow) and select Create New Object Variable.
Right-click and create a Console Command action by navigating to New Action | Misc | Console Command from the menus.
In the Properties window, type
behindview 1as the value for [0] in Commands.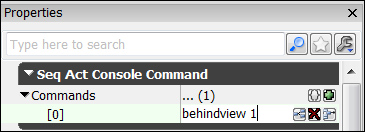
Tip
For more information on this and other console commands that you can use please see http://udn.epicgames.com/Three/ConsoleCommands.html.
Connect the output from the Player Spawned event to the input of the Console Command action by clicking on the black square on the right-hand side of the Out output on the Player Spawned event and dragging your mouse until it reaches the black square on the left-hand side of the In input.
Connect the connectors of both Instigator and Target to the Object variable we created earlier.

Save your project (File | Save) and start your game by pressing F8 or navigating toPlay | In Editor on the main toolbar.
Upon starting the game when the player is spawned (the Player Spawned event is activated), we change our perspective to be in the third person (the Console Command action is called). We've also learned some fundamentals of working with Kismet and have an understanding of how sequence objects connect together to create different effects.
I originally wrote this section in my previous book, UDK iOS Development Beginner's Guide, Packt Publishing, but I feel as if it bears repeating, especially for those who have not read it before.
While working with Kismet, some of the terms may be difficult to understand at first, so I would like to quickly go over some aspects of Kismet in general. Every node we work with is called a sequence object because it is an object within a sequence.
Have a look at the following screenshot:
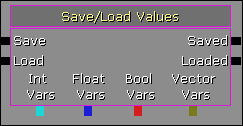
The left-hand side of a sequence object is called the input while the right-hand side is called the output. Following are the variables that are either values given to us or that we set depending on the object.
There are four different kinds of sequence objects:
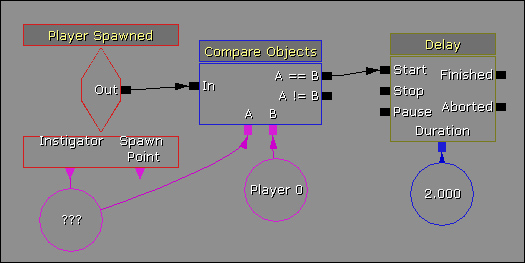
Events: This is what all other sequence objects get called from. Code in Kismet, for the most part, gets called if a certain event occurs, such as the Player Spawned event that was called when the player spawned in our level. These objects are red and are shaped like diamonds.
Actions: Actions do something when the event is triggered. This is the most used item, so it is the object with the most variety. The Console Command action, as well as the Delay variable used previously, is an example of an action. Actions are presented as rectangles.
Variables: Variables hold information within our level. If another sequence object has squares underneath it, it is a spot that holds a variable. They are colored differently depending on what the variable actually is. The Instigator action in the Player Spawned event is a variable that is filled with our player's information when it is called, and the blue number under that Delay variable in the preceding screenshot is a float variable with a value of 2.0. Variables are represented as circles.
Conditions: These actions are special in the fact that they can do different things based on the values of different objects used for comparing numbers or objects. They are used to control the flow of things within a sequence. The Compare Objects condition is an example of a condition. Conditions are traditionally blue and rectangular.
As with any job, it is important to use the tool that is appropriate for it. The UDK provides three applications, namely Kismet, Matinee, and UnrealScript, to make the game world more interactive. At this point, you should be familiar with the previous two options. All the three have specific advantages and disadvantages to them, but Kismet is the one that I use most often.
As you expand your research in the UDK after reading this book, you may see forum posts with people asking about how to do something in Kismet. Many people will reply to someone telling them to learn UnrealScript instead. While they may seem arrogant, there are some reasons why they are suggesting the use of this tool. I have included a list of pros and cons to Kismet that may help you afterwards in deciding if it is the correct tool for what you are working on.
Kismet is a wonderful tool and is a great starting point when you are first starting with the UDK. Some other benefits associated with Kismet are as follows:
Has a lower barrier to entry: No programming knowledge is needed, so it is easier to get started with Kismet and start creating games now.
Great for prototyping gameplay mechanics: Saying mechanics is going to be fun is one thing, but no one is going to believe you unless you can show it. Kismet makes it extremely easy to get something up quickly. As a designer, having something to show a programmer will make it much easier for them to translate it to code.
Great for on-off events: If your level needs to have something specific for an event or for only specific time or level events, such as an explosion, Kismet is a great tool to use for it.
Easier to see the flow of events: If you are more of a visual thinker or like to stare at something, to see the big picture, it is a lot easier to use Kismet. The sequence objects and colors all mean something specific and make it easy to discern what is going on within a specific scene.
Easily extendable with UnrealScript: With a knowledge of how UnrealScript works, it is possible to create custom sequence objects of your own to create actions of your very own. If your game would have a dialog system, creating a custom Show Dialog action would be possible in Kismet and make it easy to create entire Dialog trees within Kismet.
However, Kismet is not the be-all and end-all solution for everything that can possibly be done with the UDK. Here are some of the drawbacks that using Kismet may have:
Complexity issues: As you get more comfortable using Kismet, you will probably try to do more and more complex things with it (I know I have). If you are not careful, you may have problems reading what your code is actually doing. Basically, the more complex a sequence gets, the harder it is to read.
Reiterations: Many times in a game, you will want to have the same thing happen if you are interacting with a similar or identical object, such as a door. If you want the same behavior with multiple objects (unless you use external variables) or multiple levels, you have to paste it every single time you want to that action happen. This can quickly stockpile into a really large amount of sequence objects; this can be avoided if you'll write an UnrealScript file with the same behavior and make that object use that file to execute the actions inside.
Level specific: In much the same way, Kismet is also specific to just the level that it is created in. For instance, if we wanted to create 10 levels in our game, we would have had to do the Console Command event in every single level. With UnrealScript, this would be built into the code base for the game and be automatic for all levels of the game.
Kismet cannot do everything you would like to in a game: The truth is that the game Unreal Engine 3 was created to make a First Person Shooter (FPS), and the further you stray from that path, the harder it is going to be to create your game. That has not to say that the UDK cannot be used to create other games; it's just going to be much more difficult as the sequence objects in Kismet are meant to create an FPS.
More custom behavior requires UnrealScript: Continuing with the previous point, most of the time a game does something, such as a game mechanic, that the UDK does not seem to do (such as the Scarecrow boss battles Batman in Batman: Arkham Asylum, Vigorsin Bioshock Infinite, or the robot mechs in Hawken). These examples probably used UnrealScript or C++ code to achieve the desired result.
Kismet is slower than UnrealScript: While it will not matter with the project that we are creating now, since Kismet is basically prewritten UnrealScript executed in a certain order, Kismet is slower than what could be achieved using just UnrealScript; and, something that your game will continuously use would best be done with UnrealScript.
A fine start to our fine project. In a short amount of time, we touched on a lot of the basic things that you will need in order to create an area quickly and effectively, which we will expand upon in Chapter 3, Detailing Environments. We also touched on the basics of using Kismet, which will be vital to us in the next chapter. Let's take one final look at what we have accomplished: