


 Download code from GitHub
Beginning with SketchUp Pro
Welcome to SketchUp Pro! I am excited to work through this introductory book with you.
In this book, we will examine the tools, workflows, and best practices to get started with using SketchUp Pro. SketchUp Pro is powerful software for anyone interested in 3D modeling and design, 3D printing, and even visualization and rendering! We will start with the basics and slowly work our way through to showcase some advanced professional workflows at the end of the book.
In this chapter, we will take a visual tour through the SketchUp Pro User Interface, looking at the general structure, toolbars, and dialog boxes. Then, we will discuss navigating through a 3D SketchUp model using some standard SketchUp tools but, more importantly, the keyboard and mouse. Finally, we will look at some of the underlying rules that apply to all SketchUp geometry. We will start with a quick discussion about the available SketchUp versions you may have seen online.
The following topics are covered:
- SketchUp Versions
- SketchUp Pro User Interface
- Understanding toolbars and the default tray
- Beginning to navigate through SketchUp
- SketchUp geometry basics and rules
Let’s get started!
SketchUp Versions
SketchUp Pro is a desktop software and is the traditional format for utilizing SketchUp. Recently, SketchUp has released a new way to access SketchUp through a web browser app, known as SketchUp for Web. While the newer version of SketchUp will be more accessible and does not require any installation time, SketchUp Web does not support Extensions or desktop integrations. Because of this, SketchUp Pro is the preferred software for working professionals.
SketchUp for Web has been included in many pricing models outlined on the SketchUp website. This includes SketchUp Go, SketchUp Shop, and SketchUp for Schools. SketchUp Studio has also been introduced, which includes SketchUp Pro and SketchUp for Web as well as a collection of design and analytics tools that go beyond the scope of this book.
A full comparison of the different SketchUp options can be found on the SketchUp website.
You can see the interfaces for SketchUp Pro and SketchUp for Web in the following figures. We will discuss the parts of the SketchUp Pro User Interface later in this chapter.

Figure 1.1: SketchUp Pro User Interface
You can see that SketchUp for Web needs to be run in a web browser and in this case, it is Microsoft Edge:

Figure 1.2: SketchUp for Web User Interface
Exploring the SketchUp Pro User Interface
SketchUp Pro is available for both the Windows OS and macOS environments. This book will focus on using SketchUp Pro in the Windows OS environment using a PC keyboard (with Shift, Ctrl, and Alt keys) and a 3-button mouse.
SketchUp provides quick reference guides for both Windows and macOS on their website. I would suggest downloading the Quick Reference Card for your preferred software. This book will exclusively focus on the SketchUp Pro interface toolbars and buttons, and keyboard and mouse controls for the Windows OS environment.
Note
It will be possible to use this book while working in SketchUp Pro in a macOS environment, but you will notice differences in the User Interface and keyboard and mouse shortcuts!
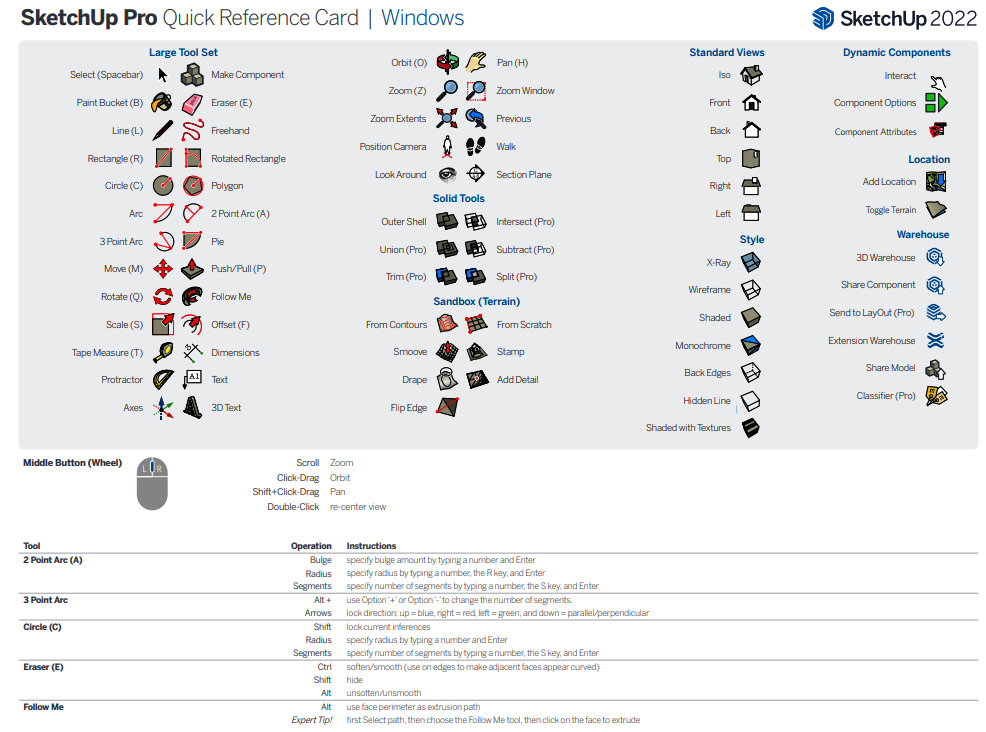
Figure 1.3: SketchUp Pro Quick Reference Card for Windows OS
Note
You can find the enlarged image here – https://download.sketchup.com/HC-QRC2022-en-SU-win-v01.pdf.
The SketchUp User Interface is composed of six main elements:
- Drawing Area
- Title Bar
- Menu Bar
- Toolbars (the Getting Started Toolbar)
- Status Bar (Prompts & Measurements)
- Default Tray (containing Default Panels)
Each of these elements is identified in the following screenshot:

Figure 1.4: SketchUp Pro User Interface with Labeled Elements
Let’s look at each of them in detail.
Drawing Area
The largest part of the User Interface is the drawing area, which is the large modeling section in the middle of the screen. This is where all SketchUp geometry is created and edited! The drawing area is always a fully 3D environment, meaning that you can draw and move geometry in any direction, and you can move the camera to view geometry at any distance or angle.
The drawing area will contain the drawing axes (red, green, and blue lines) and typically will show a model of a person to get a sense of scale. All tools are used by interacting with the drawing area. We will talk more about templates and using the drawing area in Chapter 3, Modeling with Groups and Components.
Note
The drawing area traditionally had a green ground and blue sky in older versions of the Simple SketchUp Pro template. This template has been updated to have a blue-gray ground and bright blue sky in newer versions of SketchUp.
All other User Interface elements surround the drawing area. The Title Bar, Menu Bar, and Getting Started Toolbar can all be found above the drawing area.
Title Bar
The title bar is a standard Windows OS element and will include standard Windows controls, including minimize, maximize, and close. Additionally, the title bar will show the name of the currently open file. If you have not yet saved an open file, it will show Untitled.
Menu Bar
The menu bar is another standard element found in many Windows OS software and includes the majority of all SketchUp tools in drop-down menus. File, Edit, View, Camera, Draw, Tools, Window, and Help are the main menu titles for the menu bar:

Figure 1.5: Title Bar (Top), Menu Bar (Middle), and Getting Started Toolbar (Bottom)
Getting Started Toolbar and Other Toolbars
The Getting Started toolbar is meant to provide a visual and linear guide for creating 3D models in SketchUp Pro. The Getting Started toolbar is the only toolbar that is displayed when opening SketchUp Pro for the first time. All toolbars in SketchUp Pro follow the same visual design, with colorful icons that represent the tools.
While the Getting Started toolbar contains an excellent guide for working linearly through a SketchUp project, it does not contain all tools that are in SketchUp Pro. Additional toolbars can be displayed by right-clicking on the gray space directly to the right of the getting started toolbar and selecting additional toolbars. Additionally, toolbar visibility can be toggled by doing the following:
- Accessing the Menu Bar
- Selecting View | Toolbars
This workflow will open the Toolbar dialog box:
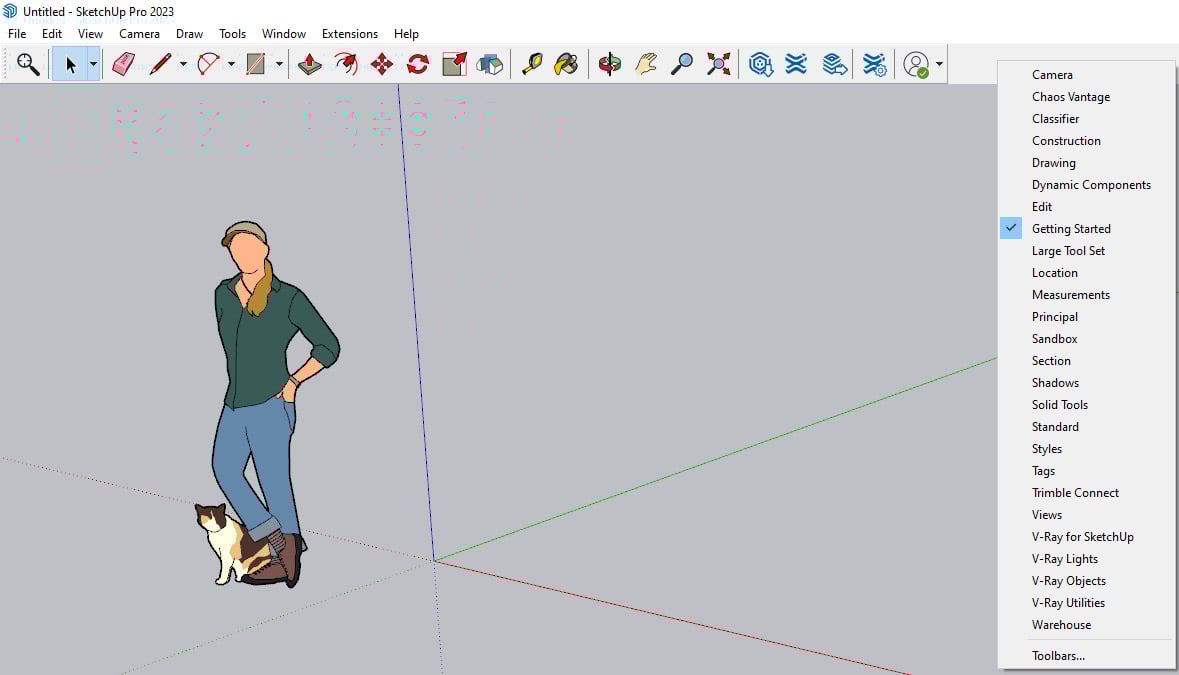
Figure 1.6: Toolbar Right-Click Contextual Menu and Toolbar Toggle Options
More toolbars will be introduced alongside professional workflows as we move through this book. It is recommended that the getting started toolbar remains visible and in the original position. However, all toolbars can be hidden or displayed, can be moved to dock at the sides of the drawing area, or can float in front of the drawing area.
To move a toolbar, do the following:
- Click and hold on the line of small dots on the left or top of the toolbar.
- Drag the toolbar to the preferred location.
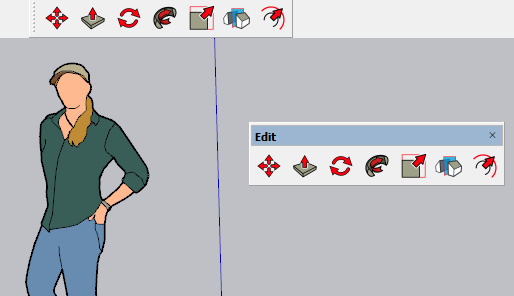
Figure 1.7: “Docked” Toolbar with Small Dots (Left) and “Floating” Toolbar (Right)
Turn on Toolbars and try moving them around for yourself! SketchUp Pro users will often have different sets of Toolbars open – you will need to find the right Toolbars and locations for your workflows.
Status Bar
The Status Bar can be found at the bottom of the screen. The Status Bar contains the Geo Location button, the Attribution button, Prompts, Measurement Label, and Measurements Value. These elements cannot be moved to other locations in the User Interface but can have their display toggled by right-clicking on the Status Bar.
Note
The Status Bar may appear to be frozen at times. This may be because SketchUp Pro is performing an autosave of the SketchUp Model. Try to back out of the tool and redo the workflow.
For now, we will focus on the prompts (or tooltips) and the measurements value. Both the prompts and measurements will constantly update as you work through a SketchUp Model. It is essential to know how to read and use both elements.
Prompts
The prompts will clarify what to do next while using a tool. Even before a tool is selected, the prompt will give a brief description of the tool’s function. Additionally, the prompt will provide options that expand on the primary function of the tool, typically accessed by using the Shift, Ctrl, and Alt keys on the keyboard.
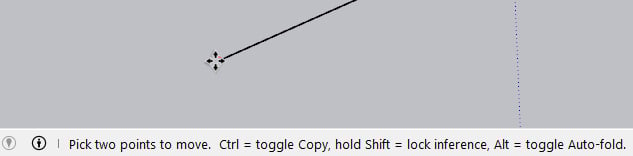
Figure 1.8: SketchUp Pro Status Bar Prompt for the Move Tool
Measurements
The measurements label and value (measurements box collectively) should be used when creating precise geometry. SketchUp geometry can occasionally be created without specific dimensions, but typically professional projects require precise dimensions.
Note
SketchUp Pro is incredibly precise, down to 15 decimal places. For reference, writing 1/64 as a decimal only requires 6 decimal places (0.015625).
The measurements value will behave similarly to the prompts in that it will update to show different values depending on the type of tool being used. The value will be a distance (dimensional) value when drawing, offsetting, or extruding with the Push/Pull tool. Similar to showing a Distance value, the measurements box value can also be an angle, like when using the Rotate or Protractor tool. Additionally, the measurements box value could represent a whole number like when using the Copy tool to create an array.
We will use the measurements box often during this book and so it would be good practice to recognize what the measurements label is prompting during different workflows:

Figure 1.9: SketchUp Pro Status Bar with Measurements Box Showing a Typed Distance (Dimensional) Value
Note
SketchUp Pro will recognize Imperial and Metric units in the same SketchUp model. If working in a feet and inches file, you can also type mm (millimeters), cm (centimeters), m (meters), and yd (yards).
Default Panels
The Default Panels are collected in the Default Tray, and these are docked on the right side of the drawing area when first using SketchUp Pro. The default panels are essentially the most used dialog boxes that are tied to tools and workflows, so SketchUp is designed to keep these panels in a convenient place.
The default panels’ visibility can be toggled by doing the following:

Figure 1.10: Menu showing Visibility Options for the Default Tray
The Manage Trays… option in the Window menu will also open a more comprehensive dialog box for managing the Default Tray:
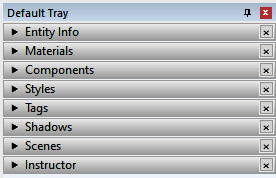
Figure 1.11: SketchUp Pro Default Tray
The default tray is located on the right of the screen to start, but this tray can be located on any side of the drawing area or can float above the drawing area.
To move the default tray, do the following:
- Click and hold on the blue section at the top of the tray.
- Drag to the preferred location. Alternatively, drag on top of the placement guides that will appear.
The panels in the default tray can be minimized or expanded by clicking on the title text or on the black arrow to the left of the title text. Panels can also be hidden by hitting the small gray “X” button, but they must be unhidden (shown) by accessing the menu as discussed at the beginning of this section.
Note
The Default Tray can also be “minimized” by unpinning the Tray. Trays can be unpinned by clicking the Pin icon in the top blue bar, which will “minimize” the bar to the side of the screen. When the Tray is hovered over with the mouse, the Tray will appear. This is helpful for smaller screens where the screen can get crowded.
Default tray panels will be explored as we move through this book. However, it would be a good idea to view the Instructor panel while going through this book, as the Instructor panel provides helpful animations and expanded tooltips for the SketchUp tools:
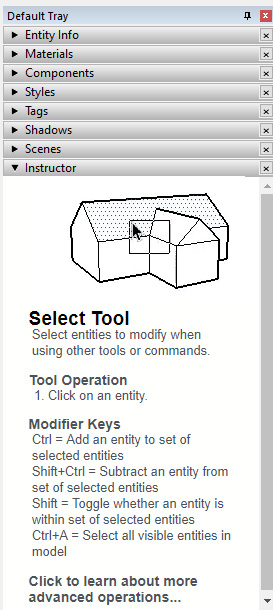
Figure 1.12: Instructor Panel Included in the Default Tray
Note
Additional User Interface elements, such as dialog boxes and context menus, will be explored later in this book. As you move forward with your skills in SketchUp Pro, this Tray can be hidden as screen space is highly valuable when modeling.
The SketchUp Pro User Interface may seem complicated at first! Please take some time to explore, move toolbars around, and begin to get comfortable knowing where things are. You could even start clicking on tools to read the Prompts and see the Measurements Box update. Don’t worry, we’ll discuss all of the basic tools as we move through the next few chapters.
The first set of tools that we must become familiar with is the Navigation tool set. SketchUp is a 3D modeling program, and we first need to learn how to navigate through our 3D space!
Navigating in SketchUp Pro
Navigation is required in all steps of a SketchUp workflow, from drawing and editing to visualizing the model. The primary navigation tools can be found on the Getting Started Toolbar, and these are the Orbit, Pan, and Zoom tools. While we will discuss how to use these tools, we will also discuss the relevant keyboard and mouse shortcuts that can be used to activate these tools. Using the keyboard and mouse shortcuts will drastically increase modeling productivity for all tools, but especially for the navigation tools.
We will also explore some other ways of navigating through SketchUp, which includes introducing the Views Toolbar, Zoom Extents, Zoom Window, and Zoom Previous. While these options are used far less than Orbit, Pan, and Zoom, they all have unique use cases that you could find helpful as you navigate your SketchUp models.
Note
The Orbit, Pan, and Zoom tools all use the scroll wheel on a 3-button mouse. Please make sure that you are using a 3-button mouse while using SketchUp Pro. When the tools are described, “scroll” means to roll the scroll wheel, and “press” means to click down and hold the scroll wheel to use it like a button.
Figure 1.13: Orbit, Pan, Zoom, and Zoom Extents on the Getting Started Toolbar
Orbit
The Orbit tool is the most essential tool for working effectively in SketchUp. SketchUp requires that the drawing area camera be placed at specific angles to create and edit geometry, and orbiting the camera is a quick way to align your view with the desired modeling result.
The Orbit tool button looks like a vertical black line being “orbited” by red and green arrows:

Figure 1.14: Orbit Tool Button
The Orbit tool can be activated by doing the following:
- Clicking the orbit button
- Pressing the left mouse button
- Moving the mouse
Or, at any time (including while using any other tool), the Orbit tool can be activated by doing the following:
- Pressing the scroll wheel
- Moving the mouse
Pressing and dragging using the middle mouse wheel is the most common and effective way of using the Orbit tool!
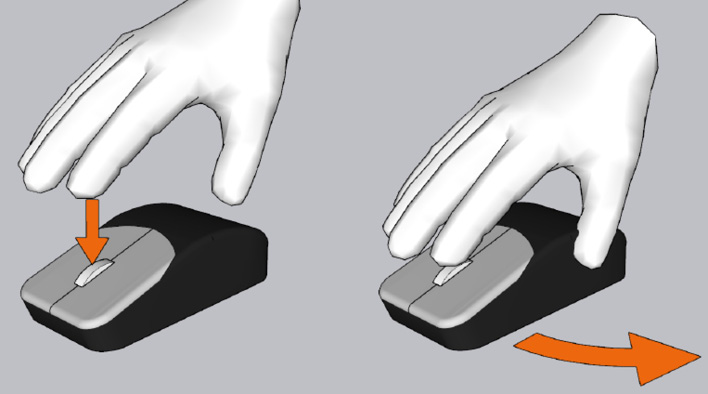
Figure 1.15: Orbit Tool Reference Guide for 3-Button Mouse
Tip
Try moving the camera with the Orbit tool! It will take some practice. Orbit will always rotate the camera around the middle of the screen, so it is best to practice using Orbit alongside the Pan and Zoom tools.
Pan
The Pan tool is a perfect companion to the Orbit tool. While the orbit tool rotates the camera, the Pan tool moves the camera laterally from side to side or up and down. This means that you will always face the same direction when using the Pan tool while the camera slides around the 3D environment.
The Pan tool button is an open hand:

Figure 1.16: Pan Tool Button
Just like the Orbit tool, the Pan tool can be activated by doing the following:
- Clicking the Pan button
- Pressing the left mouse button
- Moving the mouse
Or, at any time (including while using any other tool), the Pan tool can be activated by doing the following:
- Pressing the scroll wheel
- Pressing Shift at the same time
- Moving the mouse
Just make sure that you hold down Shift at the same time as the mouse scroll wheel while you move the mouse to pan!
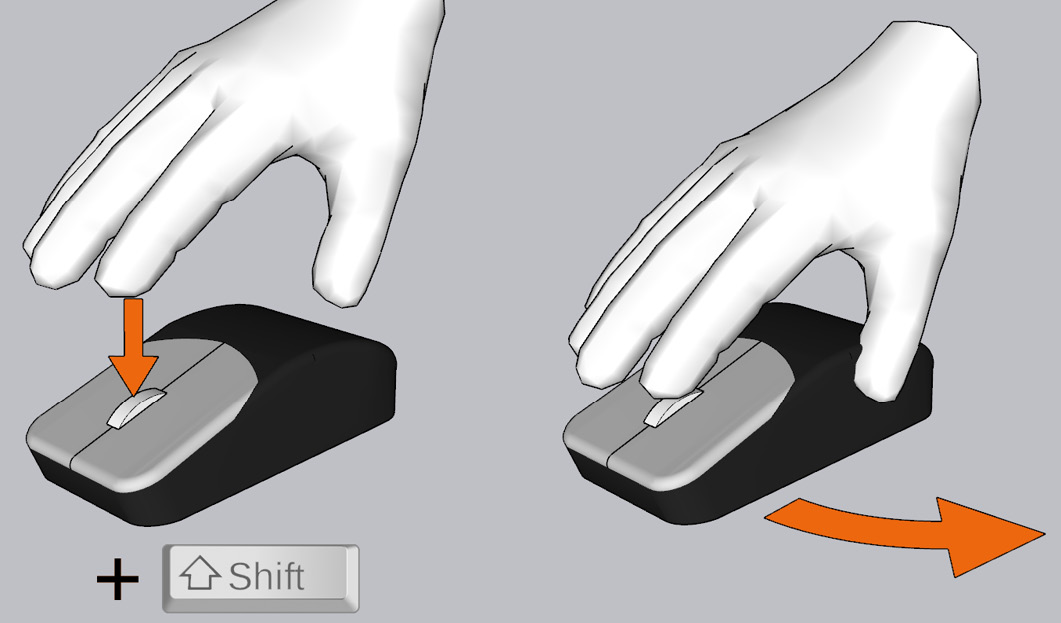
Figure 1.17: Pan Tool Reference Guide for 3-Button Mouse
Tip
The Pan tool and the Orbit tool work the same way with the 3-button mouse; just add Shift to activate the Pan tool! You can even try holding the scroll wheel and alternating between pressing Shift and releasing Shift to switch back and forth between Orbit and Pan. Note, however, that this method is not commonly used in professional workflows.
Zoom
The Zoom tool is the third primary navigation tool alongside the Orbit and Pan tools. While Pan and Orbit move the camera side to side, up and down, and around objects in the drawing area, the Zoom tool moves the camera in and out. The Zoom tool is not moving the objects – it is sliding the camera!
The Zoom tool button is a magnifying glass. There are other zoom tools, and these also have a magnifying glass, but the Zoom tool is the tool with only the magnifying glass:

Figure 1.18: Zoom Tool Button
The Zoom tool is easy to use! The Zoom tool can be activated by doing the following:
- Clicking on the button
- Pressing the left mouse button
- Move the mouse up and down
Or, at any time (including while using any other tool), the Pan tool can be activated by scrolling the mouse scroll wheel:
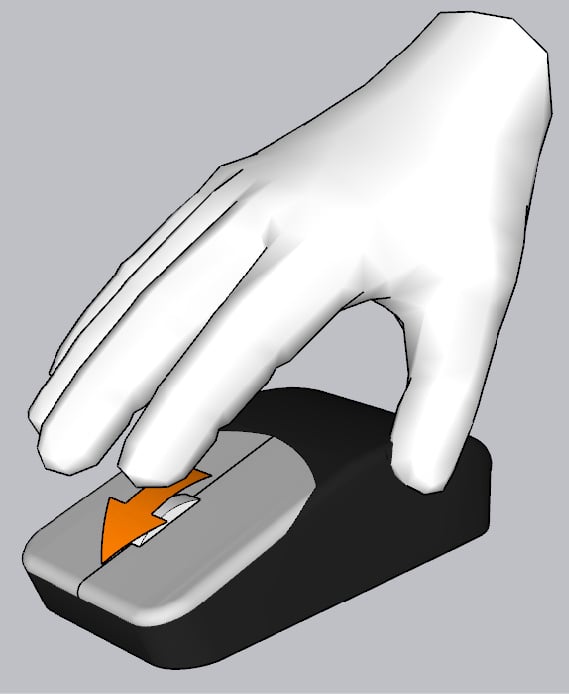
Figure 1.19: Zoom Tool Reference Guide for 3-Button Mouse
Tip
Scrolling the wheel “up” will zoom in and scrolling the wheel “down” will zoom out. Pointing the mouse button at Geometry on the screen will make SketchUp zoom quickly, and pointing the mouse at empty space will make SketchUp zoom slowly. Try this for yourself!
Field of View
The camera in SketchUp Pro has a default Field of View value of 35.00. When activating the Zoom tool, you will see the Measurements Box update to have a Field of View value.
The Field of View can be changed by using the Field of View tool in the Menu Bar under the camera. In SketchUp Pro 2023 a Field of View button was added to the Large Tool Set Toolbar:

Figure 1.20 Field of View Button on the Large Tool Set Toolbar
The Field of View can be adjusted by pressing and holding the Left mouse button and dragging up or down to change the field of view.
Alternatively, the Zoom tool can activate the Field of View tool. Do the following:
- Pressing and holding Shift
- Pressing and holding the left mouse button
- Moving the mouse
Field of View can be changed at any time while you are modeling, but it is not recommended to do so unless it is necessary for the project.
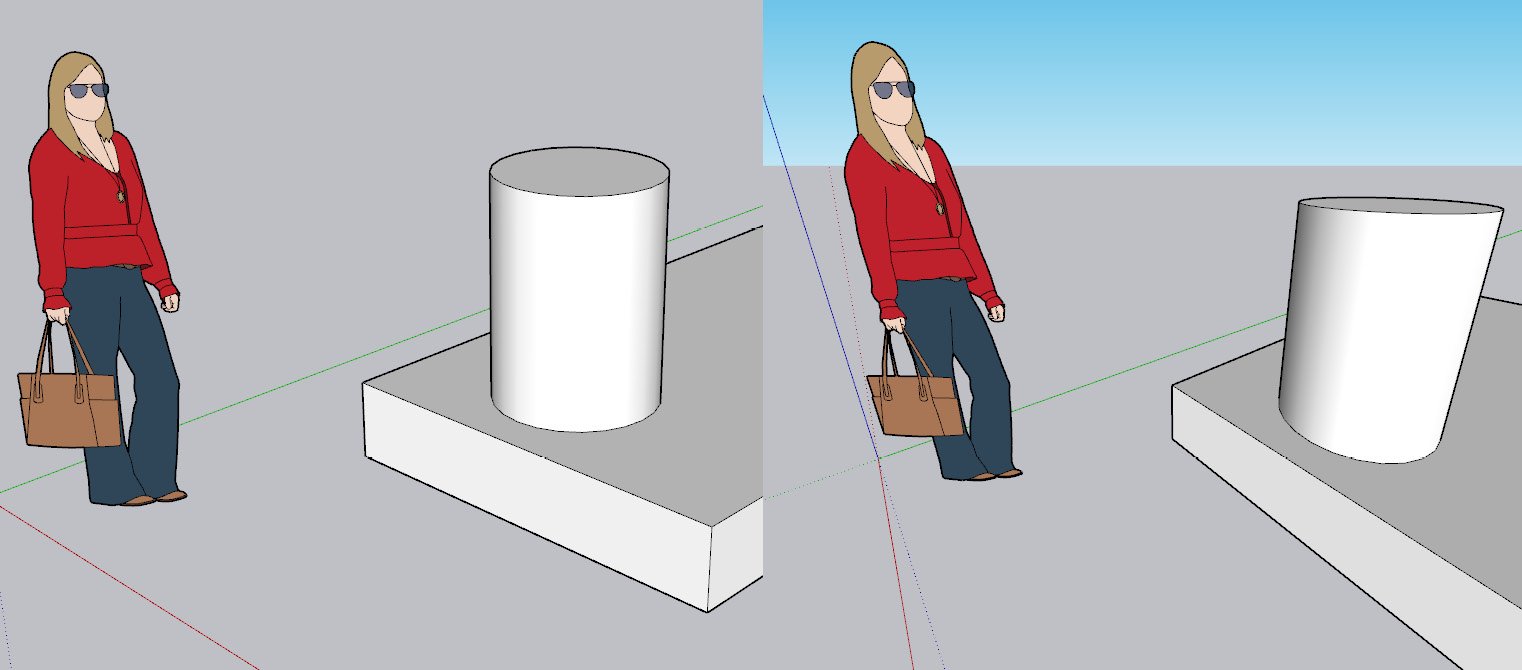
Figure 1.21: Standard Field of View of 35.00 (Left) and Extreme Field of View of 100.00 (Right)
Note
SketchUp workflows will often involve getting the right camera angle for a tool or process. Using Orbit, Pan, and Zoom in concert will allow you to set up your camera view for each workflow. This takes patience and practice!
Zoom Extents
Zoom Extents is a fast way to automatically adjust Zoom and Pan to fill the drawing area with all visible geometry. This means that you will see your whole model very quickly! The camera view will not be orbited when using Zoom Extents.
The Zoom Extents tool button looks like a magnifying glass with three red arrows:

Figure 1.22: Zoom Extents Button
Zoom Extents has a slightly more complicated keyboard shortcut, Ctrl + Shift + E, so it is suggested to use the toolbar button to activate this zoom option.
Views Toolbar
The Views toolbar includes six tools, Iso (Isometric), Top, Front, Right, Back, Left, and Bottom:
Figure 1.23: Views Toolbar
These tools change the camera view like Zoom Extents. The updated view will change the zoom level slightly, but it will also orbit the camera view to align with the original drawing coordinates. These standard views may be helpful when modeling, as they will quickly zoom to show all geometry, and move the camera around to different angles:

Figure 1.24: Model Shown at a Random Angle (Left) and Model at Front View (Right)
Note
Zoom Extents and Views are not the same tool, but they are very similar! You may never need to use the standard Views while modeling, but it is suggested to try to use Views and Zoom Extents. We will discuss more views and camera options in Chapter 5.
Other Zoom Tools
Two additional Zoom tools can be found on the Large Tool Set. These are Zoom Window and Zoom Previous Tools. Zoom Window will allow you to drag a window to zoom into a specific section of your model. Zoom Previous can be clicked to move back through your recent camera views. This can be very helpful when setting up Scenes.

Figure 1.25: Zoom Window (Top) and Zoom Previous (Bottom)
Active Tools while using Navigation
SketchUp allows for all navigation tools to be used while in the middle of using any other tool. This includes when you are drawing or editing geometry in the model! All six tools, Orbit, Pan, Zoom, Zoom Extents, Zoom Window, and Zoom Previous, can be used without interrupting the editing tools.
We will look at a few examples using the Push Pull Tool. You do not need to follow along with these examples; they are just provided for context. We will talk about the Push Pull Tool in more detail Chapter 4, Drawing Tools: We Begin Modeling!.
In this first example, we start with a circle drawn on a box. After activating the Push Pull Tool, we want to orbit the camera angle to see the geometry from a different angle. Using the 3-button mouse shortcut, the orbit tool is activated, and the camera angle is changed. When the 3-button mouse shortcut is released, SketchUp resumes the Push Pull tool.

Figure 1.26: Starting the Push Pull Tool (Left), Orbit (Middle), Pan, and Zoom (Right)
Note
In the example, the Push Pull tool was not cancelled while the view was changed with the navigation tools! You can even use the toolbar buttons, but you must click the same creation or editing tool to resume the workflow without canceling the tool.
In this second example, we are using Push Pull on the circle again. After activating Push Pull on a new camera angle, the Pan tool is selected from the toolbar. When the camera has been panned into the location that we want, Push Pull can be reactivated from the toolbar and the workflow will be resumed.
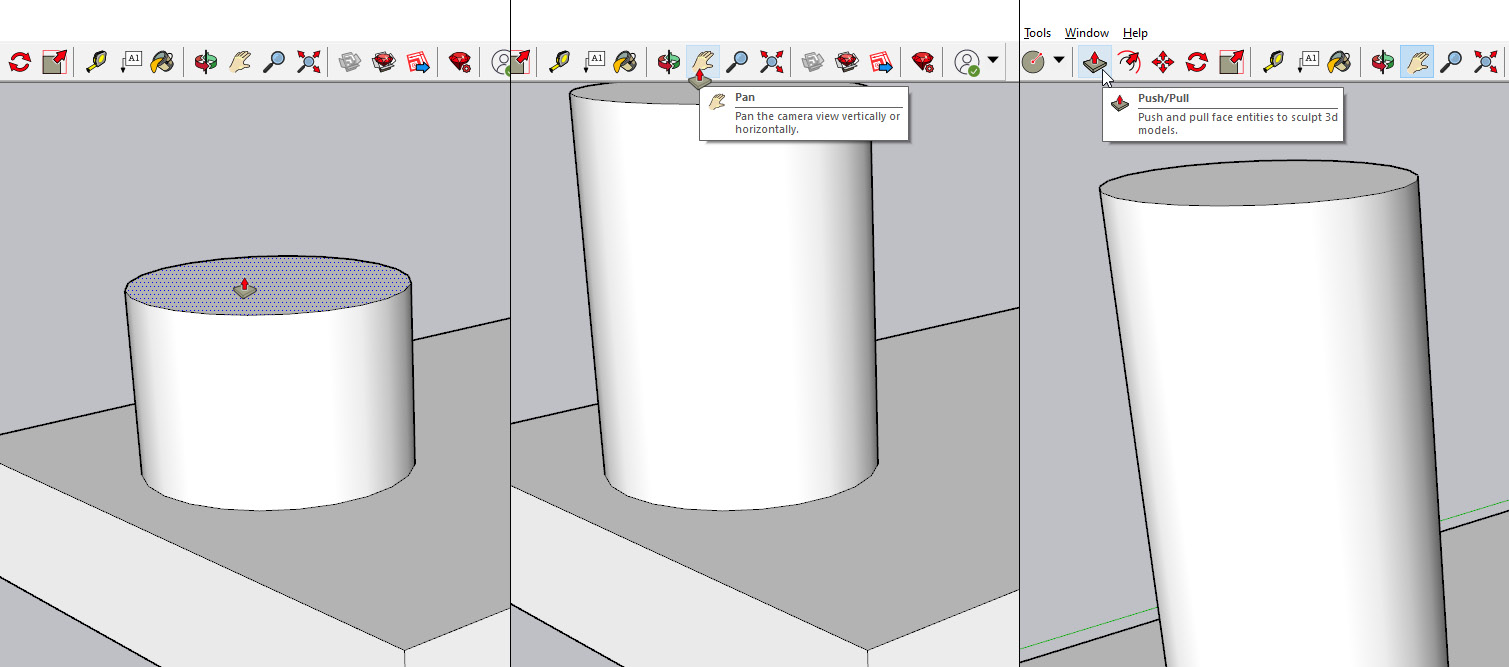
Figure 1.27: Push Pull, then Pan, then Push Pull, which resumes the previous Push Pull workflow
In this third example, we will see how a workflow can be canceled accidentally. Again, we are beginning with the Push Pull tool, then selecting the Pan tool from the toolbar. But in this case, after the pan is completed, the Select tool is chosen instead of Push Pull. Even though it appears as though the Push Pull tool created a cylinder of geometry, the workflow has not completed. When a different tool was chosen, the workflow was canceled, so no work was completed.
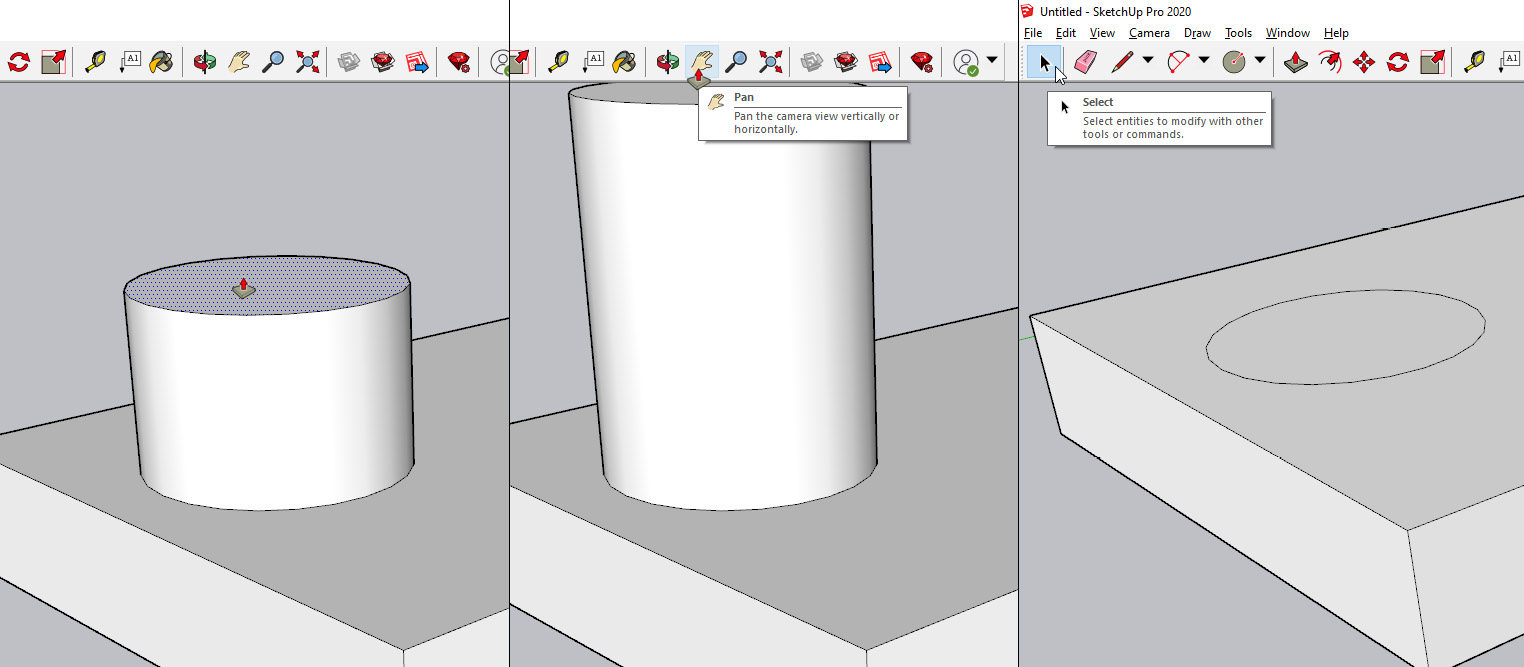
Figure 1.28: Push Pull, then Pan, then Select, which has canceled the workflow
It is so very helpful to understand how to use the 3-button mouse shortcuts while navigating in SketchUp. But even without a 3-button mouse, it is even more important to understand that you can continue working while navigating, even when clicking on the navigation tools in a toolbar.
I would highly suggest that you practice navigating in SketchUp, even if it is just around the default person component when you create a new file! Navigation takes time and practice, and it would be good to have some practice navigating before you begin to model. We will talk about modeling soon, but first, we want to look at some rules that govern SketchUp geometry.
Geometry “Rules” in SketchUp
It is undeniable – SketchUp does rule! But, more importantly for this section, SketchUp has rules that govern the geometry that is created in SketchUp.
The Geometry rules are as follows:
- All edges are straight lines between two points
- All faces are bounded (surrounded) by edges
- All faces are two-dimensional (flat)
Note
Even though faces are two-dimensional, they do not have to align with any of the model axes, but it does mean that faces cannot be bent! If a surface appears curved in a SketchUp model, it is actually made of many flat faces.
All SketchUp geometry can be categorized as either an edge or a face. All other geometry is comprised of edges and faces. There is no geometry in SketchUp that breaks this rule! We will evaluate the rules that govern edges and faces and then look at some common SketchUp geometry that is comprised of these basic geometry elements.
Edges (Lines)
Edges (sometimes referred to as lines) are the foundation of all SketchUp models. Edges are always a straight connection between two points. Edges are typically drawn individually with the Line Tool, but all creation tools make new edges:
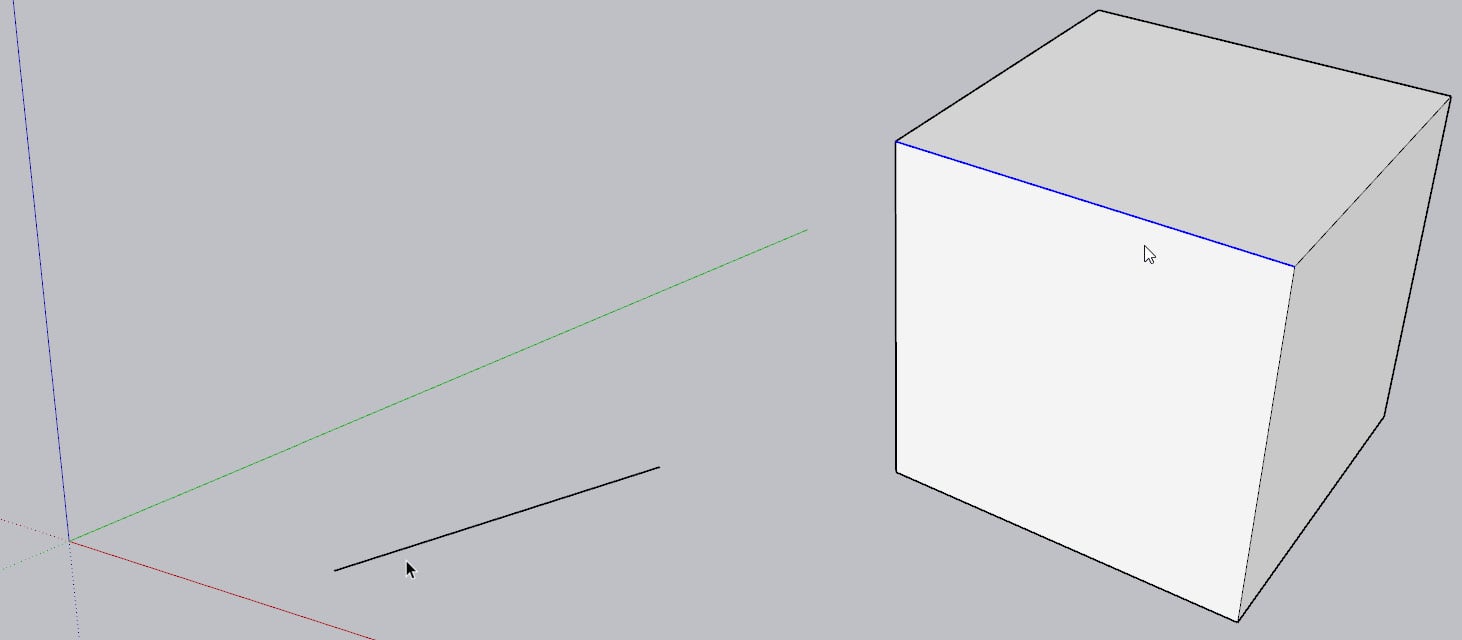
Figure 1.29: A Single Edge (Left) and an Edge on a Cube (Right)
Faces
Faces are two-dimensional surfaces that are bounded (surrounded) by multiple edges. There is no limit to the number of edges that can surround a face, but the edges must all be in the same plane. Edges cannot be bent or warped; they are always two-dimensional or flat. It is important to remember that faces cannot exist without their bounding edges, but edges can exist without faces. We will expand on this concept in later chapters.
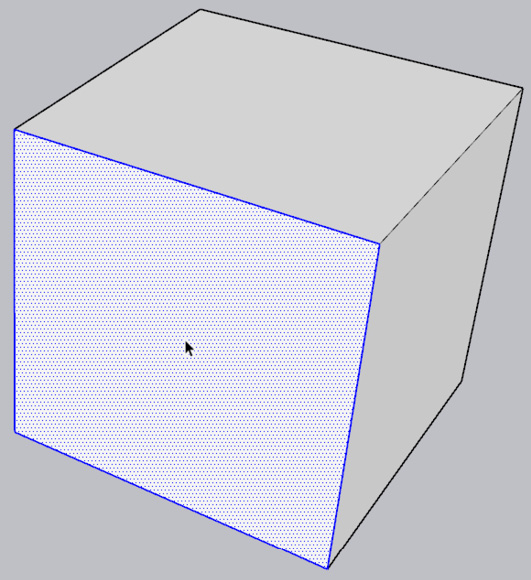
Figure 1.30: Face on a Cube
If all edges are straight, and all faces are flat, then how can we create complex and “real-world” models in SketchUp? What about the parks, plants, buildings, and interiors that we see online? How is that geometry created? SketchUp has built-in tools that allow us to get a head start on our modeling so that we do not have to draw each edge or face one by one.
Rectangles
Rectangles are familiar shapes that have a square or rectangular face surrounded by four edges. This is one of the most common shapes to start with in SketchUp. The Rectangle tool and Rotated Rectangle tool are used to quickly create rectangles, but it is good to know that any shape can be drawn with the Line tool!
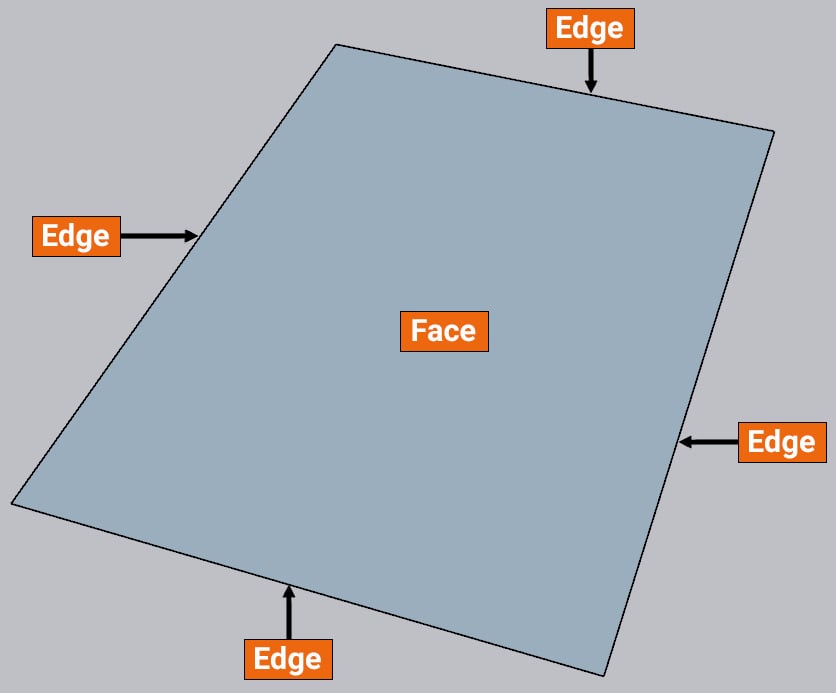
Figure 1.31: Rectangle with Faces and Edges
Polygons
As mentioned before, there is no limit on the number of edges surrounding a face. In some cases, the lengths of the edges and the angles connecting them are equal, which creates regular polygons. These shapes are also very common in designs, and SketchUp helps us model these with the Polygon tool.
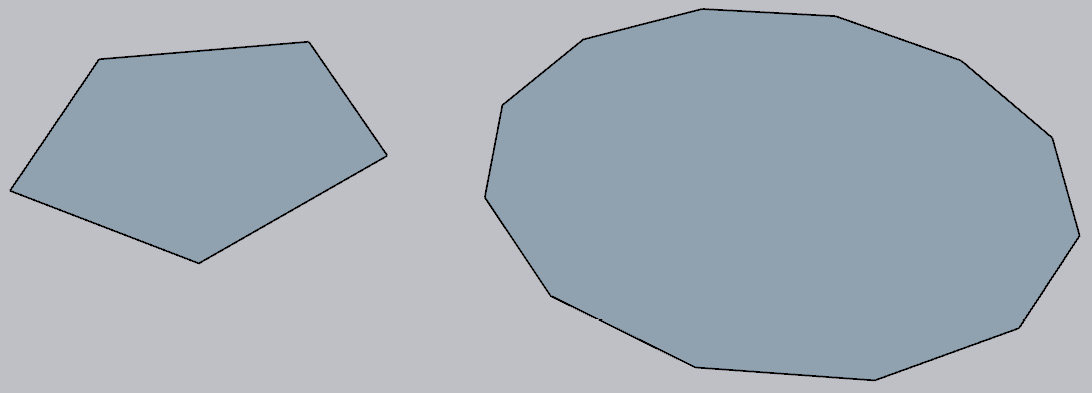
Figure 1.32: Pentagon and 12-gon (Dodecagon)
Polygons in SketchUp typically refer to regular polygons because that is what the Polygon tool creates. Any loop of edges that creates a face is technically a polygon, but we will not use the word polygon to refer to these objects in this book. We will use the term “shape” for any irregular, closed loop of edges surrounding a face:

Figure 1.33: An 8-sided Shape
Curves (Welded Edges)
Curves in SketchUp are not just arcs or squiggles; Curve is a blanket term that includes any collection of edges, connecting into a continuous path, that are Welded together. This could include any squiggle or path, two-dimensional or three-dimensional, and includes arcs and the edges of circles and polygons. Essentially, this is a collection of lines that are stuck together.
Arcs and circles seem to break the rule that all edges in SketchUp are straight. Of course, we know that arcs and circles have curved edges! To make sure that the first rule of SketchUp is not broken, arcs and circles have a series of short, straight lines that collectively look like a smooth curve. We will talk more about arcs and circles when we discuss the creation tools.
Note
By default, the Freehand, Arcs, Circle, Polygon, and Pie Tools all create curves. The Line and Rectangle Tools do not create curves because their edges are not welded together.
This is a curve that is comprised of 12 segments in a standard Arc. Remember, this is a curve because the edges are connected:
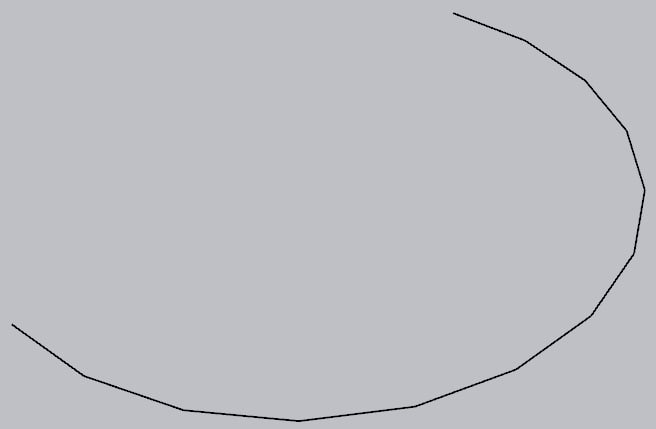
Figure 1.34: Curve – Arc
This is a “closed” curve because it creates a loop. This was created using the polygon tool:
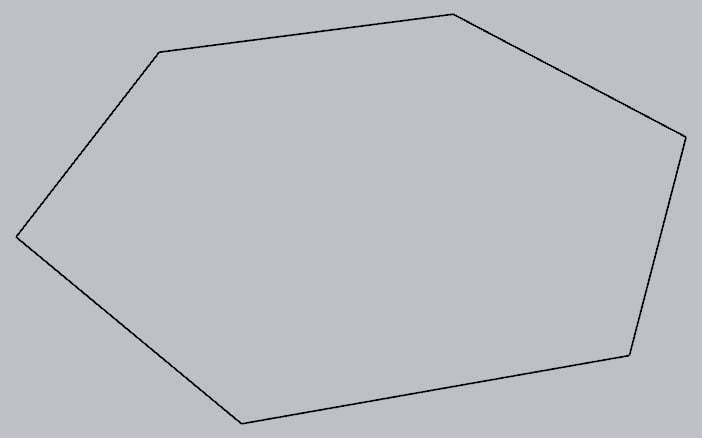
Figure 1.35: Curve – Polygon (Hexagon)
This is a curve that was created manually by drawing using the Pencil tool and using Weld Edges. We will discuss this process later in the book.
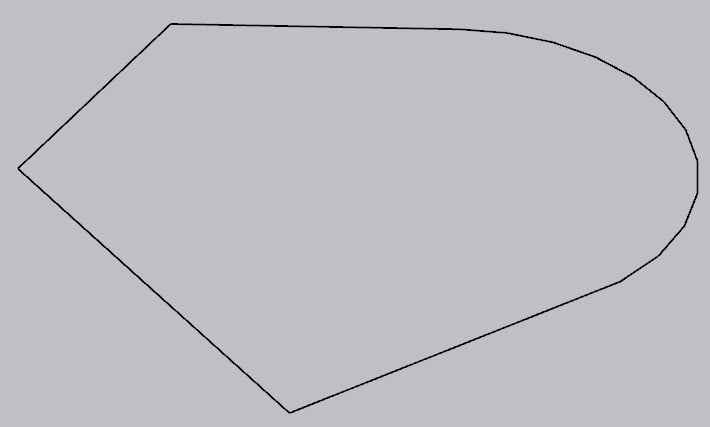
Figure 1.36: Curve – Welded Edges
Summary
In this chapter, we quickly compared SketchUp Pro and SketchUp For Web, explored the User Interface and associated toolbars and dialog boxes, learned how to navigate through 3D space in SketchUp models, and looked at the underlying rules for SketchUp geometry. We will build on all of these as we move through the rest of the book.
In the next chapter, we will look at some of the most used Tools – the Primary tools – as well as Inferences. These tools and Inferences will be essential to every SketchUp model you work on, so let’s get started!
