Under the hood, Meteor is really just a bunch of files and scripts, which are designed to make the building of a web application easier. That's a terrible way to describe something so elegant, but it helps us to better understand what we're using.
After all, Mila Kunis is really just a bunch of tissue wrapped around bone, with some vital organs inside. I know you hate me now for that description, but you get the point. She's beautiful. So is Meteor. But it doesn't do us any good to just leave it at that. If we want to reproduce that type of beauty on our own, we have to understand what's really going on.
So, files and scripts… We're going to walk you through how to get the Meteor package properly installed on your Linux or Mac OS X system, and then see the package of files and scripts in action.
Note
Windows is now officially supported (Yay!) so you can follow along using the new Windows installation if you would like. Information can be found at https://www.meteor.com/install.
In this chapter, you will learn the following topics:
Downloading and installing Meteor via curl
Loading an example application
Making changes and watching Meteor in action
There are several ways to install a package of files and scripts. You can manually download and transfer files, you can use a pretty installation wizard/package with lots of Next buttons, or you can do what real developers do and use the command line. It puts hair on your chest. Which, now that I think about it, may not be a very desirable thing. Okay, no hair; we lied. But still, you want to use the command line, trust us. Trust the people that just lied to you.
curl (or cURL if you want to get fancy) is a command-line tool used to transfer files and run scripts using standard URL locations. You probably already knew that, or you probably don't care. Either way, we've described it and we're now moving on to using it.
Open a terminal window or the command line, and enter the following command:
curl https://install.meteor.com/ | sh
This will install Meteor on your system. curl is the command to go and fetch the script. https://install.meteor.com is the URL/location of the script, and sh is, of course, the location of the script interpreter "Shell", which will run the script.
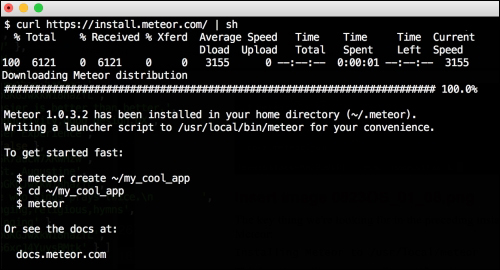
Once you've run this script, assuming you have an Internet connection and the proper permissions, you will see the Meteor package downloaded and installed:

The key thing that we're looking for in the preceding installation text is the launcher script location:
Writing a launcher script to /usr/local/bin/meteor
This location could vary depending on whether you're running this script in Linux or Mac OS X, but it puts Meteor into a location where you can then access the Meteor script from anywhere else. This will become important in a minute. For now, let's see what kind of friendly message we get when the Meteor installation is finished:
To get started fast:

  $ meteor create ~/my_cool_app
  $ cd ~/my_cool_app
  $ meteor

Or see the docs at:

  docs.meteor.com
Great! You've successfully installed Meteor, and you're on your way to create your first Meteor web application!
Note
You should bookmark http://docs.meteor.com, an invaluable reference moving forward.
The wonderful people at Meteor have included several example applications, which you can quickly create and play with; these help you to get a better idea of what Meteor is capable of.
We want to use the simplest possible example, just to get an idea of how Meteor works, so we will be creating the leaderboard example. We'll be using the command line again. This is awesome news if you still have it open! If not, open a terminal window and follow these steps.
So that we can remember where they are later, we'll put all the files for this book in the ~/Documents/Meteor folder. We will create this folder as follows:
$ mkdir ~/Documents/Meteor
Now, we need to get to that directory. Use the following command:
$ cd ~/Documents/Meteor
We can now use the Meteor create command with the --example parameter to create a local copy of the leaderboard example application:
$ meteor create –-example leaderboard
As with the Meteor installation itself, the create command script has a friendly success message:
leaderboard: created.
To run your new app:
   cd leaderboard
   meteor
There are even instructions on what to do next. How handy! Let's go ahead and do what our good command-line friend is telling us.
To start up a Meteor application, we need to be in the application directory itself. This is because Meteor looks for the startup files, HTML, and JavaScript that are needed to run the application. These are all found in the application folder, so let's go there:
$ cd leaderboard
This puts us in the ~/Documents/Meteor/leaderboard folder, and we're ready to run the application:
$ meteor
Yes, that's it. Meteor takes care of everything for us; it reads all the files and scripts, and sets up the HTTP listener:
[[[[[ ~/Documents/Meteor/leaderboard ]]]]]

Running on: http://localhost:3000/
We can now take the URL we've been given (http://localhost:3000/) and check out the example application in a web browser.
Open your favorite web browser (we'll be using Chrome, but any modern, updated browser will work) and navigate to http://localhost:3000/.
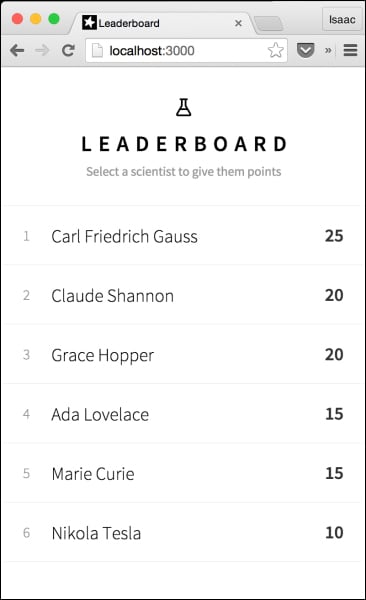
You should see a screen with a list containing the names of scientists, similar to the following screenshot:

You can go ahead and poke around the application a bit, if you want to. Click on Nikola Tesla's name and add 5 points to his score about 20 bajillion times, because he deserves it. Give some love to Marie Curie because she was so radioactive that she actually made up the word. Go nuts, friend!
Do you fear change and want to reset the scores? No problem, we can start with a clean database instance; to do this, perform the following steps:
Open the command line, and press Ctrl + C.
This stops the running application. Now, enter the following command:
$ meteor resetRestart your app, and you're good to go. Just type the following command:
$ meteor
Note that the initial scores are random, so it won't look exactly like it did before. The meteor reset command resets all the data collections and whatnot; so in a non-random app, the command will indeed reset the app cleanly.
Okay, we've got our application up and running in the browser, and we now want to see what happens when we make some code changes.
One of the best features of Meteor is reactive programming. The following extract is taken from http://docs.meteor.com/#/full/reactivity:
Meteor embraces the concept of reactive programming. This means that you can write your code in a simple imperative style, and the result will be automatically recalculated whenever data changes that your code depends on.
This principle applies to code changes too, which means that any changes that you make to the HTML, JavaScript, or database are automatically picked up and propagated.
You don't have to restart the application or even refresh your browser. All changes are incorporated in real time, and the application reactively accepts the changes.
Let's see an example.
As you become more familiar with Meteor, you will come to learn that you can make changes and add files pretty much whenever you want. You don't have to link anything up, and you certainly don't have to redeploy before you can see the results. You get to just play around, build wonderful things, and let Meteor take care of all the crunchy stuff.
To see what we mean, let's change the title of this application from Leaderboard to Yay Science! because, well, yay science!
First, make sure that the application is up and running. You can do this by having an open browser window that is pointing to http://localhost:3000/. If the app is running, you'll see your leaderboard application. If your application isn't running, make sure to follow the steps previously given in the Starting the example application section.
Now, we need to open and edit the leaderboard.html file. With your favorite text/code editor, open the leaderboard.html file under the location, ~/Documents/Meteor/leaderboard/client/, and change title in the head section using the following lines of code:
<head>
  <title>Yay Science!</title>
</head>
Go ahead and save the file, and then look at your web browser. The page will automatically update, and you'll see the title change. Earlier, it displayed the word Leaderboard:

However, now, after the execution of the preceding code, the title will display our spiffy new Yay Science! page:

This is Meteor in action! It monitors any changes to files, and when it sees that a file has changed, it tells your browser that a change has been made and that it should refresh itself to get the latest version.
Moving forward, we're going to build an application from scratch, so we don't want to make too many changes to this example application. However, we still want to stay with our new theme rather than that generic old leaderboard stuff. So, to do so, perform the following steps:
Back in your text editor, on about the tenth line or so, we have the title label for our leaderboard. Make the following change to the
<h1>tag:<h1 class="title">Yay Science!</h1>Save this change, and you'll see the change reflected in your browser. The title in our page will now look like this:

Likewise, we don't give "points" to scientists. They're not trained monkeys, dancing around for our amusement. They're scientists! We give them mad props instead. In the
<div>tag just below our title, make the following text change:<div class="subtitle">Select a scientist to give them props</div>We also need to change the button text from the word
pointsto the wordprops. Towards the bottom half of the file, you'll find a<button>tag. Change the text in that tag to the following:<button class="inc">Give props</button>Save your changes, and you will see the application update almost immediately:

Just below the
<button>tag, there is a message displayed if no scientist's name is selected. It currently uses the word "players". We want to change that to something a little more specific. To do this, make the following change to the<div>message tag:<div class="message">Click a name to select</div>Save this change, and this time, refresh your browser. Not because we need the change to take effect, but because we want to make sure no scientist is highlighted so that we can verify our message text:

Great success! In this chapter, you've successfully installed the Meteor framework, loaded an example application, and made changes to that application by becoming familiar with file changes and the reactive nature of Meteor.
You are now ready to start building your very own Meteor application, and learn more about the elegant features and advantages that come from developing with Meteor in the coming chapters.


