


This chapter takes you through downloading LevelDB and building it using the command-line techniques specific to building on OS X. It then shows how to set up an Xcode project for a simple OS X application, with iOS details in Chapter 2, Installing LevelDB and Building for iOS.
The build error messages and how we deal with them will be useful for any Mac-based developers using open source projects. These often assume familiarity with the Unix development tools and installing idioms. We will start with a high level of detail to ease people in, who have only used Xcode or a similar IDE on other platforms. Later chapters will summarize the steps, so you may want to come back here for a refresher.
The instructions in this chapter will assume that you are using the terminal in OS X. The $
that we will use, as the terminal prompt, will vary according to your local terminal settings, usually showing the current working directory.
The examples in this chapter use a minimal amount of C++ (using the easier style of C++11). Complete log files of the installation steps and source code are available at the Packt Publishing website, and later chapters have much larger samples as complete apps.
Tip
The instructions in this chapter are similar to generic Unix commands but you will probably find that commands, directory structures, and permissions vary slightly. Most Linux distributions have similar directory layouts but OS X has varied from generic Unix practice and even from OS X earlier standards.
People who want to actively work using the latest source can use Git to clone the repository, starting with the instructions, at: https://code.google.com/p/leveldb/source/checkout. The project maintainers typically update the release archives after a small number of changes, so there is little incentive to work with the repository unless you plan to actively contribute. A Git clone based on the source code used in this book and oriented towards building for Apple is: https://code.google.com/r/dentaroo-appleflavouredleveldb/.
To decide if you want to update your copy of LevelDB, you can check the changed history at https://code.google.com/p/leveldb/source/list. Most of the following screenshots and samples are from Version 1.10.1, released on May 14, 2013. Any reliance on later releases will be discussed. At least one patch to LevelDB was contributed as a direct result of this book, issue 177, building for iOS on later compilers.
LevelDB, other libraries, and our samples were compiled primarily with Xcode Version 4.6.3 and checked with the developer previews of Xcode 5 as they were made available.
The stable LevelDB releases are always available from the download page: https://code.google.com/p/leveldb/downloads/list.
Open that page and click on 1.10.1 which takes you to a specific page that allows you to click on the .tar.gz file and download it.
Using the standard Unix utility, tar will uncompress the .gz step and then unpack the .tar archive in one command. See tar --help if you want more information:
$ tar xvf leveldb-1.10.0.tar.gz
x leveldb-1.10.0/
…
x leveldb-1.10.0/util/coding.cc
Now the file is unpacked, change the directory into it:
$ cd leveldb-1.10.0
$ pwd
/Users/andydent/dev/openSourceDev/leveldb-1.10.0
You can clean up the .tar file here as it is no longer needed, but I recommend archiving a copy of your zip file, for later comparison and reversion.
Unlike many open source projects, LevelDB doesn't come with a configure script. To build our first version of it, just type make at the command line (see log of make.txt). It is important to understand the makefile which is a plain text file you can open in any editor. At the top it has a commented section to allow you to set OPT to specify a debug or a production build (the default).
The targets are labels that appear at the left of the lines, ending in colons, for example, db_bench. Most makefiles have, at least, targets all and clean. The clean target removes all the previous build products so you guarantee a build with the changed settings. The LevelDB source comes with a range of tests, invoked by make check (see log of make check.txt). In the output of make check, you will see:
==== Test TableTest.ApproximateOffsetOfCompressed
skipping compression tests
The compression test is skipped because a default install of LevelDB lacks the snappy compression library, which is used to quickly compress values in tables.
A further check you can make on your LevelDB library is to run the db_bench command which is a timing utility built by the makefile. It is built as part of the make check or can be built at any time with the command, build db_bench. If you run db_bench now and save the output, you can compare the benchmark figures before and after the inclusion of snappy. We will also look at the effect of using snappy with data, specific to your application in Chapter 10, Tuning and Key Policies, on tuning.
The snappy compression library is useful if your databases have very big values, such as, complete documents stored in a single record. You will often see it referred to in discussions of LevelDB.
For completeness, we will cover installing snappy and building it with default options. Unfortunately, at the time of writing, it doesn't build with the C++11 and libc++ options we will be using in the remaining chapters. So, after any experimentation you do with snappy here, please use the following instructions to remove it, to avoid compilation errors with libc++.
To install snappy we go through a similar process of downloading an archive from http://code.google.com/p/snappy/downloads/list, then unpacking, using a second terminal window to make it easier to keep track of the different libraries. This time, there is a configure script. We build and install with the commands:
$./configure
$make
$make install
After these three processes (see logs) you will have the include files and built libraries for snappy in a standard location in /usr, where the LevelDB makefile looks for them. Rebuild your LevelDB libraries with (in the terminal window in the LevelDB directory):
$make clean
$make
You will see –DSNAPPY shown in the log of the make command, indicating that it detected the snappy installation and changed the options to match. If you repeat the make check you will see the compression test working.
If you have installed snappy for these tests, as mentioned above, you will probably want to remove it. An uninstall target is built into the makefile, that will remove it from the standard location which is checked by the LevelDB makefile.
In a terminal with working directory set to your snappy directory:
$ make uninstall
( cd '/usr/local/share/doc/snappy' &&rm -f ChangeLog COPYINGINSTALL NEWS README format_description.txt framing_format.txt )
( cd '/usr/local/include' &&rm -f snappy.h snappy-sinksource.h snappy-stubs-public.h snappy-c.h )
 /bin/sh ./libtool   --mode=uninstall rm -f '/usr/local/lib/libsnappy.la'
libtool: uninstall: rm -f /usr/local/lib/libsnappy.la /usr/local/lib/libsnappy.1.dylib /usr/local/lib/libsnappy.dylib /usr/local/lib/libsnappy.a
Now change the directory back to your LevelDB source and make clean, then repeat the original make to rebuild your libraries.
Now that the build process is successfully building the library, utility, and test programs, you could continue to program the command-line tools in the plain Unix manner by editing the cpp files and building them with the make command. For OS X GUI and all iOS apps, we have to build with Xcode.
Tip
We will start by creating a workspace. It is a good idea to get into the habit of using workspaces to wrap your projects, because the new CocoaPods standard for delivering open source modules relies on them. There is no technical reason at this stage why we have to use a workspace, just building good habits.
In Xcode, navigate to File | New | Workspace and create a workspace somewhere you can use as a basis for your development.
Tip
I recommend avoiding spaces in path names because sometimes it causes a script or utility to do something unexpected. This is also a good advice for the Windows developers, even those who are using the latest Visual Studio. It's not the core tools which catch you, but the associated scripts, command lines, or environment variables.
Now navigate to File | New | Project which presents a template chooser. Choose an OS X Application in the left panel and click on the Command Line Tool in the icons provided, then click on Next:
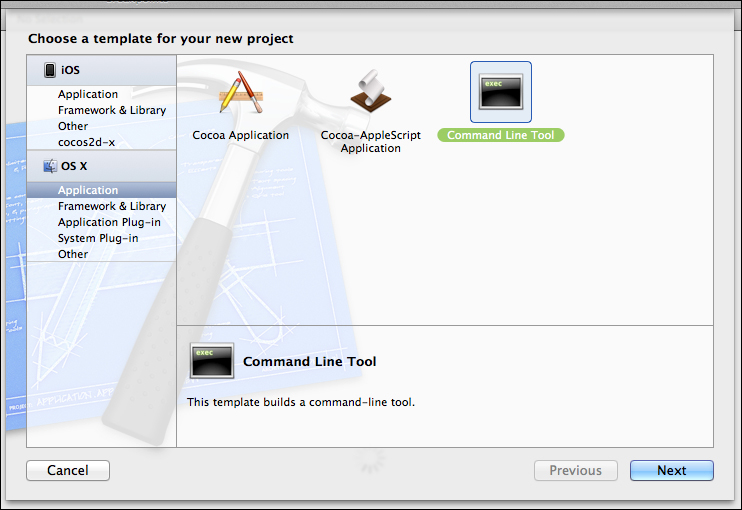
Choosing the Command Line Tool template
Choose a C++ project and uncheck the
Use Automatic Reference Counting checkbox. Make sure you specify the Product Name and Company Identifier. You will see as you type in those entries that the Bundle Identifier is being generated from them: Packt.LevelDB-OSX-Sample01. As shown in the following screenshot:
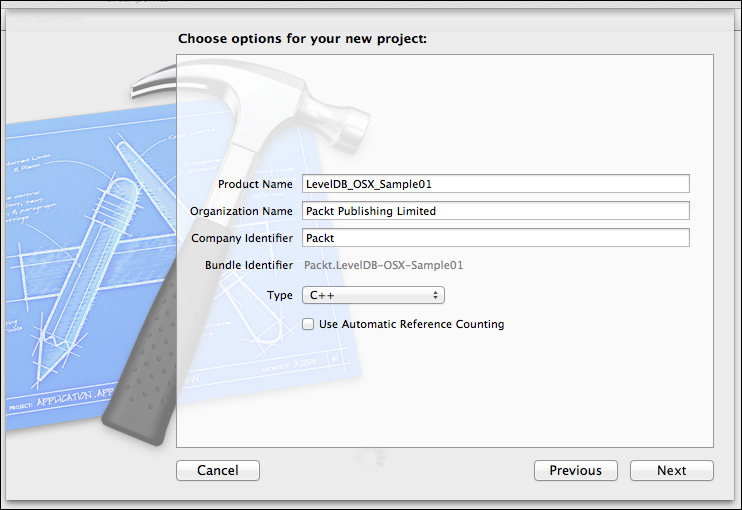
Entering options and seeing Bundle Identifier
The Next button takes you to a save dialog where you specify the location in which the project will be created. Leave the Source
Control option checked and choose Add to: your workspace, which we called levelDB_OSX.
You will see a project window appear in Xcode showing the Build Settings. In the top-left is the Run button. Just click on it to prove your command-line tool compiles and runs. At the bottom you should see the All Output of the embedded terminal window showing Hello, World!
If this is your first time in Xcode, congratulations! You have just compiled and run a simple C++ program. Now we're going to copy a bit of code from the document doc/index.html and use that to prove our simple Hello World is a Hello LevelDB.
We will start with the lines:
#include <assert>
#include "leveldb/db.h"
Notice a red warning icon springs up rapidly to the left of the <assert> line. Clicking on it tells us assert file not found and a similar message is visible in the left panel of the Navigator. Change the <assert> to a <cassert> and the message goes away (this looks for a standard C++ header instead of the traditional Unix assert header).
Tip
Downloading the example code
You can download the example code files for all Packt books you have purchased from your account at http://www.packtpub.com. If you purchased this book elsewhere, you can visit http://www.packtpub.com/support and register to have the files e-mailed directly to you.

Error due to failure to find db.h header
Now the red icon is next to the leveldb/db.h include and is warning us that it doesn't know that file. We will fix that in a minute, Xcode doesn't know where to find the LevelDB headers. For now, just copy the other lines from index.html to create a database and then the final delete db; to close it again.
The final code looks like:
#include <iostream>
#include <cassert>
#include "leveldb/db.h"

int main(intargc, const char * argv[])
{
    leveldb::DB* db;
leveldb::Options options;
options.create_if_missing = true;
leveldb::Status status = leveldb::DB::Open(options,
"/tmp/testdb", &db);
assert(status.ok());
std::cout<< "Hello, World with leveldb in it!\n";
delete db;
return 0;
}
We need to point Xcode to the header file location, which means setting a path in the settings but also deciding where the files should live. This is very much a matter of taste. You could leave them where you unpacked and built them, or put a copy in a standard location. I'm going to copy them to the standard location for Unix headers:/usr/local/include. Just drag the LevelDB directory from the include directory in our LevelDB installation (remember where we unpacked it previously) to /usr/local/include. The directory we are copying contains db.h and env.h as well as a few other .h files:
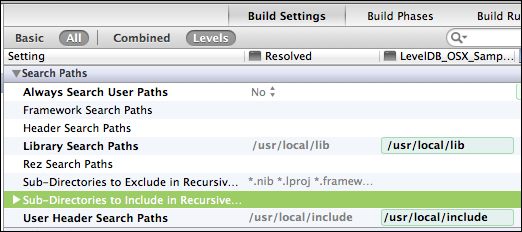
User header search paths
Copying these files still hasn't fixed our compilation warnings. We need to modify our project to tell it where to look for the include files. Click on the Xcode target LevelDB_OSX_Sample01 in the navigator (the top of the tree) and on its name in the Targets panel that appears to the right, so you see the Build Settings tab. Scroll down about half way to the Search Path section and add an entry in User Header Search Paths for /usr/local/include with recursive turned off. It will appear inline as /usr/local/include/.
Now the red icon next to the leveldb/db.h text should go away, but we still can't build, we need to add the library. Click on the Build
Phases tab and open the section Link Binary With Libraries. Drag the libleveldb.a file into this section (from the copy you put in /usr/local/lib), as shown in the following screenshot:
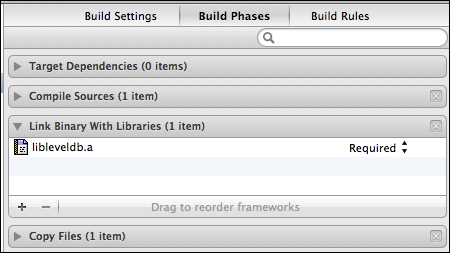
Static library added to build phases
You would think this would be enough to be able to build, but trying will cause an error:
Undefined symbols for architecture x86_64:
  "leveldb::DB::Open(leveldb::Options const&, std::__1::basic_string<char, std::__1::char_traits<char>, std::__1::allocator<char>> const&, leveldb::DB**)", referenced from:
      _main in main.o
ld: symbol(s) not found for architecture x86_64
clang: error: linker command failed with exit code 1 (use -v to see invocation)
The problem is that the default build is linked with libstdc++ and the default template uses libc++. The LevelDB library uses std::string objects across its interface, so you have to ensure the same standard libraries are used with both, library and application, to avoid crashes and unpredictable runtime errors:
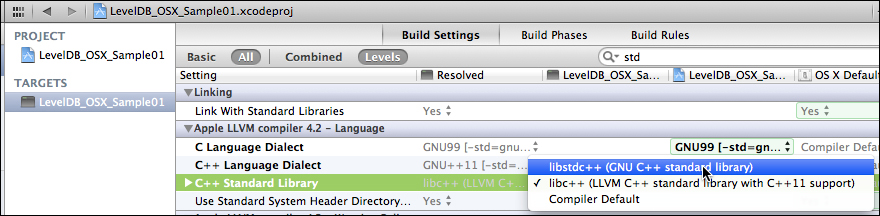
Choosing the libstdc++ library
Go back to the Build Settings tab and scroll to the Apple LLVM compiler 4.2 – Language panel. The C++ Standard Library allows you to choose libstdc++ (GNU C++ standard library).
Choose that and you should be able to finally build and run your little test program by clicking the big run icon. Then go have a look in the /tmp/testdb folder to see the database files created.
In this chapter we went through a typical experience for using Unix-oriented open source, getting LevelDB downloaded and built with the command line. We survived some common build errors and learned about differences in C++ library models.
With the libraries built and installed, we learned how to include them into an Xcode project and build a simple OS X command-line program. Next, we will learn how to vary this process for an iOS app.

