


This chapter sets the stage for the next ones. Here we cover how to get Eclipse up and running. Further, we also briefly describe what is new in this new version of the Integrated Development Environment (IDE). If you do not have any interest in knowing what new features have been added to Eclipse, you can safely skip this chapter.
We also cover how you should approach this book, where we answer questions, such as "Do I need to read the chapters in the sequence in which they appear in the book?" and "This book is riddled with tip boxes; do I need to read each and every one of them?".
Summing up, the contents of this chapter are as follows:
Downloading Eclipse
Installing Eclipse
New and noteworthy features in Eclipse Juno
As mentioned, we assume that you know Java (we expect you to know at least the basics) and, most importantly, that you have a working knowledge of computers. After all, we will not cover the nitty-gritty details of how to unpack files, create directories, find a file, start a program, and configure environment variables.
As you will see, in each chapter there are boxes containing tips and pitfalls regarding Eclipse, Java, and, sometimes, the topic at hand. These boxes are meant to help you get the most out of the underlying chapter's content, so do not skip them.
Although this book follows a tutorial-like approach, you do not need to read the chapters in the sequence in which they appear in the book. All chapters are self contained. You can read the chapters in this book in any particular order.
Eclipse is a Java program; this means that in order to use Eclipse, you first need to install a version of the Java Virtual Machine (JVM). There are basically two ways of achieving this: you may either install a Java Runtime Environment (JRE) or a Java Development Kit (JDK). Actually, what you should install boils down to what you intend to accomplish with Eclipse. Since you want to use Eclipse for Java development, you should install a JDK (besides the JVM, the JDK includes other useful things; for instance, the source code for the standard Java libraries). To run Eclipse Juno, it is recommended that you install JDK 6 or a later version (many Eclipse users have been using the newer version—Java 7). To learn how to install a version of the JVM on your operating system, navigate to http://www.oracle.com/technetwork/java/javase/index-137561.html.
If you have already installed a JVM, downloading and installing Eclipse will be quite straightforward:
First, download Eclipse Juno from the Eclipse downloads page at http://www.eclipse.org/downloads/. We strongly recommend you to download the Eclipse IDE for Java Developers version. Also, make sure to download the right version for your platform and Java version (there are two versions: 32 bit and 64 bit). Actually, the download site is smart enough to detect the OS you are running, so it will default to the download options that are available to your platform. You will get Eclipse as a compressed file (it might be either a
.zipor.tar.gzfile). It is worth mentioning that there are several distributions of the IDE; each of these distributions is tailored towards a particular purpose. Therefore, the set of plugins that ships with each distribution varies. Some distributions are Eclipse IDE for Java EE Developers, Eclipse for Mobile Developers, Eclipse Modeling Tools, and Eclipse for Testers.Second, unpack this file into the directory of your choice. As a result, you will get a subdirectory named
eclipsecontaining lots of subdirectories under it. After unpacking it, you are good to go. No further configuration is required. Easy, isn't it?Tip
There is a known issue with the built-in decompression utility shipped with the current versions of Windows. Therefore, you had better use another decompression utility when decompressing Eclipse. If you are a Windows user looking for a more robust decompression utility, give 7-Zip a try (http://www.7-zip.org/download.html). In addition, some people have reported that Eclipse has a problem with directory paths that contain spaces in their names. So if possible, try to avoid extracting Eclipse in a directory path containing spaces in its name.
To start Eclipse, double-click on the file containing Eclipse's icon (the file is named eclipse.exe on Windows and eclipse on Linux and Mac systems). Eclipse will prompt you to select a workspace. Within this context and in Eclipse's parlance, a workspace is the directory wherein your Eclipse projects will be placed. You had better create a new directory and name it eclipse_workspace (or something along the line) and point Eclipse to the location of your recently created directory. However, it bears mentioning that you can use any directory as an Eclipse workspace. It is also possible to enter the directory name directly in the workspace prompt, and Eclipse will take care of creating it for you.
After installing Eclipse, you are already able to beef it up by adding plugins of your choice. To do so, navigate to Help | Install new software…. We will cover plugins' installation in later chapters. For the time being, you just need to keep in mind that Eclipse can be extended right off the bat.
In the next section, we will highlight some of the changes that Eclipse has undergone. Of course, a lot has changed. However, let's not get bogged down with technical details. So in the next section, we will concentrate on describing only the most important and useful improvements (you will have to trust us on this one). If you are one of those people who crave completeness, you will be glad to know that we will also mention where you can get the complete list of improvements.
Two flavors of Eclipse Juno have been included in this release: 4.2 and 3.8. The basic difference between these two flavors is that 4.2 is built on top of the e4 (Eclipse 4) platform and has undergone a lot of GUI changes, but 3.8 is based on Version 3 of the platform. It is also fair to say that the 3.8 release focuses on stability and bug fixes, whereas Eclipse Juno 4.2 emphasizes the introduction of new features.
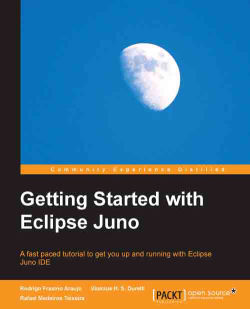
The default appearance of the platform's user interface has been revamped. The main goal of this visual update was to adopt a more modern visual style. Eclipse Juno features a workbench with a whole new look, as shown in the following screenshot. To better understand this screenshot and how things are visually organized in Eclipse, we need to go through some concepts. The term workbench refers to the desktop development environment. So, as shown in the screenshot, the workbench encompasses pretty much everything else. The elements inside the workbench are grouped into perspectives, in Eclipse's parlance (the surrounded area indicated by 2 in the screenshot). Perspectives, in turn, contain views and editors (in the following screenshot, the letter a represents views, whereas the letter b represents editors). They control what appears in the workbench. Each perspective provides all you need to perform a certain task. For instance, the Debug perspective contains the set of functionalities you would use while debugging Java programs. This functionality is split into views.
An example of a view that belongs to the Debug perspective is the Breakpoint view. (If you had never heard about breakpoints before this, do not worry. We will cover everything about them in a later chapter.) As for editors, most perspectives contain several views and a single editor. In Eclipse, as many editors as you want can be open at a given time. However, only one can be active at a time. As you progress through the book, you will switch perspectives very often. Also, you will learn how to use the most important views and editors.
At a glance, the two changes that will certainly draw the attention of the reader familiar with Eclipse are the debug control commands (Resume, Stop, Step Into, and so on). Since these have been moved out of the Debug view into the global toolbar (we will cover debugging in Chapter 3, Unit Testing with JUnit and Debugging), we now have a global search bar in the top-right corner. These elements can be seen in the previous screenshot in the area indicated by the number 1 (that is, on the menu bar or the global toolbar).
Have you ever wanted to use a view side by side with an editor? Now, in Eclipse Juno, it is also possible to stack views and editors. For instance, if you have a view whose information when displayed takes up too much space, you can stack it in the editor area to provide more space. To do so, just drag the view by its title bar while keeping the left button of the mouse pressed. As you move the view around the workbench, the mouse pointer will indicate where and what shape the view will take if you release the left mouse button. When the view is in the location that you want (in this case, between two editor tabs), release the left mouse button. The following screenshot shows a view (the Data Source Explorer view) that was docked in the editor area. You can do the same with any view. It is also worth mentioning that you can place views pretty much wherever you want.

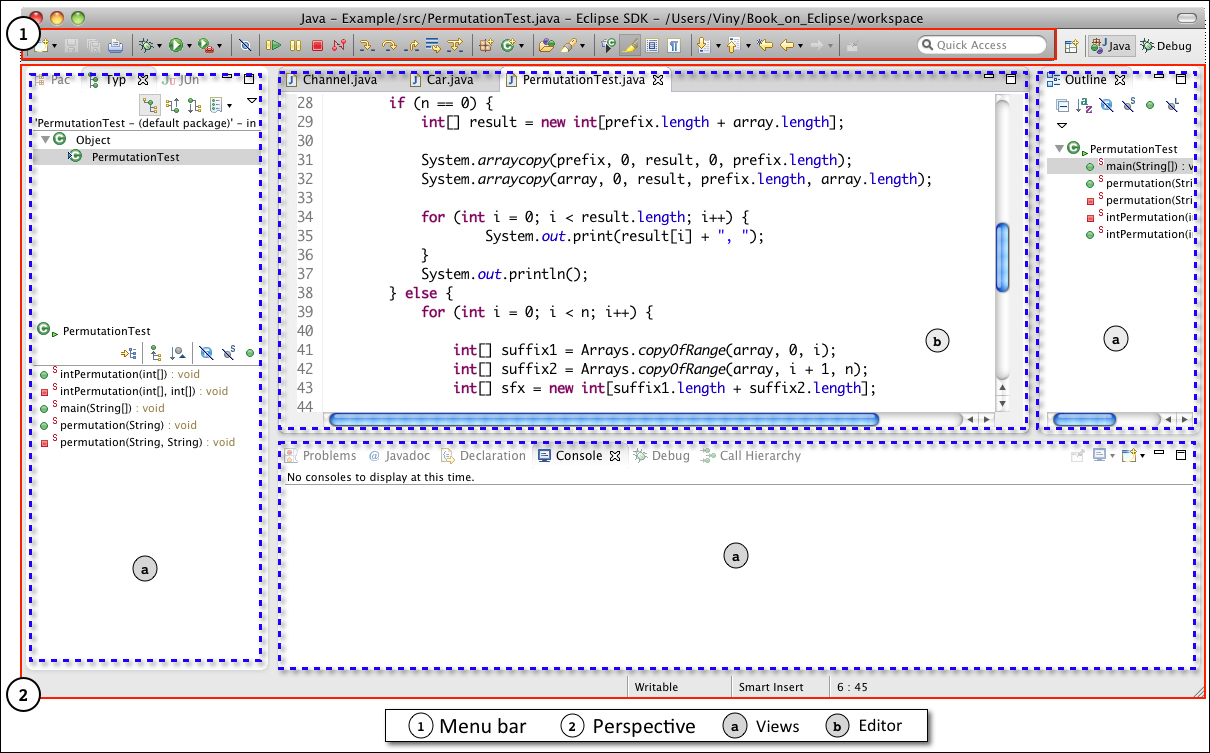
Another useful improvement is that editors can now be detached into their own windows. And what is better, the detached editor will retain its properties; this means that it will behave in exactly the same way as an editor still attached to the workbench window. This improvement is shown in the following screenshot. To detach an editor from Eclipse, simply drag it out of Eclipse's workbench window (main window).
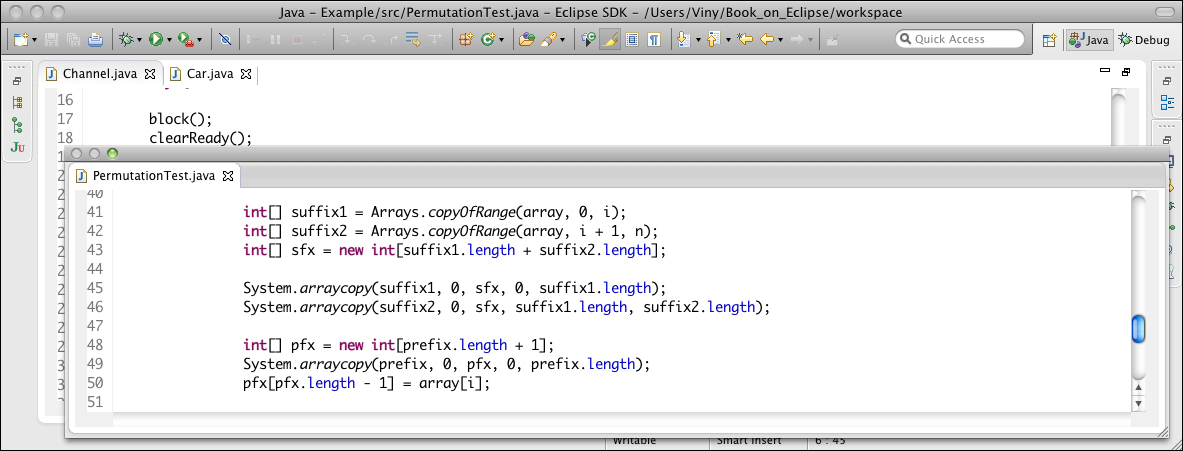
If you are one of those developers who try to get as much done as possible without lifting your fingers from the keyboard, you will find the new global search bar interesting and useful (the global search bar is in the top-right corner of the workbench). It allows you to access classes, views, perspectives, commands, menus, and so on quickly just by typing their names. The following screenshot shows the global search bar in action. To access the search bar without using the mouse, press Ctrl + 3.
In the previous versions of Eclipse, a lightweight refresh mechanism was introduced. This mechanism keeps the contents of the workspace synchronized with the filesystem; the out-of-sync files are automatically, asynchronously refreshed. However, in previous versions of the IDE, you had to enable this feature.
Now, however, it is enabled by default. If you want to disable it, navigate to Preferences | General | Workspace, and deselect Refresh on access. Unless you have a very strong reason to do so, you should keep it enabled.
Part of the Debug perspective has been moved to the main menu bar. To be more specific, the common debug control commands (that is, Resume, Stop, and so on) have been moved to the main menu bar (as shown in the following screenshot). If you do not like it this way, you can customize it. Navigate to Window | Customize Perspective…. Here, you can either add more debugging commands or remove them from the main menu bar altogether.
Tip
If you are feeling a little bit nostalgic and want everything as it used to be, that is, without the debugging command all over the place, that old look can be restored. To do so, first toggle the Show Debug Toolbar option in the Debug view's menu, and then disable the Debug toolbar from the Customize Perspective dialog. Also, if you want to return to the classic look (preserving the new features), you can navigate to Preferences | General | Appearance and select Classic from Theme.
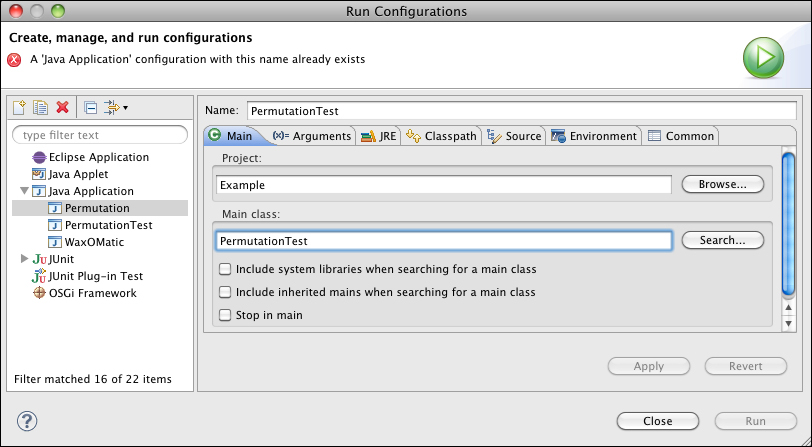
Eclipse Juno ships with improved launch configuration support. From now on, if you'll create a launch configuration with the same name as that of an existing launch configuration, the type of conflicting launch configuration will be shown in the error message. The following screenshot shows the error message that you will get when trying to create a launch configuration with the same name as a previous one. (You will learn how to create launch configurations for your Java projects in the next chapter.)
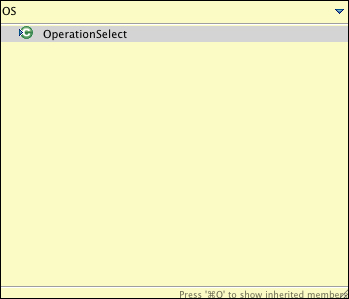
If you are already familiar with Eclipse, you have probably used the Quick Outline (Ctrl + O) and the Quick Hierarchy (Ctrl + T) views. These useful time-saving views are even better in Eclipse Juno: they now support CamelCase matching on the element name. For example, to search for ByteArrayOutputStream, simply type BAOS. The following screenshot shows a usage example:
Note
If you are a Mac OS X user, use the command button (?) to access the Quick Outline and Quick Hierarchy views instead of Ctrl.
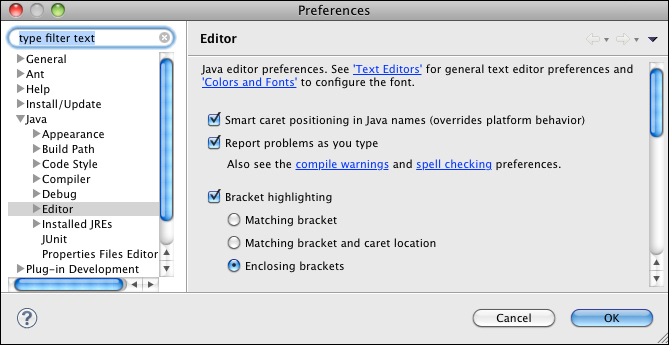
Another useful thing is the improved bracket-matching support in the Java editor. Now this editor supports the highlighting of enclosed brackets. This can be configured by going to the preference page at Java | Editor and then selecting the option Enclosing brackets, as shown in the following screenshot:
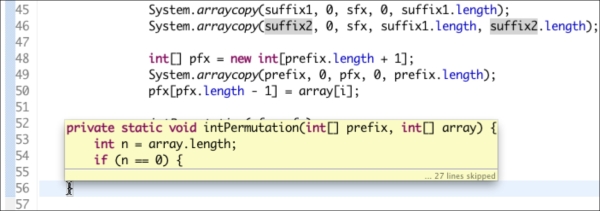
After enabling this option, go to the Navigate menu end select Go To | Matching Bracket (Ctrl + Shift + P), now this option works everywhere in the Java files. When inside a pair of brackets, pressing Ctrl + Shift + P navigates the caret to the nearest enclosing end bracket. On pressing the same buttons a second time, the caret navigates to the corresponding start bracket. Further, when you hover over a closing curly brace, Eclipse shows you the source code near the matching opening brace (as highlighted in the following screenshot).
There is way more than we described here. However, giving an in-depth overview of every improvement will not buy you anything. You'd better start on your journey towards Eclipse mastery. All the skin-deep improvements Eclipse has undergone are documented at http://archive.eclipse.org/eclipse/downloads/drops4/R-4.2-201206081400/news/eclipse-news-part1.html.
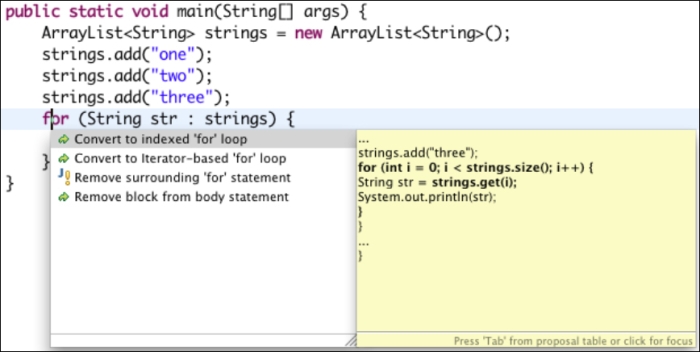
A lot of non-GUI-related improvements have also been made. For instance, now you can use the quick assist (Ctrl + 1) to turn an enhanced for loop into either an indexed for loop or an iterator-based loop. The option to transform a for loop into an indexed for loop is available for expressions that iterate over arrays or list-based types. The option to turn a for loop into an iterator-based for loop is only available for expressions of the type iterable. The following screenshot shows the new quick assist in action:
As we will see in Chapter 3, Unit Testing with JUnit and Debugging, Eclipse now ships with JUnit 4.10. Also, Eclipse supports the latest servlet application programming interface (3.0) that we will briefly discuss in Chapter 7, Web Development Using Eclipse WTP. The complete list of improvements is available at http://help.eclipse.org/juno/index.jsp?topic=%2Forg.eclipse.platform.doc.user%2FwhatsNew%2Fplatform_whatsnew.html.
Eclipse is arguably the most popular Java IDE (maybe that is why you bought this book; you figured it was about time you jumped on the bandwagon). In this chapter, we introduced Eclipse Juno and what this new version of the IDE brings to the table. As you saw, Eclipse has undergone lots of changes.
Besides introducing Eclipse, this chapter laid the foundation for the rest of the book. We emphasized some of the changes of the new version of the IDE. We could have spent more pages describing what is new, but that would not be appropriate for those of you who can barely wait to start using Eclipse. Above all, the most important changes have already been documented elsewhere (as mentioned before).
The next chapter delves into our hands-on tutorial, describing how to use Eclipse to develop Java applications. Good reading, and make sure not to get sidetracked by social networking sites.