


 Download code from GitHub
Welcome to our journey into game audio and audio development with Unity. It is the leading cross-platform game engine that provides an abundance of features to make developing games easy. For this book, it doesn't matter if you are completely new to game audio, Unity, or game development. We will start with the assumption that you are a complete novice and build from there. With each new chapter, we will be introducing new concepts and additional material. Of course, if you are an experienced Unity developer with basic knowledge of audio development, you may want to skim over the first couple of chapters. Regardless of if you are a novice or master, the later chapters in this book will cover plenty of Unity features and tools to give you the knowledge of developing AAA game quality audio for your games.
In this chapter, we will cover the basics of Unity and add audio to a project and scene in Unity. As this is the first chapter, we will be covering a quick introduction to game audio and then spend some time installing and configuring Unity. From there, we will introduce the core Unity components and how they function. Here is a summary of what we will cover in this chapter:
- Introduction to game audio
- Getting started with unity
- Importing audio into unity
- Audio sources and listeners
- 3D sound and spatial blending audio
As with most of the chapters in this book, it is expected that you follow along and complete each of the exercises. Completing the exercises hands on will reinforce all the concepts and provide you with a good foundation for the more complex material introduced in later chapters. All the material required to complete the exercises will either be provided via the book's downloaded source code or will be freely available online. Therefore, in almost all cases, you will be required to have an internet connection. If you feel that you understand the content in a chapter and just want to review the completed examples, then follow the instructions provided in the book's download to build the final examples.
Chances are, if you have played a few computer, video, or mobile games in your life, you are already quite familiar with what great game audio should sound like. Perhaps; you even cherish the audio from a couple of your favorite games. However, if someone asked you how they composed or mixed that audio, unless you were a professional audio technician, you would likely be at a loss on how the audio in a game mixes together. Fortunately, in this section, we will start to introduce some of the basic concepts of game audio, which we will of course build upon in later chapters in this book.
Game audio, unlike audio a sound designer would compose for film or television, will typically be broken down into three distinct areas as listed here:
- Music: This includes content such as theme or background music, in-game music such as a radio or a band playing, and can even include certain audio effects. Creating or obtaining unique music for your game could be as complex as recording a music track in a sound studio to purchasing rights to a music track of the asset store. In Chapter 10, Composing Music, we will explore how to compose your own unique tunes.
- Sound: This generally includes sound effects, such as creaking doors, explosions, footsteps, clicking, beeping, and many others. Most sound designers or developers will often browse through many of the free or paid sound effects sites to find a sound they like. Another option is to record your own sound effects, essentially becoming a Foley artist. In Chapter 10, Composing Music, we will look at some techniques to create some unique sound effects in software.
Note
Foley artists are traditionally people who create sound effects for film, television, and now games. The term Foley was coined from the originator, Jack Foley, who created real-time sound effects for early motion pictures. Today, the practice is no longer real time, but the name "Foley" is still synonymous with recording and creating sound effects.
- Vocals: The addition of vocals to games is a relatively new addition. Vocals were first introduced in cut or intro game scenes but now they are a main element in any AAA title. Furthermore, most AAA titles will enlist a well-known actor to provide vocals for further enhancement of the game. In Chapter 9, Character Lip Syncing and Vocals, we will cover some details about generating vocals. As well in several other chapters of this book, we will highlight the use of vocal cues in scenes.
While game audio design is similar to film and television, in many components, it differs primarily by its implementation. Audio for film follows a linear well-defined pattern, whereas in games audio is non-linear and may even be dynamic or adaptive. We will of course cover many aspects of how game audio is dynamic and adaptive in the Adaptive Sound and Music section.
If you have never heard of the term diegetic, you may just have gotten a queasy feeling in your stomach wondering what you got yourself into. Do not worry, the term diegetic refers to audio that is audible in the scene or screen as a part of the action or interaction. Conversely, non-diegetic refers to sounds that are added to the scene or screen and are not visible. Perhaps; it is more helpful if we look at some examples of diegetic and non-diegetic sounds, listed here:
- Diegetic sounds include:
- Sound effects: Explosions, gun fire, car engine, or collisions
- Music: Band playing, musical instruments onscreen playing, or car radio
- Vocals: Character dialogue, voices, or crowds
- Non-diegetic sounds include:
- Sound effects: Off screen sound effects such as coins entering a purse, tones to denote activity changes in a game, or footsteps
- Music: Scary background theme music, a novelty theme, or boss theme music
- Vocals: Narration, character vocal cues, or haunting voices
These terms may sound rather abstract right now, but be rest assured, we will get fairly intimate with the use of non-diegetic sounds in the adaptive sound and music section. As you will learn, one of the cornerstones of developing great game audio is building up good non-diegetic sounds.
Note
You may have already noticed that game audio borrows or shares a number of common film and television terms sound designers use. That, of course, is not by accident. Games have been using the same principals of audio design established for movies and television for many years. In fact, later on in this book, we will explore the use of various commercial Digital Audio Workstations (DAW) traditionally used for film or television and now plugins to Unity.
In virtually all digital games, the three base audio components we defined earlier may also include effects that will be broken into distinct layers or groups. This not only simplifies audio composition and development, which can become quickly complex as we will see, but also separates out critical audio elements. While you can think of each layer of audio playing separately during the game, from the player's perspective they will hear all the layers mixed together. The following list defines a set of basic layers we will use to group our audio:
- Ambient and environmental audio: This includes both diegetic and non-diegetic audio such as waterfalls, ocean waves, birds chirping, a rowdy tavern, crowds, a humming power plant, or a band playing music. This group is not just limited to audio sound clips but may also include effects such as reverb, echo, distortion, or other environmental audio effects. We will cover ambient audio effects in more detail starting in Chapter 2, Scripting Audio.
- Direct feedback audio: This will include any sound elements that that need to react directly to player input in a scene or on the interface. Diegetic examples of this would be shooting/reloading a gun, throwing a grenade, or watching something explode. Non-diegetic examples of this would be the sound of character getting shot, boss music playing, vocal cues, or dialog. Starting in a Chapter 2, Scripting Audio, we will cover several examples of this type of audio.
- Interface audio: This includes sounds activated as part of the game interface. This typically would include items such as button clicks or notifications. We really won't go into too much depth in this area, as interface sounds are fairly standard and use the same principals you learn to manage other audio that is easily transferable to the interface.
- Background or theme music: This area is relatively self-explanatory and immediately conjures up your favorite game theme music. However, background music can be used to dynamically change and thus alter the tone of a game during various conditions. This form of audio change is known as adaptive music and is something we will spend a great deal of time on, starting in the Adaptive sound and music section. In Chapter 2,Scripting Audio, we will introduce the use of background music in a scene.
Remember, this is only a basic definition of layers we have grouped our basic audio components into. As you will see through the rest of this book, there are a number of other ways we can group or layer audio. In Chapter 3, Introduction to the Unity Audio Mixer, we will cover the use and definition of audio groups in more detail.
Now that we have some very basic audio terminology defined, let's get into putting some of this knowledge to use in Unity. In the next section, we will look at downloading and setting up Unity.
This section assumes that you have never installed Unity before and will take you through a step-by-step exercise on download and installation. If you have installed Unity before, you may still want to quickly review this section, just to confirm you have installed the required components.
Follow the instructions to download Unity:
- Enter the following URL, https://store.unity.com/, into your favorite web browser or just click on the link.
- After the page loads, you will see several licensing options. For the purposes of this book, all you need is the
PersonalUnity license. So, just click on theDownload nowbutton on thePersonallicense as shown in the following screenshot:

Screenshot from Unity store showing Personal license Download now button
- A new page will load, showing a big green button labeled
Download Installer. Click on the button to download the Unity Download Assistant with your web browser. - After the package has completed downloading, open it as you would any other program. The Unity Download Assistant is relatively small so it should download quite quickly.
- Agree to any security notifications or notifications you normally encounter when installing new software on your computer. After the installer launches, you will see a screen similar to the following screenshot:

Unity Download Assistant starting
Note
If you are unable to install software on your computer due to security restrictions or other account settings, be sure to contact your administrator and ask them to give you access or have them install the software. During the course of this book, we will be downloading several software packages so it is advisable that you have the ability to install new software on your machine in order to complete all the exercises in the book.
- Click on the
Nextbutton to continue. Then on the next page, select the checkbox to agree to the Unity license as shown in the following screenshot:

Unity terms of service page
- Click on the
Nextbutton to continue. The next page will likely offer you an option to choose between 32 and 64-bit architecture. It is usually best to take the default (64 bit in most cases) and click on theNextbutton to continue. - The next page will allow you to choose the Unity components you want to install. This page allows you to choose from a number of components to install along with Unity. For the purposes of this book, you only need to install the default components. However, if you feel you may need or want other components, such as Android or iOS, feel free to select those as well. Just be sure to have the three main components selected as shown in the following screenshot:

The Choose Components section of the Unity install
- After you have made your component selections, click on the
Nextbutton to continue. For the next couple of dialog pages, just keep the defaults and let the installation download and install Unity. Since this can take a while, feel free to grab your beverage of choice while you wait for the installation to complete.
The Unity installation will generally run very smoothly, but if you do encounter some issues, it is best to follow the recovery instructions the installer may provide. If that doesn't fix the issue, just do a quick search and check the Unity forums. Unity has a huge community of developers that are very eager to assist newcomers with any issues, and it is almost certainly likely someone has already encountered a similar issue to yours.
Once the Unity installer has finished installing Unity, follow the instructions here:
- On the last page of the installer, you will usually be prompted with an option to launch Unity right away. Be sure that option is selected and then exit the installer.
- As the program launches, you may get a notice to provide an exception in your firewall; be sure to allow this. After Unity launches, you will be welcomed by a login screen as shown in the following screenshot:

Unity login or welcome screen
If you have never installed Unity before, you will need to create a Unity Account. Just click on the blue
create onetext as shown in the preceding screenshot. This will take you to a registration area of the Unity site. From there, complete that account setup, and when you are done, return to this item.Now that you have a Unity account created, enter your email and password in the dialog and then click on the
Sign Inbutton. After you sign in, you will be directed to the project page.
That completes your first step to becoming a Unity developer. In the next section, we will create a new project and explore the Unity interface.
Now that we have Unity installed, let's dive right in and create a project and then take a quick overview of the interface. Perform the following directions to create a new Unity project:
- If this is your first time running Unity, at this stage, you will have a dialog with a button allowing you to create a new project; click on the
NEW. For those of you who have jumped here from another section in the book, be sure to launch Unity and make sure you are logged in with your Unity account. From there select theNEWproject button at the top of the Unity start page. - The project dialog will open. Enter the project name as
GameAudioBasicsand then keep the defaults for all the other settings as shown in the following screenshot:

Creating a new project in Unity
- After you fill in the Project name, click on the
Create Projectbutton. - Unity will close the dialog, and you will see a progress dialog flash as the project is initialized and the interface loads. When Unity is done loading, you will see a screen that looks similar to the following window:

Unity interface
Note
If you have run Unity before or if you are using a different license, such as pro, your screen may appear to be quite different. Aside from any themes applied, you can return to the default layout by selecting from the menu Window | Layouts | Default.
Now that we have Unity running, let's review what each of the main windows or elements are for. You can follow along using the reference numbers shown in the preceding window screenshot to match the items in the list here:
- Hierarchy window (1): This window shows the currently displayed scenes and scene elements called a GameObject in Unity. Currently, there should be a scene labeled
Untitledin the window. Click on the arrow beside the scene to expand it and then click on the items beneath the scene. Notice how the other windows change depending on your selection. - Scene view (2): You can think of the scene window or the view as the design canvas for your game project. In this view, you can select and move objects around using the mouse or the principal direction arrows (the colored arrows). Feel free to select objects in the view and move them around. Don't worry about moving things out of place or getting lost as we are creating a new scene before we start building anything of importance.
- Inspector window (3): This window exposes and allows you to edit the properties and components of the currently selected GameObject. A lot of the time you spend working in Unity will be editing values in this window. Again, feel free to explore this window by editing some properties of a GameObject.
- Project window (4): This window shows all the resources or assets you have in the entire Unity project. As you can, see the project is currently quite bare. Not to worry, we will be quickly adding new assets.
- Game view (5): This window or view shows how the game will look to the player. It differs from the
Sceneview because it only shows what the player sees. If you click on the game window tab, you will see a sparse view of the ground layer and sky. Again, this is because we have yet to add anything interesting. - Play mode (6): This is the set of buttons at the top of the Unity interface control running the game in the editor. The buttons allow you to play and pause the game play. If you click on the play button right now, not much will happen other than the
Gameview will present itself.
At an advanced level, that covers the main elements of the Unity interface without getting bogged down in too many details. It could very well take you months or years to become an expert in using all the features of Unity. So, in order to not overwhelm you, we will only focus on the relevant information you need to complete an exercise.
So far we have been looking at an empty project and scene. In the next section, we will import a project from the Unity Asset Store.
One of the really great features of Unity is the Unity Asset Store. Game development is a complex process that requires many artistic skills in multiple areas to develop quality assets, such as 3D models, animation, textures, sound, music, shaders, and more. Chances are, if your development team is just you or a small group of developers and artists, your team will lack the skillset or time to develop all the assets for your project. Fortunately, the Unity Asset Store provides professional game quality assets at very competitive pricing or in some cases for free. Unity itself also provides a number of high-quality sample projects free of charge on the store. We will be using a couple of those projects in this book as the base for our exercises in audio development.
Follow the instructions here to download and import the project we will use for the rest of the exercises in this chapter:
- From the menu select
Window|Asset Store. This will open a new tab beside theSceneandGameviews calledAsset Store. - After the page loads in the window, there should be a search box visible at the top of the window. Enter the text
unity viking villagein the search box and click on the search button as shown in the following screenshot:

Searching in the Unity Asset Store
- When the search completes, there will be a list of search results. The first result in the list should match Viking Village from Unity Technologies. Click on this item, and you should see the asset page as shown in the following screenshot:

Viking Village asset page
- Click on the blue button labeled
Download, as shown in the screenshot to start downloading the asset. - As the asset downloads, the button will show the progress. The download may take a while, so be patient and of course feel free to grab another one of your favorite beverages.
- When the download completes, the button will read
Import. Click on the button to import the project into Unity. You will be immediately prompted by a dialog informing you that this is a complete project, as shown here:

Project import warning
- Click on the
Importbutton on the dialog to continue the project import. Importing a new project over our project is entirely okay since we have nothing we wanted to save at this point. - A dialog will appear showing you the progress of the import. This take a couple minutes after which you will be prompted with the
Import Unity Packagedialog, as shown here:

Import Unity Package dialog
- The
Import Unity Packagedialog shows all the assets to be imported as a part of the project. Feel free to scroll through the list and review the items being imported. Then, click on theImportbutton on the dialog to complete the project import. - Yet another dialog will open showing you the progress of the last stage of the import. Just be patient and enjoy that beverage or grab another, the asset will load in several more minutes.
Note
This project asset we are importing is on the large side, at around 900 MB. Fortunately, we will only need to do this once. As we will continue to reuse this project throughout the book. Generally, the assets you download from the Asset Store will often be under 100 MB.
The amount of time to import a project will be determined by the size of the asset and the content. Assets such as textures, for instance, will be compressed and often take extra time to load. Unfortunately, the sample project we are loading is composed of several compressed assets.
- When the import is complete, you will now find that the
Projectwindow is now showing several new asset folders.
Now, that we have our base project imported, in the next section, we take a quick look at the main scene and several features that will help us going forward.
After doing all that work getting the project loaded; okay, perhaps not so much work as waiting, let's load the project scene and take a quick tour of the asset by following the directions here:
- Click on the
Scenesfolder in theProjectwindow and then double-click on theThe_Viking_Village.unityfile to open the scene. The screenshot here shows theProjectwindow:

Opening the project scene
- After the scene loads, you will notice that the
Hierarchywindow is now filled with objects. Click on theSceneview tab to open the view and you should now see something very similar to what is shown in the following screenshot:

Hierarchy window and Scene view
- Press the editor play button, as shown in the preceding screenshot to start the scene and run the game.
- As the game is running, the
Gameview will automatically present itself. Use the following commands to move around the game and explore the environment and features:- W, A, S, D: The standard first person movement commands. Use these keys or the arrow keys to move around the scene.
- Mouse: This controls the look direction.
- Spacebar: This is used to jump up. Quickly taping the Spacebar key will cause the camera to hover/fly while in manual mode.
- C: This toggles between a controlled camera walkthrough and the manual or keyboard movement (first person).
- Esc: This exits the mouse lock and makes the mouse visible in the editor again.
- Take your time to explore the environment and feel free to move around as much as you like. When you are ready to move on, press the Esc key to make the mouse visible again and then press the play button again to stop the game running.
- Hopefully, you noticed, as you were moving around the game, how quiet everything was. Fortunately, that makes this scene the perfect canvas for us to develop our own game audio. This is exactly what we will do for the next several chapters in this book.
Installing Unity and getting your first project loaded is a great first step to becoming a Unity game developer. Congratulate yourself for your patience in spending the time to work through this section. In the next section, we will get back to more audio development basics.
Aside from downloading content from the Asset Store, there are a number of ways of introducing content into a Unity project. Most often, the simplest way of adding content to your project is placing the appropriate files into the relevant project folders. Unity is then smart enough to inspect the new files, provided the file type is supported by Unity, and determine the asset type to automatically import the content. Since there are a number of audio file types out there, let's take a look at the audio file format Unity currently supports in the following list:
.wav/.aif: Both of these formats are uncompressed, lossless formats, which means they are exact copies of the original audio. The.aiforiginated on the Mac, while.wavcame from the PC. Now both formats are supported by either operating system.
Note
Compressing audio or other forms of media is done in order to reduce the file size for easy transport or download. Since media compression will cause a loss of quality to the media, the term lossy is used to denote a compressed media format. Whereas, lossless or no loss, denotes a media format with no compression and thus no loss in quality.
.mp3: This is the most common compressed or lossy format for audio. This format became very popular for transferring/downloading music..ogg: This, also known as Ogg Vorbis, was developed as a patent free alternative to mp3. The standard format is lossy but it can support lossless as well.
Note
Unity can also import tracker module formats such as impulse tracker (.it), scream tracker (.s3m), extended module file format (.xm), and the original module file format (.mod). We won't cover these file types until later, in Chapter 10, Composing Music.
Now that you have a better understanding of the supported audio files types, let's import a couple of files into our project in the following exercise here:
- Before importing any content, we will create a new set of folders in the project. This will help us organize and find this content later. As you can see, by just taking a quick look through the
Projectwindow, a game project may contain numerous assets in multiple areas. - Right-click (control + Click on Mac) on the root
Assetsfolder in theProjectwindow. Then, selectCreate|Folderfrom the context menu. - A new folder will be created under the
Assetsfolder with the cursor prompting for input. Name the new folderAudio. - Right-click (control + Click on Mac) on the new
Audiofolder and selectCreate|Folderfrom the context menu. Name the folderAmbientand yourProjectwindow now look like the following screenshot:

New Audio and Ambient folders created in Project window
- Right-click [control + Click on Mac] on the
Ambientfolder and selectShow in Explorerfrom the context menu. This will open a file explorer on your desktop. Double-click on on theAmbientfolder to open it; the folder should be empty.
- Go to your desktop and open the books downloaded source code
Chapter_1_Audiofolder in another file explorer window. Drag the folders so that they are adjacent to each other and both visible. A sample screenshot is shown here:

Ambient and source code folder: Chapter_1_Audio side by side
- Drag and drop all the files from the
Chapter_1_Audiofolder into theAmbientfolder. Then, switch back to the Unity editor. After a couple seconds, you should see theAmbientfolder in theProjectwindow update with the imported audio files, as shown here:

Imported audio files showing in project folder
- Select the
lake-shore-waves2.wavaudio clip in the folder and then divert your attention to theInspectorwindow. You should see something similar to what is shown here:

Inspector window showing imported audio clip
- Click on the asset play button, as shown in the preceding screenshot, and enjoy the soothing sounds of waves hitting the lake shore. We will get into more details about what those other properties are in the next section.
Now that we have imported some new audio files into our project, let's take a more detailed look at how Unity handles them by following the exercise here:
- Focus your attention to the bottom of the Inspector window showing the audio file import settings. The following is a labeled screenshot of the details we want to pay attention to:

Examining the audio file details
- The following is a definition of what each of those sections/terms mean:
- Audio channels: This shows the various audio channels composed into the file. Unity can support up to eight channels of audio. The file we are showing has two channels in order to support stereo.
- Compression: Unity will automatically apply compression against imported audio files. Very often you will want to stay with the defaults, but we will look at ways of altering the compression method here. Vorbis, the compression type shown, is similar to mp3. The compression formats supported by Unity are: Vorbis, PCM, and ADPCM.
- Sample rate: This represents the frequency at which the audio sample was recorded, displayed as the samples per second. Most audio will be recorded in the range of 44100 and 48000 Hz. Generally, the higher the sample rate, the better quality the audio will be and Unity supports up to 192000 Hz.
- Mono/Stereo: This stipulates if the audio will play in stereo or mono. This setting will be honored if a sound is played in 2D space. However, if the sound is played in 3D, this will change. We will explore 3D sound in more detail at the end of this chapter.
- Play time: This displays the minutes and seconds an audio file will play for.
- Now that we have those definitions under our belt, we will take a look at how to alter some of the import settings. Switch your attention to the top of the
Inspectorwindow as shown in the following screenshot:

Inspector window audio import settings panel
- Since we will be importing a number of audio files into Unity, it is important we review each of these settings in more detail here:
- Force To Mono: This setting allows you to force Unity to down sample the file into a single channel, which is useful for sounds be played in 3D or you just don't want to play in stereo.
- Normalize: This setting won't activate unless you force mono. Normalize refers to the down sampling process of converting a multichannel sound to a single channel. Normalize all the channels to be sampled at an equalized volume.
- Load In Background: This sets the clip to load in a background while the game is running. If you have a large audio file, you will certainly want to check this setting.
- Load Type: This tells Unity how to load the clip into memory and supports the following settings:
- Decompress On Load: This works well for small to medium size files. The files will be decompressed into memory on load and not suffer any CPU performance when playing.
- Compress in memory: This is best for large files played less frequently. Files will need to be decompressed before playing but the savings in memory may make this a preferred option.
- Streaming: This plays the file directly from the disk. It is a great option for media played infrequently or memory management is an issue.
- Preload Audio Data: By default, the audio clip will be loaded unless this option is unchecked. Again, this is another good option for less frequently played files.
- Compression Format: This is the format used to compress the clip and is dependent on the game build settings. The format will match one of the following settings:
- PCM: The pulse-code modulation is a format best used for smaller file sizes.
- ADPCM: This is the format best used for short sounds with a lot of noise such as footsteps and weapons.
- Vorbis/MP3: This is best used to compress larger files such as our sample file. The quality of compression can be set by the quality slider.
- HEVAG: This is similar to ADPCM.
- Quality: This is a slider that allows you to downgrade the quality of a clip with the benefit of reducing the file size.
- Sample Rate Setting: This sets how the sample rate of the clip should be handled and will be one of the following:
- Preserve Sample Rate: This prevents the sample rate from being modified.
- Optimize Sample Rate: This will select the highest rate sampled within the file and apply that.
- Override Sample Rate: This allows the sample rate of the file to be downgraded. This will generally reduce the audio quality but for some large files or specific audio effects this may be preferred. This setting can never be used to artificially increase the quality or sample rate of a clip.
- Sample Rate: This value can only be changed if the Override Sample Rate setting was selected. Again, a sample can easily be downgraded to reduce the file size and quality but this setting cannot be used to upgrade a file beyond what it was originally recorded at.
- As you can see, there is a lot going on in this panel and initially it may be difficult to grasp all the terminology used. Fortunately, this panel is something we will come back to several times over the course of this book and you will get to become quite familiar with the terms and settings.
Let's use some of that new knowledge to tweak the settings on that torch.wav file we just imported by conducting the following exercise:
- Select the
torch.wavfile in theProjectwindowAssets/Audio/Ambientfolder. - In the Inspector window, check the
Force To Monosetting. The torch clip will be used as a full 3D sound and does not need two channels or stereo. Be sure theNormalizebox is also checked. - Click on the
Applybutton at the bottom of the panel. After a few seconds, this will apply the changes to the audio clip; Notice at the bottom of the Inspector window how the audio is now using only a single channel. Click on the play button to play the clip, you will most likely not hear much difference. - Click on the
Sample Rate Settingdrop down-list and select theOverride Sample Rateoption. Then, open theSample Ratelist and select22050 Hzfrom the list and then click on theApplybutton. After the settings are applied, the preview clip should match the following screenshot:

Preview showing modified audio clip settings
- The reason we downgraded the clip is to reduce some of the harsher tones. Feel free to downgrade or adjust the sample further to see the effects it has on the sound quality. Be sure to reset the clip to the settings shown in the preceding screenshot as we will be using this sound later in the chapter.
Note
Downgrading the torch clip to balance the tones may not be an optimal solution in some cases and in fact there are many other ways of equalizing a clip, as we will see. However, optimizing a clip at the source, as we did here, will always be in your best interest. In fact, if your game becomes bogged down due to overuse of audio, one of the core solutions is to optimize the imported file settings first. Audio performance and optimization is something we will cover in more detail in Chapter 11, Audio Performance and Troubleshooting.
- After you are done editing the audio clip settings, select
File|Save Projectfrom the menu. This will save the project and allow us to close the editor now if we need to.
That completes our introduction to importing audio content into Unity. In the next section, we will look at how these clips can be added to our village scene.
Before we add audio to our scene, we need to cover a few more basic concepts within Unity.
Of course, the best way to do that is to get hands on and explore more of the scene objects with the following exercise:
- If you have taken a break, open back up Unity and reload the
GameAudioBasicsproject, which we saved at the end of the last section. Of course, if you haven't taken a break, good for you, and just continue as you were. - Now, divert your attention to the
Hierarchywindow and specifically the search field at the top of the window. Click on the down arrow at the left of the search field, to select the form of the search as shown in the following screenshot:
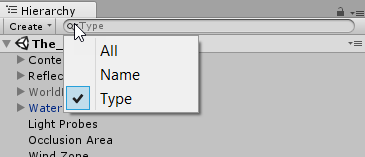
Setting the search type
- Now, enter
AudioListener; make sure to use the same case in the search field. This will filter the GameObject in theHierarchywindow with an AudioListener component attached, as shown in the following screenshot:
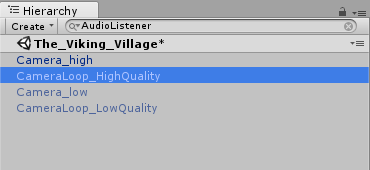
Hierarchy window showing filtered list of game objects with AudioListener
- As you can see, this filtered list of objects is showing us the various scene cameras. A camera in Unity is what captures the rendered view of the scene. As such, you can think of a camera as the player's eyes to the game world. Therefore, it only makes sense that we also make the camera be able to listen to the world using the AudioListener component. That way, as the camera moves around the scene, the ears or Audio Listener, will also be tightly coupled.
Note
A GameObject in Unity is the base scene object. What differentiates one object from another is the components attached to the GameObject. A component is a script that applies specialized functionality to a GameObject. A component could include everything from a camera, audio listener, audio source, mesh renderer, and so much more. The Inspector window allows you to view, modify, add, and remove components on a GameObject.
- Select
Camera_highat the top of the list in theHierarchywindow and take a look at theInspectorwindow and bottom-right corner of theSceneview as shown in the following screenshot:
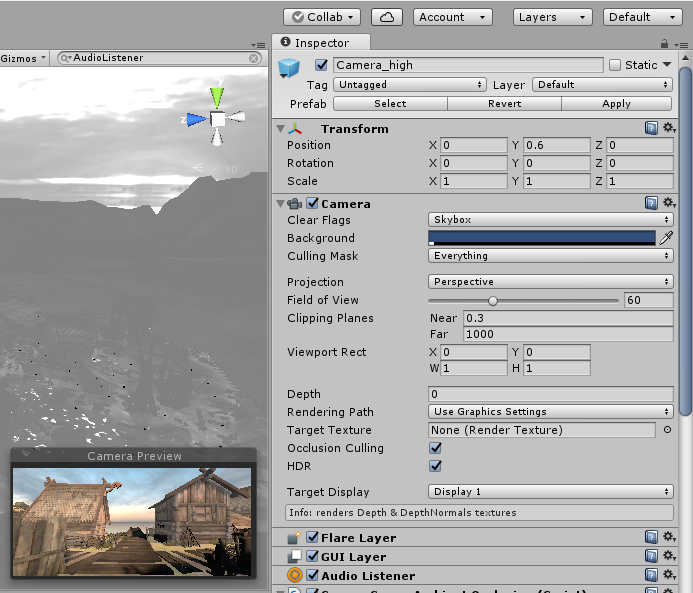
Camera preview and Inspector window
- As you can see, there are a number of components attached to the
Camera_highobject in theInspectorwindow. We won't get into the details of all the components but just take notice of theCameraandAudio Listener. Remember that these two components equate to the scene's eyes and ears. Select theCamera_highobject selected and press thePlaybutton to run the scene. - After the scene starts running and switches to the
Gameview, press the Esc key to unlock the mouse. Then, go to theInspectorwindow and scroll through the components. Feel free to turn off and on components by unchecking the checkbox beside the component name. You can even alter the component settings if you like. Notice how theGameview changes as you make those changes. Don't be afraid to change several things; as long as you are in play mode, nothing will be saved. - When you are done with exploring the
Inspectorwindow, press the Play button again to stop the game running.
Good. As you can see, we already have a number of Audio Listener components set up on the scene. This means that we can certainly hear any audio. However, we are still missing the source of our audio, which hasn't been configured. In the next section, we will add an Audio Source component to our scene.
In order to hear any audio in a scene, we need two components added to game objects. They are the Audio Listener - the ears, and the Audio Source - the noise. As you probably already realized, the dead silence of our scene must mean there are no configured Audio Sources. In the following exercise, we are going to rectify that issue by adding an Audio Source:
- Open the Unity editor and make sure the
Viking Villagescene is loaded. If you are continuing from the last section, be sure to click on theXon the right side of theHierarchywindow search field. This will remove the type filter and show all the scene objects again. - Locate the GameObject called
AccessibleVolumein theHierarchywindow and click on the arrow beside it to expand and show its child objects. Select theCapsule 5object and press F, to frame select the object as shown in the following screenshot:
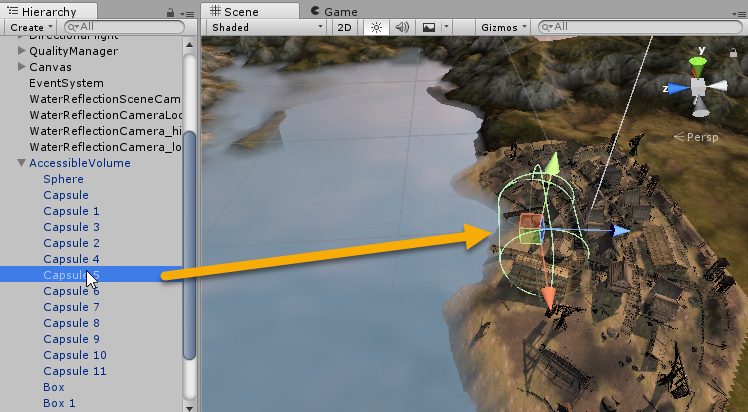
Frame selecting the Capsule 5 GameObject
- What we want to do is use the
Capsule 5object as an Audio Source for ourlake-shore-wavesambient sound we imported earlier. We will use this object as it is conveniently situated close to where we want our Audio Source. Before adding the audio though, let's make a couple changes to the capsule.
Note
We are going to add the audio to the scene following the audio layers and groups we defined earlier. Therefore, the first layer we will be adding the audio to is for the ambient and environmental background noises.
- With the capsule object still selected, rename the object
Ambient_lake-shore-wavesand then set theZposition on theTransformcomponent to60as shown in the following screenshot:
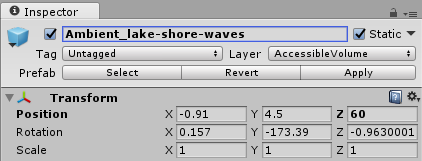
Renaming and altering the position of the Capsule 5 GameObject
Note
Giving your game objects an appropriate name is essential, especially as your scene becomes more complex. Notice how we prefixed the object name with our layer name and then followed that with the audio clip name.
- After you changed the
Zposition of theTransform,you will notice that the object moves to shore of the lake in theSceneview. This is exactly what we want, as this capsule object will be the source for the lake-shore-waves ambient sound. - Next, click on the button
Add Componentbutton at the bottom of theInspectorwindow. Typeaudioin the search text and notice how the list filters to components with audio in the name. Select the Audio Listener component as shown in the following screenshot:
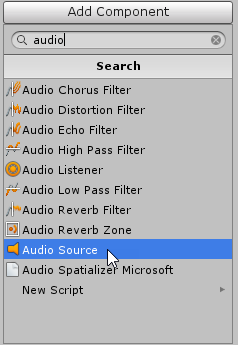
Adding the Audio Source component
- We now have an empty
Audio Sourcecomponent on our object. Click on the target icon located next to theAudioClipproperty. This will open theSelect AudioClipdialog. Select thelake-shore-waves2clip from the list as shown in the following screenshot:
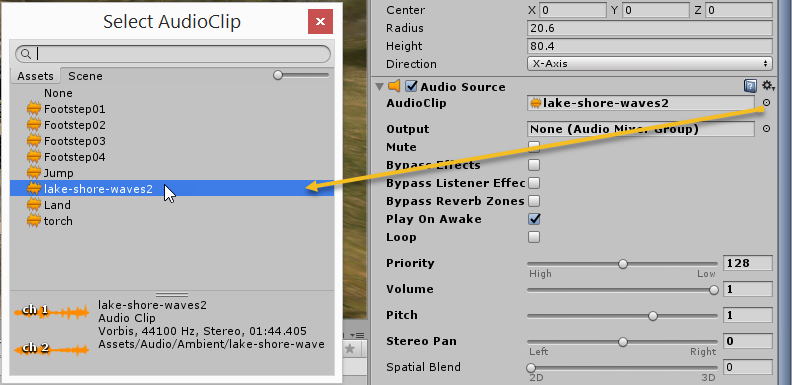
Setting the AudioClip on the component
- Close the dialog after selecting the clip. We won't worry about all the other settings on the component right now. However, we do want to make sure the clip loops, since, after all, it is ambient sound that should keep playing over and over again. Click on the checkbox next to the
Loopsetting to make sure the audio loops.
Note
Audio clips will typically be designed to either play forever, called a loop, or play just once, called a single shot. In most cases, you will want your ambient sounds to loop, but not always. Whereas, audio-like weapons or footsteps will generally be a single shot. A looping audio clip is one that is designed to play over and over again with no noticeable break or change when the clip plays over.
- With the Audio Source is added to the scene, press the Play button. Explore the scene by moving around and listening to the audio as you move. When you are done exploring, press Ctrl+P (command + P on Mac) to stop the scene running.
- Select
File|Save Scenefrom the menu, to save the changes we made to the scene. It is a good habit to save your scene often in Unity and especially when you are working with large scenes.
Good, we now have an ambient Audio Source in our scene. Of course, most likely, the first thing you noticed is that the sound was everywhere and that certainly is not what we want. We obviously only want our waves sound to be more audible when we get closer to the lake and certainly not so pronounced everywhere. What we need is to make our Audio Source use 3D or spatial sound and this is exactly what we will cover in the next section.
In this section, we are going to introduce the concept of 3D sound and show how this is implemented at the basic level within Unity. Since the introduction of virtual reality, there has been other implementations of 3D or spatial sound, which Unity can support through plugins, but that is outside the scope of this section. Either way, perhaps it is best to start with a definition of 2D and 3D sound using the following diagram:

Representation of 2D stereo versus 3D mono or spatial audio (see: https://icodelikeagirl.com)
In Unity, the basic simulation of 3D sound is achieved by reducing the audio to a single channel and then attenuating (altering the volume), depending on the distance and location to the listener. There are several variables that allow us to customize how an Audio Source is spatialized in Unity, which we will cover when we convert our lake waves 2D ambient sound to 3D in the exercise here:
- Continuing from the last section, be sure the
Ambient_lake-shore-wavesobject is selected in theHierarchywindow. - Go to the
Inspectorwindow and scroll the component list to the bottom so that all of theAudio Sourcecomponent is visible. - Drag the
Spatial Blendslider all the way to the right in order to make the sound entirely 3D as shown in the following screenshot:

Setting the spatial blend on an Audio Source
Note
Depending on the audio effect you are after, you may not want a full 2D or 3D Audio Source. Fortunately, with the Spatial Blend slider, you can select a mixture of both 2D and 3D sound. An example of an Audio Source that may use both 2D and 3D is an audio effect that needs to be heard everywhere but also has an obvious source.
- At this point, we won't make any other changes to the
Audio Sourcebut take note of the 3D sound settings and especially the graph at the bottom of the component. Observe the line representing the listener position on the graph. Pay particular attention to that line, and press the Play button to run the game. - Move around the scene and move to the water down the boardwalk. Notice how the sound does get louder as you approach the water or if you turn the direction will also change to represent where the Audio Source is. However, the sound probably isn't quite as loud as we want and the falloff is just too gradual.
- Stop the scene from running by pressing Ctrl+P (command + P on Mac).
- Let's alter the 3D settings on our Audio Source. Change the
Max Distanceon the3D Sound Settingsof the Audio Source to100. Notice how this changes the graph as shown in the following screenshot:

Changing the max distance of the Audio Source
- Press play and move around the scene again. Notice how the sound now attenuates better as you move close to the shore. Feel free to change the various 3D sound settings and see what effect they have on the audio playback.
Note
The 3D Sound Settings volume/distance graph curves and lines can also be altered by clicking on them and dragging the line or keys to alter their position and shape. Double clicking on a curve or line will introduce a new key which will allow you to alter the shape of the curve even further. With this ability to alter an audio sources volume, spatial, spread, and reverb over distance is very powerful and can allow you to create some very interesting effects.
- When you are finished altering the Audio Source settings stop the scene. At this point, if you find a combination of different audio settings, you think, might work better, feel free to set those values now. After you are done making the changes, be sure to save the scene by selecting
File - Save Scenefrom the menu.
As you can appreciate, now there are numerous ways to configure a sound to be 2D, 3D, or some mixture of both. How about we add another ambient sound for all the torches in our village by following this exercise:
- Switch your attention to the
Hierarchywindow and click on the search type dropdown on the left of search field. Then, be sure to select byNameas shown in the following screenshot:

Changing search filter type to by Name
- Enter
prop_torchin the search field. Notice how theHierarchywindow filters the objects to just display those with the matching name. Select all the objects in the window by clicking on the top item and then while holding the Shift key, select each of the remaining items in the list. So, all the torch items are selected as shown in the following screenshot:

Selecting all the torch objects
- Making sure that all the objects are still selected, go to the
Inspectorwindow and click on theAdd Componentbutton at the bottom of the window. Then, as you did before, typeaudioin the search field to filter the list to audio components. Select the Audio Source component from the list to add it to all theprop_torchGameObjects.
Note
In our example, we are modifying several copies of the same object, the torch. Yet that doesn't have to be the case. You can use this same technique to modify several different objects as long as they share a common component.
- After the
Audio Sourceis added to the objects, set the properties on the component to match those in the following screenshot:

Torch Audio Source properties
- If you find yourself struggling to set any of the properties on the Audio Source component, refer to the preceding sections in this chapter. After you are done making the edits, press the Play button to run the scene.
- Be sure to explore the scene and be sure to move close to the water and around the torches. Feel free to make changes to the Audio Source settings as you explore. As always, if you find some settings sound better, remember those and make those edits again after you exit the play mode.
Note
Have you noticed that the exercise instructions become less specific as you move through the exercises? Well, of course that is intentional and not only will it test your knowledge and make sure you are paying attention, but it also forces you to explore the Unity editor and find your own way to do something. There are numerous ways to do even the simplest tasks in Unity, and as you gain experience in the editor, you will find your own preferred ways of doing things.
- When you are done testing and tweaking audio, be sure to the save the scene and project.
Well, that completes this section and our introduction to 3D sound in Unity. We covered this material quickly and did not go into details of the 3D Sound Settings. There will be plenty of time to cover additional details about those settings in upcoming chapters.
In this chapter, we introduced a few core concepts in game audio, which we will expand on in successive chapters. After the audio introduction, we focused on downloading and installing Unity, followed by a quick walk through of the editor. From there, we imported a complete sample project from the Asset Store as a basis for completing the exercises in this and the later chapters. We then imported audio assets into the sample project and learned about compression, sample rates, channels, file formats, and more. With those new audio assets, we configured an ambient sound in our sample project, deciding later to convert that sound to 3D after understanding some basics of spatializing sound. Finally, we finished the chapter by adding another ambient sound to our scene and altering the various Audio Source settings to our auditory preference.
With this introductory chapter done, in the next chapter we will again dive into new areas of game audio and Unity development, which will include an introduction to Unity scripting, audio triggers, physics, and weapons sounds and music.


