


Communities were made generally available in the Salesforce Summer '13 release and are available in Performance, Unlimited, Developer, and Enterprise editions of Salesforce. The purpose of communities is to share information and support collaboration between companies, their customers, and their partners. A Salesforce organization can have multiple communities, each serving a distinct purpose or segment of customers/partners.
A community can be implemented using a Force.com site augmented by Visualforce where required, or by a more traditional HTML/CSS-based site using Site.com.
Communities share a lot in common with the customer and partner portals, which have been a mainstay to connect your Salesforce organization to external customers and partners. Although they are still available, and still supported by Salesforce, it is clear that the future direction of Salesforce is to use (or migrate to) communities in lieu of these portals.
In this chapter, we will be building a Volunteer Community for Force volunteers, a volunteer organization dedicated to providing support services for youth as they reach adolescence and approach adulthood. They already use Force.com to track sponsors, volunteer teams, and volunteer events, but would like to implement a community to connect to their growing network of volunteers.
Some key points to keep in mind when determining the requirements for a Salesforce community are as follows:
Who is my target audience?
What business processes am I trying to add value to?
What Salesforce information do I need to expose to my community?
What changes will be required to my organization's security model?
Will the standard Salesforce styling and appearance suffice, or do I need the HTML/CSS capabilities of Site.com?
Will I need to use Visualforce? In this case, you will probably need to use Force.com sites for your community.
Do I need to purchase more Salesforce licenses for my community members?
The community we are building will be provided by a Site.com site. Site.com is a cloud-based content management system of Salesforce used to build websites and social pages. The community that we are building will provide the following pages:
An overview of the steps that we will follow to build a community is as follows:
Note
This chapter assumes that you have enabled the improved setup user interface in Salesforce by going to Customize | User Interface and selecting the Enable Improved Setup User Interface checkbox.
To use communities in Salesforce, we need to enable them first. To enable communities in Salesforce, log in to your Salesforce Developer edition and complete the following steps:
Go to Setup | Customize | Communities | Settings.
Select Enable communities.
At this point, you will be asked for a domain prefix to use for your communities. Enter a domain name prefix that will uniquely identify your communities on Force.com, and click on the Check Availability button. If the domain prefix is already used, enter a different domain prefix and try again.
It is worth noting at this stage the URL naming conventions that Force.com uses for Developer, Sandbox, and Production instances of Force.com sites. Your unique subdomain is listed first, followed by the edition or environment type, then the instance name, and a Force.com suffix. Sandbox organizations also use the sandbox name as an extra identifier to distinguish them even further. In the following examples, the unique subdomain prefix is
volunteerforce, and the sandbox name isvfsandbox. The instance name isna1, and the sandbox instance name iscs1. The URLs for different type of organizations are summarized as follows:Type of organization
URL
Developer edition
https://volunteerforce-developer-edition.na1.force.comSandbox
https://vfsandbox-volunteerforce.cs1.force.comProduction
https://volunteerforce.secure.force.comOnce your domain prefix has been accepted, your screen should resemble the following screenshot (except for the domain prefix):

Click on Save and then click on OK in the dialog window that will give you a warning that the changes cannot be undone.
To create the Volunteer Community, complete the following steps:
Go to Setup | Customize | Communities | Manage Communities.
Click on the New Community button.
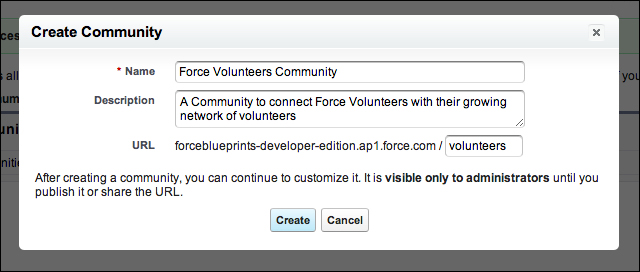
Enter
Force Volunteersfor the community name.Enter
A Community to connect Force Volunteers with their growing network of volunteersfor the Description field to describe the purpose of the community.The next step is to enter a URL for the community. This will equate to a subdirectory name underneath the domain prefix entered by you, when you enabled the communities and the Salesforce instance that you are running on. For this example, enter
volunteers.Your screen should resemble the following screenshot:
Click on Close. You will configure the community later.
Now that we have created a community, there is some configuration required to ensure that the users can access your community and view data from your Salesforce organization.
The objects that we will be configuring and the relationships between them are depicted in the following diagram:
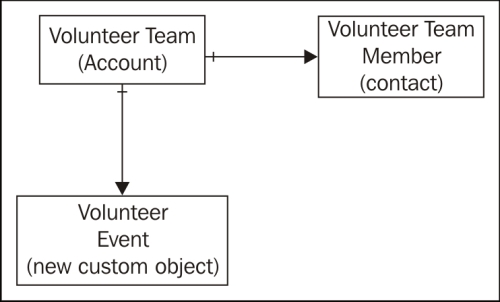
The Account object will be used to represent a team of volunteers. Each volunteer within a team will be stored as a contact on the volunteer team account.
To configure the Account object, complete the following steps:
Navigate to Setup | Customize | Accounts | Fields.
In the Account Custom Fields and Relationships section, click on the New button.
For the Data Type section, select Lookup Relationship and click on Next.
Select User as the related object in the Related To drop-down list and then click on Next.
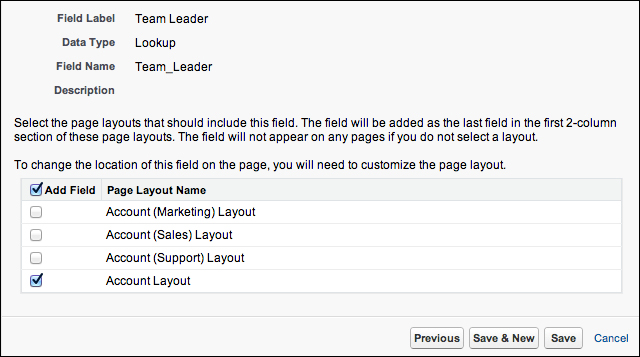
Enter
Team Leaderfor the Field Label field.Press Tab to automatically generate Field Name as
Team_Leader.Enter
A Volunteer Force Team Leaderin the Description field and click on Next.Accept the default values of the Field-Level Security for Profile section and click on Next.
Add the field to the Account Layout option only and click on Save, as shown in the following screenshot:
Your community will require a custom object to display the volunteering events for the community users and volunteers. The steps to create a custom object to display the volunteering events are as follows:
Navigate to Setup | Create | Objects.
Press the New Custom Object button.
Enter
VolunteerEventfor the object's Label field.Enter
VolunteerEventsfor the Plural Label field.Enter
Events for Volunteers to attendfor the Description field to describe the purpose of the custom object.Enter
Event_Namefor the Record Name field and leave the Data Type drop-down menu as Text.Select the following checkboxes:
Allow Reports (optional)
Allow Activities (optional)
Track Field History
Add Notes and Attachments related list to default page layout
Assuming that you are using a development environment, ensure that the Deployment Status section is set to Deployed.
Click on the Save button to create the custom object.
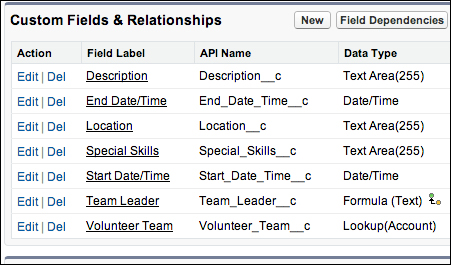
You will now need to configure some custom fields for the VolunteerEvent object. The following steps will create the custom fields:
Navigate to Setup | Create | Objects.
Click on the VolunteerEvent label hyperlink.
Click on the New button in the Custom Fields & Relationships section.
For the Data Type section, select Date/Time and click on Next.
Enter
Start/Date Timefor the Field Label field.Enter
The date/time that the volunteering event startsfor the Description field and click on Next.Accept the defaults for the Field-Level Security for Profile section and click on Next.
Accept the defaults for the Page Layouts section and select Save & New.
Repeat the steps to create the remaining fields as described in the following table:
Field type
Field label description
Description
Date/Time
End Date/TimeText Area
The location of the volunteering event
Text Area
A description of the volunteering event
Text Area
Any special skills required for the volunteering event; for example, driver's license and first aid
The final step in configuring our data model is to connect the Account and VolunteerEvent objects together. This will be a simple lookup relationship from the VolunteerEvent object to the Account object to record which team of volunteers will be the primary point of contact for the Volunteer event.
Click on the VolunteerEvent label hyperlink.
Click on the New button in the Custom Fields & Relationships section.
For the Data Type section, select Lookup Relationship and click on Next.
Select Account as the related object in the Related To drop-down list and click on Next.
Enter
Volunteer Teamfor the Field Label field.Enter
The Volunteer Team attending the eventfor the Description field and click on Next.Accept the defaults for the Field-Level Security for Profile section and click on Next.
Accept the defaults for the Page Layouts section of
VolunteerEvent(there should only be one page layout) and click on Next.Add the custom-related list only to the Account Layout option, as per the following screenshot:

Click on Save. We will now need to add one more custom field to VolunteerEvent to display the volunteer team leader, using the following steps:
Navigate to Setup | Create | Objects | VolunteerEvent.
Click on the New button in the Custom Fields & Relationships section.
For the Data Type section, select Formula and click on Next.
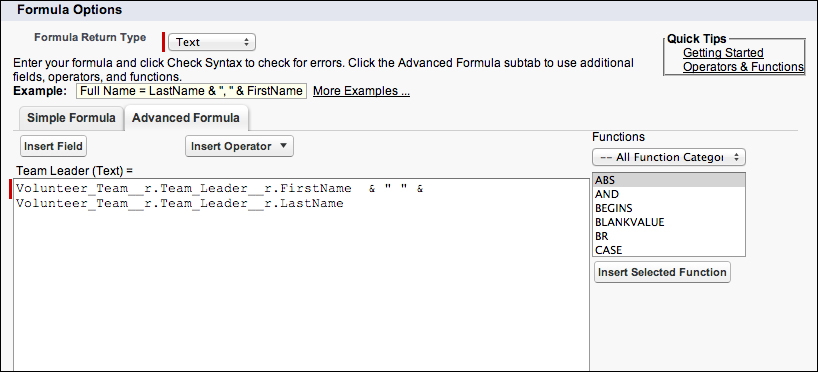
Enter
Team Leaderfor the Field Label field.Select Text for the Formula Return Type section and click on Next.
Click on the Advanced Formula tab in the formula editor.
Click on the Insert Field button; the Insert Field dialog will be displayed.
Navigate to Volunteer Event > | Volunteer Team > | Team Leader > | First Name and then click on Insert, as shown in the following screenshot:

From the Insert Operator drop-down menu in the formula editor, select the & Concatenate operator. Enter a space between two quotes: " ". Then, select another concatenation operator. Your formula should resemble the following screenshot:

Click on the Insert Field button; the Insert Field dialog will be displayed.
Select Volunteer Event > | Volunteer Team > | Team Leader > | Last Name and click on Insert.
Your formula editor should now resemble the following screenshot:
Enter
Team Leader of Volunteer Teamin the Description field and click on Next.Accept the default settings for the Field-Level Security for Profile section and click on Next.
Accept the default values for the Page Layouts section of
VolunteerEventand click on Next.Your
VolunteerEventcustom fields should now resemble the following screenshot:
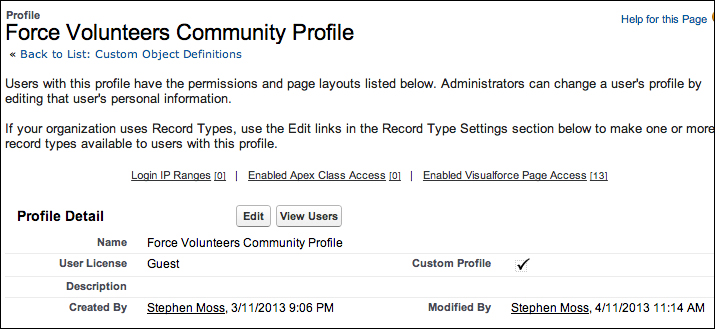
When you create a community, a public user profile is automatically created for any guest (unauthenticated) users who access the community. This profile is cloned from the default guest user profile, but can be customized for your needs. The profile does not exist in the standard user profile maintenance screen, so to configure the profile you will need to complete the following steps:
Navigate to Setup | Customize | Communities | Manage Communities.
Click on the Force.com hyperlink to access the underlying Force.com site for the community.
Click on the Public Access Settings button to access the Force Volunteers Community profile, as shown in the following screenshot:
Select the Read permission option for the Account standard object.
Scroll down to the Custom Object Permissions section.
Select the Read permission option for the VolunteerEvent custom object.
Click on Save.
Scroll to the Custom Field-Level Security section.
Click on the View hyperlink next to VolunteerEvent.
Click on the Edit button.
Make sure that the Description, End Date/Time, Location, and Start Date/Time fields are selected as Visible. There will be system-level fields selected as well and they can't be changed.
Click on the Save button.
Click on the Back to Profile button.
This ensures that any guest users accessing the community can see a list of the volunteering events that we will be constructing later in the chapter.
To allow volunteers to log into your community, they will need a Salesforce user account and an associated profile. When you enabled the communities in your Salesforce organization, a default set of communities-related profiles was created, as shown in the following screenshot:
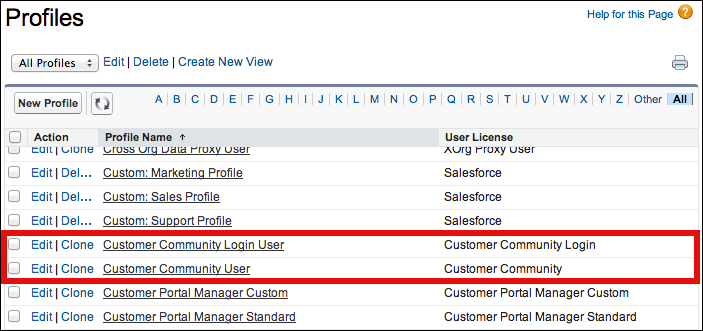
Although you can use these default profiles and assign them to the users, it is recommended to clone one of the default profiles and customize it for your needs. This is the approach that we will be taking for the Volunteer Community.
To clone and customize a default community profile, complete the following steps:
Navigate to Setup | Manage Users | Profiles.
Select the Clone link for the Customer Community User profile.
Enter
Volunteer Community Userfor the Profile Name field.Click on Save. We will now need to configure the Volunteer Community User profile to restrict access to only the objects that volunteers will need, using the following steps:
Navigate to Setup | Manage Users | Profiles.
Select the Edit link for the Volunteer Community User profile.
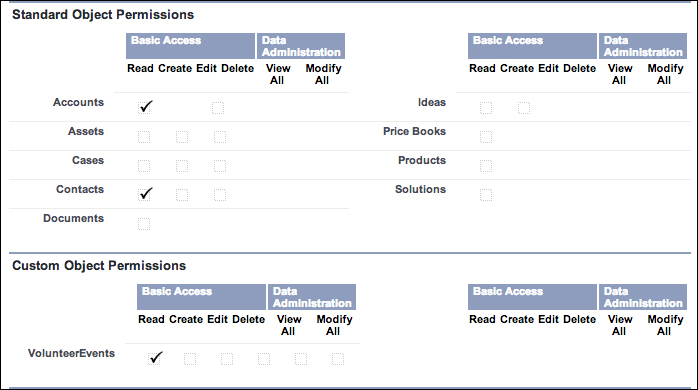
Scroll down to the Standard Object Permissions section of the Volunteer Community User profile page and ensure that the profile has only a Read access to Accounts and Contacts (deselect all permissions for any other objects).
In the Custom Object Permissions section, ensure that the profile has only a Read access to the VolunteerEvents custom object.
Your object permissions for the profile should resemble the following screenshot:
Click on Save.
Scroll to the custom Field-Level Security section.
Click on the View hyperlink next to VolunteerEvent.
Click on the Edit button.
Make sure that Description, End Date/Time, Location, Special Skills, Start Date/Time, Team Leader, and Volunteer Team are selected as Visible. There will also be system-level fields selected, which can't be changed.
Click on the Save button.
Click on the Back to Profile button.
The final profile that we will need to configure is for the Force volunteers Salesforce users. For these users, you can clone almost any standard Salesforce user profile. However, to make the most efficient use of the limited number of licenses available in a development organization, we will use Force.com - App Subscription User as the base license (for full details of the licenses supplied with a Developer edition, refer to https://wiki.developerforce.com/page/Developer_Edition). This profile can be cloned and configured to give sufficient access without using one of the very limited full Salesforce licenses available in a development organization. To configuring Force volunteers Salesforce user profiles, perform the following steps:
Navigate to Setup | Manage Users | Profiles.
Select the Clone link for the Force.com – App Subscription User profile.
Enter
Volunteer Force Userfor the Profile Name field.Click on Save.
Assuming that you are at the Volunteer Force User profile screen after saving, click on Edit.
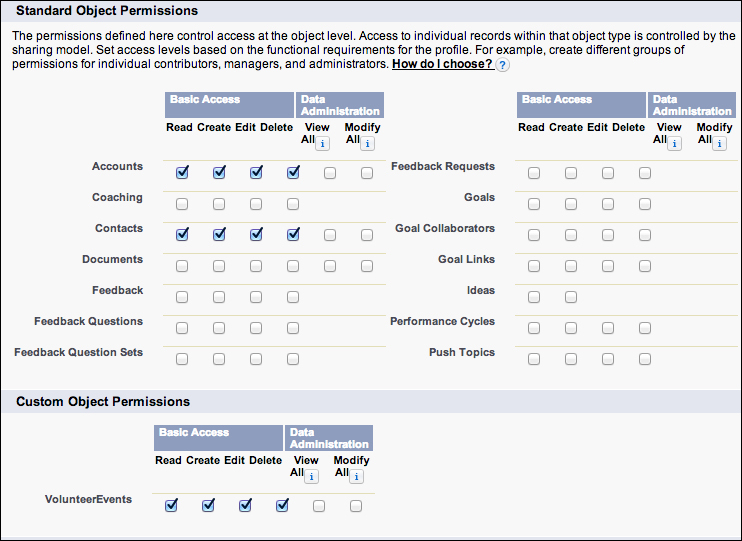
Scroll down to the Standard Object Permissions section and ensure that the profile has the Read, Create, Edit, and Delete access to Accounts and Contacts only (deselect all permissions for any other objects).
In the Custom Object Permissions section, ensure that the profile has the Read, Create, Edit, and Delete access to the VolunteerEvents custom object.
Your object permissions for the profile should resemble the following screenshot:
Volunteer Force has decided to use Salesforce Chatter as a key component of their Volunteer Community. It is envisaged that the collaborative features of Chatter will form a natural fit with those volunteers who are naturally inclined to form self-organizing teams for volunteering events.
Note
It is assumed in this section that you have already activated Chatter for your Salesforce organization. Note that Chatter is automatically enabled when a developer organization is created.
To enable community users to subscribe to a volunteer event and to collaborate and receive notifications, we will need to activate Chatter feed tracking for the VolunteerEvent object.
Navigate to Setup | Customize | Chatter | Feed Tracking.
In the list of objects being tracked, select VolunteerEvent.
Select the Enable Feed Tracking checkbox.
In the list of fields available to be tracked, select Description, Event Name, Start Date/Time, End Date/Time, Location, and Special Skills.
Click on Save.
Your Chatter feed tracking for
VolunteerEventshould now resemble the following screenshot: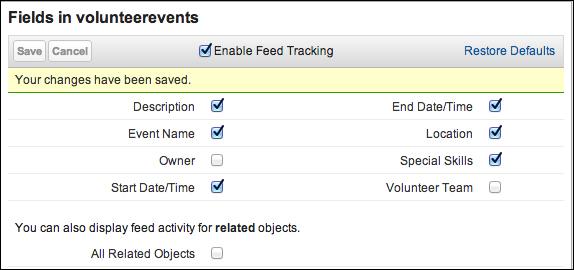
The first step in creating a custom application is to create a custom object tab for the VolunteerEvent custom object. The steps to do this are as follows:
Navigate to Setup | Create | Tabs.
Select the New button in the Custom Object Tabs section.
In the Object drop-down menu, select Volunteer Event.
Select the Tab Style lookup icon and select a style from the Tab Style dialog (if it is unused, a good match is the tab titled People).
Enter
Events for Volunteers to attendin the Description field to describe the purpose of the tab and click on Next.Accept the default value to add the tab to the user profiles and click on Next.
Deselect all of the checkboxes (a shortcut is to use the Include Tab checkbox, which will deselect all checkboxes) in the next screen, so that the tab will not be included in any application, and click on Save.
Now that VolunteerEvent has a custom object tab, we can go ahead and create the custom application by performing the following steps:
Navigate to Setup | Create | Apps.
Select the New button to create a new application.
Ensure that Custom app is selected for the application type and click on Next.
Enter
Volunteersfor the App Label field.Enter
Collaborative Community for Volunteer Force Membersin the Description field to describe the purpose of the community and click on Next.Accept the default application logo and click on Next.
Move Chatter, Accounts, and VolunteerEvents from the Available Tabs list to the Selected Tabs list by highlighting the relevant tab and clicking on the Add button. Leave the option for Home as Default Landing Tab and click on Next.
Assign the application as Visible and Default for the Volunteer Community User and Volunteer Force User profiles, and Visible for the System Administrator profile. All other profiles should not have access to the application.
Note
If you want to keep progressing with building the community, feel free to skip this section and continue to the Adding community members section.
You might be questioning what you have been doing up to this point. Aren't we supposed to be working with communities? It is worth remembering that a community is really an extension of a Force.com application. You have actually successfully built a Force.com application that can now serve as the basis for your Volunteer Community.
To see your application in action, create and activate a user account with the Volunteer Force User profile.
When you log in as a volunteer Force user, you can see the application you have built, as shown in the following screenshot:
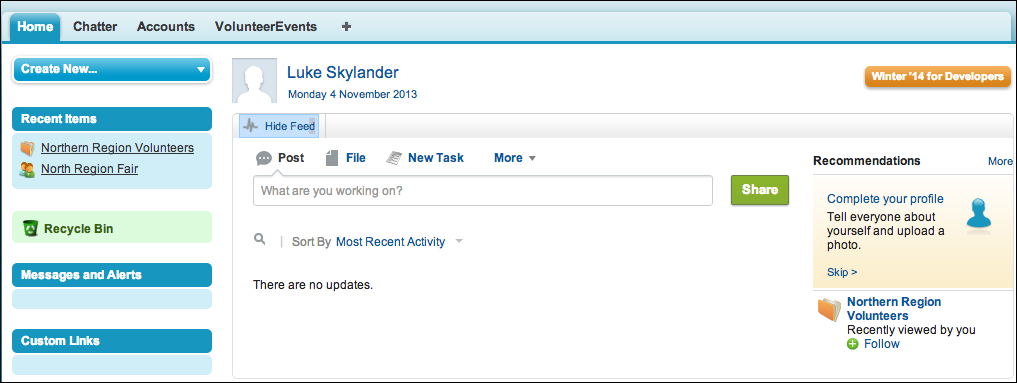
It is now possible to perform the following functions from within the application:
Record the volunteer teams using the
AccountsobjectAssociate a team leader (via the
Userobject) with a volunteer teamRecord the volunteers against a volunteer team (as Contacts)
Record a volunteer event using the
VolunteerEventcustom objectAssociate a volunteer event with a volunteer team
Congratulations! You are now in a position to build out the rest of the Volunteer Community.
Now, we will add members to the Volunteer Community. This can be a set of profiles or permission sets. Adding members will enable them to log into the community and collaborate on the volunteer events together. The following steps will guide you to add members to the Volunteer Community:
Navigate to Setup | Customize | Communities | Manage Communities.
Click on the Edit link in the Action column for the Force Volunteers Community option.
The Community Settings dialog is displayed, as shown in the following screenshot:

In the Select Profiles section of the window, select Internal in the Search drop-down list.
Move the Volunteer Force User profile from the Available Profiles list to the Selected Profiles list by highlighting it and clicking on the Add button, as shown in the following screenshot:
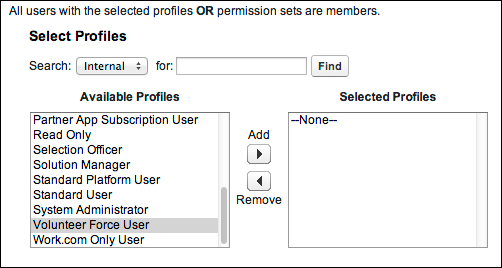
In the Select Profiles section of the window, select Portal in the Search drop-down list.
Move the Volunteer Community User profile from the Available Profiles list to the Selected Profiles list by highlighting it and clicking on the Add button.
The community members list should now resemble the following screenshot:

Click on Save.
Communities provide a declarative interface to define the following elements:
|
Branding element |
Description |
|---|---|
|
This specifies a default header for the pages in your community. For best results, it is recommended that the header be a publicly-accessible HTML document stored using the Documents tab. | |
|
This specifies a default footer for the pages in your community. For best results, it is recommended that the footer be a publicly-accessible HTML document stored using the Documents tab. | |
|
This selects a default color scheme for your community. This can be a predefined color palette from the Select color scheme drop-down list, or a custom color palette defined using HTML color notation for each color, for example, |
For the Volunteer Community, we do not need to specify a default header and footer as we will be building the community pages with Site.com. Make the following minor adjustments to the community branding:
Navigate to Setup | Customize | Communities | Manage Communities.
Click on the Edit link in the Action column for the Force Volunteers Community.
The Community Settings dialog is displayed.
Click on the Branding button to display the Branding Settings for the community.
Set the background for each page to white by entering
#FFFFFFinto the Page Background field.Assuming that you are using the default color palette, the Colors section of the dialog should resemble the following screenshot:
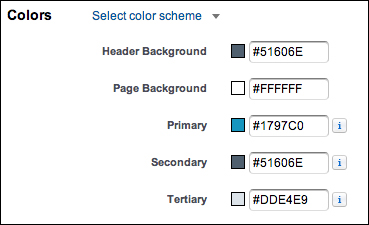
Click on Save.
Note
Any changes that you make to the community branding declaratively are automatically propagated to Site.com in the community site template and style sheet.
Force.com sites are a feature of Salesforce that allow you to create public websites and applications that are directly integrated with a Salesforce organization. As mentioned earlier, Site.com is designed as a content management system and provides more fine-grained control over the HTML and CSS of your site.
Force.com sites are available in Developer, Enterprise, Performance, and Unlimited editions of Salesforce. Visualforce is available in Contact Manager, Group, Professional, Enterprise, Unlimited, Performance, and Developer editions of Salesforce. However, if you wish to use Apex, you will need the Performance, Unlimited, Developer, or Enterprise edition of Salesforce (Apex is also available on Database.com).
Site.com is purchased as a separate license for Enterprise, Performance, and Unlimited Salesforce editions (a limited Site.com license for use only with communities is available in a Developer edition).
Note
For more information about Site.com and links to resources and recommended learning path, refer to https://wiki.developerforce.com/page/Site.com.
By default, Salesforce will use a standard Force.com site for the community. This allows the website to be configured in a declarative fashion by specifying the Salesforce tabs that will be made available to the community users. This can then be customized or extended as required by using Visualforce and Apex.
The second option to define a community website is to use Site.com. This is better suited to build a more customized interface using HTML and CSS as the key components, with a limited set of data access functionality.
For the Volunteer Community, we will be using Site.com to provide a more customized interface for the community website. Our data access requirements can also be supported by Site.com out of the box, without the need to use Visualforce or Apex.
To define a Site.com website for the Volunteer Community, the following steps will need to be completed:
Navigate to Setup | Customize | Communities | Manage Communities.
Click on the Edit link in the Action column for the Force Volunteers Community.
The Community Settings dialog is displayed.
Click on the Tabs & Pages button.
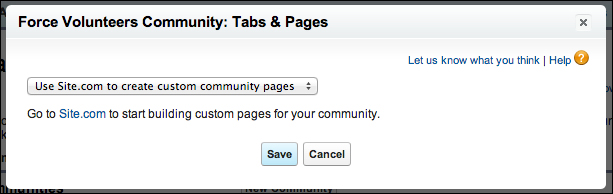
The drop-down list at the top of the Tabs & Pages dialog will be set to Use Salesforce.com tabs, by default.
Select Use Site.com to create custom community pages from the drop-down list to specify that you will be using Site.com.
The Tabs & Pages dialog should now resemble the following screenshot:
Click on Save and then on Close to dismiss the Community Settings dialog.
Now, we get to the fun part! We are going to use Site.com to build the custom user interface for the Volunteer Community.
When you selected Site.com to build the pages for the community, Salesforce automatically created a skeleton website with minimal content.
To open your Site.com community website, complete the following steps:
Navigate to Setup | Customize | Communities | Manage Communities.
Click on the Site.com link in the Custom Pages column for the Force Volunteers Community option.
If this is the first time you are using Site.com, you will be presented with the Getting Started with Site.com Studio introduction window. Select the Don't show this again checkbox, and click on the x icon in the top-right corner of the window.
You will now be presented with the Site.com landing page for your community, as shown in the following screenshot:

As seen in the screenshot, the Site Pages section displays the pages for your site. Currently, this is empty as you haven't created any pages yet.
Clicking on the Page Templates section will display the current list of templates that can be used for the pages on your site. Your screen should look like the following screenshot:
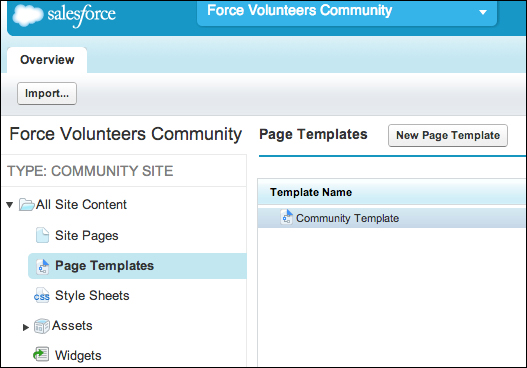
Salesforce has automatically generated the Community Template page for you, based on your selections when branding the community.
Clicking on the Style Sheets section will display the current list of style sheets associated with your site. Your screen should look like the following screenshot:
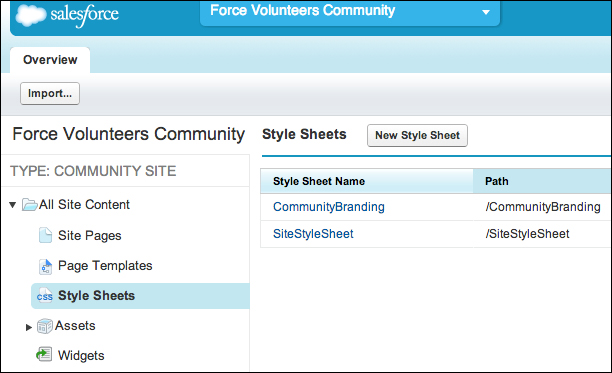
Salesforce has automatically generated the CommunityBranding style sheet for you, again based on your selections when branding the community. The default SiteStyleSheet is also generated by Salesforce, and supplies a base level of styling for site elements, such as menus, tables, and forms.
The Assets section is where you upload any images, scripts, videos, or documents that will be used by your site. Currently, this is empty as we haven't uploaded anything yet.
Clicking on the Widgets section will display the current list of reusable components that can be used for the pages on your site. Your screen should look like the following screenshot:
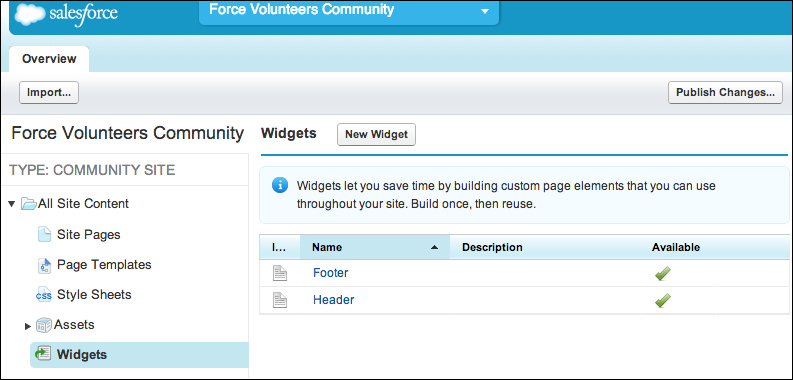
Salesforce has automatically generated the Header and Footer widgets for you, also based on your selections when branding the community.
The initial items that we will need to customize for the community site are the header and footer.
The following sections detail the steps required to customize the community header.
The steps to import the community logo are as follows:
Navigate to Setup | Customize | Communities | Manage Communities.
Click on the Site.com link in the Custom Pages column for the Force Volunteers Community option.
On the Overview tab, hover over Assets and click on Import.
In the Import an Asset dialog, click on the Browse... button.
In the file picker dialog, locate the image Force Volunteers Logo.png from the code download for this chapter and click on Open.
Leave the Overwrite existing files checkbox selected and click on Import.
Once the file has been uploaded, you will see a success message. At this point, you can click on Browse... again to import another asset if required. We don't have any more assets to upload at this point, so click on the x sign in the top-right corner of the window to close the dialog.
The
ForceVolunteersLogo.pngfile will now appear in the Assets list for the site.
The steps to add the community logo to the header are as follows:
On the Overview tab, click on Widgets.
In the list of widgets, click on Header.
Ensure that the Page Structure tab is selected, as shown in the following screenshot:
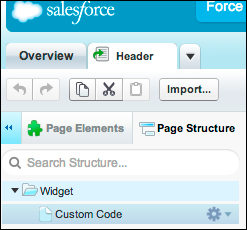
In the Page Structure tab, there will be a page element of type Custom Code underneath the Widget section. This contains any header information that has been saved as part of the community branding. You can leave this page element as it is since you didn't enter any header information when branding the community.
Tip
If you subsequently enter any header information into the community branding, it will appear in the Custom Code element. You may wish to delete the Custom Code page element to prevent this from happening. To restore the default header at a later stage, you will need to readd a Custom Code page element with the following code:
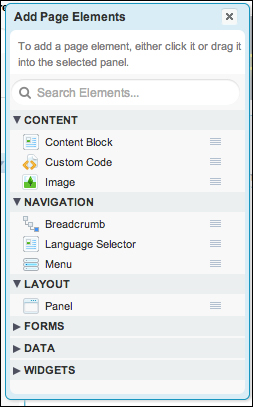
{!Network.header}Select Widget, click on the gear icon, and select Add Page Elements. From the list of page elements, select Image.
In the Add an Image dialog, select ForceVolunteersLogo.png. A preview of the logo will be displayed. Click on Apply.
To add the site navigation menu, perform the following steps:
Select Widget, click on the gear icon, and select Add Page Elements. From the list of page elements, select Panel. Close the dialog.
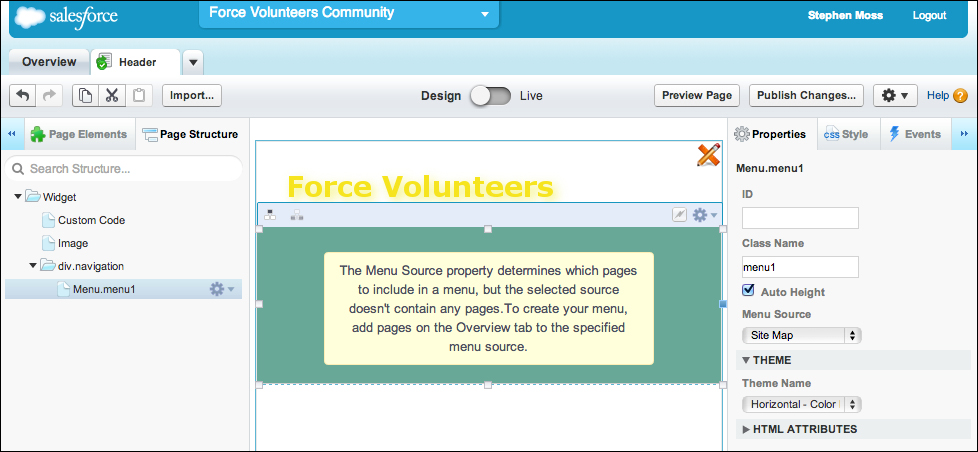
Using the Properties pane on the right of the screen, type
navigationin the Class Name field, and press Enter.Select the div.navigation panel, click on the gear icon, and select Add Page Elements, as shown in the following screenshot. From the list of page elements, select Menu. Close the dialog.
From the Properties pane, expand the THEME section and select Default for the menu Theme Name.
Your Header widget should now resemble the following screenshot:
To customize the footer, perform the following steps:
Assuming that you are still in Site.com, in the list of widgets, click on Footer.
Ensure that the Page Structure tab is selected.
In the Page Structure window, there will be a page element of type Custom Code underneath the Widget section. This contains any footer information that has been saved as part of the community branding. You can leave this page element as it is since you didn't enter any footer information when branding the community.
Tip
If you subsequently enter any footer information into the community branding, it will appear in the Custom Code element. You may wish to delete the Custom Code page element to prevent this from happening. To restore the default footer at a later stage, you will need to readd a Custom Code page element with the following code:
{!Network.footer}Select Widget, click on the gear icon, and select Add Page Elements. From the list of page elements, select Content Block.
Select the content block, click on the gear icon, and select Edit.
Delete the existing text.
From the Insert Symbol drop-down menu (the drop-down menu on the right-hand side of the Add or Edit Media drop-down list in the top toolbar), select the copyright symbol.
In the content block, type
Copyright 2014 Volunteer Force. All rights reserved. and click on Save, as shown in the following screenshot:
Close the Footer tab.
Currently, your community site is using a base collection of styling information determined by the CommunityBranding style sheet and the default SiteStyleSheet. You will now upload an additional style sheet to add some more CSS styling information using the following steps:
Navigate to Setup | Build | Customize | Communities | Manage Communities.
Click on the Site.com link in the Custom Pages column for the Force Volunteers Community option.
Click on Style Sheets to display the list of style sheets currently available.
Click on the Import... button at the top of the page, underneath the Overview tab.
In the Import an Asset dialog, click on the Browse... button.
In the file picker dialog, locate the force.css style sheet from the code download for this chapter and click on Open.
Leave the Overwrite existing files and Convert CSS files into style sheets checkboxes selected and click on Import.
Once the file has been uploaded, you will see a success message. At this point, you can click on Browse... again to import another asset if required. We don't have any more assets to upload at this point, so click on the x in the top-right corner of the window to close the dialog.
Click on Page Templates to display the list of templates for community pages.
In the list of page templates, select Community Template, click on the gear icon, and select Edit.
In the Properties pane, expand the STYLE SHEETS section, as shown in the following screenshot:

Click on the + button underneath the Style Sheets list.
A drop-down list containing the style sheets loaded into the community is displayed. Select /force.css and click on the + button next to the drop-down list (the highlighted button in the following screenshot):
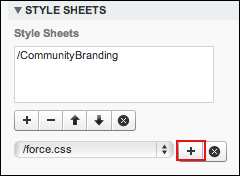
The styles from force.css will now be applied to the Community Template.
Close the Community Template tab.
The building of the site infrastructure for the community is now complete. We are now in a position to build the pages of the site itself. The following steps are to be completed to create the static site pages:
Navigate to Setup | Customize | Communities | Manage Communities.
Click on the Site.com link in the Custom Pages column for the Force Volunteers Community option.
Click on Site Pages to display the list of pages for the community. At this stage, it should be blank.
Click on the New drop-down button at the top of the list and select Site Page.
In the Create a Site Page dialog, enter Page name as
Home.Ensure that Community Template is selected in the Page templates list.
Click on Create.
The Home page will be created and displayed in the Site.com editor.
Close the Home page.
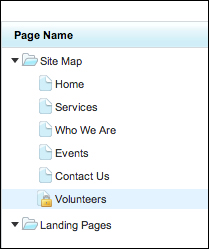
Repeat steps 4 to 9 to create the following pages:
Services
Who We Are
Events
Contact Us
Volunteers
To add text to static pages, perform the following steps:
Click on Site Pages to display the list of pages for the community.
Select the div#content.brandPrimaryBrd page element, click on the gear icon, and select Override Parent Content. Click on OK to confirm your wish to override inherited content.
Select the div#content.brandPrimaryBrd page element, click on the gear icon, and select Add Page Elements.
Click on Panel in the Add Page Elements dialog and close it.
Select the div page element you have just created, click on the gear icon, and select Add Page Elements.
Click on Content Block in the Add Page Elements dialog and close it.
Select the content block you have just created, click on the gear icon, and select Edit.
Delete the existing text.
Currently, Paragraph is the selected style for the text. Click on the style drop-down menu where Paragraph is selected and select Heading 1.
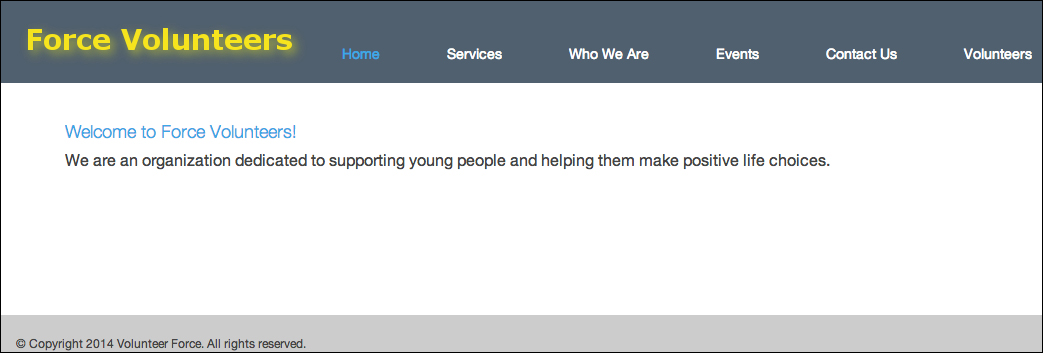
Type
Welcome to Force Volunteers!and press Enter.Click on the Style drop-down menu and select Paragraph.
Type
We are an organization dedicated to supporting young people and helping them make positive life choices.Click on Save.
Click on Preview Page and admire your home page, as shown in the following screenshot:
Repeat steps 1 to 15 and add static text to the following pages as per the following table:
Page
Heading
Paragraph text
Services
Services We OfferWe offer a range of support services encompassing Schools, Universities, Festivals and Events.Who We Are
Who We AreOur founders recognized the need for an organization to support young people at a very vulnerable stage of their lives. We now offer a comprehensive range of programs aimed at helping young people make positive life choices.Events
EventsA list of volunteer events we will be involved in.Contact Us
Contact UsFor any enquiries, contact us at volunteers@forcevolunteers.com.Volunteers
Volunteers OnlineWelcome to our Volunteers Online Page.
Note
Before creating the volunteer events' data access page, take some time to create some sample volunteer teams, volunteers, and volunteer events in your Salesforce development organization.
It will be beneficial to display a list of volunteer events on the Events page. This will require us to utilize the Salesforce data access functionality built into Site.com. Fortunately, for us, Salesforce has gone to great lengths to make the process as painless as possible.
To add a list of events to the Events page, complete the following steps:
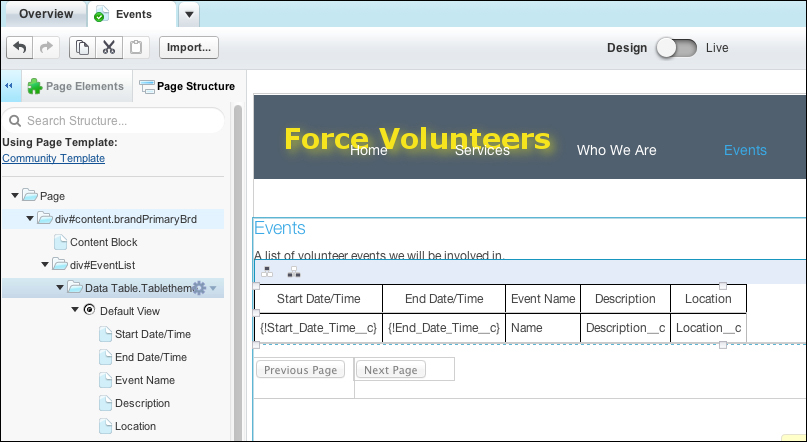
Click on Site Pages to display the list of pages for the community.
Hover over Events, click on the gear icon, and select Edit.
Select the div#content.brandPrimaryBrd page element, click on the gear icon, and select Add Page Elements.
Click on Panel in the Add Page Elements dialog and close it.
In the Properties pane, give the div page element an ID of
EventList.Click on the div#EventList element, click on the gear icon, and select Add Page Elements.
From the DATA section of page elements, select Data Table. The Create Data Table wizard will open.
In the Choose a Salesforce object drop-down menu, choose VolunteerEvent. You will notice that the Connection Preview section is populated with data from VolunteerEvent.
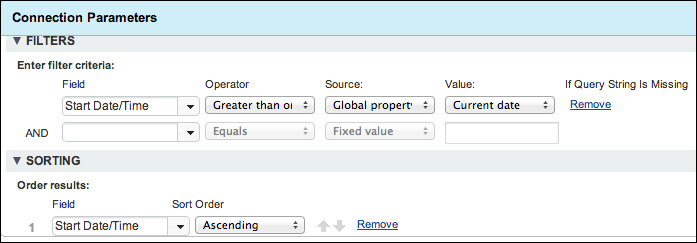
We don't want to display events from the past, so we will need to filter the data to display events with a date on or after the current date. Expand the FILTERS section.
From the Field drop-down list, select Start Date/Time.
From the Operator drop-down list, select Greater than or equal to.
From the Source drop-down list, select Global Property.
From the Value drop-down list, select Current date.
We will be sorting the events by Start/Date Time in an ascending order. Expand the SORTING section.
In the Sort Order drop-down list, select Ascending.
Your filtering and sorting criteria should resemble the following screenshot:
Click on Next.
You will now need to select the data fields to be displayed in the table. From the Available Fields list, select Start Date/Time and move it across to the Selected Fields list by clicking on the > button.
Move the End Date/Time, Event Name, Description, and Location fields across to the Selected Fields list by pressing the > button.
Click on the Reload Preview button to see a preview of your table.
When you are satisfied with the results, click on Save.
The events list will now appear on your Events page. At this point, you can select Preview Page to see your events list in action.
Congratulations! You now have a list of events on your site.
However, there are a few improvements that we can make to the events list, which are listed as follows:
To correct the styling and placement of the events list, complete the following steps:
Open the Events page from the Site Pages list.
Select the div#EventsList page element.
Select the Style pane (next to the Properties pane).
Expand the DIMENSIONS section.
Scroll down to the Padding section and enter
15for the Top padding value.From the drop-down menu, next to the Top textbox, select pixels.
Click on the Overview tab and select Style Sheets.
Click on SiteStyleSheet to open it.
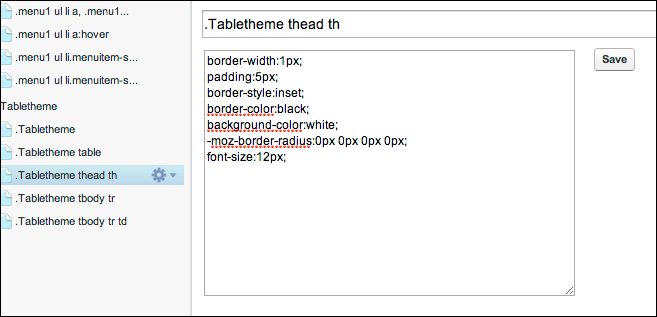
From the list of CSS styles on the left-hand side, find the .Tabletheme thead th style and select it.
In the CSS code box to the right-hand side of the style, add the following line of CSS code, as shown in the following screenshot:
font-size:12px;
Click on Save.
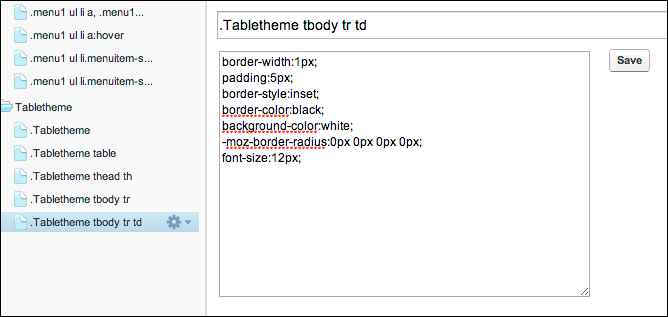
From the list of CSS styles, find the .Tabletheme tbody tr td style and select it.
In the CSS code box to the right-hand side of the style, change the border-color entry to
black, so the line reads the following code:border-color:black;
Finally, add the following line of CSS code, as shown in the following screenshot:
font-size:12px;
Now, we need to fix the formatting of the Start Date/Time and End Date/Time columns in the events list. To reformat the columns, complete the following steps:
Open the Events page from the Site Pages list.
Double-click on the Start_Date_Time__c table cell. The Edit Column dialog will be displayed.
From the Display the field value as: drop-down list, select Formatted Text.
From the Format drop-down list, select Short date and time.
Perform the same steps for the End_Date_Time__c table cell.
The final step in customizing the events list is to add paging support to the table. This will allow a user to step through the list of events. To add paging support, complete the following steps:
Select the Default View option of the Data Table.Tabletheme page element, click on the gear icon and select Edit, as shown in the following screenshot:

Expand the LIMITS section and enter
5for the Results per page field.Click on Next and then on Save.
Select the div#EventsList page element from the Page Structure tab, click on the gear icon, and select Add Page Elements.
Select Panel. In the Properties pane, give the panel an ID of
ButtonRow.Expand the DIMENSIONS section.
Scroll down to the Padding section and enter
15for the Top padding value.From the drop-down menu next to the Top textbox, select pixels.
The steps to add the paging buttons are as follows:
Select the div#ButtonRow page element, click on the gear icon, select Add Row and Column Panels, and then select Add Row and Column Panels from the Inside the panel... section.
Select a 1 x 2 grid (two columns in the first row).
Select the first div page element underneath div#ButtonRow and give it an ID of
PrevButtonin the Properties pane.In the Style pane, expand the DIMENSIONS section, and set the Width field to
100pixels.Select the second div page element underneath div#ButtonRow and give it an ID of NextButton in the Properties pane.
In the Style pane, expand the DIMENSIONS section, and set the Width field to
100pixels.Select the div#PrevButton page element, click on the gear icon, select Add Page Elements, and then select Button. Close the dialog.
In the Properties pane, change the name to
Previous Page.In the Events pane, select the click event.
Click on the + button underneath the Actions list.
In the Select an Action drop-down list, select Previous Page.
In the Target Element drop-down list, ensure that VolunteerEvent__c Data Table is selected (it should be the only element in the list).
Click on Save.
Select the div#NextButton page element, click on the gear icon, select Add Page Elements, and then select Button. Close the dialog.
In the Properties pane, change the name to
Next Page.In the Events pane, select the click event.
Click on the + button underneath the Actions list.
In the Select an Action drop-down list, select Next Page.
In the Target Element drop-down list, ensure that VolunteerEvent__c Data Table is selected (it should be the only element in the list).
Click on Save.
To cater for the end of the event list, perform the following steps:
Select the Content Block option underneath the No Data View page element of Data Table.Tabletheme, click on the gear icon, and then select Edit.
Replace the text There is no data to display for this query with
There are no more Events to display at this time. Please check back later., as shown in the following screenshot:
Click on Save.
Your Events page should now resemble the following screenshot:
The build of the Volunteer Community is nearly complete. Our last task is to secure the volunteers page. This is achieved by activating Authorization for the site.
There are three options available when activating authorization in Site.com, as shown in the following screenshot:

We want all pages to be available for public access, except the volunteers page. In this case, the custom authorization setting suits our purpose.
Complete the following steps to activate authorization for the community site:
On the Overview tab of the site, expand the Site Configuration section, and select Authorization.
The default setting is No Authorization. To change this, select Custom from the Site Setting drop-down list.
By default, all site pages are still publicly available when enabling the Custom authorization. We will need to manually configure the authorization for the volunteers page by completing the following steps:
On the Overview tab of the site, select Site Pages.
Select the Volunteers page, click on the gear icon, and select the Requires Authorization checkbox.
A padlock icon will now appear next to the Volunteers page name indicating that it is now secured. This is illustrated in the following screenshot:
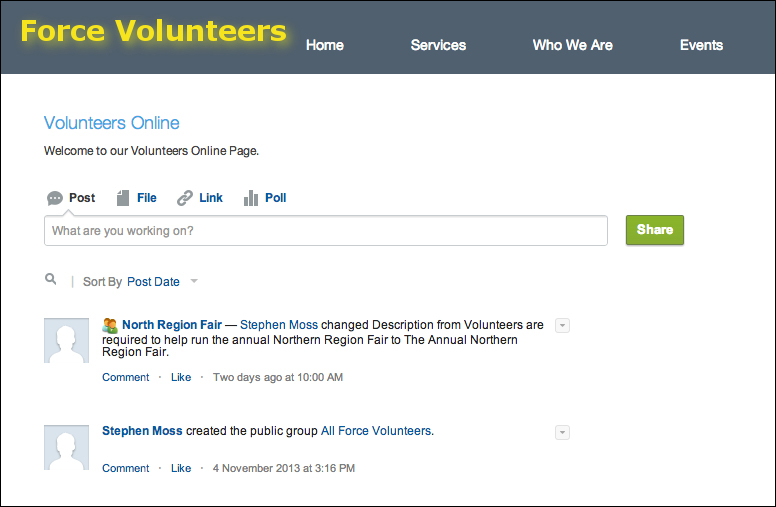
To personalize the Volunteers page, we will now add a Chatter feed for the logged in user:
Double-click on the Volunteers page to open it for editing.
Select the div#content.brandPrimaryBrd page element, click on the gear icon, and then select Add Page Elements.
Click on Panel in the Add Page Elements dialog and close it.
In the Properties pane, give the div page element an ID of
VolunteerChatter.Select the Style pane (next to the Properties pane).
Expand the DIMENSIONS section.
Scroll down to the Padding section and enter
15for the Top padding value.From the drop-down list, next to the Top textbox, select pixels.
Click on the div#VolunteerChatter element, then on the gear icon, and select Add Page Elements.
From the WIDGETS section of the dialog, select the News Feed widget.
Click on x to close the Add Page Elements dialog.
Click on Preview Page to see your Volunteers page with a personalized Chatter feed for the currently logged in user, as illustrated in the following screenshot:
Note
The first time you display the Volunteers page after it has been secured, you may be prompted to log in. If so, make sure that you select the link to log in as Member Of your Salesforce Organization.
Congratulations! The build of the community is now complete!
To create community users, they must first be added as contacts against a Salesforce account. To add a community user, complete the following steps:
Open the contact record for the community user in Salesforce.
Click on Manage External User and select Enable Customer User.
The New User screen will now be displayed.
Complete the user details for the user (you can use any data you like) and be sure that you select Volunteer Community User for the profile (assuming the profile has been created previously and is active).
Ensure that Customer Community is selected for the User License section.
Click on Save.
Now, we are ready to publish the community on Salesforce. Once the community has been published, it will be available to all users with the correct access privileges. In our case, this will be public (anonymous) users, and users with a profile of Volunteer Force User or Volunteer Community User.
To publish the Volunteer Force community, complete the following steps:
Navigate to Setup | Customize | Communities | Manage Communities.
Click on the Edit link in the Action column for the Force Volunteers Community option.
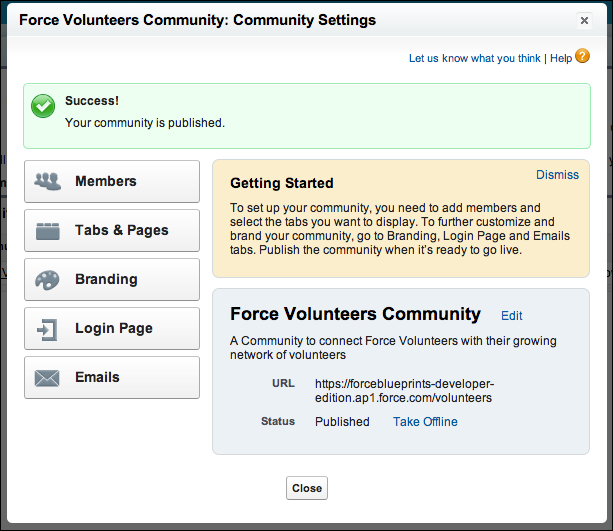
Click on the green button labeled Publish.
A dialog box will be displayed informing you that publishing the community will make it available to all members, and that all members will be sent a welcome e-mail. Click on OK.
A success message will be displayed and the community status will change to Published, as shown in the following screenshot:
The community users will also receive a welcome e-mail, as shown in the following screenshot:

Congratulations! Your community is now live!
Note
To view the licensing options for Salesforce communities, visit https://help.salesforce.com/HTViewHelpDoc?id=users_license_types_communities.htm&language=en_US.
In this chapter, we built a fully functional Salesforce community that is powered by Site.com.
First, we enabled Salesforce communities for our development organization. We then proceeded to create a new community. From there, we configured the Force.com objects and user profiles required for the community, before adding some community members. With the building blocks in place, we branded the community and built the public-facing site with Site.com. Finally, we integrated the community site to our Force.com data, secured the community, and published it.
Some possible enhancements that you could make to the community are as follows:
Add a status field to the VolunteerEvent object, with statuses such as Draft and Published. Use the data filtering capabilities of Site.com to only display the published events.
Publish a form for prospective volunteers to register their interest and capture this as a lead in Salesforce.
Customize the community login page that is displayed when a volunteer logs in.
