


 Download code from GitHub
Creating Your First Flutter App
One of the greatest Flutter features is that it makes app development easy, or at least as easy as is possible today. It provides several pre-built components that can be easily customized to fit your needs.
One of the key elements of a Flutter project is the lib folder, which contains the main Dart code for your app. This is where you will be writing most of your code, including both layout and logic. Flutter projects also contain a file called pubspec.yaml, where you’ll find the project’s dependencies and other important configuration information.
In this chapter, you will see how to create the default “Hello World” app, and understand the structure of a Flutter project. By understanding a Flutter project’s structure, you will be able to easily navigate and understand the code for your own apps.
In this chapter, you will learn:
- How to create a Flutter app
- How Flutter projects are structured
- How to run a Flutter app
- Hot reload—refresh your app without recompiling
- How to create a simple unit test
How to create a Flutter app
There are two main ways to create a Flutter app: either via the command line or in your preferred IDE. We’re going to start by using the command line to get a clear understanding of what is going on when you create a new app.
For later apps, it’s perfectly fine to use your IDE, but just be aware that all it is doing is calling the command line under the hood.
Before you begin, it’s helpful to have an organized place on your computer to save your projects. This could be anywhere you like, as long as it’s consistent. While there are no strict rules for folder names, there are a few conventions you should follow. For directories:
- Use lowercase letters and separate words with underscores: for example,
project_name. - Avoid spaces and special characters in your folders and file names.
- When choosing a folder for a Flutter project, you should avoid synchronized spaces like Google Drive or OneDrive, as they might decrease performance and create conflicts when working in teams.
As such, before creating your apps, make sure you have created a directory where your projects will be saved.
How to do it...
Flutter provides a tool called flutter create that will be used to generate projects. There are a whole bunch of flags that we can use to configure the app, but for this recipe, we’re going to stick to the basics.
If you are curious about what’s available for any Flutter command-line tool, in your Terminal simply type flutter <command> --help. In this case, it would be flutter create --help. This will print a list of all the available options and examples of how to use them.
In the directory you have chosen to create your Flutter projects, type this command to generate your first project:
flutter create hello_flutter
- This command assumes you have an internet connection since it will automatically reach out to the official repositories to download the project’s dependencies.
- If you don’t currently have an internet connection, type the following instead:
flutter create --offline hello_flutter
You will eventually need an internet connection to synchronize your packages, so it is recommended to check your network connection before creating a new Flutter project.
Now that a project has been created, let’s run it and take a look. You have several options for your target:
- Connecting a device to your computer
- Starting an emulator/simulator
- Running the app on a Chrome or Edge web browser
- Running the app on your desktop
- Type this command to see the devices currently available on your computer:
flutter devices - To specifically see the emulators you have installed on your system, type:
flutter emulators - You should see a list of the available emulators/simulators. Now, to boot an emulator on your system:
- On Windows/Linux, type the command:
flutter emulators --launch [your device name, like: Nexus_5X_API_30] cd hello_flutter flutter run - On a Mac, type the command:
flutter emulators --launch apple_ios_simulator
cd hello_flutter
flutter run
- On Windows/Linux, type the command:
- To run your app on one of the available devices, type the following command:
flutter run -d [your_device_name] - After your app has finished building, you should see a demo Flutter project running in your emulator:
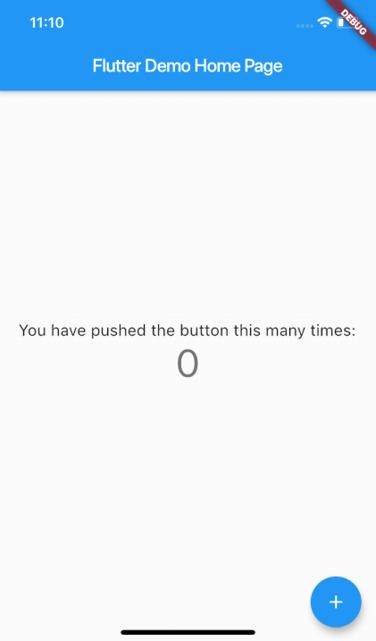
Figure 2.1: Flutter’s default “Hello World” app in an iOS Simulator
- Go ahead and play around with it. The circular button at the bottom right of the screen is called a Floating Action Button, and it’s a widget (much, much more about that in the remainder of this book, starting from Chapter 4, Introduction to Widgets!).
- When you are done, type
qin the terminal to close your app.
How to choose a platform language for your app
Both iOS and Android are currently in the middle of a revolution of sorts. When both platforms started over 10 years ago, they used the Objective-C programming language for iOS, and Java for Android. These are great languages, but sometimes can be a little long and complex to work with.
To solve this, Apple has introduced Swift for iOS, and Google has adopted Kotlin for Android.
These languages are currently automatically selected for new apps.
If you want to use the older languages (for compatibility reasons) when creating an app, enter this command into your Terminal:
flutter create \
  --ios-language objc \
  --android-language java \
  hello_older_languages
In this way, Objective-C and Java will be chosen. You are also never locked into this decision; if later down the road you want to add some Kotlin or Swift code, there is nothing stopping you from doing so.
It’s important to keep in mind that the majority of your time will be spent writing Dart code. Whether you choose Objective-C or Kotlin, this won’t change much.
Where do you place your code?
The files that Flutter generates when you build a project should look something like this:
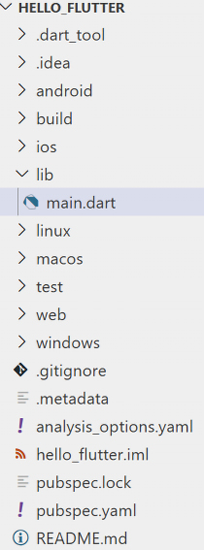
Figure 2.2: A Flutter project structure
The main folders in your projects are listed here:
androidbuildiosliblinuxmacostestwebwindows
The android, ios, linux, web, and windows folders contain the platform shell projects that host our Flutter code. You can open the Runner.xcworkspace file in Xcode or the android folder in Android Studio, and they should run just like normal native apps. Any platform-specific code or configurations will be placed in these folders. While Flutter uses a single code base for all platforms, when you build your app, it generates the specific code for each platform using these folders.
To increase performance when you build your app, Dart and Flutter support both Just-In-Time (JIT) and Ahead-Of-Time (AOT) compilation.
JIT compiling takes the source code of an app and translates it into machine code during execution. This means faster development, as the code can be tested while updating, and your code can be recompiled while the app is running.
With AOT compilation, the code is compiled before the program execution. This builds a machine code executable that can then be run on your target machine. This means better performance for your apps.
Simplifying things a little, Flutter uses JIT for debug builds and AOT for release builds, taking the best of the two worlds.
The build directory contains all the artifacts that are generated when you compile your app. The contents of this folder should be treated as temporary files since they change every time you run a build. You should also add this folder to your gitignore file so that it won’t bloat your repository.
The gitignore file contains a list of files and folders that Git should ignore when tracking changes in a project. As soon as you initialize a project with Git, this file will be added to your project’s root directory.
The lib folder is the heart and soul of your Flutter app. This is where you put all your Dart code. When a project is created for the first time, there is only one file in this directory: main.dart. Since this is the main folder for the project, you should keep it organized. We’ll be creating plenty of subfolders and recommending a few different architectural styles throughout this book.
The next file, pubspec.yaml, holds the configuration for your app. This configuration file uses a markup language called YAML Ain’t Markup Language (YAML), which you can read more about at https://yaml.org. In the pubspec.yaml file, you’ll declare your app’s name, version number, dependencies, and assets. pubspec.lock is a file that gets generated based on the contents of your pubspec.yaml file. It can be added to your Git repository, but it shouldn’t be edited manually.
Finally, the last folder is test. Here, you can put your unit and widget tests, which are also just Dart code. As your app expands, automated testing will become an increasingly important technique to ensure the stability of your project. You will create a test in the Creating a unit test recipe later in this chapter.
Hot reload—refresh your app without recompiling
Probably one of the most important features in Flutter is stateful hot reload. Flutter has the ability to inject new code into your app while it’s running, without losing your position (state) in the app. The time it takes to update code and see the results in an app programmed in a platform language could take up to several minutes. In Flutter, this edit/update cycle is down to seconds. This feature alone gives Flutter developers a competitive edge.
There is a configuration that allows executing a hot reload every time you save your code, causing the whole feature to become almost invisible.
In Android Studio/IntelliJ IDEA, open the Preferences window and type hot into the search field. This should quickly jump you to the correct setting:
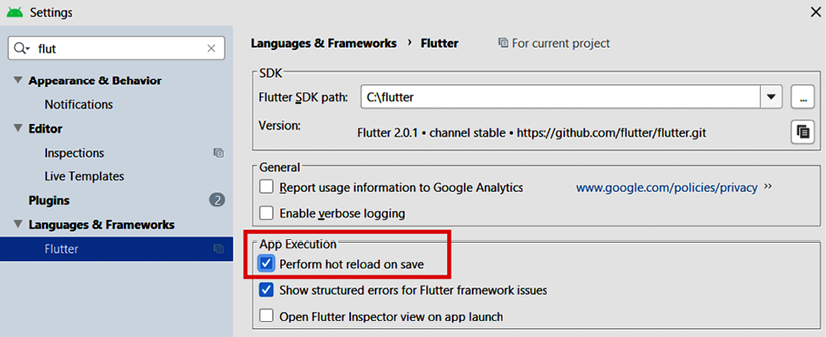
Figure 2.3: Android Studio Flutter hot reload configuration
Verify that the Perform hot reload on save setting is checked. While you are there, double-check that Format code on save is also checked.
In VS Code, open your Settings from File > Preferences > Settings. Type flutter hot reload in the search field. Here you can specify the Flutter Hot Reload On Save option with one of the available values:
- never: No hot reload executed when saving
- all: Hot reload triggered for both manual save and autosave
- allDirty: Hot reload triggered for both manual save and autosave only if the saved file had changes
- manual: Hot reload for manual save only
- manualDirty: Hot reload for manual save only if the saved file had changes
I would choose the all option if performance on your machine does not degrade, as it frees you from having to save manually when you make changes.
Let’s see this in action:
- In Android Studio or IntelliJ IDEA, open the Flutter project you created earlier by selecting File > Open. Then, select the
hello_flutterfolder. - After the project loads, you should see a toolbar in the top-right corner of the screen with a green play button. Press that button to run your project:

Figure 2.4: Android Studio toolbox
- When the build finishes, you should see the app running in the emulator/simulator. For the best effect, adjust the windows on your computer so you can see both, side by side:
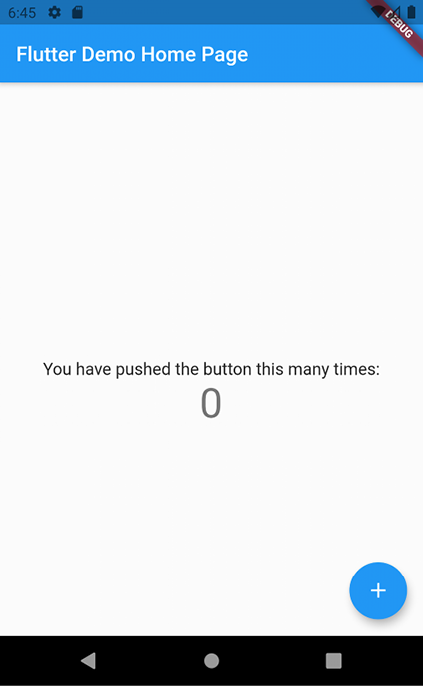
Figure 2.5: The Flutter default project on an Android emulator
- In the
main.dartfile in thelibfolder, update the primary swatch togreen, as shown in the following code snippet, and hit Save:class MyApp extends StatelessWidget { const MyApp({super.key}); @override Widget build(BuildContext context) { return MaterialApp( title: 'Flutter Demo', theme: ThemeData( primarySwatch: Colors.green, ), home: MyHomePage(title: 'Flutter Demo Home Page'), ); } } - When you save the file, Flutter will repaint the screen:

Figure 2.6: The default app after a color change
In VS Code, the pattern is very similar:
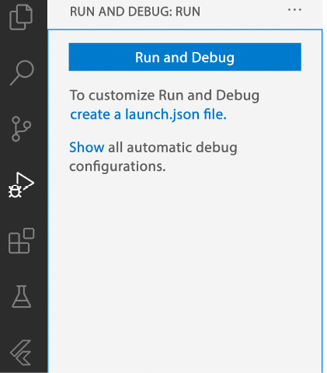
Figure 2.7: Visual Studio Code Run and Debug menu
- Update the primary swatch to
green, as shown in the following code snippet, and hit the Save button:class MyApp extends StatelessWidget { const MyApp({super.key}); @override Widget build(BuildContext context) { return MaterialApp( title: 'Flutter Demo', theme: ThemeData( primarySwatch: Colors.green, ), home: MyHomePage(title: 'Flutter Demo Home Page'), ); } } - Only if your app does not update, click on the Hot reload button (denoted by a lightning bolt) from the debug toolbar or press F5. This will update the color of your app to green:

Figure 2.8: Visual Studio Code debug toolbar
It may seem simple now, but this small feature will save you hours of development time in the future!
Creating a unit test
There are several advantages of using unit tests in Flutter, including improving the overall quality of your code, ease of debugging, and better design. When writing good tests, you may also reduce the time required to maintain your code in the long run. Writing unit tests requires some practice, but it’s well worth your time and effort.
In this recipe, you’ll see how to write a simple unit test.
Getting ready
You should have created the default Flutter app as shown in the previous recipe before writing a unit test.
How to do it...
You will now update the default Flutter app: you will change the color of You have pushed the button this many times:. The text will be red for even numbers, and green for odd numbers, as shown in Figure 2.9:
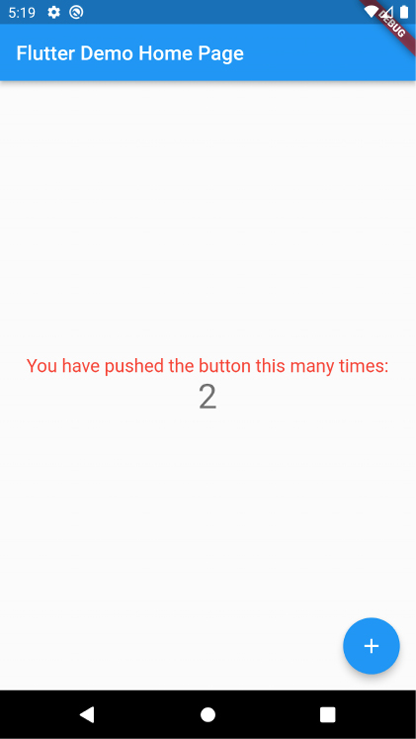
Figure 2.9: Red text for even numbers
- In the
main.dartfile in thelibfolder, at the bottom of the file, and out of any class, create a method that returns true when the number passed is even, and false when the number is odd:bool isEven(int number) { if (number % 2 == 0) { return true; } else { return false; } } - At the top of the
_MyHomePageStateclass, under theint _counter = 0;declaration, declareColor, and set it to red:Color color = Colors.red; - In the _
incrementCountermethod, edit thesetStatecall, so that it changes thecolorvalue:void _incrementCounter() { setState(() { _counter++; if (isEven(_counter)) { color = Colors.red; } else { color = Colors.green; } }); } - In the
buildmethod, edit the text containing You have pushed the button this many times:, so that you change its color and size, and remove itsconstkeyword, as shown below:Text( 'You have pushed the button this many times:', style: TextStyle( color: color, fontSize: 18, ) ), - Run the app; you should see the color of the text changing each time you press the button.
Now that the app is ready, let’s test whether the isEven function works as expected.
- In the tests folder, create a new file, called
unit_test.dart. - At the top of the new file, import the
flutter_test.dartlibrary and your project’smain.dartfile (note that you may have to changehello_flutterto your package name if you named your app differently):import 'package:flutter_test/flutter_test.dart'; import 'package:hello_flutter/main.dart'; - Create a
mainmethod under theimportstatements:void main() {} - In the
mainmethod, call thetestmethod, passingIs Evenas its name and calling theisEvenmethod twice, and checking its results, as shown here:void main() { test('Is Even', () { bool result = isEven(12); expect(result, true); result = isEven(123); expect(result, false); }); } - Run the test by typing
flutter testin your Terminal. You should see the All tests passed! message. - Instead of writing a single
testmethod, let’s create two separate tests:void main() { test('Is Even', () { bool result = isEven(12); expect(result, true); }); test('Is Odd', () { bool result = isEven(123); expect(result, false); }); } - Run the tests with the
flutter testcommand in your Terminal, and note the success message that appears again in the Terminal:All tests passed. - Make one of the tests fail:
void main() { test('Is Even', () { bool result = isEven(12); expect(result, true); }); test('Is Odd', () { bool result = isEven(123); expect(result, true); }); } - Run the test again, with the
flutter testcommand in your Terminal. You should see an error, as shown in Figure 2.10:
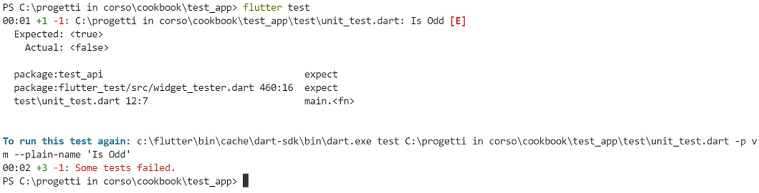
Figure 2.10: Terminal showing failing test
- Note the error message, showing the name of the failing test (Is Odd in this case).
- Let’s group the two tests together using the
groupmethod:void main() { group('Iseven group', () { test('Is Even', () { bool result = isEven(12); expect(result, true); }); test('Is Odd', () { bool result = isEven(123); expect(result, true); }); }); } - Run the test and note the error message has changed, adding the group name to the name of the failing test.

Figure 2.11: Terminal showing failing test with group name
- Edit the
Is Oddtest as shown below, then run the test again, and note that the error has been fixed.test('Is Odd', () { bool result = isEven(123); expect(result, false); });
How it works...
You can use unit tests in Flutter to test specific parts of your code, like functions, methods, and classes.
In this recipe, you wrote a simple function, called isEven, that returns true when the number passed as an argument is even, and false when it’s odd:
bool isEven(int number) {
    if (number % 2 == 0) {
      return true;
    } else {
      return false;
    }
  }
Probably there isn’t much need to test a function as simple as this one, but as your business logic evolves and gets more complex, testing your units of code becomes important.
When you create a new project, you’ll find a test directory in your project’s root folder. This is where you should place your test files, including unit tests.
In this recipe, you created a new file, called unit_test.dart. When you choose the name for a file containing tests, you might want to add test as a prefix or suffix to follow the naming convention for tests. For example, if you are testing functions that deal with parsing JSON, you might call your file test_json.dart.
In your test files, you need to import the flutter_test.dart package, which contains the methods and classes that you use to run your tests:
import 'package:flutter_test/flutter_test.dart';
You also need to import the files where the methods and classes you want to test are written. In this recipe’s example, the isEven method is contained in the main.dart file, so this is what you imported:
import 'package:hello_flutter/main.dart';
Like in any Flutter app, the main method is the entry point of your tests. When you execute the flutter test command in a Terminal, Flutter will look for this method to start executing your tests.
You write a unit test using the test function, which takes two arguments: a string to describe the test, and a callback function that contains the test itself:
void main() {
  test('Is Even', () {
    bool result = isEven(12);
    expect(result, true);
  });
}
In this case, we are running a test in the isEven() function. When you pass an even number to isEven(), like 12, you expect true to be the return value. This is where you use the expect() method. The expect() method takes two arguments: the actual value and the expected value. It compares the two values, and if they don’t match it throws an exception and the test fails.
In our example, the instruction:
expect(result, true);
succeeds when result is true, and fails when result is false.
To run the tests, you can type the flutter test command in your terminal. This will run all tests in your project. You can also run your tests from your editor, like any other Flutter app. If your tests succeed, you get a success message, otherwise, you will see which specific test failed.
When you have several tests, you can group related tests together, using the group method:
group('Iseven group', () {
    test('Is Even', () {
      bool result = isEven(12);
      expect(result, true);
    });
    test('Is Odd', () {
      bool result = isEven(123);
      expect(result, true);
    });
  });
Like the test method, the group method takes two arguments. The first is a String containing the group description, and the second is a callback function, which in turn contains one or more test() functions. You use the group() function to better organize your test code, making it easier to read, maintain, and debug.
In general, the goal of unit testing is to test single units of code, like individual functions, to ensure that they are working as expected.
See also
In addition to unit tests, there are other types of tests that you can create for your Flutter application. In particular, widget tests are used to test the functionality of widgets, and integration tests test the integration of different parts of your application. See the official documentation at https://docs.flutter.dev/testing for more information about writing tests in Flutter.
Summary
In this chapter, you’ve seen how to create a Flutter app and your first unit test. You’ve seen how directories are organized in a Flutter project: in particular, the lib directory contains the main.dart file for your app, which is the entry point for your app. Its main() method is executed when you run the app.
The pubspec.yaml file is the Flutter project’s main configuration file. Flutter creates specific target operating system directories in your project, like android and ios. You’ve seen how Flutter needs those to compile to different targets, with the same code base.
You’ve learned how to run the app from the Terminal by using flutter run and from an IDE by running the app from your editor’s interface.
You’ve seen the benefits of writing unit tests, which may help you write reliable code that works as expected, and learned how to import the flutter_test package.
You’ve seen the test(), expect(), and group() methods, which are the main building blocks for creating unit tests in Flutter.
In the next chapter, you’ll see an introduction to the Dart language.

