


Creating a Catchy Melody
Unlock your creativity and dive into the art of crafting captivating melodies in this chapter of the FL Studio Cookbook. Whether you’re an intermediate or advanced user, this chapter will provide you with the knowledge and techniques needed to compose memorable and engaging melodies that resonate with your listeners. We’ll explore the fundamental principles of melody construction, including scales, intervals, and chord progressions. Through a series of recipes, we’ll guide you through the process of developing hooks, motifs, and emotional melodies across various genres. Get ready to infuse your compositions with emotion, tension, and release, leaving a lasting impact on your audience.
By the end of the chapter, you will have become proficient in using FL Studio’s Piano roll editor. You will learn how to input, edit, and manipulate MIDI notes, utilize various tools and functions, and unlock the full potential of the Piano roll for composing melodies, harmonies, and intricate musical arrangements.
We will cover the following recipes in this chapter:
- Using the Piano roll and its features
- Creating a melody with simple notes
- Creating chords and basslines – Advanced techniques, arpeggiation, chord progressions
- Editing and manipulating MIDI files
- Tips for using the Piano roll and sounding unique with your instruments
Using the Piano roll and its features
In this recipe, we will delve into the world of FL Studio’s powerful Piano roll editor. The Piano roll is a versatile tool that allows you to input, edit, and manipulate MIDI notes, enabling you to compose melodies, harmonies, and intricate musical arrangements with ease. By the end of this recipe, you will be proficient in using the Piano roll and unlock its full potential to bring your musical ideas to life.
Getting ready
- FL Studio software
- MIDI controller (optional)
- Virtual instruments loaded in FL Studio
How to do it
- Launch FL Studio and open a new project.
- Add a new channel (virtual instrument) by clicking the + button in the Channel rack window:
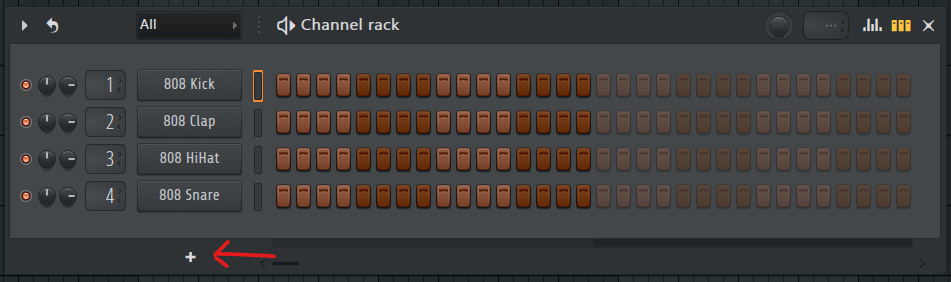
Figure 2.1: The + button in the Channel rack window
- In the Channel rack window, select a virtual instrument you want to use for your melody or harmonies. Usually, starting from piano to create your melody is recommended. Then, you can choose the appropriate instrument.
- Right-click on the newly created channel in the Channel rack window to open the Piano roll editor.
- Familiarize yourself with the Piano roll interface. You’ll see a grid representing time horizontally and pitch vertically:
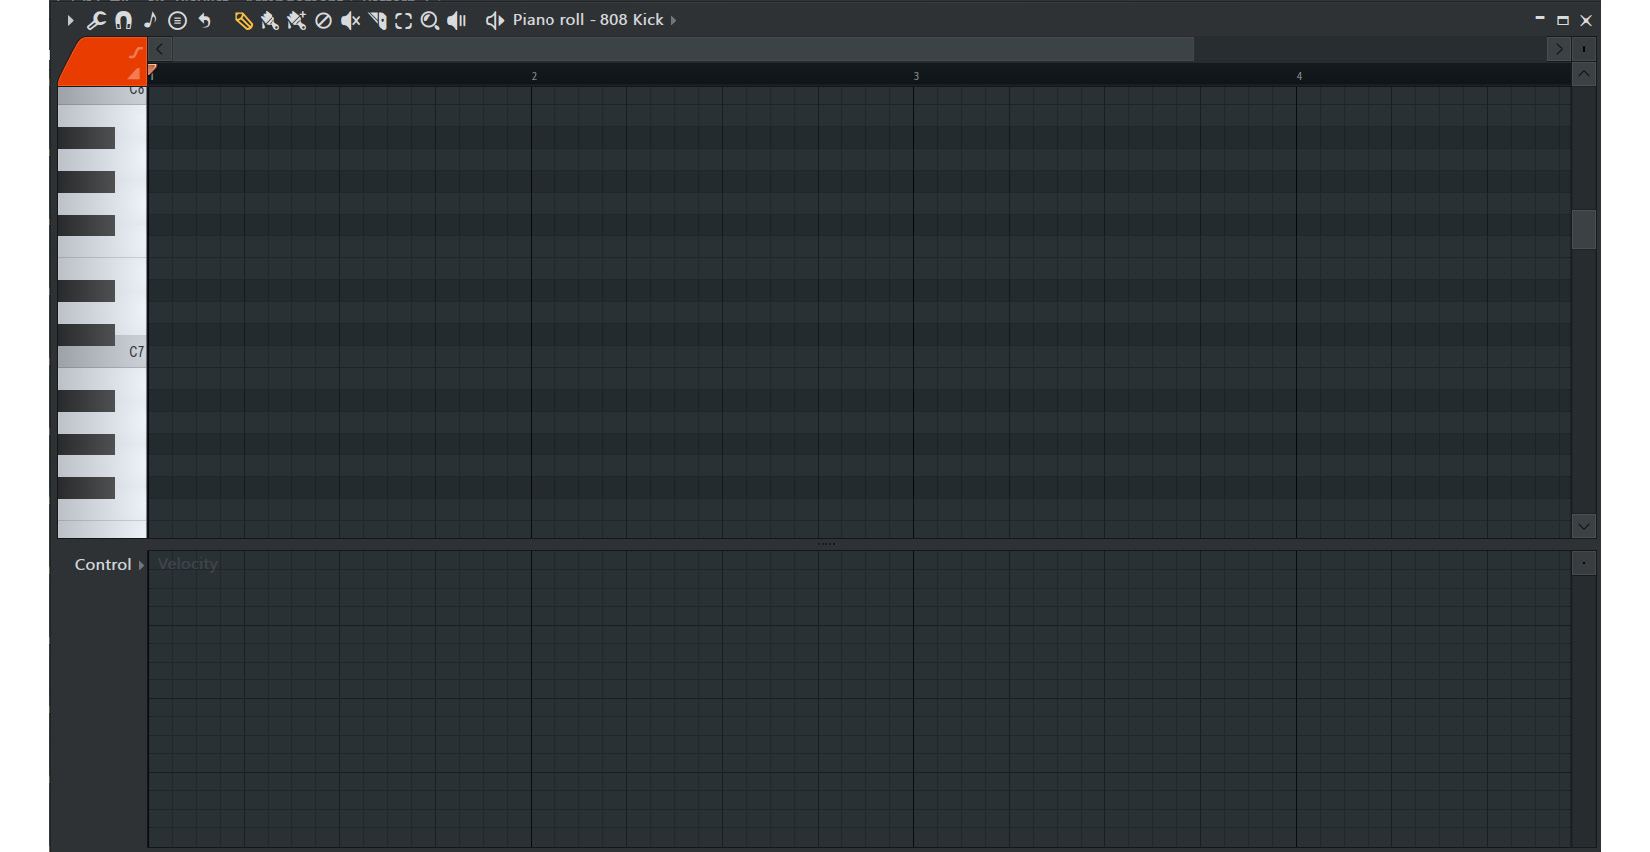
Figure 2.2: The Piano roll interface
- To input a note, simply click on the desired grid position in the Piano roll. The note will appear at that point.
- Alternatively, if you have a MIDI controller connected, you can play notes directly into the Piano roll by selecting the desired length for the notes and recording your performance:
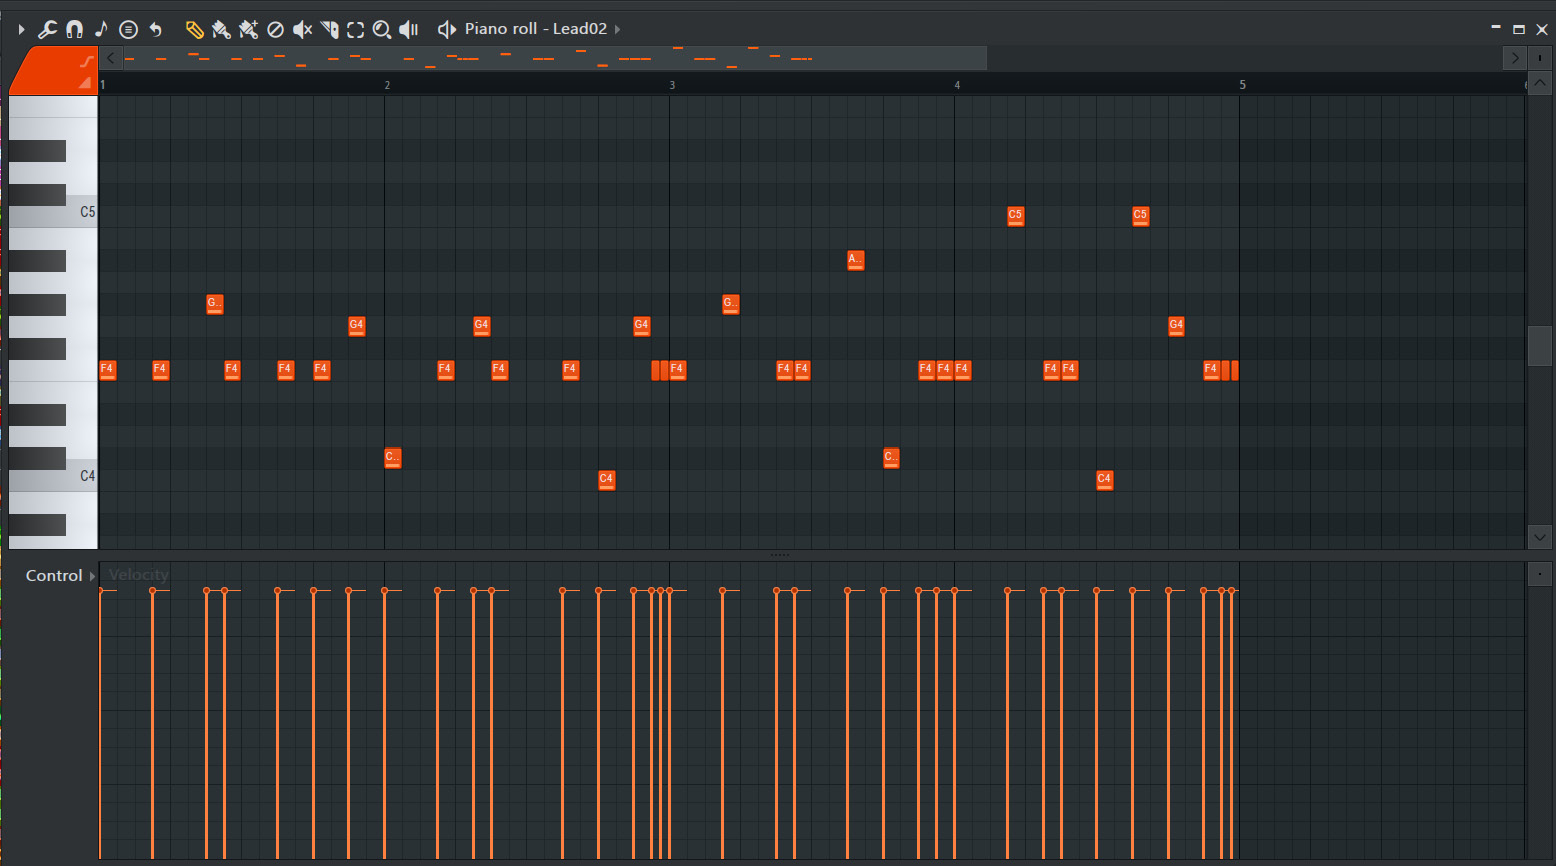
Figure 2.3: How to put notes into the Piano roll
- To edit a note, click on it and hold, then drag it horizontally to adjust its timing or vertically to change its pitch. You can also select any note you want using the Select tool and then use the Ctrl/Shift + arrow keys on your keyboard to move the selected note.
- Use Ctrl + mouse scroll wheel to zoom in or out in the Piano roll for finer adjustments.
- Experiment with different note lengths by dragging the right edge of a note to make it longer or shorter.
- To delete a note, simply right-click on it or use the Delete tool. You can also select a note using the Select tool or hold the Ctrl key on your keyboard, click on the note to select it, and press the Delete key on your keyboard to delete.
- Take advantage of the Piano roll’s selection tools. Use the Select tool to select multiple notes, the Paint tool to quickly input a sequence of notes, and the Draw tool to draw notes manually:
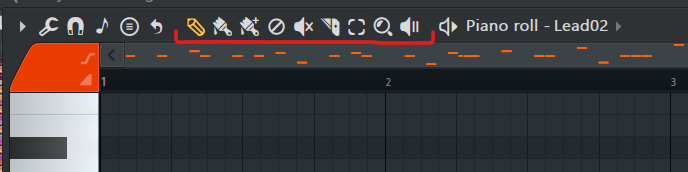
Figure 2.4: Painting notes in the Piano roll
- Use the Snap function at the top of the Piano roll to align your notes to the grid. This ensures precise timing and helps maintain a consistent rhythm.
- Adjust the velocity of each note to control its volume and expression. Simply click and drag the small square at the bottom of each note to adjust its velocity value.
- Utilize the various editing tools available in the Piano roll to refine your composition. The Move tool allows you to move selected notes, the Resize tool lets you adjust the length of selected notes, and the Mute tool silences selected notes.
- Experiment with different octaves and note positions to add depth and variation to your melody or harmonies. To transpose a selection of notes, select them and hold the Ctrl key while using the arrow keys to move them up or down in pitch.
- As you compose, consider utilizing the Piano roll’s additional features. The Snap to Grid option enables you to align notes precisely, while the Legato function allows notes to smoothly transition into each other without gaps or overlaps.
- Once you are satisfied with your composition in the Piano roll, play it back using the virtual instrument you selected. Make any necessary adjustments until it sounds just right.
There’s more
- Experiment with different note lengths, rhythms, and velocities to add variation and dynamics to your composition:
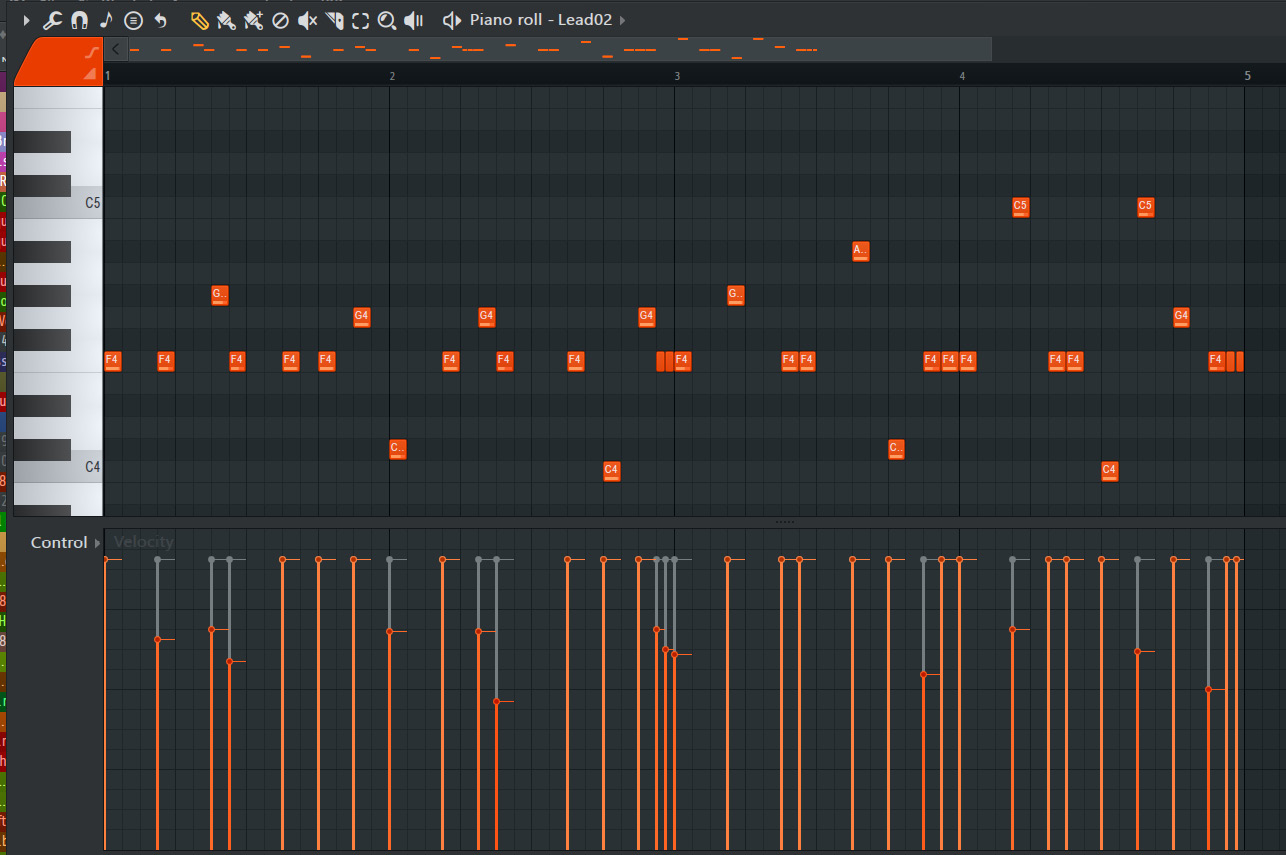
Figure 2.5: The velocity of your notes in the Piano roll
- Take advantage of the Piano roll’s editing tools, such as the Cut, Copy, and Paste functions, to rearrange or duplicate musical phrases
- Use the Scale Highlighting feature in the Piano roll’s Options menu to assist in staying within a specific scale or mode
- Explore the Piano roll’s Articulations feature, which allows you to easily add articulations, such as legato or staccato, to your MIDI notes
Don’t be afraid to experiment and explore the vast possibilities of the Piano roll. It’s a creative playground for shaping your musical ideas.
Congratulations! You’ve now become proficient in using FL Studio’s Piano roll editor. You’ve learned how to input, edit, and manipulate MIDI notes, as well as utilize various tools and functions to compose melodies, harmonies, and intricate musical arrangements. With this knowledge, you’re equipped to unlock the full potential of the Piano roll and bring your musical ideas to life.
In the next recipe, we’ll explore the process of creating a catchy melody using simple notes. Get ready to craft melodies that leave a lasting impression on your listeners!
Creating a melody with simple notes
In this recipe, we will dive into the art of crafting captivating melodies using simple notes. By selecting and arranging notes strategically, you can create melodies that are both memorable and expressive, resonating deeply with your listeners. Whether you’re a beginner or an experienced producer, this recipe will guide you through the process of creating melodies that leave a lasting impact.
Getting ready
- FL Studio software
- Basic understanding of music theory
- Imagination and creativity
How to do it
- Set up your project in FL Studio and select a virtual instrument you want to use for your melody (usually the piano for research).
- Choose a key for your melody. This will serve as your tonal center and provide a sense of stability throughout the composition.
- Begin by selecting a few simple notes within the chosen key. Start with whole or half notes to establish the basic structure of your melody. (As Hans Zimmer says, you can use the question/answer technique to create your base.)
- Experiment with different intervals between the notes. Try moving in small steps, large leaps, or a combination of both. This will add interest and create a unique melodic contour.
- Consider the rhythm of your melody. Play around with different note durations and rests to create variation and rhythmic interest.
- Pay attention to the overall flow and contour of your melody. Think about how it rises and falls, creating tension and release. Experiment with incorporating ascending and descending lines to add movement and emotion.
- Don’t be afraid to repeat certain notes or phrases in your melody. Repetition creates familiarity and reinforces memorable aspects of your composition.
- As you progress, consider adding embellishments or passing notes to your melody. These additional notes can create more intricate and expressive melodic lines.
- Experiment with dynamics by adjusting the velocity or volume of specific notes. This can add further expression and depth to your melody.
- Continuously play back your melody using the virtual instrument you selected. Listen carefully and make any necessary adjustments to the timing, pitch, or rhythm until it sounds just right.
- Once you are satisfied with your initial melody, consider adding variations. This can include subtle changes to the rhythm, pitch, or phrasing of certain sections. This will keep the listener engaged and prevent your melody from becoming repetitive.
- Take breaks and revisit your melody with fresh ears. This will help you gain perspective and make any final refinements or adjustments.
- Remember that music theory is a valuable tool, but don’t be limited by it. Allow your creativity to guide you and explore melodies that resonate with you on a personal level.
- Experiment with different virtual instruments or sound palettes to further enhance the emotional impact of your melody.
- Lastly, trust your instincts and have confidence in your melodic choices. Remember that creating a melody is an artistic expression unique to you.
There’s more
- Start with a simple chord progression as a foundation for your melody. This will help ensure that your melody harmonizes well with the underlying chords.
- Consider incorporating silence or rests in your melody. These pauses can add a sense of tension and anticipation, making subsequent notes even more impactful.
- Sing or hum your melody to internalize its essence and make any necessary adjustments to its flow and expression.
- Experiment with playing your melody on different instruments or using different sound textures. This can give your melody a fresh perspective and inspire new ideas.
Congratulations! You have successfully crafted a captivating melody using simple notes. By selecting and arranging your notes strategically, you have created a memorable and expressive melodic line. Remember to trust your creativity and explore different variations and instrument choices to further enhance the impact of your melody.
In the next recipe, we will explore the process of creating chords and basslines, unlocking advanced techniques to elevate your musical arrangements. Get ready to add depth and complexity to your compositions!
Creating chords and basslines – Advanced techniques, arpeggiation, chord progressions
In this recipe, we will explore advanced techniques for creating compelling chord progressions and melodic basslines using FL Studio. Chords and basslines form the foundation of a track, providing harmonic richness and driving energy. By delving into arpeggiation, chord voicings, and rhythmic patterns, you will learn how to create captivating and emotionally charged musical compositions that captivate your listeners.
Getting ready
- FL Studio software
- Basic understanding of music theory
- Virtual instruments loaded in FL Studio
How to do it
- Set up your project in FL Studio and select the virtual instruments you want to use for your chords and basslines.
- Decide on the key and scale you’ll be working with for your chords and bassline.
- Begin by creating a chord progression. Use the Piano roll to input the root notes of each chord, keeping them in sync with your desired rhythm:

Figure 2.6: How chord progression looks in the Piano roll
- Experiment with different chord voicings and inversions to add variety and richness to your progression.
- Once you have your chord progression, move on to the bassline. Use the Piano roll to create a melodic bassline that complements the chords.
- Consider using arpeggiation techniques to add complexity and movement to your chords and bassline. Experiment with different arpeggio patterns and timings.
- Pay attention to the relationship between the chords and bassline. Ensure they work together harmonically and rhythmically.
- Experiment with different chord progressions to evoke different emotions and moods.
- Fine-tune and adjust any notes or timings to create a cohesive and compelling chord progression and bassline.
- Play back your composition using the virtual instrument. Make any necessary adjustments until you’re satisfied with the overall sound.
There’s more
Here are some tips for arpeggiation:
- Select a chord in the Piano roll and open the Arpeggiation settings. Experiment with different arpeggio patterns, such as up, down, up-down, or random, to create movement and interest.
- Arpeggiation refers to the playing or sounding of individual notes of a chord in a sequence, rather than simultaneously. In music, an arpeggio is created by playing notes of a chord in a specific order, typically ascending or descending. This technique is often used to add a sense of fluidity, expression, or ornamentation to a musical passage, and it is commonly employed on instruments such as the guitar or piano. Arpeggiation can be an essential element in various musical genres, contributing to the overall texture and character of a piece. Using this technique, you will create another feeling to your melody instead of playing all notes of the chord at the same time.
- Adjust the speed or rate of the arpeggio to control the timing and rhythm of notes. Faster arpeggios can add energy and excitement, while slower ones can create a more relaxed and dreamy atmosphere.
- Combine arpeggiation with sustained chords or staccato notes to add contrast and dynamics to your composition.
- Layer multiple arpeggios with different patterns and velocities to create intricate and textured musical arrangements.
Here are some tips for chord voicings:
- Experiment with different chord inversions to create unique and interesting harmonic progressions. Inversions can add a sense of movement and flow to your chords.
- Explore adding extensions and alterations to your chords, such as seventh chords or suspended chords, to create tension and complexity.
- Consider using open voicings, where notes of the chord are spread out across different octaves, to create a fuller and more expansive sound.
Here are some tips for basslines:
- Experiment with different rhythmic patterns for your bassline. Syncopated rhythms or syncopated accents can add groove and energy to your composition.
- Explore using slides or glides between notes in your bassline to create smooth and melodic movements.
- Consider adding variations and fills to your bassline to keep it interesting and engaging.
- If you create a bassline from the same chord progression, you could see your notes in the background, in the Piano roll, as a Ghost channel. This makes it easier to create your bassline while seeing your chord notes:

Figure 2.7: A bassline taken from our chord progression
Congratulations! You have explored advanced techniques for creating compelling chord progressions and melodic basslines using FL Studio. By utilizing arpeggiation, chord voicings, and rhythmic patterns, you have learned how to create harmonically rich and captivating musical foundations for your tracks. Remember to experiment with different arpeggio patterns, chord inversions, and rhythmic variations to add complexity and emotion to your compositions.
In the next recipe, we will dive into the process of editing and manipulating MIDI files to further enhance your musical arrangements. Get ready to take your tracks to the next level!
Editing and manipulating MIDI files
In this recipe, we will delve into the art of editing and manipulating MIDI files to refine your compositions and add intricate details. MIDI editing gives you the power to fine-tune note durations, adjust velocities, and explore advanced manipulation techniques to create expressive and dynamic MIDI sequences. By the end of this recipe, you will have the skills to bring your MIDI compositions to life with precision and creativity.
Getting ready
- FL Studio software
- MIDI files or MIDI compositions
- Virtual instruments loaded in FL Studio
How to do it
- Open FL Studio and load your MIDI file or create a new MIDI composition.
- Double-click on the MIDI clip on the Playlist to open it in the Piano roll editor.
- Start by editing note durations. To shorten a note, hover your cursor over the right edge of the note in the Piano roll editor. Click and drag to adjust the length of the note. Repeat this process for each note that requires modification.
- Adjusting velocities can add dynamics and expression to your MIDI composition. To change the velocity of a note, click on the note in the Piano roll editor. Then, click and drag the small square at the bottom of the note vertically to increase or decrease its velocity. This will affect the volume and intensity of the note.
- Experiment with adding articulations to your MIDI composition. Articulations include legato, staccato, accent, and more. FL Studio provides various techniques to add these articulations. For example, you can use the Piano roll’s Articulations feature or the Mute tool to create staccato or muted notes.
- Explore advanced MIDI manipulation techniques such as arpeggiation. FL Studio offers built-in arpeggiator plugins that can transform your MIDI sequences into intricate patterns. Select the desired MIDI notes, open the arpeggiator plugin, and experiment with different settings and patterns to achieve the desired effect.
- Another advanced technique is chord generation. FL Studio provides tools to generate chords based on a single note or a selected set of notes. Experiment with different chord voicings and inversions to add complexity and richness to your MIDI composition.
- Humanize your MIDI sequences to add a natural and human feel to your music. FL Studio offers features such as Random or Humanize to introduce subtle variations in timing and velocity. Apply these features to selected notes or the entire MIDI composition to create a more organic and expressive performance.
- Take advantage of FL Studio’s quantization features to align your MIDI notes to a specific grid. This can help clean up and tighten up your MIDI composition, ensuring a more polished and professional sound.
- Experiment with different MIDI editing tools, such as the Cut, Copy, and Paste functions, to rearrange or duplicate musical phrases within your MIDI composition.
- Play back your edited and manipulated MIDI composition using the virtual instrument you selected. Make any necessary adjustments until you are satisfied with the result.
There’s more
- Use automation clips in FL Studio to add changes in parameters such as pitch, modulation, or filter cutoff over time. This can bring added depth and variation to your MIDI composition.
- Experiment with layering multiple MIDI tracks to create complex and harmonically rich arrangements. Each track can have its own unique MIDI composition, allowing you to combine different melodies, harmonies, and rhythms.
Don’t be afraid to experiment and try different editing techniques. MIDI editing is a creative process, and there are no strict rules. Trust your ears and intuition to make the right adjustments for your composition.
Congratulations! You have learned how to edit and manipulate MIDI files to refine your compositions and add intricate details. By adjusting note durations, velocities, and articulations, as well as exploring advanced techniques such as arpeggiation, chord generation, and humanization, you have gained skills to create expressive and dynamic MIDI sequences. Remember to experiment with different editing tools and techniques to unlock the full potential of your MIDI compositions.
In the next recipe, we will discover tips for using the Piano roll and creating unique sounds with your instruments. Get ready to explore further possibilities and make your music truly stand out!
Tips for using the Piano roll and sounding unique with your instruments
In this recipe, we will uncover valuable tips and techniques for using FL Studio’s Piano roll to its fullest potential. The Piano roll is a powerful tool that allows you to create unique melodies, chords, and harmonies while shaping and manipulating your instruments’ sounds. By incorporating these tips into your production workflow, you will be able to craft distinctive and original musical compositions that stand out from the crowd.
Getting ready
- FL Studio software
- Virtual instruments loaded in FL Studio
- Basic understanding of music theory
How to do it
- Experiment with different scales and modes in the Piano roll. By selecting unconventional scales or modes, you can create unique and unexpected musical phrases that add a fresh dimension to your compositions.
- Explore the use of chord progressions that venture beyond traditional major and minor chords. Experiment with extended chords, such as seventh chords, ninth chords, or suspended chords, to add complexity and richness to your harmonies.
- Utilize the Piano roll’s features to create complex rhythmic patterns. Experiment with different note durations, triplet or swing settings, and ghost notes to add groove and syncopation to your melodies:

Figure 2.8: Compiling different instruments to make your sound unique
- Don’t be limited to the standard piano sound. Experiment with different virtual instruments and sound libraries to find unique and distinctive sounds that match your musical vision.
- Dive into the modulation and automation capabilities of FL Studio to add depth and movement to your instrument sounds. Explore parameters such as pitch, filter cutoff, modulation, and effects to shape and evolve your sound over time:

Figure 2.9: Different automations connected to different instruments
- Experiment with layering different instruments and sounds. Blend contrasting timbres and textures to create interesting and innovative combinations that give your compositions a distinct character:

Figure 2.10: Compilation of three different layers for the Lead to make it sound unique
- Explore the use of effects in the Mixer to enhance and transform your instrument sounds. Experiment with reverb, delay, distortion, and other effects to add depth, space, and character to your sound palette:

Figure 2.11: How to arpeggiate in the Piano roll
- Utilize the Piano roll’s tools and functions, such as the quantization feature, to refine the timing and accuracy of your MIDI notes. This will ensure that your melodies and chords are played with precision and clarity.
Take advantage of FL Studio’s built-in arpeggiator plugins to create captivating arpeggios and patterns:

Figure 2.12: Arpeggiator options
- Consider incorporating real-time MIDI controllers, such as MIDI keyboards or MIDI drum pads, into your production process. This will allow you to perform and record expressive and dynamic MIDI sequences, adding a human touch to your compositions.
- Embrace experimentation, and don’t be afraid to break the rules. FL Studio offers a vast array of tools and possibilities, so feel free to explore unconventional techniques and push the boundaries of your creativity.
There’s more
- Save and organize your custom presets, including instrument settings, effects chains, and MIDI templates. This will allow you to easily recall your favorite sounds and configurations in future projects.
- Utilize FL Studio’s MIDI scripting capabilities to create custom MIDI mappings and macros, enabling you to control multiple parameters and functions simultaneously for a unique and efficient workflow.
- Collaborate with other musicians and producers to gain fresh perspectives and inspiration. Share MIDI files, presets, and techniques to exchange ideas and learn from each other’s creative processes.
Congratulations! You have explored valuable tips and techniques for using the Piano roll in FL Studio and creating unique sounds with your instruments. By incorporating these techniques into your production workflow, you have learned how to craft distinctive melodies, chords, and harmonies while shaping and manipulating your instrument sounds to achieve a unique musical identity. Remember to experiment, embrace creativity, and continue to refine your skills as you embark on your musical journey.
