


Unity is a powerful engine that enables creative people like you to build video games in different platforms.
After developing a few projects on it, you will realize that each of these could have been a better experience if you'd had a tool at that time to help you in the creation of content for your video game or in the automation of all those manual repetitive tasks that always end up generating a problem at the worst moment just because of Murphy's Law.
To create tools based on your video game requirements, Unity provides an editor scripting API to do it in a quick and fully integrated way. However, the documentation available for building such tools by yourself is not the best.
The main aim of this book is to give you a tour of some of the most important topics about editor scripting . We are going to explore its API when at the same time we implement custom tools to improve the development workflow in Run & Jump, a 2D platformer video game.
In this chapter, we will cover the following topics:
Basics of editor scripting
Run & Jump presentation and definition of the scope of the custom tools
Probably, at this point, you are familiar with the basic concepts of Unity and we can safely assume that you know how to create a small video game from scratch without too many complications. You know, for projects of this size, almost everything is always under control and nothing takes too much time to be done. Basically, it is like a little paradise in the video game developer's land.
However, when the project starts increasing in size in terms of complexity, you will notice that certain tasks are repetitive or subject to error, generating a considerable amount of effort and waste of time. For example, the mechanics of your video game are quite unique and it is hard for the level designers to create content on time and without errors. This is because Unity, or the available third-party tool you use, doesn't satisfy all the required functionalities.
Sometimes, because you have more people working on the project, the lack of a mechanism to encourage people to follow standards makes your video game crash constantly.
In the same scenario, imagine that your project also requires a lot of art assets, so artists constantly add these to Unity. The problem appears later when one of the developers needs to constantly check whether the settings of these assets are configured properly to make these look right in the final build, consuming development time.
Finally, your project will be available on several platforms. However, owing to the specific characteristics of your video game, every time you make a production build, you must check whether all the settings are okay. You also need to check whether you removed all the cheat menus used by your testers and that the correct assets are loaded into each because you are preparing a trial version. Managing this becomes a huge task!
To solve all these issues, Unity provides an editor scripting API. Using this we can do the following tasks:
Modify how the Unity editor behaves, triggering our code with specific events
Improve the workflow assistance with a custom GUI that seamlessly integrates with the Unity editor GUI
Automate repetitive tasks by accessing the Unity editor's main functionalities
Understating how to use the editor scripting API to create editor scripts in your project will allow you to make Unity work for your video game and boost the productivity of the video game development.
It's time to go hands on in the creation of editor scripts so in this section we are going to explore how to start them off.
An editor script is any piece of code that uses methods from the UnityEditor namespace, and its principal objective is to create or modify functionalities in the Unity editor.
To see this working, let's start with a basic example. Create a new project in Unity and then a new script called HelloWorld.cs. Don't worry about where to place the script, we'll talk about that in a bit. Copy the following code:
using UnityEngine;
using UnityEditor;

public class HelloWorld {

    [MenuItem ("GameObject/Create HelloWorld")]
    private static void CreateHelloWorldGameObject () {
        if(EditorUtility.DisplayDialog(
            "Hello World",
            "Do you really want to do this?",
            "Create",
            "Cancel")) {
            new GameObject("HelloWorld");
        }
    }
}
Wait for the compiler to finish and then go to the Unity editor menu and click on GameObject. At the end of the menu, you will see an item called Create HelloWorld, as shown in the following screenshot:

Click on this item, then a dialog window asks whether you really want to create this game object:

After clicking on Create, a new game object with the name HelloWorld is added to the current scene. You can check this in the Hierarchy window:

You created your first editor script using two things:
Don't worry, we will discuss these in depth later in this book. For now, we are going to move forward and discuss something very important in the creation of editor scripts: the Editor folder.
The Editor folder is one of the special folders Unity has, just like the Resources or Plugins folders.
Like the Unity documentation says, all scripts inside a folder with the name Editor will be treated as editor scripts rather than runtime scripts related to your video game. Also, you can have more than one Editor folder in your project at once if you want.
Tip
To learn more about other special folders in Unity, visit http://docs.unity3d.com/Manual/SpecialFolders.html.
If you have at least one Editor folder with a script inside, you will see something like the following in MonoDevelop (in other IDEs, such as Visual Studio or Xamarin, you may see something slightly different, but the concept is the same):

Two different assemblies will be created: the first assembly, Assembly-CSharp, is for your video game scripts and the second assembly, Assembly-CSharp-Editor, is for your editor scripts. This means that the editor scripts will not be included in your final video game build.
So, what is the problem with HelloWorld.cs? Well, right now it' s not inside an Editor folder, so if you try to build a video game with that script included, the build process will fail because Unity won't be able to find the namespace named UnityEditor:

Most of the editor scripts that we will discuss in this book, like
custom inspectors in Chapter 3, Creating Custom Inspectors, or editor windows in Chapter 4, Creating Editor Windows require being saved inside an Editor folder in order to work. However, in some situations, it is possible to achieve this without using the Editor folder.
Let's fix the original HelloWorld.cs file to work outside an Editor folder. In this case, we must tell the compiler to not include the editor-related code if we are making a video game build.
To achieve this, we will use the preprocessor directives #if and #endif with the conditional compilation symbol UNITY_EDITOR. Using both together, we can tell the compiler to exclude a block of code when we create a video game build.
Update HelloWorld.cs as follows:
using UnityEngine;
#if UNITY_EDITOR
using UnityEditor;
#endif
public class HelloWorld {

    #if UNITY_EDITOR
    [MenuItem ("GameObject/Create HelloWorld")]
    private static void CreateHelloWorldGameObject () {
        if(EditorUtility.DisplayDialog(
            "Hello World",
            "Do you really want to do this?",
            "Create",
            "Cancel")) {
            new GameObject("HelloWorld");
        }
    }
    #endif

    // Add your video game code here
}
If you feel a little overwhelmed, just keep in mind that the last script example is an exception, and as a guideline, all the editor scripts must be inside an Editor folder. to keep everything organized and working
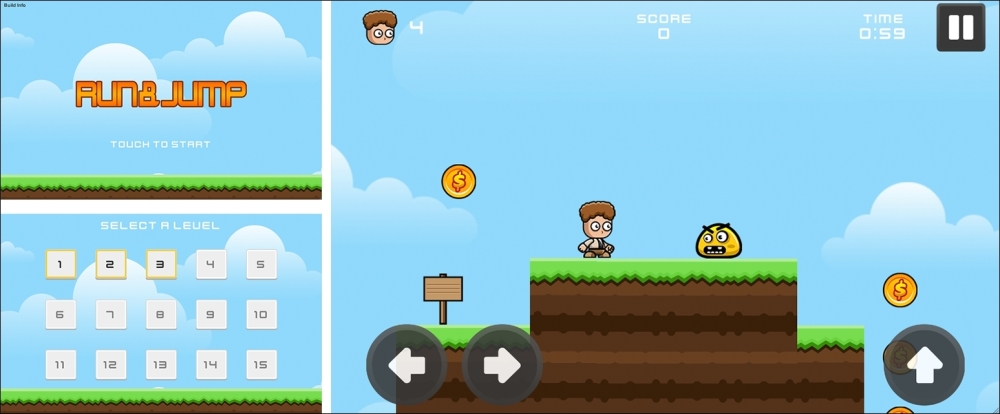
Run & Jump is a 2D platformer video game created for this book to serve as a base for our editor scripting experiments. In this section, we will talk about the video game and what kind of things we want to achieve.
Keep in mind that it is not important to understand in detail how Run & Jump is implemented. It's enough just to understand the workflows associated with the content creation of this video game.
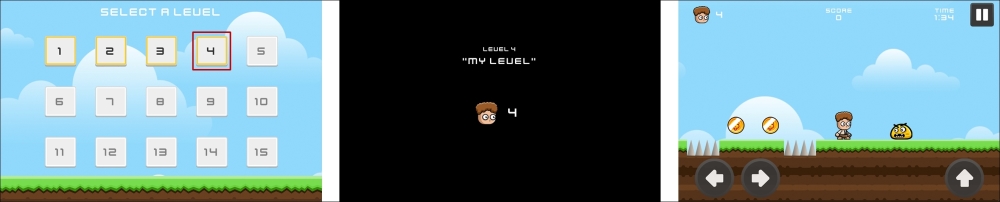
In this video game, the player takes control of Timmy, a guy who likes to collect coins and invests his time searching for hidden treasures. On his journey, he needs to avoid obstacles and enemies to reach the finale of each level and win. You can see how the video game looks in the following screenshots:
To play the video game, you will have to clone or download the project from https://github.com/angelotadres/RunAndJump in GitHub.
When you are ready, open the project in Unity. You will see the following folder structure in the Project browser:

To test the game, open the scene Title inside the Scenes folder and then press the Play button in the Unity toolbar:

To control Timmy, use the left and right arrows on your keyboard. Pressing the space bar makes him jump, and pressing it again while he is in the air makes him perform a double jump.
Currently, there are three levels implemented for this video game to test its functionality. In the next section, you will learn how to add more levels.
In this video game, each level is a Unity scene inside the folder Levels. When you start playing Run & Jump and then select a specific level, the video game call the LevelHandler scene and this starts the script LevelHandlerScene.cs.
This scene has all the GUI necessary for the level, and the script is responsible for the game's status detection (playing, paused, and so on), when the player wins or loses, and loading of the specific level scene using the method Application.LoadLevelAdditive.
Note
Unlike LoadLevel, LoadLevelAdditive does not destroy objects in the current scene. Objects from the new scene are added over the current one.
Each level scene is composed of several prefabs. We will refer to these in the rest of the book as level pieces prefabs.
Navigate to Prefabs | LevelPieces to check the available level piece prefabs. The following table contains a description of each one:


To get a better understating of what is involved in creating levels, let's create a new one. The goal is to copy the following level (or at least try to do so):
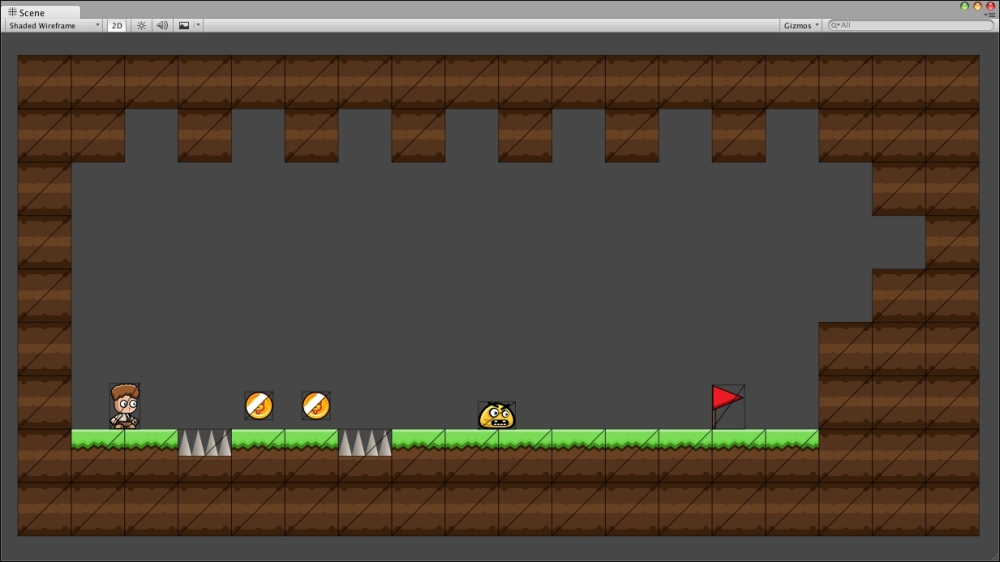
For this, you need to perform the following steps:
Add a new Game Object to the scene and attach the
level.csscript located inScripts|Level. This script contains the base to make our level work.Navigate to
Prefabs|LevelPiecesand clone the prefabs in the scene until you complete creating the level. All the prefabs must be nested inside the game object you created earlier.When you are done, click again on the root game object. If you check the Inspector window, you will see the following:

Here, you will be able to adjust the properties of the level, such as the maximum time taken to beat the level and get the score bonus, Gravity, Bgm (background music), and Background. You can play with these values: for the Bgm, you can grab an audio clip from the folder
Audio/Bgm; and for the background, you can grab a sprite fromArt/Bg.As soon you finish, save the scene inside the folder
Levelswith the nameMyLevel_level.
Tip
To align the prefabs among themselves, select the Transform tool and press and hold the V key to activate the Vertex-Snapping mode.
Run & Jump comes with a custom tool that allows you to set up the order and the name of the levels and also add these to the Scenes in Build list automatically. We must use this in order of make our level usable by the video game (one of the requirements is to include the suffix _level in the name of the scene).
In the Unity editor menu, navigate to Tools | Level Packager | Show Levels Package:

This will display the following in the Inspector window:
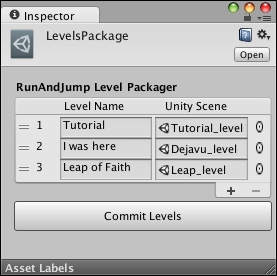
Currently, there are only three levels listed, so click on the + icon to create a new item in the list. Now, add the scene you created in right column and add the string My Level in the left column. This will add your level as the fourth one.
Save the changes by clicking on the Commit Levels button.
To check the scene you created, open the scene Title inside the Scenes folder, and then click on the Play button to run the video game:
Now you know the necessary amount of effort it takes to create a level for this game; so let's make this level creation process the first thing to improve.
Imagine a scenario where you are responsible for generating several levels for Run & Jump. You know this task is time consuming, and copying and pasting prefabs to place them in the right position is not the most efficient way to achieve this.
Basically, most of the 2D level editors use a Canvas/Brush metaphor to design the user interaction. This means the level scene is your canvas and using the mouse cursor as a brush, you paint over it level prefab instances.
Taking this in to consideration, the first thing we will create is a tool called Level Creator to make this process easier using the Canvas/Brush metaphor, and of course, in the process, we will cover several editor scripting topics.
The features of the Level Creator are as follows:
Automates the creation of a scene capable of being used as a level. This means that you can generate a scene with a game object, and the level script attached to it, with just a simple click.
Displays a grid on the Scene View option to be used as a reference. All the level piece prefabs will snap to this grid by default.
Controls and validates how the properties of the level script are changed.
Improves the visibility of the available level pieces prefabs by creating a Palette window to show a preview. This classifies the prefabs by their category.
Implements the Canvas/Brush metaphor allowing four modes: view, paint, edit, and erase level pieces prefabs.
Customizes the look and feel of the tool to improve its own appearance.
For now, let's focus on automating the creation of a scene capable to be used as a level.
Note
As you notice, Run & Jump is fully playable at it is but we are going to make a few improvements in its implementation to achieve a seamless integration with the Level Creator tool. Is because of that, all the current levels aren't be editable by the tool.
All the design decisions in this book were taken in order to make easy to understand the code related to editor scripting.
In the rest of this chapter, we will work on the first scripts of the Level Creator tool in order to automate the creation of a scene capable to be used as a level.
The goals here are:
We need to create a few folders to keep our development organized. Remember, for this entire book, we are working on the Run & Jump project.
You will find a folder called Tools in the root of the project. Right now this folder has one inside with the scripts of the tool we used to add our levels to the game.
Inside the Tools folder, create a new folder called LevelCreator and then match the folder structure, as shown in the following screenshot:
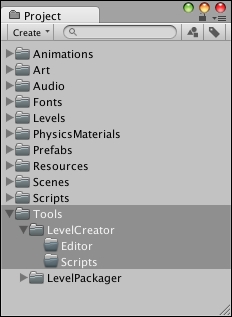
This folder structure is just a suggestion, but you must always consider creating a root folder for your custom tools.
As we were saying, we want to create a scene capable to be used as a level, but instead doing this manually in Unity, we are going to achieve the same using code.
We are going to implement a few methods to do this. Inside the folder Tools/LevelCreator/Editor, create a new script called EditorUtils.cs and add the following code:
using UnityEngine;
using UnityEditor;
using System.Collections.Generic;

namespace RunAndJump.LevelCreator {
  public static class EditorUtils {

    // Creates a new scene
    public static void NewScene () {
      EditorApplication.SaveCurrentSceneIfUserWantsTo ();
      EditorApplication.NewScene ();
    }

    // Remove all the elements of the scene
    public static void CleanScene () {
      GameObject[] allObjects = Object.FindObjectsOfType<GameObject> ();
      foreach (GameObject go in allObjects) {
        GameObject.DestroyImmediate (go);
      }
    }

    // Creates a new scene capable to be used as a level
    public static void NewLevel () {
      NewScene ();
      CleanScene ();
      GameObject levelGO = new GameObject ("Level");
      levelGO.transform.position = Vector3.zero;
      levelGO.AddComponent<Level> ();
    }
  }
}
The NewLevel method is the one that executes all the work using the help of the following two methods:
NewScene: This creates a new scene, but before doing that, asks whether we want to save the scene that is currently open. All this is done usingEditorApplication, a static class with several methods to know the state of the editor (playing, paused, compiling, and so on) and create, save, or load scenes and projects.CleanScene: This removes all the elements of the scene. Remember the camera created by default with each scene in Unity? Well, this method is going to take care of that using theDestroyImmediatemethod. This is similar to the commonDestroymethod but this works in an Editor context.
Note
To learn more about the EditorApplication class, visit http://docs.unity3d.com/ScriptReference/EditorApplication.html.
Tip
In order to avoid class name conflicts, it's always a good idea to use namespaces. In this project, all the video game classes are in the RunAndJump namespace and the Level Creator classes are in the LevelCreator.RunAndJump namespace.
Similar to the HelloWorld example we created at the beginning of this chapter, we need to make the NewLevel method accessible through the Unity editor menu using the MenuItem attribute.
Inside the folder Tools/LevelCreator/Editor, create a new script called MenuItems.cs. We will use this to add all the future menu items that the tool requires; for now, add the following code:
using UnityEngine;
using UnityEditor;
namespace RunAndJump.LevelCreator {
public static class MenuItems {
[MenuItem ("Tools/Level Creator/New Level Scene")]
private static void NewLevel () {
EditorUtils.NewLevel ();
}
}
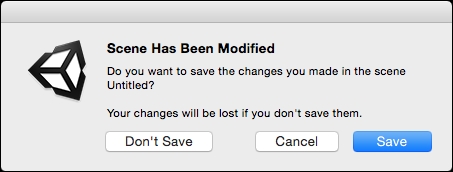
}Now, the NewLevel method will be available when you navigate to Tools | Level Creator | New Level Scene. Save all the scripts changes and for Unity to compile, then click on New Level Scene:

A dialog window will ask you whether you want to save the current changes of the scene (if this one has modifications):
After this, a new scene will be created with the game object containing the level script:
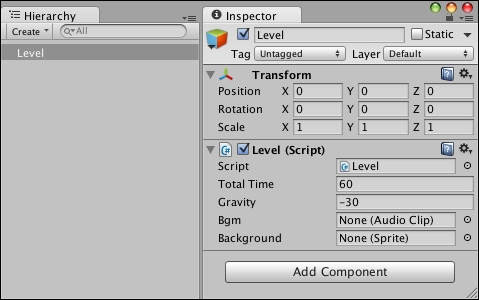
Congratulations! We have the starting point for the Level Creator tool creating a level scene with just one click!
In this chapter, we introduced you to the editor scripting API and also the project that we will use in this book.
With editor scripts, we were able to customize how Unity works and customize the workflow based on our specific requirements.
When you work with editor scripts, remember to use the UnityEditor namespace and save the scripts inside a folder with the name Editor.
If for some reason you must use the editor scripting API outside an Editor folder, remember to use the directives #if and #endif with the UNITY_EDITOR conditional compilation symbol to exclude that part of the code in the video game build.
If you plan to create a custom tool in your project, always consider these two things:
When you design a tool, always consider the user for whom you are building the tool and involve them in the design and creation process. If your tool requires a custom GUI, creating mockups is always a good alternative to get an idea of the final result. Remember, there is nothing worse than a tool that is not easy to use and doesn't solve the specific problem.
Always evaluate the cost of creating the tool and the time you want to invest in that. Ensure that the time and resources you spend creating the tool itself to save more time and resources later during development.
In the next chapter, we will continue working on the Level Creator, integrating the use of gizmos to display a grid meant to be used as guides in our tool.


