


In this chapter, we will cover:
Creating custom classes using the new Ext JS class system
Using inheritance in your classes
Adding mixins to your classes
Scoping your functions
Dynamically loading Ext JS classes
Aliasing your components
Accessing components with component query
Extending Ext JS components
Overriding Ext JS functionality
Although JavaScript is not a class-based language, it is possible to simulate classes using its prototypal structure. Ext JS 4 introduces an entirely new way of defining classes, compared with Ext JS 3. Consequently, when developing with Ext JS 4 your JavaScript's structure will be more closely in line with that of other object oriented languages.
This recipe will explain how to define classes using the new system, and give some detail about the features it has to offer. We will do this by creating a custom class to model a vehicle, with a method that will alert some details about it.
The Ext.define method is used to define new classes. It uses a string-based definition, leaving the framework to take care of the namespacing and concrete defining of the class:
Call the
Ext.definemethod with our class name and configuration object.// Define new class 'Vehicle' under the 'Cookbook' namespace Ext.define('Cookbook.Vehicle', { // class configuration goes here });Add properties and methods to the configuration object:
Ext.define('Cookbook.Vehicle', {
    Manufacturer: 'Aston Martin',
    Model: 'Vanquish',

    getDetails: function(){
        alert('I am an ' + this.Manufacturer + ' ' + this.Model);
    }
});
Tip
Downloading the example code
You can download the example code files for all Packt books you have purchased from your account at http://www.packtpub.com. If you purchased this book elsewhere, you can visit http://www.packtpub.com/support and register to have the files e-mailed directly to you.
We now add the
Ext.definemethod's optional third parameter, which is a function that is executed after the class has been defined, within the scope of the newly created class:Ext.define('Cookbook.Vehicle', { Manufacturer: 'Aston Martin', Model: 'Vanquish', getDetails: function(){ alert('I am an ' + this.Manufacturer + ' ' + this.Model); } }, function(){ Console.log('Cookbook.Vehicle class defined!'); });Finally, we create an instance of the new class and call its
getDetailsmethod:var myVehicle = Ext.create('Cookbook.Vehicle'); alert(myVehicle.Manufacturer); // alerts 'Aston Martin' myVehicle.getDetails(); // alerts 'I am an Aston Martin Vanquish'
The
Ext.definemethod handles the creation and construction of your class, including resolving the namespaces within your class name.Note
Namespaces allow us to organize classes into logical packages to keep code organized and prevents the global scope from becoming polluted. In our example, Ext JS will create a package (essentially just an object) called
Cookbook, which contains ourVehicleclass as a property. Your namespaces can be infinitely deep (that is, as many dots as you wish) and are automatically created by the framework.The first parameter of this method identifies the class name as a string. Class names are always given as strings (when defined and when instantiated) so they can be dynamically loaded when needed, meaning you can start to instantiate a class before it has been loaded.
The second parameter of this method accepts a standard JavaScript object that defines all of the properties and methods of your class. These can be accessed, as you would expect, from an instance of the class.
The third parameter of
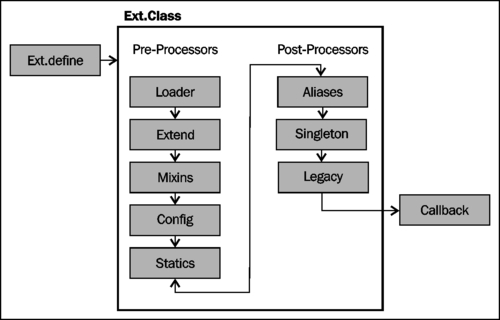
Ext.define's is an optional callback function that gets executed once the class has been fully defined and is ready to be instantiated.Internally every class that is defined is turned into an instance of the
Ext.Classclass by theExt.ClassManager. During this process, the manager runs through a series of pre and post processing steps. These processors each take care of initializing one part of the class and are called in the following order:Loader: Loads any other required classes if they don't already exist, recursing through this process for each class loaded
Extend: Now that all the required classes have been loaded, we can extend from them as required by our
extendconfig optionMixins: Any Mixins that have been defined are now handled and merged into our class
Config: Any properties in the
configconfiguration option are processed and their get/set/apply/reset methods are createdStatics: If the class has any static properties or methods these are handled at this stage
Once all of these pre-processors have completed their work our new class is ready to be instantiated. However, it will continue to work through its post-processors that perform the following actions:
At this point our class is fully created, and all that is left to do is to execute the callback function (defined as the third parameter to Ext.define) to signal the class definition being complete. The full process can be seen in the following diagram:
This model is extremely flexible and allows you to include your own pre or post processor at any stage in the sequence by using the registerPreProcessor
and registerPostProcessor
methods.
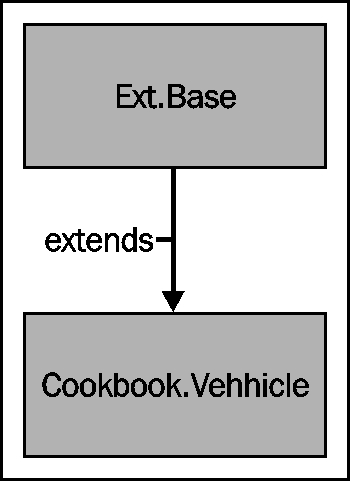
All Ext JS 4 classes inherit from a common base class, named Ext.Base. This class contains several methods that provide basic functionality to all created subclasses, for example override and callParent. When we define a new class using the Ext.define method, and don't specify an explicit base class, then the framework will automatically use Ext.Base as its base inside the Extend preprocessor. If we do specify a base class then that class will, at the root of its inheritance tree, extend Ext.Base. The following diagram shows how our custom class fits into this structure:
The new Ext JS class system also takes care of a lot of the heavy lifting for you when it comes to defining your properties, configuration options, and their associated getter and setter methods.
If you define these configuration options within a config object, the class system (inside its Config pre-processor) will automatically generate get, set, reset, and apply methods. This reduces the amount of code that needs to be maintained and downloaded.
The following code sample utilizes this config option and takes advantage of the free code that the framework will create. This code is initialized by calling the initConfig method within the constructor, which is executed when your class is instantiated.
Note
Constructors
are special methods that are executed when a class is instantiated (either using the Ext.create(..) or new syntax) and are used to prepare the object in any way needed. For example, it could be used to set up default property values.
Ext.define('Cookbook.Vehicle', {
    config: {
        Manufacturer: 'Aston Martin',
        Model: 'Vanquish'
    },

    constructor: function(config){
        // initialise our config object
        this.initConfig(config);
    },

    getDetails: function(){
        alert('I am an ' + this.Manufacturer + ' ' + this.Model);
    }
});

// create a new instance of Vehicle class
var vehicle = Ext.create('Cookbook.Vehicle');

// display its details
vehicle.getDetails();

// update Vehicle details
vehicle.setManufacturer('Volkswagen');
vehicle.setModel('Golf');

// display its new details
vehicle.getDetails();
By using this approach it is the equivalent of defining your class with the explicit methods shown as follows:
Ext.define('Cookbook.Vehicle', {
    Manufacturer: 'Aston Martin',
    Model: 'Vanquish',

    getManufacturer: function(){
        return this.Manufacturer;
    },
    setManufacturer: function(value){
        this.Manufacturer = value;
    },
    resetManufacturer: function(){
        this.setManufacturer('Aston Martin');
    },
    applyManufacturer: function(manufacturer){
        // perform some action to apply the value (e.g. update a DOM element)
        return manufacturer;
    },

    getModel: function(){
        return this.Model;
    },
    setModel: function(value){
        this.Model = value;
    },
    resetModel: function(){
        this.setModel('Vanquish');
    },
    applyModel: function(model){
        // perform some action to apply the value (e.g. update a DOM element)
        return model;
    },

    getDetails: function(){
        alert('I am an ' + this.Manufacturer + ' ' + this.Model);
    }
});
Note
Notice that we return the property's value within our apply methods. This is important as this method is called by the property's set method, so the new value is applied appropriately, and its return value is stored as the property's value.
Sometimes we will want to perform some extra actions when calling these generated methods. We can do this by explicitly defining our own version of the method that will override the generated one. In our example, when calling the apply method, we want to update a DOM element that contains the Vehicle's name, so the change is reflected on the screen. First we add some markup to hold our Vehicle's data:
<span id="manufacturer"></span>
<span id="model"></span>
Now we override the applyManufacturer and applyModel methods to perform an update of each DOM element when the properties are changed:
Ext.define('Cookbook.Vehicle', {
    config: {
        Manufacturer: 'Aston Martin',
        Model: 'Vanquish'
    },

    constructor: function(config){
        // initialise our config object
        this.initConfig(config);
    },

    getDetails: function(){
        alert('I am an ' + this.getManufacturer() + ' ' + this.getModel());
    },

    applyManufacturer: function(manufacturer){
        Ext.get('manufacturer').update(manufacturer);
        return manufacturer;
    },
    applyModel: function(model){
        Ext.get('model').update(model);
        return model;
    }
});
// create a Vehicle and set its Manufacturer and Model
var vehicle = Ext.create('Cookbook.Vehicle');
vehicle.setManufacturer('Volkswagen');
vehicle.setModel('Golf');
The next recipe explaining how to include inheritance in your classes.
The Adding mixins to your class recipe, which describes what Mixins are and how they can be added to your classes.
Dynamically Loading ExtJS Classes which explains how to use the dynamic dependency loading system that the framework provides.
More often than not when defining a new class, we want to extend an existing Ext JS class or component so that we inherit its current behavior and add our own new functionality.
This recipe explains, how to extend an existing class and add new functionality through new methods and by overriding existing ones.
We will define a very simple class that models a Vehicle, capturing its Manufacturer, Model, and Top Speed. It has one method called travel, which accepts a single parameter that represents the distance to be travelled. When called, it will show an alert with details of the vehicle, how far it travelled, and at what speed.
Define our base
Vehicleclass, which provides us with our basic functionality and from which we will extend our second class:Ext.define('Cookbook.Vehicle', { config: { manufacturer: 'Unknown Manufacturer', model: 'Unknown Model', topSpeed: 0 }, constructor: function(manufacturer, model, topSpeed){ // initialise our config object this.initConfig(); if(manufacturer){ this.setManufacturer(manufacturer); } if(model){ this.setModel(model); } if(topSpeed){ this.setTopSpeed(topSpeed); } }, travel: function(distance){ alert('The ' + this.getManufacturer() + ' ' + this.getModel() + ' travelled ' + distance + ' miles at ' + this.getTopSpeed() + 'mph'); } }, function(){ console.log('Vehicle Class defined!'); }); var vehicle = Ext.create('Cookbook.Vehicle', 'Aston Martin', 'Vanquish', 60); vehicle.travel(100); // alerts 'The Aston Martin Vanquish travelled 100 miles at 60mphDefine a sub-class
Cookbook.Planethat extends our baseVehicleclass and accepts a fourth parameter ofmaxAltitude:Ext.define('Cookbook.Plane', { extend: 'Cookbook.Vehicle', config: { maxAltitude: 0 }, constructor: function(manufacturer, model, topSpeed, maxAltitude){ // initialise our config object this.initConfig(); if(maxAltitude){ this.setMaxAltitude(maxAltitude); } // call the parent class' constructor this.callParent([manufacturer, model, topSpeed]); } }, function(){ console.log('Plane Class Defined!'); });Create an instance of our
Cookbook.Planesub-class and demonstrate that it has the properties and methods defined in both theVehicleandPlaneclasses:var plane = Ext.create('Cookbook.Plane', 'Boeing', '747', 500, 30000); plane.travel(800);
Alerts The Boeing 747 travelled 800 miles at 500mph (inherited from the Vehicle class)
alert('Max Altitude: ' + plane.getMaxAltitude() + ' feet');Alerts 'MaxAltitude: 30000 feet' (defined in the Plane class)
The extend configuration option, used when defining your new subclass, tells the Ext.Class' Extend preprocessor (which we talked about in the previous recipe) what class your new one should be inherited from. The preprocessor then merges all of the parent class' members into the new class' definition, giving us our extended class.
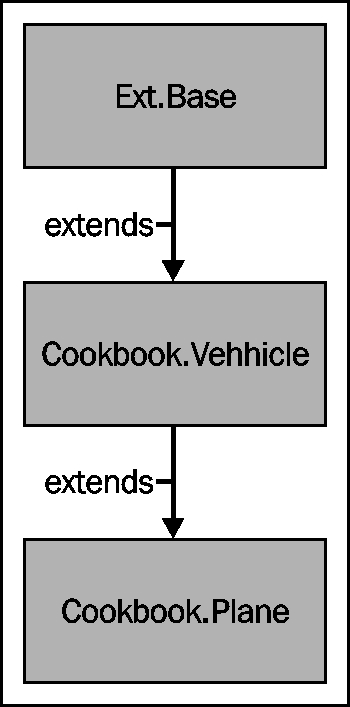
By extending the Vehicle class in this way our class diagram will look like the one shown as follows. Notice that the Plane class still inherits from the Ext.Base class through the Vehicle class' extension of it:
The callParent method is a very quick way of executing the parent class' version of the method. This is important to ensure that the parent class is constructed correctly and will still function as we expect. In previous versions of Ext JS, this was achieved by using the following syntax:
Plane.superclass.constructor.apply(this, arguments);
The new callParent method effectively still does this but it is hidden from the developer, making it much easier and quicker to call.
We can expand on this idea by adding new functionality to the Plane class and override the base class' travel method to incorporate this new functionality.
A plane's travel method is a little more complicated than a generic vehicle's so we're going to add takeOff and land methods to the class:
Ext.define('Cookbook.Plane', {
...
takeOff: function(){
alert('The ' + this.getManufacturer() + ' ' + this.getModel() + ' is taking off.');
},
land: function(){
alert('The ' + this.getManufacturer() + ' ' + this.getModel() + ' is landing.');
}
...
});We can then override the travel method of the Vehicle class to add in the takeOff and land methods into the Plane's travel procedure:
Ext.define('Cookbook.Plane', {
...
travel: function(distance){
this.takeOff();
// execute the base class’ generic travel method
this.callParent(arguments);
alert('The ' + this.getManufacturer() + ' ' + this.getModel() + ' flew at an altitude of ' + this.getMaxAltitude() + 'feet');
this.land();
}
...
});This method extends the travel functionality given to us by the Vehicle class by alerting us to the fact that the plane is taking off, flying at a specific altitude, and then landing again.
The important part of this method is the call to the callParent method. This executes the base class' travel method, which runs the Vehicle's implementation of the travel method. Notice that it passes in the arguments variable as a parameter. This variable is available in all JavaScript functions and contains an array of all the parameters that were passed into it.
We can see this in action by creating a new Plane object and calling the travel method:
var plane = Ext.create('Cookbook.Plane', 'Boeing', '747', 500, 30000);

plane.travel(800); // alerts 'The Boeing 747 is taking off'
// 'The Boeing 747 travelled 800 miles at 500mph'
// 'The Boeing 747 flew at an altitude of 30000 feet'
// 'The Boeing 747 is landing.'The very first recipe in this chapter that covers how classes work.
The recipe describing Dynamically loading Ext JS classes, which teaches you about how these classes can be loaded on the fly.
The Extending Ext JS components recipe, which explains how to use inheritance to extend the functionality of the framework.
Mixins are classes that can be included in another class, merging its members (methods and properties) into it. This technique provides us with a form of multiple inheritance where the mixin class' methods and properties can be accessed as if they were part of the parent class.
By making use of mixins we can package small and reusable bits of functionality into an encapsulated class, and merge it into classes which require that functionality. This reduces repetition and removes the need for the class to be extended directly. One example of a Mixin used within the framework is the Ext.form.Labelable class, which gives the component it is mixed into the ability to have a label attached to it.
Define our simple
mixinclass calledHasCamerawith a single method calledtakePhoto:Ext.define('HasCamera', { takePhoto: function(){ alert('Say Cheese! .... Click!'); } });Define a
skeletonclass and use themixinsconfiguration option to apply ourHasCameramixin to ourCookbook.Smartphoneclass.Ext.define('Cookbook.Smartphone', { mixins: { camera: 'HasCamera' } });We can now call our mixin's
takePhotomethod as part of theSmartphone's class within auseCameramethod:Ext.define('Cookbook.Smartphone', { mixins: { camera: 'HasCamera' }, useCamera: function(){ this.takePhoto(); } });Instantiate the
Smartphoneclass and call theuseCameramethod:var smartphone = Ext.create('Cookbook.Smartphone'); smartphone.useCamera(); // alerts 'Say Cheese! .... Click!'
By using the mixins configuration option we tell the class defining process to use the mixins preprocessor to merge all of the mixin class' members into the main class. This now means that all of the methods and properties defined as part of the HasCamera class can be accessed directly from the parent class' instance.
The name we give to our mixin in this configuration object allows us to reference it within our class' code. We will explore this later in the recipe.
Step 4, shows how we can access the HasCamera class' methods from the parent class by simply calling them as if they are part of the Smartphone class itself.
We might be required to override the functionality provided by our mixins class as we often would when using traditional inheritance.
In our example, we might want to introduce a focus routine into the takePhoto process to ensure that our subject is in focus before taking a photo. As we have done in previous recipes, we declare a method called takePhoto that will override the one added by the HasCamera Mixin, and another method to perform our focus operation:
Ext.define('Cookbook.Smartphone', {
    mixins: {
        camera: 'HasCamera'
    },

    useCamera: function(){
        this.takePhoto();
    },

    takePhoto: function(){
        this.focus();

        this.takePhoto();
    },

    focus: function(){
        alert('Focusing Subject...');
    }
});
At this point we are in trouble because our new takePhoto method needs to reference the original takePhoto method defined in the HasCamera class. However, at the moment it is pointing back to itself and will cause an infinite loop.
We get around this by calling the mixins method directly from its prototype, which can be accessed using the name we assigned it in Step 3. Our takePhoto method now becomes:
takePhoto: function(){
    this.focus();

    this.mixins.camera.takePhoto.call(this);
}The first recipe, Creating custom classes using the new Ext JS class system, for a recap about defining classes.
Overriding Ext JS' functionality describes how to customize the framework's default behaviour by defining new versions of key methods.
See the Adding functionality with plugins recipe, in Chapter 12, Advanced Ext JS for the Perfect App to help understand how plugins can be used and how they differ from mixins.
Making sure that you execute your functions in the correct scope is one of the harder tasks faced by new (and experienced!) JavaScript developers.
We would recommend studying the scoping rules of JavaScript to get a full understanding of how it works, but we will start this recipe with an explanation of exactly what scope is, how it changes, and how it affects our code.
Scope refers to the context that a piece of code is executing in and decides what variables are available to it. JavaScript has two types of scope: global scope and local scope. Variables and functions declared in the global scope are available to code everywhere. Common examples are the document and window variables. Local Scope refers to variables and functions that have been declared within a function, and so are contained by that function. Therefore, they can't be accessed from code above it in the scope chain.
Note
The scope chain is the way that JavaScript resolves variables. If you are trying to access a variable within a function, which has not been declared as a local variable within it, the JavaScript engine will traverse back up the chain of functions, (that is, scopes) looking for a variable matching its name. If it finds one then it will be used, otherwise an error will be thrown. This also means that local variables will take precedence over global variables with the same name.
We will explore a couple of examples to demonstrate how this works.
The first example shows a simple variable being declared in the global scope and it being alerted—no surprises there!
var myVar = 'Hello from Global Scope!';
alert(myVar); //alerts 'Hello from Global Scope!'
If you run the next example, you will now see two alerts; the first will say
Hello from Global Scope!and the secondHello from MyFunction!. OurmyFunctionfunction is able to access themyVarvariable because it was declared in the global scope and so can be found on the function's scope chain:var myVar = 'Hello from Global Scope!'; function myFunction(){ myVar = 'Hello from MyFunction!'; } alert(myVar); //alerts 'Hello from Global Scope!' myFunction(); alert(myVar); //alerts 'Hello from MyFunction!'We now add an alert to the
myFunctionfunction and add thevarkeyword in front of themyVarassignment within it. This keyword creates a local variable as part of themyFunction's scope with the same name as the one created in the global scope. The alert inside themyFunctionfunction will now alertHello from MyFunction!But the two alerts outside the function will alert the original globalmyVar's value. This is because themyVarvariable that was modified in themyFunctionfunction is a new local variable, and so doesn't affect the global version:var myVar = 'Hello Global Scope!'; function myFunction(){ var myVar = 'Hello from MyFunction!'; alert(myVar); } alert(myVar); //alerts 'Hello from Global Scope!' myFunction(); //alerts 'Hello from MyFunction!' alert(myVar); //alerts 'Hello from Global Scope!'Finally, we will demonstrate the use of the
thiskeyword. This keyword exists everywhere and provides us with a reference to the context (or scope) that the current piece of code is executing in. Consider the following example where a new object is created using theMyObject's constructor function. If we thenconsole.logthe contents of thethiskeyword, we see that it refers to the new object that we have created. This means that we can define properties on this object and have them contained within this object, and so, inaccessible from any other scope:function MyClass(){ console.log(this); } var myClass = new MyClass();If we add a property to the
thisobject in our constructor, we can alert it once a new instance has been created. Notice that if we try to alertthis.myPropertyoutside the scope of theMyClassobject, it doesn't exist becausethisnow refers to the browser window:function MyClass(){ console.log(this); this.myProperty = 'Hello'; } var myClass = new MyClass(); alert(myClass.myProperty); // alerts 'Hello' alert(this.myProperty); // alerts 'undefined'
When dealing with scope in Ext JS we are generally concerned with making sure our functions are executing in the scope of the correct class (whether it is a component, store, or controller). For example, by default an Ext.button.Button's click event will execute its handler function in the scope of itself (that is, this refers to the Ext.button.Button instance). It's likely that we want the button's handler to execute in the scope of the parent class (for example, a grid panel) and so we must force a different scope upon it.
We will now explore ways in which we can change the scope a function executes in using Ext JS' in-built functionality. By following these steps we will see how Ext JS makes it easy to ensure this refers to what you want it to!
Ext JS provides us with a method that allows us to force a function to execute in the scope we specify, meaning we can specify what the this keyword refers to within the function.
Define two objects, each with a property and a function:
var cat = {
    sound: 'miaow',
    speak: function(){
        alert(this.sound);
    }
};
var dog = {
    sound: 'woof',
    speak: function(){
        alert(this.sound);
    }
};

cat.speak(); // alerts 'miaow'
dog.speak(); // alerts 'woof'
Use the
Ext.bindmethod to force thedogobject'sspeakmethod to execute in the scope of thecatobject by passing it as its second parameter:Ext.bind(dog.speak, cat)(); // alerts 'miaow'
The Ext.bind method creates a wrapper function for the speak method that will force it to have its scope set to the object that is passed in, overriding the default scope value. This new function can be executed immediately (as our example did) or stored in a variable to be executed at a later point.
By using it we redefine the this keyword used within the function to refer to what was passed in as the second parameter. This is the reason that in Step 2 the alert displayed the value stored in the cat's sound property rather than the dog's.
Getting the scope of a function correct is especially important within event handlers. Ext JS provides a scope config option that can be used to explicitly set the scope an event handler is executed in.
Consider the following example where we define a button and attach a handler to its click event, which will show an alert of the current scope's text property:
var button = Ext.create('Ext.button.Button', {
    text: 'My Test Button',
    listeners: {
        click: function(button, e, options){
            alert(this.text);
        }
    },
    renderTo: Ext.getBody()
});

button.show();
By default, this refers to the button itself and displays My Test Button. But what if we want to execute the function in the scope of another object, like this one?
var exampleObject = {
    text: 'My Test Object'
};
Our initial reaction would be to use the Ext.bind method, which we looked at earlier in the recipe, and would look something like this:
listeners: {
    click: Ext.bind(function(button, e, options){
        alert(this.text);
    }, exampleObject)
}
This technique works well and functions correctly. However, there is a more succinct method in the form of the scope config option, which can be added as shown in the following code:
listeners: {
    click: function(button, e, options){
        alert(this.text);
    },
    scope: exampleObject
}
The scope object is effectively a short hand way of using Ext.bind and gives us the same outcome with less code.
If you were to include multiple event handlers within the listeners property the scope value would be applied to them all. If you want to specify a different scope value for each event, you can use the following syntax:
listeners: {
    click: {
        fn: function(button, e, options){
            alert(this.text);
        },
        scope: this
    },
    afterrender: {
        fn: function(button, options){
            // do something...
        },
        scope: otherObject
    }
}The recipe Handling event on elements and components in Chapter 2, Manipulating the Dom, Handling Events, and Making AJAX Requests for further examples.
Ext JS 4 gives us the ability to only load the parts of the framework we need, as and when we need them. In this recipe, we will explore how to use the framework to automatically load all our class dependencies on the fly.
We are going to use the Vehicle and Plane classes that we created in the Using inheritance recipe earlier to demonstrate dynamic loading.
Configure the
Ext.Loaderclass to enable it and map our namespaces to a physical path. This should be added before yourExt.onReadycall:Ext.Loader.setConfig({ enabled: true, paths: { 'Cookbook': 'src/Cookbook' } });Create individual files in the
src/Cookbookfolder for theVehicleandPlaneclasses, naming each the same as the class name (excluding the namespace).Call the
Ext.requiremethod, inside ourExt.onReadyfunction, passing in the class we need, and a callback function, which is executed after the class and all its dependencies have loaded, containing our code:Ext.require('Cookbook.Vehicle', function(){ var van = Ext.create('Cookbook.Vehicle', 'Ford', 'Transit', 60); van.travel(200); });Execute the code and monitor your Developer Tools console and HTML tabs and you will see the
Ext.define's callback being displayed and the new script tag being injected into the HTML:
The initial configuration of the Ext.Loader class is vital for our classes to be loaded correctly, as it defines how class names are mapped to file locations so the Loader class knows where to find each class it is required to load. It also highlights the need for strict naming conventions when it comes to creating your files.
In our example, the paths configuration tells the Loader that any required classes within the Cookbook namespace should be loaded from the src/Cookbook directory.
We then call the Ext.require method, (an alias of the Ext.Loader.require method) which takes the class name specified and resolves its URL based on the paths configuration, and if it hasn't already been loaded previously, injects a script tag into the HTML page to load it. Once this load has happened the specified callback function is executed where you can create instances of the class with the knowledge that it has been fully loaded.
The Ext.require method accepts either a single or array of string values that will all be loaded prior to the callback being executed.
One of the great things about the Ext.Loader class is that it is recursive and won't stop until all the files needed by the original required classes are loaded. This means that it will load all classes referenced in the extend, mixins, and requires configuration objects.
We will demonstrate this by creating an instance of Cookbook.Plane
, which extends the Cookbook.Vehicle class. If we execute the following code, and monitor your developer tool as we did before, we will see both classes being loaded and created:
Ext.require('Cookbook.Plane', function(){
   var plane = new Ext.create('Cookbook.Plane', 'Boeing', '747', 500, 35000);
   plane.travel(200);
});Aliasing allows you to define a shorthand name for a component class. This is particularly useful as it means you don't always have to reference the full class name, which, if you are following Sencha's naming convention, can become fairly long. Additionally, aliasing allows you to define an xtype for your component.
This xtype is not only a shortcut to the full component name but brings advantages such as improved performance.
Instead of explicitly creating components during initialization a component with an xtype can be created implicitly as an object config. If you don't instantiate everything as an object, you can defer creation and rendering of the component to save resources until they are actually required.
We will demonstrate aliasing by creating a panel inside a viewport.
We start by defining our class and specifying an
aliasconfig option with a "widget" prefix:Ext.define('Customer.support.SupportMessage', { extend: 'Ext.panel.Panel', alias: 'widget.supportMessage', title: 'Customer Support', html: 'Customer support is online' });The panel
Customer.support.SupportMessagecan be instantiated lazily by using itsxtype:Ext.application({ name: 'Customer', launch: function(){ Ext.create('Ext.container.Viewport', { layout: 'fit', items: [{ xtype: 'supportMessage' }] }); } });
Ext.reg() doesn't exist in Ext JS 4, instead we register aliases with the alias config option.
When the application is first loaded, the class definitions are parsed and a dictionary of class aliases is created. This is contained within the framework's component manager (Ext.ComponentManager).
We're required to name our aliases with a prefix, "widget." However, when using the alias the prefix is not required.
The aliases are, as you would expect, simply a reference to the class. As we haven't instantiated the class (yet) we're able to save memory and resources. This is particularly helpful when our widgets are nested deeply as resources are not wasted on components that are not required or even rendered.
As we destroy our components, the framework releases the resources, but keeps the alias reference in the component manager, so that we can re-create the same component time and time again.
Calling the alias is done using the xtype config option, which is where you provide the alias name.
There are other ways to define aliases for your components.
Aliasing is used throughout this book in a variety of topics and recipes, however, the recipe Constructing a complex form layout, in Chapter 5, Loading, Submitting, and Validating Forms is a good example of using xtypes.
Ext JS 4 introduces a new helper class called Ext.ComponentQuery
, which allows us to get references to Ext JS Components using CSS/XPath style selector syntax. This new class is very powerful and, as you will find out, is leveraged as an integral part of the MVC architecture system.
In this recipe we will demonstrate how to use the Ext.ComponentQuery class to get references to specific components within a simple application. We will also move onto exploring how this query engine is integrated into the Ext.Container class to make finding relative references very easy.
Finally we will look at adding our own custom selector logic to give us fine-grain control over the components that are retrieved.
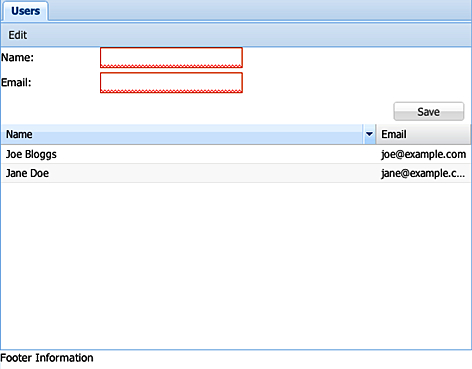
We will start by creating a simple application, which consists of a simple Ext.panel.Panel
with a toolbar, buttons, a form, and a grid. This will form the basis of our examples as it has a number of components that we can query for.
var panel = Ext.create('Ext.panel.Panel', {

    height: 500,
    width: 500,
    renderTo: Ext.getBody(),
    layout: {
        type: 'vbox',
        align: 'stretch'
    },
    items: [{
        xtype: 'tabpanel',
        itemId: 'mainTabPanel',
        flex: 1,
        items: [{
            xtype: 'panel',
            title: 'Users',
            id: 'usersPanel',
            layout: {
                type: 'vbox',
                align: 'stretch'
            },
            tbar: [{
                xtype: 'button',
                text: 'Edit',
                itemId: 'editButton'
            }],
            items: [{
                xtype: 'form',
                border: 0,
                items: [{
                    xtype: 'textfield',
                    fieldLabel: 'Name',
                    allowBlank: false
                }, {
                    xtype: 'textfield',
                    fieldLabel: 'Email',
                    allowBlank: false
                }],
                buttons: [{
                    xtype: 'button',
                    text: 'Save',
                    action: 'saveUser'
                }]
            }, {
                xtype: 'grid',
                flex: 1,
                border: 0,
                columns: [{
                    header: 'Name',
                    dataIndex: 'Name',
                    flex: 1
                }, {
                    header: 'Email',
                    dataIndex: 'Email'
                }],
                store: Ext.create('Ext.data.Store', {
                    fields: ['Name', 'Email'],
                    data: [{
                        Name: 'Joe Bloggs',
                        Email: 'joe@example.com'
                    }, {
                        Name: 'Jane Doe',
                        Email: 'jane@example.com'
                    }]
                })
            }]
        }]
    }, {
        xtype: 'component',
        itemId: 'footerComponent',
        html: 'Footer Information',
        extraOptions: {
            option1: 'test',
            option2: 'test'
        },
        height: 40
    }]
});
The main method of the Ext.ComponentQuery class is the query method. As we have mentioned, it accepts a CSS/XPath style selector string and returns an array of Ext.Component (or subclasses of the Ext.Component class) instances that match the specified selector.
Finding components based on xtype: We generally use a component's xtype as the basis for a selector and can retrieve references to every existing component of a xtype by passing it in to the query method. The following snippet will retrieve all
Ext.Panelinstances:var panels = Ext.ComponentQuery.query('panel');Just like in CSS we can include the concept of nesting by adding a second xtype separated by a space. In the following example, we retrieve all the
Ext.Buttoninstances that are descendants of anExt.Panelinstance:var buttons = Ext.ComponentQuery.query('panel button');Note
If you have custom classes whose xtypes include characters other than alphanumeric (for example, a dot or hypen) you cannot retrieve them in this way. You must instead query the
xtypeproperty of the components using the following syntax:var customXtypeComponents = Ext.ComponentQuery.query('[xtype=—My.Custom.Xtype—'];Retrieving components based on attribute values: Along with retrieving references based on xtype, we can query the properties a component possesses to be more explicit about which components we want. In our sample application we have given the Save button an
actionproperty to distinguish it from other buttons. We can select this button by using the following syntax:var saveButton = Ext.ComponentQuery.query('button[action="saveUser"]');This will return all
Ext.Buttoninstances that have anactionproperty with a value ofsaveUser.Combining selectors: It is possible to combine multiple selectors into one query in order to collect references to components that satisfy two different conditions. We do this by simply comma separating the selectors. The following code will select all
Ext.ButtonandExt.form.field.Textcomponent instances:var buttonsAndTextfields = Ext.ComponentQuery.query('button, textfield');Finding components based on ID: A component's
idanditemIdcan be included in a selector by prefixing it with the#symbol. This syntax can be combined with all the others we have seen so far but IDs should be unique and so should not be necessary. The following code snippet will select a component with an ID ofusersPanel:var usersPanel = Ext.ComponentQuery.query('#usersPanel');Retrieving components based on attribute presence : One useful feature of the component query engine is that we can select components based on an attribute simply being present, regardless of its value. This can be used when we want to find components that have been configured with specific properties but don't know the values they might have. We can demonstrate this with the following code that will select all
Ext.Componentthat have the propertyextraOptions.var extraOptionsComponents = Ext.ComponentQuery.query('component[extraOptions]');Using Components' Member Functions: It's also possible to execute a component's member function as a part of the selection criteria. If the function returns a truthy result then that component will be included (assuming the other criteria is met) in the result set. The following code shows this in action and will select all text fields who are direct children of a form and whose
isValidmethod evaluates to true:var validField = Ext.ComponentQuery.query('form > textfield{isValid()}');
The Ext.ComponentQuery
is a singleton class that encapsulates the query logic used in our examples. We have used the query method, which works by parsing each part of the selector and using it in conjunction with the Ext.ComponentManager class. This class is responsible for keeping track of all the existing Ext.Component instances, and is used to find any matching components.
There is one other method of the Ext.ComponentQuery class to introduce and a further four methods that are part of the Ext.container.AbstractContainer class.
The component query class allows us to evaluate a component reference we already have to find out if it matches a certain criteria. To do this we use the is method, which accepts a selector identical to the ones that the query method accepts and will return true if it does match. The following code determines if our main Ext.Panel (referenced in the panel variable) has an xtype of panel.
var isPanel = Ext.ComponentQuery.is(panel, 'panel');
There are four methods available in the Ext.container.AbstractContainer class (which all container classes extend from; for example panels), which utilizes the component query engine and allow us to query using that component as the root. These methods are query, child, up and down. The query method is identical to the query method available in the Ext.ComponentQuery class but uses the container instance as the root of the query and so will only look for components under it in the hierarchy.
The up and down methods
retrieve the first component, at any level, either above or below the current component in the component hierarchy that matches the selector passed in.
Finally, the child method retrieves the first direct child of the current instance that matches the selector.
Pseudo-selectors allow us to filter the retrieved result array based on some criteria that may be too complex to represent in a plain selector. There are two built-in pseudo-selectors: not and last. These can be added to a selector using a colon. The following example shows a selector that will retrieve the last text field.
var lastTextfield = Ext.ComponentQuery.query('textfield:last');It is very simple for us to create our own custom pseudo-selectors; we will demonstrate how to add a pseudo-selector to retrieve components that are visible.
We start by creating a new function on the Ext.ComponentQuery.pseudos object called visible, which accepts one parameter that will contain the array of matches found so far. We will then add code to loop through each item, checking if it's visible and, if it is, adding it to a new filtered array. We then return this new filtered array.
Ext.ComponentQuery.pseudos.visible = function(items) {
    var result = [];

    for (var i = 0; i < items.length; i++) {

        if (items[i].isVisible()) {
            result.push(items[i]);
        }
    }

    return result;
};
We can now use this in a selector in the same way as we did before. The following query will retrieve all visible components:
var visibleComponents = Ext.ComponentQuery.query('component:visible');The recipes about MVC in Chapter 12, Advanced Ext JS for the Perfect App make use of component queries extensively.
It is regarded as best practice to create each of your components as extensions of Ext JS' own components and store them in separate files. This approach aids code reuse, helps organize your code and makes maintenance a much easier task. In this recipe, we will discuss how to go about extending an Ext JS component to create a pre-configured class and then configuring it to make our own custom component.
We will define an extension of the Ext.panel.Panel class to create a simple display panel.
Define a new class under the
Cookbooknamespace, which extends theExt.panel.Panelclass:Ext.define('Cookbook.DisplayPanel', { extend: 'Ext.panel.Panel' });Override the
Ext.panel.Panel's initComponentmethod and call the parent class'initComponentmethod:Ext.define('Cookbook.DisplayPanel', { extend: 'Ext.panel.Panel', initComponent: function(){ // call the extended class' initComponent method this.callParent(arguments); } });Add our own component configuration to the
initComponentmethod by applying it to the class itself:initComponent: function(){ // apply our configuration to the class Ext.apply(this, { title: 'Display Panel', html: 'Display some information here!', width: 200, height: 200, renderTo: Ext.getBody() }); // call the extended class' initComponent method this.callParent(arguments); }Create an instance of our preconfigured class and show it:
var displayPanel = Ext.create('Cookbook.DisplayPanel');
displayPanel.show();
Our first step creates our new class definition and tells the framework to give our new class all the functionality that the Ext.panel.Panel has, through the use of the extend config option.
We then introduce an override for the initComponent method, which is used by each component to add its own configuration and perform any actions that are needed to set the component up. In order to ensure that this component behaves as it should, we call the parent class' initComponent method (in this case, Ext.panel.Panel) using the callParent method.
Next, we give our new class the configuration we want. We do this by using the Ext.apply method, which merges our configuration object into the class itself.
We are now able to instantiate our new class using its defined name and it will automatically be configured with all the properties we applied in the initComponent method. This means we can create a DisplayPanel anywhere in our code and only have to define it once.
We can take this idea further by integrating our own functionality into an extended component by overriding its functions. We are going to create a custom TextField that includes some information text below the field to help the user complete the form field correctly:
First we create our basic structure for extending the
Ext.form.field.Textcomponent:Ext.define('Cookbook.InfoTextField', { extend: 'Ext.form.field.Text' });Next, we override the
onRenderfunction, which is used to render the component to the page. In our override, we immediately call the parent'sonRendermethod, so the field is fully rendered before our code is executed. We then use theExt.core.DomHelperclass to insert a newdivelement, after the textfield, containing the value from the component'sinfoTextproperty:Ext.define('Cookbook.InfoTextField', { extend: 'Ext.form.field.Text', onRender: function(){ this.callParent(arguments); // insert our Info Text element Ext.core.DomHelper.append(this.getEl(), '<div>' + this.infoText + '</div>'); } }, function(){ console.log('Cookbook.InfoTextField defined!'); });We can now create our new
InfoTextFieldclass wherever we like and display any value that we would like using theinfoTextconfig option, like this:var infoTextField = Ext.create('Cookbook.InfoTextField', { renderTo: Ext.getBody(), fieldLabel: 'Username', infoText: 'Your Username must be at least 6 characters long.' }); infoTextField.show();
Creating custom classes with the new Ext JS class system for an explanation on creating classes and their structure.
We extend classes throughout this book, however, if you would like to see it in action we suggest you take a look at Modeling a data object, in Chapter 7, Working with the Ext JS Data Package.
The next recipe covers overriding in more detail.
To save the hassle of editing the framework directly (not recommended) when you are looking to alter its behaviour Ext JS provides a very useful override feature. By keeping framework behaviour changes separate you can remove them easily if necessary and keep track of your updates when upgrading to a newer version of the framework.
Altering framework code is strongly discouraged as other developers may not realize your changes and be unpleasantly surprised by the non-standard behavior!
Overriding allows you to take an existing class and either modify the behavior of existing functions or add completely new ones. This greatly increases the flexibility of the framework as it provides a very straightforward way to completely alter the out-the-box behaviour.
Achieving this in Ext JS 4 is done with the Ext.override method, which is an alias of Ext.Base.override.
Ext.override(Object originalCls, Object overrides) takes the original class and merges the new (or updated) functions you wish to create for the class.
It's perhaps worth pointing out that Ext.override will overwrite any members with the same name, so if you wish to simply extend their functionality you may be required to include the code from the original function.
To demonstrate overriding we will add new functions to an existing class.
Let's start by defining a class and giving it a
welcomemethod:Ext.define('Simple.Class', { welcome: function() { alert('Welcome to the app'); } });We provide
Ext.overridewith the original class and add new functions:Ext.override(Simple.Class, { goodBye: function() { alert('Goodbye'); }, runAll: function() { this.welcome(); this.goodBye(); } });Next, instantiate our class and call the new
runAll()method:var app = new Simple.Class(); app.runAll(); // Welcome to the app // GoodbyeThe override can also be written like this:
Simple.Class.override({
  //New members...
});
The override method of Ext.Base takes the original class and loops around the new functions that you've created by adding them to the prototype of the existing class and replacing any existing ones with the new definitions.
There are a number of other features in the framework that help you override and perform similar tasks.
If you are looking to extend the behavior of an existing function, you can now easily call the original function passing any required arguments using the callParent method.
Let's take the example from the recipe Extending Ext JS Components. The recipe shows how to add information text under a specified text field.
We can amend that example and force our information text to appear on all text fields throughout the application with a very simple override.
Ext.define('Cookbook.overrides.TextField', {
    override: 'Ext.form.field.Text',

    onRender: function(){
        this.callParent(arguments);

        Ext.core.DomHelper.append(this.el, '<div>' + this.infoText + '</div>');
    }
});
Note
We use the usual Ext.define function and give our override a name; this can be any name we want. Instead of including an extend configuration like we normally would, we add the override option, which is a string representation of the class we want to apply the override to.
Just like the Extending Ext JS Components recipe we override the text field's onRender function and want to call the parent's onRender method so the field is fully rendered before our code is executed. We do this by including this.callParent(arguments), which will execute the Ext.form.field.Text class' onRender function.
If we wanted to skip the Ext.form.field.Text class' onRender function and execute its parent class' (that is, Ext.form.field.Base) onRender function, (if we were, for example, providing a complete customization of the text Field's rendering process) we do this by calling Ext.form.field.Text.superclass.onRender.apply(this, arguments).
Now we define infoText in our text field's config options and it will display the field;
Ext.application({
    launch: function(){
        Ext.create('Ext.container.Viewport', {
            layout: 'fit',
            items: [{
                xtype: 'form',
                defaultType: 'textfield',
                items: [{
                    fieldLabel: 'Security Question',
                    name: 'securityQuestion',
                    allowBlank: false,
                    infoText: 'You are required to write a security question for your account.'
                }, {
                    fieldLabel: 'Security Answer',
                    name: 'securityAnswer',
                    allowBlank: false,
                    infoText: 'Please provide the answer to your security
                }]
            }]
        });
    }
});