Download code from GitHub
Chapter 1: Managing Azure Active Directory Objects
This first chapter of this book is focused on learning how to manage Azure Active Directory (Azure AD) objects. In this chapter, you will learn how to create and manage users and groups within Azure AD, including user and group properties. Additionally, we will look at Azure AD's administrative units (AUs) and discover how to create them alongside managing device settings and performing bulk user updates. You will also learn how to manage guest accounts within Azure AD, configure Azure AD join, and configure Self-Service Password Reset (SSPR).
In brief, in this chapter, the following topics will be covered:
- Creating Azure AD users and groups
- Creating AUs
- Managing user and group properties
- Managing device settings
- Performing bulk user updates
- Managing guest accounts
- Configuring Azure AD join
- Configuring SSPR
Technical requirements
In order to follow along with the hands-on exercises, you will need access to Azure AD as a global administrator. If you do not have access to this, students can enroll for a free account at https://azure.microsoft.com/en-in/free/.
An Azure AD Premium P1 license is also required for some of the sections. Luckily, there is also a free 1-month trial for students at https://azure.microsoft.com/en-us/trial/get-started-active-directory/.
Creating Azure AD users and groups
Azure AD offers a directory and identity management solution within the cloud. It offers traditional username and password identity management, alongside roles and permissions management. On top of that, it offers more enterprise-grade solutions, such as Multi-Factor Authentication (MFA) and application monitoring, solution monitoring, and alerting.
Azure AD can easily be integrated with your on-premises Active Directory to create a hybrid infrastructure.
Azure AD offers the following pricing plans:
- Free: This offers the most basic features, such as support for single sign-on (SSO) across Azure, Microsoft 365, and other popular SaaS applications, Azure Business-to-Business (B2B) for external users, support for Azure AD Connect synchronization, self-service password change, user and group management, and standard security reports.
- Office 365 Apps: Specific Office 365 subscriptions also provide some functionality such as user and group management, cloud authentication, including pass-through authentication, password hash synchronization, seamless SSO, and more.
- Premium P1: This offers advanced reporting, MFA, Conditional Access, Mobile Device Management (MDM) auto-enrollment, Azure AD Connect Health, advanced administration such as dynamic groups, self-service group management, and Microsoft Identity Manager.
- Premium P2: In addition to the Free and Premium P1 features, the Premium P2 license includes Azure AD Identity Protection, Privileged Identity Management, access reviews, and entitlement management.
Note
For a detailed overview of the different Azure AD licenses and all the features that are offered in each plan, you can refer to https://www.microsoft.com/nl-nl/security/business/identity-access-management/azure-ad-pricing?rtc=1&market=nl.
Creating users in Azure AD
We will begin by creating a couple of users in our Azure AD tenant from the Azure portal. To do this, perform the following steps:
- Navigate to the Azure portal by opening a web browser and browsing to https://portal.azure.com.
- In the left-hand menu, select Azure Active Directory.
- Under the Manage blade of Azure AD in the left-hand menu, select Users | All users. Then, select the + New user option from the top-level menu, as follows:

Figure 1.1 – The Azure AD Users blade
- We are going to create three users. Add these values that are shown in the following screenshot:
- Name:
PacktUser1. - User name: The username is the identifier that the user enters to sign in to Azure AD. Select your domain name, which has been configured, and add this to the end of the username. The default is usually an onmicrosoft.com domain, but in my case, I have assigned a custom domain name, called safezone.fun. In the First name section, I have chosen
Packt, and in the Last name section, I have addedUser1. Therefore, the User name value, in my case, will bePacktUser1@safezone.fun:
- Name:
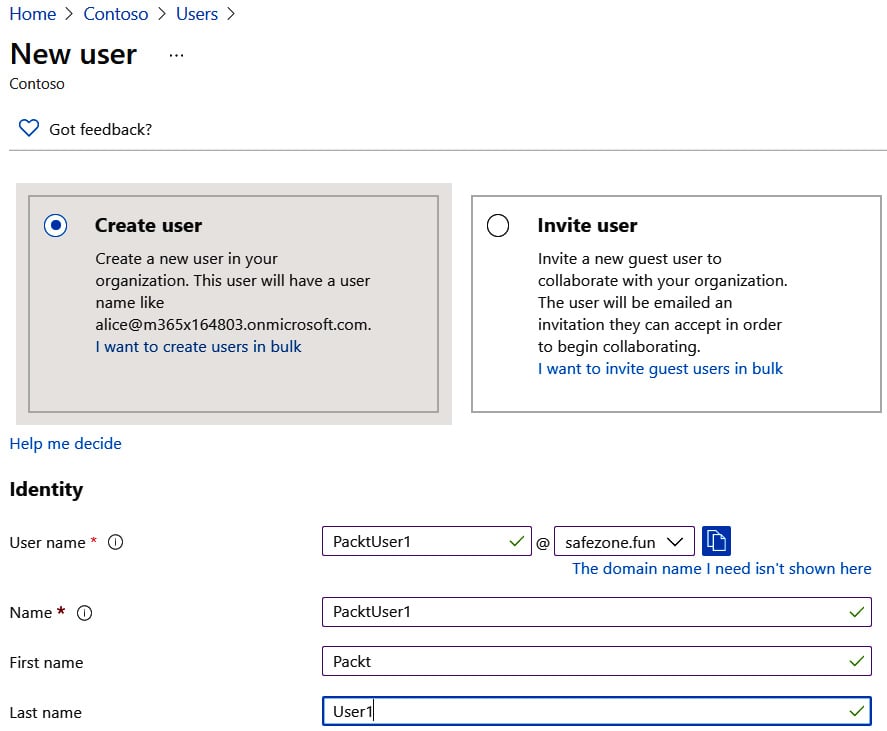
Figure 1.2 – The Azure AD user creation page part 1
- Leave the sections under Groups and Roles in their default settings for now.
- Next, we need to fill in information regarding the following:
- Block sign in: No
- Usage location: South Africa
- Job title:
Azure administrator - Department:
IT - Company name:
Packt1 - Manager: No manager selected:
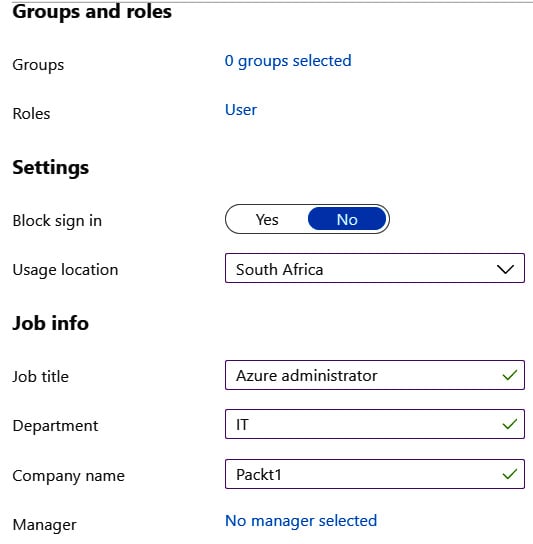
Figure 1.3 – The Azure AD user creation page part 2
Now that we have created users in our Azure AD tenant, we can add them to a group in Azure AD.
Creating groups in Azure AD
There are two main group types, as follows:
- Security groups: These groups serve the same function as traditional on-premises groups, which is to secure objects within a directory. In this case, it is to secure objects within Azure AD.
- Microsoft 365 groups: These groups are used to provide a group of people access to a collection of shared resources that is not just limited to Azure AD but also includes shared mailboxes, calendars, SharePoint libraries, and other Microsoft 365-related services.
Security groups are used as container units to group users or devices together. There are three main membership types for security groups:
- Assigned: This is where you manually assign users to a group.
- Dynamic user: This is where you can specify parameters to automatically group users, for example, grouping all users who have the same job title.
- Dynamic device: This is where you can specify parameters to automatically group devices, for example, grouping all devices that have the same operating system version.
To create and manage groups from the Azure AD tenant in the Azure portal, you have to perform the following steps:
- Navigate to the Azure portal by opening a web browser and browsing to https://portal.azure.com.
- In the left-hand menu, select Azure Active Directory.
- Under the Manage blade of Azure AD in the left-hand menu, select Groups | All groups. Then, select the + New group option from the top-level menu, as follows:
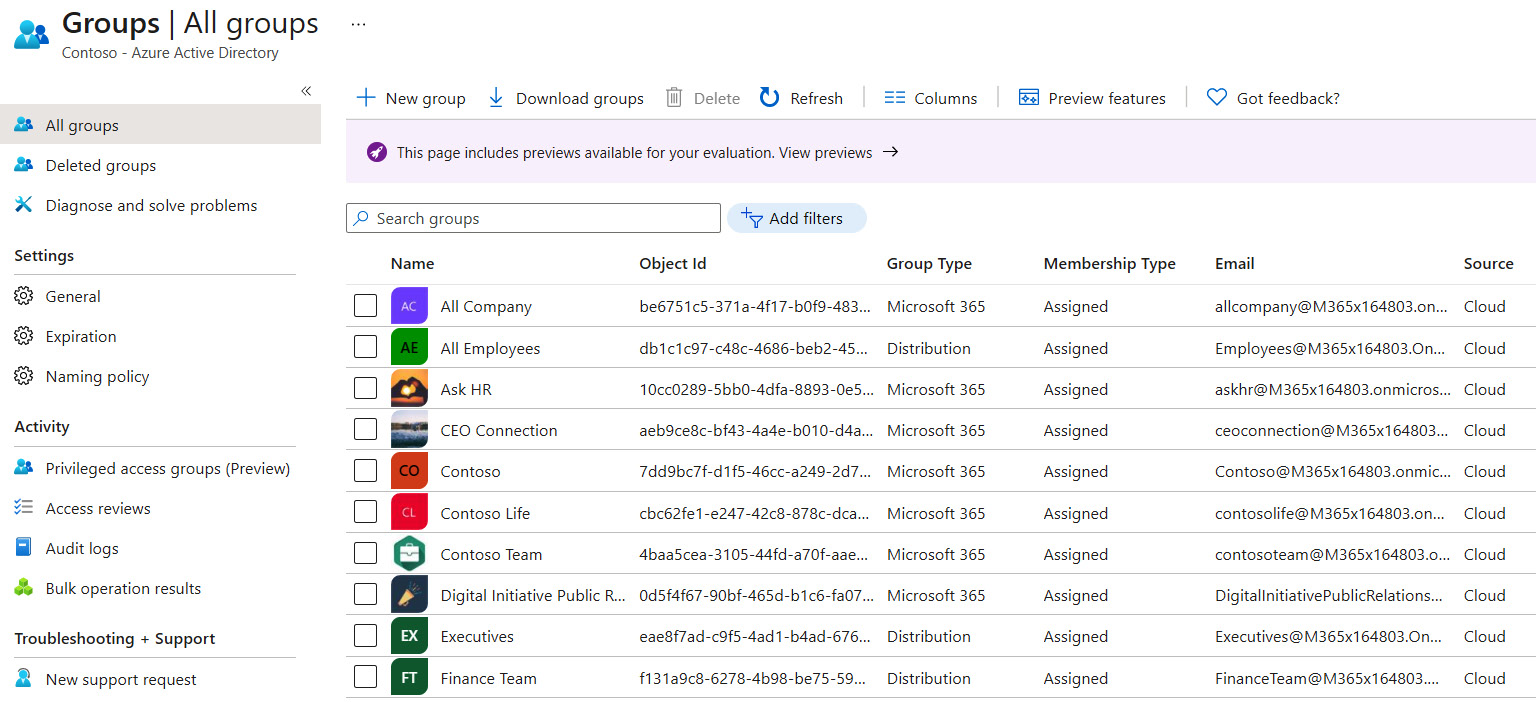
Figure 1.4 – The Azure AD group creation page part 1
- Add the following values to create the new group:
- Group type: Security
- Group name:
Azure Admins - Group description:
Dynamic group for all Azure Admins - Azure AD roles can be assigned to the group: No
- Membership type: Dynamic User
- Owners: No owners selected:
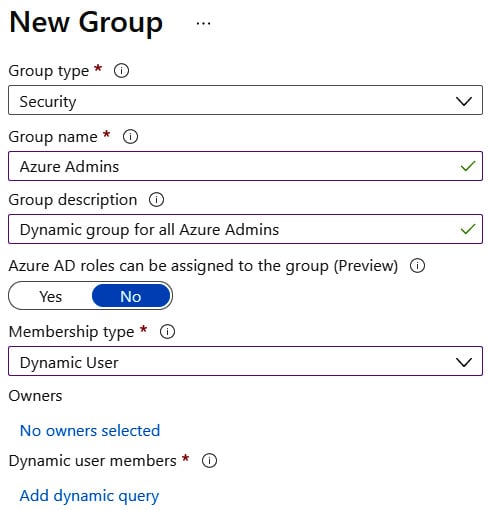
Figure 1.5 – The Azure AD group creation page part 2
For the Dynamic Query rule, the property is jobTitle, the operator is Equals, and the value is Azure administrator, as shown in the following screenshot:
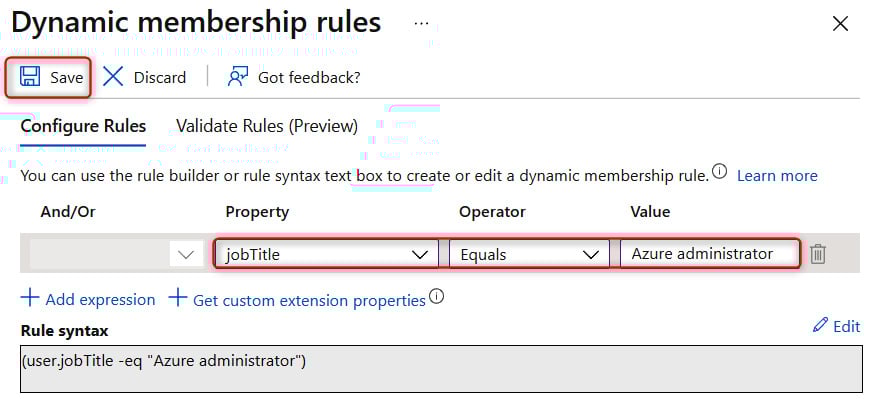
Figure 1.6 – The Azure AD group dynamic query
- Click on Create.
Tip
Remember that when using dynamic groups, a Premium P1 license needs to be assigned to the user.
Now that we have created the group, replication takes around 5 minutes. Refresh the Azure web page, and the users will appear as members of the Azure admins group that we just created:
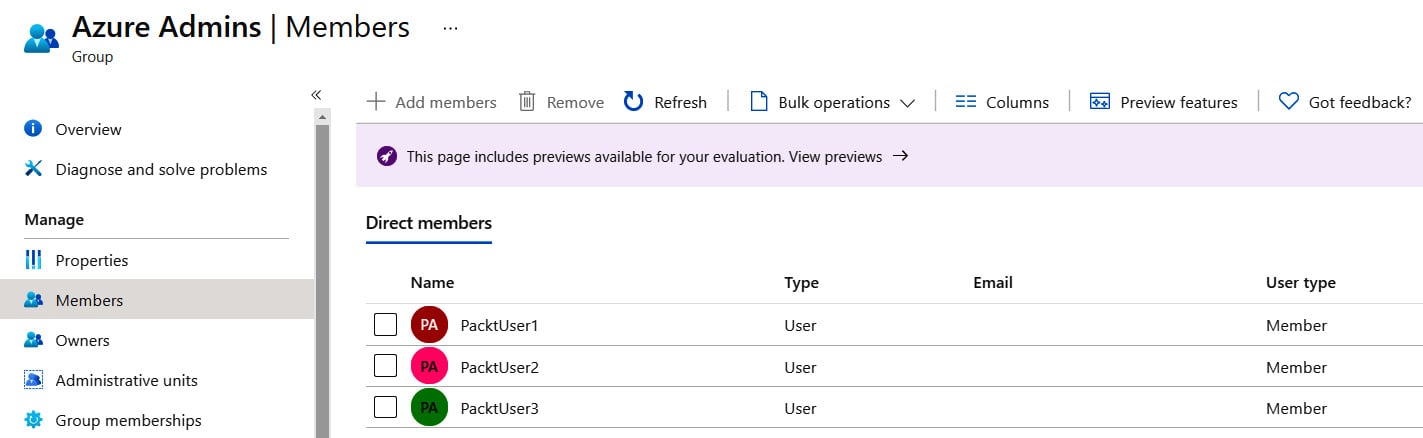
Figure 1.7 – The Azure AD group's dynamic group users added automatically based on the membership rules
In this section, we took a look at Azure AD users and groups and created a few accounts. We also created a dynamic membership group to include users via dynamic membership rules.
We encourage students to read up further by using the following links, which are based on Azure AD fundamentals such as adding users in Azure AD, assigning RBAC roles, creating Azure AD groups, and also creating dynamic groups in Azure AD:
- https://docs.microsoft.com/en-us/azure/active-directory/fundamentals/add-users-azure-active-directory
- https://docs.microsoft.com/en-us/azure/active-directory/fundamentals/add-custom-domain
- https://docs.microsoft.com/en-us/azure/active-directory/fundamentals/active-directory-users-profile-azure-portal
- https://docs.microsoft.com/en-us/azure/active-directory/fundamentals/active-directory-users-assign-role-azure-portal
- https://docs.microsoft.com/en-us/azure/active-directory/enterprise-users/groups-create-rule
- https://docs.microsoft.com/en-us/azure/active-directory/enterprise-users/groups-dynamic-membership
Next, we are going to look at Azure AUs, specifically where they can be used and how to create an AU.
Creating Azure AD AUs
Azure AD AUs are used in scenarios where granular administrative control is required. AUs have the following prerequisites:
- An Azure AD Premium P1 license is required for each AU administrator.
- An Azure AD Free license is required for AU members.
- A privileged role administrator or global administrator is required for configuration.
Tip
AUs can be created via the Azure portal or PowerShell.
The easiest way to explain AUs is by using a scenario. A company called Contoso is a worldwide organization with users across 11 countries. Contoso has decided that each country is responsible for its own users from an administrative point of view. That is where Azure AD AUs come in handy. With AUs, Contoso can group users per country and assign administrators that only have control over these users and cannot administrate users in other countries.
The following diagram displays a high-level overview of how AUs work in the same tenant across different departments. The following example is based on different regions:
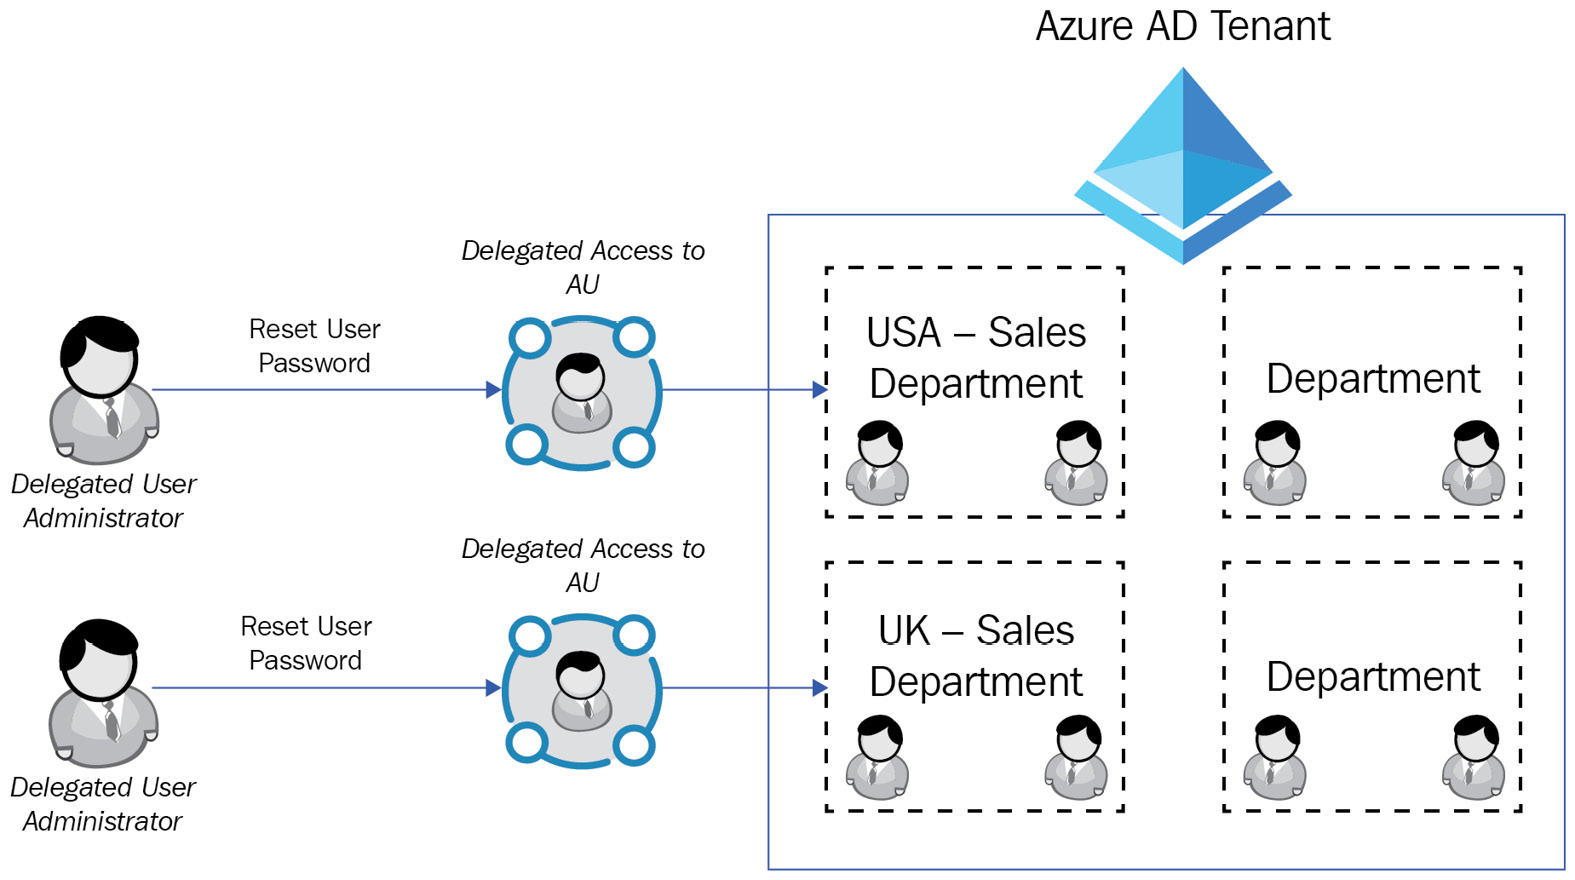
Figure 1.8 – An AU overview displaying the separation of users for US sales and UK sales
The following roles can be assigned within an AU:
- Authentication administrator
- Groups administrator
- Help desk administrator
- License administrator
- Password administrator
- User administrator
Important Note
Groups can be added to the AU as an object; therefore, any user within the group is not automatically part of the AU.
Now, let's go ahead and create an AU via the Azure portal:
- Navigate to the Azure portal by opening a web browser and browsing to https://portal.azure.com.
- In the left-hand menu, select Azure Active Directory.
- Under the Manage blade of Azure AD in the left-hand menu, select Administrative units and click on + Add:
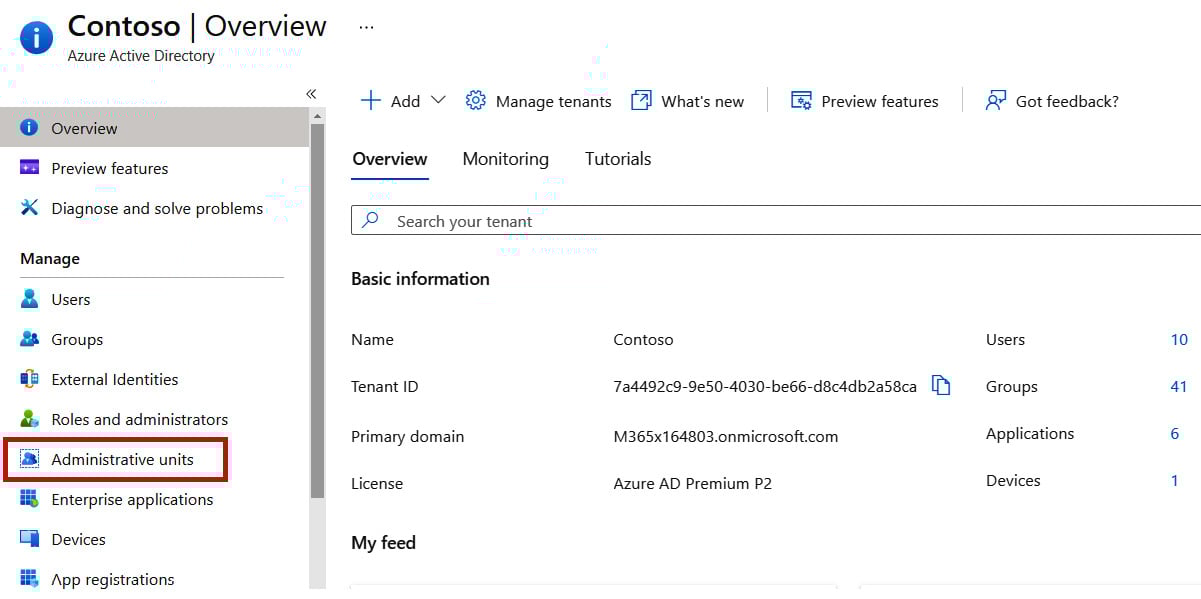
Figure 1.9 – The AU blade within Azure AD
- Enter a name for the group. I'm using
South Africa Users. In the Description field, it is best practice to add a brief description of what this AU is going to be used for:
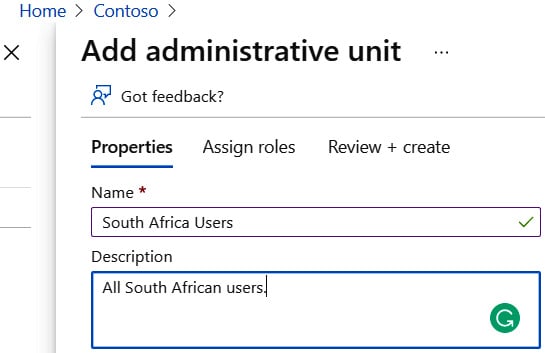
Figure 1.10 – The creation blade for an AU
- Next, under Assign roles, add the users that you want to be administrators based on the available roles. Then, select Password administrator and choose PacktUser1.
- Click on Review + create:
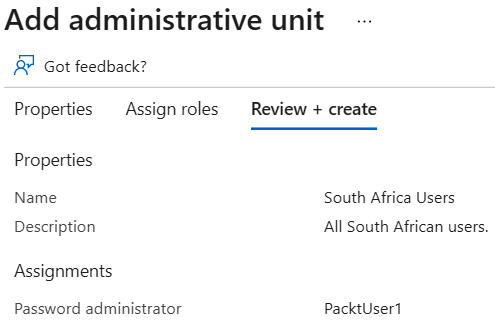
Figure 1.11 – The AU summary page
- The next step is to add all the users you want PacktUser1 to manage; in our case, we need to add PacktUser1, PacktUser2, and PacktUser3. On the left-hand side, under Manage, click on Add member and select the members:
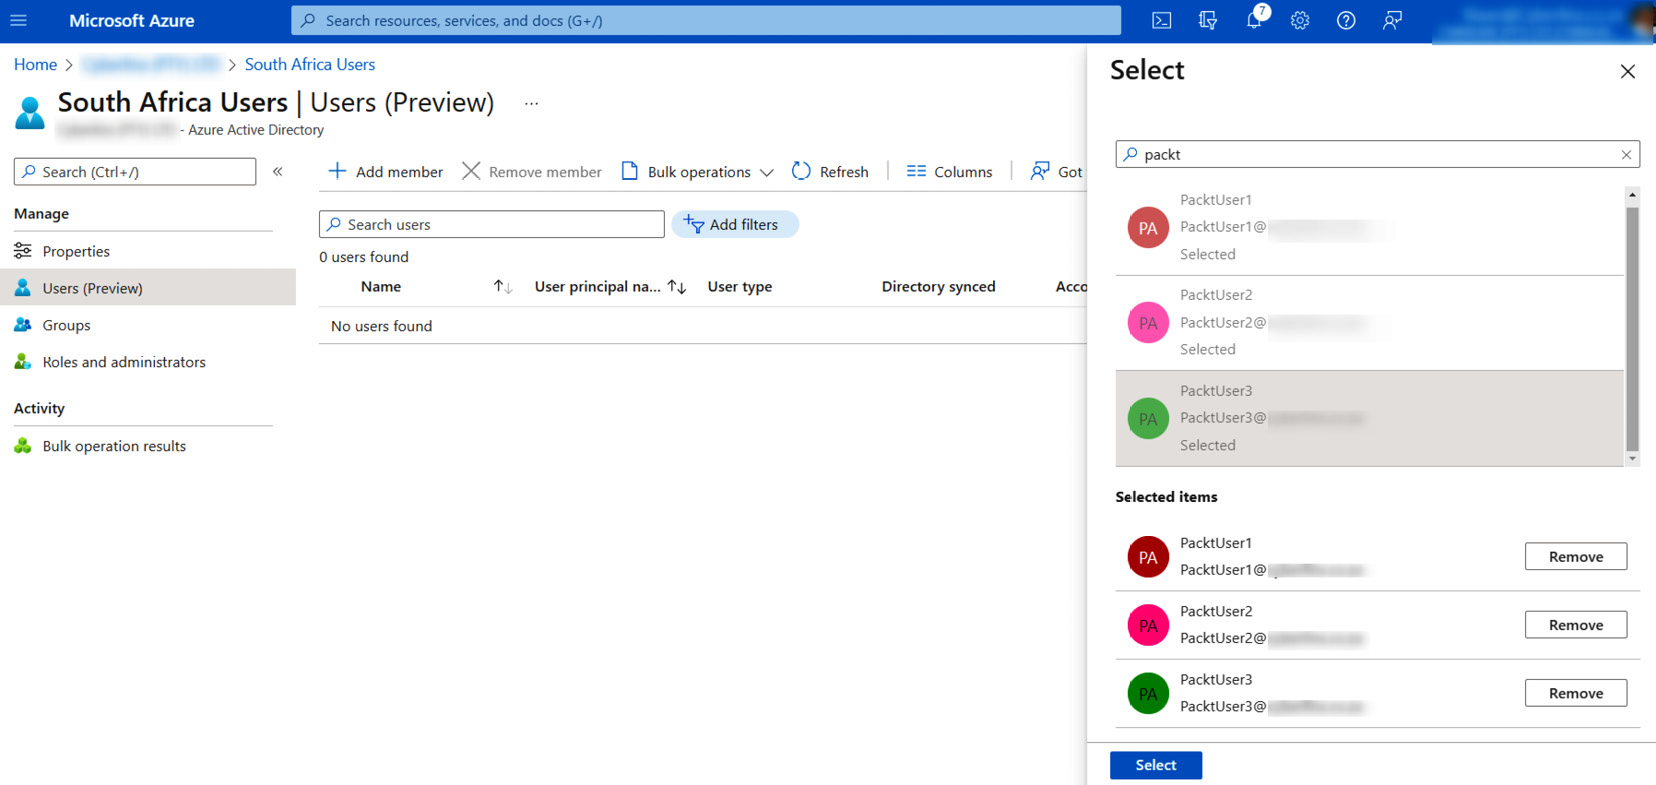
Figure 1.12 – Adding users to the AU
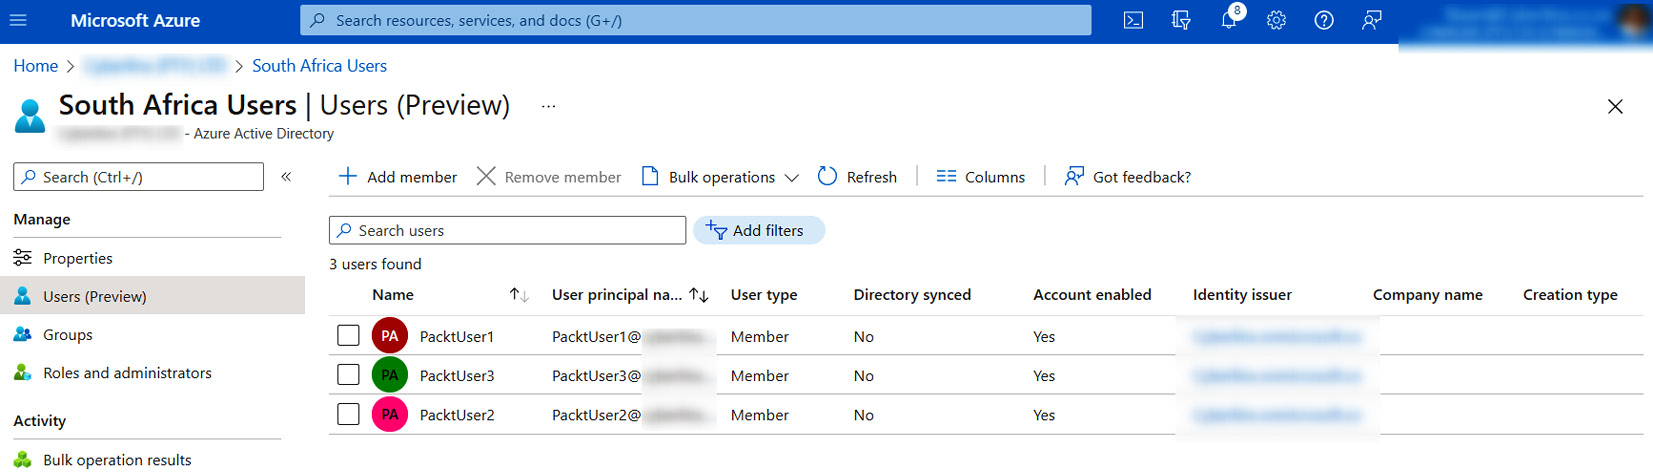
Figure 1.13 – Displaying the users added to the AU
- You can now log in with PacktUser1, and you should be able to reset the password of PacktUser2.
Important Note
Remember, you need to assign an Azure AD P1 license to administrators within the AU.
In this section, we explained what an AU is and how it can be used. Additionally, we went through the creation of an AU step by step.
We encourage students to read up further by using the following links, which will provide additional information around AU management:
- https://docs.microsoft.com/en-us/azure/active-directory/roles/admin-units-manage
- https://docs.microsoft.com/en-us/azure/active-directory/roles/admin-units-add-manage-users
Now, let's move on and take a look at how to manage user and group properties.
Managing user and group properties
Part of an Azure administrator's task is to understand what can be done from a user and group perspective within Azure AD. Let's take a look at what we can configure for an Azure AD user account:
- Profile: This is where you can view and update information such as the name, user type, job information, and more.
- Assigned roles: This setting is where you can view all of the role assignments for that specific account; assignments can be in the form of eligible, active, or expired assignments.
- Administrative units: This setting displays the AUs that the user is part of.
- Groups: This setting displays the AD groups that the user is part of.
- Applications: This setting displays the application assignments.
- Licenses: This setting displays what licenses are currently assigned to the user account.
- Devices: This setting shows what devices are associated with the user account, including the join type such as Azure AD joined.
- Azure role assignments: This setting displays the resources on a subscription level to which the account has access.
- Authentication methods: This setting displays the authentication contact information, such as the phone number and email address for MFA. From here, you can also set the account to reregister for MFA or revoke current MFA sessions.
Now that we have reviewed all the user properties, let's take a look at the group settings.
Azure AD groups have the following settings available:
- Overview: This displays the membership type, the source directory, the object ID, the creation date, and more.
- Properties: This setting displays the general settings for the group, such as the group name, the description, the group type, and the membership type, which can be changed here.
- Members: This setting displays all of the current members of the group; bulk operations can also be performed from here.
- Owners: This setting displays the owners of the group who can modify the group and the members within it.
- Administrative units: This setting displays the AUs that the group is part of.
- Group memberships: This setting displays all of the security groups that the group belongs to (nested grouping).
- Applications: This setting displays the application assignments.
- Licenses: This setting displays the licenses that are assigned to the group, which group members will inherit automatically.
- Azure role assignments: This setting displays the resources of a subscription level to which the group members have access.
- Dynamic membership rules: This setting displays the configuration rules; for dynamic groups, this is where you can change the configuration rules, which will affect the members of the group.
And that brings an end to the user and group properties. In this section, we have looked at all of the different settings for Azure AD users and Azure AD groups.
We encourage students to read up further by using the following links, which will provide additional information around managing group settings via the command line and also dive into external user attribute flows:
- https://docs.microsoft.com/en-us/azure/active-directory/enterprise-users/groups-settings-v2-cmdlets
- https://docs.microsoft.com/en-us/azure/active-directory/external-identities/user-flow-add-custom-attributes
Next, we are going to look at how to manage device settings within Azure.
Managing device settings
Azure AD offers the ability to ensure that users are accessing Azure resources from devices that meet corporate security and compliance standards. Device management is the foundation of device-based conditional access, where you can ensure that access to the resources in your environment is only possible from managed devices.
Device settings can be managed from the Azure portal. To manage your device settings, your device needs to be registered or joined to Azure AD.
To manage the device settings from the Azure portal, you have to perform the following steps:
- Navigate to the Azure portal by opening https://portal.azure.com.
- In the left-hand menu, select Azure Active Directory.
- In the Azure AD Overview blade, under Manage, select Devices, as follows:
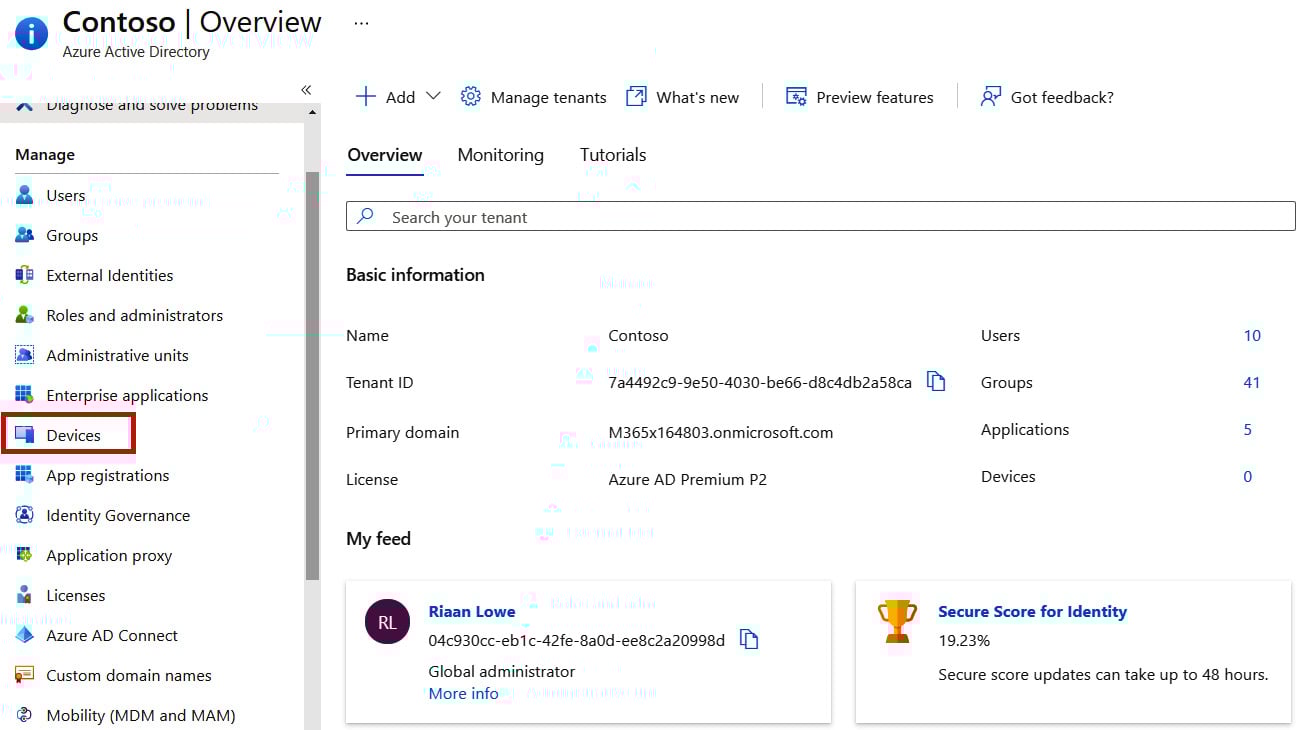
Figure 1.14 – The Azure AD Devices blade
The device management blade will open. Here, you can configure your device management settings, locate your devices, perform device management tasks, and review the device management-related audit logs.
- To configure the device settings, select Device settings from the left-hand menu. From here, you can configure the following settings, which are shown in the following screenshot:
- Users may join devices to Azure AD: Here, you can set which users can join their devices to Azure AD. This setting is only applicable to Azure AD join on Windows 10.
- Users may register their devices with Azure AD: This setting needs to be configured to allow devices to be registered with Azure AD. There are two options here: None, that is, devices are not allowed to register when they are not Azure AD joined or hybrid Azure AD joined, and All, that is, all devices are allowed to register. Enrollment with Microsoft Intune or MDM for Office 365 requires registration. If you have configured either of these services, All is selected and None is not available.
- Require Multi-Factor Authentication to register or join devices with Azure AD: Here, you can request that the user is required to perform MFA when registering a device. Before you can enable this setting, MFA needs to be configured for the users who register their devices.
- Maximum number of devices per user: This setting allows you to select the maximum number of devices that a user can have in Azure AD.
- Manage Additional local administrators on all Azure AD joined devices: This setting allows you to add additional local administrators for Azure AD joined devices.
- Manage Enterprise State Roaming settings: This setting provides users with a unified experience across all of their Windows devices and reduces the turnaround time when configuring new devices:
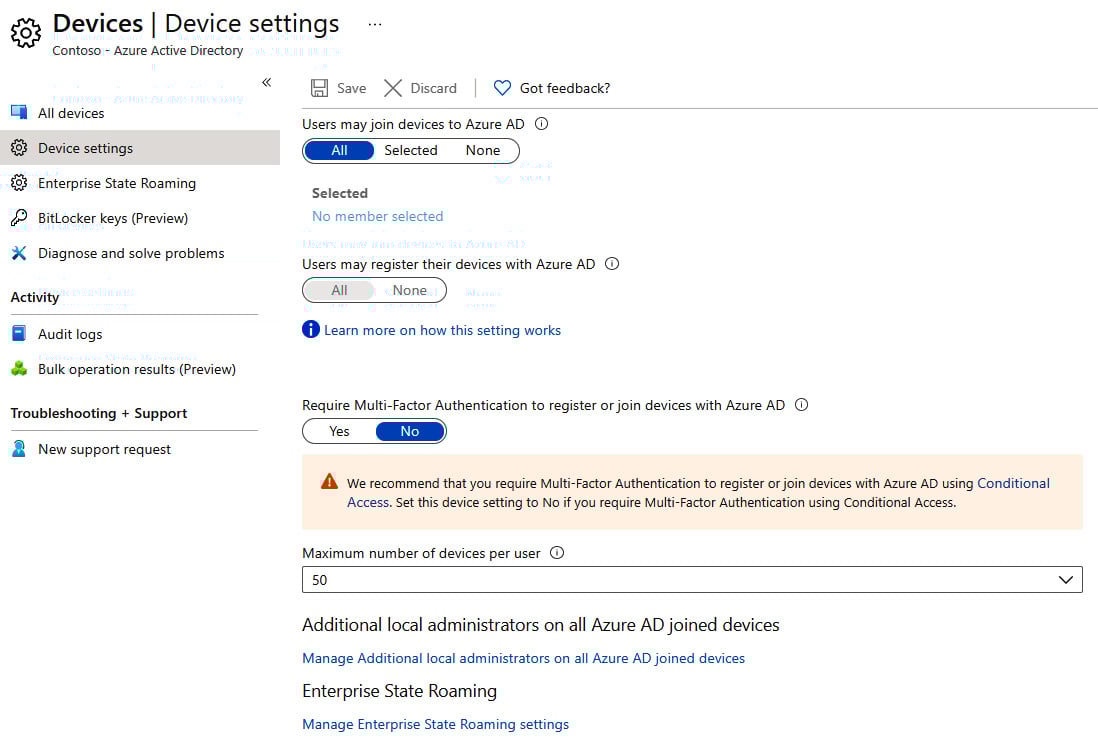
Figure 1.15 – The Azure AD Device settings blade
- To locate your devices, under Manage, select All devices. In this overview, you will see all the joined and registered devices, as follows:

Figure 1.16 – The Azure AD All devices blade displaying all of the devices linked to Azure AD
- Additionally, you can select the different devices from the list to get more detailed information about the device. From here, global administrators and cloud device administrators can disable or delete the device, as follows:
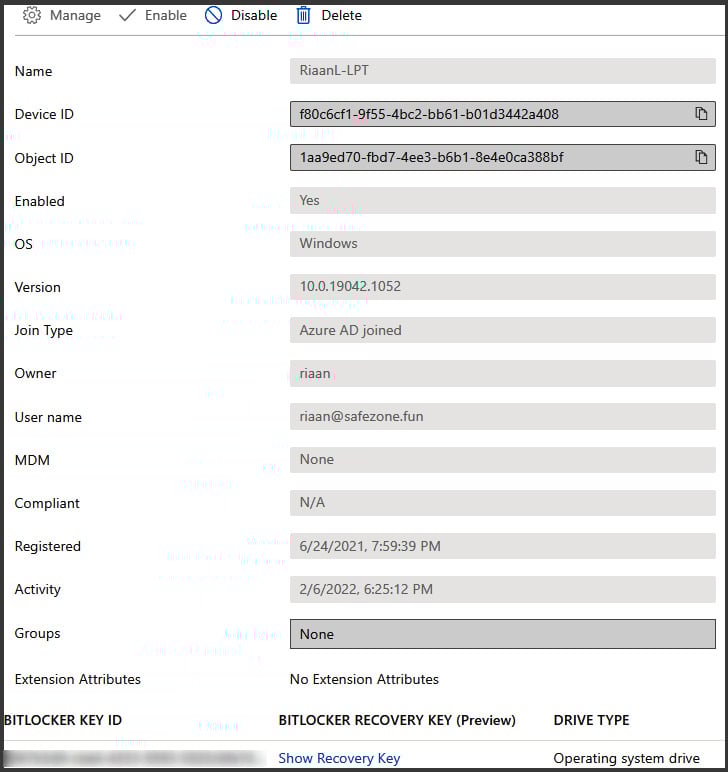
Figure 1.17 – The Azure AD device details for a specific device with the option to disable or delete the selected device
- To audit logs, under Activity, select Audit logs. From here, you can view and download the different log files. Additionally, you can create filters to search through the logs, as follows:
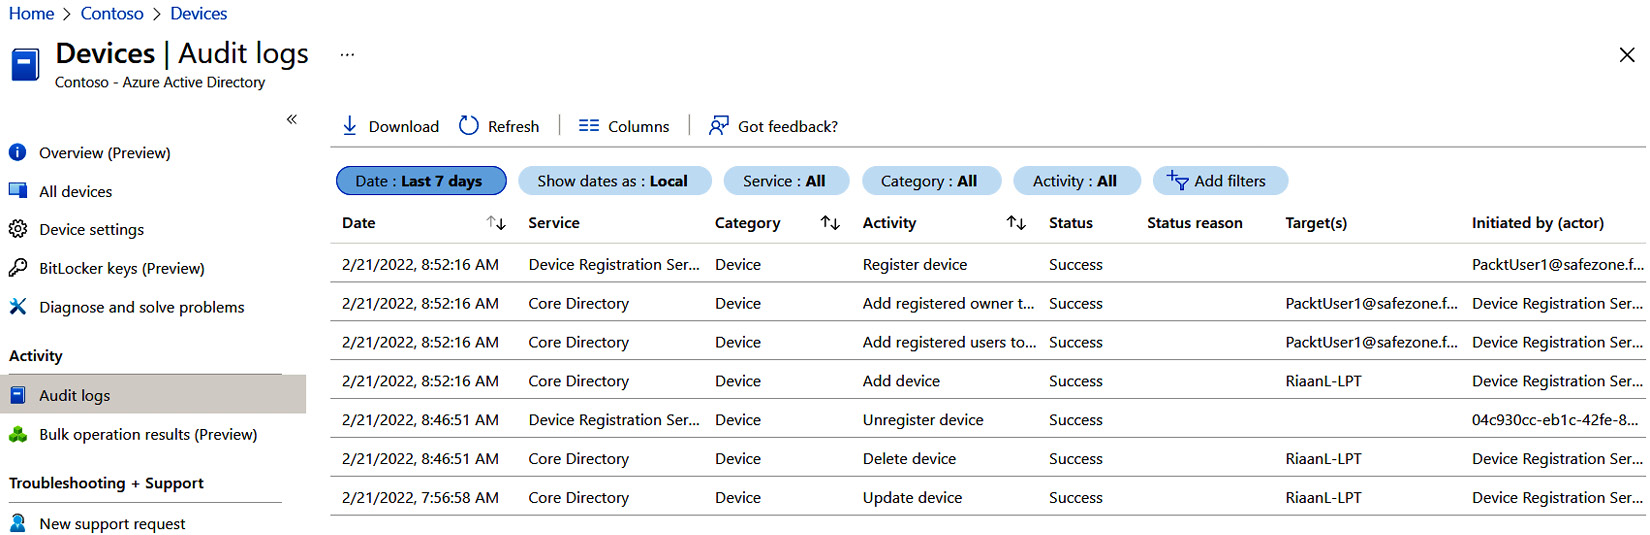
Figure 1.18 – The Azure AD device Audit logs blade
This concludes our section on how to manage your device settings via the Azure portal.
We encourage students to read up further by using the following links:
- https://docs.microsoft.com/en-us/azure/active-directory/devices/device-management-azure-portal
- https://docs.microsoft.com/en-us/microsoft-365/business/manage-windows-devices?view=o365-worldwide
Next, we are going to look at how to perform bulk user updates.
Performing bulk updates
Performing bulk user updates is similar to managing single users (such as internal and guest users). The only property that can't be set for multiple users is resetting the password. This has to be done for a single user.
Azure has also improved its bulk user settings by adding a drop-down menu that enables you to do the following via the downloadable CSV template and then re-uploading it:
- Bulk user creation
- Bulk user invitation
- Bulk user deletion
- Bulk user downloads
To perform a bulk user update, you have to perform the following steps:
- Navigate to the Users overview blade again in Azure AD.
- Select the Bulk operations drop-down menu:
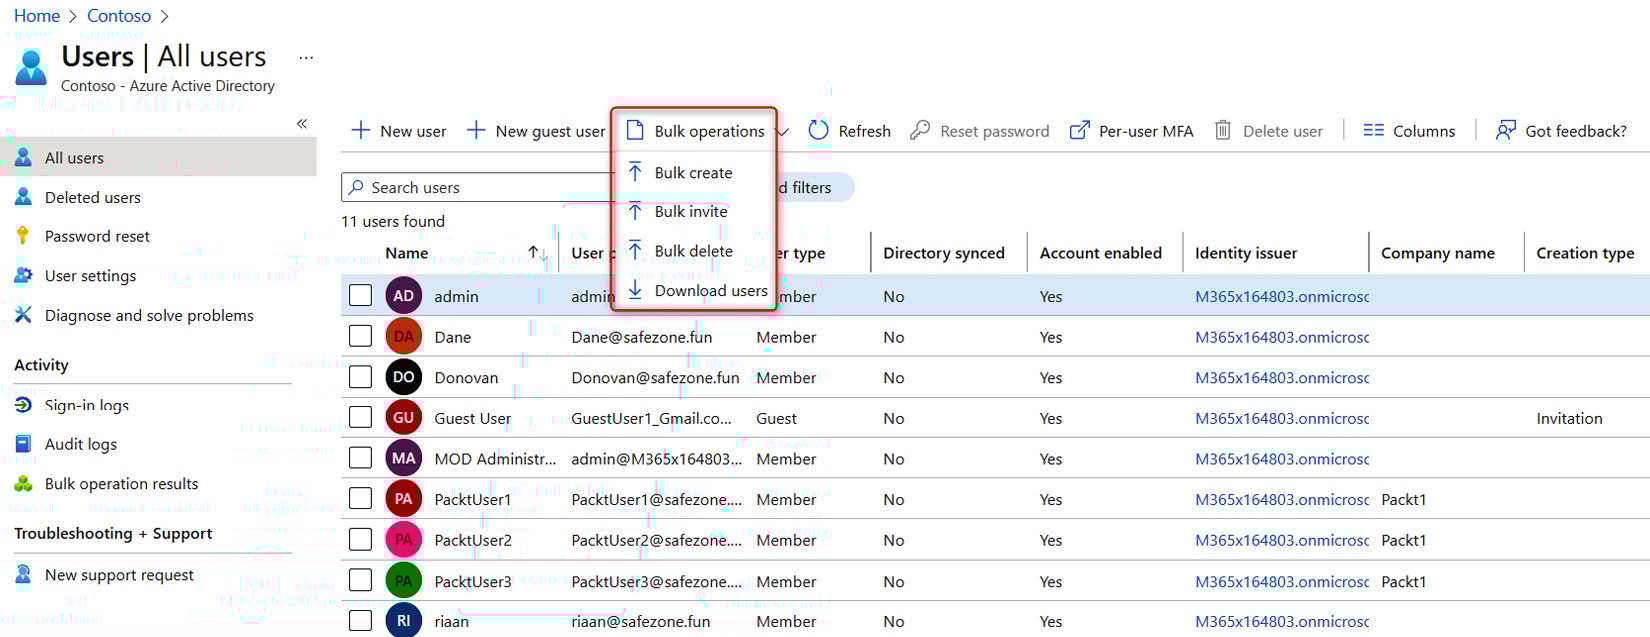
Figure 1.19 – The Azure AD bulk user operations option
- From the menu, select the action you want to complete; for example, select Download users:

Figure 1.20 – The Azure AD bulk user download setting
- Also, you can update multiple users by selecting them and choosing to delete them or configure MFA for each user:
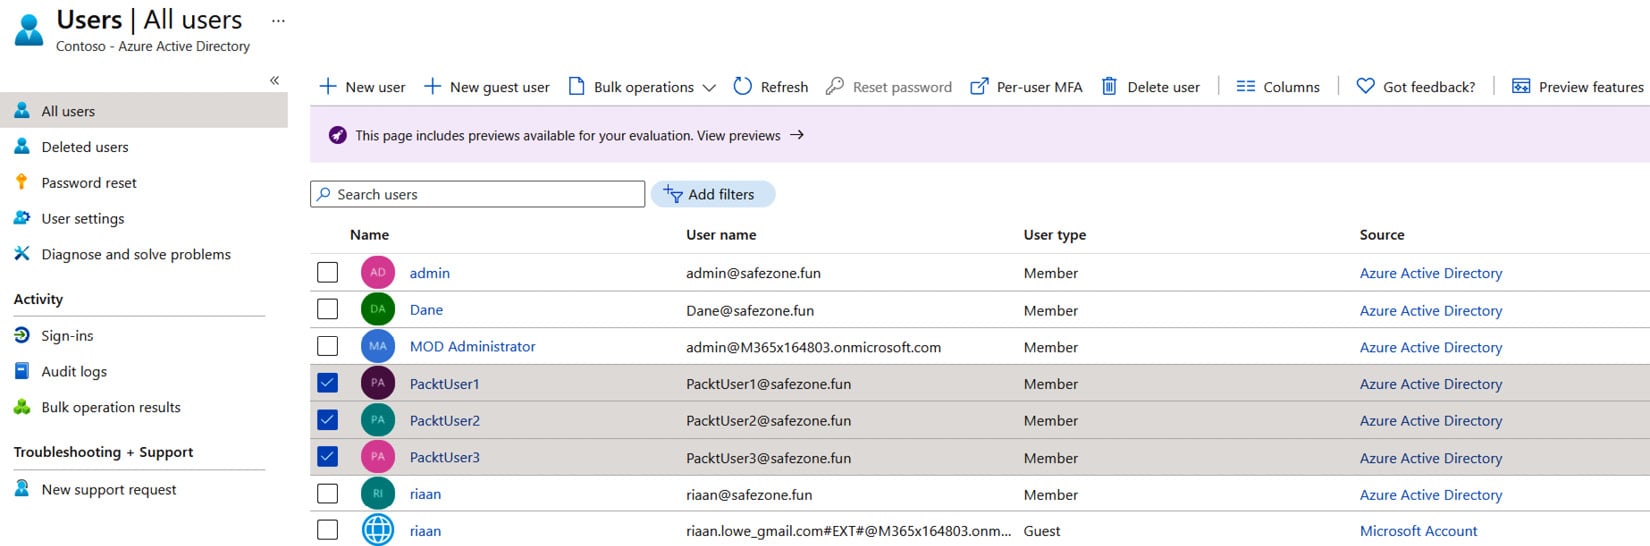
Figure 1.21 – The alternative Azure AD method for bulk user operations
This concludes our demonstration on how to perform bulk user updates and how it works.
We encourage students to read up further by using the following links, which will look at adding bulk users:
- https://docs.microsoft.com/en-us/azure/active-directory/enterprise-users/users-bulk-add
- https://docs.microsoft.com/en-us/azure/active-directory/enterprise-users/groups-bulk-import-members
In the next section, we are going to cover how you can manage guest accounts.
Managing guest accounts
You can also add guest accounts in Azure AD using Azure AD B2B. Azure AD B2B is a feature on top of Azure AD that allows organizations to work safely with external users. To be added to Azure B2B, external users don't require a Microsoft work or personal account that has been added to an existing Azure AD tenant.
All sorts of accounts can be added to Azure B2B. You don't have to configure anything in the Azure portal to use B2B; this feature is enabled by default for all Azure AD tenants. Let's see how to manage guest accounts by performing the following steps:
- Adding guest accounts to your Azure AD tenant is similar to adding internal users to your tenant. When you navigate to the Users overview blade, you can choose + New guest user from the top-level menu, as follows:

Figure 1.22 – The Azure AD Users blade to add a new guest user
- Then, you can provide an email address and a personal message, which is sent to the user's inbox. This personal message includes a link to log in to your tenant.
- Select Invite user to add the user to your Azure AD tenant, and send an invitation to the user's inbox:
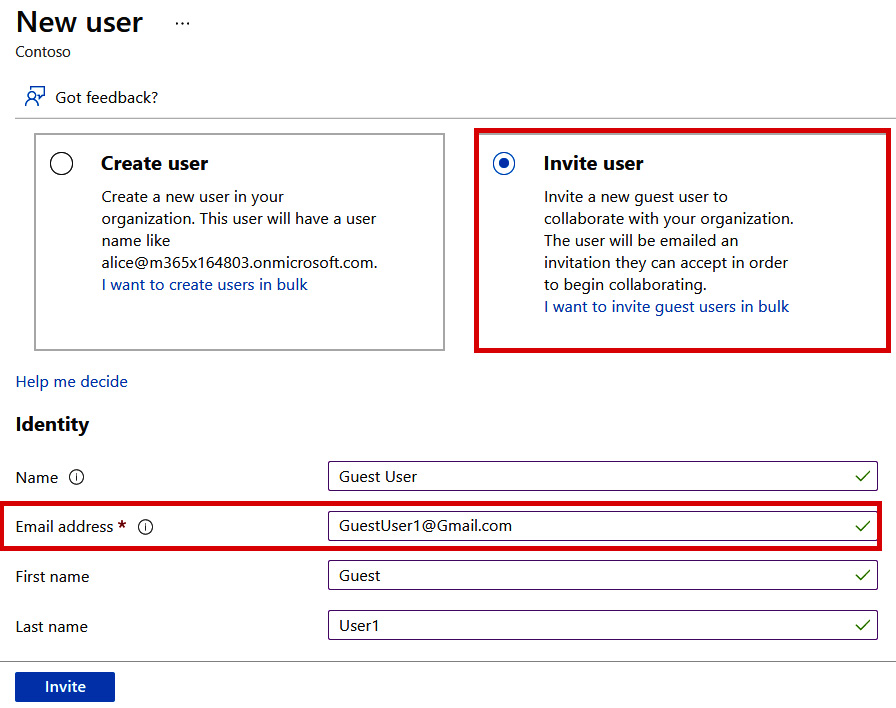
Figure 1.23 – Azure AD – inviting a guest user
- To manage external users after creation, you can select them from the Users overview blade. They will have a User type value, which is named Guest. Simply select the user from the list, and you will be able to manage the settings that are displayed in the top-level menu for this user, as follows:
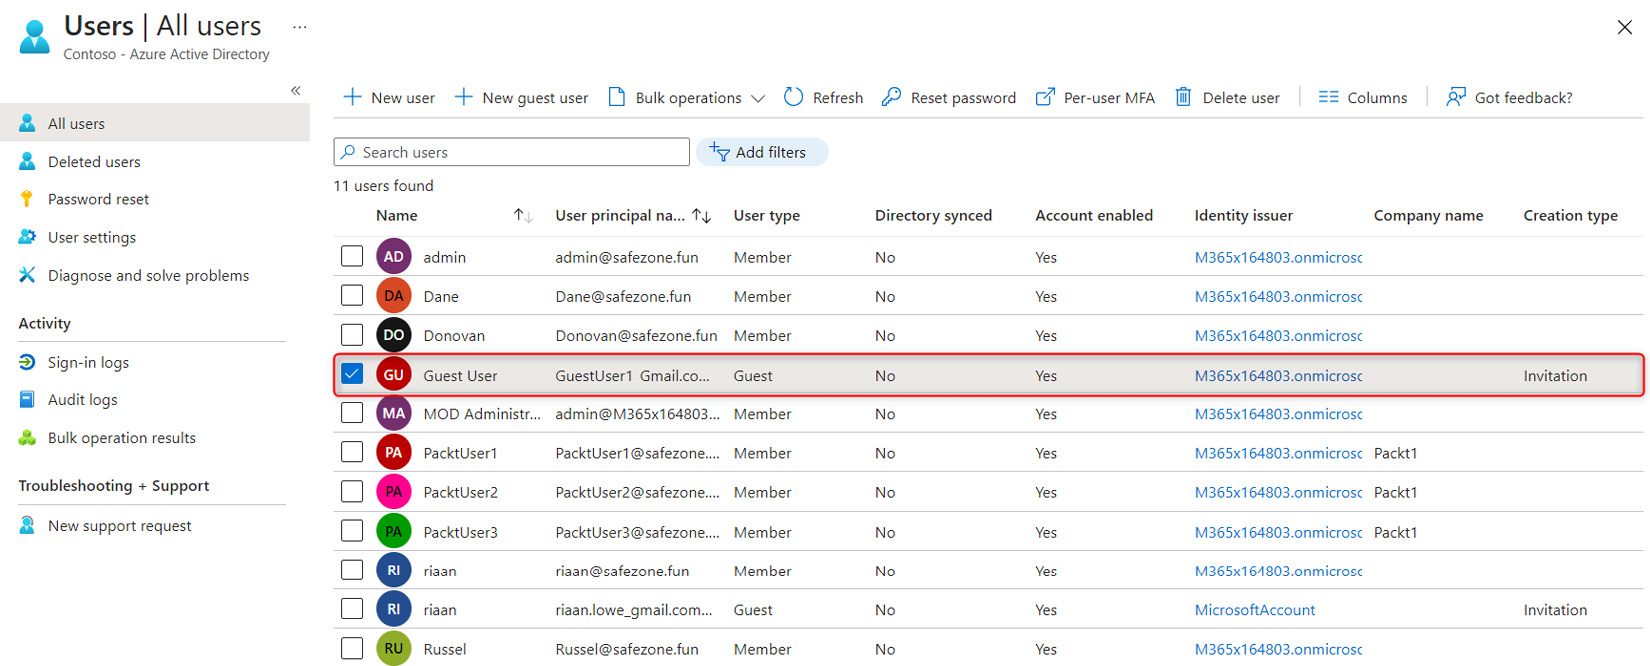
Figure 1.24 – The Azure AD Users blade displaying the account as Guest under User type
And that brings an end to this section. In this short section, we have reviewed guest accounts in Azure AD and learned how to configure them.
We encourage students to read up further by using the following links, which will provide additional information around restricting guest permissions: https://docs.microsoft.com/en-us/azure/active-directory/enterprise-users/users-restrict-guest-permissions.
In the next section, we are going to look at what Azure AD join is and how to configure it for Windows 10 devices.
Configuring Azure AD join
With Azure AD join, you are able to join devices directly to Azure AD without the need to join your on-premises Active Directory in a hybrid environment. While hybrid Azure AD join with an on-premises Active Directory might still be preferred for some scenarios, Azure AD join simplifies the process of adding devices and modernizes device management for your organization. This can result in the reduction of device-related IT costs.
Your users are getting access to corporate assets through their devices. To protect these corporate assets, you want to control these devices. This allows your administrators to ensure that your users are accessing resources from devices that meet your standards for security and compliance.
Azure AD join is a good solution when you want to manage devices with a cloud device management solution, modernize your application infrastructure, simplify device provisioning for geographically distributed users, and when your company is adopting Microsoft 365 as the productivity suite for your users.
Azure AD join can be deployed by using any of the following methods:
- Bulk deployment: This method is used to join large numbers of new Windows devices to Azure AD and Microsoft Intune.
- Windows Autopilot: This is a collection of technologies used to preconfigure Windows 10 devices so that the devices are ready for productive use. Autopilot can also be used to reset, repurpose, and recover devices.
- Self-service experience: This is also referred to as a first-run experience, which is mainly used to join a new device to Azure AD.
When it comes to joining devices to Azure AD, there are two main ways of managing those devices:
- MDM only: This is when the device is managed exclusively by an MDM provider such as Intune.
- Comanagement: This is when the device is managed by an MDM provider and System Center Configuration Manager (SCCM).
When joining a Windows 10 device to Azure AD, there are two scenarios that we need to look at:
- Joining a new Windows 10 device via the Out-of-Box Experience (OOBE).
- Joining an already configured Windows 10 device to Azure AD.
Let's take a look at how we can join an existing Windows 10 device to Azure AD:
- On the Windows 10 device, search for Settings and open Accounts.
- Select Access work or school, and choose Connect:
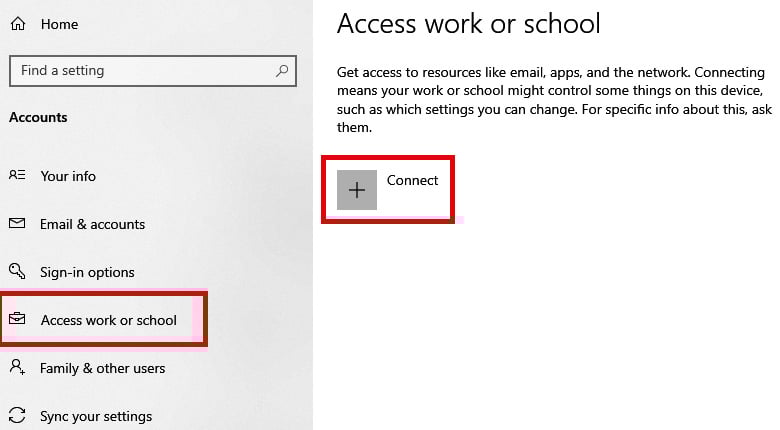
Figure 1.25 – The Windows 10 settings menu to add and connect a device to Azure AD
- Under Alternate actions, choose Join this device to Azure Active Directory:

Figure 1.26 – The Windows 10 device with the selected option to join the device to Azure AD
- A new window will pop up and ask you to sign in. Sign in with your organization's account. In my case, this will be
PacktUser1@safezone.fun:
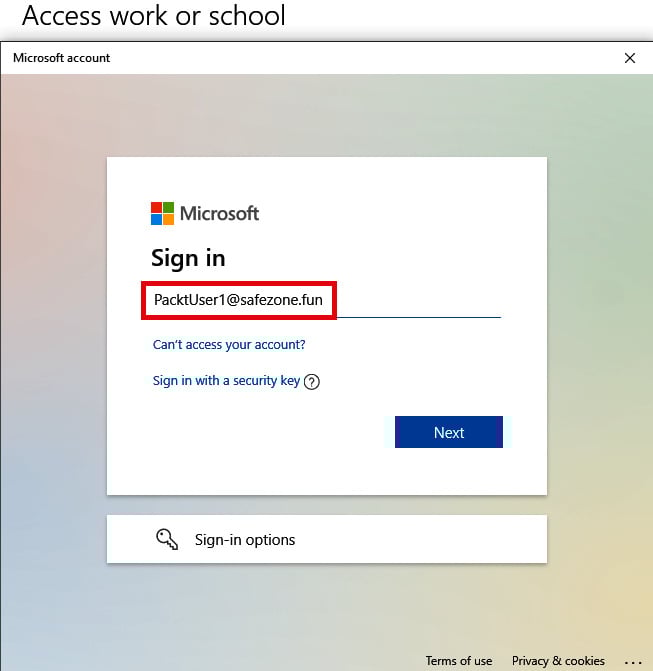
Figure 1.27 – The Windows 10 device requires you to sign in to an Azure AD account to join it to Azure AD
- You will be prompted to verify whether you want to join your domain. Proceed by clicking on the Join button:
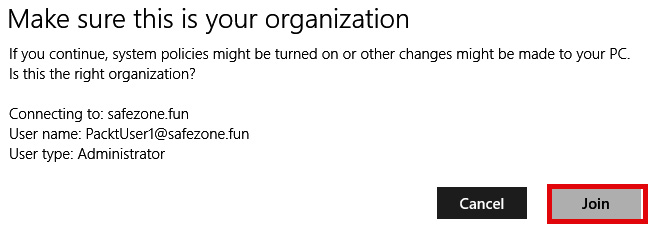
Figure 1.28 – The Windows 10 device summary page before joining it to Azure AD
And now the Windows 10 device has been successfully joined to Azure AD:
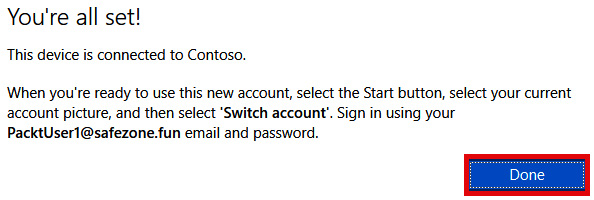
Figure 1.29 – The Windows 10 device has successfully been joined to Azure AD
- As a final step, let's navigate to the Azure portal and under Manage, select Devices, and our newly Azure AD joined device will show up:
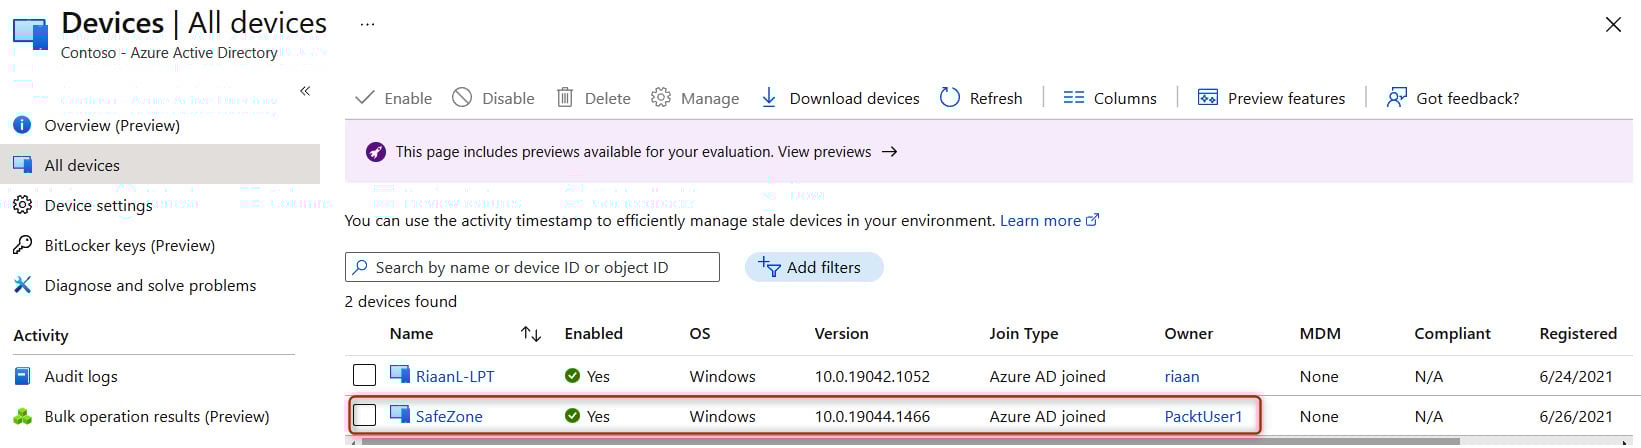
Figure 1.30 – Displaying the recently joined Windows 10 device in Azure AD under the Devices blade
That brings an end to this section. We have learned what Azure AD join is, the methods to enroll, and we have also shown the steps of how to manually join a Windows 10 device to Azure AD.
We encourage students to read up further by using the following links, which will provide additional information around Azure AD join, Windows Autopilot, and bulk device enrollment:
- https://docs.microsoft.com/en-us/azure/active-directory/devices/concept-azure-ad-join
- https://docs.microsoft.com/en-us/mem/autopilot/windows-autopilot
- https://docs.microsoft.com/en-us/mem/intune/enrollment/windows-bulk-enroll
- https://docs.microsoft.com/en-us/azure/active-directory/devices/azuread-joined-devices-frx
In the next section, we are going to take a look at SSPR.
Configuring SSPR
By enabling a self-service password for your users, they are able to change their passwords automatically, without calling the help desk. This will significantly eliminate the management overhead.
Note
The Azure AD free-tier license only supports cloud users for SSPR, and only password change is supported, not password reset.
SSPR can be easily enabled from the Azure portal. To do this, perform the following steps:
- Navigate to the Azure portal by opening
https://portal.azure.com. - In the left-hand menu, select Azure Active Directory.
- In the Azure AD Overview blade, in the left-hand menu, under Manage, select Password reset, as follows:
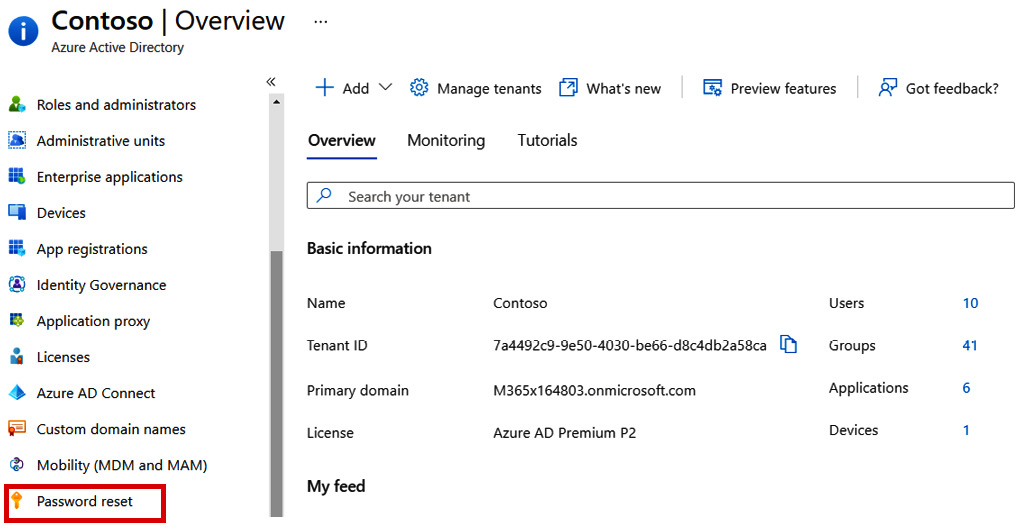
Figure 1.31 – The Azure AD Password reset blade
- In the Password reset overview blade, you can enable SSPR for all your users, by selecting All, or for selected users and groups, by selecting Selected. For this demonstration, enable it for all users and click on Save in the top-level menu, as follows:
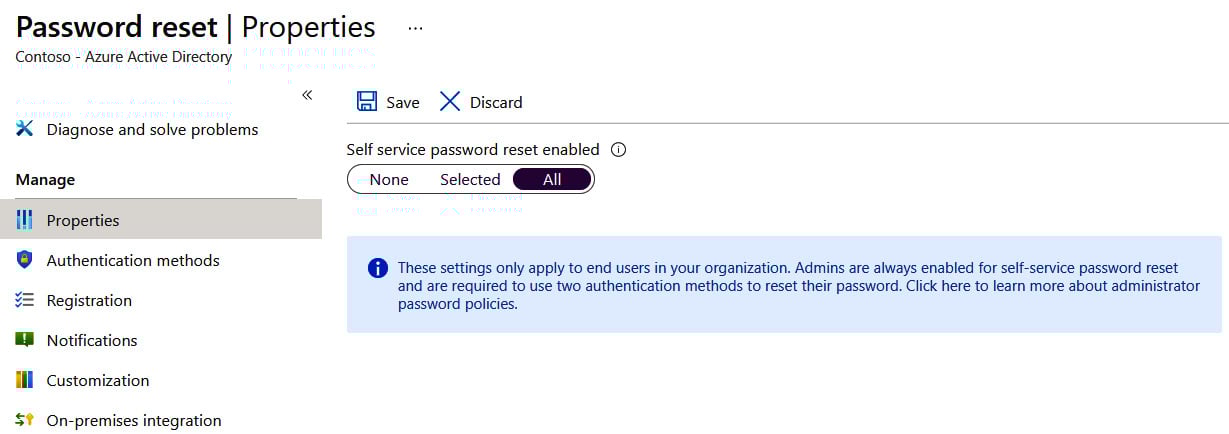
Figure 1.32 – The Azure AD Password reset properties
- Next, we need to set the different required authentication methods for your users. To do this, under Manage, select Authentication methods.
- In the next blade, we can set the number of authentication methods that are required to reset a password and explore what methods are available for your users, as follows:
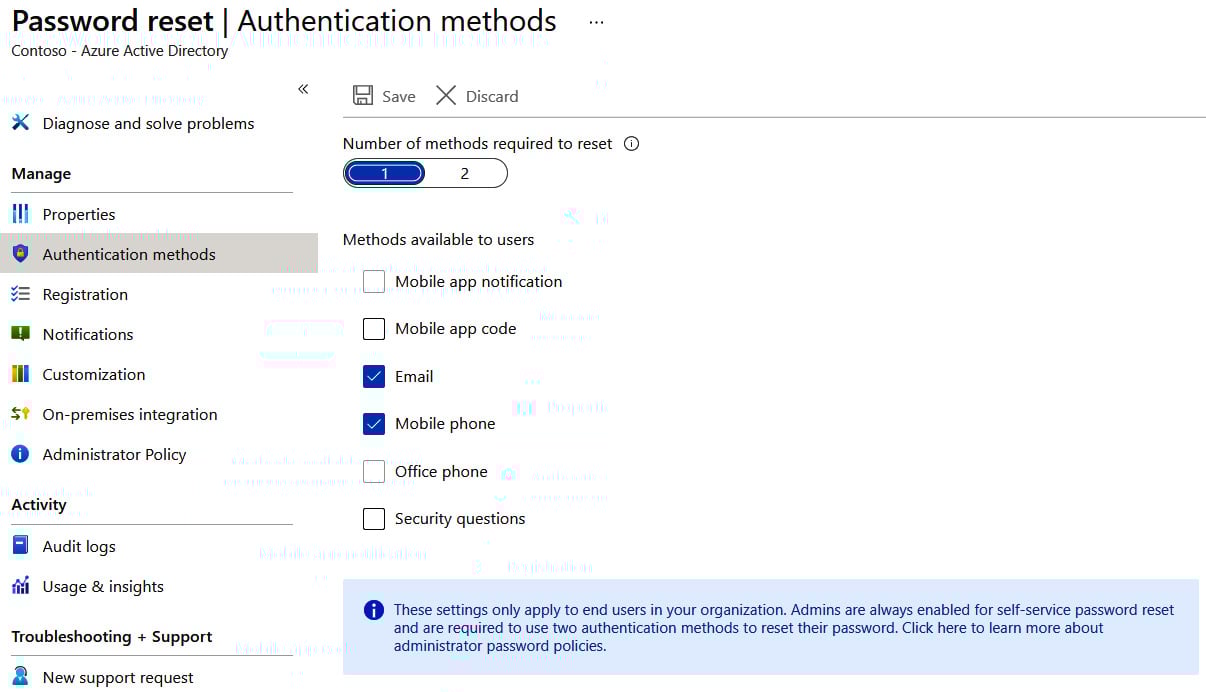
Figure 1.33 – The Azure AD Password reset blade displaying the available authentication methods for users
- Make a selection and click on Save.
Important Note
If you want to test SSPR after configuration, make sure that you use a user account without administrator privileges.
We encourage students to read up further by using the following links:
- https://docs.microsoft.com/en-us/azure/active-directory/authentication/concept-sspr-howitworks
- https://docs.microsoft.com/en-us/azure/active-directory/authentication/tutorial-enable-sspr
Summary
In this chapter, we discussed how to create Azure AD users via the Azure portal, how to create a dynamic group, and how to add users to that dynamic group. We addressed user and group properties. Additionally, we discussed the different bulk user operations and how to create a guest account from the Azure portal. Finally, we discussed how to join a Windows 10 device to Azure AD and how to enable the configuration options for SSPR.
In the next chapter, we'll cover Role-Based Access Control (RBAC) and get hands-on with creating custom RBAC roles. Additionally, we will learn how to interpret role assignments.