


 Download code from GitHub
Philosophy of Building Immersive Experiences
Welcome to Enhancing Virtual Reality Experience with Unity! In this book, we will explore not only what it takes to build virtual reality (VR) experiences, but also how to expand on that knowledge to create innovative experiences with VR. You will be able to create amazing projects in VR on your own in no time as we progress through this book. We will follow a series of step-by-step tutorials to complete projects aimed at giving you the skills you need to be proficient at VR development.
VR can encompass many content and concept areas, but we will cover the major areas so that you have a good foundation and understanding as you continue your journey as a developer. Ultimately, the goal is to create VR experiences that are fun and engaging.
This chapter will explore some of the foundational concepts of immersive experiences, VR, and using the Unity game engine. The goal is to first understand some of the philosophy around what immersive experiences are and why we build experiences with this technology. Before we dive deep into VR, we will expand your concept of VR by first defining immersive experiences and introducing VR within that context. VR goes beyond making games for headsets. It is a medium that can be applied to a variety of industries and applications, such as healthcare, education, therapy, design, entertainment, and so on. We will break down the various components that comprise the experiences and introduce some of the hardware that is necessary to develop and participate in those experiences. In this way, before we begin developing, you will have a better idea of what to expect when you open Unity to start building your experiences.
In this chapter, we will cover the following topics:
- What is an immersive experience?
- What are the essential components of an immersive experience?
- Understanding XR, AR, VR, and MR
- How does VR work?
- Approaching VR development
What is an immersive experience?
Immersion is a core concept of how we experience the world around us. It can be minimal (sitting in a park and reading a book) or maximal (going scuba diving in the ocean as you feel the weightlessness from the water pressure pushing against your body), but the fact remains that immersion is a constant in our lives. Quite frankly, we don’t have any concept of what a lack of immersion is because the experiences we have involve some level of immersion.
Medical students are trained to test the functions of the human body so that patients can have a fully immersive experience. As the body declines due to age and disease, we see that things become less immersive, and ultimately, quality of life diminishes. Immersion affects our perceptions and informs our reality to an extent. Nevertheless, there is no box that we can put the concept of immersion into because it is all-encompassing.
The Merriam-Webster Dictionary defines immersion as “a state of being deeply engaged or involved, deep mental involvement.” We can also use the more literal definition: “to plunge into something that surrounds or covers especially: to plunge or dip into a fluid.” Both definitions overlap in many ways because they allude to an ever-present stimulus. When we talk about immersive experiences, we are referring to the concept of how the surrounding environment provides stimuli that inform our perceptions. In those conversations, we often describe what we see, smell, feel, hear, and believe to be true based on what engaged our senses at that moment.
An immersive experience is an illusion that makes you feel like you are inside or part of an environment. We perceive the environment as tangible (real), but it is intangible. This environment engages your senses through the use of technology and feedback to mimic real-world phenomena: when you walk, you hear footsteps; running blurs your surroundings; and looking at lights disrupts your vision.
We are familiar with this notion as extended reality (XR) or mixed reality (MR) – that is, placing digital objects in the real world and directly interacting with them as if they were actually there. We can use hardware such as head-mounted displays (HMDs) and infrared sensors to augment physical spaces with digital objects and enhance the experience within the space.
However, before we learn more about MR, we must talk about the role of the senses in immersion. Senses are the focal point of our experiences. Without them, we are unable to interpret information or engage with the world around us. If we hear a loud noise, we will cover our ears and try to leave the source of the noise. When we are confronted with the source in the future, our negative experience will inform us how we should respond to that source. Let’s say we were immersed in an environment with a loud noise. That noise provided an unpleasant experience for our ears, and we responded by removing the stimulus. We care about what appeals to our experiences because, in this example, the noise shaped the experience. If the noise wasn’t as loud, it would likely have improved the experience.
Understanding immersion through the senses
We should all be familiar with the major senses: touch, sight, hearing, smell, and taste. We often associate those senses with experience and actions. If you want to taste, you will eat food; if you want to see, you will watch TV; if you want to smell, you will breathe in an aroma; if you want to touch, you will hold something; and if you want to hear, you will listen to music. Those actions toward a stimulus engage the senses and provide us with an experience. Each sense alone provides us with a different way to experience the world around us.
If our senses are tied to our experiences, they become the anchors of an immersive experience. We can say that an immersive experience is something that incorporates multiple senses into one experience. Think of immersion as being on a spectrum, rather than it being all or nothing. You can’t remove immersion completely because it is tied to our senses. Unless you lose all of your ability to sense, you can’t completely remove immersion. Rather, it is on a scale of less immersive to more immersive.
For example, imagine you are walking down a busy street in the middle of rush hour in a major city. You are rushing from a lunch date back to work, so you are holding part of your lunch on your way back. While doing so, someone dumps spoiled milk on you from their balcony. It reeks! In this scenario, you can imagine the type of experience you would have in that situation. Based on the description, you can also isolate each part of that experience into their respective senses:
- Touch: You can feel the food in your hand as you hold your lunch. When the milk lands on you, you feel the liquid on your skin and clothes (fun fact – we can’t feel wetness, but we can feel the difference in pressure and temperature of the liquid compared to the air on our skin).
- Sight: You see tons of cars and people out in the city. Maybe you can even see some buildings and have the sun shining in your eyes.
- Smell: You could be smelling the food you are eating, the smog and sewage of the city, or even the stench of the spoiled milk that was spilled onto you.
- Taste: You could taste the food you had for lunch, or maybe some of the spoiled milk got into your mouth; you probably have a bad taste in your mouth now.
- Hearing: In a busy city, you might hear car horns, engines revving, people talking, and even the sound of the spoiled milk hitting the ground as it also covers you.
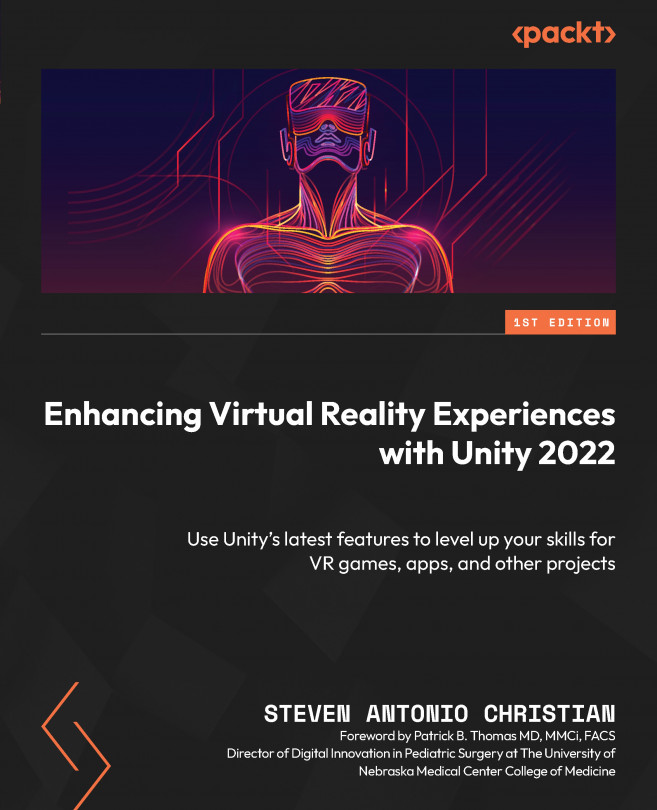
When it comes to immersion, you can’t get more immersed than this! The experience I have described incorporates all the senses (Figure 1.1) and would leave you with a vivid and lasting memory:
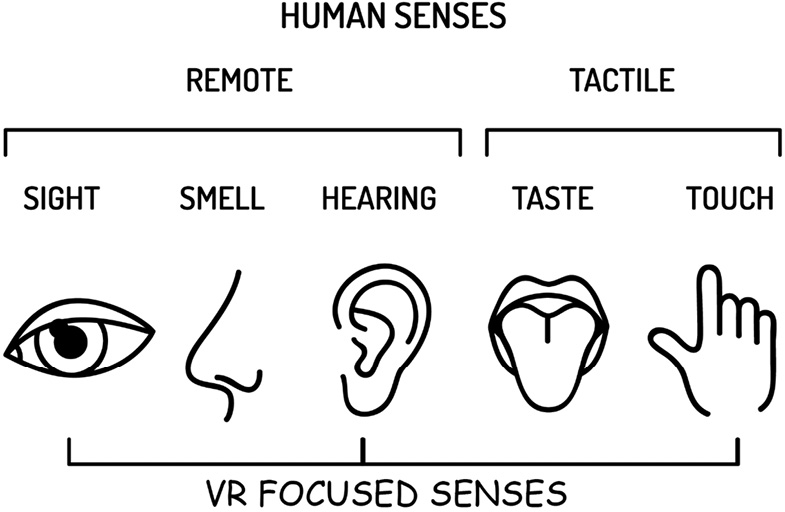
Figure 1.1 – Human senses that focus on VR include sight, hearing, and touch
When we talk about applications of immersive technology, especially VR, we are in some ways trying to use technology to mimic what we would experience in real life. Research suggests that experiences are more memorable when more senses are tied to those experiences. If you can find ways to build experiences that incorporate the senses in believable ways, the user will feel more engaged, and they will walk away from the experience more informed. We will explore some techniques in future chapters to achieve these goals.
What makes something immersive?
When we talk about being less immersive, we simply mean that we start to remove our senses from the experience. When you remove touch, you can’t feel anything; remove sight, you can’t see the world around you; remove smell, you can’t enjoy aromas; remove hearing and everything is quiet; and remove taste and you cannot enjoy food. The more senses you remove, the less immersive the experience is. Going back to the idea of removing immersion completely, can you do that and still be alive?
Think about the experiences we enjoy and see if you can define what senses are used to make it immersive:
- Reading a book involves seeing and touching
- Listening to music involves listening
- Watching TV involves seeing and listening
- Talking on the phone involves talking and listening
- Swimming involves moving and seeing
- Playing video games involves touching, seeing, and hearing
- Driving a car involves touching, seeing, and hearing
When we talk about these experiences, one crucial component is interaction. We aren’t in stasis: we are acting and reacting to the world around us. Even if the experience is passive, there is a level of interactivity that keeps us engaged. When the experience requires us to perform an action, that makes it interactive. Let’s not confuse interaction with immersion. They are two separate concepts involved in the same experience. You may listen to music, watch a movie, or read a book. Those are passive experiences, but the act of turning the page, changing the channel with a remote, or rewinding a song gives you a level of interaction that keeps you engaged.
To make VR experiences immersive, use the elements of immersion as a guide. We know that immersive experiences are more engaging for users, and the focal point of immersive experiences is our senses. By developing experiences focused on what we see, feel, and do, we can create applications that have a true impact on the VR industry and community. Note that this is independent of the content or industry. These approaches and philosophies can be applied to a variety of industry applications because they speak to the core component of what makes VR different than other mediums such as animation, cinema, or console games. It is the ability to immerse the user in an experience.
How to make experiences immersive
So, how do you make something more immersive? Simple – involve more senses in the experience. Compared to text, video is more immersive because it involves two senses rather than one. Reading incorporates sight and listening incorporates hearing, but watching a movie involves both seeing and listening. To make reading more immersive, add sound. To make listening to music more immersive, add haptic feedback to feel the sound vibrations. When you are thinking about immersion, think about building off the native experience rather than exchanging one element for another. I would not consider video to be the same as immersive reading because you are replacing text with images. Although you are adding sound, you are taking away the text-based visual.
Adding sound to a quiet reading experience such as background music or sound effects can make the reading experience more immersive without taking away the core element of the experience.
With VR, you can take the concept of immersive experiences and build on that framework using technology and digital assets. VR uses interactions in a completely virtual world to let you walk, run, jump, and navigate with motion. Even though you can’t touch the object in the world, haptics can provide limited vibrational feedback. Ultimately, you can see the objects, hear the objects, and orient yourself in spaces among the objects. Compared to being behind a computer screen or gamepad, VR is more immersive because you are in the very location you want to explore, not a proxy of it. You don’t control the character; you are the character.
Now that we have introduced what an immersive experience is and its various components, we can explore what components are essential to achieving such experiences within VR. This will help simplify how to approach building immersive experiences and make the process seem less daunting.
What are the essential components of an immersive experience?
The point of explaining and defining immersion and immersive experiences in the preceding section was intentional. When we talk about VR or any other variation of XR, we are talking about different types of experiences that engage the user in distinct ways. It is important to understand that as fact rather than opinion because some technical aspects and elements make the experiences what they are. They can be clearly defined and formulaic. With most VR experiences, the user will have an experience with an HMD such as an Oculus Quest. With augmented reality (AR), the user will most likely have an experience through their smartphone. The list can go on.
The true impact as a creator and developer is taking the core elements of a formulaic experience and infusing abstract and creative elements into it so that people have a memorable experience they want to share with friends and colleagues or even promote to the world. At face value, all VR experiences are a variation of putting on a plastic headset and responding to stimuli that are not real, but the experiences people reflect on afterward with VR are a lot more formative and expressive. They will describe what they did, what they saw, and how the VR experience made them feel. The following are some examples of general (non-specific) experiences that can be enhanced using VR:
- Entertainment through 360-degree videos: You can immerse yourself in the video as if you are there. 360 videos provide a passive VR experience that allows you to see in all directions rather than at just a monitor screen in front of you. Think about someone base jumping with a 360-camera attached to them. In VR, you can tag along with them as they go on an epic adventure.
- Games: Instead of sitting on the couch with a controller, you can be the player in the game dodging all the obstacles and scoring all the points. Such games include the following:
- Story/role-playing games: You take on the persona of a character in a story and evolve as the story progresses.
- FPS games: First-person shooters allow you to go to battle with others in a game of survival. You can navigate environments to evade gunfire and take out opposing players.
- Foraging/exploration games: Games where you can traverse vast worlds, climb high peaks, and scavenge for resources. These games normally focus on puzzles and creating lighthearted experiences.
- Sports games: Instead of going to the field or the court in real life, you can play your favorite sport in VR.
- Artistic games: These games are abstract because they are all about using interactions to elicit a certain effect. This can mean shooting paintballs at a 100-foot canvas to make a painting or fishing in a field on another planet.
- Survival games: Much like first-person shooters, you are immersed in an environment where the goal is to think outside the box to increase your chance of survival.
- Social/virtual meetings: You can meet up with friends, watch movies, and go to meetings in virtual environments with friends across the globe. Geographic locations won’t hinder you from connecting with others.
- Medicine: You can improve patient outcomes in a variety of areas, from therapy to training. With VR, you can create simulation modules for healthcare professionals to improve their training and provide immersive learning experiences for patients to better understand their health.
- Education: In the classroom, VR can give students the ability to explore learning in a more exploratory way. This allows them to retain information better. Students can go on museum and gallery tours to places across the globe and interact with content beyond a textbook.
- Military training: You can make training more accessible and cheaper with simulations of the tasks at hand. The military uses VR to simulate combat environments.
- Utility/productivity: VR can be used to extend your office beyond its physical location. Instead of using a computer monitor, your headset can create countless virtual monitors so that you can multitask and work in a variety of locations. Want to work on a project on the beach with a 200-foot monitor screen? You can do that in VR.
- Real estate: You can tour homes from your living room using digital replicas of the places you intend to learn more about. Digital twins allow for deep exploration of real-world locations without you having to physically be there.
- Engineering: You can design and prototype before you move to manufacturing. This saves countless work hours and allows for rapid revisions and iterations, thus saving money.
- Exercise: Instead of going to a workout class, you can bring the workout class to you. In VR, you can gamify your workouts with others and/or in fantastical ways using digital enhancements.
- Content creation: You can ditch the keyboard and mouse to sculpt and paint content for projects in VR. If you like the kinetic experience of sculpting but still want to work digitally, you can put on a headset and do what you do best in the way that feels the most natural.
Skills required to build immersive experiences
Some technical and nontechnical skills are valuable in the XR industry and for developing VR experiences that will have an impact. In many cases, if you have developed skills and worked on projects in other industries, you can integrate those skills into making engaging immersive experiences. Understand that you do not exist within a vacuum. You have skills and ideas that can push the culture of XR forward in new and exciting ways. I can speak from personal experience. I was a Division 1 college football player who did software development for Windows Mobile in the early 2000s. When Windows Mobile went defunct, I shifted to comic illustration and visual storytelling. My creative endeavors evolved from newspaper comics to webcomics, to animation on YouTube, to live-action visual effects, and ultimately to XR creation. I did all that while playing football, retiring, and getting into medical school. Over this 10+ years’ creative and professional journey, I developed skills in a variety of areas that further informed my workflow and ideas to create and pursue.
The reason your skills are so valuable is because XR is just a medium. It is a manifestation of the ideas you think of and write on paper. Those ideas can become books, animated shows, live-action movies, training modules, mobile apps, and so on. You just so happen to want to create VR experiences. In many ways, there are projects and ideas only you can produce to a specific end because you ultimately infuse your skills and experiences into the work you do. Whether it is naming conventions or artistic style, the things you create will have a touch of you in them. If 10 developers and creators get the same prompt, which is a brief description of a project idea that a client or developer hopes to create, you will get 10 different projects. Some will be better than others based on the utilization of tools and execution of the prompt. Here are the skills that will prove most useful to you when you are trying to build immersive experiences:
- Project management: Immersive experiences can be large in scale and require experience managing multiple elements. If you don’t know how to navigate both people and a variety of content sources, you can easily become overwhelmed. Although this is often lost on developers and creators, project management skills are crucial to completing projects. To build a portfolio and further your career, you must be able to complete projects.
- Creative direction: XR has yet to reach its peak market value. As a result, grand ideas exist that are yet to be manifested and translated into experiences. The value of a creator and developer is not only measured by the technical skills you offer but also by the vision you present to explore the technology and push it to new heights with your ideas. Having experience in a variety of content creation workflows and pipelines can help you explore the possibilities of XR. Creative directors develop and manage projects from ideas to finished products. They typically have experience in a variety of areas, such as marketing, illustration, business, product development, and more. These skills serve as valuable assets on the creative journey.
- Software development: Having technical skills is very valuable in developing XR experiences. Although Unity makes building experiences easier, to get the most out of the medium and the platform, you need to know how to open the hood and unlock certain features. Even if you aren’t a seasoned coder, being familiar with code structures and functions can lead to major growth and innovations in the space.
Technological components of building immersive experiences
Every immersive experience has the same core elements. The difference among all experiences is the degree to which each of the core elements is incorporated. Whether you are doing a simulation or playing a game, you will need animation, a user interface, lighting, and audio. Creating experiences is more about navigating the required elements to fit the scope of the project rather than redefining what it means to build an experience. Innovation is taking what already exists and improving upon it with ideas that show the true potential of the tools and the medium. The following comprise some of the core components of building immersive experiences:
- Game engine: Most VR experiences are built on game engines because of their ability to render objects in real time instead of pre-rendering the objects, such as animation and compositing software. In this book, we will be using the Unity game engine, the most versatile engine used to build XR applications and games. Another popular engine is Unreal Engine.
- Rendering: I mentioned that game engines use real-time rendering to provide a platform for building interactive experiences. Within Unity, there are render pipelines that determine the way objects are rendered within the experience. The difference in rendering pipelines is usually device-dependent. There are render pipelines for lower-end devices such as smartphones and high-definition pipelines for higher-end devices. Since VR headsets have hardware specifications, knowing which one to use for your project early in the development process is crucial to providing the best experience for your users.
- 3D content: You can’t have a virtual experience without 3D content (2D content on some occasions). In a virtual experience, you interact with the 3D objects in the world you are experiencing. This content can comprise characters, buildings, environments, and even digital twins. Content can make or break the experiences you build because the user chooses the VR experiences they want based on the content in the experience.
- Shaders, materials, and textures: Often associated with 3D content, shaders, materials, and textures provide an element of variation to the 3D world that can elicit various emotions and responses. They provide the color and character to the polygons and pixels of the digital world. If 3D models are the architecture and foundation for the world, then materials and shaders are the paint and decorations. When the materials, shaders, and textures are used correctly, they become recognizable and familiar to the user.
- Levels design and architecture: Design is crucial to experiences because you need to give users environments to anchor their experiences to. Without a map to navigate or cities to traverse, they have no direction.
- Audio: Sound is crucial to having an immersive experience. Hearing the sound of your feet on the pavement as you walk or increasing the volume of music as you walk closer to the source creates something subtle yet impactful. If you can create and integrate sounds, you can harness an important component of an immersive experience.
- UX/UI: User interfaces are the blueprints of interactions within the experiences. If you design a world but people don’t know how to explore the world, then you need to find ways to design elements that feel natural and intuitive.
- Animation: Animation brings life to a static world. In a real-time game engine, VR makes animation an integral part of the interactive experiences. It is often the element people respond to the most because animation alters the world as time progresses. If we were playing a sports game, the location of the animated character or object can determine how the player would respond. In a still world, a player has no incentive to engage in the experience.
- Lighting: Nothing is fun if you can’t see. Lighting 3D environments is a necessary skill because it gives you full control of every element that can improve visibility and influence mood.
- Performance: Not every experience will work on every device. Being able to develop something vast but also performant can maximize your reach and leave a lasting impression on users.
- Software development: Even though we interact with the content we see in a virtual world, those interactions are dependent on elements that you code and integrate using C#. Knowing how to utilize code so that it works for your project can unlock unlimited possibilities.
Now that we understand what immersive experiences are and the components that make up such experiences, let’s dive deeper into XR.
Understanding XR, AR, VR, and MR
Extended reality (XR) is the umbrella term that’s used to explain technology that engages our senses. This includes providing information, recreating worlds, or enhancing the world in real time. It was developed to enable more immersive experiences using digital objects. When we look at how digital objects are used, it is often through a 2D experience. This experience can include animation, word processing, video games, and even training simulations. Incorporated digital content can include images, and 3D designs that are rendered on a screen. But why should we spend hours building 3D content only to experience it in 2D? XR provides a way out of this limitation by creating a pathway for viewing 3D content in a 3D space. If we think in 3D and build in 3D, then we must have a way to experience our content in 3D.
XR is an umbrella term for augmented reality (AR), virtual reality (VR), and mixed reality (MR) (Figure 1.2). On the surface, people often confuse the three, but it would be valid to say that even if they are different from each other, they all comprise XR.
Within XR, we can think of AR, VR, and MR on a spectrum just like immersion. On one side, you have a completely digital world with digital objects, and on the other side, you have a physical world with digital objects. The consistent component across each experience is the digital objects, but the difference is how connected to the physical world the experience is. There are specific hardware and sensors that contribute to attaining these experiences, but we will get to that a bit later.
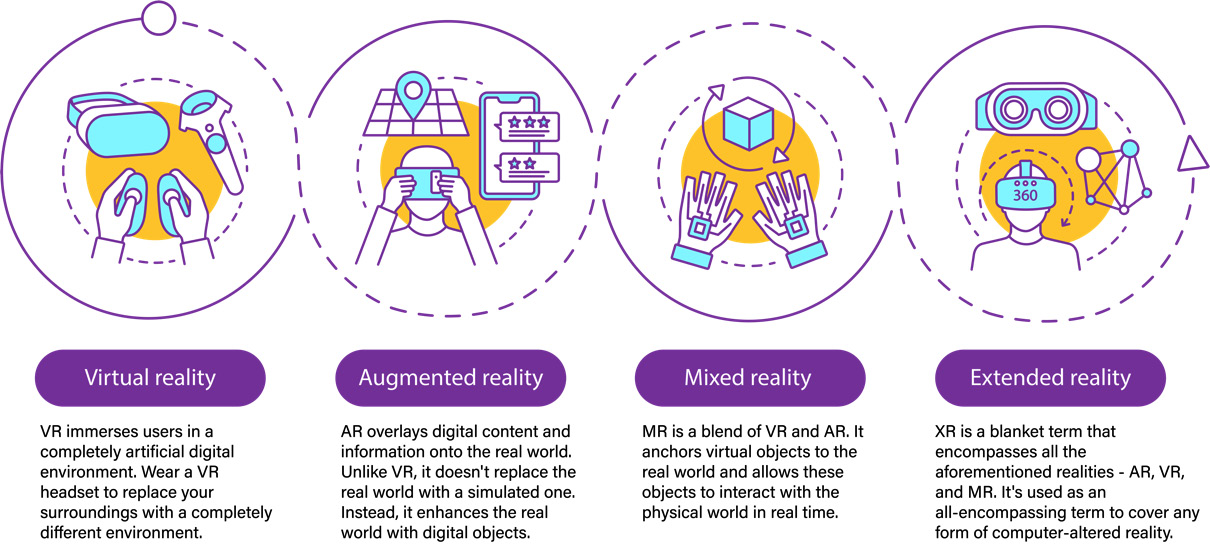
Figure 1.2 – Overview of VR, AR, MR, and XR
AR is when you have an experience that places digital objects in a completely physical world. This experience is dependent on sensors from a device that can scan the surrounding area to create a believable experience for the user. You are usually adding digital elements to the screen of a live camera feed. The camera feed is most likely from a smartphone or webcam. There are AR headsets such as HoloLens that create more immersive experiences, but they place those experiences into another category (MR). AR can also incorporate audio such as Bose glasses, which infuse audio into your environment without the need for headphones. Some popular AR experiences are found on smartphones: Pokémon Go, Snapchat face filters, and IKEA Place.
VR is when you have an experience in a completely digital world. In VR, you are not tied to the physical world. You can think of it as being inside a computer, like in Tron, or inside your favorite game. You can walk, run, and jump as an avatar in the digital world. Compared to AR, VR is not sensor-heavy, but it does require specific hardware to get the most out of the experience. At most, you would require a headset such as the Oculus Quest, but you can also use Google Cardboard, where you can use your phone with a low-cost headset case to have bite-sized experiences.
MR lies somewhere in the middle of that spectrum. It combines both AR and VR elements, allowing real words and digital objects to interact seamlessly. Instead of removing yourself from the physical world to have more interactions with digital objects in the digital world, you are integrating more sensors to track your body so that you can interact with digital objects in the physical world. In this experience, you are combining camera sensors with HMDs to scan the world around you, scan your body, and build an immersive environment that combines the best of AR and VR. Devices such as HoloLens and Magic Leap allow you to do that.
Understanding the difference between AR, VR, and MR
AR uses interactions on a screen such as toggles, sliders, or buttons. You can think of this as playing a phone game. AR does not allow you to interact with digital objects outside of screen and button input. It is mainly used for rendering digital objects in a digital environment or adding digital elements such as animation and 3D models to print media. The major draw to AR is the fact that it doesn’t remove the user from the physical world they are in. It enhances the real environment with digital content.
VR uses interactions in a completely virtual way. Compared to AR, VR requires a headset and an adequate amount of space for most experiences. When you put the headset on, you are essentially leaving the physical world for the digital world. Rather than having button interactions on a screen, you are making gestures and movements instead. Most headsets have joysticks and handheld devices that give you more control over the interactions. VR experiences, because they are not tied to the physical world, will have larger-scale experiences that can last minutes to hours. Because you have a headset on, you are inside the game as if you were the real character. You don’t control the character. You are the character.
MR is often confused with AR because the core element of AR (placing digital objects in the real world) is wrapped within MR. The key differentiator is that in MR, your hands are usually free because you have an HMD rather than a smartphone, so sensors can track and occlude your hands, and you can interact with digital objects naturally with simple hand gestures. You can think of it as AR with hand tracking and object interactions, or VR in the real world. If we revisit the spectrum analogy, again, MR lies somewhere in the middle of AR and VR.
As a comic book artist and visual storyteller, I delve into the distinct attributes of each XR branch. My webcomic, Eyelnd Feevr, weaves immersive tales on paper and elevates them with the fusion of technology on digital platforms. These technologies breathe life into comics in unparalleled ways: AR animates characters off the pages, VR submerges readers into the comic’s universe, and MR intertwines the narrative with tangible reality. The depth and richness of Afro-centric narratives present vast possibilities to harness these innovations, enriching the storytelling journey.
With that, we have covered what XR is and the difference between AR, VR, and MR. You should now have a better understanding of which medium would be used for which experiences you want to pursue. If you want people to be in an experience for an extended period, go with VR. If you want people to have an experience that is accessible and affordable, go with AR. If you want people to experience the best of the real and digital world combined, go with MR. Since this is a book focused on VR experiences, let’s get a little more background on how VR came to be.
Brief history of VR
The exact moment when VR was developed is currently disputed. There were references to the idea of an artificial world noted back in the early 1900s. Thomas G. Zimmerman and Jaron Lanier developed the first commercial applications of virtual technology at the company VPL Research. The main purpose of VR was for flight simulations, automotive design, and military training. This usage lasted from the 1970s to the 1990s. By the early 90s, VR started to become more mainstream. Nintendo, SEGA, and Apple were developing products as line extensions of their already popular products. By the 21st century, we started to see different mobile form factors and more portable solutions. Since then, there has been an ever-growing industry and landscape of applications using VR to where it is now seen as a medium rather than an application. The shift from an application to a medium allows VR to be industry-agnostic. Whether it is print publishing, healthcare, or higher education, VR can be used to engage customers, clients, and students.
With our increased background on VR and how it can be used to build experiences, we will now explore how it works, and what is required to create the experiences we want.
How does VR work?
VR may seem difficult to comprehend but by the end of this book, this mountain will seem more like a manageable hill. Two areas of understanding are required to fully comprehend how VR works: development and engagement. The latter requires less explanation, so we will start with that first.
VR experiences require devices specifically for VR applications. They can be smartphones or HMDs. To engage in a VR experience, you can either open the application on your phone or open the application on your headset. With the application active, you can enjoy the experience until you are ready to exit.
Developing for VR is a bit more time-consuming and intricate. Before you begin developing a VR experience, it is always good to write out a roadmap. This can include features you want to integrate, assets you want to utilize, and even interactions you want to have. This can be a checklist or a narrative description.
When you are building experiences, recall the list of elements I mentioned in the Technological components of building an immersive experience section. Developing a good workflow is easier when you can formulate a plan with the elements you have access to. You will need audio, animation, and 3D models. What will those look like and sound like?
Using that as a guide, you can gather all of your assets from other sources, such as Blender, Photoshop, or even asset marketplaces.
When you have all your assets, you can open Unity and begin to build out each scene of the experience. You may combine C# code with music, 3D models, character animation, and object interactions all into one experience.
After you have a prototype, you can integrate testing into the development process. Since we experience on devices, it is best to test on those devices early and often. When you finish, you build and export the VR experience to your intended device (headset or smartphone) and enjoy the experience. We will expand on how to develop VR experiences later, but this should help establish a standard process as you gain more experience.
How do we experience VR?
The most popular way to experience VR is with a headset or HMD. The headset will render a visual in each eye separately. This is called stereoscopic rendering. This is different from seeing through an open viewport, which is a full-screen view, similar to what we see with most smartphone experiences.
Once you have the headset on, you can load an experience onto your headset, and you can enjoy the experience.
Some experiences will require you to clear out a space to move around, and others will work perfectly in a seated position. All this depends on what you intend to do in VR. The only thing hindering you is your desires.
Hardware, software, and platforms that support VR development and engagement
Even though we will be focusing on developing VR experiences in Unity using an Oculus Quest as the test device, it is important to be aware and familiar with other tools since all the stuff we will be learning can easily be applied to other tools that are mentioned. More importantly, as time goes on, higher-end devices will become more accessible, and creators will always explore various tools to meet the scope of what the client needs:
- Headsets: VR headsets allow the user to enter an immersive digital world by simply putting on a headset. There are a variety of headsets available on the market at a range of price points. Let’s discuss some of the popular headsets and what features make them unique for VR:
- Desktop-based headsets require a computer to use. Some VR experiences require high-end graphics rendering and computer processing to play, and these headsets will allow you to plug into a USB port and engage. The limiting factor is that you must have a hardline connection to enjoy VR:
- PlayStation VR is a console-based VR system developed by Sony to work with the Sony PlayStation (PS). It allows you to experience high-end console games through VR. To do so, you also need a PS4 or PS5, a PS camera, and a VR system (headset and handheld controllers). This is great for users who don’t have an expensive computer but have a PS4 or PS5 game console. More importantly, by utilizing PS Network, you can play games with friends fairly easily in VR.
- HTC Vive is a VR headset developed by HTC. It uses two sensors in the corners of the room to map your surroundings and track your movements while the headset is also connected to a computer. It uses two hand controllers to track finger and hand movements. It provides a fully immersive experience but may require a computer with good processing power to run smoothly. Unlike PSVR, which uses the PS’s library of games, HTC Vive uses the SteamVR library, an online-based VR gaming software.
- Oculus Rift S is a connected VR headset by Oculus (Meta). It provides a fully immersive experience with high-end graphics comparable to a console gaming experience. It has two touch controllers that provide hand and finger tracking. You do not need additional sensors to use the headset. The price point and the minimal setup hardware make this a solid headset for the price.
- HP Reverb G2 is a connected VR headset by Hewlett Packard. Much like the Oculus Rift S, it provides a fully immersive experience with a headset and hand controllers that support touch input and hand tracking. This headset is capable of playing on lower-end computers, but to get the best experience, a computer with a good graphics card and processor is recommended. It has one of the best displays of any headset with a 2K (2,160 pixel x 2,160 pixel) per eye resolution. It also comes with off-ear speakers that improve the quality of the audio out of the box. For the price, this is one of the more premium VR options on the market.
- Valve Index is a PC-powered VR headset by Valve. It is a fully immersive VR headset that requires an external base station for full tracking capabilities. It comes with two sensors you must mount to a wall for body tracking, and two controllers for touch input and hand tracking. It is one of the most expensive headsets on the market, but that comes with some perks. First, it is one of the most comfortable headsets to wear for long periods. Visually, it also provides a good pixel density at a high frame rate, allowing you to get the crispest picture possible without the lag.
- Mobile VR is another category of VR experiences that often trade accessibility for quality. It follows the basic concept of VR as you use your phone to play the experiences with or without a case you can wear on your head. It does not provide hand or body tracking, but you can use a Bluetooth controller to interact with elements in the experience. Typically, with mobile VR, the headset case is device agnostic as it serves solely as a phone holder. In this case, you usually choose one based on the comfort and the price rather than the software features. The quality of the VR experience is usually determined based on your mobile device:
- Android phones are the most popular phones for mobile VR. They have a lot of support behind them from Google, Samsung, and the open developer community on the internet. Because Android is open source, there are very few barriers hindering developers from developing VR experiences. This provides some of the most innovative games and applications on the market. Interestingly enough, almost all VR headsets are Android-based, so the difference in experiences is normally due to the lack of sensors and processing power of the Android smartphone.
- iPhone’s VR is simple, but it can be limited. If you want to have a VR experience on iPhones, you simply choose the VR app you downloaded from the App Store, place the iPhone into a VR head-mounted case, and enjoy. Again, much like Android phone VR experiences, you don’t have hand or body tracking, and the processing power is not as high. You can use a Bluetooth remote to interact with objects, but you can expect these experiences to be more passive, such as watching 360 videos. Unlike Android, iPhone does not have as much developer support, and the experiences available are restricted to ones you can find on the App Store. iOS is a good introduction to VR for early adopters, but it only skims the surface of possibilities for intermediate to advanced users.
- Standalone headsets do not require a computer connection to run, although some games may require a connected device. Standalone headsets are unique because they provide the portability of a mobile device and the quality of a desktop headset. They are the most popular category of headsets because they have the best features for the price. They require an internet connection and most of the experiences that are played are stored on the device. It is likely that if you meet someone who has a VR device, it will be a standalone headset:
- Oculus Quest 2 is a standalone headset by Oculus (Meta). It is the most popular headset on the market at the time of writing. It does not require a PC but is capable of supporting connected experiences as a hybrid device. It has a high refresh rate for a standalone headset and supports hand tracking and gestures with two hand controllers. It is the most versatile headset because it can play a variety of experiences from a variety of platforms.
- Lenovo Mirage VR S3 is a standalone headset developed by Lenovo. Like other standalone headsets, it does not require a PC to use. It only comes with one remote control, so you will have limited hand gestures and interactions with this headset experience. A unique feature of this device is that its memory can be expanded with a microSD card.
- Desktop-based headsets require a computer to use. Some VR experiences require high-end graphics rendering and computer processing to play, and these headsets will allow you to plug into a USB port and engage. The limiting factor is that you must have a hardline connection to enjoy VR:
- Platforms: These are integral to the VR experience because they serve as hubs for navigating the virtual world and accessing games and applications. Without a VR platform, your headset is just a paperweight with futuristic sensors. Platforms provide you with access to different games and marketplaces, depending on the supported headset, although there is overlap in the content that each platform offers:
- SteamVR is a customizable VR platform by Valve that allows you to launch apps and games and interact with objects in VR. It supports most VR headsets on the market. SteamVR is a one-stop shop for everything you would want to do with your headset.
- Oculus VR is the default platform for Oculus headsets. Although this is specific to Oculus headsets, it is good to mention because most people who have a VR headset have an Oculus. Oculus is similar to SteamVR in terms of its customizability and access to popular marketplace applications. Oculus VR supports a hybrid mode that allows you to choose if you want to render things with your computer by plugging it in or with your headset as a standalone device.
- Windows Mixed Reality is a VR platform for Windows operating systems. It provides VR experiences for compatible devices such as the HP Reverb. In Windows Mixed Reality, you can choose from a variety of apps and games available on your computer.
- Open Source Virtual Reality (OSVR) is an open source VR platform that supports a variety of devices on Windows, Android, OSX, and Linux. It is more of a developer kit, but the focus of OSVR is to improve the standard for smooth VR experiences.
- Accessories: They can improve your day-to-day experience in VR. These options are normally hardware-focused and not software-focused, but since this book is about enhancing VR experiences, I figured the physical comfort should at least be covered. This will not be a comprehensive list or endorsement of particular products. My goal is to make you aware of what is available so that you can make more informed decisions about the experiences you want to have:
- Haptic feedback gloves and suits provide extended sensory input through direct feedback. With gloves and suits, you can feel the difference between a hard, soft, and smooth virtual surface. It fills the gap of touch sensation that is left void with virtual objects. When we talk about making experiences more immersive, improving touch sensation with additional hardware can do that.
- Sensory masks allow users in VR to smell in VR. These masks simulate natural, relaxing, and realistic smells and add them to your VR experiences. They work as attachments to your headset that you can use in your development process to provide sensations such as water mist, heat, wind, and vibration for your different VR scenarios.
- Omnidirectional treadmills provide a unique opportunity to improve mobility within VR. One of the limiting factors of VR is the physical space available for you to navigate in VR. Even in the most robust VR experiences, because of space limitations, we are stuck with using joysticks to explore virtual worlds. You may be able to duck under objects or jump over fences, but locomotion is often hindered for logistical and safety reasons. Omnidirectional treadmills do that by giving you the means to walk in any direction for an unlimited time virtually while also having a small physical footprint. If you want to have a more realistic simulation of movement in VR, look into one of these.
- Headphones that connect directly to the headset provide a better audio experience. It makes you feel more immersed because the audio quality is not obstructed by sounds from your environment. If you want to improve the audio quality, you can get some headphones.
- Extended batteries. If you have a standalone headset such as an Oculus Quest, one of the biggest selling points is also its limiting factor. Yes, I am talking about battery life. Standalone headsets are great because you are not tethered to a computer. Although that can be liberating, it does mean your experiences have a time limit. With an extended battery, you can extend that time limit without compromising comfort.
- Game and rendering engines: These are the premier software for developing experiences for VR. Their ability to render elements in real time allows for interaction-based experiences that react and respond to user engagement:
- Unity is one of the most popular engines for AR, VR, and mobile gaming. It is very versatile and can be used to create applications for a variety of industries. We will be focusing on VR development in Unity for this book primarily.
- Unreal Engine is another popular game engine known for rendering high-fidelity experiences in real time. It supports a wide range of VR platforms and provides avenues for developers to use Python and C++ in their development processes.
- Godot is an open source game engine that uses modules to expand the features of the platform. It has a huge library of tools to build games and other experiences for a range of platforms. The Godot gaming community is growing, and more support is available as a result.
- CryEngine is a reliable second-tier engine that’s used for games and provides a great toolset to build VR experiences. It offers great visuals and a sandbox of options that are relevant to VR development. It does not have as much support as Unity or Unreal, but it’s open source and can fulfill all the needs you may have to get started.
- AppGameKit is a great game engine for beginners and hobbyists that provides developers with the tools needed to learn game development. You can expand its features by installing the VR extension. Here, you can develop VR games with a library of common interactions you will find in most games. Compared to other engines where you can make VR applications, AppGameKit focuses primarily on game development.
- Blender can support VR development. Blender is great for content creation, and the latest version allows you to connect to an Oculus Quest. With Blender, you can view your model creation in a virtual space and traverse the elements. You can also model objects in VR, but there are not as many tools to build interactive games and applications as there are for most engines.
- Amazon Sumerian is a lesser-known software developed by Amazon that allows you to render VR experiences with Amazon Web Services (AWS). It is a popular platform for early developers because it does not require programming or 3D skills to build experiences. More importantly, these experiences can work with a variety of devices, from smartphones to high-end headsets.
- Sketchup Studio is a 3D modeling tool that allows you to create models specific to construction and architecture. It has a VR feature where you can create those models in VR. If you are familiar with CAD and construction-specific tools, Sketchup may be a good avenue for exploring VR.
- Software development kits (SDKs): These are a set of tools, sample scenes, and code examples that allow developers to create games and applications for specific platforms and hardware. In most cases, you download the SDK from a reputable website and utilize it within a compatible software, such as Unity:
- Steam VR Plugin allows you to develop VR experiences in a game engine such as Unity and Unreal and distribute those experiences on the Steam VR marketplace – one of the largest marketplaces in the world. This SDK also allows you to add Steam-specific features to your experiences, such as achievements and matchmaking.
- Open VR SDK is a developer kit by Valve that is used to make VR experiences for a variety of hardware. It builds off of the foundation that SteamVR provides to give developers more features for their hardware-specific interactions.
- Oculus Integration SDK allows you to develop VR experiences for Oculus in the Unity game engine. It has all the tools needed to go from concept to finished project and make it available for Oculus users.
- Virtual Reality Toolkit is a collection of scripts and interactions that work for a variety of VR experiences. At the time of writing, it is only compatible with the Unity game engine.
- Dev Kit allows you to develop experiences for PSVR. Compared to other SDKs, where you can download them and start developing very quickly, with PSVR, you must become a registered developer first.
- Cardboard SDK (formerly Google VR) is a developer kit that allows you to make VR experiences for Android and iOS. It supports motion tracking, stereoscopic rendering, and user interaction for mobile devices out of the box to let you create engaging VR experiences on a smartphone.
- PICO Unity XR SDK is used to develop experiences for the Lenovo Mirage. It supports games and applications built on the Android platform.
- Content creation: These tools allow creators to create 3D objects and animated assets for their VR experiences. Game engines are perfect for rendering elements in real time, but those objects need to be created and optimized for rendering. That includes having a low poly count, textures, materials, and even the right real-world scale. You can do all of that in content creation software:
- Maya is an industry standard for game development and animation. Most 3D characters and animated assets for games made in Unity and Unreal are made with Maya. If you need a tool that does everything you want for VR, Maya is a safe choice that has applications in other industries.
- Cinema 4D is a 3D animation powerhouse. It is used by a variety of entertainment industries due to its ability to provide high-quality renders and simulations. Although the simulations and renders do not translate to Unity, Cinema 4D has superb modeling, animation, and polygon reduction tools to make your VR scene more performant.
- Blender is one of the most versatile tools a content creator can have. It can support 3D modeling, 3D animation, 2D animation, texturing, 3D mesh optimization, and 3D world-building. Pretty much anything you can think of, Blender can do. You can create your content here and export it to an engine to render it.
- ZBrush is a 3D sculpting program that gives you the ability to create 3D models and objects as if you are sculpting with clay. It has a variety of tools to streamline your process and give you the highest quality creations.
- Photoshop is a dependable 2D content creation tool. It is great for prototyping user interfaces, designing interactive UI elements, creating decals, and 2D animation. Game engines are not the best at creating professional-looking UI themes, but Photoshop can be used to address that.
- Oculus Medium is a tool that allows you to create content in VR using the Oculus VR headset. You can create 3D models using sculpting and traditional modeling techniques. Medium has a robust array of painting tools to texture your models to your liking.
We know what VR is, we are familiar with all the hardware and software (Figure 1.3), and we know what applications can be made. With this foundation, we can begin to explore VR development. The next section will cover ways to approach VR development. Instead of diving deep into Unity and building prototypes, it is wise to expand on the workflow I mentioned earlier in this chapter so that you can approach development with confidence and efficiency:

Figure 1.3 – Core elements of VR development
Approaching VR development
I mentioned earlier in this chapter that VR development involves many components: 3D assets, animation, sounds, code, and more. The key to building VR experiences successfully and efficiently is all about navigating the required components and utilizing them effectively within your project.
How do you do that? Well, the short answer is trial and error. You have to spend time exploring the tools and making things. You may be rusty when you work on your first project, but by the 100th project, you will feel pretty comfortable with your ability to create. Regardless of whether you are a beginner, intermediate, or advanced developer, we will cover some techniques to put you on the right track. Acknowledging the importance of repetition to master these concepts, this section delves into the development of VR experiences using the principle of design thinking. As we explore these fundamental ideas, Chapter 10, Design Thinking for Virtual Reality Experiences, will revisit them, enhancing our grasp and underscoring their significance in our workflow.
Setting expectations for projects
VR development can be a lengthy process. It can take months, if not years, to complete a project. Sometimes, those experiences meet our expectations, and other times, they don’t. Throughout this process, you want to set yourself up for success at every turn, no matter how big or small the project is. With that being said, you want to develop a growth mindset. This means that with every experiment and project, your goal is not to be perfect – it is to constantly improve. You want to test your limits and capabilities and push the ideas you want to pursue as far as possible. The tools you are learning to use and the skills you apply to your projects are just a means to that end goal. Going back to the 100-project analogy, compared to your first project, your 100th project will not be perfect, but it will be better than your first. Your 200th project will be even better than your 100th. Quite often, you will look back at old projects that you were proud of and think, “I’m much better now.” That is the point!
Let’s say you have an idea for a project, such as a fully immersive massive multiplayer open-world role-playing game with dragons, unlockable achievements, and a robust character creation system, and you want it to work on both low-end headsets and high-end headsets smoothly. You must ask yourself, “What am I capable of developing now, and what will I be able to do later?” Pulling references from our favorite games and applications, we must understand that they were created by teams of people who devoted years, thousands of dollars, and countless resources to them. More importantly, they earned years of foundational education to know how to implement core elements and features. Can one person develop this? Yes, but it will not happen overnight. A developer’s most unspoken qualities are patience and persistence.
Developing VR experiences is all about improving – that’s why we call it developing. There is always something to improve. Ultimately, your goal, as a developer, is to develop experiences that can be usable. In VR, that means that you can interact with objects, traverse digital worlds, and not get motion sickness in the process. More importantly, your goal is to take an experience that works on your high-powered computer, export it as an application, and have it run smoothly on an HMD. If you can do that, you are on the right track.
Navigating available resources
One thing you will ask in your development process is: “Do I have to make everything in my VR experience?” The short answer is no. You don’t have to make every single model or character in your VR experience. There are games and applications on the market from developers that have little to no experience with 3D modeling, texturing, scripting, producing audio, and even animation. What they are successful at is coming up with interesting ideas and using the resources available to bring them to life. How do they do that? We will discuss this briefly here.
Major game engines such as Unity and Unreal have huge communities that come together all in the name of making games. With that large community comes a market for sharing and selling assets. You can find these in the respective marketplaces of the mentioned game engines. They are amazing places to find a wide range of assets for an affordable price. You may even find some stuff for free or in a blowout sale. In the marketplace, you will find 3D models and animation, 2D sprites and animation, music and sound effects, VFX, particle systems, templates for games, premade level designs, scripts to optimize your game, and more – literally anything you can think of you can find.
If you want to explore resources outside of the marketplace for content, you have pretty decent options:
- Sketchfab is one of the leading platforms for 3D content on the web, or you can download 3D models from users who post their content. So long as it is a
.fbxor.objfile, you can implement it into your project fairly easily. - TurboSquid is an alternative market that allows you to buy 3D content. It is not specifically for games or XR experiences, but the content can be modified to work with any project you may have.
- ArtStation is one part portfolio and another part marketplace. Here, you can find inspiration from other users who post content, and you can download and purchase that content if the users make it available. ArtStation is a wonderful place to go if you need to get out of your creative block because it has such a talented creative community.
- Mixamo is a huge library of animations that can be utilized in any project. Whether you are looking for a walk cycle or some stock interactions for non-playable characters, this is a great place to go to get your characters moving. More importantly, they offer rigging for any humanoid character to apply those animations perfectly. This is a free resource with a great community of support.
If you need help with development and coding, there are some places you can explore as well:
- Unity Forums are great places to start when you are looking for a solution. There are experienced Unity developers who know the Unity game engine inside and out. Even if they don’t know how to fix problems for XR experiences specifically, they can walk you through possible solutions because of their experience with the Unity game engine.
- Unity Discord is an alternative to forums. Unlike forums where you could be waiting for days if not weeks for an answer to your inquiry, Unity Discord gives you access to the same support team in real time. They have specific groups for XR development and VR that you can post questions in. You may get responses from developers or one of the thousands of other members who may be able to help you.
- Stack Overflow is a perfect place to find help when you are stuck in the development process. The community is large and spans a variety of industries and coding languages. More than likely, if you post your problem, someone may have a solution. Often, you can simply copy and paste those solutions into your projects so that you can move on to the next task.
- YouTube is a great place to find help with problems others may be facing. A simple search in the search bar can lead you down a path of learning how to create a certain element or how to code a certain feature. When I got started, I made a point to follow certain Youtubers who created work I eventually wanted to create.
We are in a day and age where a simple internet search can help you tremendously. As a solo developer, being able to create experiences with high-quality assets, even if I don’t know how to create those myself, is liberating because I can focus on the core of my ideas and innovate in ways that speak to my interests.
Developing an efficient workflow
The final thing to discuss is the workflow. How do we take all the knowledge, skills, and assets we’ve acquired and apply them to a project? There is a methodology I follow that has helped me with projects from a variety of industries, such as healthcare, animation, and even bookmaking that I can share with you. The purpose of a workflow is to streamline your creative process so that you can focus your energy on the creative process rather than figuring out the steps to create the project. Although that does not seem like much of a problem, it can be taxing when you are working on large projects or exploring things you never did before. With a workflow, you will know what steps you need to take to create something before you even start working on the project. That in part gives you a level of confidence that is increasingly valuable as you embark on your experimental journeys. You may not know what it will look like when it is finished, but you know how to get to the finish line. That is half the battle right there!
Let’s say you have an idea you want to work on. You are excited about the possibilities, and you are eager to get to work. Before you begin a project, remember that everything starts on paper. It can be a napkin, a notebook, or even a document on your phone. The goal is to take that idea and transfer it from your brain to something tangible. Doing this does two things for you:
- It converts a project that is floating in the ether of your brain into something tangible that you can see and touch. You can share it with your peers, and you can deconstruct it and reconstruct it.
- The act of writing something down forces you to articulate it in a way that makes sense. When we have an idea in our head, it is normally a collection of elements that make up a project. We can think about it, but when someone asks us about our idea, we often find it difficult to provide a concise description of it. You have an idea, but the idea is only as good as how well you can communicate it to yourself and others. Writing it down will help you articulate it and fill in gaps with details you probably did not think of initially.
Let’s try out an example.
Brainstorming ideas for developing projects
Brainstorming for a project could go through the following seven stages, starting with idea creation:
- Idea: A cool VR experience that is fun to play.
How much should you write down for our idea? Well, the short answer is however much you want/need to get the point across. You will eventually be expanding on the idea, but if you need a starting point that is not too daunting, start with one to two sentences. Briefly describe what it is you want to create.
- Writing down a brief description: I want to make a cool VR experience that is fun to play where you can be a superhero for a day.
When you write down your brief description, you may have the urge to elaborate on what the experience is and some of the features involved in it. That is what we want. The purpose is to demystify and uncover elements of the experience so that you can turn those elements into actionable items you can apply your skills. Once you know what type of project you have, then you will know what elements you need, and how to acquire those elements. With your brief done, you can expand on it by adding a list of features. This can be elements of the user experiences, particular content, certain themes, and more. Think of this as a brain dump for your project. Get it all out and on paper. If you get stuck, don’t worry. We will revisit this later.
- Creating a feature list:
- An open VR world where people can run, walk, and fly
- You can save people and fight bad guys
- You can go to the highest mountain and watch the sunset
- There is a level-up system where you can earn more interactions and features
- You can customize your character
With this feature list, the project is starting to become clearer and clearer. You should be able to visualize the experience more than when it was in your head because articulating it on paper makes the idea more concrete.
- Research: Now, you can start doing some research. Research is valuable because you want to know what is out there already. If you are making a commercial game, you want to see if there is an idea similar to yours. You may need to tweak it or pivot to differentiate it from others. You can also look for inspiration on functionality, themes, artistic style, and more. We don’t live in a vacuum, and your creative process should not exist in a vacuum either. As you create stuff and put it out into the world, others are doing the same. This can be a valuable resource early on when you are exploring new ideas. It allows you to see what is possible. To do this, you can start with a Google search based on some keywords from your feature list. Formulate a list of terms you can search on the internet. Start with five keywords and add more if you need to. You may get enough from a few searches, but that is not always the case. Regardless, the goal is to give you enough inspiration to expand on your current ideas. Some good places to start are Google, YouTube, Twitter, Instagram, ArtStation, and Pinterest.
- Shortlisting keywords: Based on your research, you may notice that some words or phrases seem to appear more frequently and feel more relevant. Write some of them down. You could have a list that looks like this:
- Superhero VR experiences
- Flying in VR
- Games with superpowers
- Action-adventure VR experiences
- Cool VR interactions
- VR fighting games
You can use these keywords to fine-tune your research.
- Creating a mood board: You did a bunch of searches and found a bunch of cool ideas people are working on. Some of those ideas you want to explore in your experiences and others you don’t. By this time, you should have a better idea of what your experience is and what it is not. What do you do with all this? Make a mood board.
A mood board is a document that helps you organize the elements, features, and inspirations of your project. Create different sections on your mood board to place elements you like or don’t like. If you see a feature in a game you like, add it to your mood board. If you see a color palette, add it to your mood board. If you like a character style, add it to your mood board. If you played a game you hated, add it to your mood board. Some great tools to help with creating one are PureRefs, Google Docs, Microsoft Word, Milanote, and Pinterest. They work great for giving you a digital canvas to organize ideas and references. The following figure shows you how you could organize a mood board you create:
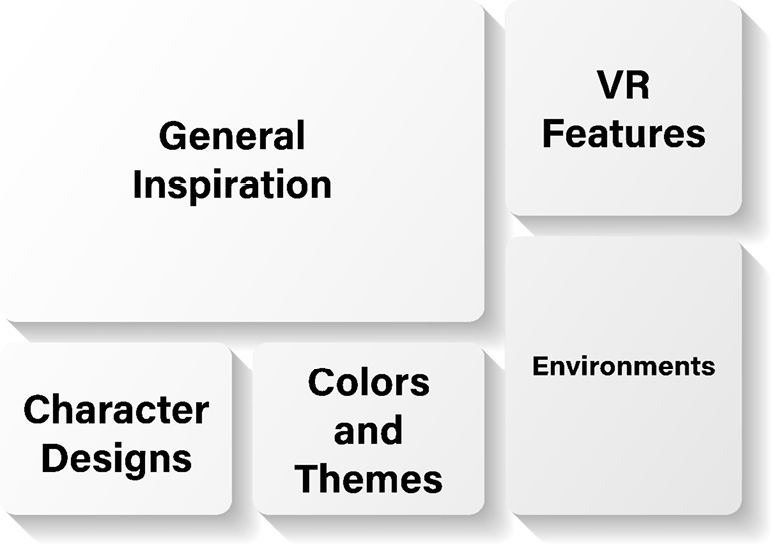
Figure 1.4 – Mood board example
With our mood board, we can elaborate on the list and expand it with more details. There may be some features that are nice to have now and some nice to have later. Maybe you want to have everything be in a particular style. Maybe there are some vague ideas in your feature list that need to be fleshed out more. Think about what it is the user will be doing and how it will make them feel. What is the experience you are trying to provide for them? What elements of your experience will the users be excited the most about? Take this time to address those questions.
- Creating a detailed feature list: Once you have answered the questions, you can create a more detailed feature list compared to what we did in step 3. Your list could now look like this:
- An open world where people can explore in VR:
- They can navigate three settings: a city, forest, and space environment
- They can run up buildings
- They can fly to the tops of mountains
- They can walk on the moon
- Users can interact with people and objects using common VR interactions:
- They can punch bad guys
- They can open doors and enter buildings
- They can shoot projectiles and use weapons
- Users can enjoy dynamic levels and environments:
- They can watch the sunset on top of a mountain
- They can do yoga in the park
- They can enjoy a concert with other non-playable characters
- As the user plays the game, they can customize their character:
- They can unlock and buy gear to equip themselves
- They can level up their skills
- They can improve their abilities through training
- They can add and remove various superpowers
- An open world where people can explore in VR:
The feature list we have now is more focused on something we want to build rather than an idea we have. Everyone has ideas, but what differentiates this from others is that we are focusing more on the user experience. Remember, people care about VR because it provides us with a unique and immersive user experience. If we don’t consider that early in the development process, then we will lose sight of what our goal is: making innovative VR experiences. We are not done, though. We need to convert this list into actionable items. This is a crucial step because this will be our guide for creating every element of the experience. That is why we call it a roadmap.
Planning development details using a roadmap
Based on the features we mentioned, we can split the elements into categories that make sense for us to develop. I like to label my categories based on the type of assets so that I can understand what it would require to include that element in my experience. Afterward, we will have a comprehensive list of what our VR experience will be made of, a list of to-dos to direct us, and all we would need to do is create those elements and implement them into the experience. We can use the following roadmap:
- Characters:
- Enemies:
- Grunt enemy model
- Boss enemy model
- Attack animations
- Character grunts
- Main character:
- Various customizable elements, such as hair and clothing
- Level up system
- Non-playable characters:
- Low poly mesh characters
- Idle and walk animations
- Stock conversation audio
- To-do: Record audio, character animation, character design, 3D model and texture, and create character controllers for each type of character
- Enemies:
- Environments:
- City scene:
- Buildings, roads, streetlights, sidewalks, cars, city blocks
- Park, school, intersections, city hall, and more
- City ambiance sounds
- Objects that emit audio
- Forest scene:
- Terrain with grass, rocks, birds, and trees
- Walking paths and natural landmarks
- Nature sounds
- Objects that emit audio
- Space scene:
- Moon terrain, Sun, stars, and space environment
- To-do: Design 3D environments, populate environments with objects and characters, add sounds to various audio sources, and set boundaries for character navigation
- City scene:
- User interface:
- Menu screens:
- Buttons, text, scene navigation
- Pause screen:
- Buttons, text, scene navigation, game settings
- Heads-up displays:
- UI design, health bar, map indicator
- To-do: Design the interface screens and create each element according to the color palette and theme
- Menu screens:
- User interactions:
- Character controller
- Flying system
- Shooting projectiles
- Grabbing objects
- Fighting system
- To-do: Code each system
- Rewards:
- Superpowered abilities:
- To-do: different VFX for the abilities
- Level-up system:
- To-do: Code the system and use particle and sound effects for user feedback
- Superpowered abilities:
We can elaborate on the roadmap even more, but you get the gist. You list all of the elements needed for a particular experience and try to think about what the technical requirements are. Some things may only need to be recorded; others may need to be rendered. Figure out what you need to do for that element and add it to the roadmap. The bulk of the prep work is done. You should have a familiarity with the project that will inform you what your first objective would be. Regardless of where you start, you aren’t going to have that element finished before you move on to the next element. Your development process should still be at a high level. Focus on the core elements of the experience and not the itty-bitty details. There will be time for that later. Right now, we just need to lay the foundation that we can build on. If we shortcut this process, then we will be sure to regret it in the future because our project’s foundation will not be able to fully support our aspirations for the project. In the Roadmapping section of Chapter 10, Design Thinking for Virtual Reality Experiences, we will cover a full concept of the roadmapping process that we will be able to flesh out with more details and eventually put into practice in Chapters 11 to 17.
Developing a prototype based on your mood board and roadmap
Using the to-dos as a guide, we can perform some steps to prepare us for making our prototype. We can divide what we need to do into three stages:
- Sketching/drafting:
- Coding: Before we spend countless hours coding in Visual Studio, we can create some of the necessary scripts and place comments describing what we intend to do instead of coding. We may not need all the code to get up and running but having a plan can provide us with directions we can do ourselves or collaborate with others on.
- Character design: It can take time to develop one character let alone a whole cast. Start with sketching the character design in a side and front pose. This will help you when you begin modeling because it is easier to replicate a premade character than modeling on the fly.
- Environment design: Just like character design, building an environment that can take on a life of its own can be time-consuming. A way to mitigate some of the problems is to create a map of your environments. Include everything from city blocks, key landmarks, points of interest, and more. Think of all the elements that make up an area and include them. When you plan out all the areas of a location, you can simply move elements to those areas of the map and cut out most of the guesswork. Another opportunity is to do concept art for how the environment should look and feel. You can design buildings and objects and visualize settings you want to replicate in the experience. Again, the goal is to take the guesswork out of the creative process.
- Sound recording: Audio is a crucial component of an immersive experience. Even if you are not a sound design expert, there are things you can do to create the best auditory experience for the user. Think about all the sounds in your experience and try to create a comprehensive list you can use to build a library of sounds. You may have started doing that in your roadmap, but if not, here is your opportunity. You will need sounds for cars, sword slashes, people talking, footsteps, grunts, and more. You can record them yourself, or you can get them from a third party. Regardless, building a library based on your needs is a great way to prepare for your prototype.
- User interface design: User interfaces benefit the most from planning because you can do most of the designing of the buttons, text, and visual elements, and then import them into your experience for coding, regardless of whether it is a menu screen, pause screen, character HUD, or something else. Sketch out the locations of each element and prepare them for prototyping.
- Animation: Develop a list of all the animated elements that need to be made for the different situations. Animating can be time-consuming, so knowing what to animate can minimize the time needed to spend on the process. Some of these assets can be purchased or downloaded from third parties.
You will get to a point where you want to start putting things together. When that point comes, it means you are ready to prototype.
- Prototyping: I normally encourage developers to get to the prototype phase as quickly as possible, but only if they have the other stuff done. Again, we are in the business of building experiences, not making pitch decks. We want to make things we can show users instead of creating documents that describe the experiences we want to make. If we are talking about building full experiences, the preparation work will take longer, but if we are trying to develop an element of the experience, we can jump into the prototyping phase with minimal prep work. The purpose of this phase is to make something that we can quickly use with a headset. It will be rough and buggy but getting to a prototype sooner allows us to address the problems early before the project becomes too big to manage:
- Code: We can follow our comments from our previous steps to implement any interactions we want. This can include downloading SDKs and toolkits to lighten the developmental load of our projects. This will not be production-ready code, but just enough to test out the features.
- Characters: We don’t need fully rendered, high-quality characters right now. We just need simple meshes with a character rig and character controller. They can be place markers for our final character designs. We focus on their interactions with the environment and players right now.
- Environments: We will be introduced to the term grayboxing later in this book, but the concept is all about using primitive shapes to build environments. We can color code them based on whether they are buildings, cars, or trees, but don’t focus on the details right now. So long as the environment is to scale and has all the core elements, you can be satisfied with a world of cubes, spheres, and prisms.
- Sounds: You should have a decent number of sounds in a library at this point. You can swap them out later if you want. The goal is to start playing around with different sound combinations in your prototype early so that you can capture the different effects you want a user to experience.
- User interfaces: User interfaces also do not need to be pretty. They just need to be functional. For a prototype, it will be good enough to have simple buttons, sliders, and scenes that you can navigate. Focus on being able to load scenes within your experience, point buttons to specific results, and load whatever information you want to load on the screen. The beautiful themes can come later.
- Animation: You can get pretty far without having animation right now. Much like building a sound library, you can build an animation library to use for your projects. If you have little to no experience with animation, Mixamo and Marketplaces are great places to build your library. Since most of the VR interactions will be code-based for your player, the animation assets will typically be used for enemies, non-playable characters, and objects in your environment.
Having a prototype is a feat in and of itself. Test it out and see how far you have come. If you have friends and colleagues, have them try it too. Feedback early in the process is very valuable. Make note of all the things that work and don’t in the experience so that you can quickly address them before you add more elements to the experience. When you are satisfied with where the experience is, you can begin polishing the experience. This can come in a variety of forms. If you are creating all the assets yourself, that would mean that you would be spending the majority of your time building 3D models and characters, animating, designing environments, and more. If you are using primarily third-party assets, you would be kitbashing and implementing those assets into your project in place of the cubes and low poly meshes. More than likely, you are doing a combination of both. With that being said, the goal here is to make the game look as polished as possible. Add all the code you need, replace all the characters, integrate all the sounds and animation you want from your library, and spruce up your UI screens.
By this time, your experience has taken on a life of its own. What started as an idea is now an interactive experience that occupies gigabytes on your hard drive. It looks good and sounds good when you are in the experience, but now, we need to make sure it runs well on a device. We will discuss some good optimization techniques later in this book. At this point, you want to try to optimize all your assets and content: compress audio and image files, clean up your code, bake all your lights, reduce keyframes in your animation, and more. This will help improve your frame rate and minimize the number of crashes your experience may have as people try to run them in a variety of settings and contexts.
Beyond this, you will continue to improve on different features of your experience, and on some occasions, rebuild it to correct some of the mistakes you made early in the development process. Like I said before, you are not making a final product – you are developing experiences. That developmental process is never-ending. The experiences will never be fully completed because there is always room for improvement. What you are doing is creating experiences that are good enough to share with others.
With that, we have gone through a full project workflow that you can follow to make your development process more efficient. You know the steps required to build the experience. Now, you can spend more time applying those steps and focusing on the creative process.
- Creating a workflow checklist: To make prototype development even simpler, you can turn it into a checklist you can reuse over and over to keep you on track. This is something you can expand on and make your own, but we will be using this later in this book as we dive deeper into developing VR experiences:
- Get your idea on paper.
- Write a brief one to two-sentence description.
- Create a feature list.
- Create a keyword list to do research.
- Create a mood board of inspiration and ideas.
- Expand on your list of features.
- Create a roadmap for your project.
- Sketch out elements, including menus, designs, code, assets, concepts, and more.
- Prototype features such as scenes, UIs, interactions, and animation.
- Test our experience, in the editor and on the device.
- Polish our experience by creating final assets, kitbashing, and populating worlds.
- Optimize our experience for function and performance.
With this refined roadmap, you will be better equipped to build, test, and deploy your VR experience in Unity.
Summary
In this chapter, we covered a variety of topics that are essential for orienting ourselves in a VR developer’s mindset. We covered the basics of what an immersive experience is, what the different types of immersive experiences are, and what elements distinguish each of them. We then explored the various components and technical skills required to build VR experiences.
VR is a medium that incorporates various hardware such as HMDs and motion controllers with software to create experiences that go beyond games. VR has applications in the healthcare, entertainment, and education industries too.
At the end of this chapter, we explored how to set up expectations for ourselves and our projects. We went through all the necessary steps required to complete a full project and developed a checklist we can use in future chapters to improve our creative process and VR development workflow.
In the next chapter, we will dive deep into the Unity game engine. We will learn the basics of what it is and how to use it to build VR experiences.
