Chapter 1: Setting Up the Application
Notion is a software application that can help individuals and teams get things done. It offers many of the benefits of paper, writing down notes, ideas, and thoughts. However, it also has the benefits of digital tools such as searching, database structures, and remote collaboration.
In this chapter, we're going to cover the following main topics:
- Creating an account
- Downloading the application
- Using Notion on multiple devices
You will learn how to create an account in the Notion application for yourself or a team of people, resulting in at least one created account. Note that you cannot use the Notion app without at least one account, so this step cannot be avoided.
Additionally, you will learn how to download the application onto multiple devices if you use them, such as a PC, Mac, laptop, tablet, and mobile. Following this, you will learn how to access an account that you have created on any of those devices. This will give you synced access to your information across each device while remaining safe with your data.
Technical requirements
In this chapter, you will need a device that has access to the internet. The device you use will impact the navigation and guidance given in this chapter, so a PC or laptop is advised but not necessary. Additionally, a phone or tablet can be used, but they might have limited functionality when setting up. Having multiple devices around you will allow for all the setup to be done in one sitting.
Creating an account
Now you will learn how to create an account in Notion. This is so that you can access the application to keep your information and data private while also storing the information linked to the account you create:
- When you first go looking for Notion, you can find it by searching in your browser (such as Google, Bing, or Yahoo). In the results section, you should see the Notion website, which is titled Notion – The all-in-one workspace for your notes, tasks, wikis.
- When you click through to the main page, you will be able to view their website. However, if you have made an account previously, it will take you into the workspace you are currently logged into; in this case, you can move on to the next section of this chapter.
- At the top of the main page, there is a section for you to add your email address and sign up, as shown in Figure 1.1. The email address that you enter in that box is the email address you will use for your account. This email will receive all the emails and notifications that the Notion app sends out:
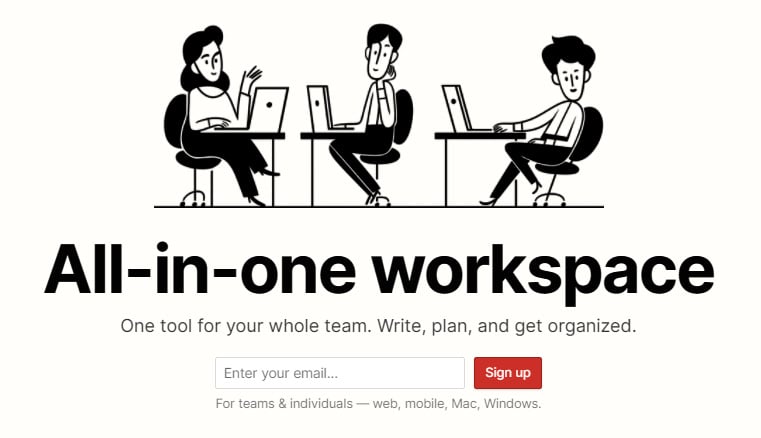
Figure 1.1 – The Notion website – enter your email account to sign up
Alternatively, you can navigate to the upper-right corner of the main page and click on Log in, if you have an account, or Sign up to create a new account. Going through this option will take you to a different page where you can use your Google or Apple sign-in details to create a new account. This will use the email address from that account as your Notion account email.
- Once you have entered an email address for the Notion account, a confirmation code will be sent to that email address. The main page you are on will change and ask for a confirmation code. Go to your email inbox to find the Notion sign-up code. If the email is not in your inbox, you might need to check your spam folder due to your email settings.
- Once you have found the sign-up email, there will be two options to choose from:
- A link that will take you to a Notion page
- A code that you need to put into the main page you just left, asking for the confirmation code
- Having entered the code or gone through the magic link in the email, you will be taken to a Privacy & Data collection page. This page shares how Notion uses cookies to securely identify your account along with how Intercom, Amplitude, Segment, Snowflake, Crashlytics, and Loggly are used to collect analytics for improving the product and troubleshooting customer issues.
- You can withdraw your consent to analytics at any time by emailing team@makenotion.com, which is linked on the page. Additionally, they mention the product updates and marketing emails that will be sent out with an unsubscribe link, if you don't want to receive them, along with their terms of service and privacy policy information.
- When you are happy to proceed, you will be taken to a profile page. This will give you the option to add a name, image, and password to your profile. Notion asks for a password that is longer than 15 letters or longer than 10 characters with letters and numbers.
There is no need to add a profile picture at this point, as the account can be created with just a username and password. Once you have entered a username and password, click to continue. You will be given two options:
- A team options
- An individual option
- If you select the team option, it will ask you for a workspace name, company size, and your starting team. You can add a logo, but it is not mandatory. As you continue through this process, it will ask you to invite your teammates into the workspace. You can invite them via their email address, and if they do not already have a Notion account, they will go through the account creation process. Again, this is not mandatory at this point, and you can move forward without inviting anyone into the space.
- When you pick a team plan, you will be put on the trial package, so you will be limited in terms of some of the features that you have access to. To check which features are limited, navigate to your workspace settings and look at the plan section. This will be covered, in more detail in Chapter 3, Template Import Options, Account Settings, and Workspace Settings.
- If you select the individual option, you will be directed to your Notion workspace. At this point, if you decide that you want to test out the team plan as a trial, you can; however, again, you would need to go through the workspace settings.
- When you enter the Notion workspace, you will go through an onboarding process that shows you some templates that you can choose to import into your workspace.
Templates will be covered in more detail in Chapter 3, Template Import Options, Account Settings, and Workspace Settings, but you will also be given a Getting Started page in your private section. The Getting Started page goes over some of the basics that will be fully covered throughout this book.
Downloading the application
In this section, we will download Notion onto our PC, Mac, or laptop device. The process of downloading Notion to our mobile or tablet devices will also be explained. While downloading Notion to your computer has little storage or speed benefits, it does provide some added functionality alongside the ability to add Notion to your taskbar for easy startup access. However, downloading Notion to multiple devices does give you many more options, in terms of its use cases and applications, to create a more productive system overall.
Note
Before I continue, I want to mention that Notion, like most software applications, uses words and terms that might cross over with other words that you are familiar with. This can get confusing at times, but I will explain each term as we come across them.
Having created an account, you will have access to a workspace. A workspace in Notion is at the core of collaboration. It is the digital space that stores the pages and databases that house all your information. A workspace can have multiple members, guests, and admins, which will be covered further in Chapter 3, Template Import Options, Account Settings, and Workspace Settings, but a person who is logged into an account can also have access to multiple workspaces.
If you look at the upper-left corner of the sidebar on your screen, it will show you what workspace you are in. Note that at this point, you will be logged into one account, which will have access to one workspace.
When you are looking to download Notion, you can either search for the Notion website to download the app, or you can go through the workspace you are logged into.
When going through the Notion website, there is an option in the menu bar at the top of the screen that says Download, as shown in Figure 1.2:
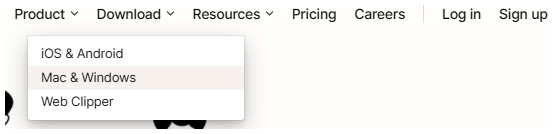
Figure 1.2 – Hover over the options menu for local app download
When hovering over it with the mouse, you are presented with different download options. Once you have clicked on the appropriate option, you can download the app using the App Store or Play Store for mobiles and tablets. You can also download it to the device using the Mac or Windows download options.
Alternatively, if you have Notion open on your PC, Mac, or laptop device and are logged into a workspace, you can navigate to the upper-left corner and open the workspace menu. At the bottom of the menu, you will see three options: Add another account, Log out all, and Get Mac/Windows app. When you click on the Get Windows app button, it will take you to the same page on the website, giving you the relevant download button.
Once you have started the download, your system will start downloading Notion to your local device. The application will be stored on the device you are downloading it to, which can take up the system's memory. If the device memory is low, the download might fail, or your device might decrease in speed, so checking the system memory before downloading would be wise.
If you are on a mobile or tablet device, the first option to go through the Notion website is still available, but if you were to log into your account through a browser, it would give you another option to download Notion from the App Store or Play Store, depending on the device you are using.
Alternatively, if you are on your mobile, you could navigate directly to the App Store if you are on iOS or Play Store if you are on Android. Then, you can search for Notion, which should show a result with the same icon as the PC/Mac app, and an app saying made by Notion Labs, inc should appear. Click Install and then open the app on your device.
Irrespective of the device or system you have downloaded the app on, you will then come to a sign-in page that is consistent across all devices. You can sign in through Google, using that email account, sign in through Apple, using that email account, or continue with email, giving you the option to type in an email account. To gain access to the same account you created on the PC, Mac, or laptop, the email address needs to be the same when you sign in, as that is the account it will log you in as.
When you are on your PC, Mac, or laptop device, look over to the upper-right corner of the screen. There will be a three-dot menu that you can click on, giving you a drop-down list of options. About halfway down the list, there will be an Open in Windows app option on Windows or an Open in Mac app option on Mac. After you have downloaded Notion to your system, this will then open your workspace page in the local Notion app.
At this point, you can have your Notion account logged into multiple devices that are all synced together. Personally, I would add a shortcut to Notion on my PC so that I can easily access it from my taskbar and move the Notion app on my devices to a more action-focused location; for example, on mobile, having it on my front page, and the same for the tablet.
Using Notion on multiple devices
In this section, we will go through some of the viewing and functional differences between various devices. There are some actions that you can perform on some devices that are, at the time of writing this, unavailable on other devices. This could impact how you format your pages, build out your workspace, and navigate through the app.
PC, Mac, or laptop
Using a PC, Mac, or laptop will give you the most functionality and flexibility in terms of what you can do with the app. Notion was first built for desktop use, with the mobile and tablet apps being developed later.
When viewing Notion on your screen, you should see the active workspace screen. It includes the active page in the middle, a navigation sidebar on the left-hand side, some options in the upper-right corner for sharing alongside an action menu, and the help button in the lower-right corner of the screen, as shown in Figure 1.3:
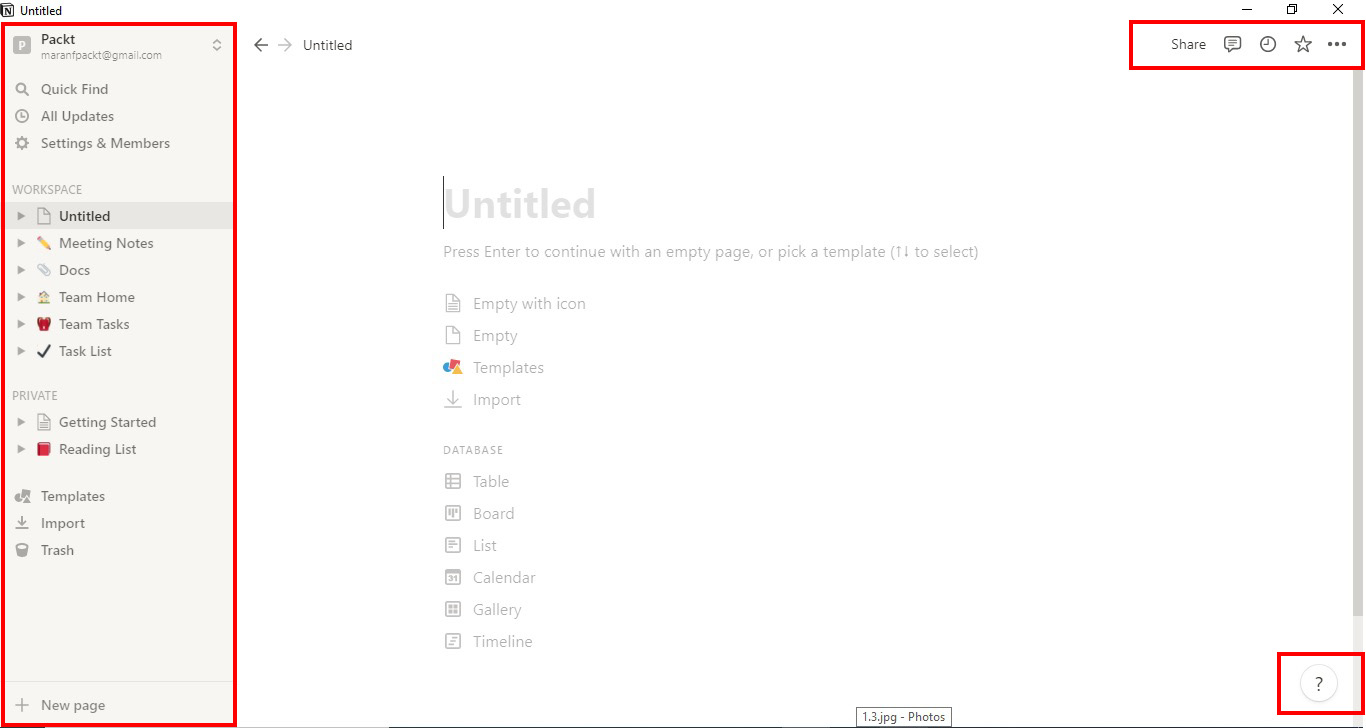
Figure 1.3 – The workspace home screen for a PC, Mac, or laptop
The sidebar on the left-hand side can be toggled off so that it doesn't show or fill up space. This can be done by clicking the option at the top of the sidebar, as shown in Figure 1.4, or using the Ctrl + \ keyboard shortcut:
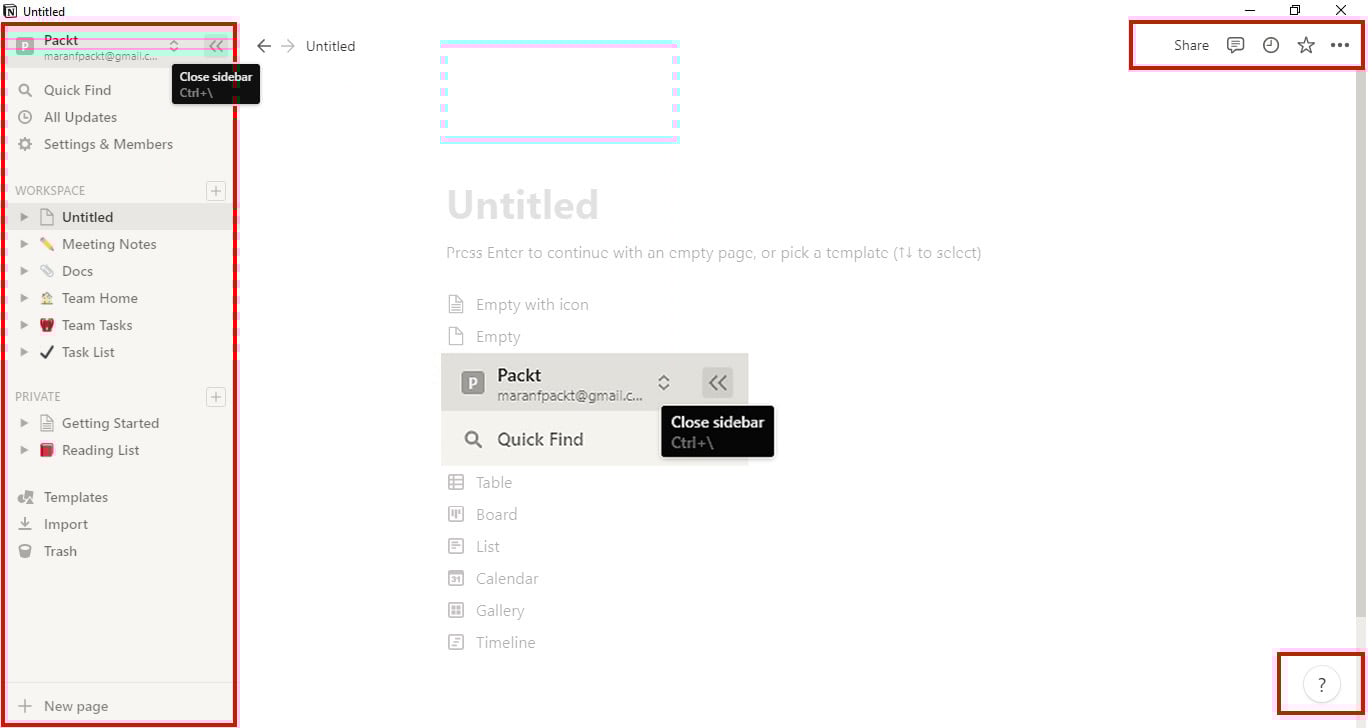
Figure 1.4 – Closing the left-hand sidebar option on a PC, Mac, or laptop
When you are interacting with the blocks inside the application (note that blocks will be explained further in Chapter 4, All the Building Blocks), there are a few options to choose from.
You can either click into the block to add text, interact with the embedded media, or trigger a block action. You could click on the six-dot option at the side of the block, giving you a drop-down menu of actions to apply to the block. Or you could click outside of a block, drag your mouse over the intended blocks you want to interact with, and then use the six-dot option or the Ctrl + / shortcut to make any changes.
While on a PC, Mac, or tablet, the only way to move a block is to click and hold the six-dot option, as highlighted in Figure 1.5. Then, drag the block to the desired location.
Note
This could create columns, which will be covered further in Chapter 4. All the Building Blocks.

Figure 1.5 – The six-dot option next to a single block
The location of the breadcrumb, which, in Notion, refers to the file tree that shows what page or database the currently active page has gone through, is at the top of the active page just like on all other devices; note that workspace navigation is covered in further detail in Chapter 2, Workspace Navigation, Sharing, and Appearance.
Tablet
When viewing Notion on a tablet or iPad screen, the layout will be different. Instead of there being a left-hand sidebar, there is a button to open the sidebar for navigation located in the upper-left corner of the screen, as highlighted in Figure 1.6.
The sharing and action options are still in the upper-right corner of the screen, but the share options are in the box and arrow icon menu, and the action options are in the three-dot menu.
At the bottom of the screen, there is the quick search, notification bell, and new page shortcut, which have been taken out of the sidebar from the PC, Mac, or laptop workspace view. In addition to this, there are undo and redo arrows in the lower-right corner of the screen.
On the main working page, there are additional options to add a template to the page, which will be covered further in Chapter 3, Templates, Imports, Account Settings, and Workspace Settings:
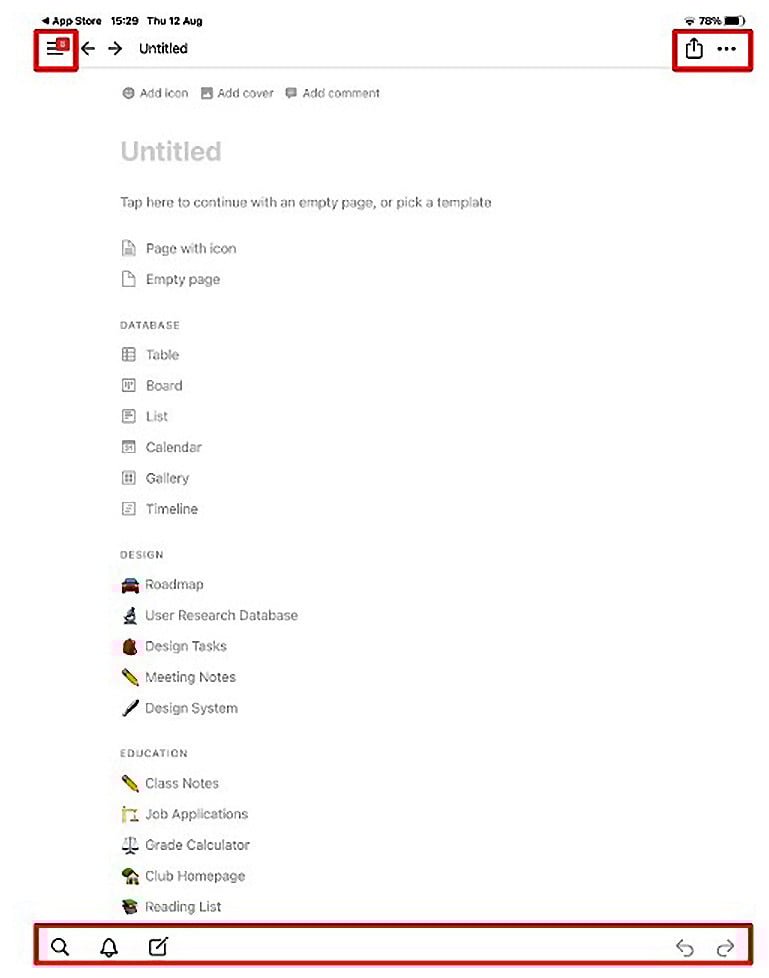
Figure 1.6 – The workspace home screen for the iPad
Unlike the PC, Mac, or laptop view, interacting with blocks doesn't rely on mouse movements or clicks. To add a block, a line of text, or to trigger a block action, you need to click on an active text block on the page to bring up the toolbar or the six-dot menu, as shown in Figure 1.7:
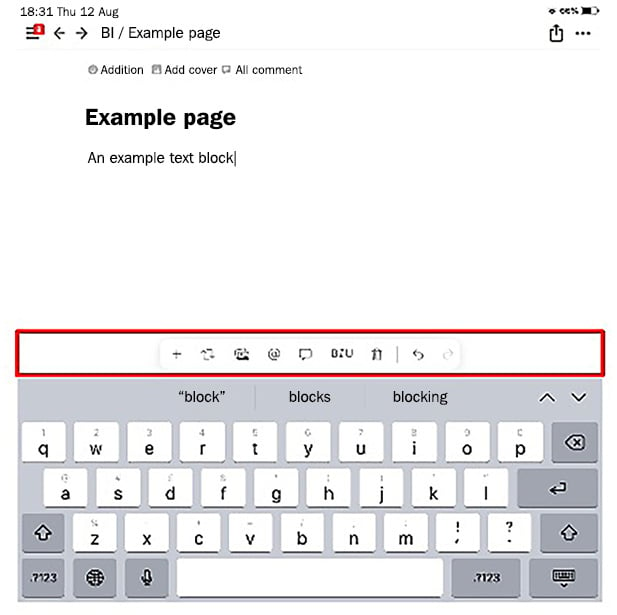
Figure 1.7 – The tablet/iPad toolbar location
To move a block on the tablet or iPad, you need to tap on the block, click on the six-dot option to highlight the block, click off the menu when it appears, then hold the screen on the block with your finger. Finally, you can move it to the desired location.
At the time of writing this book, there is no way to create columns inside a page on the tablet or iPad versions.
Mobile
When viewing Notion on the mobile app, it mimics much of the tablet/iPad workspace view. The sidebar is hidden behind the button in the upper-left corner. The share and action options are still in the upper-right corner, with the share options behind the traditional three-dot and two-line icons and the actions behind the three-dot menu. The search box, notifications bell, and new page shortcut are located at the bottom of the screen. However, unlike the tablet/iPad app, there are no undo or redo buttons, as shown in Figure 1.8:
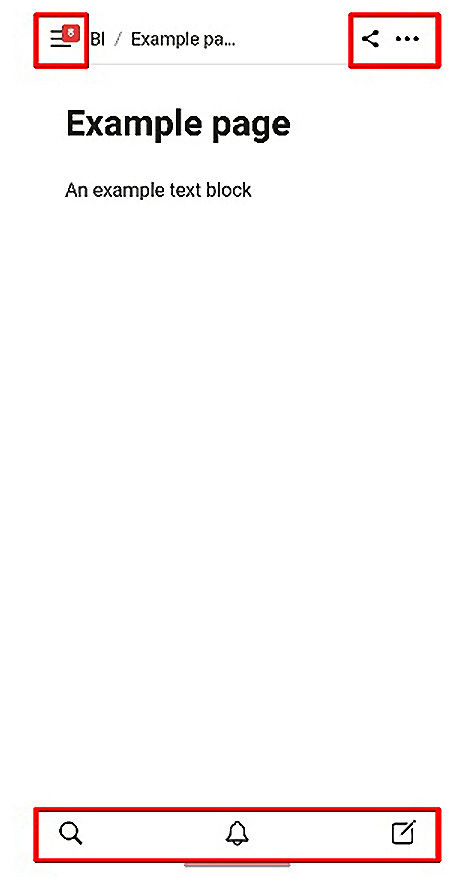
Figure 1.8 – The workspace home screen for mobile
The same can be said for the interaction with blocks on the mobile app. To create a block, go into an active text block on the page by pushing it with your finger to bring up the toolbar. From there, you have access to all the block actions. Similarly, you can move blocks on the mobile app by using the following method:
- Select a block and then select the drop-down menu for the keyboard.
- Then, push and hold on to the desired block and move it up and down.
At this point in Notion, there is no way to make columns on a mobile device.
Summary
In summary, before you can access the application, you need to make an account using your preferred email address, which can receive updates and notifications. To access that account on multiple devices, a download of the app needs to be completed per device. Then, you can log in to the account using the same email and password. Despite Notion being available on all of the main devices, such as PC, Mac, laptop, mobile, and tablet/iPad, the flexibility, usability, and available features are better suited for PC, Mac, and laptop devices.
Now that the account and workspace have been created, we need to gain an understanding of how to navigate around the workspace so that we know where data and information are stored. Additionally, we need to gain an understanding of the main actions that are available when working within the Notion app.