


The first thing we need to do with ElasticSearch is install it. As with many applications, you start with the installation and configuration, usually forgetting about the importance of those steps until something bad happens. In this chapter we will focus quite extensively on this part of ElasticSearch. Be advised that this chapter is not a definitive guide to every configuration option and parameter. Of course, we would like to describe them all, but if we did that we would have to write a book that is twice (or even more) the size of the one you are holding in your hands! In addition to that, ElasticSearch is like all the other software applications available today—it evolves every day and keeps changing. We will cover only what we feel is commonly required, as well as specific functionalities that are sometimes hard to understand or those that are so wide that having them described in a single place would save you some time. By the end of this chapter, you will have learned the following:
The basic concepts of ElasticSearch
How to install and configure your Cluster
Using the ElasticSearch REST API
How to create an index
How to configure your mappings
How to use dynamic mappings
What a template is and how to use it
What routing is and how to use it
How to use index aliasing
ElasticSearch is an open source search server project started by Shay Banon and published in February 2010. The project grew into a major player in the field of search solutions. Additionally, due to its distributed nature and real-time abilities, many people use it as a document database. Let's go through the basic concepts of ElasticSearch
An index is the place where ElasticSearch stores data. If you come from the relational database world, you can think of an index like a table. But in contrast to a relational database, the table values stored in an index are prepared for fast and efficient full-text searching and in particular, do not have to store the original values. If you know MongoDB, you can think of the ElasticSearch index as being like a collection in MongoDB; and if you are familiar with CouchDB you can think about an index as you would about the CouchDB database.
The main entity stored in ElasticSearch is a document. In an analogy to relational databases, a document is a row of data in a database table. Comparing an ElasticSearch document to a MongoDB one, both can have different structures, but the one in ElasticSearch needs to have the same types for common fields.
Documents consist of fields (row columns), but each field may occur several times and such a field is called multivalued. Each field has a type (text, number, date, and so on). Field types can also be complex—a field can contain other subdocuments or arrays. The field type is important for ElasticSearch—it gives the search engine information about how various operations such as comparison or sorting should be performed. Fortunately, this can be determined automatically. Unlike relational databases, documents don't need to have a fixed structure; every document may have a different set of fields and in addition to that, the fields don't have to be known during application development. Of course, one can force a document structure with the use of schema.
In ElasticSearch, one index can store many objects with different purposes. For example, a blog application can store articles and comments. Document type lets us easily differentiate these objects. It is worth noting that practically every document can have a different structure; but in real operations, dividing it into types significantly helps in data manipulation. Of course, one needs to keep the limitations in mind. One such limitation is that the different document types can't set different types for the same property.
ElasticSearch can work as a standalone, single-search server. Nevertheless, to be able to process large sets of data and to achieve fault tolerance, ElasticSearch can be run on many cooperating servers. Collectively, these servers are called a cluster and each of them is called a node. Large amounts of data can be split across many nodes via index sharding (splitting it into smaller individual parts). Better availability and performance are achieved through the replicas (copies of index parts).
When we have a large number of documents, we can come to a point where a single node is not enough because of the RAM limitations, hard disk capacity, and so on. The other problem is that the desired functionality is so complicated that the server computing power is not sufficient. In such cases, the data can be divided into smaller parts called shards, where each shard is a separate Apache Lucene index. Each shard can be placed on a different server and thus your data can be spread among the clusters. When you query an index that is built from multiple shards, ElasticSearch sends the query to each relevant shard and merges the result in a transparent way so that your application doesn't need to know about shards.
In order to increase query throughput or achieve high availability, shard replicas can be used. The primary shard is used as the place where operations that change the index are directed. A replica is just an exact copy of the primary shard and each shard can have zero or more replicas. When the primary shard is lost (for example, the server holding the shard data is unavailable), a cluster can promote a replica to be the new primary shard.
The first step is to make sure that a Java SE environment is installed properly. ElasticSearch requires Version 6 or later, which can be downloaded from the following location: http://www.oracle.com/technetwork/java/javase/downloads/index.html. You can also use OpenJDK if you wish.
To install ElasticSearch, just download it from http://www.elasticsearch.org/download/ and unpack it. Choose the lastest stable version. That's it! The installation is complete.
The main interface to communicate with ElasticSearch is based on an HTTP protocol and REST. This means that you can even use a web browser for some basic queries and requests; but for anything more sophisticated, you'll need to use additional software, such as the cURL command. If you use the Linux or OS X command, the curl package should already be available. In case you're using Windows, you can download it from http://curl.haxx.se/download.html.
Let's now go to the newly created directory. We can see the following directory structure:
|
Directory |
Description |
|---|---|
|
The scripts needed for running ElasticSearch instances and for plugin management | |
|
The directory where the configuration files are located | |
|
The libraries used by ElasticSearch |
After ElasticSearch starts, it will create the following directories (if they don't exist):
One of the reasons—but of course, not the only one—that ElasticSearch is gaining more and more attention is because getting started with ElasticSearch is quite easy. Because of the reasonable default values and automatics for simple environments, we can skip the configuration and go straight to the next chapter without changing a single line in our configuration files. However, in order to truly understand ElasticSearch, it is worth understanding some of the available settings.
The whole configuration is located in the config directory. We can see two files there: elasticsearch.yml (or elasticsearch.json, which will be used if present) and logging.yml. The first file is responsible for setting the default configuration values for the server. This is important because some of these values can be changed at runtime and be kept as a part of the cluster state, so the values in this file may not be accurate. We will show you how to check the accurate configuration in Chapter 8, Dealing with Problems. The two values that we cannot change at runtime are cluster.name and node.name.
The cluster.name property is responsible for holding the name of our cluster. The cluster name separates different clusters from each other. Nodes configured with the same name will try to form a cluster.
The second value is the instance name. We can leave this parameter undefined. In this case, ElasticSearch automatically chooses a unique name for itself. Note that this name is chosen during every startup, so the name can be different on each restart. Defining the name can help when referring to concrete instances by API or when using monitoring tools to see what is happening to a node during long periods of time and between restarts. If you don't provide a name, ElasticSearch will automatically choose one randomly—so you can have different names given to the same node on each restart. Think about giving descriptive names to your nodes. Other parameters are well commented in the file, so we advise you to look through it; do not worry if you do not understand the explanation. We hope that everything will become clear after reading the next few chapters.
The second file (logging.yml) defines how much information is written to the system logs, defines the log files, and creates new files periodically. Changes in this file are necessary only when you need to adapt to monitoring or back up solutions, or during system debugging.
Let's leave the configuration files for now. An important part of configuration is tuning your operating system. During the indexing, especially when you have many shards and replicas, ElasticSearch will create several files; so the system cannot limit the open file descriptors to less than 32,000. For Linux servers, this can usually be changed in /etc/security/limits.conf and the current value can be displayed using the ulimit command.
The next settings are connected to the memory limit for a single instance. The default values (1024MB) may not be sufficient. If you spot entries with OutOfMemoryError in a log file, set the environment variable ES_HEAP_SIZE to a value greater than 1024. Note that this value shouldn't be set to more than 50 percent of the total physical memory available—the rest can be used as disk cache and it greatly increases the search performance.
Let's run our first instance. Go to the bin directory and run the following command from the command line:
./elasticsearch –f (Linux or OS X)
elasticsearch.bat –f (Windows)
The -f option tells ElasticSearch that the program should not be detached from the console and should be run in the foreground. This allows us to see the diagnostic messages generated by the program and stop it by pressing Ctrl + C. The other option is -p, which tells ElasticSearch that the identifier of the process should be written to the file pointed by this parameter. This can be executed by using additional monitoring software or admin scripts.
Congratulations, we now have our ElasticSearch instance up and running! During its work, a server usually uses two port numbers: one for communication with the REST API by using the HTTP protocol and the second one for the transport module used for communication in a cluster. The default port for the HTTP API is 9200, so we can check the search readiness by pointing a web browser at http://127.0.0.1:9200/. The browser should show a code snippet similar to the following:
Tip
Downloading the example code
You can download the example code files for all Packt books you have purchased from your account at http://www.packtpub.com. If you purchased this book elsewhere, you can visit http://www.packtpub.com/support and register to have the files e-mailed directly to you.
{
  "ok" : true,
  "status" : 200,
  "name" : "Donald Pierce",
  "version" : {
    "number" : "0.20.0"
  },
  "tagline" : "You Know, for Search"
}
The output is structured as a JSON (JavaScript Object Notation ) object. We will use this notation in more complex requests too. If you are not familiar with JSON, please take a minute and read the article available at http://en.wikipedia.org/wiki/JSON.
Note
Note that ElasticSearch is smart. If the default port is not available, the engine binds to the next free port. You can find information about this on the console, during booting:
[2012-09-02 22:45:17,101][INFO ][http] [Red Lotus] bound_address {inet[/0:0:0:0:0:0:0:0%0:9200]}, publish_address {inet[/192.168.1.101:9200]}Note the fragment with [http]. ElasticSearch uses a few ports for various tasks. The interface that we are using is handled by the HTTP module.
Now we will use the cURL program. For example, our query can be executed as follows:
curl –XGET http://127.0.0.1:9200/_cluster/health?pretty
The -X parameter is a request method. The default value is GET (so, in this example, we can omit this parameter). Do not worry about the GET value for now, we will describe it in more detail later in this chapter.
Note the ?pretty parameter. As a standard, the API returns information in a JSON object in which the new line signs are omitted. This parameter forces ElasticSearch to add a new line character to the response, making the response more human-friendly. You can try running the preceding query with and without the ?pretty parameter to see the difference.
ElasticSearch is useful in small and medium-sized applications, but it is built with large installations in mind. So now we will set up our big, two-node cluster. Unpack the ElasticSearch archive in a different directory and run the second instance. If we look into the log, we see something similar to the following:
[2012-09-09 11:23:05,604][INFO ][cluster.service ] [Orbit] detected_master [Bova][fo2dHTS3TlWKlJiDnQOKAg][inet[/192.168.1.101:9300]], added {[Bova][fo2dHTS3TlWKlJiDnQOKAg][inet[/192.168.1.101:9300]],}, reason: zen-disco-receive(from master [[Bova][fo2dHTS3TlWKlJiDnQOKAg][inet[/192.168.1.101:9300]]])This means that our second instance (named Orbit) found the previously running instance (named Bova). ElasticSearch automatically formed a new, two-node cluster.
Even though we expect our cluster (or node) to run flawlessly for a lifetime, we may end up needing to restart it or shut it down properly (for example, for maintenance). There are three ways in which we can shut down ElasticSearch:
If your node is attached to the console (run with the
–foption), just press Ctrl + CThe second option is to kill the server process by sending the TERM signal (see the kill command on the Linux boxes and program manager on Windows)
The third method is to use a REST API
We will focus on the last method now. It allows us to shut down the whole cluster by executing the following command:
curl -XPOST http://localhost:9200/_cluster/nodes/_shutdown
To shut down just a single node, execute the following command:
curl –XPOST http://localhost:9200/_cluster/nodes/BlrmMvBdSKiCeYGsiHijdg/_shutdown
In the previous command line, BlrmMvBdSKiCeYGsiHijdg is the identifier for a given node. The former may be read from ElasticSearch logs or from another API call:
curl -XGET http://localhost:9200/_cluster/nodes/
Running an instance in the foreground using the –f option is comfortable for testing or development. In the real world, an instance should be managed by the operating system tools; it should start automatically during system boot and close correctly when the system is shut down. This is simple when using a system like Linux Debian. ElasticSearch has the deb archive available with all the necessary scripts. If you don't use the deb archive, you can always use the ElasticSearch service wrapper (https://github.com/elasticsearch/elasticsearch-servicewrapper), which provides all the needed startup scripts.
ElasticSearch REST API can be used for various tasks. Thanks to it, we can manage indexes, change instance parameters, check nodes and cluster status, index data, and search it. But for now, we will concentrate on using the CRUD (create-retrieve-update-delete ) part of the API, which allows us to use ElasticSearch in a similar way to how you would use a NoSQL database.
Before moving on to a description of various operations, a few words about REST itself. In a REST-like architecture, every request is directed to a concrete object indicated by the path part of the address. For example, if /books/ is a reference to a list of books in our library, /books/1 is a reference to the book with the identifier 1. Note that these objects can be nested. /books/1/chapter/6 is the sixth chapter in the first book in the library, and so on. We have the subject of our API call. What about an operation that we would like to execute, such as GET or POST? To indicate that, request types are used. An HTTP protocol gives us quite a long list of request types to use as verbs in the API calls. Logical choices are GET in order to obtain the current state of the requested object, POST for changing the object state, PUT for object creation, and DELETE for destroying an object. There is also a HEAD request that is only used for fetching the base information about an object.
If we look at the examples of the operations discussed in the Shutting down ElasticSearch section, everything should make more sense:
GET http://localhost:9000/: Retrieves information about an instance as a wholeGET http://localhost:9200/_cluster/nodes/: Retrieves information about the nodes in an ElasticSearch clusterPOST http://localhost:9200/_cluster/nodes/_shutdown: Sends information to shut down an object in the nodes in a cluster of ElasticSearch
Now we will check how these operations can be used to store, fetch, alter, and delete data from ElasticSearch.
In ElasticSearch, every piece of data has a defined index and type. You can think about an index as a collection of documents or a table in a database. In contrast to database records, documents added to an index have no defined structure and field types. More precisely, a single field has its type defined, but ElasticSearch can do some magic and guess the corresponding type.
Now we will try to index some documents. For our example, let's imagine that we are building some kind of CMS for our blog. One of the entities in this blog is (surprise!) articles. Using the JSON notation, a document can be presented as shown in the following example:
{
  "id": "1",
  "title": "New version of Elastic Search released!",
  "content": "…",
  "priority": 10,
  "tags": ["announce", "elasticsearch", "release"]
}
As we can see, the JSON document contains a set of fields, where each field can have a different form. In our example, we have a number (priority), text (title), and an array of strings (tags). In the next examples, we will show you the other types. As mentioned earlier in this chapter, ElasticSearch can guess these type (because JSON is semi-typed; that is, the numbers are not in quotation marks) and automatically customize the way of storing this data in its internal structures.
Now we want to store this record in the index and make it available for searching. Choosing the index name as blog and type as article, we can do this by executing the following command:
curl -XPUT http://localhost:9200/blog/article/1 -d '{"title": "New version of Elastic Search released!", "content": "...", "tags": ["announce", "elasticsearch", "release"] }'You can notice a new option to cURL, -d. The parameter value of this option is the text that should be used as a request payload—a request body. This way we can send additional information such as a document definition.
Note that the unique identifier is placed in the URL, not in the body. If you omit this identifier, the search returns an error, similar to the following:
No handler found for uri [/blog/article/] and method [PUT]
If everything is correct, the server will answer with a JSON response similar to this:
{
  "ok":true,
  "_index":"blog",
  "_type":"article",
  "_id":"1",
  "_version":1
}
In the preceding reply, ElasticSearch includes information about the status of the operation and shows where the new document was placed. There is information about the document's unique identifier and current version, which will be incremented automatically by ElasticSearch every time the document changes.
In the above example, we've specified the document identifier ourselves. But ElasticSearch can generate this automatically. This seems very handy, but only when an index is the only source of data. If we use a database for storing data and ElasticSearch for full text searching, synchronization of this data will be hindered unless the generated identifier is stored in the database as well. Generation of a unique key can be achieved by using the following command:
curl -XPOST http://localhost:9200/blog/article/ -d '{"title": "New version of Elastic Search released!", "content": "...", "tags": ["announce", "elasticsearch", "release"] }'Notice POST instead of PUT. Referring to the previous description of the REST verbs, we wanted to change the list of documents in an index rather than create a new entity, and that's why we used POST instead of PUT. The server should respond with a response similar to the following:
{
  "ok" : true,
  "_index" : "blog",
  "_type" : "article",
  "_id" : "XQmdeSe_RVamFgRHMqcZQg",
  "_version" : 1
}
Note the highlighted line, which has an automatically generated unique identifier.
We already have documents stored in our instance. Now let's try to retrieve them:
curl -XGET http://localhost:9200/blog/article/1
Then the server returns the following response:
{
  "_index" : "blog",
  "_type" : "article",
  "_id" : "1",
  "_version" : 1,
  "exists" : true,
  "_source" : {
  "title": "New version of Elastic Search released!",
  "content": "...",
  "tags": ["announce", "elasticsearch", "release"]
}
In the response, besides index, type, identifier, and version, we also see the information saying that the document was found and the source of this document. If the document is not found, we get a reply as follows:
{
  "_index" : "blog",
  "_type" : "article",
  "_id" : "9999",
  "exists" : false
}
Of course, there is no information about the version and source.
Updating documents in an index is a more complicated task. Internally, ElasticSearch must fetch the document, take its data from the _source field, remove the old document, apply changes, and index it as a new document. ElasticSearch implements this through a script given as a parameter. This allows us to do more sophisticated document transformation than simple field changes. Let's see how it works in a simple case.
After executing the following command:
curl -XPOST http://localhost:9200/blog/article/1/_update -d '{
  "script": "ctx._source.content = \"new content\""
}'
The server replies with the following:
{"ok":true,"_index":"blog","_type":"article","_id":"1","_version":2}It works! To be sure, let's retrieve the current document:
curl -XGET http://localhost:9200/blog/article/1

{
  "_index" : "blog",
  "_type" : "article",
  "_id" : "1",
  "_version" : 2,
  "exists" : true,
  "_source" : {
  "title":"New version of Elastic Search released!",
  "content":"new content",
  "tags":["announce","elasticsearch","release"]}
}
The server changed the contents of our article and the version number for this document. Notice that we didn't have to send the whole document, only the changed parts. But remember that to use the update functionality, we need to use the _source field—we will describe how to use the _source field in the Extending your index structure with additional internal information section in Chapter 3, Extending Your Structure and Search.
There is one more thing about document updates—if your script uses a field value from a document that is to be updated, you can set a value that will be used if the document doesn't have that value present. For example, if you would like to increment the counter field of the document and it is not present, you can use the upsert section in your request to provide the default value that is going to be used. For example:
curl -XPOST http://localhost:9200/blog/article/1/_update -d '{
  "script": "ctx._source.counter += 1",
  "upsert": {
    "counter" : 0
  }
}'
In the preceding example, if the document we are updating doesn't have a value in the counter field, the value of 0 will be used.
We have already seen how to create (PUT) and retrieve (GET) documents. A document can be removed in the similar way but the only difference is in the verb used. Let's execute the following delete command:
curl -XDELETE http://localhost:9200/blog/article/1
{"ok":true,"found":true,"_index":"blog","_type":"article","_id":"1","_version":3}
Now we are able to use the CRUD operations. This lets us create applications using ElasticSearch as a simple key-value store. But this is only the beginning!
So, we have our ElasticSearch cluster up and running and we also know how to use ElasticSearch REST API to index our data, delete it, and retrieve it, although we still don't know the specifics. If you are used to SQL databases, you might know that before you can start putting the data there, you need to create a structure, which will describe what your data looks like. Although ElasticSearch is a schema-less search engine and can figure out the data structure on the fly, we think that controlling the structure and thus defining it ourselves is a better way. In the following few pages, you'll see how to create new indexes (and how to delete them) and how to create mappings that suit your needs and match your data structure.
Note
Please note that we didn't include all the information about the available types in this chapter and some features of ElasticSearch (such as nested type, parent-child handling, geographical points storing, and search) are described in the following chapters of this book.
An index is a logical structure in ElasticSearch that holds your data. You can imagine it as a database table that has rows and columns. A row is a document we index and a column is a single field in the index. Your ElasticSearch cluster can have many indexes inside it running at the same time. But that's not all. Because a single index is made of shards, it can be scattered across multiple nodes in a single cluster. In addition to that, each shard can have a replica—which is an exact copy of a shard—and is used to throttle search performance as well as for data duplication in case of failures.
All the shards that an index is made up of are, in fact, Apache Lucene indexes, which are divided into types.
In ElasticSearch, a single index can have multiple types of documents indexed—for example, you can store blog posts and blog users inside the same index, but with completely different structures using types.
As we mentioned earlier, although ElasticSearch can do some operations for us, we would like to create the index ourselves. For the purpose of this chapter, we'll use the index named posts to index the blog posts from our blogging platform. Without any more hesitation, we will send the following command to create an index:
curl –XPOST 'http://localhost:9200/posts'
We just told ElasticSearch that is installed on our local machine that we want to create the posts index. If everything goes right, you should see the following response from ElasticSearch:
{"ok":true,"acknowledged":true}But there is a problem; we forgot to provide the mappings, which are responsible for describing the index structure. What can we do? Because we have no data at all, we'll go for the simplest approach—we will just delete the index. To do that, we run a command similar to the preceding one, but instead of using the POST HTTP method, we use DELETE. So the actual command is as follows:
curl –XDELETE 'http://localhost:9200/posts'
And the response is very similar to what we got earlier:
{"ok":true,"acknowledged":true}So now that we know what an index is, how to create it, and how to delete it, let's define the index structure.
The schema mapping—or in short mappings—are used to define the index structure. As you recall, each index can have multiple types; but we will concentrate on a single type for now. We want to index blog posts that can have the following structure:
Unique identifier
Name
Publication date
Contents
So far, so good right? We decided that we want to store our posts in the posts index and so we we'll define the post type to do that. In ElasticSearch, mappings are sent as JSON objects in a file. So, let's create a mappings file that will match the previously mentioned needs—we will call it posts.json. Its contents are as follows:
{
  "mappings": {
    "post": {
      "properties": {
        "id": {"type":"long", "store":"yes",
        "precision_step":"0" },
        "name": {"type":"string", "store":"yes",
        "index":"analyzed" },
        "published": {"type":"date", "store":"yes",
        "precision_step":"0" },
        "contents": {"type":"string", "store":"no",
        "index":"analyzed" }
      }
    }
  }
}
And now to create our posts index with the preceding file, we need to run the following command:
curl -XPOST 'http://localhost:9200/posts' –d @posts.json
@posts.json allows us to tell the cURL command that we want to send the contents of the posts.json file.
And again, if everything goes well, we see the following response:
{"ok":true,"acknowledged":true}We have our index structure and we can index our data, but we will take a pause now; we don't really know what the contents of the posts.json file mean. So let's discuss some details about this file.
As you can see, the contents of the posts.json file are JSON objects and because of that, it starts and ends with curly brackets (if you want to learn more about JSON, please visit http://www.json.org/). All the type definitions inside the mentioned file are nested in the mappings object. Inside the mappings JSON object there can be multiple types defined. In our example, we have a single post type. But for example, if you would also like to include the user type, the file would look as follows:
{
  "mappings": {
    "post": {
      "properties": {
        "id": { "type":"long", "store":"yes",
        "precision_step":"0" },
        "name": { "type":"string", "store":"yes",
        "index":"analyzed" },
        "published": { "type":"date", "store":"yes",
        "precision_step":"0" },
        "contents": { "type":"string", "store":"no",
        "index":"analyzed" }
      }
    },
    "user": {
      "properties": {
        "id": { "type":"long", "store":"yes",
        "precision_step":"0" },
        "name": { "type":"string", "store":"yes",
        "index":"analyzed" }
      }
    }
  }
}
You can see that each type is a JSON object and those are separated from each other by a comma character—like typical JSON structured data.
Each type is defined by a set of properties—fields that are nested inside the properties object. So let's concentrate on a single field now, for example, the name field, whose definition is as follows:
"contents": { "type":"string", "store":"yes", "index":"analyzed" }So it starts with the name of the field, which is contents in the preceding case. After the name of the field, we have an object defining the behavior of the field. Attributes are specific to the types of fields we are using and we will discuss them in the next section. Of course, if you have multiple fields for a single type (which is what we usually have), remember to separate them with a comma character.
Each field type can be specified to a specific core type provided by ElasticSearch. The core types in ElasticSearch are as follows:
String
Number
Date
Boolean
Binary
So now, let's discuss each of the core types available in ElasticSearch and the attributes it provides to define their behavior.
Before continuing with all the core type descriptions I would like to discuss some common attributes that you can use to describe all the types (except for the binary one).
index_name: This is the name of the field that will be stored in the index. If this is not defined, the name will be set to the name of the object that the field is defined with. You'll usually omit this property.index: This can take the valuesanalyzedandno. For the string-based fields, it can also be set tonot_analyzed. If set toanalyzed, the field will be indexed and thus searchable. If set tono, you won't be able to search such a field. The default value isanalyzed. In the case of the string-based fields, there is an additional option—not_analyzed, which says that the field should be indexed but not processed by the analyzer. So, it is written in the index as it was sent to ElasticSearch and only the perfect match will be counted during a search.store: This can take the valuesyesandno, and it specifies if the original value of the field should be written into the index. The default value isno, which means that you can't return that field in the results (although if you use the_sourcefield, you can return the value even if it is not stored), but if you have it indexed you still can search on it.boost: The default value of this attribute is1. Basically, it defines how important the field is inside the document; the higher the boost, the more important are the values in the field.null_value: This attribute specifies a value that should be written into the index if that field is not a part of an indexed document. The default behavior will just omit that field.include_in_all: This attribute specifies if the field should be included in the_allfield. By default, if the_allfield is used, all the fields will be included in it. The_allfield will be described in more detail in Chapter 3, Extending Your Structure and Search.
String is the most basic text type, which allows us to store one or more characters inside it. A sample definition of such a field can be as follows:
"contents" : { "type" : "string", "store" : "no", "index" : "analyzed" }In addition to the common attributes, the following ones can also be set for string-based fields:
term_vector: This can take the valuesno(the default one),yes,with_offsets,with_positions, orwith_positions_offsets. It defines whether the Lucene term vectors should be calculated for that field or not. If you are using highlighting, you will need to calculate term vectors.omit_norms: This can take the valuetrueorfalse. The default value isfalse. When this attribute is set totrue, it disables the Lucene norms calculation for that field (and thus you can't use index-time boosting).omit_term_freq_and_positions: This can take the valuetrueorfalse. The default value isfalse. Set this attribute totrue, if you want to omit term frequency and position calculation during indexing. (Deprecated since ElasticSearch 0.20).index_options: This allows to set indexing options. The possible values aredocswhich affects in number of documents for terms to be indexed, freqs which results in indexing number of documents for terms and term frequencies and positions which results in the previously mentioned two and term positions. The default value isfreqs. (Available since ElasticSearch 0.20.)analyzer: This is the name of the analyzer used for indexing and searching. It defaults to the globally defined analyzer name.index_analyzer: This is the name of the analyzer used for indexing.search_analyzer: This is the name of the analyzer used for processing the part of the query string that is sent to that field.ignore_above: This is the maximum size of the field. The rest of the fields beyond the specified value characters will be ignored. This attribute is useful if we are only interested in the first N characters of the field.
This is the core type that gathers all the numeric field types available to be used. The following types are available in ElasticSearch:
A sample definition of a field based on one of the numeric types can be as follows:
"price" : { "type" : "float", "store" : "yes", "precision_step" : "4" }In addition to the common attributes, the following ones can also be set for the numeric fields:
precision_step: This is the number of terms generated for each value in a field. The lower the value, the higher the number of terms generated, resulting in faster range queries (but a higher index size). The default value is4.ignore_malformed: This can take the valuetrueorfalse. The default value isfalse. It should be set totruein order to omit badly formatted values.
This core type is designed to be used for date indexing. It follows a specific format that can be changed and is stored in UTC by default.
The default date format understood by ElasticSearch is quite universal and allows us to specify the date and optionally the time; for example, 2012-12-24T12:10:22. A sample definition of a field based on the date type can be as follows:
"published" : { "type" : "date", "store" : "yes", "format" : "YYYY-mm-dd" }A sample document that uses the preceding field can be as follows:
{
  "name" : "Sample document",
  "published" : "2012-12-22"
}
In addition to the common attributes, the following ones can also be set for the date type- based fields:
format: This specifies the format of the date. The default value isdateOptionalTime. For a full list of formats, please visit http://www.elasticsearch.org/guide/reference/mapping/date-format.html.precision_step: This specifies the number of terms generated for each value in that field. The lower the value, the higher is the number of terms generated, resulting in faster range queries (but a higher index size). The default value is4.ignore_malformed: This can can take the valuetrueorfalse. The default value isfalse. It should be set totruein order to omit badly formatted values.
This is the core type that is designed to be used for indexing. The Boolean values can be true or false. A sample definition of a field based on the Boolean type can be as follows:
"allowed" : { "type" : "boolean" }The binary field is a BASE64 representation of the binary data stored in the index. You can use it to store data that is normally written in binary form, like images. Fields based on this type are, by default, stored and not indexed. The binary type only supports the index_name property. A sample field definition based on the binary field looks like the following:
"image" : { "type" : "binary" }Sometimes you would like to have the same field values in two fields—for example, one for searching and one for faceting. There is a special type in ElasticSearch—multi_field—that allows us to map several core types into a single field and have them analyzed differently. For example, if we would like to calculate faceting and search on our name field, we could define the following multi_field:
"name": {
  "type": "multi_field",
  "fields": {
    "name": { "type" : "string", "index": "analyzed" },
    "facet": { "type" : "string", "index": "not_analyzed" }
  }
}
The preceding definition will create two fields, one that we could just refer to as name and the second one that we would use as name.facet. Of course, you don't have to specify two separate fields during indexing, a single one named name is enough and ElasticSearch will do the rest.
As we mentioned during the mappings for the fields based on the string type, we can specify the analyzer used. But what is an analyzer? It's a functionality that is used to analyze data or queries in a way we want them to be indexed or searched—for example, when we divide words on the basis of whitespaces and lowercase characters, we don't have to worry about users sending words in lower- or uppercases. ElasticSearch allows us to use different analyzers for index time and during query time, so we can choose how we want our data to be processed in each stage of the search. To use one of the analyzers, we just need to specify its name to the correct property of the field and that's all!
ElasticSearch allows us to use one of the many analyzers defined by default. The following analyzers are available out of the box:
standard: A standard analyzer that is convenient for most European languages (please refer to http://www.elasticsearch.org/guide/reference/index-modules/analysis/standard-analyzer.html for the full list of parameters).simple: An analyzer that splits the provided value on non-letter characters and converts letters to lowercase.whitespace: An analyzer that splits the provided value on the basis of whitespace characters.stop: This is similar to a simple analyzer; but in addition to the simple analyzer functionality, it filters the data on the provided stop words set (please refer to http://www.elasticsearch.org/guide/reference/index-modules/analysis/stop-analyzer.html for the full list of parameters).keyword: This is a very simple analyzer that just passes the provided value. You'll achieve the same by specifying that field asnot_analyzed.pattern: This is an analyzer that allows flexible text separation by the use of regular expressions (please refer to http://www.elasticsearch.org/guide/reference/index-modules/analysis/pattern-analyzer.html for the full list of parameters).language: This is an analyzer that is designed to work with a specific language. The full list of languages supported by this analyzer can be found at http://www.elasticsearch.org/guide/reference/index-modules/analysis/lang-analyzer.html.snowball: Ths is an analyzer similar to the standard one, but in addition, it provides a stemming algorithm (please refer to http://www.elasticsearch.org/guide/reference/index-modules/analysis/snowball-analyzer.html for the full list of parameters).
In addition to the analyzers mentioned previously, ElasticSearch allows us to define new ones. In order to do that, we need to add an additional section to our mappings file, the settings section, which holds the required information for ElasticSearch during index creation. This is how we define our custom settings section:
"settings" : {
  "index" : {
    "analysis": {
      "analyzer": {
        "en": {
          "tokenizer": "standard",
          "filter": [
            "asciifolding",
            "lowercase",
            "ourEnglishFilter"
          ]
        }
      },
      "filter": {
        "ourEnglishFilter": {
          "type": "kstem"
        }
      }
    }
  }
}
As you can see, we specified that we want a new analyzer named en to be present. Each analyzer is built from a single tokenizer and multiple filters. A complete list of default filters and tokenizers can be found at http://www.elasticsearch.org/guide/reference/index-modules/analysis/. As you can see, our en analyzer includes the standard tokenizer and three filters: asciifolding and lowercase—which are available by default—and the ourEnglishFilter, which is a filter that we have defined.
To define a filter, we need to provide its name, its type (the type property), and a number of additional parameters required by that filter type. The full list of filter types available in ElasticSearch can be found at http://www.elasticsearch.org/guide/reference/index-modules/analysis/. That list is changing constantly, so I'll skip commenting on it.
So, the mappings with the analyzer defined would be as follows:
{
  "settings" : {
    "index" : {
      "analysis": {
        "analyzer": {
          "en": {
            "tokenizer": "standard",
            "filter": [
             "asciifolding",
             "lowercase",
             "ourEnglishFilter"
            ]
          }
        },
        "filter": {
          "ourEnglishFilter": {
            "type": "kstem"
          }
        }
      }
    }
  },
  "mappings" : {
    "post" : {
      "properties" : {
        "id": { "type" : "long", "store" : "yes",
        "precision_step" : "0" },
        "name": { "type" : "string", "store" : "yes", "index" :
        "analyzed", "analyzer": "en" }
      }
    }
  }
}An analyzer field (_analyzer) allows us to specify a field value that will be used as the analyzer name for the document to which the field belongs. Imagine that you have some software running that detects the language the document is written in and you store that information in the language field in the document. Additionally, you would like to use that information to choose the right analyzer. To do that, just add the following to your mappings file:
"_analyzer" : {
  "path" : "language"
}
So the whole mappings file could be as follows:
{
  "mappings" : {
    "post" : {
      "_analyzer" : {
        "path" : "language"
      },
      "properties" : {
        "id": { "type" : "long", "store" : "yes",
        "precision_step" : "0" },
        "name": { "type" : "string", "store" : "yes",
        "index" : "analyzed" },
        "language": { "type" : "string", "store" : "yes",
        "index" : "not_analyzed"}
      }
    }
  }
}
However, please be advised that there has to be an analyzer defined with the same name as the value provided in the language field.
There is one more thing we should say about analyzers—the ability to specify the one that should be used by default if no analyzer is defined. This is done in the same way as configuring a custom analyzer in the settings section of the mappings file, but instead of specifying a custom name for the analyzer, the default keyword should be used. So to make our previously defined analyzer default, we can change the en analyzer to the following:
{
  "settings" : {
    "index" : {
      "analysis": {
        "analyzer": {
          "default": {
            "tokenizer": "standard",
            "filter": [
             "asciifolding",
             "lowercase",
             "ourEnglishFilter"
            ]
          }
        },
        "filter": {
          "ourEnglishFilter": {
            "type": "kstem"
          }
        }

    }
}Sometimes, you may not want to store separate fields; instead, you may want to store the whole input JSON document. In fact, ElasticSearch does that by default. If you want to change that behavior and do not want to include the source of the document, you need to disable the _source field. This is as easy as adding the following part to our type definition:
"_source" : {
  "enabled" : false
}
So the whole mappings file would be as follows:
{
  "mappings": {
    "post": {
      "_source": {
        "enabled": false
      },
      "properties": {
        "id": {"type":"long", "store":"yes",
        "precision_step":"0" },
        "name": {"type":"string", "store":"yes",
        "index":"analyzed" },
        "published": {"type":"date", "store":"yes",
        "precision_step":"0" },
        "contents": {"type":"string", "store":"no",
        "index":"analyzed" }
      }
    }
  }
}Sometimes, it's handy to have some of the fields copied into one; instead of searching multiple fields, a general purpose field will be used for searching—for example, when you don't know which fields to search on. By default, ElasticSearch will include the values from all the text fields into the _all field. On the other hand, you may want to disable such behavior. To do that we should add the following part to our type definition:
"_all" : {
  "enabled" : false
}
So the whole mappings file would look like the following:
{
  "mappings": {
    "post": {
      "_all": {
        "enabled": false
      },
      "properties": {
        "id": {"type":"long", "store":"yes",
        "precision_step":"0" },
        "name": {"type":"string", "store":"yes",
        "index":"analyzed" },
        "published": {"type":"date", "store":"yes",
        "precision_step":"0" },
        "contents": {"type":"string", "store":"no",
        "index":"analyzed" }
      }
    }
  }
}
However, please remember that the _all field will increase the size of the index, so it should be disabled if not needed.
The previous topic described how we can define type mapping if the mapping generated automatically by ElasticSearch is not sufficient. Now let's go one step back and see how automatic mapping works. Knowledge about this prevents surprises during development of your applications and let's you build more flexible software. In this second case, if sometimes our application grows and automatically generates new indexes (for example, for storing a massive number of time-based events), it is more convenient to adjust the mechanism of determining the data types. Also, if an application has many indexes, the possibility of defining the mapping templates is very handy.
ElasticSearch can guess the document structure by looking at the JSON, which defines the document. In JSON, strings are surrounded by quotation marks, Booleans are defined using specific words and numbers are just a few digits. This is a simple trick, but it usually works. For the following document:
{
  "field1": 10,
  "field2": "10"
}
field1 will be guessed as a long type, but field2 will be determined as a string. The other numeric types are guessed similarly. Of course, this can be a desired behavior, but sometimes the data source may omit the type information and everything may be presented as strings. The solution to this is enabling more aggressive text checking in the mapping definition. For example, we may do the following during index creation:
curl -XPUT http://localhost:9200/blog/?pretty -d '{
  "mappings" : {
    "article": {
      "numeric_detection" : true
    }
  }
}'
Unfortunately, this problem is also true for the Boolean type and there is no option to force guessing Boolean types from the text. In such cases, when a change of source format is impossible, we can only define the field directly in the mappings definition.
Another type that causes trouble is date. ElasticSearch tries to guess the dates given as timestamps or strings that match the date format. Fortunately, a list of recognized formats can be defined as follows:
curl -XPUT http://localhost:9200/blog/?pretty -d '{
  "mappings" : {
    "article" : {
      "dynamic_date_formats" : ["yyyy-MM-dd hh:mm"]
    }
  }
}
As in the previous example, the preceding command shows the mappings definition during index creation. Analogically, this works in the PUT mapping API call of ElasticSearch. The format of the data definition is determined by the ones used in the joda-time library (visit http://joda-time.sourceforge.net/api-release/org/joda/time/format/DateTimeFormat.html). As you can see, this allows you to adapt to almost any format that can be used in the input document. Note that dynamic_date_format is an array. This means that we can handle several date formats simultaneously.
Now we know how ElasticSearch guesses what is in our document. The important information is that a server can guess that for any new document. Let's check this simple case of how it can deal with changes:
curl -XPUT localhost:9200/objects/obj1/1?pretty -d '{ "field1" : 254}'Now we have a new index called objects with a single document in it—a document with only a single field. This is obviously a number, isn't it? So let's query ElasticSearch and retrieve the automatically generated mappings:
curl -XGET localhost:9200/objects/_mapping?pretty
And the reply is as follows:
{
  "objects" : {
    "obj1" : {
      "properties" : {
        "field1" : {
          "type" : "long",
          "ignore_malformed" : false
        }
      }
    }
  }
}
No surprise here, we got what we expected (more or less). Now let's try something different—the second document with the same field name, but another value:
curl -XPUT localhost:9200/objects/obj1/2?pretty -d '{
 "field1" : "one hundred and seven"
}'
And the reply is as follows:
{
  "error" : "MapperParsingException[Failed to parse [field1]];
  nested: NumberFormatException[For input string:
  \"one hundred and seven\"]; ",
  "status" : 400
}
It doesn't work. ElasticSearch assumes the field1 field as a number, and successive documents must fit into this assumption. To be sure, let's have one more try:
curl -XPUT localhost:9200/objects/obj1/2?pretty -d '{
 "field1" : 12.2
}'
Now that we have tried to index a document with a number, but a number of a different type, it succeeded. If we query for the mappings, we will notice that the type hasn't been changed. ElasticSearch silently changed our value and truncated the fractional part. It's not good, but this can happen when the input data is not so good (it usually isn't) and this is why we sometimes want to turn off automatic mapping generation. Another reason for turning it off is a situation when we don't want to add new fields to an existing index—fields that were not known during application development. To turn off automatic field adding, we can set the dynamic property to false, as follows:
{
  "objects" : {
    "obj1" : {
      "dynamic" : "false",
      "properties" : {
      ...
      }
    }
  }
}Sometimes we want to have the possibility of different type determination dependent on situations such as the field name and type defined in JSON. This is the situation in which dynamic templates can help. Dynamic templates are similar to the usual mappings. Each template has its pattern defined, which is applied to the document's field names. If a field matches the pattern, the template is used. The pattern can be defined in a few ways:
match: The template is used if the name of the field matches the pattern.unmatch: The template is used if the name of the field doesn't match the pattern.
By default, the pattern is very simple and allows us to use the asterisk character. This can be changed by using match_pattern=regexp. After using this option, we can use all the magic provided by regular expressions.
There are variations such as path_match and path_unmatch that can be used to match the names in nested documents.
When writing a target field definition, the following variables can be used:
{name}: The name of the original field found in the input document{dynamic_type}: The type determined from the original document
The last important bit of information is that ElasticSearch checks templates in order of their definitions and the first matching template is applied. This means that the most generic templates (for example, with "match": "*") should be defined at the end. Let's have a look at the following example:
{
  "mappings" : {
    "article" : {
      "dynamic_templates" : [
        {
          "template_test": {
            "match" : "*",
            "mapping" : {
              "type" : "multi_field",
              "fields" : {
                "{name}": { "type" : "{dynamic_type}"},
                "str": {"type" : "string"}
              }
            }
          }
        }
      ]
    }
  }
}
In the preceding example, we defined a mapping for the article type. In this mapping, we have only one dynamic template named template_test. This template is applied for every field in the input document because of the single asterisk pattern. Each field will be treated as a multi_field, consisting of a field named as the original field (for example, title) and the second field with the same name as the original field, suffixed with str (for example, title.str). The first of the created fields will have its type determined by ElasticSearch (with the {dynamic_type} type) and the second field will be a string (because of the string type).
As we have seen earlier in this chapter, the index configuration, and mappings in particular, can be complicated beasts. It would be very nice if there was a possibility of defining one or more mappings once and then using them in every newly created index, without the need to send them every time. ElasticSearch's creators predicted this and included a feature called index templates. Each template defines a pattern, which is compared to the newly created index name. When both match, the values defined in the template are copied to the index structure definition. When multiple templates match with the newly created index name, all of them are applied and values from the later applied templates override those defined in the previously applied templates. This is very convenient, because we can define a few common settings in the more general templates and change them into more specialized ones. Additionally, there is an order parameter, which lets us force desired template ordering. You can think of templates as dynamic mappings, which can be applied not to the types in documents, but to the indexes.
Let's see a real example of a template. Imagine that we want to create several indexes where we don't want to store the source of the documents so that the indexes will be smaller. We also don't need any replicas. The templates can be created by calling ElasticSearch REST API and an example cURL command would be similar to the following:
curl -XPUT http://localhost:9200/_template/main_template?pretty -d '
{
  "template" : "*",
  "order" : 1,
  "settings" : {
    "index.number_of_replicas" : 0
  },
  "mappings" : {
    "_default_" : {
      "_source" : {
        "enabled" : false
      }
    }
  }
}'
From now on, all created indexes will have no replicas and no source stored. Note the _default_ type name in our example. This is a special type name indicating that the current rule should be applied to every document type. The second interesting thing is the order parameter. Lets define the next template with the following command:
curl -XPUT http://localhost:9200/_template/ha_template?pretty -d '
{
  "template" : "ha_*",
  "order" : 10,
  "settings" : {
    "index.number_of_replicas" : 5
  }
}'
All new indexes will behave as before except the ones with the names beginning with ha_. In this case, both the templates are applied. First, the template with the lower order is used and then, the next template overwrites the replicas setting. So, these indexes will have five replicas and disabled source storage.
There is one more important thing about this example. If we try to create a document with five replicas and we have only a single node in the cluster, it will probably fail after some time and display a message similar to the following:
{
  "error" : "UnavailableShardsException[[ha_blog][2] [6] shardIt,
  [1] active : Timeout waiting for [1m], request: index
  {[ha_blog][article][1], source[\n{\n  \"priority\" : 1,\n
  \"title\" : \"Test\"\n}]}]",
  "status" : 503
}
This is because ElasticSearch tries to create multiple copies of each of the shards of which the index is built, but this only makes sense when each of these copies can be placed on different server instances.
Templates can also be stored in files. By default, the files should be placed in the config/templates directory. For example, our ha_template should be placed in the config/templates/ha_template.json file and have the following contents:
{
  "ha_template" : {
    "template" : "ha_*",
    "order" : 10,
    "settings" : {
      "index.number_of_replicas" : 5
    }
  }
}
Note that the structure of the JSON is a little bit different and has the template name as the main object key. The second important thing is that the templates must be placed in every instance of ElasticSearch. Also, the templates defined in the files are not available with the REST API calls.
In this section, we will discuss one of the most powerful control mechanisms that we have in our hands—routing. To be concise, it allows us to choose a shard that will be used to index or search data. It doesn't sound interesting, right? So, before continuing with some use cases I'll try to show you how the standard, distributed search and indexing works in ElasticSearch.
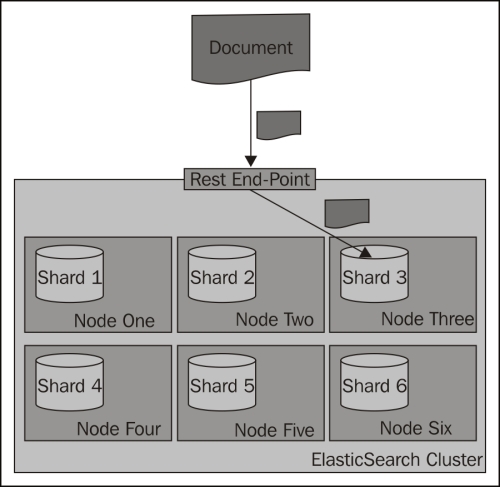
During an index operation, when you send a document for indexing, ElasticSearch looks at its identifier to choose the shard in which the document should be indexed. By default, ElasticSearch calculates the hash value of the document's identifier and on the basis of that, puts the document in one of the available primary shards. Then those documents are redistributed to replicas. The following diagram shows a simple illustration of how indexing works by default:
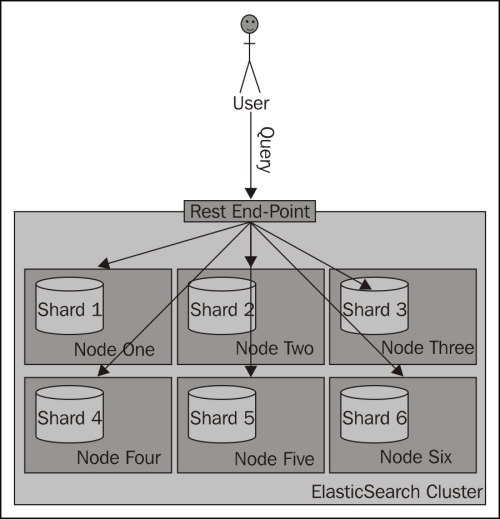
Searching is a bit different from indexing, because in most situations you need to ask all the shards to get the data you are interested in. Imagine the situation when you have the following mappings describing your index:
{
  "mappings" : {
    "post" : {
      "properties" : {
        "id" : { "type" : "long", "store" : "yes",
        "precision_step" : "0" },
        "name" : { "type" : "string", "store" : "yes",
        "index" : "analyzed" },
        "contents" : { "type" : "string", "store" : "no",
        "index" : "analyzed" },
        "userId" : { "type" : "long", "store" : "yes",
        "precision_step" : "0" }
      }
    }
  }
}
As you can see, our index consists of four fields—the identifier (the id field), the name of the document (the name field), the contents of the document (the contents field), and the identifier of the user to which the documents belong (the userId field). To get all the documents for a particular user—one with userId equal to 12—you can run the following query:
curl –XGET 'http://localhost:9200/posts/_search?q=userId:12'
The preceding request is run against the _search endpoint, which allows us to send queries to ElasticSearch. All the queries we send to ElasticSearch will be sent to that endpoint. The following diagram shows a simple illustration of how searching works by default:
What if we could put all the documents for a single user into a single shard and query on that shard? Wouldn't that be performance wise? Yes, that is handy, and that is what routing allows you do to.
Routing can be used to control to which shard your documents and queries will be forwarded. As we have already mentioned, by default, ElasticSearch uses the value of the document's identifier to calculate the hash value, which is then used to place the document in a given shard. With such behavior, all the shards get a similar amount of data indexed and during search all those shards are queried. By now you would probably have guessed that in ElasticSearch you can specify the routing value both at index-time and during querying, and in fact if you decide to specify explicit routing values, you'll probably do that during both indexing and searching.
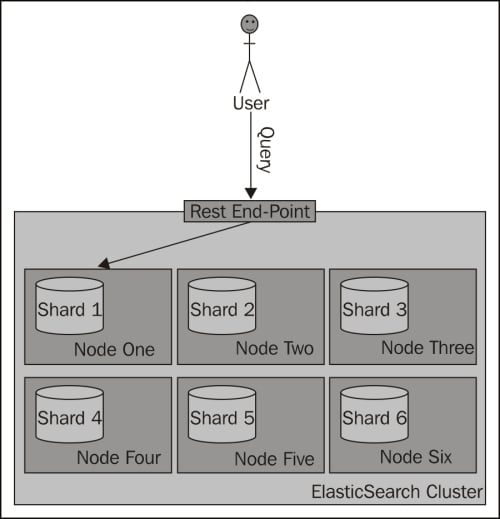
In our case, we would use the userId value to set routing during indexing and the same value during searching. You can imagine that for the same userId value, the same hash value will be calculated and thus all the documents for that particular user will be placed in the same shard. Using the same value during searching will result in searching a single shard instead of the whole index.
Please remember that when using routing, you should still add a filter for the same value as the routing one. This is because you'll probably have more distinct routing values than the number of shards of which your index will be built. Because of that, a few distinct values can point to the same shard; if you were to omit the filtering, you would get data not for a single value you route on, but for all those that reside in a particular shard. The following diagram shows a simple illustration of how searching works with a custom routing value provided:
The simplest way (but not always the most convenient one) to provide routing values is to use the routing parameter. When indexing or querying, you should just add the routing parameter to your HTTP or set it by using the client library of your choice.
So, to index a sample document to the previously shown index, we would use the following command:
curl -XPUT 'http://localhost:9200/posts/post/1?routing=12' -d '{
  "id": "1",
  "name": "Test document",
  "contents": "Test document",
  "userId": "12"
}'
This is what our previous query would look like, if we were to add the routing parameter:
curl –XGET 'http://localhost:9200/posts/_search?routing=12&q=userId:12'
As you can see, the same routing value was used during indexing and querying. We did that because we knew that during indexing we have used the value 12. We wanted to point our query to the same shard, therefore we used exactly the same value.
Please note that you can specify multiple routing values, which should be separated by comma characters. For example, if we want the preceding query to be additionally routed with the use of the section parameter (if such existed) and we also want to filter by this parameter, our query will look like the following:
curl –XGET 'http://localhost:9200/posts/_search?routing=12,6654&q=userId:12+AND+section:6654'
Specifying the routing value with each request that we send to ElasticSearch works, but it is not convenient. In fact, ElasticSearch allows us to define a field whose value will be used as the routing value during indexing, so we only need to provide the routing parameter during querying. To do that, we need to add the following section to our type definition:
"_routing" : {
  "required" : true,
  "path" : "userId"
}
The preceding definition means that the routing value needs to be provided (the "required": true property); without it, an index request will fail. In addition to that we specified the path attribute, which decides which field value of the document will be used as the routing value. In our case, the userId field value will be used. These two parameters mean that each document we send for indexing needs to have the userId field defined. This is convenient, because we can now use batch indexing without the limitation of having all the documents from a single branch using the same routing value (which would be the case with the routing parameter). However, please remember that when using the routing field, ElasticSearch needs to do some additional parsing. Therefore, it's a bit slower than the use of the routing parameter.
After adding the routing part, the whole updated mappings file will be as follows:
{
  "mappings" : {
    "post" : {
      "_routing" : {
        "required" : true,
        "path" : "userId"
      },
      "properties" : {
        "id" : { "type" : "long", "store" : "yes",
        "precision_step" : "0" },
        "name" : { "type" : "string", "store" : "yes",
        "index" : "analyzed" },
        "contents" : { "type" : "string", "store" : "no",
        "index" : "analyzed" },
        "userId" : { "type" : "long", "store" : "yes",
        "precision_step" : "0" }
      }
    }
  }
}When working with multiple indexes in ElasticSearch, you can sometimes lose track of them. Imagine a situation where you store logs in your indexes. Usually, the number of log messages is quite large; therefore, it is a good solution to have the data divided somehow. A quite logical division of such data is obtained by creating a single index for a single day of logs (if you are interested in an open source solution for managing logs, look at Logstash—http://logstash.net). After a while, if we keep all the indexes, we start having problems in understanding which are the newest indexes, which ones should be used, which ones are from the last month, and maybe which data belongs to which client. With the help of aliases, we can change that to work with a single name, just as we would use a single index, but instead work with multiple indexes.
What is an index alias? It's an additional name for one or more indexes that allow(s) us to query indexes with the use of that name. A single alias can have multiple indexes as well as the other way around, a single index can be a part of multiple aliases.
However, please remember that you can't use an alias that has multiple indexes for indexing or real-time GET operations—ElasticSearch will throw an exception if you do that. We can still use an alias that links to only one single index for indexing though. This is because ElasticSearch doesn't know in which index the data should be indexed, or from which index the document should be fetched.
To create an index alias, we need to run an HTTP POST method to the _aliases REST endpoint with an action defined. For example, the following request will create a new alias called week12 that will have indexes named day10, day11, and day12:
curl -XPOST 'http://localhost:9200/_aliases' -d '{
  "actions" : [
    { "add" : { "index" : "day10", "alias" : "week12" } },
    { "add" : { "index" : "day11", "alias" : "week12" } },
    { "add" : { "index" : "day12", "alias" : "week12" } }
  ]
}'
If the alias week12 isn't present in our ElasticSearch cluster, the preceding command will create it. If it is present, the command will just add the specified indexes to it.
If everything goes well, instead of running a search across three indexes as follows:
curl –XGET 'http://localhost:9200/day10,day11,day12/_search?q=test'
We can run it as follows:
curl –XGET 'http://localhost:9200/week12/_search?q=test'
Isn't that better?
Of course, you can also remove indexes from an alias. Doing that is similar to how we add indexes to an alias, but instead of the add command, we use the remove one. For example, to remove the index named day9 from the week12 index, we would run the following command:
curl -XPOST 'http://localhost:9200/_aliases' -d '{
 "actions" : [
    { "remove" : { "index" : "day9", "alias" : "week12" } }
  ]
}'The add and remove commands
can be sent as a single request. For example, if you want to combine all the previously sent commands into a single request, you will have to send the following command:
curl -XPOST 'http://localhost:9200/_aliases' -d '{
  "actions" : [
    { "add" : { "index" : "day10", "alias" : "week12" } },
    { "add" : { "index" : "day11", "alias" : "week12" } },
    { "add" : { "index" : "day12", "alias" : "week12" } },
    { "remove" : { "index" : "day9", "alias" : "week12" } }
  ]
}'In addition to adding or removing indexes to or from aliases, the applications that use ElasticSearch may need to retrieve all the aliases available in the cluster or all the aliases an index is connected to. To retrieve these aliases, we send a request using an HTTP GET command. For example, the following command gets all the aliases for the day10 index and the second one will get all the available aliases:
curl -XGET 'localhost:9200/day10/_aliases'
curl -XGET 'localhost:9200/_aliases'
The response from the second command is as follows:
{
  "day10" : {
    "aliases" : {
      "week12" : { }
    }
  },
  "day11" : {
    "aliases" : {
      "week12" : { }
    }
  },
  "day12" : {
    "aliases" : {
      "week12" : { }
    }
  }
}Aliases can be used in a similar way to how views are used in SQL databases. You can use full Query DSL (discussed in detail in the Queying ElasticSearch section in the next chapter) and have your query applied to all the count, search, delete by query, and more such operations. Let's look at an example. Imagine that we want to have aliases that return data for a certain client, so we can use it in our application. Let's say that the client identifier we are interested in is stored in the clientId field and we are interested in client 12345. So, let's create an alias named client with our data index, which will apply a filter for the clientId automatically:
curl -XPOST 'http://localhost:9200/_aliases' -d '{
  "actions" : [
  {
    "add" : {
      "index" : "data",
      "alias" : "client",
     "filter" : { "term" : { "clientId" : "12345" } }
    }
  } ]
}'
So, when using the preceding alias, you will always get your queries, counts, deletes by query, and more such queries filtered by a term query that ensures that all the documents have the 12345 value in the clientId field.
Similar to the aliases that use filtering, we can add routing values to the aliases. Imagine that we are using routing on the basis of user identifier and we want to use the same routing values with our aliases. For the alias named client, we will use the routing value of 12345,12346,12347 for indexing, and only 12345 for querying. So, we create an alias with the following command:
curl -XPOST 'http://localhost:9200/_aliases' -d '{
  "actions" : [
  {
    "add" : {
      "index" : "data",
      "alias" : "client",
      "index_routing" : "12345,12346,12347"
      "search_routing" : "12345"
    }
  } ]
}'
This way, when we index our data by using the client alias, the values specified by the index_routing property will be used, and during query time, the one specified by the search_routing property will be used.
If you run the following query with the preceding alias:
curl -XGET 'http://localhost:9200/client/_search?q=test&routing=99999,12345'
The value used as a routing value will be 12345. This is because ElasticSearch will take the common values of the
search_routing attribute and the query routing parameter, which in our case is 12345.
In this chapter, we've looked at how to install, configure, and start using the ElasticSearch server. We've also learned how to make use of the default mappings and templates feature of ElasticSearch. We also looked at some of the more advanced topics such as index aliasing and index- and query-time routing.
In the upcoming chapters, we will learn how to query ElasticSearch, what types of queries we can use, and how to filter the results of our queries.
