


Welcome to Drupal 7 Social Networking! During the course of this book we are going to learn how to develop a flexible, powerful, and interesting social networking site using the Content Management System, Drupal 7. We will start by looking at the concepts of social networking, Content Management Systems, and Drupal. Once we are more familiar with the concepts we will install Drupal, look at its features, and see how it works. By using a combination of existing features, modules, themes, and some simple custom development, we will enable user interaction, user contributions, and the ability for our users to communicate with each other.
In this chapter you will learn:
What social networking is
About social networking concepts
What a Content Management System is
What Drupal is
Why Drupal is an excellent platform for Social Networking sites
How to install and configure Drupal
Throughout the book we will use Drupal, and our increasing knowledge of it to develop a site for a fictional project, DinoSpace!—a Social Networking site for keepers of pet dinosaurs.
Social Networks are a relatively new aspect to the Web that are really taking off. Many businesses, organizations, communities, and families are using social networking to promote themselves, communicate better with others, and to engage with their audience.
Social networking relies upon users building up their own network of contacts on the site, which in turn introduces them to new contacts. On many social networking websites, it allows them to be found more easily, and for new contacts to be recommended or introduced, helping to grow the user network.
Let's look at an example of how a user's network of contacts can be built up:

This social network representation shows the connections between contacts. It also illustrates how a user may be able to discover friends of a friend, and friend recommendations (based on friends in common), making it easy for the user to build up their social network, to communicate with new people, or reconnect with lost contacts.
Social networks generally serve two primary functions; firstly they allow users to connect with each other and build a contact network as we have just discussed. However, they also provide a community with collaboration and contribution features, allowing the content and information within the social network to be grown by the users themselves. Later in this chapter we will discuss some of the features available in existing social networks and social networking software, to build up a list of key features we will need to include, as well as things we might like to include.
There is some very compelling business logic to using both existing and custom social networks. Creating your own social network or social network tools gives a dedicated customer area where feedback on products and services can be obtained, for instance, use of support forums to discuss and resolve problems. Areas which allow customers to share tips, resources, and product care tips help promote those products and services.
There are some examples of businesses making great use of existing social networks and their own social networking type websites to improve their businesses. Let's have a look at a few specific examples:
Dell, a popular computer manufacturer, was recently able to attribute $2 million of sales to their Twitter account www.twitter.com/DellOutlet. By regularly posting discounts and discount codes to followers, Dell was able to entice more customers to their online shop to make a purchase. More information is available on the Mashable website: http://mashable.com/2009/06/11/delloutlet-two-million/.
NameCheap is a domain name registrar, and they use Twitter for two purposes. Firstly, they collect and respond to feedback from customers mentioning their company, and more prominently, they run various competitions giving away free domain names. These viral competitions encourage more users to follow them, and promote the competition, therefore increasing their own brand awareness. The NameCheap Twitter account is http://twitter.com/namecheap.
British Telecom uses Twitter to help improve customer service and manage their reputation. You may have seen this used in response to customer complaints to try and assist them with their problems, and escalate matters such as fault testing and engineer call out. This makes them seem more caring (also emphasized by their choice of Twitter username www.twitter.com/BTCare), and increases customer satisfaction by resolving problems more quickly.
While not strictly a social network, Netgear have various social aspects to their website, both through a dedicated community area and the support section of their website. The support section integrates community generated content from their discussion forums, and brings this into product pages, making it easier for customers to find answers to the questions that the staff have not answered directly. Discussion forum software is also quickly becoming social networking software to an extent, in its own right.
There are already a number of popular and powerful social networks available, which we will discuss in a moment, so why would we want to create our own social network? We will want to create a social network for the following reasons:
Provide a service: With the site we are going to create throughout this book we will be providing a service through the exchange of knowledge and information relating to owning pet dinosaurs. Having our own social network provides a fantastic platform for sharing and expanding this knowledge.
Improve business: A social network can allow businesses to interact informally with customers, gathering feedback and in some cases giving value to the customer. One particular instance of this that I have noticed is that radio stations often advertise their websites as social network type websites, where listeners can get in touch, connect with other listeners, request songs, share photographs, and so on.
Improve communications: Communicate with users informally, easily, and cheaply—Drupal can be used for Intranets too and can easily handle group communication functions.
They are fun!: Social networks help break down the barriers of time and distance, and are a good way to meet new people in a relatively safe way. Recent years have also seen an increase in the number of niche social websites focusing on dating and real-world socializing.
Some of the reasons I've just listed still don't answer why we should create our own social network, as opposed to using an existing one. Let's look at some of them in more detail.
There are many ways in which websites and social networks provide additional services which are relevant to the social network or the target audience, though these are often through third-party applications. For example, there are features for both Facebook and LinkedIn which can provide a list of books which a user has read; these link off to book retailers so that more information can be discovered and the books can be purchased. Additionally, some social networks contain knowledge bases of information which can be improved by the user.
With existing social networks, any additional service provided either directly through the social network or through third-party applications and plug-ins would, or could, be restricted in a number of ways. The terms and conditions of the social network would be the main restriction, followed by how the features themselves can be added.
For example, if we wanted to add a map of dinosaur-friendly restaurants to an existing social network, it would rely upon:
Data collection / use provisions with the social networks terms of service
Promotion within that social network, which can be a challenge
Provisions for third party applications, which would most likely limit and restrict the functionality and design
Design and user interface guidelines enforced by the social network
By tapping into the existing user base of established social networks, we can communicate with a new group of users, increasing awareness, and hopefully improving business. One slight flaw with existing social networks is providing extra enhancements.
Taking Facebook as an example, third-party developers create additional features, and embedded them as applications, and some of these applications add business functionality. One example allowed users to book a table at a restaurant. The limitation with using Facebook is that before information is sent to the application, the user is subjected to several dialogs asking for their confirmation. These dialogues are important to prevent abuse, and to ensure user data is used properly, however it is an obstacle for developers. As more and more applications become available, there is more competition for a user's attention, which recently has led to applications requesting users to invite their friends to use it. These mass invitations have the opposite effect, and discourage users from using the applications in question.
With our own social network, the data and functionality would be hosted by ourselves, giving us the freedom to extend the functionality of the social network to help us improve business as we see fit, leading to a more relevant and user friendly social network!
Social networks remove most barriers to communication, such as geographical location (the only barrier which remains is Internet access), and this is the case for both existing and custom Social Networks. The primary advantage over using our own system is that we are less restricted in how we can communicate with users. With existing social networks you must be connected to the user, and restrictions may be imposed over which communication methods you use within the social network, or which external communication details are shown to you.
There are many existing social networks available, some of which are already very popular, and have some excellent features. I'd imagine you have heard of all these before, and more likely use them on a regular basis, but let's take a look at the most prominent features of some of these more popular sites.
Facebook is very much a global social networking website for everyone over the age of 13, starting out for students at Harvard University, branching out to all universities, and now available for everyone. Features available include:
A customizable profile
Users can update their statuses
Users can connect with other users by adding them as "friends"
Statuses of friends can be commented upon and users can indicate that they "like" a particular status
Friends can post messages to each other's profiles
Photos can be posted and shared
Events can be posted and shared, with attendees sending their RSVPs online
Groups can be created and joined, promoting specific activities or interests
Topics can be discussed
Third-party developers can create their own applications for Facebook, to add more to the platform
LinkedIn is a business social networking site which encourages business contacts to connect. Features available on LinkedIn include allowing users to:
Customize their profile
Connect with colleagues
See how users are connected to others
Recommend other users with respect to a job
Integrate Twitter with their account profiles
Create and view business profiles
MySpace is a social networking website used primarily by a younger audience, very popular with bands, particularly because of how many profiles can be customized with HTML, and how music can be embedded within profiles. Features available include:
Customizable profiles, complete with:
HTML customization, allowing users to customize the colors, look, and feel of MySpace
Music integration
The user's current mood
Comments
Groups: small subsets of users
MySpace TV: video sharing
Applications through an API
Forums: for discussions
Polls: to get user opinion
Twitter is a microblogging social networking website, which primarily deals with very short messages of 140 characters or less. Despite this, it has a large number of prominent features, including:
Profiles can be customized, both in terms of colors and background image
Users can update their status
Users can reply to each other's status updates
Users can repost another user's status update, using the ReTweet function
The ease of use and small set of core features have made Twitter very popular.
We are going to create our own social networking website, and to do that, we are going to use Drupal, an Open Source Content Management System (CMS). So, let's look at exactly what a CMS is, and what Drupal is.
Before we look into exactly what a CMS is, let us look at the problem with websites which lead to the need for content management solutions.
Most websites available on the Internet involve a degree of complexity, be it that they are large websites with a lot of content; they may deal with dynamic user interactions, or they may involve a number of different people updating different sections. Even small websites can be complicated to manage, particularly if the design needs changing, or a particular piece of information needs changing on every page.
One of the key features of a content management system is that it separates the design of a website, the content of a website, and the logic or features of the website, making it easy to change any aspect of the website independently without affecting the rest of the website.
The following diagram shows the separation of these key layers, and how, when a visitor to the website requests a page, the content management system takes the design template and takes the content from the database. It combines the two, along with any logic (such as checking to see if the visitor is logged in, in which case it may display a username too) and then sends the result to the visitor's web browser.

Generally, Content Management Systems have the ability for users to:
Create content
Edit, delete, and manage content
Provide and restrict access to content, and the ability to edit the content
Allow multiple users to easily edit and control different areas of a website simultaneously
Separate the design, content, and logic layers of the website
Collaborate effectively
Manage different versions or drafts of content (referred to as revisions in Drupal)
Drupal is a free open source content management system that allows individuals or a community of users to easily publish, manage, and organize a wide variety of content on a website.
The project was started by Dries Buytaert and is now assisted in development with a large community. One particular advantage with Drupal is its modular framework, which allows additional features to be plugged into it, in the form of modules. The Drupal website maintains an extensive list of modules and themes (custom designs) which can be used.
The Drupal website address is drupal.org, and it contains the core Drupal downloads, news and updates related to Drupal, discussion forums and information, and downloads for many of the user contributed modules and themes, which can be downloaded to enhance Drupal.
Because of the way Drupal is structured, it is very flexible to adapt to the needs of a wide range of different websites. Permission to perform various actions such as creating content, writing a comment, writing a blog post, and so on can all be assigned to different roles within Drupal, be it the role of an administrative user or the role of a standard user who is logged in. This means that we can grant the permission to contribute and help manage the content of the website to the users of the website.
Many social-oriented features are included with Drupal "out of the box" (without the need to download extra files or modules) including:
Drupal's modular framework, as mentioned earlier, allows new features to be installed at a later time. There are many modules available designed to enhance Drupal's ability to work and act like a social network. It also means that once our site is up and running, we can easily expand it at a later date with new modules to add extra functionality. Such modules include:
With Drupal being a Content Management System, we also have the advantage that a part of our site could be controlled and managed by us, as is typical with most websites, and other areas can be contributed to by the community.
Drupal isn't the only option available, though since you are reading this book I'd imagine you are planning to use it! It is worth being aware of the alternatives, to ensure that before we start creating our site, we know we are using the right platform to do what we want.
Off-the-shelf products provide quick access to most common features, but their main lacking is in specific customization. One alternative is to create your own social networking website; by rolling your own, you can ensure it functions exactly how you want it to. The downside is the additional development time, technical skills required, and the difficulty in implementing some of the social features which off–the-shelf products have out of the box.
If you want to know more about how you could roll your own social networking site, Packt has a book published on the subject, PHP 5 Social Networking at https://www.packtpub.com/php-create-powerful-dynamic-social-networking-website/book.
Elgg is an open source social networking platform, complete with functionality for setting up profiles, sharing files, adding friends, blogging, aggregating RSS, content tagging, and social graphs. Elgg also has an API allowing developers to extend Elgg by adding additional functionality, as well as a RESTful API to allow other applications to interact with the platform. More information on Elgg is available on their website: http://www.elgg.org/.
There are of course options available which combine using an off-the-shelf system and a custom system, however, these mainly facilitate extending the functionality of the existing social networking platform, or by integrating some of those social aspects with our own website. Such approaches include:
Facebook Applications: Creating applications which are accessed through Facebook's main site, providing additional features to users, for example, a Map of Dinosaur friendly restaurants these are hosted externally, by the developer.
Facebook Connect: Allows websites to interact with Facebook, using it as an authentication protocol, pulling friend data from it, as well as pushing and pulling status updates to and from Facebook.
Google OpenSocial: A set of common APIs which make applications for social networks interoperable with supporting social networking sites. It also enables site developers to integrate the API so that other developers can build applications for that site too.
There are many other social networking engines available for this type of approach, although they are not as common as the ones listed earlier. A simple web search will provide a list of additional engines which we can investigate if we wish.
Throughout this book we are going to be creating our very own social networking website using Drupal; this website is called DinoSpace! and it is aimed at owners of pet dinosaurs (yes, I know, nobody really owns a pet dinosaur…it would be too expensive and impractical) to interact with one another. In particular the website aims to:
Connect owners of pet dinosaurs and allow them to build and maintain friendships with other users
Allow owners to share stories about their pets
Help promote dinosaur-friendly places to visit
Provide interactive help and support to fellow dinosaur owners
Allow owners to chart their activities with their dinosaur
Of course the website needs to enable more than just user to user interactions; it also needs to provide other content, and allow communication between us, the managers of the website, and our users to keep them up to date.
We know what Drupal is, we know what social networking is, and we know what we are going to create with Drupal throughout the course of this book; let's get started! The first thing we need to do is install Drupal. This section contains some detailed technical information regarding the requirements and installation of Drupal.
Note
For most of the book, we will be working with Drupal installed locally on our own computers (see Appendix A, for setting up a development environment if you don't have web server software installed on your own computer). As we build up the site we will then deploy Drupal onto a web server in Chapter 10, Deploying and Maintaining our Social Network.
Provided we used the instructions in Appendix A to set up our development environment, we will already have a suitable development environment which meets the minimum requirements to run Drupal. For reference, or if you are using a custom development environment and want to check if it meets the requirements for Drupal, the minimum requirements are:
A web server:
Apache 2.0 or greater is recommended
PHP 5.2.4 or greater.
Database engine: Either MySQL 5.0.15 (or greater), MariaDB 5.1.44 (or greater), PostgreSQL 8.3 (or greater) or SQLite 3.4.2 (or greater). MySQL is assumed during the course of this book.
To make use of friendly or clean URLs, the
mod_rewritemodule for Apache, and the ability to use.htaccessfiles is required. However, this is optional.PHP's XML extension may be required to utilize certain XML-based services using Drupal. This is also optional.
The Drupal Handbook also has a page on installation and usage requirements; however this page is currently for several versions of Drupal, with accompanying notes, and is marked as requiring an update: http://drupal.org/requirements.
We can download Drupal from the download page, http://drupal.org/download. This page contains download links for Drupal Core, Installation Profiles, Themes, Translations, and Modules. We want to download Drupal core:

Now that we have downloaded a copy of Drupal 7, we need to install it on our local web server, to do that we need to:
Extract the Drupal files
Create a database
Run the Drupal installer
The file we have downloaded is a compressed file containing all of the individual files which make up Drupal. We need to extract this into the web folder in our development environment (see Appendix A) using an unzipping program (such as WinZip, PowerArchiver, or Windows, built in "Compressed folders" system, or the default program for handling compressed files on your computer).
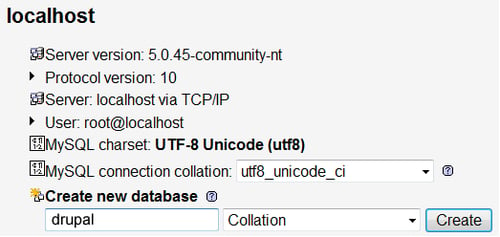
We need a database for Drupal to use to store information such as the website's content, details of our users, settings, and so on. PHPMyAdmin is a web-based tool for administering MySQL databases; most web hosts provide access to it, and we have a copy on our local machine too.
Let's log in to phpMyAdmin and create our database, our local installation is located at http://localhost/phpmyadmin/. We will need to have our database username and password available (see Appendix A, if you are using that development environment). Most of the development environment software, such as WAMP, XAMPP, and so on have a default username of root without a password.
Once logged in, we have the option to create a new database, let's call it drupal, by entering it into the Create new database box:
Now we have our database, we can run the installer; to do that we just need to visit the folder where we extracted Drupal, using our web browser. This should be http://localhost/drupal/.
Since we haven't installed Drupal yet, visiting this page will take us straight to the installer, which initially asks us if we wish to install the Standard (with the most commonly used features pre-configured) or Minimal (with only a few modules enabled) installations.
Select an installation profile: Let's select Standard, and then click the Save and continue button:

Choose a language: Next, we need to select the language we want to install Drupal in. The default download only includes English, though additional languages can be downloaded from
Drupal.org, so we can click the Save and continue button again:
Drupal will then automatically verify the development server against the installation requirements; as we are using a suitable development environment, this won't raise any issues for us.
Database configuration: We are then presented with the Set up database screen where we can enter the name of the database we created earlier,
drupal, and the username and password (working locally, the default WAMP installation gives us a username ofrootwith no password) required to access that database:
Once we have entered that, we again click Save and continue.
Drupal installer: Now the installer gets to work:

Configure the site: The final step in the installation process is for us to provide some basic configuration information, including the Site name, Site e-mail address, details for a maintenance account, server country and time zone, and update notifications.
We need to supply the site name,
DinoSpace!, and e-mail address, so that our site has a name, and all site e-mails come from a site related e-mail address. The site maintenance account will be our initial administrative user account; it is important that we use a secure username and password:
The SERVER SETTINGS indicate the country to be used for the site, and the default time zone for dates and times displayed on the site. Finally, we can select to have our Drupal installation automatically check for updates and send notifications to us:

Once we have completed this page, we click Save and continue.
Installation complete: Our installation is now complete; the final screen confirms this for us, and provides us a link to view the newly installed Drupal site:

If we click that link, we see our new site, and we are automatically logged in:

We will discuss Drupal's administrative options more in Chapter 2, Preparing Drupal for a Social Networking Site; however, now that we have installed Drupal let's look at configuring our installation.
Provided we are logged in as an administrator, the administration bar is at the top of the page, listing the main administrative sections available. Click the Configuration option:

This then presents us with a pop up window overlay within our browser, containing the administration options available:
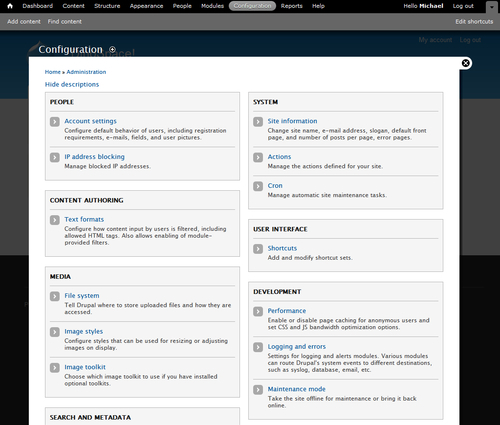
Let's go through these, focusing on the ones important to us for initially configuring our site.
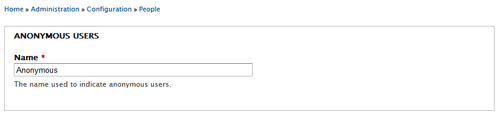
Here the first group of settings is for ANONYMOUS USERS; this has a setting Name, which is the name given to users who have not logged into the site, but who are interacting with the site. Any content that they create will be created under this name. Let's leave this as Anonymous:
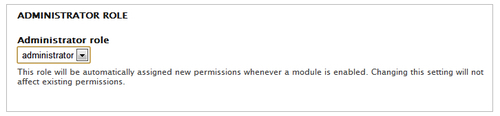
The next group of settings is ADMINISTRATOR ROLE, the role for administrative users. Within Drupal, users have a number of roles within the site (such as administrator, editor, reviewer, and so on) and these roles have various permissions assigned to them. When new modules are installed, the administrator would automatically have full permissions for these modules; by selecting or changing the Administrator role here, we can change which role will automatically receive these permissions when new modules are installed. Let's leave this setting as administrator.
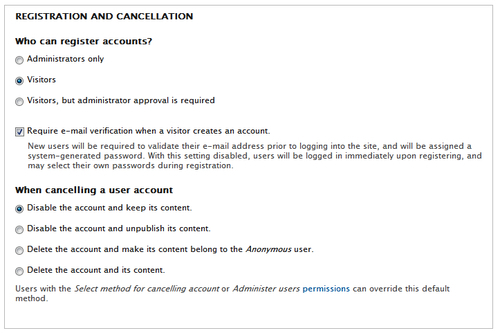
Next we have REGISTRATION AND CANCELLATION, which defines who can register for a user account, if these accounts require e-mail validation, and what happens in the event of an account cancellation. Since we will want lots of visitors to sign up to DinoSpace! we should configure it so that Visitors are selected under Who can register accounts?. To prevent automated SPAM accounts registering and posting SPAM content, we should require all visitors to verify their e-mail account before they are able to log in.
Finally, we should leave it so that when accounts are disabled, the content created by that user is retained on the site. If we changed this, various pages, comments, and discussion posts would be removed when a user cancels their account.
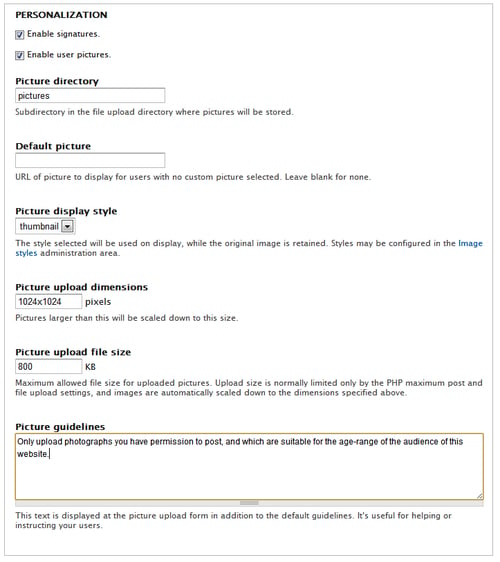
The next section, PERSONALIZATION, allows us to provide some brief personalization options for our users, such as allowing them to upload pictures and use e-mail signatures. Let's enable signatures so that our users can have a custom piece of text added after their posts on the website, and add picture guidelines requesting that our users only upload photos that they are permitted to upload, and that are within the guidelines of our site:
The final group of options here allows us to customize the text of any of the user account related e-mails which Drupal sends out:
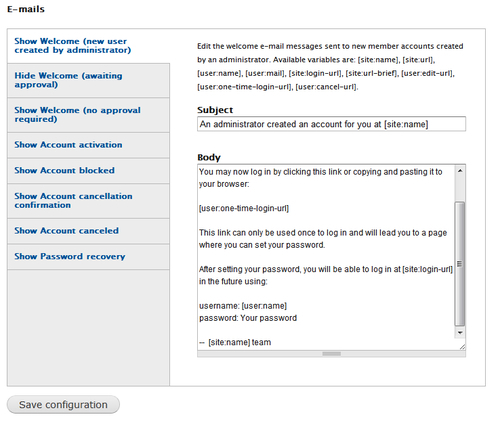
We should leave the e-mail options as they are and click Save configuration.
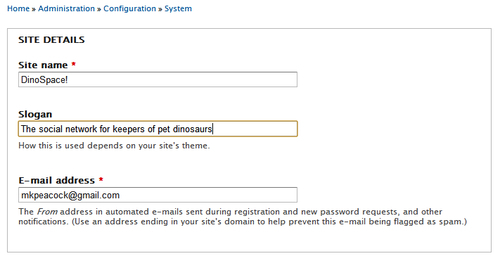
After clicking Save configuration from the e-mail settings, the site information can be found under the Configuration menu. The first group of settings under site information is SITE DETAILS, this includes the Site name and E-mail address, which we set when we installed Drupal, and also the site's slogan, so we need to add that in here:
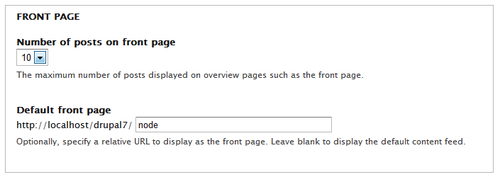
The next group of settings, FRONT PAGE, define which page should act as the front page, and how many posts should be displayed on that page. This isn't something we are ready to change yet, as we don't have any content, so we can leave that as it is:
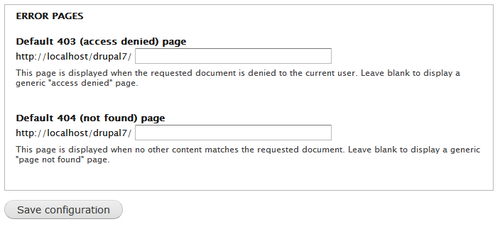
The final group of settings relate to ERROR PAGES, and which pages should be used for the default 403 and 404 error pages. Again, we don't have content in place for these pages, so for now, we should leave them as they are. Once we have created pages to act as the error pages, we simply add the pages' URLs into the appropriate boxes:
The other configuration options are not immediately important to us, however now is a good time for us to take a look at what these settings do.
This setting allows us to list a number of IP addresses, the Internet addresses assigned to computers, which we want to block from using our site. If we find that we are receiving troublesome posts from one particular user or SPAM account, we can block their access to the site. This isn't foolproof, as IP addresses can be spoofed to appear to be different, or the user could request a renewed IP address from their Internet Service Provider.
Certain tasks, such as bulk mailings or search indexing, need to be processed on a regular basis automatically. The cron settings allow us to manually run these tasks, and configure how frequently they should be run.
From here we can configure types of formatting that we wish to enable in our site, and the types of users who are permitted to use that content. For example, allowing users to post full HTML could pose a security risk, and only administrators should be permitted to post that. Other users would be allowed to post a restricted sub-set of HTML tags with their posts.
This section indicates where files are uploaded to, and the servers temporary folder; these are automatically set from the installation process.
This section allows us to group various image effects (resizing, cropping, and so on) together, for use by other features and modules.
By default, since we are using the GD image library, this allows us to set the default image quality for uploaded images; this is a compromise between image quality and file size.
Various options to help with the speed and performance of our site are managed within this section. By default, Drupal caches (keeps its own copy, preventing the need for it to continually lookup or load it) certain information, which keeps things running fast. Sometimes, we may need to turn off caching or clear the cache so that new options and changes we apply (for example, adding a new template) can take effect.
This allows us to define which types of errors should be logged, and how many of these logs should be kept.
This allows us to turn our website off, placing it into maintenance mode, and displaying a message to our users.
This allows us to "map" one web address onto another, for instance, creating a shortcut link to a long URL to promote on marketing materials.
This allows us to enable or disable the use of Clean URLs in our site. Clean URLs convert URLs which make use of the query string (?path=node/) to ones which don't, making them cleaner and more user friendly.
This allows us to customize our default RSS feed, which is a list of publicly visible content that visitors can read through their favorite feed reader.
We have looked into what social networking is, looked at various social networking concepts, and also why we may wish to create a social network. We then looked at Drupal and are now aware of what it is and how it can be used as a social networking platform. Finally, we installed Drupal onto our local development environment, examined the configuration options available, and made some basic configuration changes to the default Drupal installation.
The next stage is to start preparing our site to be a social network!