


Drupal is a free (licensed under the General Public License (GNU), Version 2 or later), community-powered, open-source Content Management System (CMS), which allows creating websites of many types. It's a great tool for both, users with no technical background, as well as top-notch developers, to use it for building complex websites and web applications.
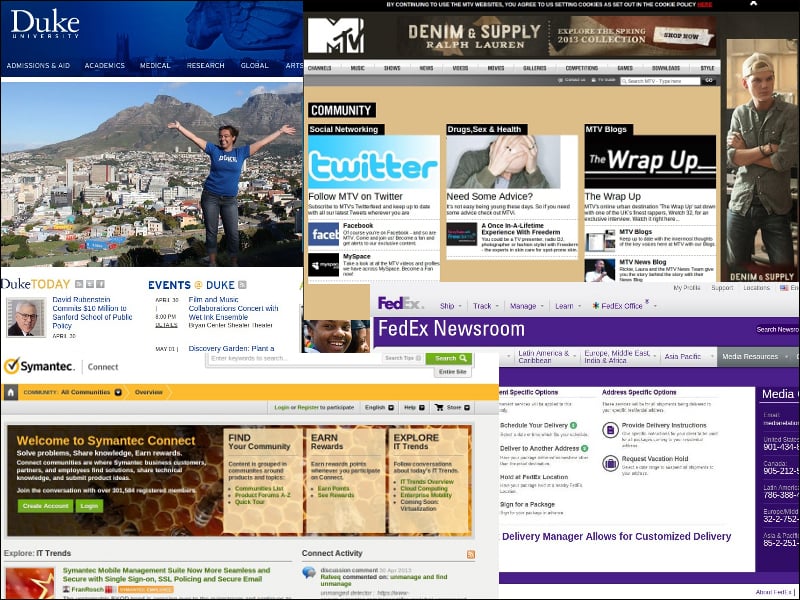
Some examples for popular companies and organizations that decided to leverage Drupal as their content management system are FedEx, Symantec, MTV, and Duke University. The list is long, and you can find out more at http://drupal.org/case-studies or http://www.drupalshowcase.com.
In this chapter, we will cover:
Nodes and Entities
Creating custom content types
Managing fields for content types
Drupal began back in 1999 with Dries Buytaert starting to develop his idea for a forum platform, and has greatly evolved into a leading and award-winning software. Since then, it has seen significant growth. Today, it powers millions of websites and has positioned itself as a candidate at the top of the list for websites and web platform frameworks. Drupal has a company behind it, Acquia, which drives for further cutting-edge development, keeping the pace with the technology trends, and serves as a commercial resource for those requiring professional services.
With almost every release, Drupal has managed to reinvent itself, for both its developer community as well as its users. With Drupal 7, it has even more transformed itself into a Content Management Framework (CMF), by providing many abstractions to what content is and how it is handled. This road is setting the path for a large adoption by developers, to create web applications in many verticals, and has spurred a variety of platform niches from enterprise software, e-learning, and e-commerce, to social networking and collaboration software, to name a few.
Drupal 7's technology stack requires PHP5 (5.2.5 or higher) for the application server; MySQL (5.0.15 or 5.1.30 or higher) as the more favorable option for a database server, and HTML/jQuery for its presentation layer. The choice for this technology has no doubt helped in making it popular and easily deployable for hosting companies.
Being a CMS, in Drupal, most of your website probably will be structured around content. Whether it's managing it or displaying it in different layouts, themes, and views, content will be driving your website. Even more, content may be associated with the business logic about your website, which then defines a behavior based on content. Some examples for that may be, to send an email notification to users when a new content has been created, or to assign a rating system to content, such as five star rating or kudos, so that users can like it and in turn, this content receives higher visibility among your users. The possibilities are endless.
You have probably understood by now that content is very much a generic term for anything. It can be an article or blog if you're planning to run an online news-magazine website, or it may be a message post limited to 140 characters (if you didn't recognize, that's Twitter basically). Content can even be the posting of images by users, aligned in vertical columns with an infinite scroll, or the posting of videos. Throw into that the ability to rate, tag, create a personalized feed, maybe a customized bookmark/playlist too, then some of that special sauce we call social networking, by adding friendships and following the activity of other users in the website, and you've got yourself what we know today as Pinterest and YouTube.
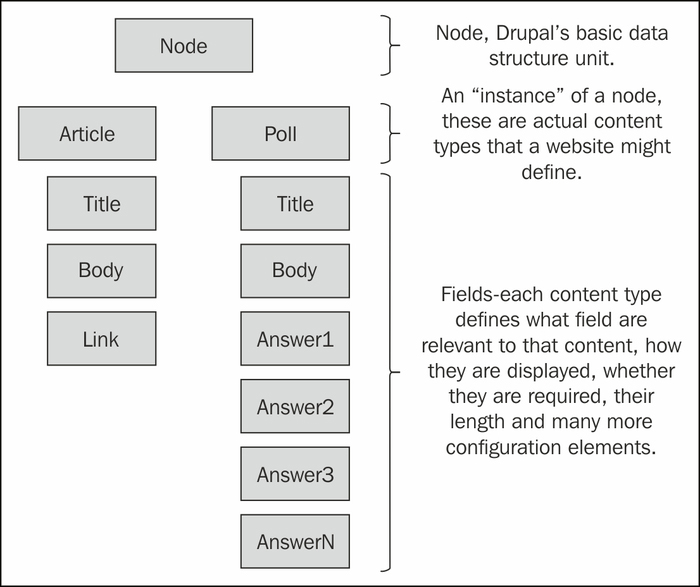
It's been a long time now that the term node has been at the very core of Drupal, so you have probably heard of it by now. As we've seen, content is very abstract and can take on many forms and shapes. Due to that reason, you'll often hear or read that "In Drupal, everything is a node" and that's most often the case. Whether your content is images, blogs, videos, forums, or polls, they all share very common characteristics and can be abstracted as a node.
These attributes of content such as title, body, created and modified time, whether the content may be commented on, and so on, are all pretty common properties across the different content types. And for this reason Drupal considers all these to be of the same nature, and so, to provide more flexibility without limiting the content types, it's simply called a node.
Note
When examining specific content types in detail, it becomes clear that having a specific set of attributes such as Title and Body, is not enough. A Poll type content would require additional fields, such as text fields, which will represent possible answers. Download type content may require a file attachment field, in which a user can upload, and then another user can download. These additional fields have been developed as part of contributed modules, by the community, which answer this exact requirement of adding more fields and field types to nodes than what Drupal provides out of the box. You may have come to known these modules as Content Construction Kit (CCK) and Chaos Tools and many other modules which build upon this field's framework and further enrich content types. We will go into more details soon enough on this.
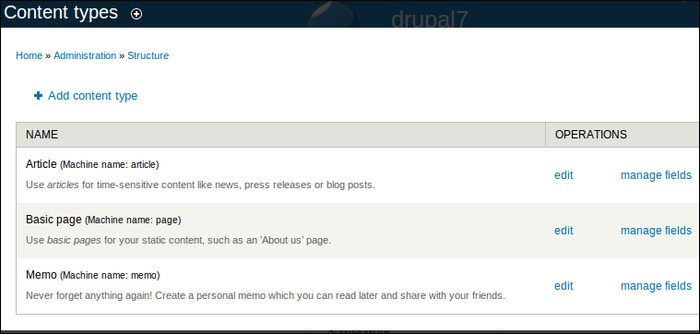
Out of the box, Drupal 7 ships with two basic content types: Article and Basic page.
The Article content type is used for blogs or news item, and as such it features properties such as, a comments area enabled, fields such as images and tags, displaying of the latest added content of this type in the front page. A Basic Page on the other hand doesn't have the comments area display, nor any special fields. Its display doesn't contain any information about the author who created the page and when it was created, but rather just prints the body of the page. It's easier to see the distinction between the two content types, and designing your content type's fields and settings is a very important part of building a website with Drupal.
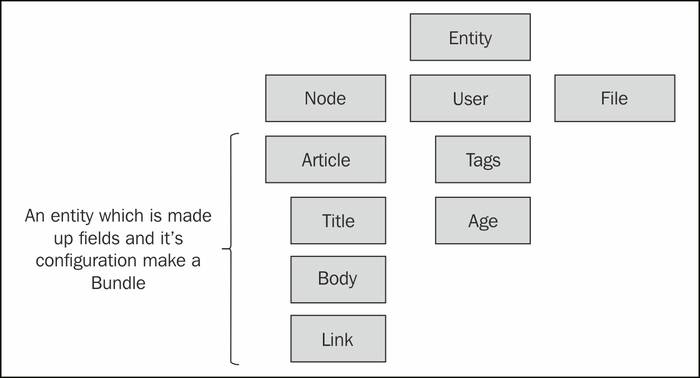
Nodes are Drupal's term for any-kind-of-content, but Drupal 7 has taken a further step in abstraction and possibly coined a new phrase "everything is an entity", when introducing the entity model.
A thought may have triggered in your head when reading about nodes that while many content types are similar, they are definitely not the same. Some may not even require what Drupal would consider as a core field such as a title. This would then result in redundant data and a schema structure that is not very fit for what you had in mind for your content type to be.
To take this further, much inspired from other Object Oriented Design (OOD) concepts, Drupal also figured that it's basic schema for users and other objects such as taxonomy, comments, and so on, may be lacking too, meaning that it may be too strict, and site builders will eventually want to customize and extend those. With this thinking in mind, it has been made clear that nodes are not the only objects to take the even more generalized form of entities. This will rather extend to users and more objects that Drupal has been making extensive use of, for a while now, as its core building block (taxonomy, users, and comments, to name a few).
Note
You may ask yourself what's new about defining entities because if you required your own unique data structure you could easily design the schema for it in your module's install file and decide what fields you need to create the database table that fits your needs. If you choose to go this road then those table fields are almost entirely disconnected from Drupal's built-in hooks system, and you are left on your own to tie them into Drupal's handlers. With Drupal's entity model you get this Drupal-awareness connectivity for free and many aspects of Drupal can then interact with your entities.
Entities allow us to create a common infrastructure across different objects, such as nodes and users. Then, if nodes are able to define a content type such as an article and assign fields to it, this goes the same for the users. This generalization of objects to a common ground provides software developers better maintenance and interoperability, and in result we, site builders, gain more features and powerful tools to customize and create the website as we see fit.
Bundle is the name given for the implementation of an entity type. If we implemented a node entity (meaning, we create a content type) and called it article, assigned some fields to it too, we inherently created a bundle called article. Bundles allow for the grouping of different entity types with their respective fields.
Nodes are not gone nor have they been replaced. For most content types, where it makes sense to treat something as a content rather than an entity, should not be abused and one can definitely build on the node's generic structure design with the envisioned content type and its related fields.
Creating entities is a task which requires defining many properties of it, whether it's fieldable, its basic fields structure, and so on. Sometimes, one would need to create an entity type which Drupal doesn't provide out of the box, like nodes or users, this process is much regarded as "further customization achievable by program code", hence requiring more in-depth knowledge and technical skills, which we will not pursue in the scope of this book.
So far we've introduced the concept behind the entity model, and in specific, the nodes and their content types. Let's proceed by creating a new content type that we'll name Memo for keeping personal notes.
Tip
What's so special about creating digital "stick it" notes? Even the simplest ideas can grow into great applications that can affect our everyday life. Evernote (http://www.evernote.com), which dubbed itself as "remember everything from saving thoughts and ideas, to preserving experiences" is the company behind the popular mobile and web app, for creating and sharing (rich media) notes with your peers, and is valued at an amazing $1B price tag.
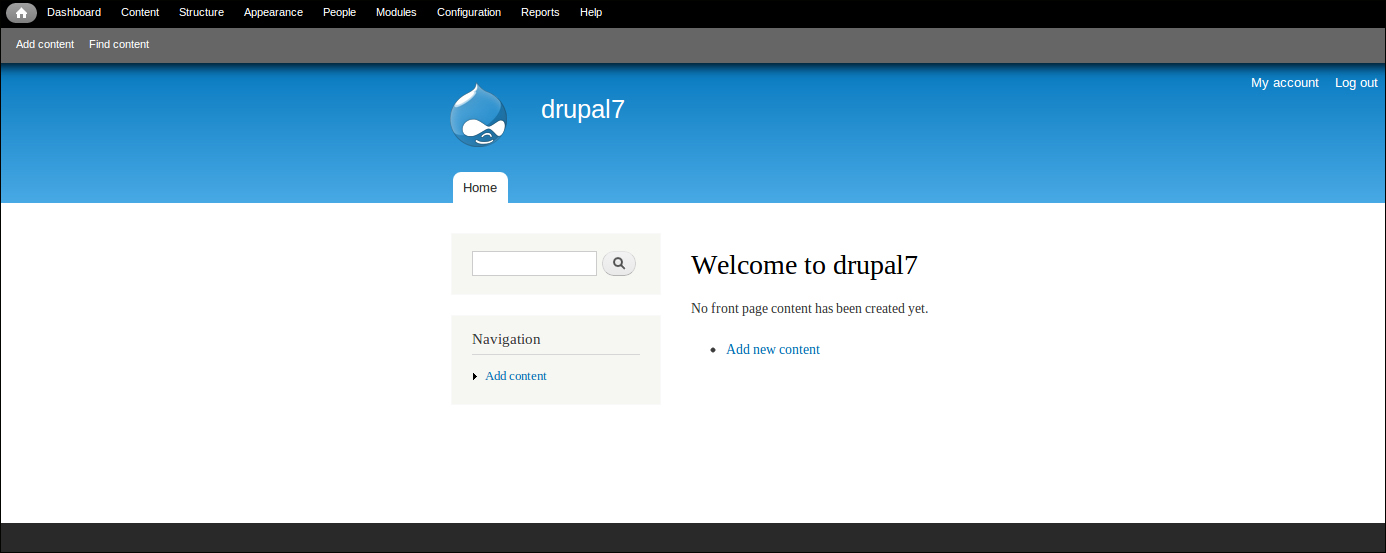
We assume a fresh install of Drupal 7 (7.19 is the version available at the time of writing this book) so the first page should probably look as follows:
Note
When logged in as an administrator user you will see the administration navigation bar at the top in black color. We will often refer to this as the administrative navigation bar, mostly throughout this chapter, since we are just starting out. When otherwise navigation is being described, such as Structure | Content types, it is always referring to the menu items from that administrative navigation bar at the top. For your convenience, we will also often note in parenthesis the direct URL to access the relevant page.
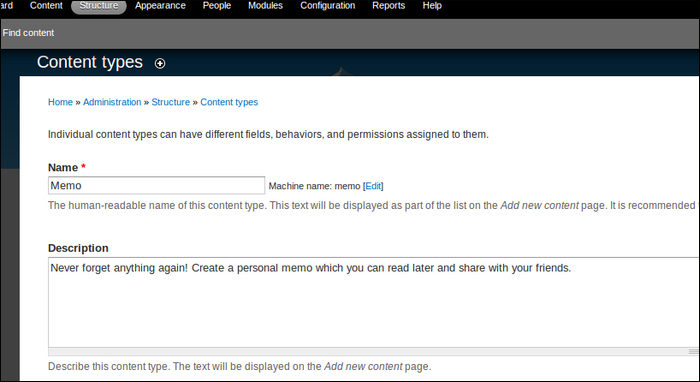
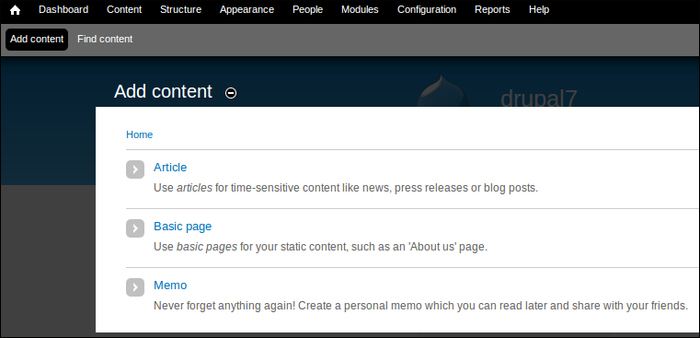
To create the content type we can either make use of the shortcuts present in the page content area (this is the center of the page) or the Navigation block (in the left side of the page). If you are unable to locate neither of these we can use the administrative navigation bar at the top and navigate to Structure | Content types | +Add content type (/admin/structure/types/add).
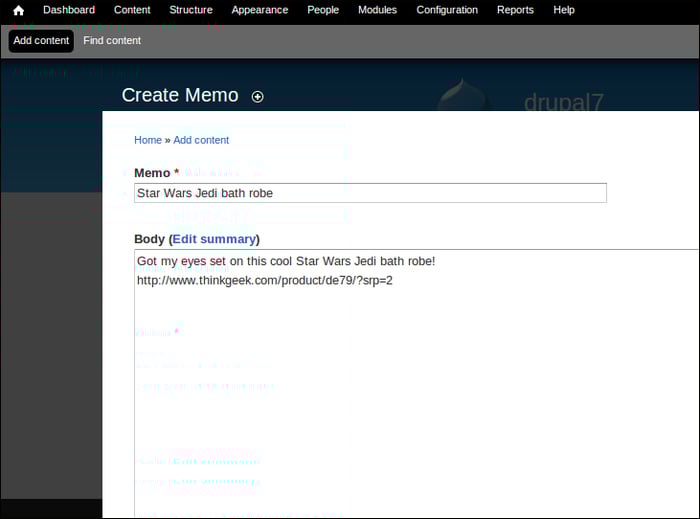
In the new content type page, we'll provide the content type name, Memo, and an optional description.
Tip
It's a better naming convention to use the singular word for a content type. As you can see, Drupal has already modified our title for its internal use, noted by the Machine name field.
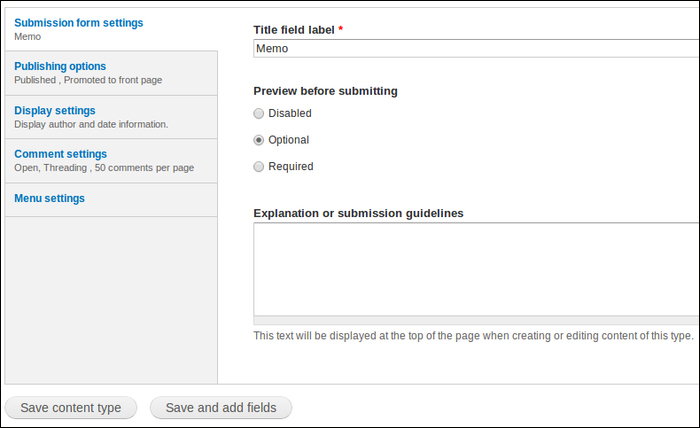
More settings for this content type are available but we'll only customize the Title field name and call it Memo, leave the rest of the default options as they are, which basically are the same as Drupal's built-in Article content type which we described earlier.
Last, we will click on Save content type which saves the settings and submits the form.
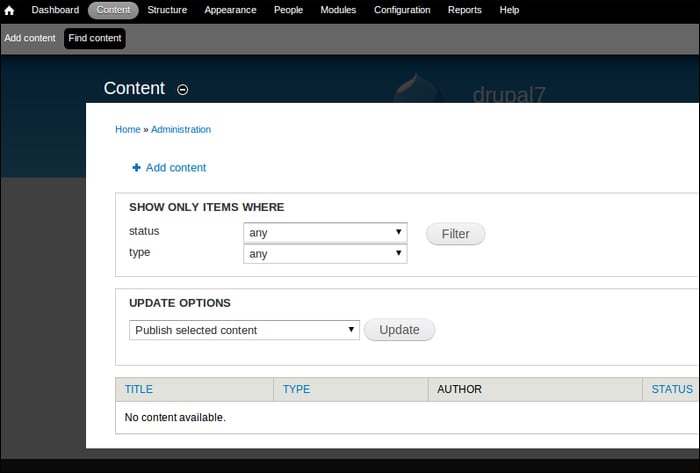
At this point, we have our newly created content type Memo and we can test how it works. We want to add content to the newly created Memo content type, so we will either use the shortcut for Add content, or if they are not present we can use the top administrative bar and navigate to Content | Add content (/node/add).
In addition to Drupal's default content types we see our new Memo content type.
After choosing Memo, we will see the Add content form for creating our specific content type, where we will provide the memo title and a more descriptive body message.
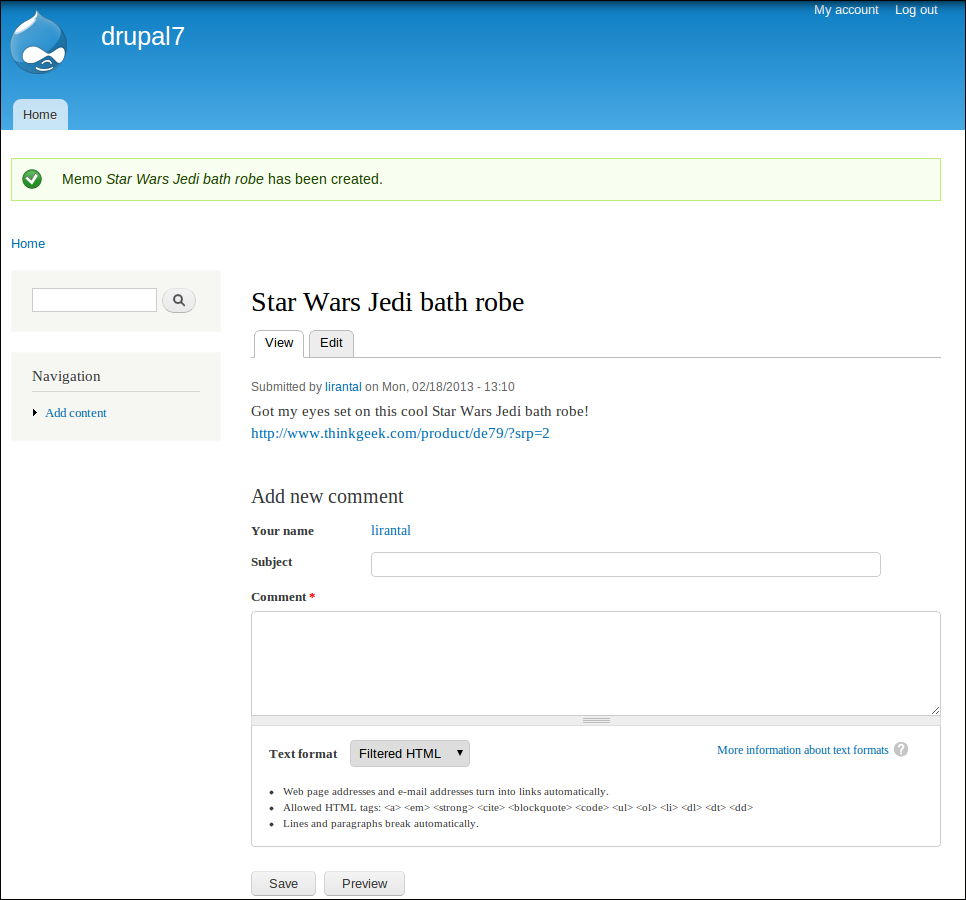
Once finished with the memo we'll hit the Save button to submit and create our new memo.
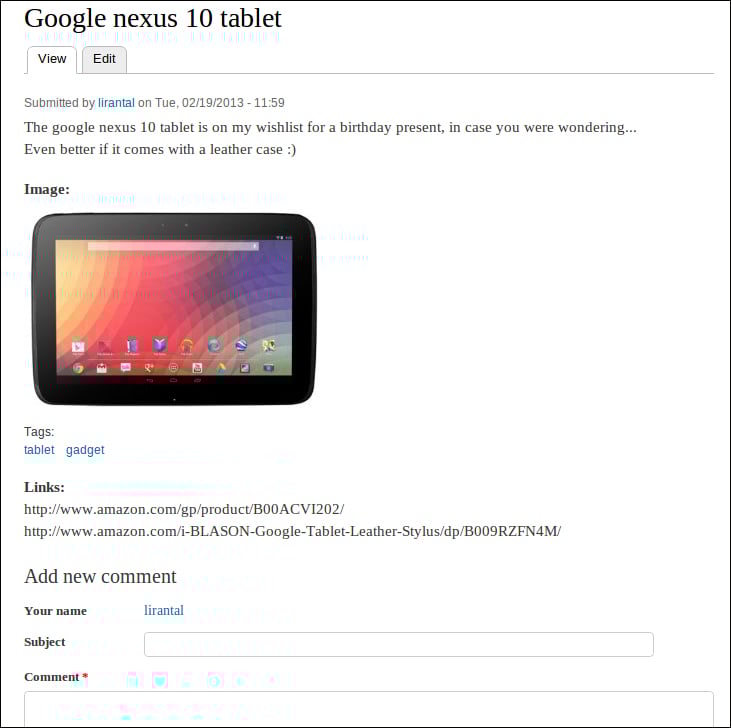
Our memo has been submitted and for logged-in users, it looks as follows:
When looking at the preceding submitted memo, you may realize that there is room for improvements, such as, adding some images would have been more appealing to the eye. Also, it may be nice to have dedicated links field so that we can display them the way that we choose to, like a resources listing of them, at the bottom of the memo.
This brings us to our next topic in this chapter: Fields.
With fields, we can customize our content types to our pleasing, by adding select box dropdowns, file attachments, images, radio buttons, and more. Every content type may have different fields, and once a field has been created it can be used for other content types which greatly ease management of fields, for both the user as well as Drupal's inner working.
Note
We can attach fields to any entity, whether it's a node content type like an Article, or the user entity. As we mentioned before, the grouping of an entity type and its fields create a bundle.
Community powered module, CCK, has really helped revolutionize content types by providing flexible field types, field widgets, validation, and more, in the hands of site builders. This great effort did not go unnoticed from Drupal's core developers and it has been introduced in Drupal 7 as part of its core and the fieldable entity concept.
If you are coming with prior Drupal experience, specifically versions prior to Drupal 7, then you are most probably aware that the need for content types to support additional custom fields is essential. It makes a perfect example for the open source development model of scratching the itch where the contributed set of CCK modules, which introduced the ability to create fields and attach them to Drupal's content types, had found itself being a core component in many Drupal installations, and has long been a great tool in a site builder's arsenal.
Note
Scratching the itch is the #1 guideline of The Cathedral and the Bazaar (http://en.wikipedia.org/wiki/The_Cathedral_and_the_Bazaar) essay, in regards to the development models and methods in open source. This guideline relates to a scenario, where due to a rising need for something that is missing in a piece of software (like a feature, or maybe a bug in the system) a solution is produced in many forms by the community. Whether a developer decides to start his own project to address that requirement, or perhaps contributes a patch to add this requirement, this new functionality was introduced to an "itch" that the said developer had and wanted to fix it.
Let's add some fields to our memo content type.
Using the top administrative bar, navigate to Structure | Content types (/admin/structure/types).
Out of the possible operations we are interested in, is the manage fields option, so we'll click on that for the Memo content type.
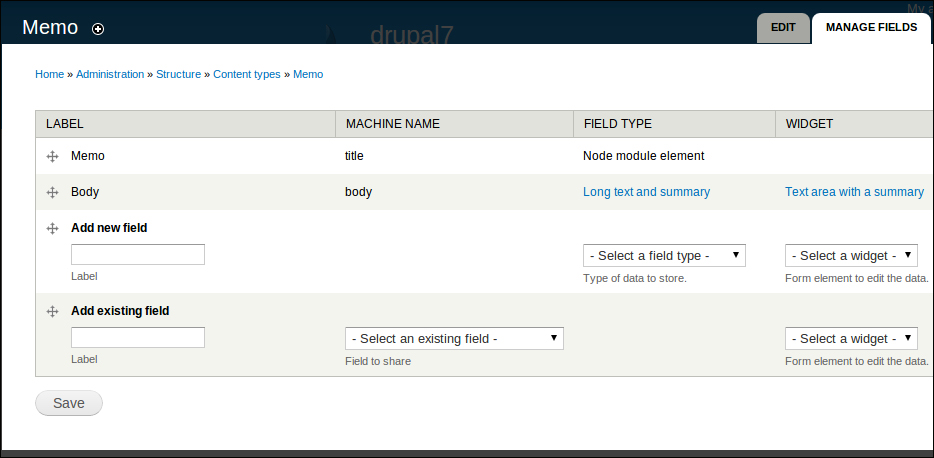
In this page we are now made aware, more than ever, of the fieldability of Drupal's node's content types. The Memo content type that we created has a title and body field (which you can tell by the MACHINE NAME column) and it doesn't come by any surprise as we've already set those when creating it. Yet, notice that the title field is an inherent field that is provided by the node entity, and we can't remove it, unlike the body field which we can customize to our liking, or completely remove it.
Tip
Drupal as a CMS truly has one of the most flexible architecture design and allows developers who are proficient with its internals to really make (almost) anything happen, including making that title field "go away" if required.
Other than the fields already present, we can add fields either by defining a new field type and selecting its widget, or choosing a field type that was already created before, in this case it's Drupal's field_image and field_tags.
We'll continue with adding two more fields for the Memo content type: Images and Tags, and we can utilize the already existing options and set their label, starting with the image field:

After clicking on the Save button, we are presented with the field_image type's settings which we can customize to our needs, some of which are:
Allowed file extensions: By default the permitted file types are .png, .gif, .jpg, and .jpeg.
Maximum upload size: If we want to enforce it so that our hosting space is not abused.
Number of values: By default set to 1, this setting defines how many instances of this field will be allowed. For example, setting it to Unlimited will enable an AJAX user interface for adding more and more images when creating a memo.
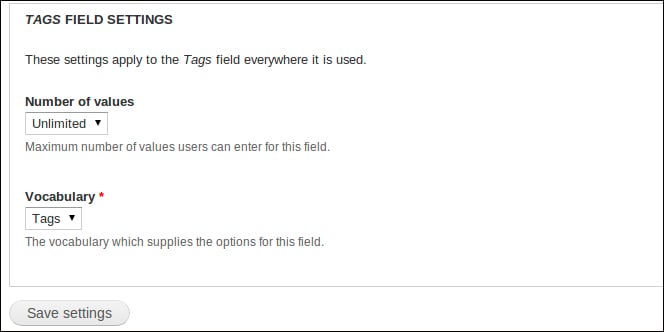
Once you're satisfied with the settings click on Save settings button and we'll continue with adding the second Tags field:

The curious of us will notice that there are several widgets to use, for this field, which define the rendered view for each field when editing content: Autocomplete term widget (tagging), Check boxes / radio buttons, and a Select list. This is where we need to put some thinking, tags (in Drupal this concept is referred to as taxonomy) have characteristics of being free form, and as such may grow to very big sets, which does not scale well with checkbox/radio HTML elements; and it's a very poor User Experience (UX) practice, if utilizing large items for a select box, so the Autocomplete term widget (tagging) option seems to be the most reasonable one, for a widget.
After saving, we're being presented with the FIELD SETTINGS page and we can notice how the settings for this field are very different from the previous image field. One particular setting that is set by default is the Number of values option which is set to Unlimited and it makes some sense with the use of tags as well as with our selection of the autocomplete widget.
Note
Also, notice how the Vocabulary option had also been set by Drupal. A bit on taxonomy in Drupal, also broadly known as Tags, is a core Drupal module which allows you to classify and organize data around your site. When should one use taxonomy, and not a field? When hierarchical structure is required, data needs to be kept as plain text. The vocabulary word comes from the concept of grouping a set of terms (this is what Drupal calls tags) together. Moreover, with the entity model in Drupal, taxonomy is an entity too, like nodes and users, which as you probably guessed right, allows us to attach fields to vocabularies.
Let's add another field to store links that we may want to add in our memos. Since links are really plain text, we can use the Text field type and its default (and only) widget is Text field too.

The default setting of 255 characters length limit is probably enough for most cases, including our purpose of this field for links, so we can leave it like that, and click on Save field settings. After which, we are then presented with the new text field's settings and we should probably change the Number of values option to Unlimited for this field too and click on Save settings.
Observing our new structure for the Memo content type we can see the newly added fields at the bottom of the list.
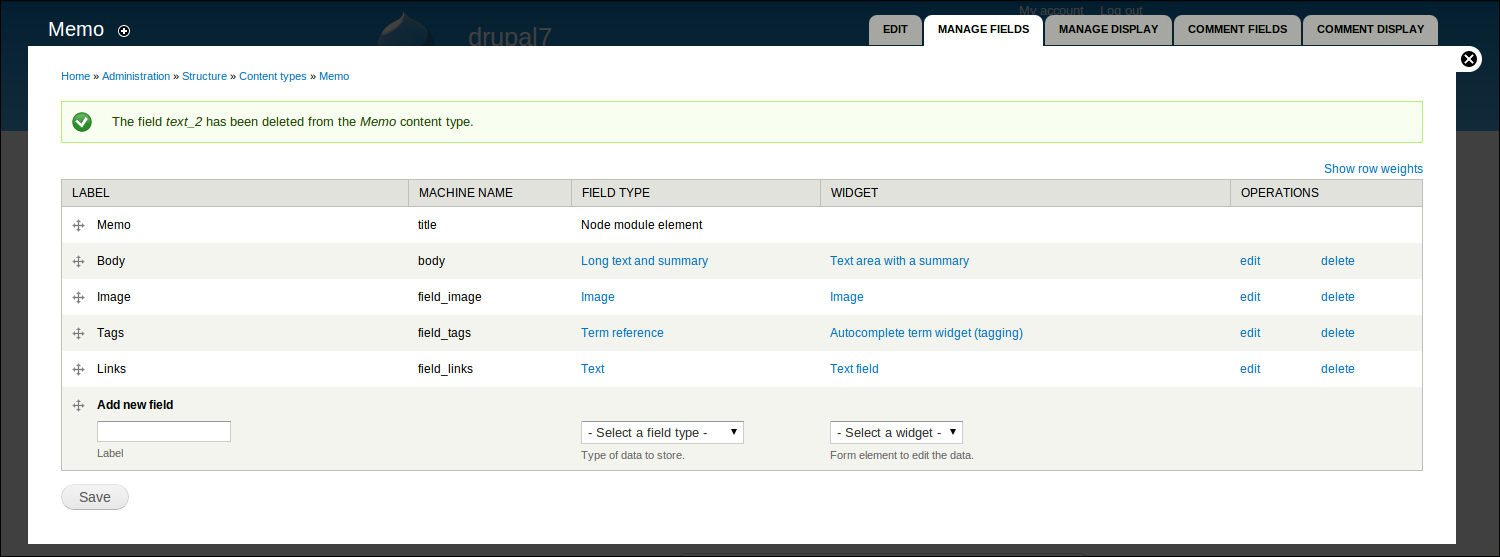
This listing also hints on the ordering of the fields, so if we wanted to make some changes there, such as bringing the Tags field beneath the Memo field, we can simply drag and drop this item by using the grey color arrow icon to the left of the label in the LABEL column. Once finished with reordering, we need to click on the Save button.
Adding a memo now will result in the following:
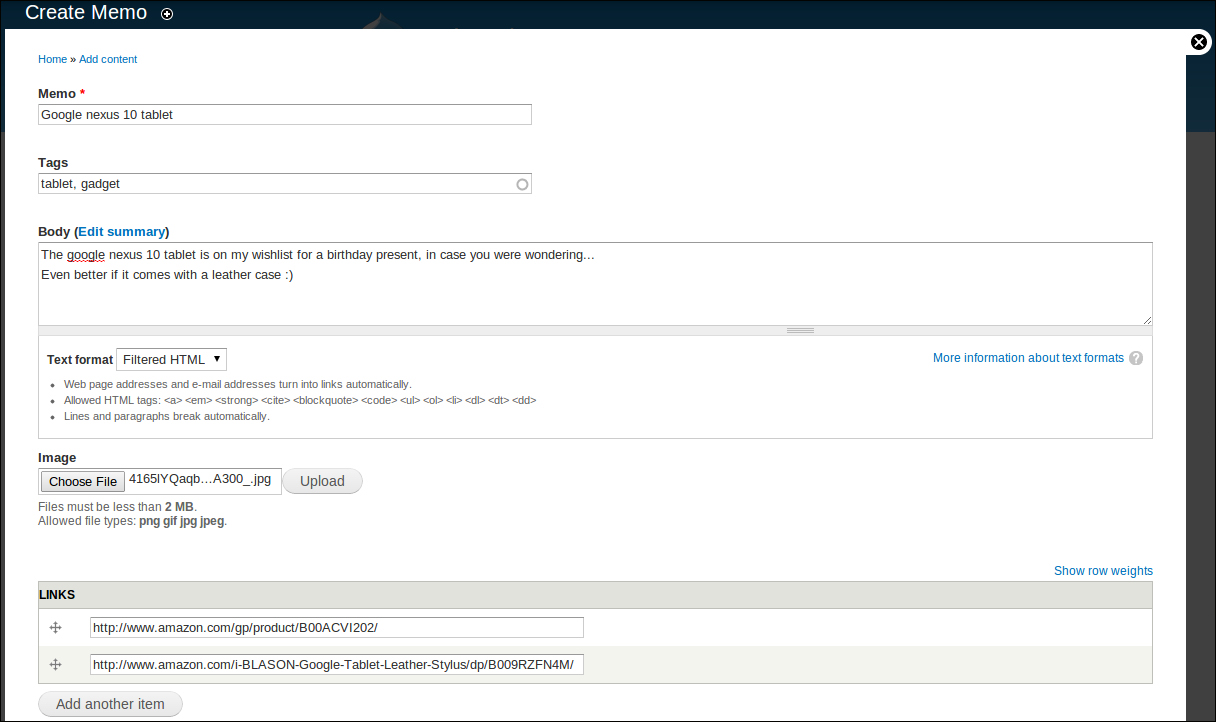
Viewing the form with our newly added fields looks as follows:
While the above fields' ordering dealt with managing the display of the form fields when adding or editing memos, we might also be interested in changing the overall appearance of an actual posted memo.
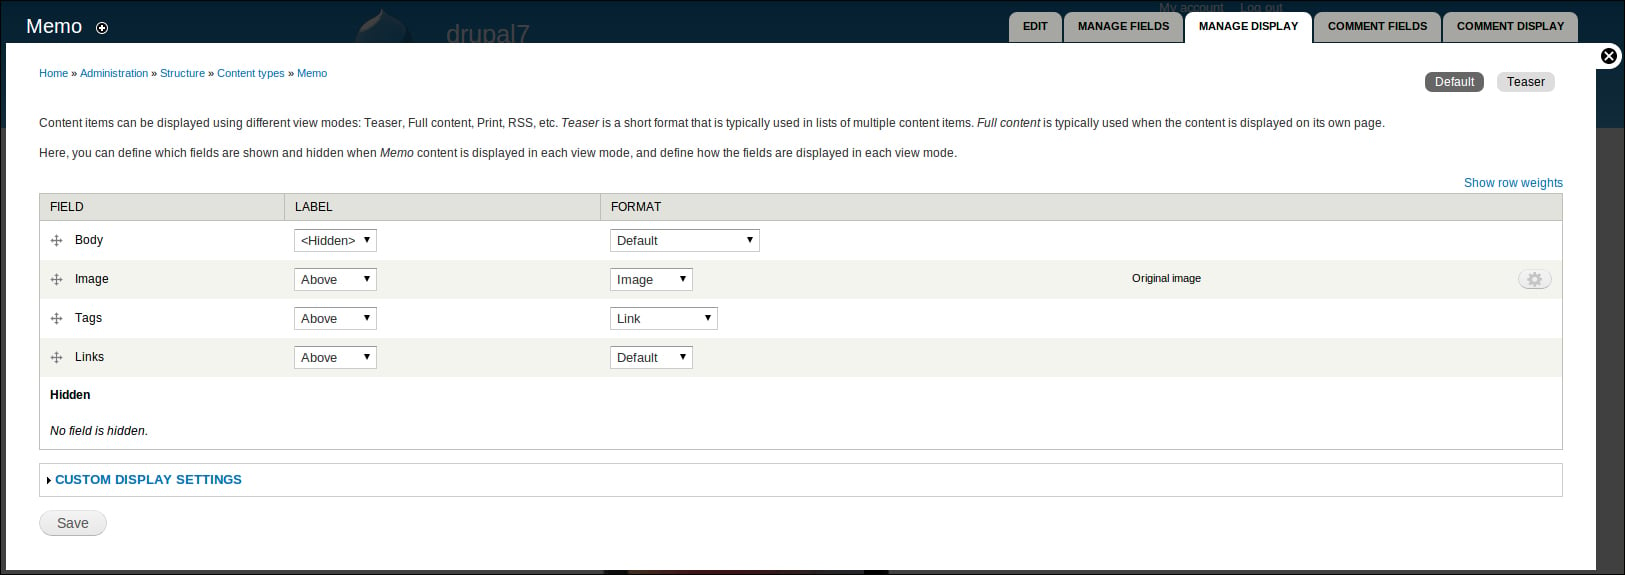
To do this we navigate to the Memo content type's configuration page again, which is at Structure | Content types | Memo | manage display (/admin/structure/types/manage/memo/display), and we're presented with a new configuration page:
Displaying of content types may be different, depending on which view mode is being utilized. These view modes are for example, Full content, which is equivalent to the Default display mode for most purposes, and represents the mode for viewing the full page of the content type (this is for example, when in content listing, like in blogs, when you click on the "read more" link and view the full article on a dedicated page). Another view mode can be Teaser, which is often used when doing the content listing, similar to a blog, where you don't want to put too much content but rather a sort of summary for the content.
On the upper-right corner of the MANAGE DISPLAY configuration tab, we can see sub tabs for each view mode that we want to customize. By default, there's the Default and the Teaser mode. If we want to customize more view modes we can simply expand the CUSTOM DISPLAY SETTINGS link, choose any of the options there, and they will be added as subtabs.
Sticking with the Default view mode and taking a closer look at the fields table we can see the fields being used in this view (notice how all fields are being used, and none of them is hidden from the layout) and the Label and Format settings. The Label column configures where the field's label shows up, if at all, and the Format settings specify what kind of formatting rule to apply on the content that is being displayed for this field. If we examine the Format options for the Body field, then some options such as Trimmed or Summary or trimmed, makes sense for short content listings, like in the Teaser view mode that we mentioned.
There is definitely some room for improvements on the Default view mode for our memo, so here are some ideas for styling the view better:
We can remove the Image label next to the image as that's pretty self-explanatory, and put the Tags field at the top with the LABEL column displayed as Inline, to eat up less space.
Note
Instead of having the image laid out as its own field and space, in the view, we can put it inline to the text. Unfortunately, there's no Drupal way of doing this out-of-the-box function and this requires one of the many handlings, such as using the Insert module (http://drupal.org/project/insert) to put customized HTML image tags on the Body's WYSIWYG editor, or utilizing the Media module (http://drupal.org/project/media).
Once you're done setting up the field's display settings click on the Save button, and watch the new layout of your Memo content.
To practice on this, let's revive Drupal's front page node's listing. It uses the Teaser display mode, so we'll go ahead and update the fields listing. In the Image field, add a <hidden> label by drag-and-drop, and set the Image style dropdown to thumbnail by clicking on the gear icon, and setting the select box accordingly, then click on Update. And for Tags, drag and drop this field upwards as well, and set its Label to Inline. When done click on Save (feel free to further customize the teaser display mode to your liking), and view the home page to review your changes.
This chapter served as an introduction to the very building blocks of Drupal's node structure. Beginning from the very start, we have introduced Drupal's software stack, and tracked its origin back as an early open source project. We then continued to learn about Drupal's very basic and prominent node structure, which evolved in Drupal 7 and extended into powerful and abstract entities. Having created our own Memo content type, we have made acquaintances with Drupal's administrator user interface, which enables the site builders to build their custom content types, manage their fields as well as their display too.
In the next chapter, we will take a look at another aspect of Drupal's basic functionality, dealing with views, and the over-all presentation layer.


