


In this chapter, we will focus on setting up a development environment, so that you can begin writing the code for a Drupal-powered website, and we will explore some other aspects of what it means to be a Drupal developer.
In this chapter, we will:
Install and configure the settings for a web server, PHP, and the MySQL database
Install and use Git
Install and use Drush
Install Drupal 7
Install the Aptana IDE, and set up a PHP-based Drupal project
Explore http://drupal.org/ from a developer's perspective
So let's get started and get a Drupal development environment set up so we can move onto some cool development examples in the following chapters.
Although you can use a number of different web servers and databases, we are going to use the commonly used combination of Apache, MySQL, and PHP, often referred to as the *AMP stack.
For Mac OS X, we will use the MAMP package to install an AMP stack.
Note
The instructions for setting up a development environment for Mac OS X are very similar to setting a development environment for a Linux distribution. They are both Unix-based operating systems. If you aren't already tied to a particular Linux distribution, and would like to set up a development environment in Linux, then I highly recommend the Ubuntu distribution (distro). There are excellent directions on setting up a Drupal development environment, available at http://groups.drupal.org/node/6261, and if you don't already have Ubuntu installed, there is a Quickstart virtual machine available as part of the Drupal Quickstart project. More information can be found at http://drupal.org/project/quickstart.
First, download MAMP from http://www.mamp.info/en/downloads/index.html. Once MAMP has completed downloading, double-click on the downloaded .zip file, expand the 64bit folder, and then double-click the
MAMP.pkgfile. This will launch the MAMP installer as shown in the following screenshot:
Next, click on Continue on this screen and the next screen, then click on Continue, and click on Agree to agree to the terms of the software license agreement, and then click on Continue once again on the next screen. It is important on the next screen to click on the Customize button, and on the very next screen, un-check the MAMP Pro 2.0.1 checkbox.

After that, click on Install. After the installation completes, click on Close. Go to your
Applicationsfolder and the MAMP folder, and double-click on the MAMP application. After the Apache and MySQL servers have started, you will see the following MAMP start screen load in your default web browser:
For Windows, we will use XAMPP.
Note
This is a disclaimer of sorts. I do most of my Drupal development on Mac OS X. I also believe that developing on a Unix-based operating system, such as OS X, is a better fit for Drupal development, as there are many development-oriented aspects of Drupal that either depend on Unix or are Unix-centric. From cron to Unix-based permissions, a lot of documentation on http://drupal.org/ will be biased towards the Unix operating systems.
First, download XAMPP from http://www.apachefriends.org/en/xampp-windows.html. Scroll down the page until you get to the XAMPP for Windows section, and click on the Zip download. After the
xampp-win32-1.7.4-VC6.zipfile has completed downloading, right-click on it and select Extract All…, enterC:\as the destination, and click on Extract. Note that the extraction process will take a few minutes.Note
WAMP (http://www.wampserver.com/en/) is also a good choice for setting up an AMP stack on Windows.

Now, navigate to the
C:\xamppdirectory, and double-click on thexampp-controlapplication to start the XAMPP Control Panel Application:
Inside the XAMPP Control Panel Application, click on the Start buttons next to Apache and MySQL. Now, open up your favorite web browser, navigate to
http://localhost, and you should see something similar to the following screenshot:
There is one last step with XAMPP before we move on; we need to set the
adminpassword for MySQL. In your favorite web browser, openhttp://localhost/security/index.php:
Enter the new password as
root,and click on the Password changing button to submit the change. You should see the following message:The root password was successfully changed. Please restart MYSQL for loading these changes!
Drupal 7 recommends PHP version 5.3. The latest version of MAMP includes PHP version 5.3.6 (it also includes PHP version 5.2.13, and allows you to switch between them). The latest version of XAMPP for Windows includes PHP version 5.3.5. Although this version of PHP meets the requirements of Drupal 7, there are some PHP-related settings that need to be tweaked before we install Drupal, to ensure that things will run smoothly.
Mac OS X: Use your favorite text editor to open the php.ini file located at /Applications/MAMP/bin/php/php5.3.6/conf. If you are using Apple's TextEdit application, then I recommend that you take a look at Smultron - http://www.peterborgapps.com/smultron/, which is inexpensive and available in the Mac App Store. Other favorite text editors for the Mac include TextMate - http://macromates.com/ and Coda - http://panic.com/coda/, among many others.
Windows: Use your favorite text editor to open the php.ini file located at C:\xampp\php. I like Sublime Text and Notepad++.
Navigate to the Resource Limits section, and edit the settings to match the following values:
max_execution_time = 60;
max_input_time = 120;
memory_limit = 128M;
error_reporting = E_ALL & ~E_NOTICE
Drupal 7 is a bit slower in some ways than Drupal 6. So, it is important that you make these changes to the php.ini file for your Drupal 7 development site to run smoothly.
Although it is possible to run Drupal 7 on several different databases, including some NoSQL databases (such as MongoDB), we will use the most commonly used database, MySQL. For Drupal 7, MySQL version 5.0.15 or higher is recommended, and both of the AMP stacks chosen for Mac OS X and Windows include MySQL versions higher than that. Now, let's tweak some MySQL configuration settings to ensure a smooth running development environment.
Mac OS X: MAMP does not use a my.cnf file by default. So you must copy the file at /Applications/MAMP/Library/support-files/my-medium.cnf to /Applications/MAMP/conf/my.cnf (notice the new name of the file).
Windows: For XAMMP, open the my.ini file located at C:\xampp\mysql\bin.
Open the my.cnf/my.ini file in your text editor, and find and edit the following settings to match these values:
# * Fine Tuning
#
key_buffer = 16M
key_buffer_size = 32M
max_allowed_packet = 16M
thread_stack = 512K
thread_cache_size = 8
max_connections = 300
One of the real gotchas for the Drupal MySQL configuration is the max_allowed_packet setting. This has always been a source of bewildering errors in the past for myself and many other Drupal developers that I know, and it is a setting that is specifically mentioned on the http://drupal.org/requirements#database page, under the Database server section.
Note
When you are ready to take your site live, there are some excellent performance tuning tips available on drupal.org at http://drupal.org/node/2601.
Before we can install Drupal, we need to create a new and empty MySQL database.
Both MAMP and XAMPP include phpMyAdmin—a web-based administration tool for MySQL. We will use phpMyAdmin to create an empty database for Drupal.
Mac OS X: With MAMP running, open your favorite web browser, and go to http://localhost:8888/phpMyAdmin.
Windows: With XAMPP running, open your favorite web browser, and go to http://localhost/phpmyadmin/.
You will see the following screen:
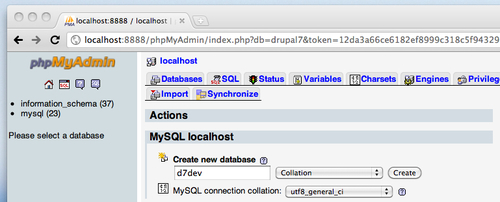
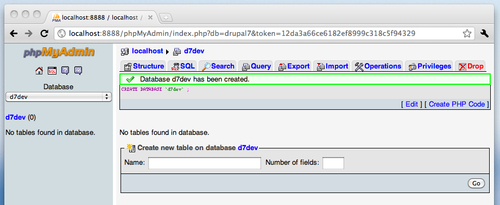
The default page of phpMyAdmin includes a form for creating a database as shown. Enter the name d7dev for your database, and click on Create. You will then see the following screen:
Git is a source control and versioning software that has become very popular over the last few years. In February of 2011, drupal.org migrated from the outdated CVS versioning system to Git. The migration to Git has enabled a completely new way for Drupal developers to interact with drupal.org, and we will highlight this enhanced interaction throughout the book. However, we will also immediately start using Git to facilitate setting up a Drupal development environment. So, if you don't already have Git installed on your computer, let's get it set up.
To install Git for the Mac, we are going to use Homebrew (an open source package manager for Mac OS X) with installation instructions available at https://github.com/mxcl/homebrew/wiki/installation.
Once you have Homebrew installed, installing Git is as easy as opening up the
Terminalapplication (in /Applications/Utilities), and typing the following command:brew install GitType the following to see if it worked:
Git version
Tip
Downloading the example code
You can download the example code files for all Packt books you have purchased from your account at http://www.packtpub.com. If you purchased this book elsewhere, you can visit http://www.packtpub.com/support and register to have the files e-mailed directly to you.
For Windows, we are going to use msysgit available at http://code.google.com/p/msysgit/downloads/list.
Download the most recent version of the full installer for the official Git, currently
Git-1.7.6-preview20110708.exe, and then double-click on the downloaded file link to begin the installation process.
Click on Next, and then click Next again on the GNU General Public License screen.
On the Select Destination Location screen, click on Next to accept the default destination.
On the Select Components screen, accept the defaults again, and click on Next.
On the Adjusting your PATH Environment screen, select Run Git and included Unix tools from the Windows Command Prompt as this will allow Git to work with Drush, which we will cover next.

You have installed the Git version control system—a tool that will greatly facilitate interaction with the existing contributed code at Drupal.org.
Drush, a portmanteau of the words Drupal and shell, is a command line utility that facilitates the management of a Drupal environment from your favorite shell (the Terminal application on Mac OS X and the Command Prompt application on Windows). For example, installing a contributed module on drupal.org could be as easy as running the following commands from the command line:
drush dl modulename
drush en -y modulename
Installing Drush for Windows is a bit more involved than it is for Mac OS X. We will be following the directions available at http://drush.ws/sites/default/files/attachments/Drush%20Installation%20Guide.pdf for installing Drush on Windows
Download the Drush installer from http://drush.ws/drush_windows_installer, and follow the instructions in the Drush Installation Guide PDF. On the Custom Setup screen, make sure that you select to install the cwRsync Optional Components and Register Environment Variables, as shown in the following screenshot:

After the installation has completed we are going to use Git to update Drush to a newer version because the version included with the Drush Installer has some issues (as of July 2011). Open the Command Prompt application for Windows and enter the following commands:
cd /ProgramData/Propeople
rm -r Drush
git clone --branch master http://git.drupal.org/project/drush.git
By using Git, you will now be able to easily keep your Drush installation up-to-date. To check if it is out of date, you can just run
gitstatus.
We are going to use a combination of Drush and Git to install Drupal.
Mac OS X: Open up the Terminal application, and type the following command:
cd /Applications/MAMP/htdocsWindows: Open the Drush command prompt application, and type the following command:
cd /xampp/htdocsNow, we are going to use Git to locally clone the Drupal core Git repository into a new
d7devfolder (this will take a few minutes, or so, depending on your network bandwidth):$ git clone http://git.drupal.org/project/drupal.git d7dev Cloning into d7dev... remote: Counting objects: 131301, done. remote: Compressing objects: 100% (36527/36527), done. remote: Total 131301 (delta 98528), reused 119725 (delta 88369) Receiving objects: 100% (131301/131301), 38.73 MiB | 554 KiB/s, done. Resolving deltas: 100% (98528/98528), done. $ cd d7dev
Next, we want to use Git to switch to the latest Drupal 7 release. First, we will list all of the available releases:
$ git tag -l 7.*
7.0
~
7.1
7.10
7.11
7.12
7.2
7.3
7.4
7.5
7.6
7.7
7.8
7.9
From this list ( I removed all of the
alpha,rc, and unstable releases), you will see that the latest release is7.12, but you should substitute whatever the latest release may be for you, and use that in the following Git command:$ git checkout 7.12 Note: checking out '7.12'. You are in 'detached HEAD' state. You can look around, make experimental changes and commit them, and you can discard any commits you make in this state without impacting any branches by performing another checkout. If you want to create a new branch to retain commits you create, you may do so (now or later) by using -b with the checkout command again. Example: git checkout -b new_branch_name HEAD is now at 4d4080b... Oops. Not yet. ;) Revert "Back to 7.13-dev."
Next, we are going to go through the web-based installation process to set up Drupal.
Mac OS X: Open
http://localhost:8888/d7dev/in your web browser.Windows: Open
http://localhost/d7dev/in your web browser.You should see the following screen:

Select the Standard profile, and click on Save and Continue.
On the Choose language screen, select your language, and click on Save and Continue.
On the Database configuration screen, select MySQL. Enter
d7devfor the database name, androotas the database username and password. Click on Save and Continue.On the Configure site screen, enter the following values (the e-mail address doesn't have to be real, but must appear valid):
Fill out the rest of the form, and click on Save and continue. Your Drupal site installation is complete. So click on the Visit your new site link to see the site.

Go to http://www.aptana.com/products/studio3/download, and download the correct version of the Aptana Studio IDE for your operating system. Double-click on the file once it has completed downloading, and follow the installer directions to install Aptana Studio.
Note
By no means should you feel like you have to use Aptana Studio. There are a number of other good IDEs out there, and you may already be using a different IDE or may just be happy using your favorite text editor. However, I will be using Aptana Studio throughout the book, so it may be easier to follow along if you are also using Aptana Studio.
Upon opening Aptana Studio for the first time, you should see the following screen:
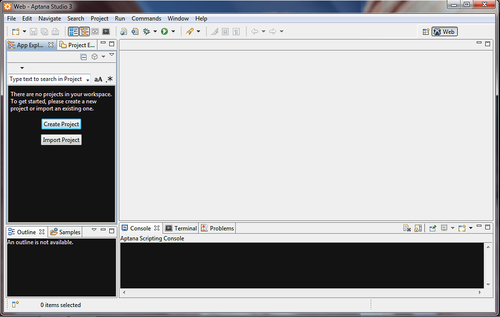
Click on the Create Project button, select PHP Project, and click on Next. At this point, you will see the New PHP Project window:

You must uncheck the Use default location checkbox, and browse to your new Drupal 7 install location. For Windows, it is
C:\xampp\htdocs\d7dev, and for Mac OS X, it is/Applications/MAMP/htdocs/d7dev. After you have selected the location of your new Drupal 7 installation, click on Finish.You will now have a project listing as shown in the following screenshot:

You have set up an IDE and have created a Drupal 7 project. Now, we are ready to start doing some Drupal development!
Now that you have a new project pointing to your d7dev Drupal installation, let's take a look around. In your project folder, go to the modules/aggregator folder, and open the aggegrator.module and aggegrator.pages.inc files. You will notice that the aggregator.module file does not have any syntax coloring, while the aggegrator.pages.inc file does. Aptana is not set up to recognize the Drupal-specific file types, such as *.module and *.install, as PHP files. Also, there are some simple formatting-related settings that don't follow the Drupal coding standards as specified at http://drupal.org/coding-standards.
Content type associations are used in Eclipse-based IDEs, so that the correct file editor is used for a specific set of file types. The PHP editor is typically only associated with the .php and .inc file suffixes, but for the Drupal development, we will also want the .install and .module suffixes associated with the PHP editor.
In Aptana Studio open up the Preferences menu; for Windows, it is under Window | Preferences, and for Mac OS X, it is under Aptana Studio 3 | Preferences. Navigate to General | Content Types.
Expand the Text section in the Content types list, scroll down to PHP Source, and select it.
Click on the Add… button.
Type
*.installfor the new Content type association, and click on OK.Repeat steps 4 and 5 by substituting
*.modulefor the new Content type association.Your final configuration should look similar to the following screenshot:

The Aptana formatter profile will align the Aptana Studio PHP formatting with the Drupal coding standards (as outlined at http://drupal.org/coding-standards) as much as possible.
In your web browser, go to http://drupalcode.org/sandbox/kmadel/1249414.git/blob/HEAD:/drupal_aptana_formatter_profile.xml, right-click on the
drupal_aptana_formatter_profile.xmllink, select Save as… or Save link as… (depending on your browser), and click on Save.
In Aptana Studio, open up Preferences, and go to Aptana | Formatter.
Click on the Import… button, navigate to and select the file downloaded in the first step, and click the Open button.

The Active profile: will now show that it is using the Drupal Profile [built-in]. Click on OK to save the settings.
For the settings to take effect, you will have to quit and then re-open Aptana Studio.
If you are new to the Drupal development, the first thing that you should understand is that being a good Drupal developer means being a part of the Drupal community. Drupal development is very much an open source process, and, as such, it is a community driven process.
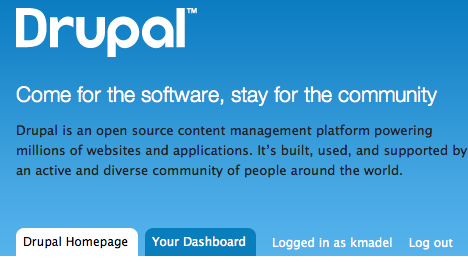
Drupal.org has numerous resources to assist developers of all experience levels. However, before we can take advantage of all of these resources, you need to be a member of drupal.org. So, if you haven't already joined drupal.org, now is the time to do so at http://drupal.org/user/register. Once you are a member, and have logged in to drupal.org, you will see two primary tabs - Drupal Homepage and Your Dashboard:
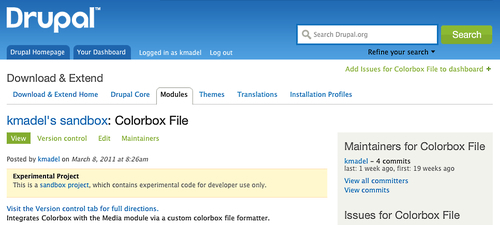
As we move forward with the Drupal 7 development, we will return to your drupal.org dashboard on many occasions to keep a track of issues of the contributed modules that we are using. We will also utilize the new sandbox development feature that Drupal has added as part of the migration to Git. Before Drupal switched to Git, a lot of developers hosted their projects on GitHub as well as in the Drupal CVS-based repository. Working with CVS on day-to-day development of code became more and more tedious as compared to using new tools, such as Git. In addition to the numerous developer assets provided by drupal.org, you will find a number of Git related documentation and tools. We will find in the chapters to come how important Git is as a tool for using and contributing Drupal code. The following is a screenshot of one of my Git-enabled sandbox projects on drupal.org:
Make sure that you know the answers to the following questions before you continue.
You have reached the end of Chapter 1! You should now have a working Drupal 7 website and an Aptana Studio IDE-based PHP project to begin doing custom Drupal development. I know that we haven't actually written any code yet, so I am excited to get started with some cool development examples in the next chapter. However, this chapter has given us some tools and configuration tweaks to make the development process much easier and more fun. Now, we are ready to begin developing for Drupal in earnest.

