


In this chapter, we will cover the following recipes:
Verifying the requirements for Docker installation
Installing Docker
Pulling an image and running a container
Adding a nonroot user to administer Docker
Setting up the Docker host with Docker Machine
Finding help with the Docker command line
At the very start of the IT revolution, most applications were deployed directly on physical hardware, over the host OS. Because of that single user space, runtime was shared between applications. The deployment was stable, hardware-centric, and had a long maintenance cycle. It was mostly managed by an IT department and gave a lot less flexibility to developers. In such cases, hardware resources were regularly underutilized.
The following diagram depicts such a setup:
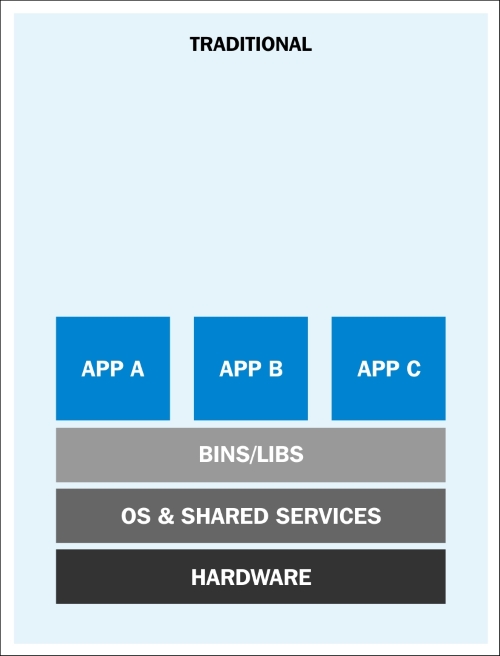
Traditional application deployment (https://rhsummit.files.wordpress.com/2014/04/rhsummit2014-application-centric_packaging_with_docker_and_linux_containers-20140412riek7.pdf)
To overcome the limitations set by traditional deployment, virtualization was invented. With hypervisors such as KVM, XEN, ESX, Hyper-V, and so on, we emulated the hardware for virtual machines (VMs) and deployed a guest OS on each virtual machine. VMs can have a different OS than their host; that means we are responsible for managing the patches, security, and performance of that VM. With virtualization, applications are isolated at VM level and defined by the life cycle of VMs. This gives better return on investment and higher flexibility at the cost of increased complexity and redundancy. The following diagram depicts a typical virtualized environment:
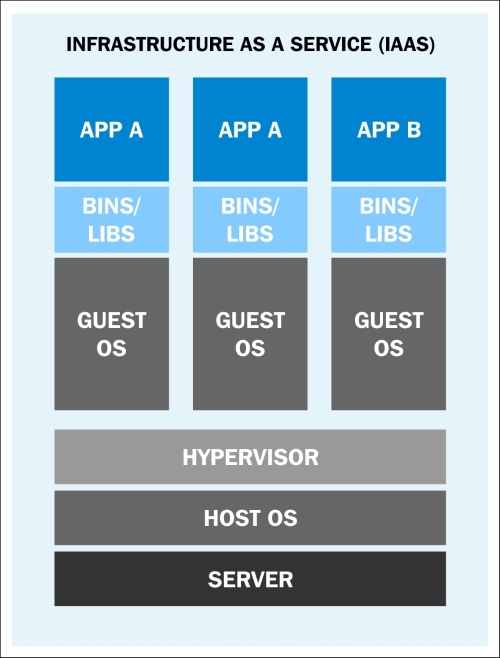
Application deployment in a virtualized environment (https://rhsummit.files.wordpress.com/2014/04/rhsummit2014-application-centric_packaging_with_docker_and_linux_containers-20140412riek7.pdf)
After virtualization, we are now moving towards more application-centric IT. We have removed the hypervisor layer to reduce hardware emulation and complexity. The applications are packaged with their runtime environment and are deployed using containers. OpenVZ, Solaris Zones, and LXC are a few examples of container technology. Containers are less flexible compared to VMs; for example, we cannot run Microsoft Windows on a Linux OS. Containers are also considered less secure than VMs, because with containers, everything runs on the host OS. If a container gets compromised, then it might be possible to get full access to the host OS. It can be a bit too complex to set up, manage, and automate. These are a few reasons why we have not seen the mass adoption of containers in the last few years, even though we had the technology.
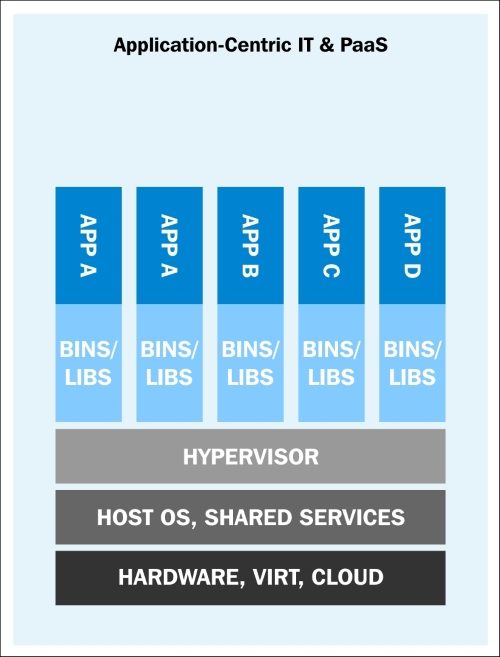
Application deployment with containers (https://rhsummit.files.wordpress.com/2014/04/rhsummit2014-application-centric_packaging_with_docker_and_linux_containers-20140412riek7.pdf)
With Docker, containers suddenly became first-class citizens. All big corporations such as Google, Microsoft, Red Hat, IBM, and others are now working to make containers mainstream.
Docker was started as an internal project by Solomon Hykes, who is the current CTO of Docker, Inc., at dotCloud. It was released as open source in March 2013 under the Apache 2.0 license. With dotCloud's platform as a service experience, the founders and engineers of Docker were aware of the challenges of running containers. So with Docker, they developed a standard way to manage containers.
Docker uses Linux's underlying kernel features which enable containerization. The following diagram depicts the execution drivers and kernel features used by Docker. We'll talk about execution drivers later. Let's look at some of the major kernel features that Docker uses:
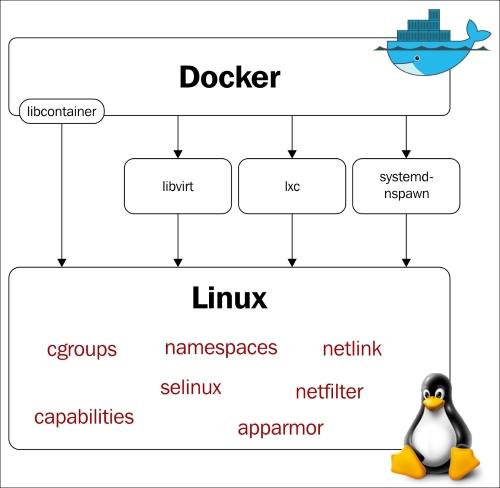
The execution drivers and kernel features used by Docker (http://blog.docker.com/wp-content/uploads/2014/03/docker-execdriver-diagram.png)
Namespaces are the building blocks of a container. There are different types of namespaces and each one of them isolates applications from each other. They are created using the clone system call. One can also attach to existing namespaces. Some of the namespaces used by Docker have been explained in the following sections.
The pid namespace allows each container to have its own process numbering. Each pid forms its own process hierarchy. A parent namespace can see the children namespaces and affect them, but a child can neither see the parent namespace nor affect it.
If there are two levels of hierarchy, then at the top level, we would see a process running inside the child namespace with a different PID. So, a process running in a child namespace would have two PIDs: one in the child namespace and the other in the parent namespace. For example, if we run a program on the container (container.sh), then we can see the corresponding program on the host as well.
On the container:

On the host:

With the pid namespace, we can run the same program multiple times in different isolated environments; for example, we can run different instances of Apache on different containers. But without the net namespace, we would not be able to listen on port 80 on each one of them. The net namespace allows us to have different network interfaces on each container, which solves the problem I mentioned earlier. Loopback interfaces would be different in each container as well.
To enable networking in containers, we can create pairs of special interfaces in two different net namespaces and allow them to talk to each other. One end of the special interface resides inside the container and the other in the host system. Generally, the interface inside the container is named eth0, and in the host system, it is given a random name such as vethcf1a. These special interfaces are then linked through a bridge (docker0) on the host to enable communication between containers and route packets.
Inside the container, you would see something like the following:
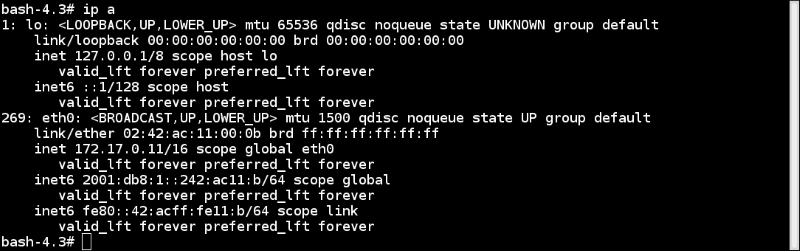
And in the host, it would look like the following:
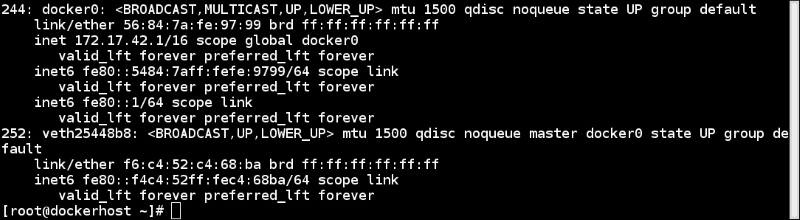
Also, each net namespace has its own routing table and firewall rules.
Inter Process Communication (ipc) provides semaphores, message queues, and shared memory segments. It is not widely used these days but some programs still depend on it.
If the ipc resource created by one container is consumed by another container, then the application running on the first container could fail. With the ipc namespace, processes running in one namespace cannot access resources from another namespace.
With just a chroot, one can inspect the relative paths of the system from a chrooted directory/namespace. The mnt namespace takes the idea of a chroot to the next level. With the mnt namespace, a container can have its own set of mounted filesystems and root directories. Processes in one mnt namespace cannot see the mounted filesystems of another mnt namespace.
With user namespace support, we can have users who have a nonzero ID on the host but can have a zero ID inside the container. This is because the user namespace allows per namespace mappings of users and groups IDs.
There are ways to share namespaces between the host and container and container and container. We'll see how to do that in subsequent chapters.
Control Groups (cgroups) provide resource limitations and accounting for containers. From the Linux Kernel documentation:
Control Groups provide a mechanism for aggregating/partitioning sets of tasks, and all their future children, into hierarchical groups with specialized behaviour.
In simple terms, they can be compared to the ulimit shell command or the setrlimit system call. Instead of setting the resource limit to a single process, cgroups allow the limiting of resources to a group of processes.
Control groups are split into different subsystems, such as CPU, CPU sets, memory block I/O, and so on. Each subsystem can be used independently or can be grouped with others. The features that cgroups provide are:
Some of the subsystems that can be managed by cgroups are as follows:
There are multiple ways to control work with cgroups. Two of the most popular ones are accessing the cgroup virtual filesystem manually and accessing it with the libcgroup library. To use libcgroup in fedora, run the following command to install the required packages:
$ sudo yum install libcgroup libcgroup-tools
Once installed, you can get the list of subsystems and their mount point in the pseudo filesystem with the following command:
$ lssubsys -M

Although we haven't looked at the actual commands yet, let's assume that we are running a few containers and want to get the cgroup entries for a container. To get those, we first need to get the container ID and then use the lscgroup command to get the cgroup entries of a container, which we can get from the following command:
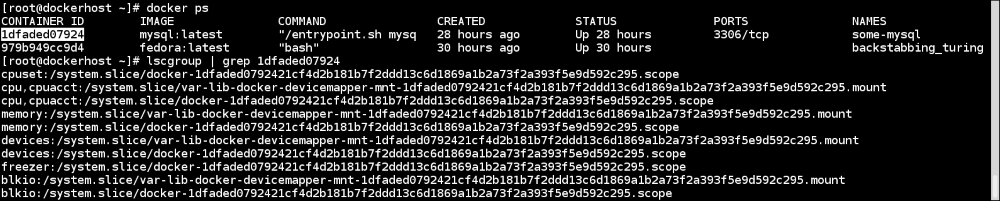
Note
For more details, visit https://docs.docker.com/articles/runmetrics/.
The Union filesystem allows the files and directories of separate filesystems, known as layers, to be transparently overlaid to create a new virtual filesystem. While starting a container, Docker overlays all the layers attached to an image and creates a read-only filesystem. On top of that, Docker creates a read/write layer which is used by the container's runtime environment. Look at the Pulling an image and running a container recipe of this chapter for more details. Docker can use several Union filesystem variants, including AUFS, Btrfs, vfs, and DeviceMapper.
Docker can work with different execution drivers, such as libcontainer, lxc, and libvirt to manage containers. The default execution driver is libcontainer, which comes with Docker out of the box. It can manipulate namespaces, control groups, capabilities, and so on for Docker.
Docker is supported on many Linux platforms, such as RHEL, Ubuntu, Fedora, CentOS, Debian, Arch Linux, and so on. It is also supported on many cloud platforms, such as Amazon EC2, Rackspace Cloud, and Google Compute Engine. With the help of a virtual environment, Boot2Docker, it can also run on OS X and Microsoft Windows. A while back, Microsoft announced that it would add native support to Docker on its next Microsoft Windows release.
In this recipe, let's verify the requirements for Docker installation. We will check on the system with Fedora 21 installation, though the same steps should work on Ubuntu as well.
Docker is not supported on 32-bit architecture. To check the architecture on your system, run the following command:
$ uname -i
x86_64
Docker is supported on kernel 3.8 or later. It has been back ported on some of the kernel 2.6, such as RHEL 6.5 and above. To check the kernel version, run the following command:
$ uname -r
3.18.7-200.fc21.x86_64
Running kernel should support an appropriate storage backend. Some of these are VFS, DeviceMapper, AUFS, Btrfs, and OverlayFS.
Mostly, the default storage backend or driver is devicemapper, which uses the device-mapper thin provisioning module to implement layers. It should be installed by default on the majority of Linux platforms. To check for device-mapper, you can run the following command:
$ grep device-mapper /proc/devices
253 device-mapper
In most distributions, AUFS would require a modified kernel.
Support for cgroups and namespaces are in kernel for sometime and should be enabled by default. To check for their presence, you can look at the corresponding configuration file of the kernel you are running. For example, on Fedora, I can do something like the following:
$ grep -i namespaces /boot/config-3.18.7-200.fc21.x86_64
CONFIG_NAMESPACES=y
$ grep -i cgroups /boot/config-3.18.7-200.fc21.x86_64
CONFIG_CGROUPS=y
Installation document on the Docker website at https://docs.docker.com/installation/
As there are many distributions which support Docker, we'll just look at the installation steps on Fedora 21 in this recipe. For others, you can refer to the installation instructions mentioned in the See also section of this recipe. Using Docker Machine, we can set up Docker hosts on local systems, on cloud providers, and other environments very easily. We'll cover that in a different recipe.
The default Docker daemon configuration file is located at /etc/sysconfig/docker, which is used while starting the daemon. Here are some basic operations:
The installation document is on the Docker website at https://docs.docker.com/installation/
I am borrowing this recipe from the next chapter to introduce some concepts. Don't worry if you don't find all the explanation in this recipe. We'll cover all the topics in detail later in this chapter or in the next few chapters. For now, let's pull an image and run it. We'll also get familiar with Docker architecture and its components in this recipe.
To pull an image, run the following command:
$ docker pull fedoraList the existing images by using the following command:
$ docker images
Create a container using the pulled image and list the containers as:

Docker has client-server architecture. Its binary consists of the Docker client and server daemon, and it can reside in the same host. The client can communicate via sockets or the RESTful API to either a local or remote Docker daemon. The Docker daemon builds, runs, and distributes containers. As shown in the following diagram, the Docker client sends the command to the Docker daemon running on the host machine. The Docker daemon also connects to either the public or local index to get the images requested by the client:
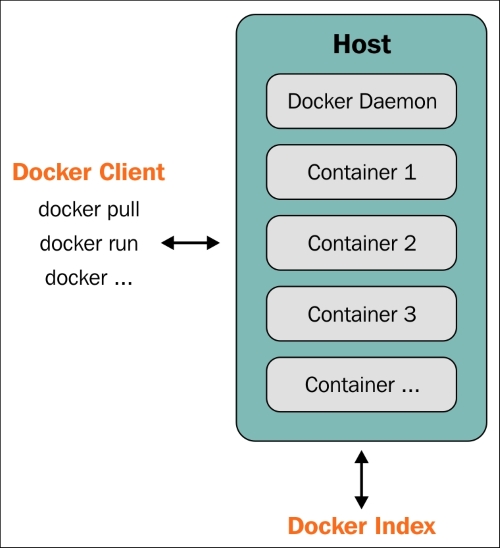
Docker client-server architecture (https://docs.docker.com/introduction/understanding-docker/)
So in our case, the Docker client sends a request to the daemon running on the local system, which then connects to the public Docker Index and downloads the image. Once downloaded, we can run it.
Let's explore some keywords we encountered earlier in this recipe:
Images: Docker images are read-only templates and they give us containers during runtime. There is the notion of a base image and layers on top of it. For example, we can have a base image of Fedora or Ubuntu and then we can install packages or make modifications over the base image to create a new layer. The base image and new layer can be treated as a new image. For example, in following figure, Debian is the base image and emacs and Apache are the two layers added on top of it. They are highly portable and can be shared easily:

Docker Image layers (http://docs.docker.com/terms/images/docker-filesystems-multilayer.png)
Layers are transparently laid on top of the base image to create a single coherent filesystem.
Registries: A registry holds Docker images. It can be public or private from where you can download or upload images. The public Docker registry is called Docker Hub, which we will cover later.
Index: An index manages user accounts, permissions, search, tagging, and all that nice stuff that's in the public web interface of the Docker registry.
Containers: Containers are running images that are created by combining the base image and the layers on top of it. They contain everything needed to run an application. As shown in preceding diagram, a temporary layer is also added while starting the container, which would get discarded if not committed after the container is stopped and deleted. If committed, then it would create another layer.
Repository: Different versions of an image can be managed by multiple tags, which are saved with different GUID. A repository is a collection of images tracked by GUIDs.
The documentation on the Docker website at http://docs.docker.com/introduction/understanding-docker/
With Docker 1.6, the Docker community and Microsoft Windows released a Docker native client for Windows http://azure.microsoft.com/blog/2015/04/16/docker-client-for-windows-is-now-available
For ease of use, we can allow a nonroot user to administer Docker by adding them to a Docker group.
Create the Docker group if it is not there already:
$ sudo group add dockerCreate the user to whom you want to give permission to administer Docker:
$ useradd dockertest
Run the following command to allow the newly created user to administer Docker:
$ sudo gpasswd -a dockertest docker
The preceding command will add a user to the Docker group. The added user will thus be able to perform all Docker operations. This can be the security risk. Visit Chapter 9, Docker Security for more details.
Earlier this year, Docker released Orchestration tools (https://blog.docker.com/2015/02/orchestrating-docker-with-machine-swarm-and-compose/) and Machine, Swarm, and Compose deploy containers seamlessly. In this recipe, we'll cover Docker Machine and look at the others in later chapters. Using the Docker Machine tool (https://github.com/docker/machine/), you can set up Docker hosts locally on cloud with one command. It is currently in beta mode and not recommended for production use. It supports environments such as VirtualBox, OpenStack, Google, Digital Ocean, and others. For a complete list, you can visit https://github.com/docker/machine/tree/master/drivers. Let's use this tool and set up a host in Google Cloud.
Note
We will be using Docker Machine just for this recipe. Recipes mentioned in this or other chapters may or may not work on the host set up by Docker Machine.
Docker Machine does not appear with the default installation. You need to download it from its GitHub releases link (https://github.com/docker/machine/releases). Please check the latest version and distribution before downloading. As a root user, download the binary and make it executable:
$ curl -L https://github.com/docker/machine/releases/download/v0.2.0/docker-machine_linux-amd64 > /usr/local/bin/docker-machine
$ chmod a+x  /usr/local/bin/docker-machine
If you don't have an account on Google Compute Engine (GCE), then you can sign up for a free trial (https://cloud.google.com/compute/docs/signup) to try this recipe. I am assuming that you have a project on GCE and have the Google Cloud SDK installed on the system on which you downloaded Docker Machine binary. If not, then you can follow these steps:
Set up the Google Cloud SDK on your local system:
$ curl https://sdk.cloud.google.com | bashCreate a project on GCE (https://console.developers.google.com/project) and get its project ID. Please note that the project name and its ID are different.
Go to the project home page and under the APIs & auth section, select APIs, and enable Google Compute Engine API.
Assign the project ID we collected to a variable,
GCE_PROJECT:$ export GCE_PROJECT="<Your Project ID>"Run the following command and enter the code which is provided on the popped up web browser:
$ docker-machine  create -d google --google-project=$GCE_PROJECT  --google-machine-type=n1-standard-2 --google-disk-size=50 cookbook
INFO[0000] Opening auth URL in browser.
.......
......
INFO[0015] Saving token in /home/nkhare/.docker/machine/machines/cookbook/gce_token

INFO[0015] Creating host...
INFO[0015] Generating SSH Key
INFO[0015] Creating instance.
INFO[0016] Creating firewall rule.
INFO[0020] Waiting for Instance...
INFO[0066] Waiting for SSH...
INFO[0066] Uploading SSH Key
INFO[0067] Waiting for SSH Key
INFO[0224] "cookbook" has been created and is now the active machine.
INFO[0224] To point your Docker client at it, run this in your shell: eval "$(docker-machine_linux-amd64 env cookbook)"
List the existing hosts managed by Docker Machine:
$ ./docker-machine_linux-amd64 ls
You can manage multiple hosts with Docker Machine. The
*indicates the active one.To display the commands to set up the environment for the Docker client:
$ ./docker-machine_linux-amd64 env cookbook
So, if you point the Docker client with the preceding environment variables, we would connect to the Docker daemon running on the GCE.
And to point the Docker client to use our newly created machine, run the following command:
$ eval "$(./docker-machine_linux-amd64 env cookbook)"
From now on, all the Docker commands will run on the machine we provisioned on GCE, until the preceding environment variables are set.
Docker Machine connects to the cloud provider and sets up a Linux VM with Docker Engine. It creates a .docker/machine/ directory under the current user's home directory to save the configuration.
Docker Machine provides management commands, such as create, start, stop, restart, kill, remove, ssh, and others to manage machines. For detailed options, look for the help option of Docker Machine:
$ docker-machine -h
You can use the --driver/-d option to create choosing one of the many endpoints available for deployment. For example, to set up the environment with VirtualBox, run the following command:
$ docker-machine create --driver virtualbox dev

Here, dev is the machine name. By default, the latest deployed machine becomes primary.
Documentation on the Docker website at https://docs.docker.com/machine/
Guide to setting up Docker on Google Compute Engine at https://docs.docker.com/installation/google/
Docker commands are well documented and can be referred to whenever needed. Lots of documentation is available online as well, but it might differ from the documentation for the Docker version you are running.
On a Linux-based system, you can use the
mancommand to find help as follows:$ man dockerSubcommand-specific help can also be found with any of the following commands:
$ man docker ps
$ man docker-ps
Documentation on the Docker website at http://docs.docker.com/reference/commandline/cli/

