


In the last few years, the range of devices in which complex graphics are embedded has vastly increased. This is great for users, but a demanding challenge for developers. Direct3D 11 had provided a significant expansion in capabilities over the previous version; now, Direct3D 11.1, the new version of DirectX 11 which is shipped in Windows 8, presents some new features.
This chapter is about DirectX 11.1. Before learning about programming with the new component extension (C++/CX) of Microsoft and DirectX 11.1, it seems necessary to take a step backward and commence with the new features of DirectX 11.1 on a Metro Style application to discover why we must move to the newer version. This chapter will cover the following:
The need for DirectX 11.1
The prerequisites
Introduction to C++ component extensions (C++/CX)
Metro Style apps
Setting up your first project
Building your first Metro app
Working with game time
Initializing the device
At the end of this chapter, a running DirectX 11.1 project under Windows 8 and a framework will be created that supports game time.
Microsoft DirectX, first released in 1995, is a set of standard commands that can be used by developers to send instructions to video cards. In 2002, Microsoft released DirectX 9, and later in August 2004, DirectX 9.0c was released, which supported shader model 3.0.
DirectX 9 was only supported by the Xbox 360 console and Windows XP and later versions. DirectX 10 changed to a new pipeline and was only available on Windows Vista and later versions. DirectX 10.1, which was shipped with Service Pack 1 of Windows Vista, was the updated version of DirectX 10.
In 2008, Microsoft unveiled DirectX 11, which had some amazing features including a compute shader, dynamic shader linking, tessellation, multithreaded rendering, and shader model 5.0. DirectX 11 can be run on Windows Vista and Windows 7.
Now, Direct3D 11.1 is due to ship with Windows 8. In fact, everything in Windows 8 is based on DirectX 11.1; it comes with several new features, such as the following:
Device sharing
HLSL minimum precision
Support a larger number of UAVs and use them in every pipeline stage
Force the sample count to create a rasterizer state
Create larger constant buffers than a shader can access
Discarding resource and resource views
Support stereoscopic 3D for gaming and videos
There are many other features, and we will introduce some of them in this book.
Note
At the moment, Windows 7 Service Pack 1 and Windows Server 2008 R2 Service Pack 1 can be updated via the KnowledgeBase 2670838 platform update to improve and use some features of DirectX 11.1. For more information, check the article at http://support.microsoft.com/kb/2670838.
At the Game Developers Conference (GDC) 2013, Windows director of communications, Christopher Flores, said:
"60 million Windows 8 licenses had been sold during the first two months of launch, matching the "record-setting" sales in a similar time period for Windows 7. The Store had seen double digit growth in the number of visiting users week over week since its October launch, with 95 percent of the apps available having been downloaded."
According to the Steam Hardware and Software Survey of May 2013, Windows 8 (64-bit) surpasses Windows XP in popularity and is almost as popular as Windows 7 (32-bit).

Windows Store, which is only available with Windows 8, provides new opportunities for everyone. It's a big chance for developers to write games and sell them in the Store.
For distributing your game on Windows Store, you need to port your code to DirectX 11.1. Windows 8 is the only option for programming with DirectX 11.1; you need to use Visual Studio 2012 along with Windows 8.
Whenever you build your application, you can follow the instructions from the Windows Dev Center article for an introduction to publishing your applications on the Store. For more information, please check this article at the following link:
http://msdn.microsoft.com/en-us/library/windows/apps/br230836.aspx.
Windows 8 will be cross-platformed, which means your game can be run on Microsoft platforms supported by Windows 8, such as PCs, Microsoft tablets, and Windows Phone 8, but note that each platform has its own limitations.
The new generation of Microsoft's games console, Xbox One, runs on three separate operating systems. The one where games run is NT Core, which is shared between Windows 8, Windows Phone 8, Windows RT, and Windows Server 2012. This means that developers can easily port their code from Windows 8 to other platforms and there is no need to rewrite their code from the very first line.
Finally, the simplified UI programming of Metro Style development should not be forgotten. Microsoft introduces Metro Style development in C++, C#, XAML, HTML, and JavaScript for experienced as well as newbie developers.
Tip
A good game comes from a good design, not just good graphics!
If you prefer to work alone, you can try to create a simple game and publish it on Windows Store. However, your games will be more likely to succeed if you build a game with a team that includes a game designer, a concept designer, a sound designer, and an animator.
As you go through this book, it might be useful to start creating your own first game for Metro Style, writing and testing samples all by yourself; if you face any problems, you can check different websites, such as MSDN Code Gallery at http://code.msdn.microsoft.com, for improving your game code. The samples and articles of Microsoft DirectX SDK (June 2012): AMD Developer Central (http://developer.amd.com) and nvidia Developer Zone (http://developer.Nvidia.com) are the best references for getting started with DirectX.
The following are some essential prerequisites that should be considered before developing an application using DirectX 11.1:
The first important requirement is a personal computer or tablet running on Windows 8.
You need to set up Microsoft Visual Studio Express 2012 for Windows 8 as a developer environment. Furthermore, you should be familiar with DirectX programming and object-oriented programming with C++ and have a basic understanding of the math and the 3D coordinate systems.
Make sure you set up the Windows Software Development Kit (SDK) for Windows 8. The Windows SDK for Windows 8 contains headers, libraries, and tools that can be used when creating Windows 8 applications.
As a further aid to understanding how to run the samples of this chapter, all of the source code is provided for your reference, and they have been used in an open source rendering framework; so, please make sure to get the source code from Packt Publishing's website when reading this book.
Note
For those who come from a background of C# to C++, it is suggested that for better management and refactoring of C++ code, use Visual Assist X (http://www.wholetomato.com/). Please note that it is not free, but a free trial version of 30 days with all functionalities is available.
Check the following link if Visual Studio 2012 is not available. Make sure to get the right product for Windows 8:
http://www.microsoft.com/visualstudio/eng/products/visual-studio-express-products
Use the following link to download Windows Software Development Kit (SDK) for Windows 8:
http://msdn.microsoft.com/en-us/windows/hardware/hh852363.aspx
Microsoft C++ with Component Extensions (C++/CX) is an update to Microsoft C++, which is the language for developing a Windows Store game running on DirectX 11.1. It is truly mapped out to the new generation of the native C++ programming and is similar to C++/CLI; it is actually native code and not managed code. C++/CX is needed when you want to write C++ code-behind for Windows Store applications which uses the XAML user interface. Alternatively, it creates a Dynamic Link Library (DLL) to be called out from a Windows Store application, which is built using JavaScript, C#, or Visual Basic. And finally, it writes the Windows Store game using DirectX 11.1.
C++/CX brings the power of C++ along with the ease of programming. Jim Springfield, an architect of the Visual C++ team, wrote in his MSDN blog:
"However, while the C++/CX syntax is very similar to C++/CLI, the underlying implementation is very different; it does not use the CLR or a garbage collector, and it generates completely native code."
Have a look at his blog at the following link:
http://blogs.msdn.com/b/vcblog/archive/2011/10/20/10228473.aspx
Note
If you want more resources for C++/CX, take a look at the Visual C++ Team blog at the following URL:
http://blogs.msdn.com/b/vcblog/archive/2012/08/29/cxxcxpart00anintroduction.aspx
I'd recommend the Hilo, an example application, as a resource for starting out (http://hilo.codeplex.com).
C++/CX is a great place for developing applications for those game programmers who come from a background of C#, such as XNA Platform, SlimDx, and SharpDx. Also, for those who come from the management background of C++ or native C++, C++/CX won't disappoint! As mentioned earlier, you can use C++/CX along with XAML, but it is only available under the Metro UI; this means that C++/CX only runs on Windows 8 platforms.
There is no need to use native C++ while using Windows Runtime C++ Template Library (WRL); instead, you can use C++/CX code as a high-level language for using WRL code. In other words, it helps you write simpler code.
According to MSDN, the purpose and design of the WRL is inspired by the Active Template Library (ATL), which is a set of template-based C++ classes that simplifies the programming of Component Object Model (COM) objects.
To have a better overview of C++/CX, let's check its benefits.
WRL includes ComPtr, which is an improved version of ATL's CComPtr class. It means that most of the functions of ATL::CComPtr are implemented in WRL::ComPtr. On the other hand, C++/CX has a hat (^), which is the same as ComPtr. If you are familiar with C++ 11, you will realize that both ComPtr and ^ have the same behavior as that of shared_ptr. Note that only the behavior is similar, not the implementation.
The following is a simple class and two interfaces in C++/CX:
interface struct IGet
{
  int Get() = 0;
};
interface struct ISet
{
  void Set(int value) = 0;
};
ref class CProperty sealed : IGet, ISet
{
public:
  CProperty()
  {
    OutputDebugString(L"CProperty created. \n");
  }
  virtual int Get() { return this->field; }
  virtual void Set(int value) { this->field = value; }
private:
  ~CProperty()
  {
  OutputDebugString(L"CProperty released. \n");
  };
  int field;
};
Tip
Downloading the example code
You can download the example code files for all Packt books you have purchased from your account at http://www.packtpub.com. If you purchased this book elsewhere, you can visit http://www.packtpub.com/support and register to have the files e-mailed directly to you
When the CProperty object is created or destroyed, the corresponding message is shown on the output debug window of Visual Studio.
All Windows runtime classes are derived from the
IInspectable interface, and the IInspectable interface inherits from the IUnknown interface. C++/CX supports
ref classes and ref structs that have got the managed lifetime by the automatic reference counting. It suggests that when you create a new reference to an object, IUnknown::AddRef is automatically called in order to increment the reference count, and when the destructor of the object is called, IUnknown::Release automatically decrements the reference count.
CProperty^ a = ref new CProperty();
In order to allocate a ref class in the dynamic memory, use the
ref new keyword; also note that the hat is actually a smart pointer in C++/CX.
In C++/CX, the object Platform::Object is the base class on the platform namespace that provides a common behavior for Windows runtime classes. Unlike native C++, C++/CX does not support multiple inheritance; however, if you still want to use this feature, you need to use the native C++ code within the Metro app. If you are a C++ programmer, you will see that there are a lot of differences between inheritance in C++ and C++/CX. Let's check those differences with reference to the following example. Change the CProperty class until the CObject class is able to inherit from it:
ref class CProperty : IGet, ISet
{
internal:
  CProperty(){};
protected:
  virtual void GetType(){};
protected public:
  virtual void GetName(){};
public:
  virtual int Get() { return this->field; }
  virtual void Set(int value) { this->field = value; }
private:
  int field;
};
ref class CObject sealed : public CProperty
{
public:
  CObject(){};
protected:
  virtual void GetType() override
  {
    CProperty::GetType();
  };
};
CObject is declared as a sealed class, which means this class cannot be used as a base class and its virtual members cannot be overridden. The sealed keyword is used for the ref classes just as the final keyword is used in C++ 11, which is used for the standard classes and functions.
These are the basic rules for inheritance in C++/CX:
The base
refclass has got an internal constructor; in other words, an unsealedrefclass cannot have apublic,protected, orprotected publicconstructor.The
refclasses can implement any number of interfaces. As you can see,CPropertyis implemented from two different interfaces (ISetandIGet).The
refclasses can inherit from only one baserefclass. As you can see, theCObjectrefclass inherits from only theCPropertybaserefclass.Only the
sealedclass has got apublicconstructor in order to prevent further derivation.Access to a
protectedmember declared in therefclass is not possible; it is possible only if the member is declared asprotected public. See the declaration of theGetNameandGetTypefunctions.For
refclasses, only thepublicinheritance is supported. For instance:ref class CObject sealed : public CProperty // OK ref class CObject sealed : private CProperty // Error
Delegates are most commonly used in conjunction with events. Let's discuss both of them in this section.
Many components in the Windows runtime expose events, and each event has a delegate type. You can declare an event in a ref class or inside an interface. The following example shows how to declare events and delegates:
namespace EVENT
{
  //Forward declaration
  ref class CEvent;
  public delegate void CEventHandler(CEvent^ sender, Platform::String^ e);
  void OnEvent(CEvent^ sender, Platform::String^ e)
  {
        //Do something
  }
  public ref class CEvent sealed
  {
  public:
    CEvent(){};
    event CEventHandler^ Event;
    void RiseEvent()
    {
      Event(this, L"CEvent raised");
    }
  };
}
First, we declare a delegate named CEventHandler
. This delegate has two arguments, a sender that is a type of CEvent class, and a standard string of Windows runtime.
The following code shows how to initialize an event, fire it, and how to use the callback method (OnEvent). The EventRegistrationToken class helps you store the token of an event in order to remove the event handler that is previously subscribed.
CEvent^ c = ref new CEvent();
Windows::Foundation::EventRegistrationToken token = c->Event += ref new CEventHandler(&OnEvent);
  c->RiseEvent();
  c->Event -= token;
In this section, you were introduced to C++/CX. Every application has got unique requirements for programming. Every Windows Store application is built on Windows runtime, and the core of Windows runtime is Application Binary Interface (ABI), which is built on COM. Although we can use native C++ to directly interact with COM, don't forget that this method is not as simple as when using C++/CX.
Prior to getting started with coding, it is crucial to discover what Metro Style applications are and whether they can be cross-platform.
Windows 8 introduces a new type of application called a Windows Store app. Your application can be written and sold on Windows Store. It is a great opportunity for developers to write applications that can be run on PCs, tablets, and Windows Phones, and it might even be possible to run on the new generation of Xbox; that is, Xbox One!
In Metro Style, you can develop in a variety of languages. If you are a web developer, you may prefer to develop with HTML5, CSS3, and JavaScript; if you are a .NET developer, you can develop with XAML with code-behind in C++, C#, or Visual Basic.
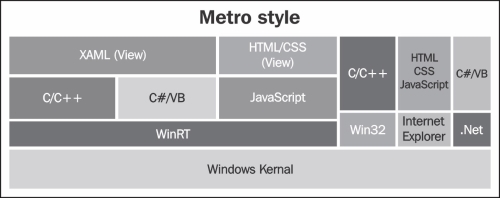
If you are a game programmer, you can use DirectX 11.1 with C++/CX and HLSL to develop your game; if you prefer the .NET platform for game development, it is possible to write a wrapper for C++/CX.
Please note that Windows Store application development is supported only by Windows 8. Visual Studio 2012 supports ARM development, hence all Metro Style applications in the Windows Store work on both ARM and x86/64. The x86/x64 processors are fast and powerful, but they require a lot of electricity; on the other hand, ARM processors are weak and need low power, and they are used for PDAs, smartphones, and tablets. Because of the difference in hardware, a program that is built on an x86/x64 processor cannot run on an ARM processor and vice versa.
For creating your project, the first step is opening Visual Studio 2012 and creating a new Windows Store project from the C++ tab by performing the following steps:
Open Visual Studio 2012 and navigate to File | New | Project (or Press Ctrl + Shift + N). You will see a project dialog box appear.
Click on the Visual C++ tab and select Windows Store; then select Direct3D App and choose a name for your project, such as
Chapter 1or any other name you prefer. Make sure you browse the right path for your project's location; finally, click on OK.In order to develop an application on Windows 8, you will need a developer license. When you see the Developer License dialog box, first read Microsoft's terms and then click on I Agree.

You will need to have a Microsoft account. If you already have one, log in with your own account; if you don't, sign up to get a new account.
Press F5 and Visual Studio will output this: Would you like to build?. Click on Yes; when the building process completes, you will see a cube that rotates in the center of the screen.
Don't worry if the code seems overwhelming. In the next section, we will guide you through writing your own framework in order to get a better understanding of it.
We have introduced C++/CX and ran our first sample; now it is time to build our own framework gradually in order to get familiar with DirectX 11.1 programming:
Open the
First Metro Appproject from the source code ofChapter 1. If you cannot find the Solution Explorer pane, press Ctrl + Alt + L or navigate to View | Solution Explorer to enable it.In the Solution Explorer pane , enable Show All Files. This feature lets us use
Folderinstead ofFilterin our project. However, you can addFilterand just change it to the path ofincludesin your project.
Let's check the pch.h and pch.cpp files from the source code. The pch.h file is shown in the following code:
#pragma once
#include <wrl/client.h>
#include <d3d11_1.h>
#include <DirectXMath.h>
#include <memory>
#include <ppl.h>
#include <ppltasks.h>
#include <agile.h>
If you are a C++ programmer, you will see unfamiliar header files named wrl, agile.h, ppl.h, and ppltasks.h. Also, DirectXMath.h is unfamiliar for DirectX programmers. What are they supposed to do?
wrl headers are needed to take advantage of the Windows 8 libraries, and agile.h is the header needed to enable threading model and marshaling behavior across COM.
In our project, we need an agile object type to create CoreWindow. If you want to access an instance of a class from both the UI thread and a background thread, define the class as agile. If you do not want to define it as agile, be aware of the behavior of this class at runtime. Remember that if you define a ref class in C++/CX, it is agile by default, and do not define a member that is not agile inside this type of class. According to MSDN, some classes cannot be agile for a variety of reasons.
We added ppl.h and ppltasks.h to use Windows runtime asynchronous tasks; we will see these headers in action later.
DirectXMath
is a library designed for C++ developers, and it includes functions for common linear algebra and graphical math operations.
You may be familiar with precompiled headers; it is a performance feature supported by some compilers to reduce the compilation time and store the compiled state of code in a binary file. Because we want to create a precompiled header to compile and build the project more quickly, we need to change some properties. Follow the ensuing steps:
Right-click on Project and go to the Properties page. From C/C++, go to the Precompiled Headers tab and make sure Precompiled Header is set to Use(/Yu) and Precompiled Header File is set to pch.h as shown in the following screenshot:
Finally, right-click on pch.cpp and make sure Precompiled Header is set to

In the Scenes folder, there are the Window.h and Window.cpp files.
The Window.cpp file is responsible for creating a window and handling the events, and it must be inherited from IFrameworkView. The IFrameworkView interface is shown in the following screenshot:
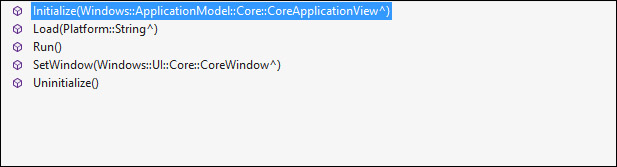
The following are the methods seen in the preceding screenshot:
The
Initializemethod is for the app view and the initialization of graphics. This method is called when an app is launched.The
Loadmethod loads any external resources used by the app view, such as shaders, textures, or other resources.The
SetWindowmethod is for setting the current window for the app object's view.The
Uninitializemethod is responsible for releasing and disposing the resources.
The following are other events for handling our window more easily:
The
OnWindowSizeChangedevent is triggered when the window size is changed.The
OnLogicalDpiChangedevent occurs when theLogicalDpiproperty changes because the p ixels per inch (PPI) of the display changes.The
OnActivated,OnSuspending, andOnResumingevents are triggered when the state app is activated, suspended, or resumed.The
OnWindowClosedevent, as its name implies, is triggered when the window is closed.The
OnVisibilityChangedevent is an event handler that is triggered when the visibility of the window is changed.The
OnPointerPressedevent is an event handler that our app calls when the user taps on the touch pad or presses the left mouse button.The
OnPointerMovedevent is the same asOnPointerPressedbut is called when the player swipes a finger across the touch pad or moves the mouse.
Now that we have introduced the preceding methods and events, let's see their definition in the Window.cpp file as shown in the following screenshot:
void Window::Initialize(CoreApplicationView^ appView)
{
 appView->Activated += ref new TypedEventHandler<CoreApplicationView^, IActivatedEventArgs^>(this, &Window::OnActivated);

  CoreApplication::Suspending += ref new EventHandler<SuspendingEventArgs^>(this, &Window::OnSuspending);

  CoreApplication::Resuming += ref new EventHandler<Platform::Object^>(this, &Window::OnResuming);
}
According to the IFrameworkView interface, the entry argument of the Initialize method is CoreApplicationView, which is a pointer. We declare the Activated, Suspending, and Resuming events likewise. Just as in the
Initialize method, we declared the events of the window, such as SizeChanged, VisibilityChanged, Closed, and Pointers, in the SetWindow method. Right now, there is no need to load the resource, so leave this method as it is for now.
void Window::Run()
{
  while (!isWindowClosed)
  {
    if (isWindowVisible)
    {
      CoreWindow::GetForCurrentThread()->Dispatcher->ProcessEvents(CoreProcessEventsOption::ProcessAllIfPresent);
    }
    else
    {
      CoreWindow::GetForCurrentThread()->Dispatcher->ProcessEvents(CoreProcessEventsOption::ProcessOneAndAllPending);
    }
  }
}
The Run method is the main method of your application. This is an entry point to your game. While your app is not closed, it will check the visibility of your window; if the window is visible, it dispatches all currently available events in the queue. CoreProcessEventsOption::ProcessAllIfPresent calls the handlers for each input event that is currently in the message queue. If no events are pending, it returns immediately and waits for the next event.
Do not use Uninitialize, as there are no resources to be released right now; the same goes for OnWindowSizeChanged. Furthermore, OnPointerPressed, OnPointerPressed, and OnPointerMoved events are going to be used later in Chapter 3, Rendering a 3D Scene, for handling the input.
void Window::OnActivated(CoreApplicationView^ applicationView,
  IActivatedEventArgs^ args)
{
  CoreWindow::GetForCurrentThread()->Activate();
}
When the OnActivated event triggers, you must activate the current thread. The CoreWindow::GetForCurrentThread() method gives you the current thread, and with the Activate method, you can activate this thread. Now we just need to create the main method with the array of the string as the entry arguments; so, add the following code to Window.h:
ref class App sealed : IFrameworkViewSource
{
public:
  virtual IFrameworkView^ CreateView();
};
The App class is inherited from IFrameworkViewSource; we need to add a public virtual method named CreateView
to the App class in order to create IFrameworkView. At last, add the following code to Window.cpp:
IFrameworkView^ App::CreateView()
{
  return ref new Window();
}
[Platform::MTAThread]
int main(Platform::Array<Platform::String^>^)
{
  auto app = ref new App();
  CoreApplication::Run(app);
  return 0;
}
Press F5 to build your project. The result is just an empty Metro window.
In the next section, we are going to integrate our framework with time.
Time is the main element of any application; your game cannot be handled without time management. In this section, we are going to create a time manager. Open the Work with game time project from Chapter 1 and then open Timer.h from the FrameWork folder.
Timer is a ref class that is declared as sealed. Total and Delta are two properties that are used in the Timer class.
The Total
property is used to measure the duration (in seconds) between the last call to the Reset method and the last call to the Update method. It returns the total time of the timer. The
Delta property is used to measure the duration (in seconds) between two calls to the Update method. The Timer method uses the QueryPerformanceFrequency function to retrieve the frequency of the high resolution performance counter.
void Update()
{
if (!QueryPerformanceCounter(¤tTime))
{
throw ref new Platform::FailureException();
}
totalTime = static_cast<float>(
static_cast<double>(currentTime.QuadPart - startTime.QuadPart) / static_cast<double>(frequency.QuadPart));
if (lastTime.QuadPart == startTime.QuadPart)
{
deltaTime = 1.0f / 60.0f;
}
else
{
deltaTime = static_cast<float>(static_cast<double>(currentTime.QuadPart - lastTime.QuadPart) /static_cast<double>(frequency.QuadPart));
}
lastTime = currentTime;
}
};Basically, you use QueryPerformanceFrequency to get the number of ticks per second and QueryPerformanceCounter to get a high resolution timer value.
To calculate totalTime, use (CurrentTime - StartTime) / frequency; for calculating deltaTime, use (CurrentTime - lastTime) / frequency.
The QueryPerformanceCounter method will only reassemble the frequency of the CPU. Please note that according to MSDN, the results of QueryPerformanceCounter may vary with different processors.
In the next section, we will create and configure the Direct3D device.
In the final section of this chapter, we are going to initialize and configure our device. As the window has been created and the time has been added to our framework, the next step is to obtain a reference to the device. Open the Initialize the device project from the source code.
Let's check the new headers and classes of this project step-by-step. First, open DXHelper.h from the Framework folder. The DXHelper.h file is shown in the following code:
#pragma once
#include "pch.h"
using namespace Platform;
namespace DXHelper
{
  inline void OutputDebug(Platform::String^ Msg)
  {
    auto data = std::wstring(Msg->Data());
    OutputDebugString(data.c_str());
  }
  inline void ThrowIfFailed(HRESULT hr)
  {
    if (FAILED(hr)) throw Exception::CreateException(hr);
  }
}
We need two methods to manage our exceptions and to show messages to the output debug window of Visual Studio. We defined them as inline methods inside the DXHelper namespace. Game is a class that is designed to be used as the base class of other scenes. ComPtr is in the Microsoft::WRL namespace, and Platform is vital for Agile. Open it from Game.h, which is in the Framework folder. You can see the following code in the
Game.cpp file:
ref class Game abstract
{
internal:
  Game();
private:
  void CreateDevice();
  void CreateWindowSize();
  void HandleDeviceLost();
protected private:
  //D3D Objects
  ComPtr<ID3D11Device1> d3dDevice;
  ComPtr<ID3D11DeviceContext1> d3dContext;
  ComPtr<IDXGISwapChain1> swapChain;
  ComPtr<ID3D11RenderTargetView> renderTargetView;
  ComPtr<ID3D11DepthStencilView> depthStencilView;
You can declare the device as ID3D11Device1* or ComPtr<ID3D11Device1>; as mentioned earlier, the only difference is that ComPtr is a class that is responsible for automatically getting and releasing the object. It is not necessary to use it, but often it is more convenient to use ComPtr for the purposes of memory management.
D3D_FEATURE_LEVEL featureLevel;
  Size renderTargetSize;
  Rect windowBounds;
  Agile<CoreWindow> coreWindow;
DisplayOrientations displayOrientations;
Tip
If you are going to develop a Metro Style application, you need to be concerned with the orientation of the screen. Because you can manage the orientation of the screen, access to DisplayOrientations from the Windows::Graphics::Display namespace is possible.
public:
  virtual void Initialize(CoreWindow^ window);
  virtual void WindowSizeChanged();
  virtual void Render() = 0;
  virtual void Present();
};
In the preceding code, all the methods declared are virtual methods except Render, which is declared as a pure virtual method. In C++, a pure virtual function (declared using = 0) must be implemented by the derived classes. The following code shows the Game.cpp class. These three headers are the precompiled header, our framework helper, and the Game.h header:
#include "pch.h" #include "..\DXHelper.h" #include "..\Game.h"
void Game:: CreateDevice ()
{
HRESULT hr =  S_FALSE;
  UINT creationFlags = D3D11_CREATE_DEVICE_BGRA_SUPPORT;
#if defined(_DEBUG)
  creationFlags |= D3D11_CREATE_DEVICE_DEBUG;
#endif
The D3D11_CREATE_DEVICE_DEBUG flag is used for enabling the debug layer when you want to check the errors and warnings of your code; for debugging, you need D3D11_1SDKLayers.dll; for getting this DLL, you must install SDK for Windows 8.
In Direct3D 11.1, a device can be created with some configuration flags that can be used in a majority of applications, but there are also several other driver types that must be considered; you can get more info about them from MSDN (http://msdn.microsoft.com/en-us/library/windows/desktop/ff476107(v=vs.85).aspx). An example of that is as follows:
D3D_FEATURE_LEVEL featureLevels[] =
  {
    D3D_FEATURE_LEVEL_11_1,
    D3D_FEATURE_LEVEL_11_0,
  };
The D3D_FEATURE_LEVEL driver describes the set of features targeted by a Direct3D device. These features can be set from level 9_1 to level 11_1.
  ComPtr<ID3D11Device> device;
  ComPtr<ID3D11DeviceContext> context;
  hr = D3D11CreateDevice(
      nullptr,
      D3D_DRIVER_TYPE_HARDWARE,
      nullptr,
      creationFlags,
      featureLevels,
      ARRAYSIZE(featureLevels),
      D3D11_SDK_VERSION,
      &device,
      &featureLevel,
      &context);
   DXHelper::ThrowIfFailed(hr);
  hr = device.As(&d3dDevice);
  hr = context.As(&d3dContext);
}
With D3D11CreateDevice, we create the Direct3D device and get an immediate context. Just as we do in ComPtr, call QueryInterface to signify that the interface has been identified. It is always important to check the return value from the API calls to ensure the function has succeeded.
A swap chain is a collection of buffers that are used for displaying frames to the user. When something is displayed on the monitor, the data in the back buffer is being filled while the data in the front buffer is being displayed. Actually, the front buffer is a pointer to a surface and represents the image being displayed on the monitor. The swap chain is responsible for presenting the back buffer by swapping it with the front buffer; this process is called surface flipping.
In the CreateWindowSize method, we initialized the swap chain. Firstly, we checked if the swap chain already exists or not. If the answer is yes, just resize it with the same adaptor. But, if the swap chain does not exist, we must create it as follows:
  if(swapChain != nullptr)
  {
    HRESULT hr = swapChain->ResizeBuffers(
      2, // Double-buffered swap chain.
      static_cast<UINT>(renderTargetSize.Width),
      static_cast<UINT>(renderTargetSize.Height),
      DXGI_FORMAT_B8G8R8A8_UNORM,
      0);
  }
In order to create the swap chain, we first need to define the swap chain description. The properties of the swap chain description are as follows:
The
DXGI_FORMATDXGI_FORMATstructure, which describes the display formatThe
Stereo flagproperty is either true, which means the fullscreen display mode or the swap chain back buffer is stereo, otherwise the false value, which means that the full screen display mode or the swap chain back buffer is not stereoThe
SampleDescproperty describes the multisampling parametersThe
BufferUsageproperty describes the surface usage and the CPU access options for the back bufferThe
BufferCountproperty indicates the number of buffers in the swap chainThe
Scalingproperty identifies the resize behavior if the size of the back buffer is not equal to the target outputThe
DXGI_SWAP_EFFECTproperty typed value uses the options for handling the pixels in a display surfaceThe
DXGI_ALPHA_MODEDXGI_ALPHA_MODEproperty typed value identifies the transparency behavior of the swap chain back bufferA combination of
DXGI_SWAP_CHAIN_FLAGDXGI_SWAP_CHAIN_FLAGtyped values, which are combined by using a bitwiseORoperation
Now let's get back to the previous code:
  else
  {
    DXGI_SWAP_CHAIN_DESC1 swapChainDesc = {0};
    swapChainDesc.Width = static_cast<UINT>(renderTargetSize.Width);
    swapChainDesc.Height = static_cast<UINT>(renderTargetSize.Height);
    swapChainDesc.Format = DXGI_FORMAT_B8G8R8A8_UNORM;
    swapChainDesc.Stereo = false;
    swapChainDesc.SampleDesc.Count = 1;
    swapChainDesc.SampleDesc.Quality = 0;
    swapChainDesc.BufferUsage = DXGI_USAGE_RENDER_TARGET_OUTPUT;
    swapChainDesc.BufferCount = 2;
    swapChainDesc.Scaling = DXGI_SCALING_NONE;
    swapChainDesc.SwapEffect = DXGI_SWAP_EFFECT_FLIP_SEQUENTIAL;
    swapChainDesc.Flags = 0;
The primary goal of Microsoft DirectX Graphics Infrastructure (DXGI) is to manage low-level tasks that can be independent of the DirectX graphics runtime. DXGI provides a common framework for future graphics components which is used to present frames to a window, monitor, or read the contents on a monitor.
    ComPtr<IDXGIDevice1>  dxgiDevice;
    hr = d3dDevice.As(&dxgiDevice);
    ComPtr<IDXGIAdapter> dxgiAdapter;
    hr = dxgiDevice->GetAdapter(&dxgiAdapter);
    ComPtr<IDXGIFactory2> dxgiFactory;
    hr = dxgiAdapter->GetParent(__uuidof(IDXGIFactory2), &dxgiFactory)
//__uuidof extracts the GUID attached to an object.
CoreWindow^ window = coreWindow.Get();
hr = dxgiFactory->CreateSwapChainForCoreWindow(d3dDevice.Get(), reinterpret_cast<IUnknown*>(window), &swapChainDesc, nullptr, &swapChain);
hr = dxgiDevice->SetMaximumFrameLatency(3);
}
SetMaximumFrameLatency helps you control the latency of an application loop for the process of updating. Actually, frame latency is the number of frames that are allowed to be stored in a queue while the CPU is responding to user input before submission for rendering. In DirectX 11.1, the value defaults to 3, but it can range from 1 to 16.
The render target view allows you to render the scene to a texture resource. You can then apply a shader to the texture resource before displaying it. When the back buffer is ready, the
CreateRenderTargetView method is used to create a render target view.
The last part creates the render target view, the depth stencil, and the viewport of Direct3D. Use the back buffer to create the render target view; also, you can define the render target view description or send nullptr to use the default value.
The properties of the render target view description are as follows:
The
Formatproperty specifies the format type of resource dataThe
ViewDimensionproperty identifies the type of resource that will be viewed as a render targetThe
Bufferproperty specifies how the render target resource will accessTexture1D,Texture1DArray,Texture2D,Texture2DArray,Texture2DMS,Texture2DMSArray, andTexture3D, which are used to specify the subresources.
First we get the back buffer from the swap chain, and then we will create the render target view from this back buffer as shown in the following code:
ComPtr<ID3D11Texture2D> backBuffer;
  hr = swapChain->GetBuffer(0, __uuidof(ID3D11Texture2D), &backBuffer);
  hr = d3dDevice->CreateRenderTargetView(backBuffer.Get(), nullptr, &renderTargetView);
The depth stencil view is a 2D buffer that controls how the depth and stencil buffers are used; it is similar to a render target view, but the difference is that it represents the depth and stencil buffers. The depth buffer stores z data of each pixel as a floating point while the stencil buffer contains integer data of each pixel. As mentioned before, the depth stencil buffer is a 2D buffer, hence the buffer has a 2D texture.
CD3D11_TEXTURE2D_DESC inherits from D3D11_TEXTURE2D_DESC and is used to create a depth stencil description (CD3D11_DEPTH_STENCIL_VIEW_DESC) which specifies how to access a resource used in a depth stencil view.
CD3D11_TEXTURE2D_DESC depthStencilDesc(
    DXGI_FORMAT_D24_UNORM_S8_UINT,
    static_cast<UINT>(renderTargetSize.Width),
    static_cast<UINT>(renderTargetSize.Height),
    1,
    1,
    D3D11_BIND_DEPTH_STENCIL);
  ComPtr<ID3D11Texture2D> depthStencil;
  hr = d3dDevice->CreateTexture2D(&depthStencilDesc, nullptr,
    &depthStencil);
  CD3D11_DEPTH_STENCIL_VIEW_DESC
    depthStencilViewDesc(D3D11_DSV_DIMENSION_TEXTURE2D);
  hr = d3dDevice->CreateDepthStencilView(depthStencil.Get(),
    &depthStencilViewDesc, &depthStencilView );
  CD3D11_VIEWPORT viewport(
    0.0f,
    0.0f,
    renderTargetSize.Width,
    renderTargetSize.Height);
  d3dContext->RSSetViewports(1, &viewport);
}
For creating the viewport, you must specify the top, the left, and the size of the screen.
Finally, the Present method is used for presenting DXGI_ PRESENT_PARAMETERS. It then discards the render target and depth stencil views. Furthermore, it will be responsible to check whether the video card has been physically removed, a driver upgrade for the video card has been launched, or if there is something wrong with the drivers of the video card. If any of these have happened, it should destroy and recreate the device. As the HandleDeviceLost method is responsible for managing it, it is simply a reinitialize device.
So, we have introduced how to initialize the Direct3D device. The SimpleScene class shows you how to clear the screen using the functions of the
Game class. Note that the SimpleScene class must inherit from the Game class.
In this chapter, we have introduced the new features of Windows 8, DirectX 11.1, and the new extension of C++, which is called C++/CX. Also, we have set up our first project, added time to our new framework, and initialized the Direct3D device.
In the next chapter, we will cover the new features of HLSL in DirectX 11.1, buffers, and the compiled shader objects. Finally, we will outline the new additions of Direct3D 1.1.

