


 Download code from GitHub
Planning Your Component
Joomla! is an extensible Content Management System (CMS). For years, people have used Joomla! to build great websites, such as company websites, sites for associations, niche social networks, blogs, and school websites.
Joomla's popularity stems from the plenty of features and functionalities it comes with – content and user management, custom fields to expand your articles and create directories, and built-in search, among others.
Even so, despite all these great features, it does not solve all the problems you may face when building a web application. In this book, you are going to learn how to use Joomla! to build solutions while leveraging the Joomla! FrameworkTM to make your work easier. Throughout this book, we will explore how to code our components, modules, plugins, and even templates to develop an integrated and portable solution to our technical problems.
The first step to solving a technical problem is always to write a good plan. The planning process provides a better understanding of the problem. In this chapter, we will go through the process of identifying our problem and writing a plan to solve it.
We will identify which parts of our problem correspond to which technical entities. After that, you will see how easy it is to define the basic architecture of your project. Finally, we will add some mock data that will be helpful when we start testing our work.
In this chapter, we are going to cover the following main topics:
- Understanding what a Joomla! component is
- Translating your problem into an application
- Defining your component database structure
- Adding mock data to your database
By the end of this chapter, you will be able to design and plan the development of a Joomla! component that solves a problem in the real world.
Technical requirements
You do not need special software to develop a Joomla! extension. A text editor should do that, but using the right tools will help you develop quicker. Also, all the tools we recommend are free and are available for several operating systems:
- A Joomla! website. We recommend using a free site from https://launch.joomla.org. It’s perfect for testing purposes, and it has all the server tools we need. For development purposes, it’s better to use a local LAMP stack because you have better and faster access to all files.
- Visual Studio Code as your code editor. You may download it from https://code.visualstudio.com/.
- PhpMyAdmin as a database client to edit the database structure of your site. It is included in the server tools of the Joomla! Launch server panel.
You can find the code files for this chapter on GitHub: https://github.com/PacktPublishing/Developing-Extensions-for-Joomla-5/tree/chapter01
Understanding what a Joomla! component is
In Joomla!, we have several types of extensions – components, modules, plugins, templates, libraries, packages, and languages. All of these have a specific purpose in the system, but due to Joomla’s flexibility, in some cases, it can get difficult to choose one type over the other. Should I use a module to include content at the end of my articles, or is it better to use a content plugin? Do I use a custom user plugin to add fields to my user profile, or should I use Joomla! Custom Fields capabilities? After reading this book, you will be able to choose the option that best fits your project.
The main and most complete extensions in Joomla! are components. We can think of Joomla! components as small web applications on their own. Components do not need to be supported by any other parts of your Joomla! site. They can work isolated from the rest of your site, and they complete the scope of your website.
In any case, you will get the most from any component when they team up with other Joomla! parts, such as modules or plugins.
Your website is formed by lots of pages, and every page has a URL. In Joomla!, every time you access a URL, you are inside a Joomla! component. So, components have their own page requests, and no other components of the site can affect them when you load their URL. Despite this isolation, they can communicate with other components using their code.
Some characteristics of a Joomla! component are as follows:
- Joomla! components offer a secure entry point for your requests. With them, you may create webhooks for external services or receive data from forms.
- Components usually have a backend and a frontend. The backend is usually restricted to managers and administrators of the site and is used to manage the data.
- In most scenarios, your component will have to store data in the database. For instance, if you want to create a component to track your projects’ progress, you need to store the names of your projects, their statuses, and probably more information in the database. For this reason, components install new tables in your database to store information.
- Components automatically add themselves to Joomla’s backend menu, and they install new menu item types on your site to show their data on the site’s frontend.
In fact, in Joomla!, you are always working with components as every page (backend or frontend) of your site is a component view.
Now that we know some characteristics of a component, let’s see how we can use them to solve real-world problems.
Translating your problem into an application
Whenever your customers demand a new feature for their website, you need to think of how to put it in place. Most of the design process consists of understanding your client’s needs and being able to translate them into all the entities that conform to your web application.
Modeling applications into coding elements is a complex subject that involves lots of research. In this book, we will take a practical approach and make a visual and simplified architecture for our data.
In any case, you need to plan your extension properly, and for that, you need to translate your customer’s words into coding blocks.
Identifying your elements
In any problem you want to solve, you can identify different elements that form part of your problem:
- Entities: An entity is an element of your problem with which other elements can interact. For instance, it could be a company, a user, a task, or an invoice. Also, an entity implies data that needs to be stored in the database.
- Relationship: A relationship relates entities to one another with no action between them. For instance, a customer will have a company.
A real-world example
In this book, we will be solving a real-world problem. We need to develop a project management tool that allows us to do the following (these are also the requirements to solve the problem):
Now, let’s begin by defining entities for this problem.
Defining your entities
Data entities are one of the most important parts of our project. They correspond to the data we need to store for our project. Data entities will be the tables in our database where we store our component information.
Some of these data entities are easy to recognize. For instance, if your project has users, then the user will correspond to a data entity.
Finding entities
In our project management tool project, we can see several entities at a glance:

Figure 1.1 – Entities we identify in our problem
In this figure, we can see the following entities:
- Customers: This represents our customers and will have enough information to identify them – Firstname, Lastname, Email, Company name, Company ID, Company Address, and Phone.
- Invoices: This involves the invoices we may send to our customers. Our invoicing system will be quite simple; it will just need the Customer data, Services provided, and Amount fields.
- Projects: Projects are entities in our problem as they represent the service our customer has requested. In our case, projects will just have a name, description, and deadline.
- Project category: We want to be able to differentiate several categories in our project, and an easy way of doing so is by adding categories to our projects. Our project categories will need just a name.
- Tasks: Tasks are the jobs we have to do for our project, so it makes sense to think of them as entities in our requirements. In our scenario, a task will have a name, a description, a state, and a deadline.
What actions can we find in our problem?
Not only do we need to define the entities that form our system, but we also need to identify the actions that can be applied to all of them. Actions are the tasks we can perform on our entities. In our extension, for instance, we can create new projects, or edit existing customers. So, Create and Edit are the actions of our component.
Some types of actions are common to all entities, and you should count on them every time:
- Create entity: This action allows us to add data to our database. Any time you create an entity, a row is added to its table in the database.
- Edit entity: This action allows us to modify the data we previously added to the database. When you edit an entity, no extra row is added to the database.
- Remove entity: This action removes data we previously added to the database. When you remove an entity, you remove at least one row from the database. Or move it to the trash first and remove it from the trash later.
- Show entity: This action allows you to show the data of your entity. No data is changed in your database when you use this action.
And, of course, every project will have its own needs and can have several actions not shown in this book. For our real-world project, we have identified the following actions for each of our entities:
- Customer: For our Customer entity, we can find the following actions:
- Invoice: For the Invoice entity, we can define the following actions:
- Create invoice
- Edit invoice
- Send invoice
Please be aware that we have omitted the removed action from invoices. Most countries do not allow you to remove invoices, so it makes sense not to consider this action in our project. You need to find a solution for changing or deleting customer data. An invoice should always contain the original data.
- Project: For the Projects entity, we define the following actions:
- Project category: For the Project category entity, these are the actions we can add:
- Task: For the Task entity, we find these actions:
Defining relationships
Our entities are not isolated; they need to be connected to have some functionality. For instance, a task must belong to a project, and a customer might have several invoices.
It is important to define the relationships between all our entities to be able to devise the database tables.
In our example, we can find the following relationships:
- Customer:
- Invoice:
- Project:
- Task:
- Every task will be assigned just to one project
These relationships are illustrated in the following figure:

Figure 1.2 – Graphical representation of our relationships
The arrows in the figure show the entities’ relationships. When we create our database tables in the following sections, these arrows will represent a field that relates to two tables. For instance, in the Invoices table, we will have an id_customer field that shows the relationship between the customer and the invoice.
Once we have translated our problem into entities and their relationships, we can define the database structure for our component.
Defining your component database structure
Our component needs to store information in the Joomla! database. So, we need to identify all the tables and columns we need for our component. Once we have identified all the elements of our problem, it is easy to write down the table’s structure.
We will take the following approach to write the table’s structure:
- Add database tables for entities
- Add extra information columns to tables
- Reflect relationships in the database
- Create tables (What kind of tables? We already added database tables for entities (see the first item))
Let’s start by taking a quick to the Joomla! database’s default tables before adding our tables.
A quick look at the Joomla! database
After installing Joomla!, your database will be populated with several tables. These tables are part of Joomla! Core.
If you log in to PhpMyAdmin, you may see something like this:
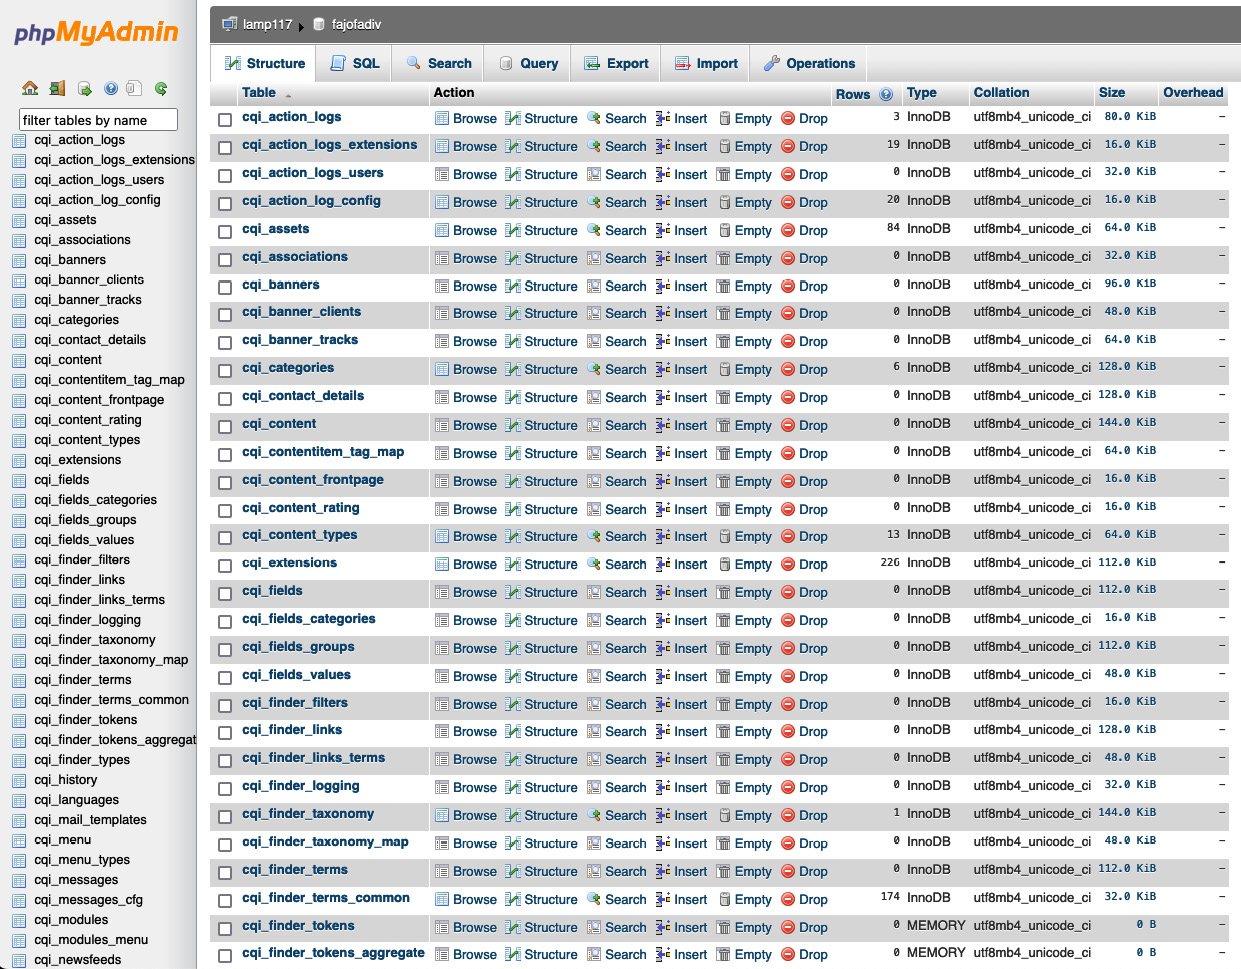
Figure 1.3 – Joomla! tables after installing Joomla!
Here, you can see some tables that come with Joomla!. You should not change these tables or edit their content directly in the database unless you know what you are doing.
One thing you may have noticed is that my installation table names are different from yours. In my case, all the tables start with the cqi_ prefix; in your installation, you will find a different prefix.
This is a security measure that has come with Joomla! since Joomla! 1.0. Adding this prefix prevents possible attackers from knowing the exact name of the tables, thus preventing them from planning a direct attack on your database.
This also makes it impossible for us to know the exact table names when we are creating our extensions. To overcome this problem, in Joomla!, we can use the #__ prefix for table names in the code of the extension. You will also find this convention in this book when referring to database tables.
If you want to know the exact database prefix of your Joomla! installation, access the backend of your site and go to System. In the Information panel, click on the System Information link. Then, go to the Configuration File tab; you may find it next to the dbprefix setting.
Adding database tables for entities
As a rule of thumb, we will have one table per entity in our problem, so we can start representing our tables as per this schema:
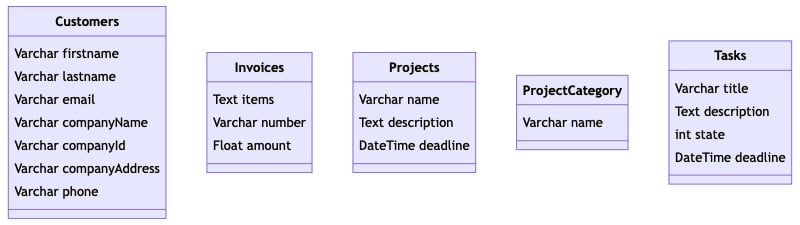
Figure 1.4 – Representation of our tables with their fields
This simple scheme covers all the tables with their fields. Even so, you may notice we have not added any customer data to the invoice. You need to add Customer data to the invoices because when you delete customers, you will lose the Customer data on your invoice! That is because we have just added fields that hold unique and independent information, and now, we are going to add the fields that relate one table with another. Consider the following schema:
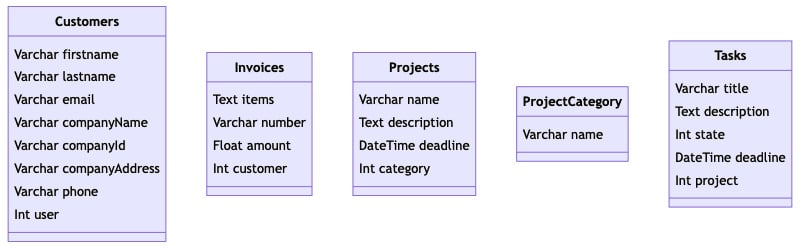
Figure 1.5 – Representation of our tables after adding related fields
Our tables are now complete as they define all the fields and relationships we specified in the previous sections.
Adding extra information columns to tables
Even though we have completed our database structure, it will be a poor database definition if we do not add some extra columns to our definition. For instance, we could add a column registering the creation date of an invoice. Also, it might be interesting to know if an invoice has been modified after creation.
Finally, how do you relate the customer field in the Invoices table with the Customers table? We can do this by adding metadata to our component.
You will want to add some metadata columns to all your tables. These metadata fields give you information about when a new row was added to your table or the last user who modified it. Therefore, these are the common fields you will add to your tables:
- id: It’s used to refer to the specific entity
- modified: Represents the date when the entity was edited
- created: Represents the date when the entity was created
- modified_by: Links to the user who edited the entity
- created_by: Links to the user who created the entity
The database should generate the id column value automatically when each entity is created:
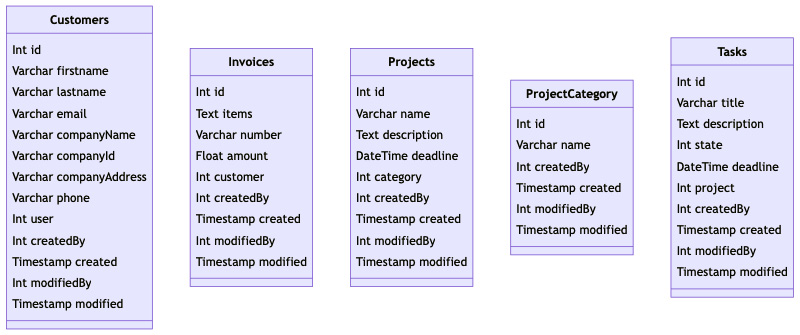
Figure 1.6 – Representation of our tables after adding metadata fields
Reflecting relationships in the database
The last step to having a good visual representation of the project is adding relationships to our diagram.
After adding the extra information fields, our relationships have grown – now, every table is related to the Joomla! User table via the modified_by and created_by fields.
Even though we do not need to create the Joomla! User table, it is a good idea to include a representation of this table in our diagram. We do not need to cover the whole table; just showing the fields we use is enough:

Figure 1.7 – Representation of our tables with all the relationships between them
Here, you can see a full representation of our tables, with arrows representing how they are related.
As you can see, every table links to the Joomla! User table. This is because we have different fields such as modified_by or created_by, which relate to the id field in the Joomla! User table. Besides that, we can see how our tables are related graphically so that we can represent all the relationships we defined in the previous section.
Creating tables in the database
Once we have a clear representation of our tables, we can generate the code to create the tables in our database.
You can use the following code to create the projects table:
CREATE TABLE IF NOT EXISTS '#__spm_projects' (
    'id' int(11) UNSIGNED NOT NULL AUTO_INCREMENT,
    'name' VARCHAR(255) NOT NULL,
    'alias' VARCHAR(255) NOT NULL,
    'description' TEXT,
    'deadline' DATETIME,
    'category' INT(11),
    'created' DATETIME DEFAULT NOW(),
    'modified' DATETIME DEFAULT NOW(),
    'created_by' INT(11)  NOT NULL ,
    'modified_by' INT(11)  NOT NULL ,
    PRIMARY KEY ('id')
    ) ENGINE=InnoDB;
This SQL code will create our projects table. To ensure our tables are unique, and we do not clash with other extensions using similar table names, we can use an extra prefix with the name of our component. In our case, we will use#__spm_projects. Also, remember that before using this code to create your database, you need to replace #_ with your database prefix, as explained in the previous section.
Finally, note the change of casing in the field names. Though MySQL allows you to use caps in the field names, historically, database fields are all in lowercase. So, for our SQL code, we are replacing and renaming our fields from modifiedBy to modified_by and so on. So, why did I mention “modifiedBy” earlier? You can leave that out to make it less confusing.
To create the tasks table, we will use this code:
CREATE TABLE IF NOT EXISTS '#__spm_tasks' (
'id' int(11) UNSIGNED NOT NULL AUTO_INCREMENT,
    'title' VARCHAR(255) NOT NULL,
    'alias' VARCHAR(255) NOT NULL,
    'description' TEXT,
    'deadline' DATETIME,
    'state' INT(3) NOT NULL,
    'project' INT(11),
    'created' DATETIME DEFAULT NOW(),
    'modified' DATETIME DEFAULT NOW(),
    'created_by' INT(11)  NOT NULL ,
    'modified_by' INT(11)  NOT NULL ,
    PRIMARY KEY ('id')
    ) ENGINE=InnoDB;
In this SQL code, we are using an INT type for the project field. This indicates that the project field will store the value of the id field from the #__spm_projects table.
For our customers table, we use a similar code:
CREATE TABLE IF NOT EXISTS '#__spm_customers' (
    'id' int(11) UNSIGNED NOT NULL AUTO_INCREMENT,
    'firstname' VARCHAR(255) NOT NULL,
    'lastname' VARCHAR(255) NOT NULL,
    'email' VARCHAR(255) NOT NULL,
    'company_name' VARCHAR(255) NOT NULL,
    'company_id' VARCHAR(255) NOT NULL,
    'company_address' VARCHAR(255) NOT NULL,
    'phone' VARCHAR(25) NOT NULL,
    'user' INT(11),
    'created' DATETIME DEFAULT NOW(),
    'modified' DATETIME DEFAULT NOW(),
    'created_by' INT(11)  NOT NULL ,
    'modified_by' INT(11)  NOT NULL ,
    PRIMARY KEY ('id')
    ) ENGINE=InnoDB;
In this case, we use an INT field to store the id value of our user from the #__users table in the user field.
Finally, we will create our invoices table using this code:
CREATE TABLE IF NOT EXISTS '#__spm_invoices' (
    'id' int(11) UNSIGNED NOT NULL AUTO_INCREMENT,
    'items' TEXT NOT NULL,
    'number' VARCHAR(25) NOT NULL,
    'amount' FLOAT DEFAULT 0.0,
    'customer' INT(11),
    'created' DATETIME DEFAULT NOW(),
    'modified' DATETIME DEFAULT NOW(),
    'created_by' INT(11)  NOT NULL ,
    'modified_by' INT(11)  NOT NULL ,
    PRIMARY KEY ('id')
) ENGINE=InnoDB;
Once we have the code to create our tables, we can access our database and create them. So, go to your server hosting tools and access your database client. I recommend using phpMyAdmin, but other tools, such as dbadminer, are also an excellent choice. Once you are connected to your database, just execute the preceding SQL code.
After that, all your tables will be created and you will be ready to start adding data to your tables.
Adding mock data to your database
Sample data is a key part of any development process. The benefits of using mock data in our application are clear:
- It provides a better overview of the application
- It saves testing time as you do not need to introduce the data yourself in the app
- It helps you identify errors in your application as you will see the application working sooner
- When you release the app, you can use this mock data to feed your test environments
As mock data does not need to be real or accurate, you may just create some random sentences and copy them into a .csv file. Still, there is a better alternative and you should aim to have useful mock data. Here are some tips you may follow:
- Try to find data that makes sense to your context. For instance, if you have to fill in a phone number, do not add random numbers. Instead, use a number with 9 digits that match your phone number format.
- Do not use real information as your mock data. It might be leaked and you do not want to expose your family and friends.
- Try to automate the process as much as possible.
- You probably need as many types of mock data, as entities you have.
So, keeping these tips in mind, we are going to create a little script that helps us generate our mock data.
Defining the content of our mock data
For each of our entities, we’ll generate a CSV file with sample data. We will import this data into our recently created tables, so we need it to have a specific structure.
For each entity, we will have the following columns (one per field):
- Customers: Firstname, lastname, email, company name, company ID, company address, and phone
- Invoices: Services provided and amount
- Projects: Name, description, and a deadline
- Tasks: Name, description, state, and deadline
Automating mock data generation
It’s a good idea to have more than one sample item per entity in our component. The more items you have, the more cases you can test and notice when developing your component. Also, having random items helps you discover issues and errors in an early phase. You may create sample items one by one by hand, but that will be a repetitive, boring task prone to human error. Instead, we are going to automate the creation of sample data using a simple PHP script.
As we are developing for Joomla! and we love PHP (also, since most of the Joomla! coding is done in PHP, it makes sense not to introduce another language), we are going to code a small PHP script. This script will use a Faker PHP library to automate the process of creating the data. You can find more information about Faker in the Further reading section at the end of this chapter.
The Faker PHP library can create fake data for several type fields and it’s very popular in the PHP community.
Let’s create a folder in our repository called Mock and copy this composer.json file:
{
    "name": "project-manager/mock-data",
    "description": "A script to generate mock data for the
        project",
    "type": "project",
    "license": "GPL v2",
    "autoload": {
        "psr-4": {
            "Carcam\\MockData\\": "src/"
        }
    },
    "require": {
        "fakerphp/faker": "^1.19"
    }
}
This composer.json file defines our project and tells Composer that we want to use the Faker PHP library in it. After that, we must execute composer install in our folder and create the create-mock-customers.php script. In this file, we start loading the Composer autoloader file. This allows us to use namespaces in our script. If you are not familiar with Composer, I recommend that you check out the relevant link in the Further reading section of this chapter:
<?php
require_once 'vendor/autoload.php';
Then, we must define the headers of the CSV file and the number of lines of data we want to create.
How much fake data should I create?
For the number of lines in our CSV, we use a number bigger than 20. In Joomla!, by default, we have 20 items per page, so this helps us show at least two pages of items in the listings.
We must also define the path to save the resulting file before we create the data:
$headers = ['firstname', 'lastname', 'email',
    'company_name', 'company_id', 'company_address',
        'phone'];
$totalLines = 30;
$filepath = './data/customer.csv';
Once we have set up the script, we must initialize the Faker class and start creating our CSV file in a for loop. Inside this for loop, we must initialize an array to store each column and add the values obtained from the Faker class. Finally, we must assign the $data array to the CSV line:
$faker = Faker\Factory::create('en_US');
$csv[0] = $headers;
for ($line = 0; $line < $totalLines – 1; $line++) {
    $data = array();
    $data[] = $faker->firstName();
    $data[] = $faker->lastName();
    $data[] = $faker->email();
    $data[] = $faker->company();
    $data[] = $faker->ein();
    $data[] = $faker->address();
    $data[] = $faker->phoneNumber();
    $csv[$line] = $data;
}
As soon as we finish adding the lines to the data array, we must create the file that will store this data. First, we must create and open the file; then, we must go through our $csv array with a loop to write down every line of the .csv file:
if (!file_exists(dirname($filepath))) {
    mkdir(dirname($filepath), 0755);
}
$file = fopen($filepath, 'w');
foreach ($csv as $row) {
    fputcsv($file, $row);
}
fclose($file);
The process for creating the other entities’ mock data files is similar, so I leave it up to you to check the code in this book’s GitHub repository.
Importing mock data into the database
Once we have created our mock data, we need to add it to our database to be able to use it or retrieve it from our component.
At this point, we are going to import the data manually. However, later in this book, we will learn how we can include it in the installation files, though I do not recommend this approach.
Note
Adding sample data in your installation files will install this data every time your user installs the component. This might be interesting for first-time users, but it is annoying for users who are already acquainted with the component.
To begin importing, follow these steps:
- To import data into your database, you need to access phpMyAdmin or a similar tool and go to the #__spm_customers table we created in the previous section.
- Then, click on Import, add your CSV file, and click on Import:
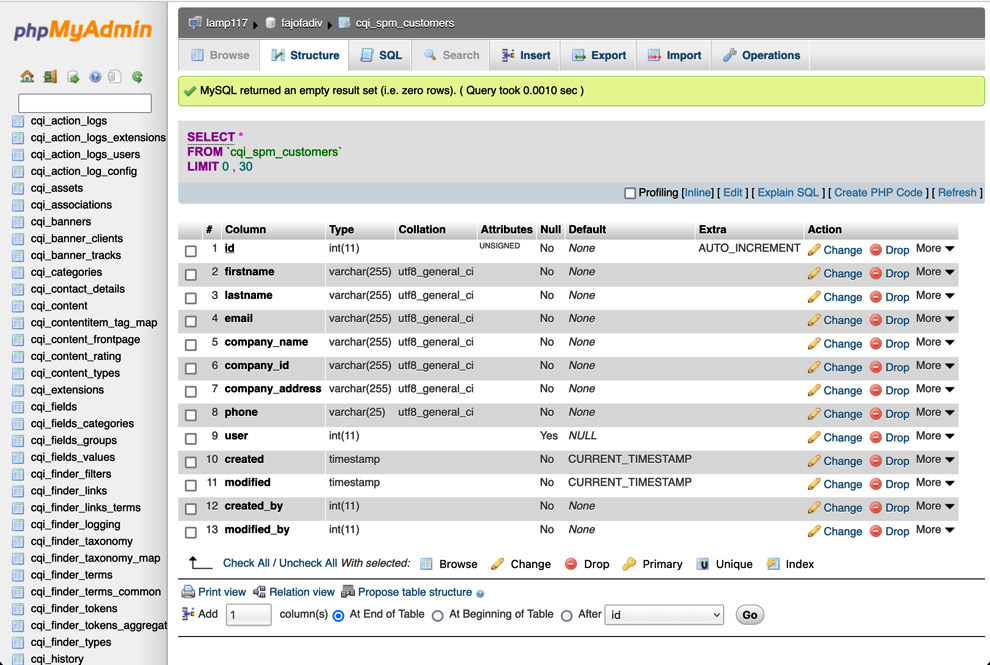
Figure 1.8 – The #__spm_customers table with the Import button at the top right
Now, our database is full of mock data and we are ready to start coding our component to see the results of this import.
Summary
In this chapter, we showed you all the possibilities we have when using a Joomla! component. We also presented a real-world problem, and we started planning a solution for it. Having a development plan helps us understand the problem and allows us to envision all the possible approaches we might take to solve the problem. Finally, we created the database structure and the fake data we are going to use to test it.
You are now ready to translate a real-world problem into a coding problem. You also know how to create a database structure for your component and how to fill it with test data.
In the next chapter, we will code the backend for our component and interact with our new tables from it.
Further reading
- You can read about SemVer at https://semver.org/.
- W3Techs is the site of reference for the CMS market. You can view Joomla! usage and trends worldwide at https://w3techs.com/technologies/details/cm-joomla.
- The
FakerPHPlibrary offers lots of possibilities for creating fake data. You can find more information about it at https://fakerphp.github.io/. - Composer is the de facto dependency manager standard for PHP and it helps you create featured-rich applications using third-party libraries. You can read more about it at https://getcomposer.org/.
- Joomla! relies on namespaces to work. Namespaces in PHP solve lots of issues when using different libraries in your code. You can read more about namespaces in the PHP manual at https://www.php.net/manual/en/language.namespaces.rationale.php.