


 Download code from GitHub
Azure Networking Fundamentals
As more organizations migrate business-critical workloads to the Azure cloud platform (or build new ones), they rely on applications and services being able to communicate with each other securely to provide services to their internal teams, business partners, and customers. Azure Virtual Network (VNet) is the core service for implementing secure private networking in Azure. A VNet is a virtual version of a physical network, implemented on the Azure cloud platform.
In this chapter, we will focus on the foundational concepts of implementing private network connectivity in Azure. We will walk through what Azure VNet is, its capabilities, the key differences between Azure VNet and a traditional on-premises network, and supported services that can be launched into Azure VNet (spoiler: as well as a virtual machine (VM), we can also deploy 20 other services into Azure VNet).
We’ll then go on to discuss key implementation options such as designing/assigning IP address spaces, segmentation using subnets, and resource IP address assignments – how resources are allocated an IP address (another spoiler: you can’t use self-managed DHCP!).
Lastly, we’ll talk about the routing and traffic flow functionalities of Azure VNet. In other words, how does routing work and how do we control traffic flow?
In this chapter, we will cover the following topics:
- Understanding Azure VNet
- Planning VNet naming and location
- Planning VNet IP address spaces
- Planning VNet subnet segmentation
- Hands-on exercise – creating a single-stack VNet in Azure
- Hands-on exercise – creating a dual-stack VNet in Azure
- Understanding private IP address assignment for subnet workloads
- Hands-on exercise – determining the VM location and sizes for future exercises
- Hands-on exercise – exploring private IP assignments
- Cleaning up resources
Each topic has been structured to align with the recommended network connectivity best practices in Azure. Let us get into this!
Technical requirements
To follow along with the instructions in this chapter, you will need the following:
- A PC with an internet connection
- An Azure subscription
Before we proceed to cover the security best practices, let us prepare our Azure subscription for the hands-on exercises that we will complete later in the chapter.
Understanding Azure VNet
Before we get too far into Azure networking concepts, let’s establish what Azure VNet is and the capabilities that it provides.
A VNet is a virtual version of a physical network, implemented on the Azure cloud platform. The main advantage that it has over a traditional network is that we don’t need to implement or maintain the underlying physical hardware for this network (these responsibilities are offloaded to our cloud provider – Microsoft). But for the most part, we can achieve similar capabilities and architectures that we can achieve on-premises. We can even implement more flexible architectures with Azure VNets due to the software-defined nature.
So, what capabilities does Azure VNet provide? Here is a short list of some use cases:
- Connectivity for supported Azure services including VM, virtual machine scale sets (VMSSs), and 32 other services
- Native Internal TCP/UDP Load Balancing and proxy systems for Internal HTTP(S) Load Balancing
- Connects to on-premises networks using Cloud VPN tunnels and Cloud Interconnect attachments
Limitation
An Azure subscription can have up to 1,000 VNets as of the time of writing (April, 2022). An additional subscription will be needed to grow beyond this limit.
Azure VNet versus traditional networks
Even though Azure VNet is similar to a traditional on-premises network in many ways, there are still important differences, mainly due to restrictions that have been put in place by Microsoft to ensure security in a multi-tenant platform such as Azure. Here are some key ones:
- Azure VNet does not support Layer-2 semantics (Only Layer-3 and Layer-4). This means that concepts such as virtual LANs (vLANs) and Layer-2 broadcasts don’t work in Azure VNet. Figure 1.1 shows the output of running the
arp -acommand on a VM that is deployed in Azure VNet. You will notice that the MAC address resolution for VMs in the same subnet results in the same12:34:56:78:9a:bcvalue. This is because we are on a shared platform and the VNet is a Layer-3 overlay instead of Layer-2:

Figure 1.1 – ARP table on an Azure VM
- Another key difference between a traditional network and Azure VNet is that some protocols and communication types are restricted from being used in Azure VNet. Protocols such as multicast, broadcast, DHCP unicast, UDP source port
65330, IP-in-IP encapsulated packets, and Generic Routing Encapsulation (GRE) packets are not allowed in Azure VNet. Any application or service capability that requires these protocols or communication types will need to be refactored before deployment into Azure VNet for it to work. The only protocols that are allowed are TCP, UDP, ICMP, and Unicast communication (except source portUDP/68 /, destination portUDP/67, and UDP source port65330, which is reserved for the host).
Note
For more information on the differences of Azure VNet and traditional networks, refer to the document at https://docs.microsoft.com/en-us/azure/virtual-network/virtual-networks-faq.
Now that you have some fundamental information on what Azure VNet is, let’s discuss how you would go about planning one, starting with considerations around naming it.
Planning Vnet naming
All Azure resources have a name that must be unique within a scope. The scope is different for each resource type. When creating a Vnet, its name must be unique within the scope of the resource group. This means that it is possible to have two Vnets in your Azure subscription with the same name as long as they don’t belong to the same resource group! This can be useful in a design that involves having the same Vnet resource name for both development and production environments, as shown in Figure 1.2.

Figure 1.2 – Vnet names must be unique for the resource group scope
Even though it is possible to have duplicate names within a subscription, it is not a recommended practice as it could later lead to confusion when investigating security incidents using logging information (we will cover network logging and monitoring later in this book). When investigating security incidents, it helps to be able to quickly identify affected resources and having a unique resource naming strategy for your Vnets helps with this.
Regarding naming best practices, it is best to define a naming convention as early as possible. This convention should be communicated to the teams with permission to create network resources in Azure, and preferably, the naming convention should be enforced using tools such as Azure Policy. To define a good naming strategy, consider these recommendations:
- Review resource name restrictions for the Vnet and other network resources in Azure. For example, a Vnet name can have up to 64 characters made up of alphanumerics, underscores, periods, and hyphens. Your naming convention should take this into consideration. Information on Vnet naming restrictions can be found at https://docs.microsoft.com/en-us/azure/azure-resource-manager/management/resource-name-rules#microsoftnetwork.
- Consider including information about the following – resource type, resource location, deployment environment, and workload type in your naming convention. For example, a Vnet for production web services workloads in the East US region might be named
prod-eastus-webservices-Vnet(Figure 1.3).

Figure 1.3 – Sample Vnet naming convention
For more thoughts on naming conventions, please refer to this document: https://docs.microsoft.com/en-us/azure/cloud-adoption-framework/ready/azure-best-practices/resource-naming.
Planning VNet location
Almost all Azure services are created in a regional location specified at creation time. I said almost all because there are some exceptions – so-called global or non-regional services that are not pinned to a region. Azure Vnet is a regional service.
As of the time of writing (April 2022), the Azure cloud has 55 active regions in which we can create Vnets (with nineteen announced regions coming soon).
So, which regions should you select when creating Vnets? Consider the following three points to guide your decision regarding this:
- Business compliance requirements: This is the first point that you should consider when deciding the Azure region to locate your Vnets in. If there are organizational/industry compliance requirements that require data residency or data sovereignty in a geographic area, then you must adhere to that! You don’t want to end up in a situation where your organization is fined or charged for violating governmental regulations! For example, if you are providing services to a US government agency, the workloads that you are using to provide those services may be required to be in Vnets created in one of the Azure US government regions.
- Proximity to the users: This is the second key point to consider regarding Vnet location. You want your networks in locations close to the end users to ensure the lowest network latency. For example, if your organization is based in the UK and your network will host workloads that will provide services to your customers in the area, it will probably be best to create your Vnet(s) in either the UK South or the UK West Azure regions. You could perform your own tests to determine latency information for your end users or you could leverage unofficial sites such as https://azurespeedtest.azurewebsites.net/ and https://cloudpingtest.com/azure.
- Resiliency requirements: This is another key point to consider when deciding where you should create your Vnets. Does your resiliency architecture require you to be able to distribute your network workloads in multiple data centers within the same region? If it does, then you need to select one of the regions that allow you to use availability zones (AZs) – distinct groups of data centers in the same region. Not all Azure regions currently support this capability. At the time of writing, only 25 of the 55 active regions support AZs. I will recommend checking this document for an up-to-date list before you create your network resources – https://docs.microsoft.com/en-us/azure/availability-zones/az-overview.
The following diagram shows an example of a Vnet with AZs:

Figure 1.4 – A Vnet with AZs
Also, keep in mind that the decision to distribute your network workloads in multiple AZs in a region results in an extra cost of 0.01 USD (0.008 GBP) per gigabyte of data transferred between AZs for both inbound and outbound traffic.
Planning Vnet IP address spaces
Every Vnet must have at least one IP address space assignment. A Vnet space assignment can either be single-stack (IPv4 address space only) or dual-stack (IPv4 and IPv6 address spaces). At the time of writing, an IPv6-only Vnet is not supported! You might be able to create an IPv6-only Vnet in the portal, but you will not be able to attach a virtual network interface card (NIC) to it. Attempting it will result in the error message shown in Figure 1.5:

Figure 1.5 – Your Vnet must have at least one IPv4 address space to use IPv6
Note
Azure does not yet support an IPv6-only Vnet and subnet, but you can implement dual-stack Vnets and subnets that support both IPv4 and IPv6.
Azure VNet is not limited to one IP address space assignment. We can add more IP address spaces as needed, which is great for scalability! For example, we may want to add an additional IPv4 address space to support an unexpected workload expansion.
Limitation
Regardless of how many addresses are contained in the IP address spaces assigned to a Vnet, the total number of private IP addresses assigned to workloads cannot exceed 65,536.
The IP address spaces assigned to a Vnet do not have to be contiguous. Figure 1.6 shows an example of this with a Vnet that is configured to have two IPv4 address spaces that are not contiguous – 10.1.0.0/16 and 192.168.1.0/24 and an additional IPv6 address space for a dual-stack implementation – fd00:db8:deca::/48.

Figure 1.6 – A Vnet with multiple address spaces
So, which IP address spaces should we use for our Vnets in Azure? Even though it is not required, it is highly recommended to use address ranges within the private, non-internet routable address spaces! For IPv4, this will be one of the IP ranges defined in RFC 1918 and for IPv6, this will be the Internet Engineering Task Force (IETF) defined Unique Local Addresses, which use the fc00::/7 address range.
RFC 1918 private IPv4 address ranges
Private IP address ranges defined in RFC 1918 are IP ranges that have been set aside by the IETF for private network use. They include the following:
•10.0.0.0/8 (10.0.0.0 – 10.255.255.255)
•172.16.0.0/12 (172.16.0.0 – 172.31.255.255)
•192.168.0.0/16 (192.168.0.0 – 192.168.255.255)
Using any of the RFC 1918 private IP address ranges will require some form of address translation for internet routing and connectivity (we will cover this scenario later in this book).
Shared IPv4 address spaces reserved in RFC 6598 can also be used as they are treated as private IP address spaces in Azure. This range includes the following:
100.64/10(100.64.0.0–100.127.255.255)
Other IP address spaces may work but they are not recommended as they could have undesirable routing side effects with instability! The following address ranges are not allowed to be used as Vnet IP address spaces:
224.0.0.0/4(Multicast)255.255.255.255/32(Broadcast)127.0.0.0/8(Loopback)169.254.0.0/16(Link-local)168.63.129.16/32(Internal DNS)
Whatever IP address ranges you decide to use for your Vnets, it is highly recommended to plan for non-overlapping IP address spaces across Azure regions and on-premises locations in advance. You can achieve this by defining an organization-wide IP address scheme that ensures that each network has its own unique private IP address space if it is an Azure network or an on-premises network.
Best practice
Define an organization-wide IP address scheme that ensures that each organization network has its own unique private IP address space.
One of the reasons why this is important is that it can impact your ability to connect networks together later or leave you in a situation where you need to implement sub-optimal network address translations that add to the complexity.
For example, you cannot connect two Vnets together via Vnet peering if they have the same address space! Figure 1.7 shows the error message that you will get if you attempt this:

Figure 1.7 – Vnets with overlapping address spaces cannot be peered
If you don’t know what Vnet peering is, don’t worry, we will cover it later in this book when we look at hybrid connectivity. You could use a VPN gateway to connect two networks with the same IP address spaces but this requires implementing address translation, which can make troubleshooting traffic flow very complex!
Planning Vnet subnet segmentation
To provide isolation within a Vnet, we can divide it into one or more subnets. Subnets are primarily used for workload segmentation (logical perimeters within a Vnet). Figure 1.8 shows an example of this. In the diagram, we have a Vnet with two subnets. Web services are deployed into their own subnet (Web tier Subnet) and data services are deployed into their own subnet (Data tier Subnet).
With this approach, we can use an Azure route table to control how traffic is routed between the subnets. We can also use a network security group (NSG) or a network virtual appliance (NVA) to define allowed inbound/outbound traffic flow from/to the subnets (segments). The result of this is that if a part of our application stack is compromised, we are better placed to contain the impact of the security breach and mitigate the risk of lateral movement through the rest of our network. This is an important Zero Trust principle implementation. We will cover route tables, NSGs, and NVAs later in this book.

Figure 1.8 – Segmentation using subnets
How many subnets can Azure VNet have? It can have up to 3,000 subnets! Each subnet must have a unique IP address range that is within the defined IP address spaces of the Vnet (overlap is not allowed). For example, a Vnet with an IPv4 address space of 10.1.0.0/16 cannot have a subnet with an IP address range of 10.1.1.0/24 and another subnet with an address range of 10.1.1.0/25 as these ranges overlap with each other. Attempting to do so will result in the error message shown in Figure 1.9:

Figure 1.9 – Subnets with overlapping addresses not allowed
After defining the IP address range for a subnet, Azure reserves five IP addresses within each subnet that can’t be used! The first four IP addresses and the last IP address in an Azure subnet cannot be allocated to resources for the following reasons:
x.x.x.<first address>: This is reserved for protocol conformance as the network addressx.x.x. <second address>: This is reserved by Azure for the default gateway of the subnetx.x.x. <third address>andx.x.x. <fourth address>: This is reserved by Azure to map the Azure DNS IPs to the Vnet spacex.x.x. <last address>: This is reserved for protocol conformance as the broadcast address (even though Azure Vnets don’t use broadcasts as we mentioned earlier)
For example, if the IP address range of your subnet is 10.1.0.0/24, the following addresses will be reserved:
- 10.1.0.0: Network address
- 10.1.0.1: Default gateway address
- 10.1.0.2 and 10.1.0.3: Used to map Azure DNS IPs to the Vnet space
- 10.1.0.255: Broadcast address
This leaves a total of 250 addresses that can be allocated to subnet resources: 10.1.0.4 – 10.1.0.254. Because of the required address reservation, the smallest supported IPv4 address prefix is /29, which gives five reserved addresses and three usable addresses. Specifying anything less leaves zero usable IPv4 addresses, which results in the error message shown in Figure 1.10:

Figure 1.10 – The smallest supported IPv4 address prefix for a subnet is /29
Note
The smallest supported size for an Azure IPv4 subnet is /29. The largest is /2.
If you are implementing a dual-stack design, the standard size of the assigned IPv6 address space should be /64. This is in line with the standard defined by the IETF. A /64 space is the smallest subnet that can be used locally if auto-configuration is desired. Any attempt to add an IPv6 address space that is not a /64 will result in the error message shown in Figure 1.11:

Figure 1.11 – Only a /64 address space assignment allowed for a subnet
When planning your subnets, make sure that you design for scalability. Workloads in your subnets should not cover the entire address space, giving you no room to add more workloads if needed. Plan and reserve some address space for the future. Also, take into consideration that some network resources such as the VMSS may need to dynamically add more workloads based on incoming requests. Modifying the IP address range of an Azure subnet that has workloads deployed is no straightforward task. It involves you removing all existing resources! Attempting this will result in the error message shown in Figure 1.12:

Figure 1.12 – The error message when trying to resize a subnet with resources
Working with platform services in subnets
For most organizations, the main services that they will deploy into Azure VNet subnets are infrastructure-as-a-service (IaaS) services such as VMs and VMSSs but there are currently about 23 more services that can be deployed into a Vnet subnet, including platform services such as Azure SQL Managed Instance, App Service, Cache for Redis, and Azure Kubernetes Service. Deploying a supported platform service into a Vnet subnet is referred to as Vnet integration or Vnet injection.
A full list of services that are supported for VNet integration can be found at https://docs.microsoft.com/en-us/azure/virtual-network/virtual-network-for-azure-services#services-that-can-be-deployed-into-a-virtual-network.
There are about 25 services that can be deployed into a Vnet subnet, as shown in Figure 1.13:

Figure 1.13 – Various types of services supported for Vnet integration
Most PaaS services that support Vnet integration impose restrictions on the subnets that they can be deployed into, and this should be considered when planning your subnets. Here are some of the restrictions to consider:
- About 14 services require a dedicated subnet — this means that they cannot be combined with other services in the same subnet. For example, a VPN gateway cannot be deployed together with another service in the same subnet – the subnet must be dedicated only to that service!
- Still, on dedicated subnets, some services allow multiple instances of the same service in the same dedicated subnet while some require a dedicated subnet per service instance! For example, the Azure SQL Managed Instance’s service allows multiple instances of the same service to be deployed into the dedicated subnet (Figure 1.14), while the Azure Spring Cloud service requires dedicated subnets per service instance (Figure 1.14):

Figure 1.14 – Two SQL-managed instances in the same dedicated subnet. Spring cloud requires dedicated subnets per instance
- Some platform services require their subnets to be called a specific name. For example, the subnet that the Azure Firewall service is deployed into must be called AzureFirewallSubnet, the subnet that the VPN Gateway service is deployed into must be called GatewaySubnet, and the subnet that the Azure Bastion service is deployed into must be called AzureBastionSubnet. This is required for some automation components relating to the services to work.
- Some platform services require a minimum Classless Inter-Domain Routing (CIDR) block for their subnets. For example, the subnet that the Azure Bastion service is deployed into must have a minimum /26 prefix.
- Some platform services require permissions to establish basic network configuration rules for the subnet that they will be deployed into. The process of assigning this permission is called subnet delegation. For example, when a SQL-managed instance is deployed into a subnet, it automatically creates an NSG and a route table and applies them to that subnet.
The key takeaway here is this – before deploying platform services into subnets, ensure that you follow the guidance in the service documentation regarding the aforementioned considerations to avoid inconsistencies in service functionalities. Always refer to the documentation for up-to-date information: https://docs.microsoft.com/en-us/azure/virtual-network/virtual-network-for-azure-services#services-that-can-be-deployed-into-a-virtual-network.
Now that you have some understanding of how to plan key aspects of Azure VNet, let us go ahead and get some implementation going!
Hands-on exercise – creating a single-stack VNet in Azure
In this exercise, we will create a single-stack IPv4 network for a fictional organization called CharisTech, which is in the process of migrating some on-premises applications to Azure. We will implement two VNets and subnets to support workloads that will be migrated. Here are the tasks that we will complete in this exercise:
- Task 1: Creating the CharisTech resource group
- Task 2: Creating the CoreServicesVNet VNet and subnets
- Task 3: Verifying the creation of VNets and subnets
Figure 1.15 shows the outcome that we’ll get to at the end of the tasks:
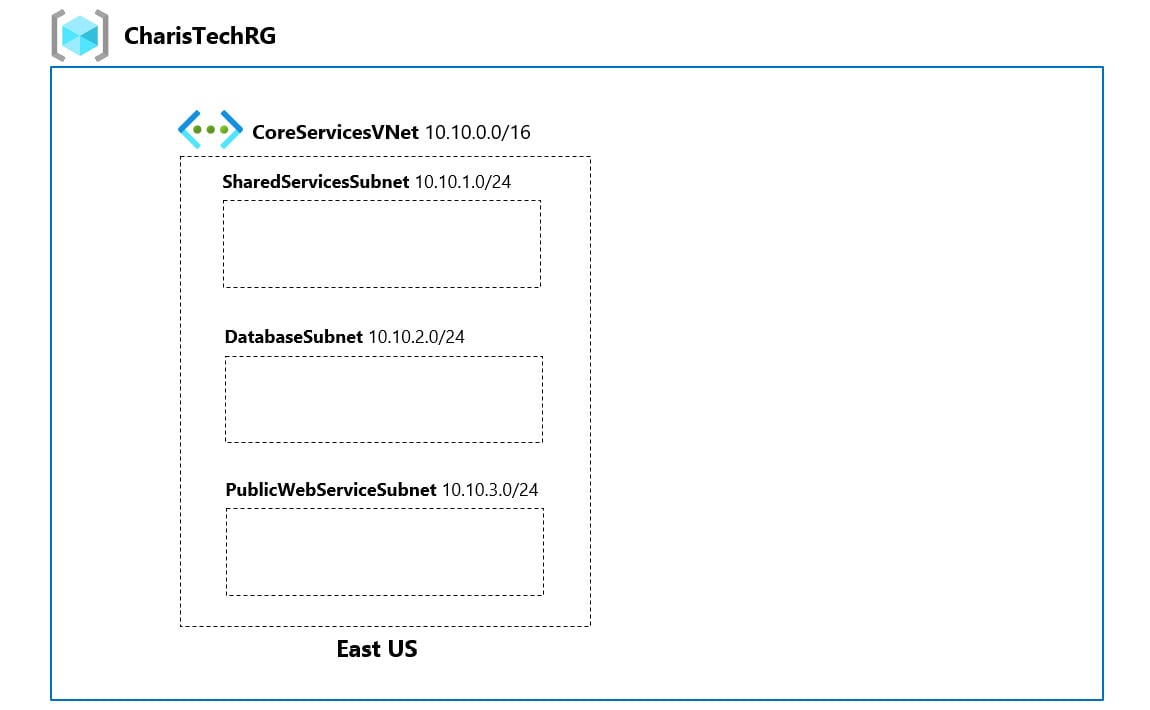
Figure 1.15 – CharisTech Azure VNets and subnets
Task 1 – creating the CharisTech resource group
A resource group is a logical container for managing related Azure resources. In this task, we will create a resource group called CharisTechRG that will hold the networking resources that we will create in other tasks:
- Open a web browser and browse to https://portal.azure.com.
- On the left-hand side, click on the portal menu icon, then click on Create a resource:

Figure 1.16 – Create a resource
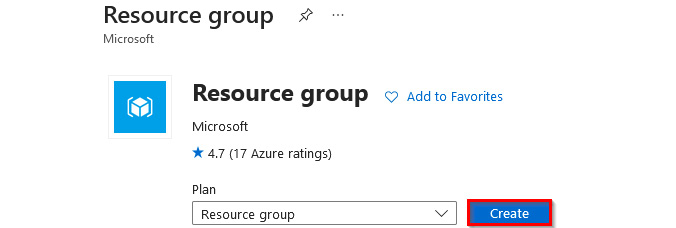
Figure 1.17 – Create a resource group
- In the Basics tab, enter the following values:
- Subscription: Select your Azure subscription (1)
- Resource group:
CharisTechRG(2) - Region: East US (3)
Then, select Review + create (4):
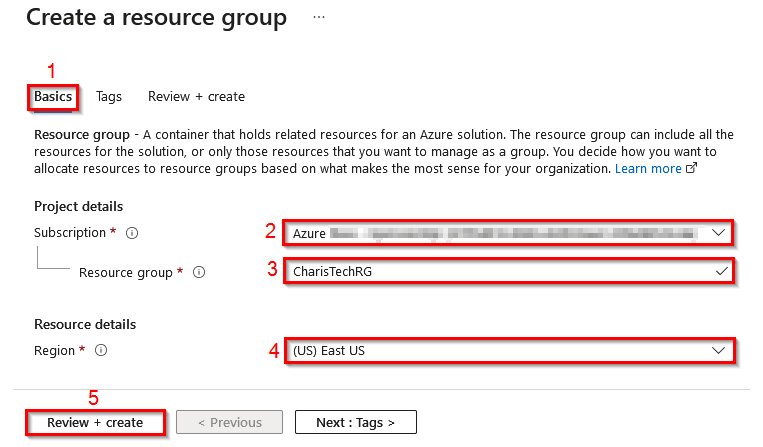
Figure 1.18 – Creating a resource group
- Select Create. It should only take a few seconds to create the resource group.
- In the top-right corner of the window, select the notification icon (the bell icon). Then, select Go to resource group to open the newly created resource group:
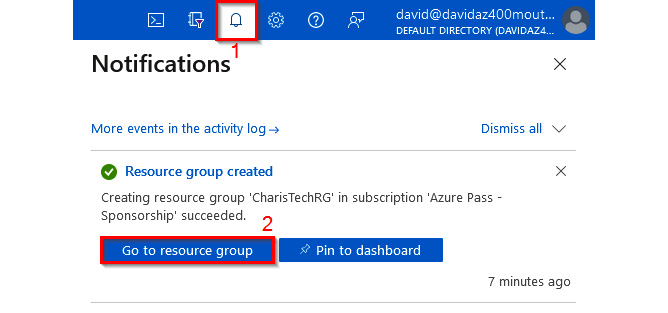
Figure 1.19 – Opening the newly created resource group
Leave this window open for the next task. Now that we have a resource group that we can use as a management container, let us proceed to create the VNets and subnets.
Task 2 – creating the CoreServicesVNet VNet and subnets
The first network that we will create is the CoreServicesVNet VNet (Figure 1.15). The network will be deployed in the East US region. It will be segmented into three subnets that will host the following workloads:
- Public web services (PublicWebServiceSubnet)
- Databases (DatabaseSubnet)
- Shared services that are key to the operations of the business, such as domain controllers (SharedServicesSubnet)
Let’s get started:
- In the CharisTechRG window, select + Create. In the search box, enter
Virtual Network. Select Virtual Network in the search results:
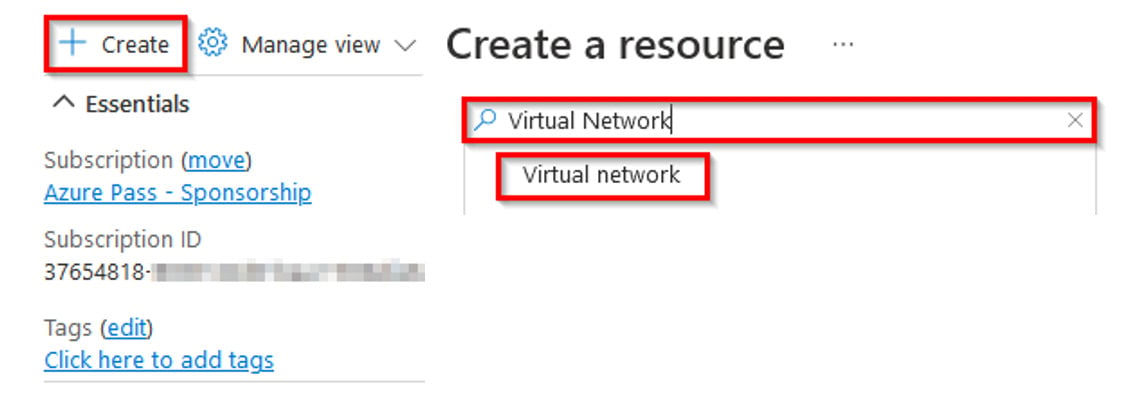
Figure 1.20 – Creating a resource
- On the Virtual Network page, select Create.
- On the Create virtual network window, in the Basics tab, enter the following values:
- Subscription: Select your Azure subscription
- Resource group:
CharisTechRG - Name:
CoreServicesVNet - Region: East US
Then, click Next: IP Addresses >:
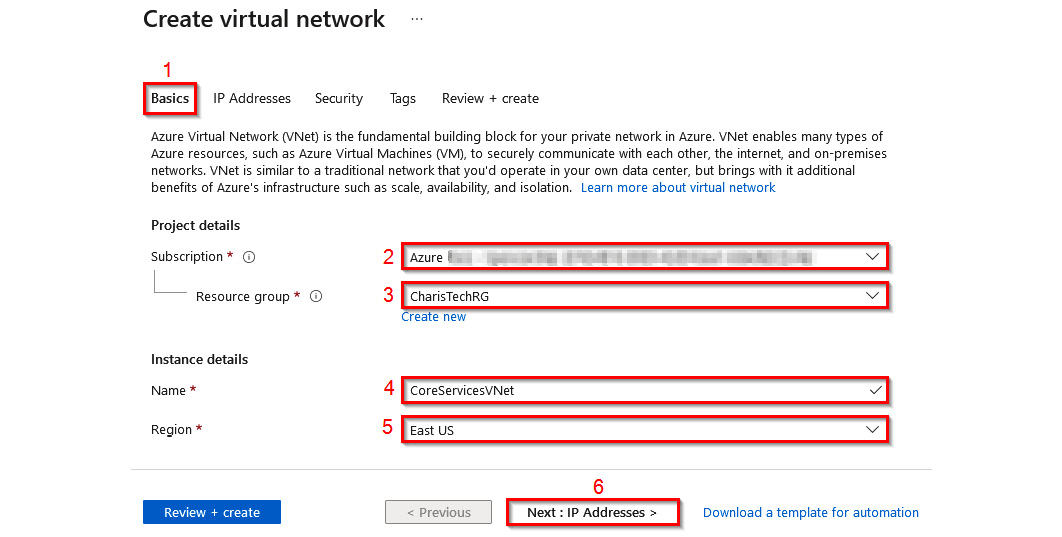
Figure 1.21 – Creating the VNet
- In the IP Addresses tab, change the default IP address space to
10.10.0.0/16. Then, select + Add subnet:
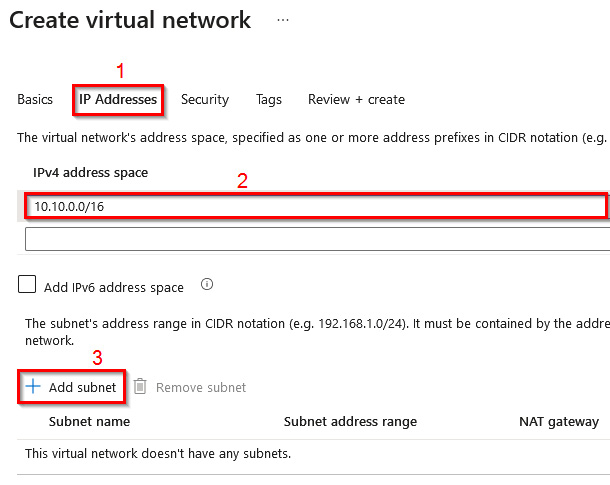
Figure 1.22 – Setting the IP address
- In the Add subnet window, configure the following:
- Subnet name:
SharedServicesSubnet - Subnet address range:
10.10.1.0/24 - NAT gateway: None
- Service endpoint: 0 selected
- Subnet name:
Then, click Add:
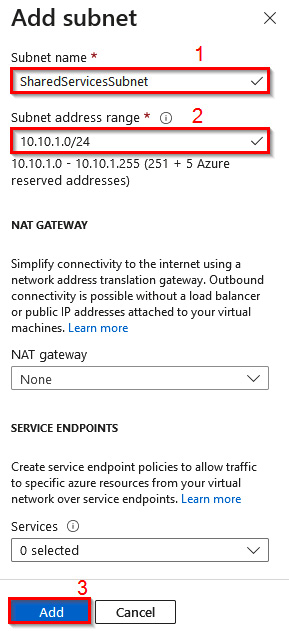
Figure 1.23 – Adding a subnet
|
Subnet |
Configuration option |
Configuration value |
|
DatabaseSubnet |
Subnet name |
DatabaseSubnet |
|
Subnet address range |
10.10.2.0/24 |
|
|
PublicWebServiceSubnet |
Subnet name |
PublicWebServiceSubnet |
|
Subnet address range |
10.10.3.0/24 |
Table 1.1 – Subnet configuration details
7. The configuration should look like Figure 1.24. Click on Review + create:
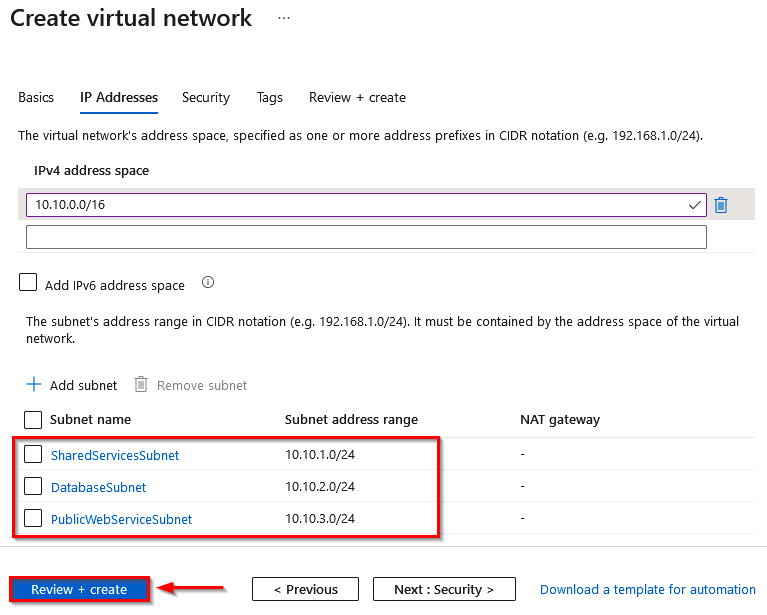
Figure 1.24 – Subnets added to the VNet configuration
8. Select Create. It should only take a few seconds to create the VNet and subnets.
Awesome! After the deployment completes, let us review what has been created.
Task 3 – verifying the creation of the VNet and subnets
In this task, we will review the resources created in the last task:
- Click on Go to resource to open the newly created VNet:
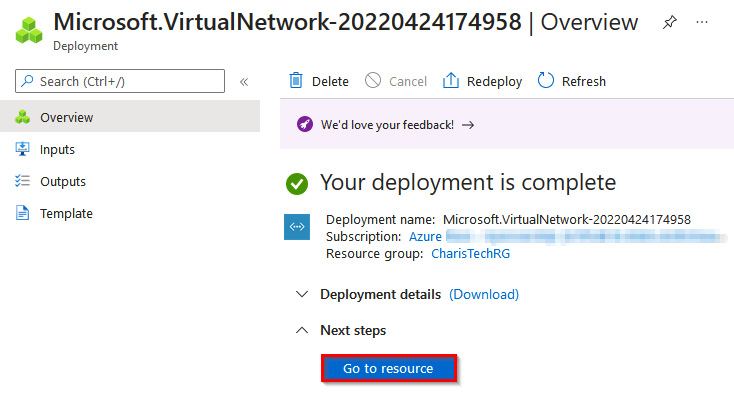
Figure 1.25 –Microsoft VNet overview
- In the CoreServicesVNet virtual network blade, in the Settings section, click on Subnets to review the subnets that were created:
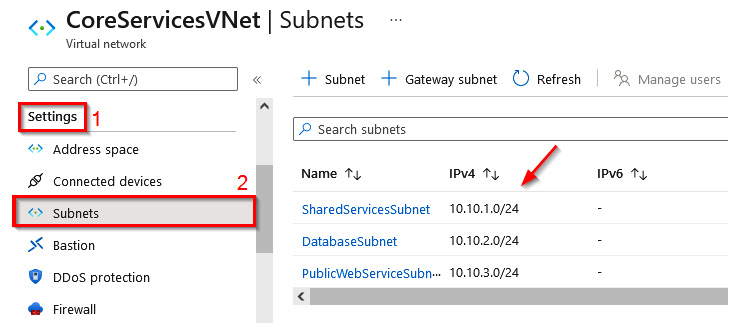
Figure 1.26 – Reviewing the subnets
You can leave this window open for the next task. Now that we have a resource group that we can use as a management container, let us proceed to create the VNets and subnets.
Hands-on exercise – creating a dual-stack VNet in Azure
In this exercise, we will create a dual-stack network in Azure that supports both IPv4 and IPv6 for the fictional organization called CharisTech. The activities in this task will be completed using the Azure CLI to give you familiarity with the different Azure management tools. Here are the tasks that we will complete in this exercise:
- Task 1: Creating the dual-stack EngineeringVNet VNet and subnets
- Task 2: Verifying the creation of the dual-stack VNet and subnets
Figure 1.27 shows the outcome that we’ll get to at the end of the tasks:
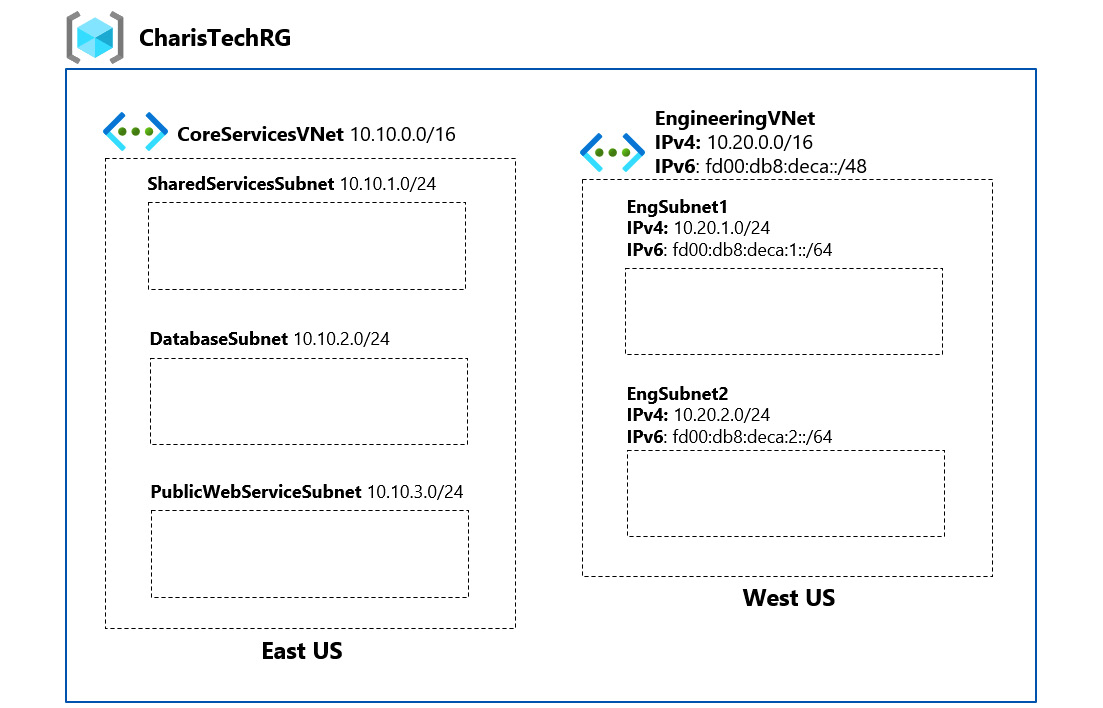
Figure 1.27 – CharisTech Azure VNets and subnets
Task 1 – creating the dual-stack EngineeringVNet VNet and subnets
- Open a web browser and go to the Azure Portal at https://portal.azure.com. Sign in with your admin user account credentials.
- In the Azure Portal, click on the Cloud Shell icon in the top right corner of the Azure Portal:

Figure 1.28 – Click the icon to open Cloud Shell
- (Optional) If this is your first time launching Cloud Shell, you will be prompted to select between the Bash and PowerShell environments. Select Bash. You will also be prompted to create a storage account that will be used by Cloud Shell. Select Create Storage.
- If this is not your first launch, ensure you have Bash selected for your environment:

Figure 1.29 – Select the Bash shell environment
- In Cloud Shell, enter the following commands to set the values that we will use for the following variables: resource group, location, and VNet:
group=CharisTechRG
location=westus
VNet=EngineeringVNet
- Create a VNet with the
az network VNet createcommand. The following command creates a VNet namedEngineeringVNetwith one subnet namedEngSubnet1. Both the VNet and the subnet are dual-stack:az network VNet create --name $VNet --resource-group $group --location $location --address-prefixes "10.20.0.0/16" "fd00:db8:deca::/48" --subnet-name EngSubnet1 --subnet-prefix "10.20.1.0/24" "fd00:db8:deca:1::/64"
- Add a second subnet with the
az network VNet subnet createcommand. The following command adds a dual-stack subnet namedEngSubnet2to theEngineeringVNetnetwork that we created earlier:az network VNet subnet create -n EngSubnet2 --address-prefixes "10.20.2.0/24" "fd00:db8:deca:2::/64" --resource-group $group --VNet-name $VNet
Now that the dual-stack VNets and subnets are created, let us verify them.
Task 2 – verifying the creation of the dual-stack VNet and subnets
- In the Cloud Shell environment, enter the following command to list the VNets in the subscription and output the result in a table format:
az network VNet list --resource-group CharisTechRG --output table
The output should be like the output shown in Figure 1.30:

Figure 1.30 – The VNet list output
As you can see, using command-line management tools such as the Azure CLI greatly streamlines resource management in Azure!
Understanding private IP address assignment for subnet workloads
When resources are deployed into an Azure VNet subnet, a private IP address is automatically assigned from the subnet’s address range. If the subnet is a single-stack subnet (IPv4 only), Azure assigns an IPv4 address to the workload. If the subnet is a dual-stack subnet (both IPv4 and IPv6), Azure assigns both an IPv4 and an IPv6 address if the service supports IPv6 assignments. As of the time of writing, only VMs and VMSS NICs support both IPv4 and IPv6, other VNet services/resources support only IPv4 private IP assignments.
There are two methods for private IP assignments in an Azure VNet subnet (Figure 1.31):
- The first method is dynamic assignment where the next available unassigned or unreserved private IP address, from the subnet’s address range, is automatically assigned to a resource. This is the equivalent of using Dynamic Host Configuration Protocol (DHCP) on-premises. For example, in a subnet with a
10.10.1.0/24address range, if the10.10.1.4address is already assigned to another resource, the next available address –10.10.1.5– is automatically assigned to the next resource. This method is the default allocation method for all VNet resources, including VNet-integrated platform services. For VM and VMSS NICs, dynamic IP addresses are released if a network interface is deleted or re-assigned to a different subnet within the same VNet.

Figure 1.31 – VNet resource private IP assignment options
- The second method is static assignment, where an unassigned or unreserved IP address can be reserved for a resource from the subnet’s address range. This may be necessary for situations where clients or other services are hardcoded to locate an application via its IP address instead of its Domain Name System (DNS) record (we will cover DNS options in Azure in the second chapter of this book). It is highly recommended to implement a static IP assignment by changing the private IP allocation method from the Azure platform instead of setting the IP statically from the operating system (as we would do on-premises). The latter method could lead to loss of access if the resource is moved into a different subnet. This method is not supported by all VNet resources but it is supported for common ones, such as VM NIC (Figure 1.31) and Azure Cache for Redis (Figure 1.32).

Figure 1.32 – Static IP assignment for a VNet deployed Cache for Redis resource
As a general rule, you should avoid static private IP assignments as much as possible. This is because cloud-hosted workloads are usually dynamic with capabilities such as auto-scaling that allow resources to be added/removed in response to the volume of requests being received. Using the default dynamic assignment method means that we have one less thing to worry about.
It is also important to note that VM network interfaces can have more than one private IP assignment (Figure 1.33). Actually, they can have up to 256 private IP assignments!

Figure 1.33 – Multiple private IP assignments for a VM NIC
Enough discussion for now; let us review this in practice. But first, we need to determine the locations and VM sizes that we will be using.
Hands-on exercise – determining the VM location and sizes for future exercises
To complete some of the hands-on exercises in this book (such as the exercise after this one), you will need to deploy VMs for testing. In Azure, not all VM sizes are available in all subscription regions! There are also CPU quota limits for VM families and subscription regions (Figure 1.34).
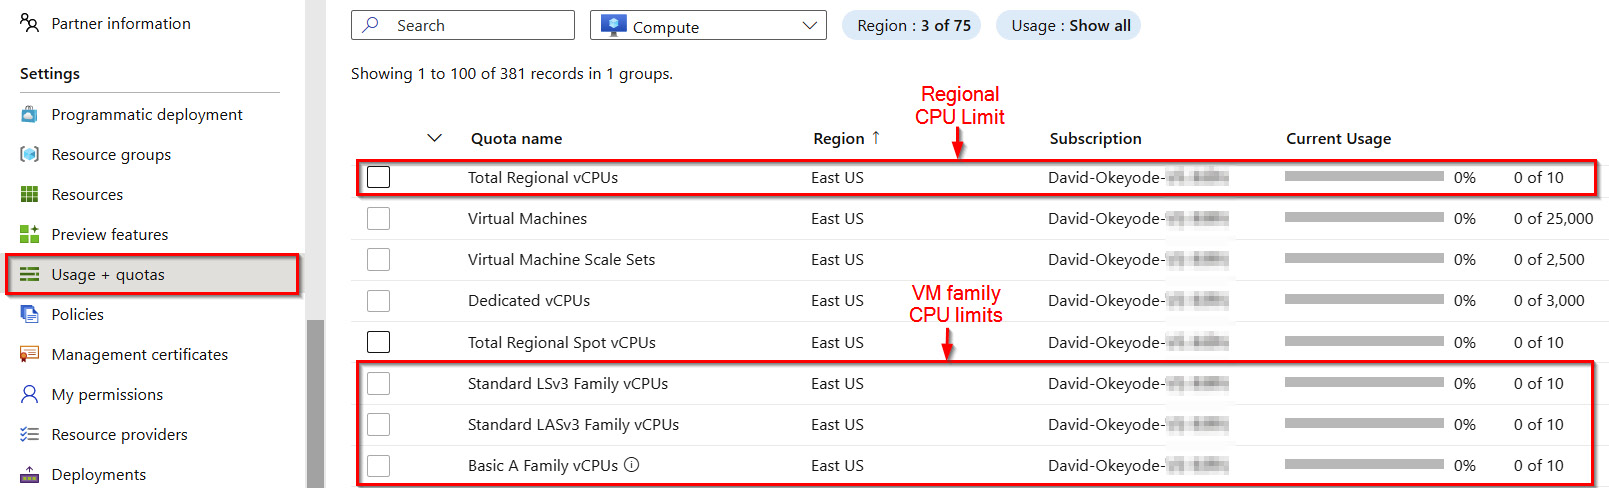
Figure 1.34 – Regional and VM family CPU limits per subscription
In this exercise, you will evaluate your subscription to determine the VM sizes and locations to use for the exercises in the upcoming chapters of this book. Here are the tasks that you will complete in this exercise:
- Task 1: Determining the CPU quota limits for recommended subscription regions
- Task 2: Determining the VM size availability for recommended subscription regions
For the hands-on exercise, I will be defaulting to the East US and West US Azure regions as these are the regions that I have used throughout the rest of the book. While I recommend that you also use these regions, you do not need to stick with this recommendation. There is nothing particular about them. If you decide to use other regions instead, simply replace the values as you run the specified commands. You can obtain a list of Azure locations with the az account list-locations -o table Azure CLI command.
Let’s get into this!
Task 1 – determining the CPU quota limits for recommended subscription regions
The steps are as follows:
- Open a web browser and go to the Azure Portal at https://portal.azure.com. Sign in with your admin user account credentials.
- In the Azure Portal, click on the Cloud Shell icon in the top right corner of the screen, as shown in Figure 1.35.

Figure 1.35 – Click the icon to open Cloud Shell
- Ensure you have Bash selected for your environment as we will be working with Azure CLI commands:
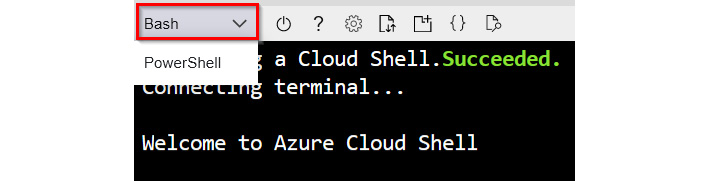
Figure 1.36 – Select the Bash shell environment
- Use the following two commands to verify the CPU quota limit for the East US and West US Azure regions. If you plan on using different regions, remember to replace the value for the location parameter with the regions that you are planning to use:
az vm list-usage --location eastus --output table
az vm list-usage --location westus --output table
- In the output of the commands in step 4, review the Total Regional vCPUs usage and limit to ensure that you have sufficient CPU quota available in the region. Figure 1.37 shows a limit of 10 vCPUs for the East US region in my subscription and current usage of 4 vCPUs (by existing VM deployments). This means that I can only deploy additional 6 vCPUs in the region. The only exceptions to this are if I remove existing VM resources to free up usage or raise a Microsoft support ticket to increase the limit for that region in my subscription. To follow the hands-on exercises, ensure that you have a minimum of 6 vCPUs available in both regions!
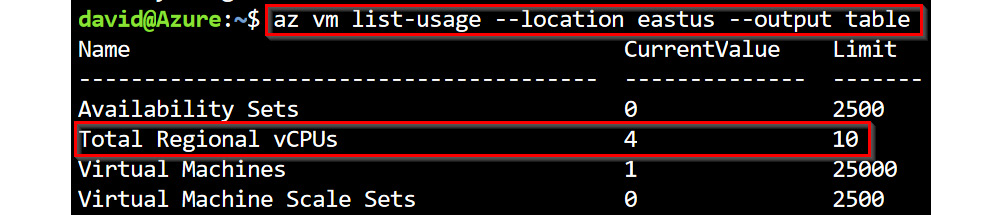
Figure 1.37 – The total regional vCPU usage
- Still in the output of the commands in step 4, review the Standard BS Family vCPUs usage and limit to ensure that you have sufficient CPU quota for the VM size family that we will be using in the hands-on exercises. Figure 1.37 shows a limit of 10 vCPUs for the East US region in my subscription and current usage of 0 vCPUs. I will be defaulting to this VM family size in the exercise chapters. If you plan on using a different VM family, ensure that you have sufficient vCPU quota for it in the regions that you plan to use.

Figure 1.38 – Standard BS VM Family regional vCPU usage
- In Cloud Shell, use the following two commands to verify available sizes for the
Standard_BVM family in the East US and West US Azure regions. I will be defaulting to a VM size in this VM family. If you plan on using different regions, remember to replace the value for the location parameter with the regions that you are planning to use:az vm list-skus --location eastus --size Standard_B --all --query "[?restrictions[0].reasonCode != \`NotAvailableForSubscription\`]" --output table az vm list-skus --location westus --size Standard_B --all --query "[?restrictions[0].reasonCode != \`NotAvailableForSubscription\`]" --output table
- In the output of the commands in step 7, review to ensure that the Standard_B2s VM size has no restrictions in both regions. Figure 1.39 shows that the size is available for my subscription in the East US region. Leave Cloud Shell open for the next exercise.
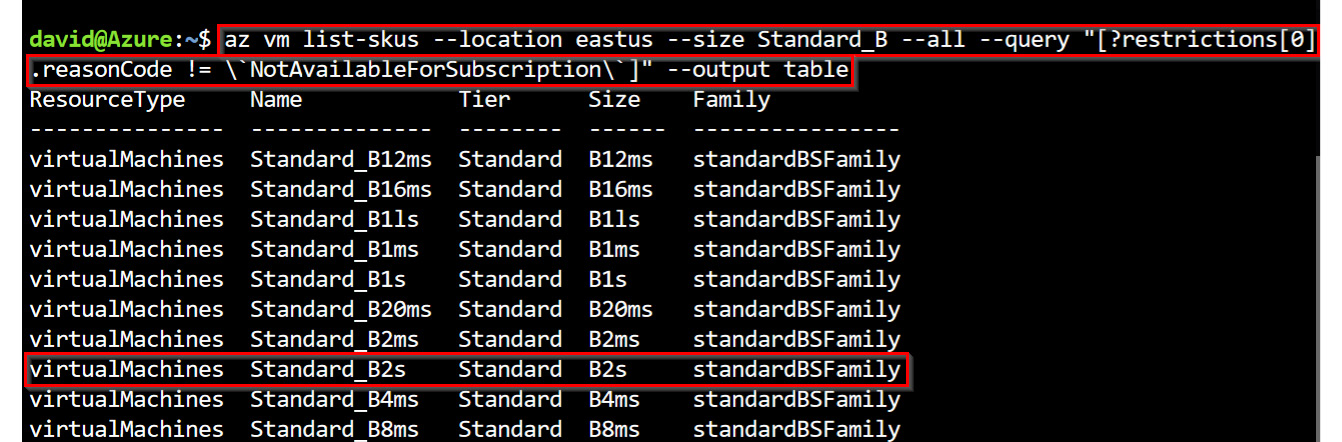
Figure 1.39 – The Standard_B2s VM size availability check
Now that you have verified the regions and VM size that you will be using, make a note of these as you will be needing them in the upcoming exercises in this chapter and in the rest of the chapters of this book.
Hands-on exercise – exploring private IP assignments
In this exercise, you will explore private IP assignment options for VNet resources. Here are the tasks that you will complete in this exercise:
- Task 1 – deploying VMs with dynamic and static private IP assignments
Let’s get into this!
Task 1 – deploying VMs with dynamic and static private IP assignments
The steps are as follows:
- In the Azure Cloud Shell environment, enter the following commands to set the values that we will use for the following variables: resource group, location, VNet, subnet, and VM size. Replace the
Standard_B2svalue if you are using a different size than you verified in the previous exercise:group=CharisTechRG location=eastus VNet=CoreServicesVNet subnet=PublicWebServiceSubnet size=Standard_B2s
- Deploy a VM called
WebVM0intoPublicWebServiceSubnetofCoreServicesVNetwith theaz vm createcommand. This will default to the dynamic private IP assignment method:az vm create -g $group -n WebVM0 --image UbuntuLTS --admin-username azureuser --generate-ssh-keys --VNet-name $VNet --subnet $subnet --size $size --public-ip-address ""
The following figure shows the output of this command. Ignore the warning about the public IP as the VM is created without a public IP assigned.
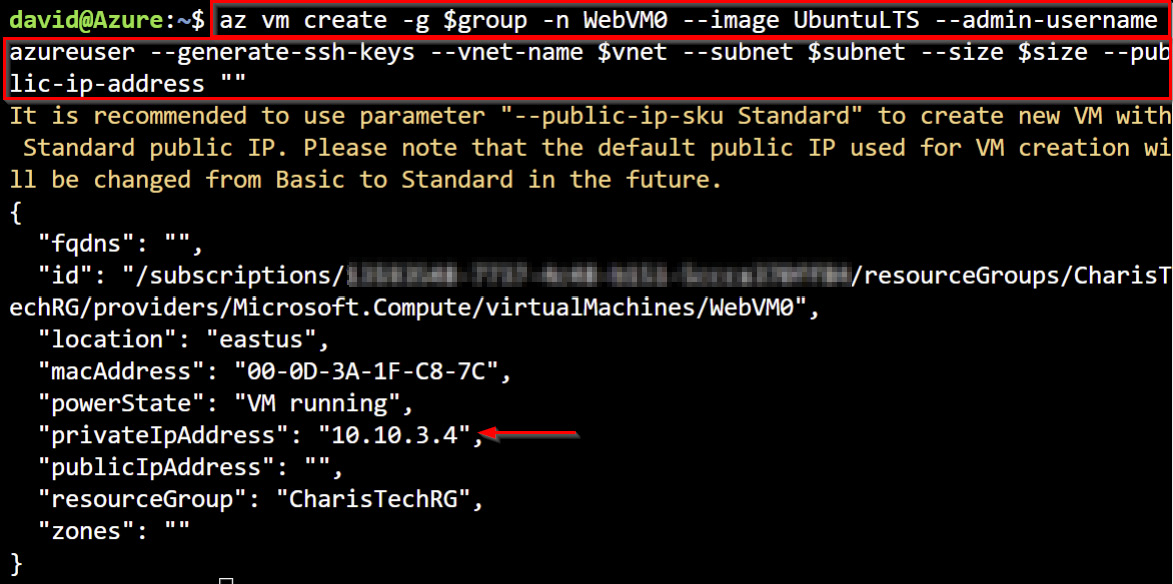
Figure 1.40 – VM creation with the default dynamic private IP assignment
- Deploy a VM called
WebVM1intoPublicWebServiceSubnetofCoreServicesVNetwith theaz vm createcommand. This time around, we will specify a static private IP assignment of10.10.3.10:az vm create -g $group -n WebVM1 --image UbuntuLTS --admin-username azureuser --generate-ssh-keys --VNet-name $VNet --subnet $subnet --size $size --public-ip-address "" --private-ip-address "10.10.3.10"
The following figure shows the output of this command. Ignore the warning about the public IP as the VM is created without a public IP assigned.
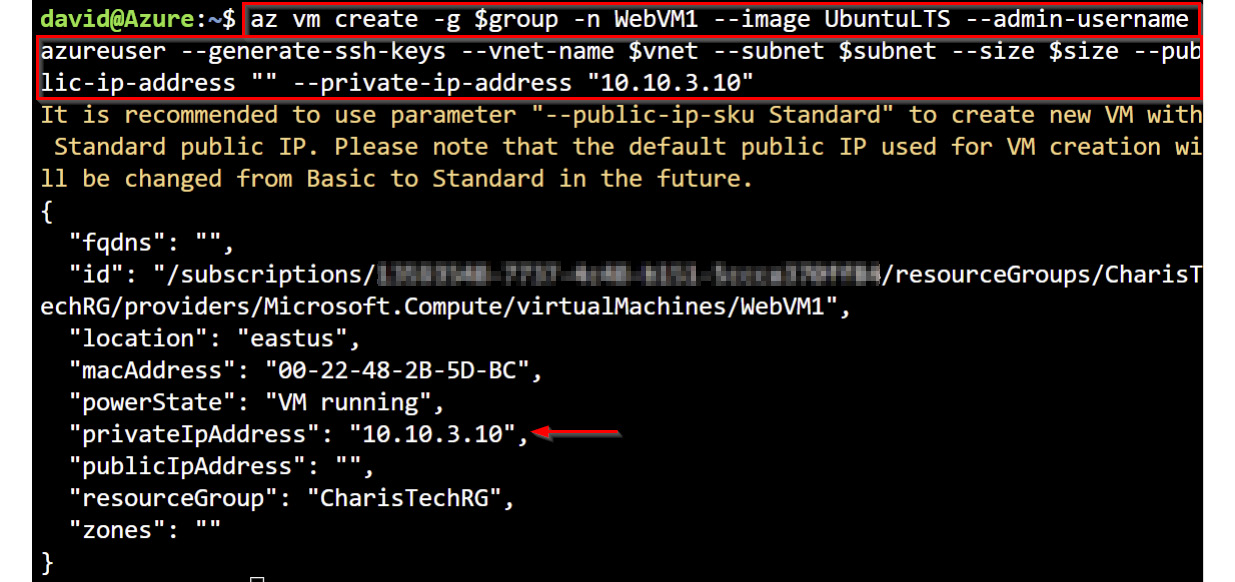
Figure 1.41 – VM creation with the default dynamic private IP assignment
- Review the private IP assignment of the VM network interfaces using the
az network niclistcommand:az network nic list -g $group --query "[*].{NIC:name, PrivateIP: ipConfigurations[0].privateIpAddress, Assignment: ipConfigurations[0].privateIpAllocationMethod, IPVersion: ipConfigurations[0].privateIpAddressVersion}" -o table
The --query parameter is used to sort through the JSON array response to select the properties that we are interested in. The following screenshot shows what the output looks like:
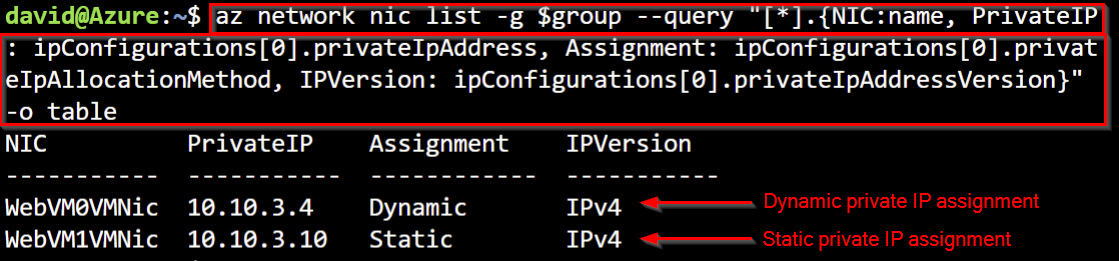
Figure 1.42 – The VM NIC dynamic private IP assignment
Leave Cloud Shell open for the last exercise in this chapter.
Hands-on exercise – cleaning up resources
In this exercise, we will remove the resources that we created in the chapter exercises to avoid running up a large cost in Azure!
In Cloud Shell, run the following command to delete the CharisTechRG resource group. This will remove all the resources that we created for the exercises in this chapter:
az group delete --name CharisTechRG --yes
Summary
In this chapter, we covered an overview of what Azure VNet is. We discussed core VNet planning concepts such as designing a consistent naming scheme, which is critical to resource identification, especially in logging scenarios that we will cover later in this book. We discussed key considerations around selecting the right regions to deploy your networks into, specifying an IP address space that scales, and implementing private IP assignments.
We also carried out hands-on exercises on creating single-stack and dual-stack VNets, determining VM location and sizes for future exercises, and exploring private IP assignments to further solidify the concepts that you learned in this chapter.
The skills that you gained in this chapter are foundational to your being able to design reliable network architectures in Azure to host business-critical applications.
Azure network engineering is a deep and complex topic and we’re only just starting to scratch the surface. In the next chapter, we will cover one of the most important aspects of designing scalable networks in Azure – DNS.
Further reading
For more information about the topics covered in this chapter, you can refer to the following:
- Explore Azure networking services – https://docs.microsoft.com/en-us/learn/modules/azure-networking-fundamentals/
- Configure and manage VNets for Azure administrators – https://docs.microsoft.com/en-us/learn/paths/azure-administrator-manage-virtual-networks/
