


 Download code from GitHub
The Inkscape Interface
There’s no doubt about it, Inkscape is a powerful design application. As such, there is a multitude of tools and functions to get the results you’re after. When you open Inkscape for the first time, it can seem a bit overwhelming. Worry not – we’ll have you up to speed in no time!
In this chapter, you will learn about the various parts of the Inkscape user interface, what they are used for, and how to navigate them. Knowing your way around will dramatically speed up your work in Inkscape, as you will spend less time searching for the tools you need, which of course leaves more time for using them.
By the end of this chapter, you should have a good idea of where to find things easily in Inkscape.
In this chapter, we will cover the following topics:
- Navigating the interface
- The Menu bar
- The Tool bar and Tool control bar
- The Desk and Page area
- The Swatch Palette
- The Color Indicators
- The Layer Info Indicator
- The Status bar
- The Docking area and dialogs
- The Commands bar
- The Snap control bar
- The Display Transform Control
Technical requirements
To make the most of this chapter, you’ll need a computer running a recent version of Linux, macOS, or Windows.
You will, of course, also need a fresh copy of Inkscape 1.1, which you can download from the Inkscape website at www.inkscape.org (simply click the DOWNLOAD button and follow the instructions). As mentioned in the Preface, Inkscape is free to download and can be used for many purposes. Neat, huh?
I also highly recommend using a mouse as there are some functions tied to the mouse that are hard (or impossible) to do with a touchpad. Laptop trackpads are notoriously terrible for your wrists, and while they may suffice for casual mousing on the go, they are less precise and much harder on your wrists than a mouse for click-heavy graphic design tasks. As a laptop addict in university, I destroyed my wrists learning this lesson the hard way.
So, you can save yourself the medical bills and pain by investing in a good-quality mouse now. While I tend to recommend a Logitech mouse, even the cheapest off-brand mouse is better than the most expensive trackpad. If you can manage to get one with a third mouse button, then you get some nice extra functionality, such as being able to grab/pan the canvas just by holding it down.
Navigating the interface
The Inkscape user interface is broken up into panels that are organized like shelves for all the stuff you’ll be using throughout this book. We will provide plenty of screenshots so that you don’t have to memorize all the parts at this point. Think of this more as a guided tour than something to memorize and a reference for when you can’t quite remember what that thing was called. You know... that thing. The thingy with the buttons... Yeah, that one.
But before we dive into the parts of Inkscape, it will help a little to make sure we’re looking at the same Inkscape. I’ve opted to use light mode for the figures in this book, because it looks better in print, it saves ink (which is also eco-friendly), and smaller print tends to be easier to read.
By default, Inkscape’s got a brand-new, sexy dark mode. It’s fine to leave it that way if you like it – just be aware that the icons will be slightly different than the ones in this book. For those keen on having things look the same, you can switch out of Dark mode in the Startup dialog area (also known as the Welcome Screen area) by flipping the Dark mode switch, as shown in Figure 1.1:
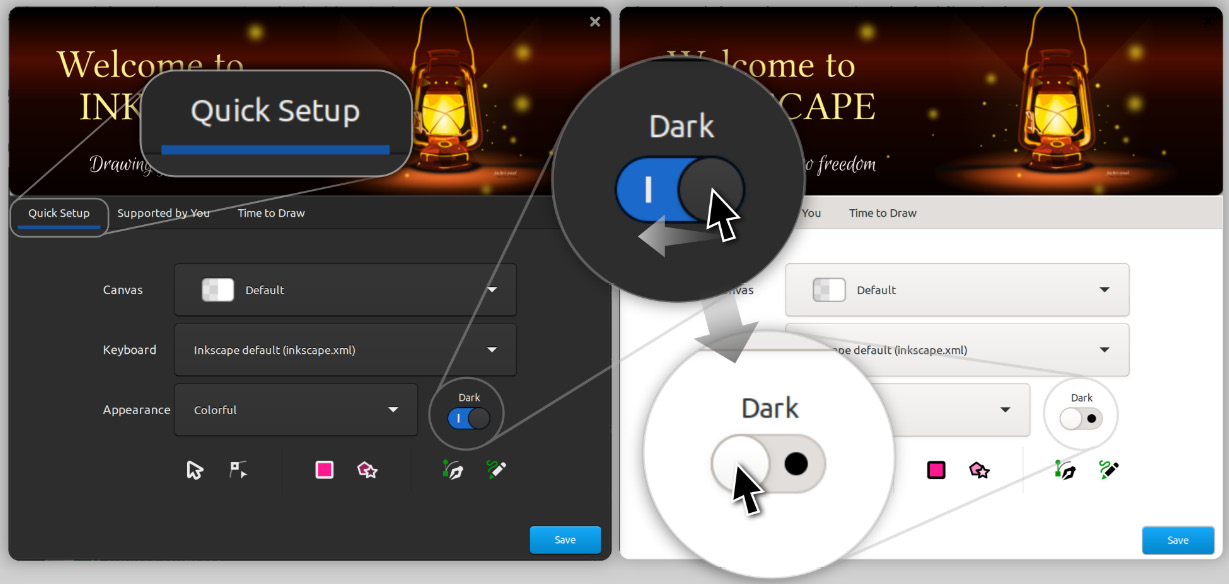
Figure 1.1 – Switching out of dark mode in the Startup dialog (Welcome Screen)
I’ve also opted to use the classic Inkscape icons because they are easier to see and also make this book usable for legacy versions of Inkscape that predate the new icon themes. You can get them looking the same as they are in this book by using the Appearance dropdown beside the Dark mode switch, as shown in Figure 1.2:
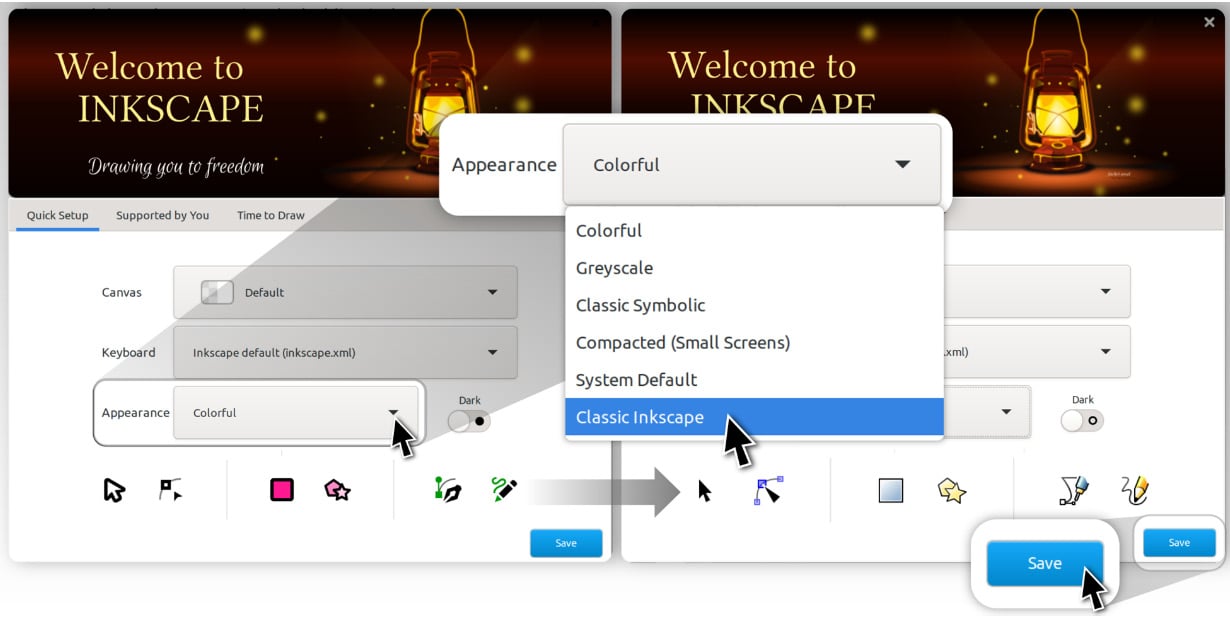
Figure 1.2 – Changing the icon theme to Classic Inkscape
That certainly looks more like it! However, there’s one more gotcha; depending on how wide your screen is, Inkscape may look slightly different than in some of the screenshots in this book. For example, the laptop that I’m using to write this book is 3,840 x 2,160px, meaning it’s a widescreen format of ratio 16:9. The main difference between this and Inkscape’s default view is that the Commands bar is on the side of the screen rather than taking up space at the top.
Inkscape is smart enough to recognize my screen type and give me a wider view instead. Your view may be a bit different, so for consistency, you might want to switch the view to Wide instead. You can do this by clicking the View menu at the top of the screen and choosing Wide, as shown in Figure 1.3:
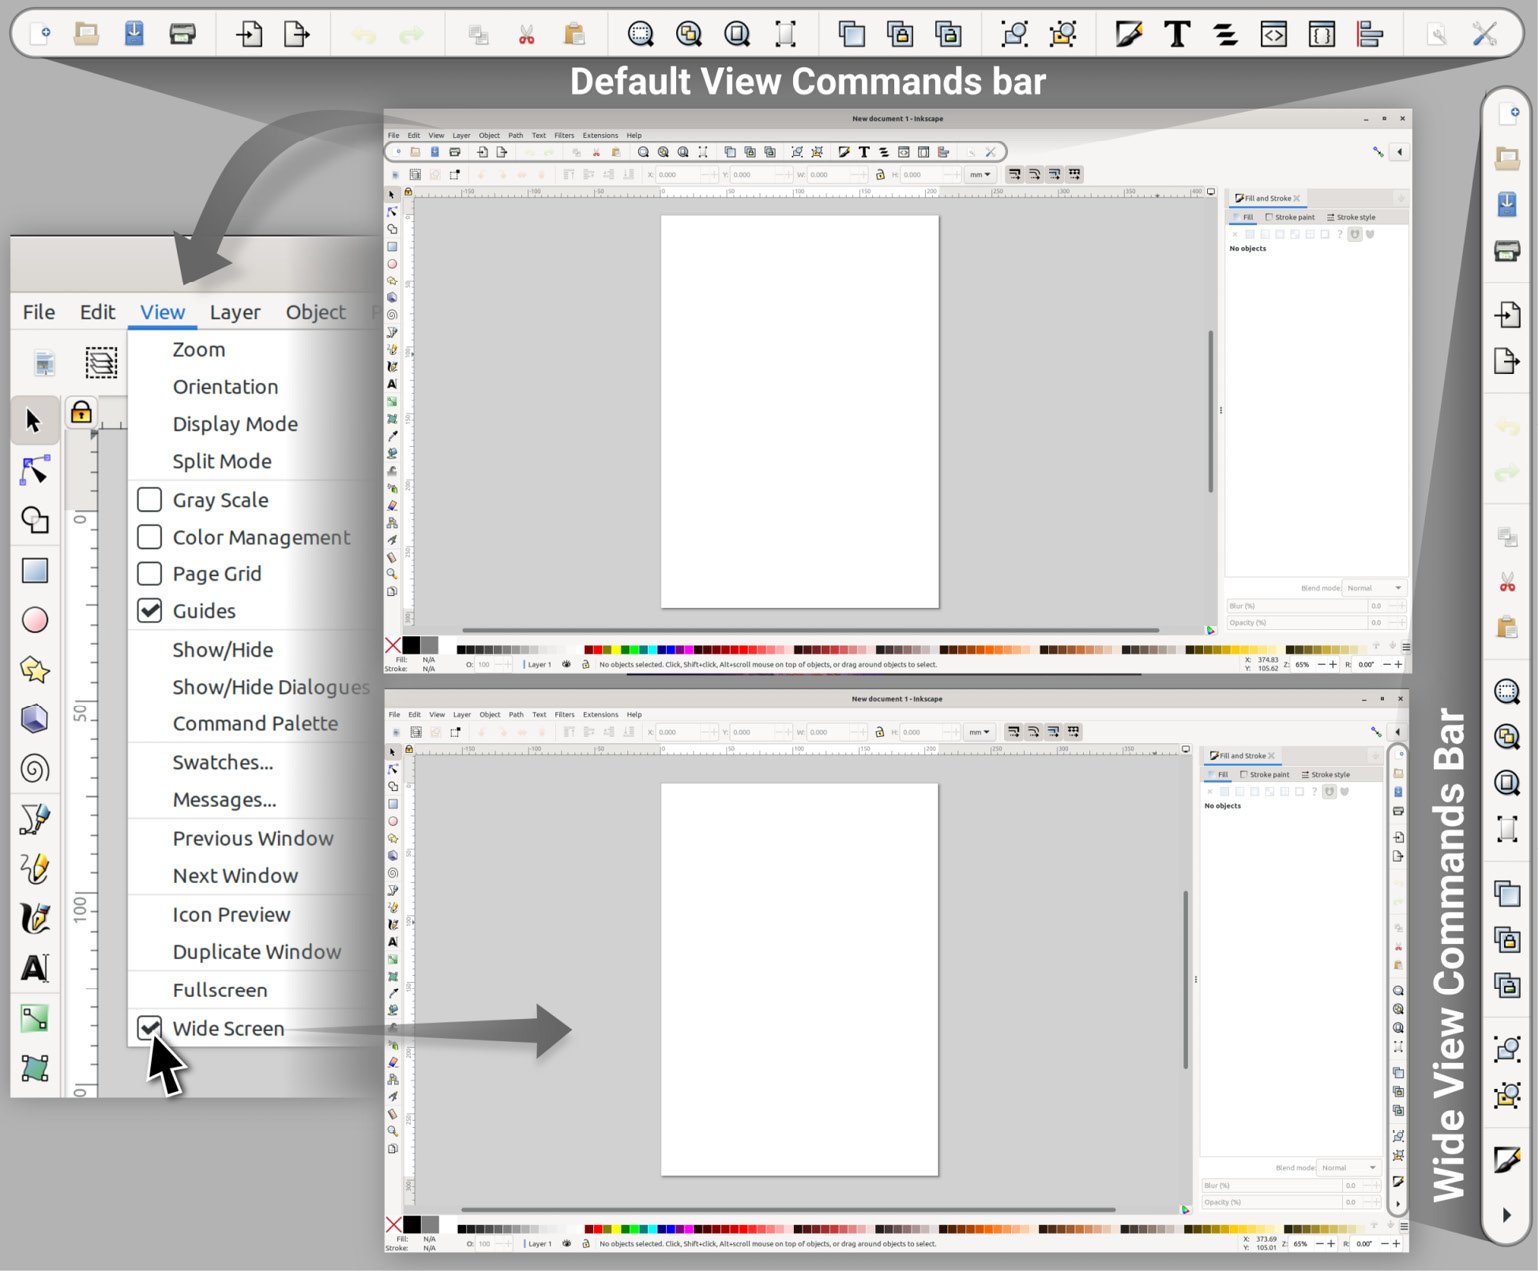
Figure 1.3 – Switching from the default view to the Wide view
Switching views is entirely optional and will not affect anything except the location of the Commands bar, which we will go over but not use very much as it’s far more efficient to use hotkeys for most of the items in this menu.
It also gets in the way of the much more useful Tool control bar, which we will use extensively, so I recommend pushing it to the side to preserve your vertical screen space for drawing and reduce clutter.
Have a look at Figure 1.4 for a breakdown of the parts. Here, I’ve cut up the Wide Screen interface into bits, spaced out so that you can see the different areas we’ll be discussing in this section better:
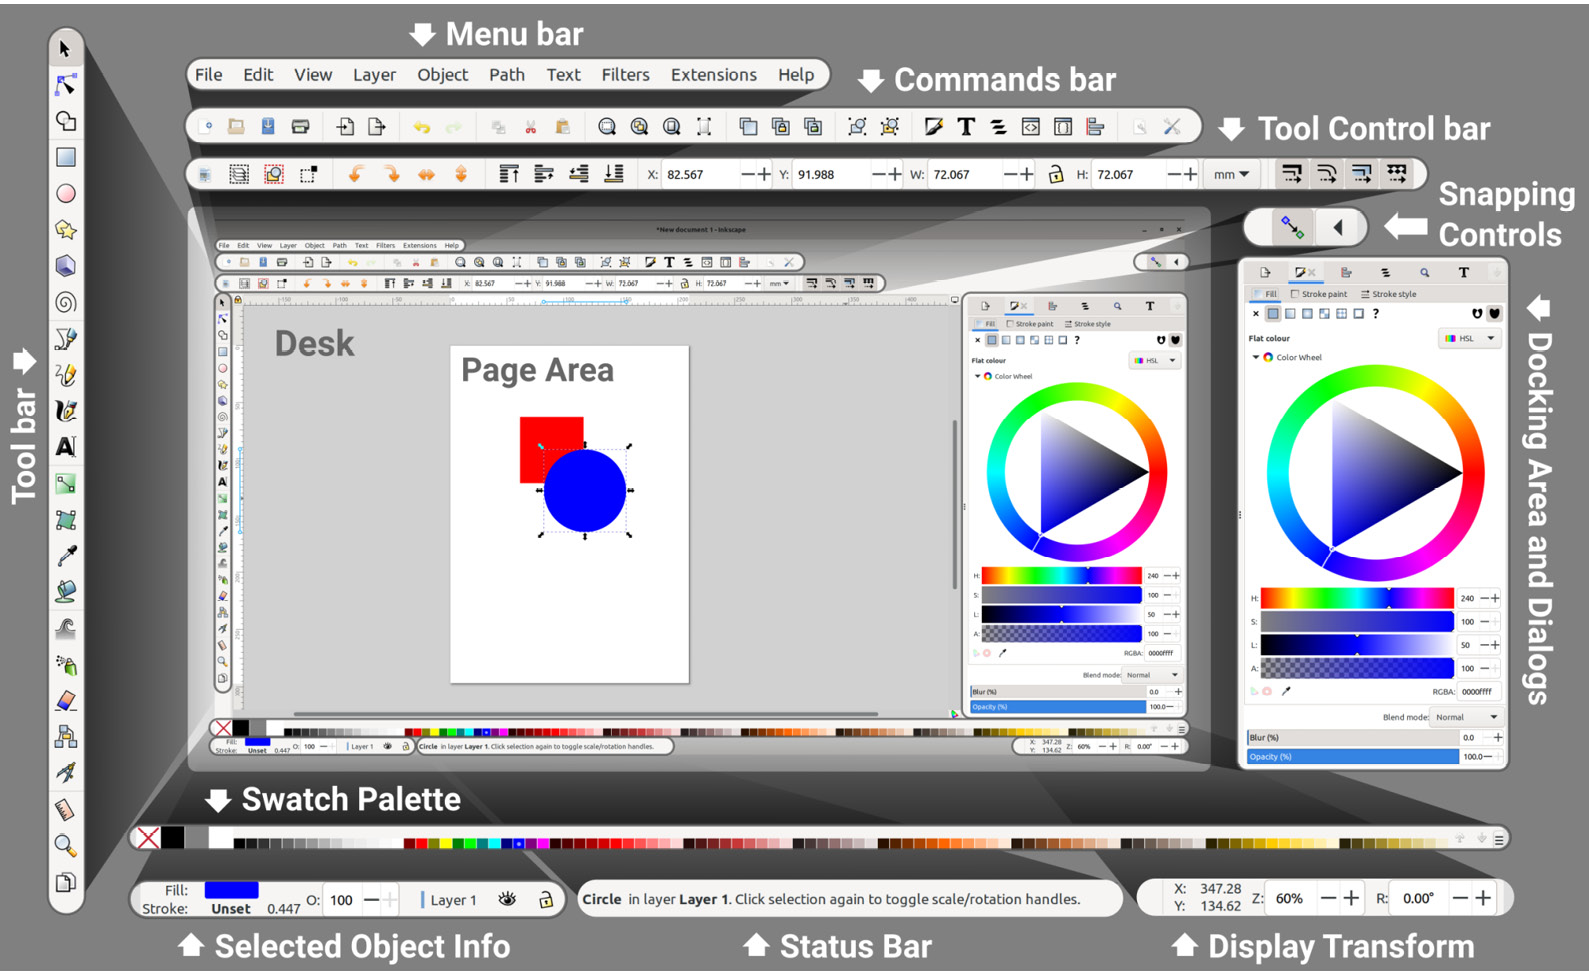
Figure 1.4 – Inkscape interface
Before we dive into the specifics of the various parts of the interface, it’s worthwhile going over some conventions that Inkscape uses to assist you in finding your way around:
- Hover to discover: Hover your mouse cursor over an icon or box for a moment to see what it does (see Figure 1.5 for an example of hovering to discover more information):
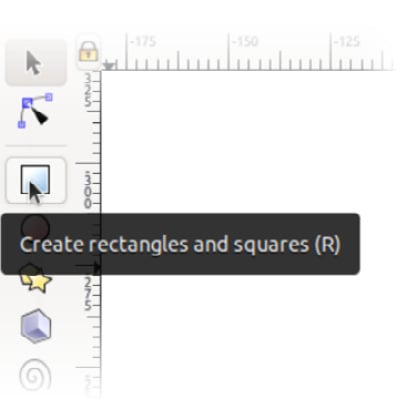
Figure 1.5 – Hovering over a button shows its function
- Hotkeys: A hotkey is a keyboard key (or a combination of them) that you can use to do something instantly rather than clicking through menus or looking through the icon bar. Inkscape will generally list the hotkey associated with the item, be it in the Menu bar or the hover information (Hover to discover, as mentioned in the previous bullet point).
The more you memorize these hotkeys, the faster you can work and the less time you will need to spend clicking around. Eventually, you’ll be able to think about doing something and do it simultaneously via hotkeys. A little time invested in doing this during your projects will save you untold amounts of time forever after.
- Instant Search: As of Inkscape 1.1, there is a new Command Palette that can be called up with the Shift + ? hotkey. This is a search bar where you can type in what you want, and Inkscape will show you the results right away. This is a great way to find things quickly, and well worth remembering the hotkey. Got a question? Tap the Shift + ? hotkey, as shown in Figure 1.6:

Figure 1.6 – The Command Palette in action
- Buttons: These require only a single click to perform the action. Some examples of these are the Save and Load buttons contained in the Command Palette, and the + and – keys located inside the Spin Boxes, which allow you to increment the value in the box.
- Toggles: These have the same appearance as buttons, but instead of performing a one-time function, they activate or deactivate something. They appear often in the Tool control bar, where you can see which tool or snapping options are active at a glance. They have two states – on and off.
When toggled on, the background of the icon will go a few shades darker to indicate that the button is depressed. Pressing it again when it’s in this state toggles it off again, and the dark background will disappear. See Figure 1.7 for examples of toggles and buttons in Inkscape:

Figure 1.7 – Toggles versus buttons
- Spin Boxes: These are boxes that contain numeric values that can be incremented or decremented using the + and – buttons contained in them. Pressing the + button increments, while – decrements. You can also click inside the box to edit the value manually.
Here are a few neat tricks to use with Spin Boxes:
- Double-click inside the Spin Box to highlight the integer part or the decimal part of the number. You can then start typing a new value and it will overwrite the highlighted part of the number.
- Triple-click inside the Spin Box to highlight the entire number. As before, you can type in a new value. You can also copy and paste the value by using the Ctrl + C and Ctrl + V hotkeys.
- Calculate by using math operators in the Spin Box. That’s right! You can add, subtract, multiply, and divide right in the Spin Box and Inkscape will change your math into a number once you hit the Enter key. No calculator is required! Some examples can be seen in Figure 1.8:
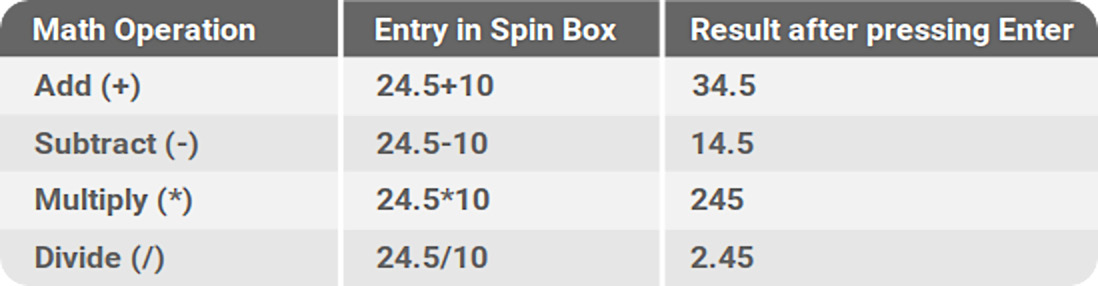
Figure 1.8 – Spin Box math operations table
- Convert from one measurement into another by adding the units to the number. For example, if you are working in centimeters (cm) and are making something that needs to be 24 inches, you can convert it into cm just by typing 24in into the Spin Box and tapping the Enter key when you’re done:

Figure 1.9 – Spin Box converting inches into centimeters
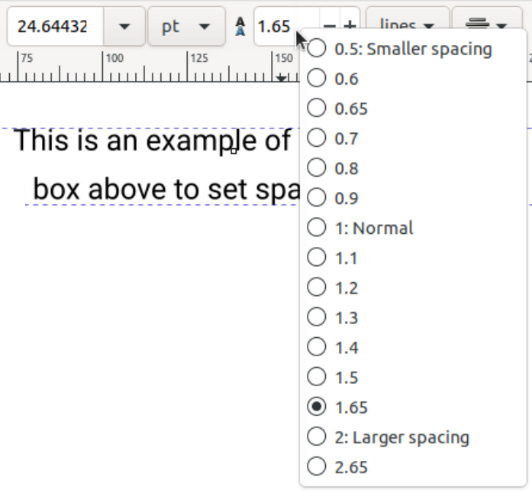
Figure 1.10 – Right-clicking a Spin Box pops up useful default options
So, with all these little tips and tricks for getting around, are we ready for the grand tour? Great! Let’s start with an old familiar friend, the Menu bar.
The Menu bar
You’re probably familiar with this bar as it’s a staple of most desktop applications. Whenever you want to find something, it’s usually organized into menus at the top of the screen (see Figure 1.11):
Figure 1.11 – Inkscape’s Menu items
While this certainly seems like a lot of information, you will see that everything is sorted logically, and once you get used to where things are, it will become second nature. For now, here are some examples of the kinds of things you can find in each menu:
- File: Contains entries related to loading and saving files, printing, cleaning up, and changing the properties of your document.
- Edit: This menu contains copy, paste, and select actions, as well as the Inkscape Preferences dialog.
- View: This menu features zoom controls, display modes, and a variety of customization options to show and hide pieces of the Inkscape user interface.
- Layer: This menu houses layer controls and shortcuts. This menu also brings up the Layers dialog. You will likely use the Layers dialog more often than the items in this menu, but they are still a good reference for the hotkeys to raise and lower layers, and so on.
- Objects: This menu includes a myriad of useful tools for interacting with objects, including raising and lowering them in the object stack (more on that later). This menu also brings up the Objects dialog, the Align and Distribute dialog, and the Arrange dialog, all of which we will cover in later chapters.
- Path: This is a veritable toolbox of functions for editing the nodes and curves (lines/strokes) of your shapes, as well as for converting from an object into a path to make shapes editable. There are also useful path operations to add, remove, and cut shapes using other shapes. We’ll spend a good deal of time in this menu as it contains fast ways to get the shapes we want to make without the need to edit them node by node.
- Text: This menu can be used to bring up the Text and Font dialog, attach text to paths, flow text through objects so your paragraphs take on the shape of non-rectangle objects, and, of course, the all-important Check Spelling dialog.
- Filters: In addition to constructing shapes, Inkscape makes it possible to add effects to them. It’s best to use the effects in this menu sparingly for a variety of reasons. However, there are some neat effects here and the ability to build your own, so we’ll have some fun with that later.
- Extensions: Inkscape supports extensions written in the programming language Python. Writing these is beyond the scope of this book, but I’ll take you on a guided tour of the fabulous extensions that come with Inkscape so you can do awesome things such as generate barcodes and QR codes, change the colors of your shapes and objects as you would do in photo-editing software, and so on.
- Help: This menu contains a great collection of quick links for learning Inkscape basics, getting help, and even chatting with Inkscape community members in real time on the Inkscape chat server. The manual is a bit outdated at the time of writing this book but contains a lot of useful information nonetheless.
Note
In this book and online forums, it’s common to use > to indicate the way to get to a menu item. For example, instead of saying “go to the top Menu bar and click on the Edit menu, then click on the Paste Size option, then click on the Paste Width option,” we instead say Edit > Paste Size > Paste Width.
Much easier to read, isn’t it? It’s also easier to type and remember, and generally saves everyone involved a ton of time.
That about wraps it up for the Menu bar. Next, we’ll have a look at the Tool bar and Tool control bar.
The Tool bar and Tool control bar
These two go hand in hand. The tools are on the left, and the controls for the tools are at the top. When you choose a tool from the bar on the left, the Tool control bar will display all the options for that tool. For example, if you choose the Star and Polygon tool, the Tool control bar area displays the number of points, whether it’s a star or a polygon, and even the rounding of the points! Changing to the Text tool shows all the various fonts, letters, line and character spacing, and so on.
When the Star and Polygon tool is selected, the Tool control bar shows options for the tool, such as how many corners the star has, as shown in the following screenshot:
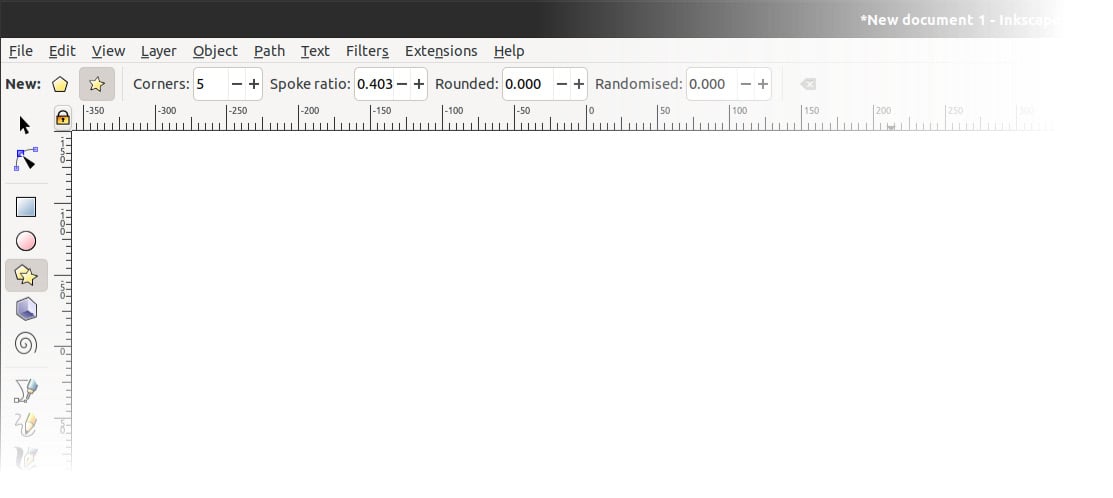
Figure 1.12 – The Star and Polygon tool
Double-clicking on a tool in the Tool bar will bring up options for that tool (see Figure 1.13), including Last used style, which you’ll probably want to turn on so that Inkscape remembers the fill color and stroke thickness of the last shape you drew, the last font you used for text, and so on. Double-clicking a tool brings up the Preferences dialog for that tool:
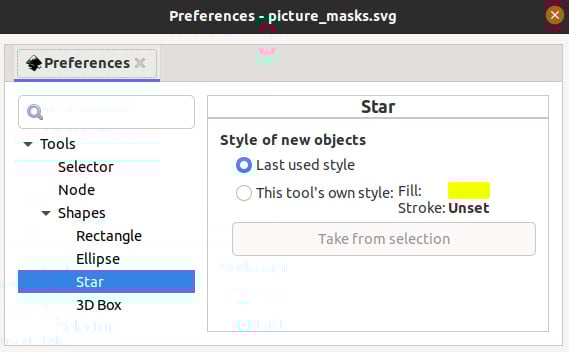
Figure 1.13 – Star tool Preferences dialog
We’ll be exploring the various options for each of these tools in detail in the next chapters, but for now, let’s move on to the main event – the Desk and Page areas.
The Desk and Page areas
This area, shown in Figure 1.14, is where you’ll be drawing with the various tools in the Tool bar. The Page area, by default, is an A4-sized page but can be changed by selecting File > Document Properties or pressing Ctrl + Shift + D:
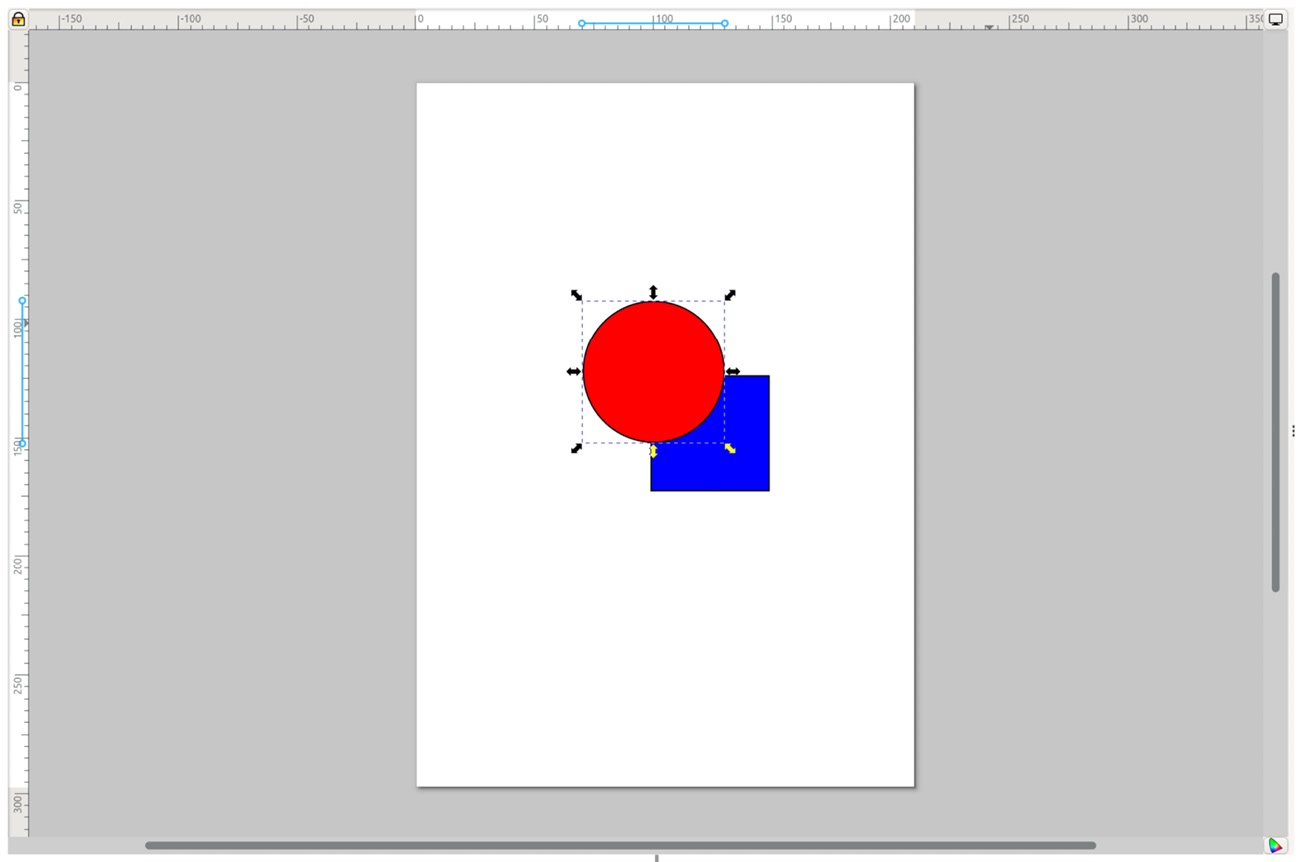
Figure 1.14 – The Desk area with a few shapes drawn on the Page area
Although you can draw anywhere in the Desk area, the Page area is a good place to keep your main graphics. It’s what will appear in the thumbnail preview of your file browser and web browser, or what someone will see when they open that PDF you saved. It’s also the region that is exported when choosing the Page option in the PNG Export dialog (more on that later).
Here are some tips for navigating the Desk and Page areas:
- Zoom in and out: Hold the Ctrl key and use the mouse wheel to zoom in and out. If your computer supports a touch screen, you can also pinch to zoom, or use the + and – keys as well. There is also a Zoom tool in the Tool bar that looks like a magnifying glass, but with all these great ways to zoom without switching tools, I recommend the other methods.
- Panning the view: Moving the view from side to side or up and down is called panning. Sure, you can drag the tiny scrollbars at the bottom and left-hand side of the canvas, but you could also just hold the spacebar down, which will grab the canvas and move it as you move the mouse.
Holding the middle mouse button also works if you have one, but once you get used to the spacebar method, it’s going to be your go-to method of panning. You will wish your other applications did the same after a while.
- The context menu: What if you didn’t have to move your mouse off the canvas to access some of the Menu bar items? Even better, what if you could just right-click on the canvas, or an object on the canvas and instantly be offered a subset of actions just for that kind of object? Well, that’s exactly what the context menu is for! Simply right-click on the Desk, Page, or any selected object and you will be presented with a choice assortment of useful things, as you can see in Figure 1.15:
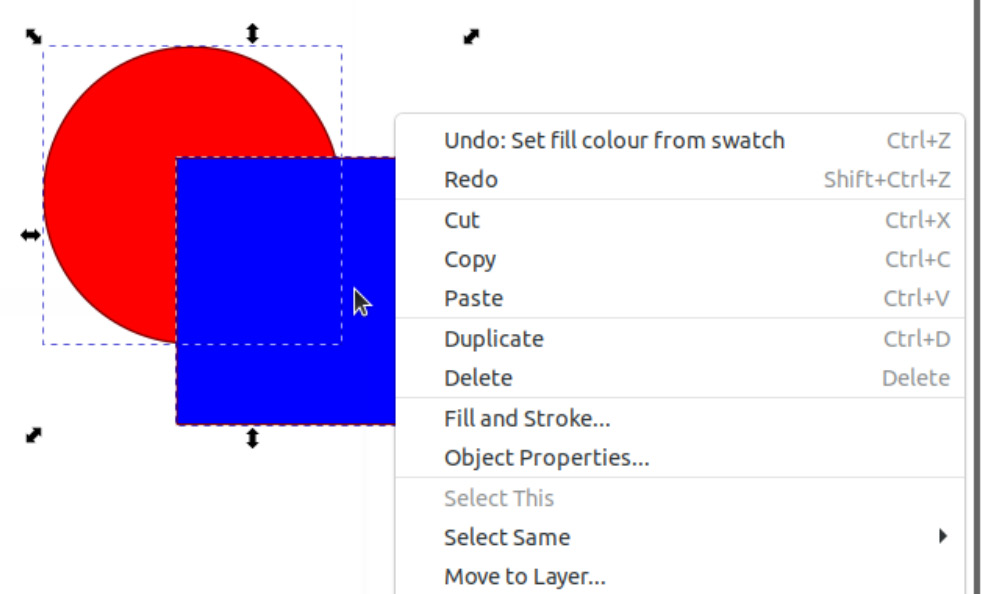
Figure 1.15 – Right-clicking this selection brings up the context menu for what is selected
So, now that you know how to get around the Desk area, let’s have a look at some ways you can color your shapes with the Swatch Palette.
The Swatch Palette
As shown in Figure 1.16, the Swatch Palette is good for quick coloring. Clicking one of these will fill any selected shape with that color:

Figure 1.16 – The Swatch Palette
Likewise, holding Shift and clicking a swatch will assign a stroke of that color, or you can right-click a swatch and choose Set stroke from the popover menu. Clicking the hamburger menu (the one with three lines) on the far right will give you option to see more colors and switch between palettes. Also, the up and down arrow buttons to the left of the hamburger menu will scroll up and down the available swatches in the currently selected palette, as will hovering the mouse cursor over the swatches and using the mouse wheel.
In Inkscape 1.3, you may notice that the first swatches on the left are larger than the rest. These are pinned colors, and you can add and remove them from this area to save your favorites. Say, for example, you really like the brightest red, and you’d like it to be pinned. Simply right-click on the red swatch and choose Pin color from the menu that pops up, as shown in Figure 1.17.
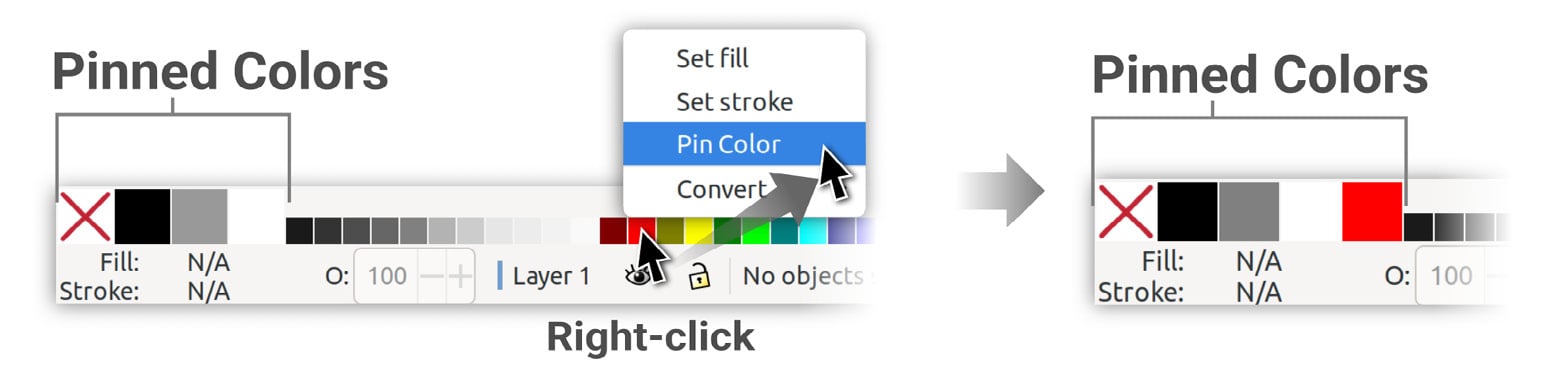
Figure 1.17 – Pinning colors to the Pinned Colors area
The color indicators
The color indicators indicate the Fill and Stroke (outline) colors for the selected shape. These indicators will be blank (and show N/A, which is short for not applicable) until a shape is selected. Clicking the color bar will bring up the Fill and Stroke dialog for more options, as well as a variety of color pickers to choose custom colors.
Right-clicking the color bars will bring up a menu of nice presets, as well as the ability to copy, paste, and swap colors between fills and strokes, as shown in Figure 1.18:
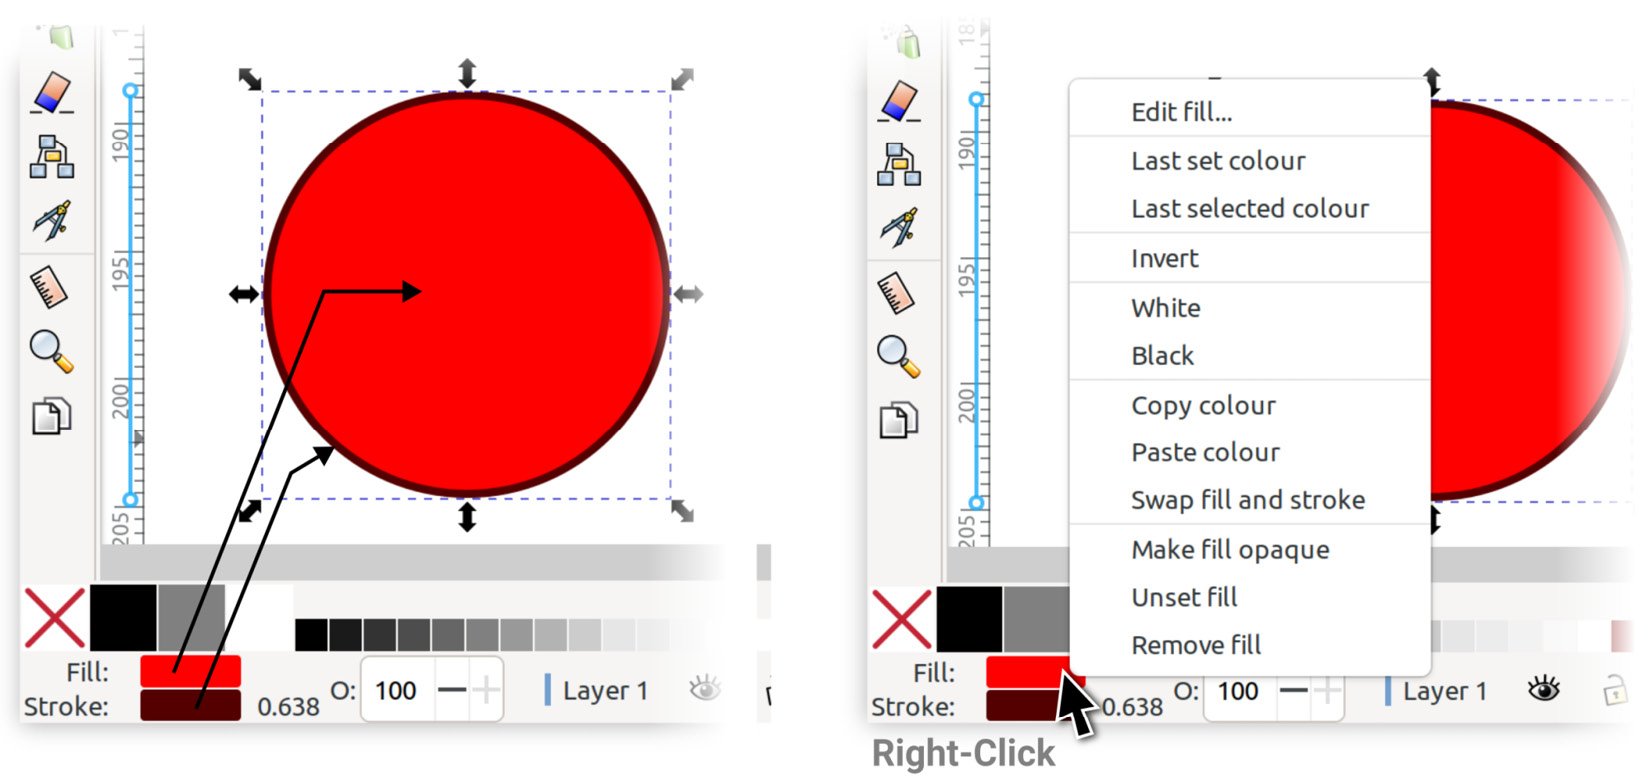
Figure 1.18 – Fill and stroke indicators (left) and the options you get after right-clicking the Fill or Stroke color bars (right)
Next to the Stroke color bar is a number representing the stroke’s width (0.638 in this case). Clicking that number will open the Stroke Style tab in the Fill and Stroke dialog, where you can change its value.
The O: value to the right of the stroke’s width in the box is the opacity value, which controls the transparency/opacity of the selected object. This value corresponds to the opacity slider at the bottom of the Fill and Stroke dialog. You can use either one to change this opacity value.
Those are the basics of the color indicators, but you’ll notice there are more options directly to the right. Let’s see what the Layer Info Indicator is all about, shall we?
The Layer Info Indicator
These are just a few quick-access tools (see Figure 1.19) for working with the currently selected layer or group. These controls are also available in the Layers dialog and Objects dialog, which we will discuss later:
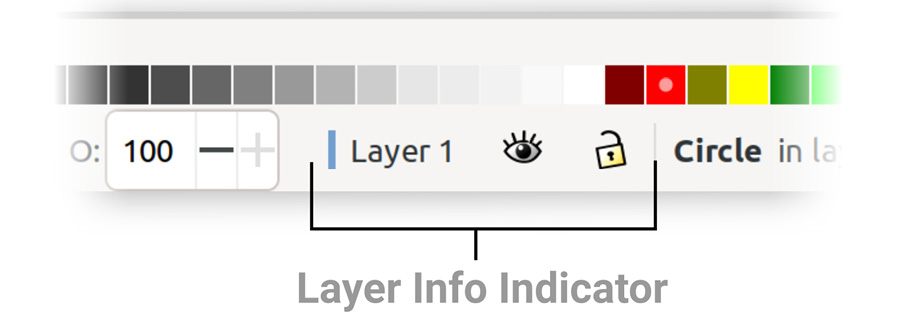
Figure 1.19 – Layer Info Indicator
Clicking the Eyeball Toggle icon will hide or show the current layer or group, and the Lock Toggle icon will lock or unlock it. Locking a layer means you cannot select it, which is nice for working on top of background shapes that you don’t want to accidentally select. You can also click the layer name, and the Layers and Objects dialog will appear with the current layer and object selected.
Further to the right is a space filled with a message – this is the Status bar.
The Status bar
A much-overlooked area of the interface, this readout shows useful information about the current state of Inkscape (see Figure 1.20):

Figure 1.20 – The Status bar – an invaluable source of information
This area shows different things, depending on what’s selected:
- When no shapes are selected, the Status bar contains useful tips about the active tool.
- When an object is selected, the Status bar shows what the object type is and information about the object.
- When a path is selected, the Status bar shows how many nodes are in the current path.
- When a group is selected the Status bar shows how many objects and paths the group contains, and whether it contains other groups.
- When an image is selected, the Status bar shows the dimensions of the image in pixels, and whether the image is linked or embedded in the document.
- When something goes wrong – for example, you’ve tried to subtract one shape from another using path operations, and one of the objects isn’t a path. Inkscape will show an error message here reminding you that one of your shapes is an object and will not work for this operation until you convert it (more on this later).
Now, let’s take a look at the Docking area and dialogs.
The Docking area and dialogs
This area, featured in Figure 1.21, will show all dialogs you call up, and provides a customizable space where you can keep one or more of them handy while you work:
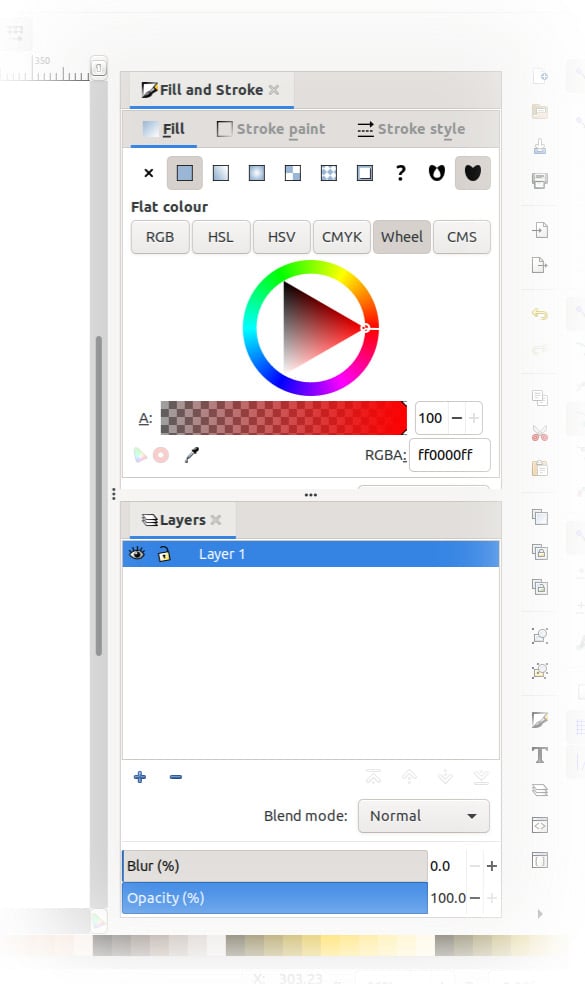
Figure 1.21 – The Docking area, shown here with the Fill and Stroke and Layers and Objects dialogs
When opening Inkscape for the first time, you may not see any dialog boxes. There are various ways of summoning these dialogs, such as clicking the Fill and Stroke color bars (as mentioned previously), or by using equivalent options in the Menu bar (Object > Fill and Stroke, for example).
You can click and drag the tabs at the top of each dialog to rearrange them in the Docking area, and as of Inkscape 1.1, you can even dock them to the other side of the screen next to your Tool bar if you wish.
Notice the three dots on the left-hand side of the dialogs. This is a handle, which you may use to resize the dialogs. Handles are also present between each dialog for the same purpose.
Tip
At the time of writing, developers are working hard to shrink the area needed for some of the wider dialogs. Meanwhile, you can also drag out a dialog into a floating window and then close it. Inkscape will remember your preference and will float the dialog when you call it up again so that it does not constantly use up space in your dock. The F12 key also toggles the Docking area on and off, so if it’s encroaching on your drawing space, you can banish it temporarily and pull it back out when you need it.
Moving further to the right, there is another bar of icon buttons, though you will probably not need these as often. Let’s have a look at the Commands bar.
The Commands bar
This bar (see Figure 1.22) contains some of the commonly used functions in various menus in the Menu bar, such as save/load, undo/redo, and even calls up some of the dialogs. I never use these, but they are a nice touch for those who aren’t used to selecting things out of the Menu bar or using hotkeys (which is my preferred method). Recall from earlier in the chapter that this bar may be at the top by default, depending on your screen dimensions.
The Command bar is the button-clicky way to do things you should be doing with hotkeys:

Figure 1.22 – The Commands bar
The arrow at the bottom can be clicked to show more dialogs that do not fit on the screen. Depending on your screen resolution, you may or may not see this arrow.
Well, we’re here at the final bar of buttons and about as far right as we can go without falling off the screen. These are toggles, as mentioned previously, and comprise the Snap control bar.
The Snap control bar
When you move your objects around the page or draw new shapes, the cursor can automatically snap to various parts of the drawing area or other shapes that you have already drawn. This can be handy for alignment, as we will see in later chapters.
Figure 1.23 shows typical snapping behavior – while you are dragging an object to a new location, Inkscape takes the closest point (or line) on your shape to your cursor and suggests places to align or snap it to a nearby shape. You can then simply release the mouse button and the shape will be perfectly aligned:
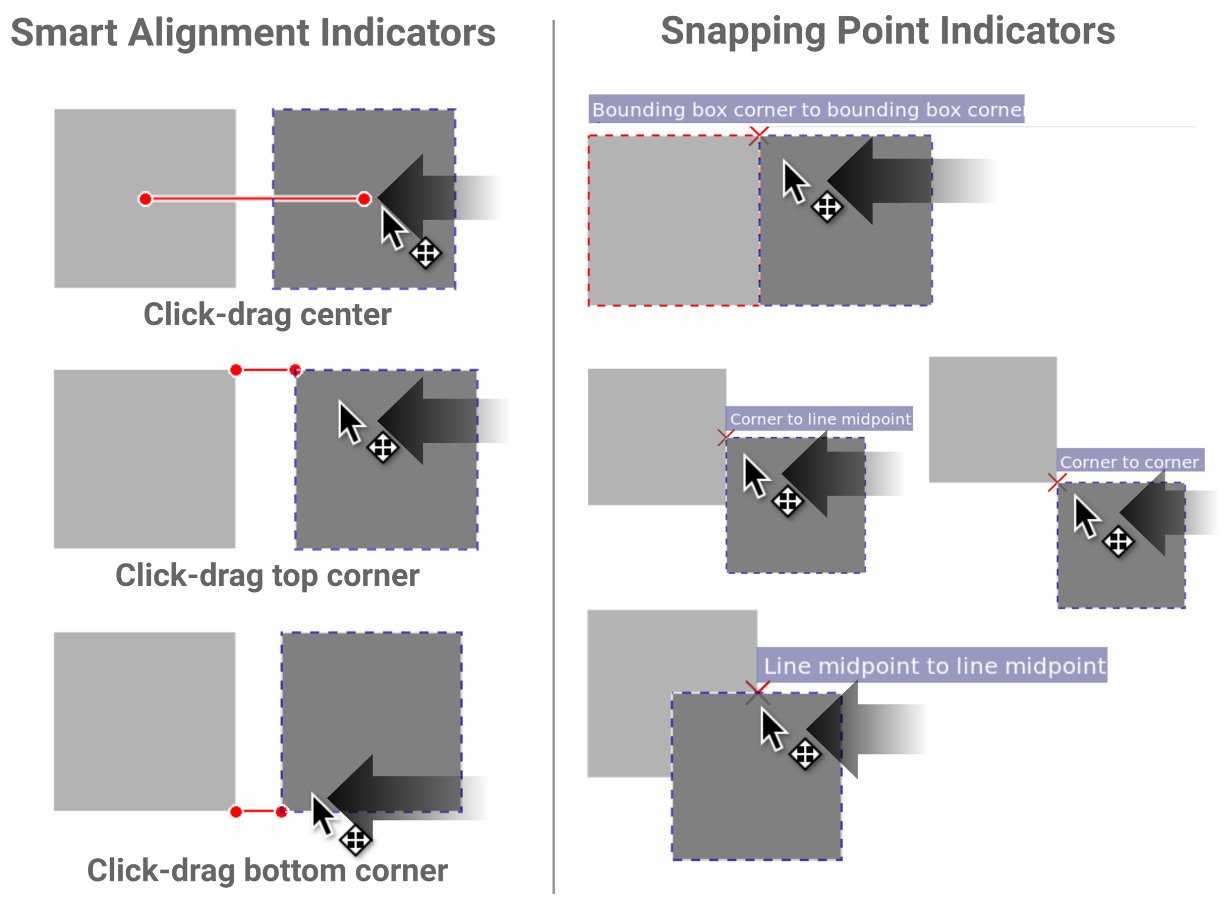
Figure 1.23 – When you move one object close to another, a snapping point appears
A snapping indicator will appear when an object snaps to another so that you can see what Inkscape is snapping to before you release the mouse button. You can control what Inkscape uses to snap using the Snapping Controls toggle.
Clicking the Snapping Controls toggle enables and disables snapping, while the arrow beside it pops up the Simple Snapping options by default. Clicking the Advanced Options link at the bottom shows a full list of all snapping options in Inkscape, as shown in Figure 1.24:
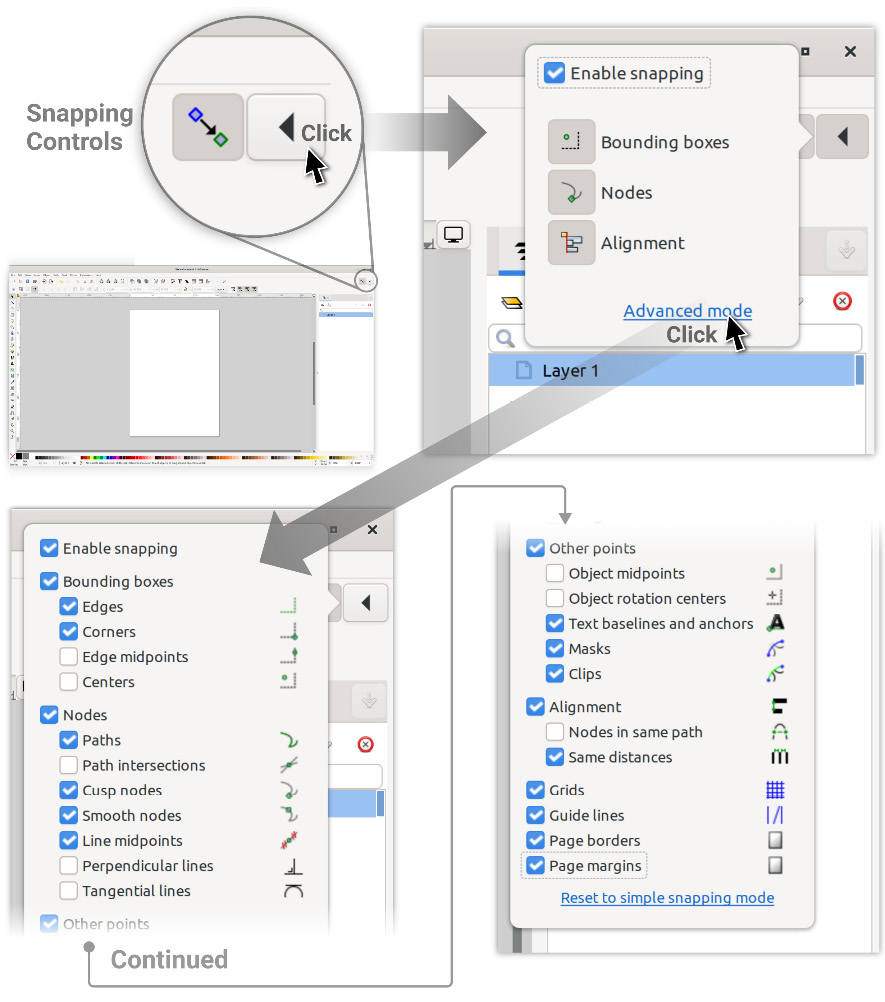
Figure 1.24 – Expanding the Snapping controls to Advanced mode for all snapping options
The following summarizes what these checkboxes do:
- Enable Snapping: This button will toggle all snapping on and off so that you can activate or deactivate snapping easily. You can also use the % key to toggle this on and off.
- Bounding Boxes: When you select an object, a dashed rectangle appears around it. This is called the bounding box, and this checkbox turns snapping on/off to this invisible boundary. The indented checkboxes in this section allow you to control which parts of the bounding box Inkscape snaps to.
- Nodes: Nodes are the points between each line of your shape. If you’ve converted your object into a path, this section allows you to snap one object to another by one of its nodes. We will cover more about nodes and paths in Chapter 5, Node Editing – Modifying Your Shapes with Nodes and Curves. Like the Bounding Box section, the indented checkboxes let you tell Inkscape what kinds of nodes you want to snap to.
- Other Points: This is a catch-all for those snapping options that don’t fit nicely into one of the other groups – for example, snapping to the baseline of a line of text and anchors, or an object’s rotational center or midpoint. We will learn more about them later when we talk about rotating and transforming shapes.
- Snap to Grid: By default, the grid doesn’t show up in Inkscape, so turning this option on will snap objects that you are moving to the invisible grid. If you want to see the grid, simply tap the # key (which looks a little like a grid), or toggle it by selecting View > Page Grid.
- Guide Lines: You can create snapping lines by clicking on a ruler and dragging it outward onto the Desk or Page. Click and drag from the top ruler to make horizontal lines, and from the top-left ruler to make vertical lines. You can also click and drag from the top-left corner, where the rulers converge to drag out a 45-degree snapping line.
Then, all you need to do is use this snapping toggle to snap your objects to your newly created guides. Use the > key to toggle these lines on and off or select View > Guides. You can also remove a guide by dragging them back to the ruler, or simply hovering your cursor over one and hitting the Delete key.
- Page Borders: Yep, you can even snap your shapes to the border of the page using this toggle.
- Page Margins: If you’ve set page margins with the Pages Tool property, you can snap objects to them.
In the final section of this chapter, we’ll look at Display Transform Control.
The Display Transform Control
This area, shown in Figure 1.25, is located at the bottom-right corner of the Inkscape window and contains a manual control for the Desk view. It includes a readout of the X and Y cursor position when it’s over the Desk (measured from the top-left corner of the page), a zoom control, and a view rotation control:

Figure 1.25 – Display Transform Control
Right-clicking the zoom or rotation controls gives some nice preset options, as shown in Figure 1.26, some of which are also in the View menu:
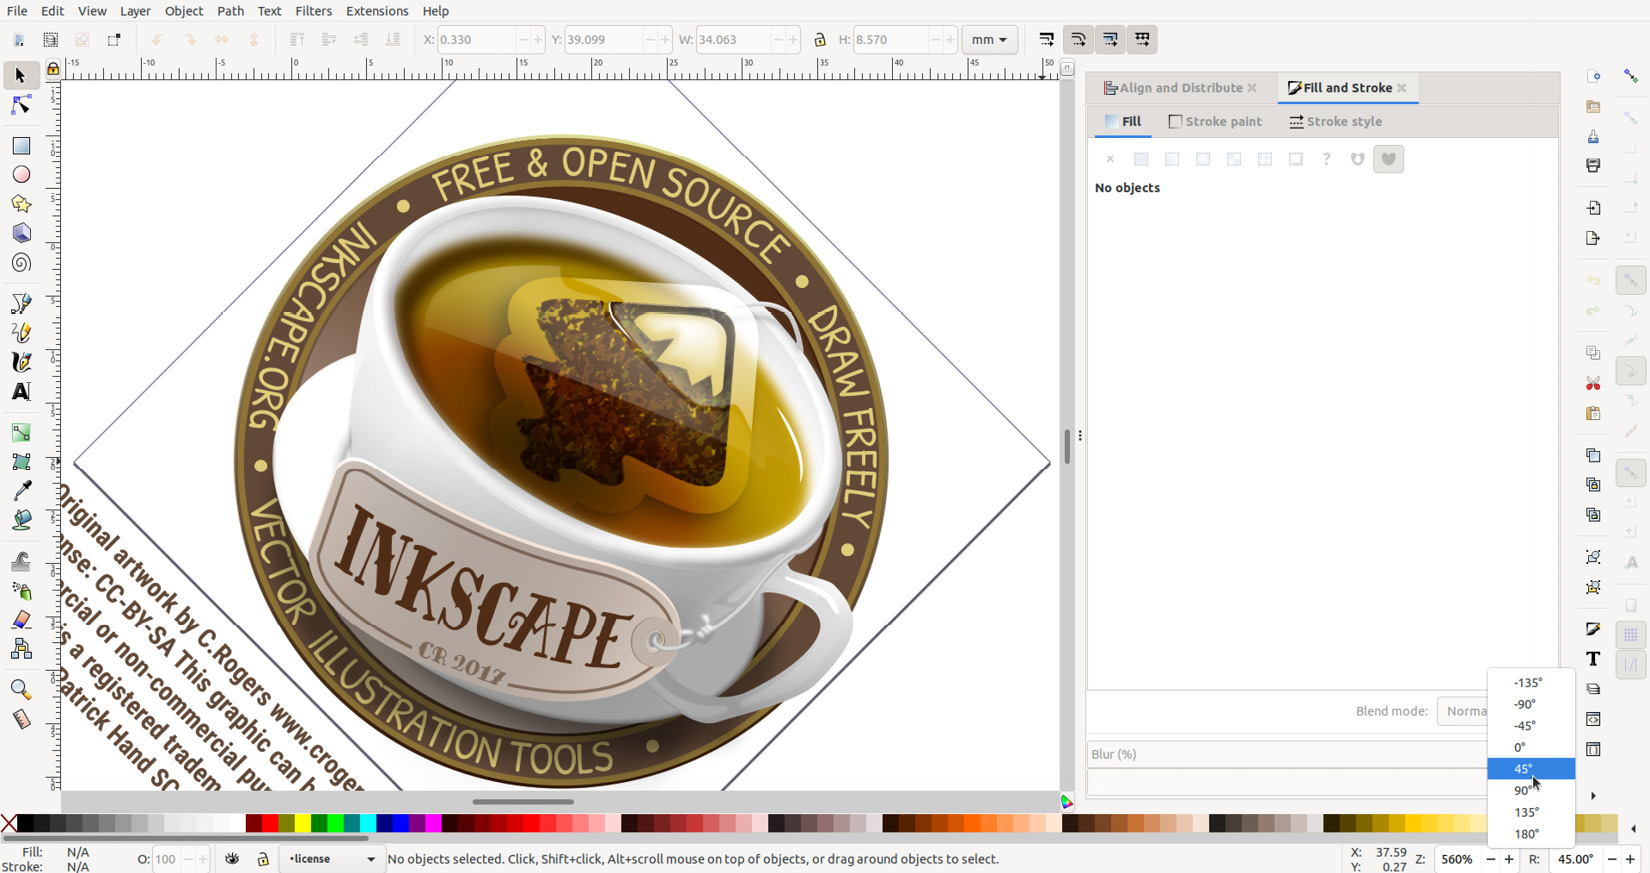
Figure 1.26 – Right-clicking the R Spin Box gives a nice set of preset rotations
For the most part, I recommend using hotkeys and mouse buttons for the navigation described in the The Desk and Page area section earlier in this chapter, but if you’re lost in some blank area of the Desk, or the display is rotated at a strange angle and you don’t know how you got there, this bar allows you to get back where you were quickly.
Summary
In this chapter, we looked at the parts of the Inkscape user interface, how to navigate the Desk area, and identify Spin Boxes, menus, buttons, and toggles. We also went over some neat tricks to use Inkscape as a calculator. Then, we covered some hidden features, such as the right-click default options in Spin Boxes, the sneaky but useful context menu, and a myriad of ways to zoom without using the Zoom tool.
Knowing the contents of this chapter will serve you well in your creative journey with Inkscape, saving you time and building confidence using Inkscape as a tool for creating your graphics. Even better, you can help other users find things they never knew existed to help save them time as well. Sharing is caring in the Inkscape community after all.
Now that we have our footing, we will take the next steps and start making some great stuff in Inkscape. Let’s get into it with Moving and Styling Shapes in the next chapter!