Download code from GitHub
Using Power Automate Desktop and Creating Our First Flow
In the previous chapter, we saw how Power Automate Desktop (PAD) was born and how powerful the tool can be for automating repetitive tasks. In this chapter, we will take a detailed look into the following:
- What is necessary for installing PAD on a local machine
- How the application is built up
- How to create our first flow by using the built-in recorder
To use PAD effectively, a basic understanding of the application is essential, as we will spend most of our time on the very areas presented here. Also, knowledge of the PAD recorder will be extremely helpful throughout this book because it can also save us a lot of time when creating flows. Now, let’s look at how we can get PAD running on our computers.
Understanding the prerequisites for installing PAD
Let’s begin by taking a look at what you need to get Power Automate up and running on a local machine. Two things are required to install Power Automate:
- A Windows operating system (Windows 10 or Windows 11 Home edition or above) and some hardware requirements/recommendations
- A Microsoft work or school account to sign in to Power Automate
Since there are specific things to consider, let’s take a closer look at each of these topics now.
The Windows operating system
The minimum hardware to run PAD is a 1.00 GHz processor, 1 GB of free storage, and 2 GB of RAM. As always, the more powerful a machine is, the better the applications will run, and this also counts for PAD. If you are running a local application that should be part of automation and that also consumes significant PC resources, these resources should be counted on top.
The Windows Home editions (Windows 10 and Windows 11) have a few restrictions (https://learn.microsoft.com/en-us/power-automate/desktop-flows/setup) when working with PAD:
- The first one is that it is not possible to create PAD flows with the Selenium integrated development environment (IDE). If you want to use this IDE to create PAD flows, a Windows Professional or Enterprise edition will be necessary.
- Selenium is an open source test automation framework for the web. We discussed in the previous chapter that PAD and Robotic Process Automation (RPA) have their origins in testing frameworks for user interfaces, of which Selenium is an example. Selenium also has an IDE (https://www.selenium.dev/selenium-ide/), which you can use to create Power Automate Desktop flows – but only if the underlying operating system is Windows Professional or Enterprise. The second restriction is that a UI flow cannot be triggered from the Microsoft cloud when running on a machine with Windows Home. A PAD flow could potentially be triggered from a cloud flow (Power Automate Flow), and this makes it possible to integrate a local application into a larger context by launching a local workflow triggered by events in the cloud ecosystem.
Integration with the Microsoft Cloud
If you intend to integrate a PAD flow with the Microsoft Cloud, a Windows Professional version or higher is required.
Microsoft account
To be able to access the files for installing PAD, a Microsoft account (formally known as Windows Live ID) is required. There are different types of accounts and all of them are suitable for using PAD:
- (Personal) Microsoft account: This is probably the most commonly used type of account in the private area. It is free and provides access to Microsoft’s consumer services such as Outlook.com, OneDrive, and Office applications. To sign up, an existing email address can be used or a new one can be created. This account can also be used to sign in to a Windows machine.
- Work or school account: This type of account is created by an organization that uses Azure Active Directory (AAD) as the authentication and authorization platform. Typically, additional services or subscriptions are purchased that offer additional functionality to users.
- Organization premium account: This is a special form of work or school account. In this case, the organization is not only managing users via AAD but has also moved certain or all parts of IT to the cloud, such as Exchange, Teams, and Business applications.
With all three types, the full potential of PAD can be unleashed. The organization’s premium account has the following capabilities on top:
- Connecting and integrating with cloud flows (see the previous comments on the operating system)
- Collaboration and advanced functionality (such as central Dataverse storage, sharing of flows, as well as centralized management and reporting)
- Additional premium functionality such as access to AI Builder and unattended execution of flows
For the vast majority of use cases, a personal Microsoft account is sufficient. Nevertheless, in the following chapters of this book, we will see scenarios where a premium account is necessary to access specific services.
Additional notes on accounts
To install PAD, a user with administrator privileges on the device is required. A Windows local or domain account with these privileges should be used. To access PAD installation files, however, one of the Microsoft accounts mentioned previously is necessary. The Windows local account can be associated with the Microsoft account in the corresponding Windows account settings.
Now that we know the prerequisites, let’s take a look at how to install the software.
Installing PAD
The installation files for PAD are not on the local Windows medium – you must download these from the Microsoft download center. Therefore, an active internet connection and a modern browser are required – Microsoft Edge version 80 or higher or Google Chrome. For this book, I am using a machine with Windows 11 Home edition and a freshly created personal Microsoft account. To install PAD, do the following:
- Open your browser and navigate to https://www.office.com. If you are not already logged in, do so with your Microsoft account.
- On the right-hand side, you should see a list of familiar icons such as those for Word, Excel, and more. Click on the last one, called Apps. Clicking this icon will make additional apps appear:
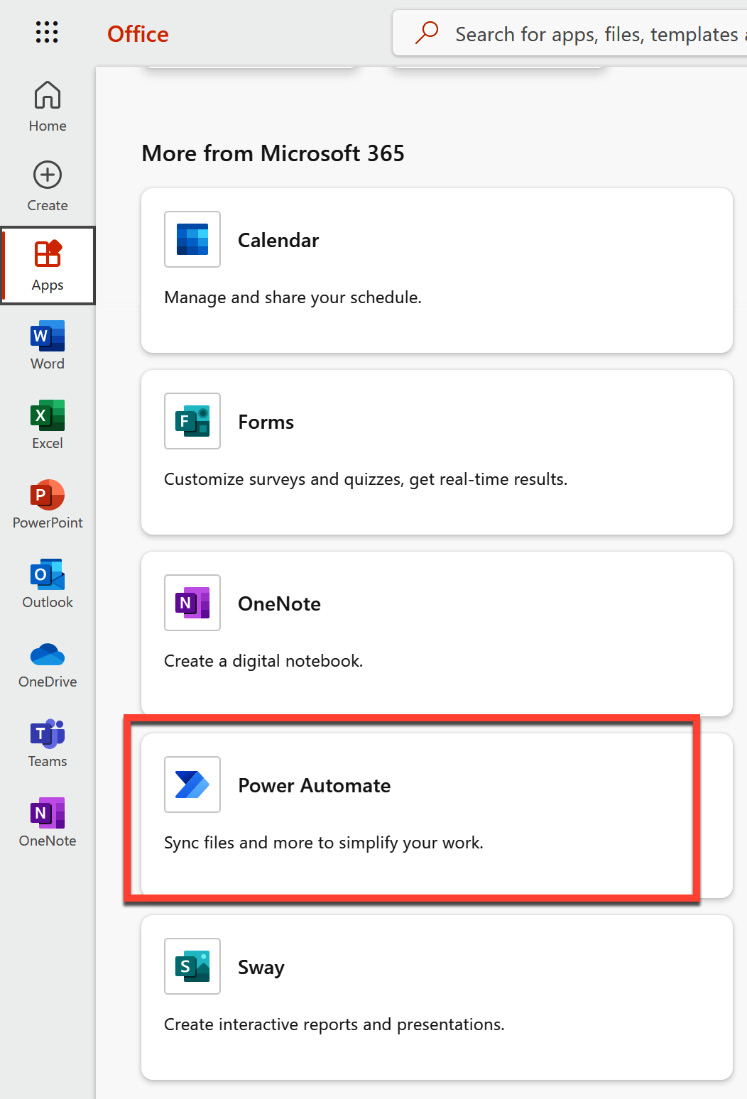
Figure 2.1 – Microsoft Office home page with additional apps
- Click on Power Automate. If you don’t see this icon, scroll down a bit. Next, you may see a little welcome screen that wants you to choose the right region or country. Please select the appropriate entry and press Get started.
- You will be redirected to the start screen of Power Automate, which is where the installation files are concealed. Click on My flows in the left navigation bar:
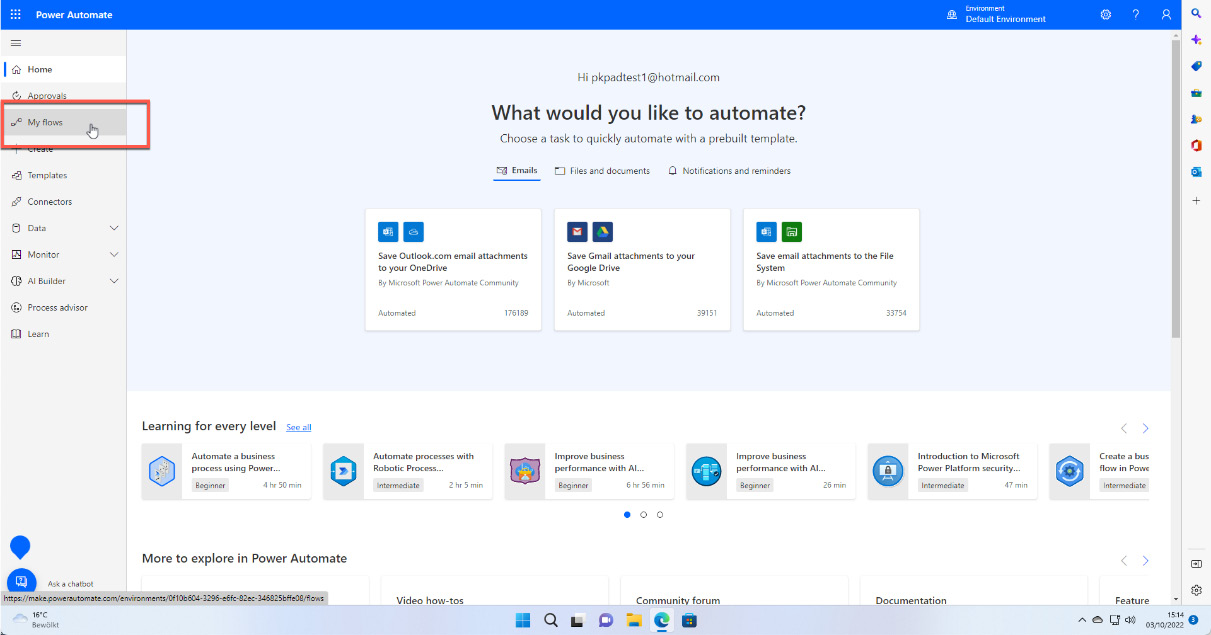
Figure 2.2 – Accessing My flows in Power Automate
- On the next screen, there is an Install button at the top right that reveals the installation files for PAD and the on-premises data gateway. Click on the first entry to start installing PAD:
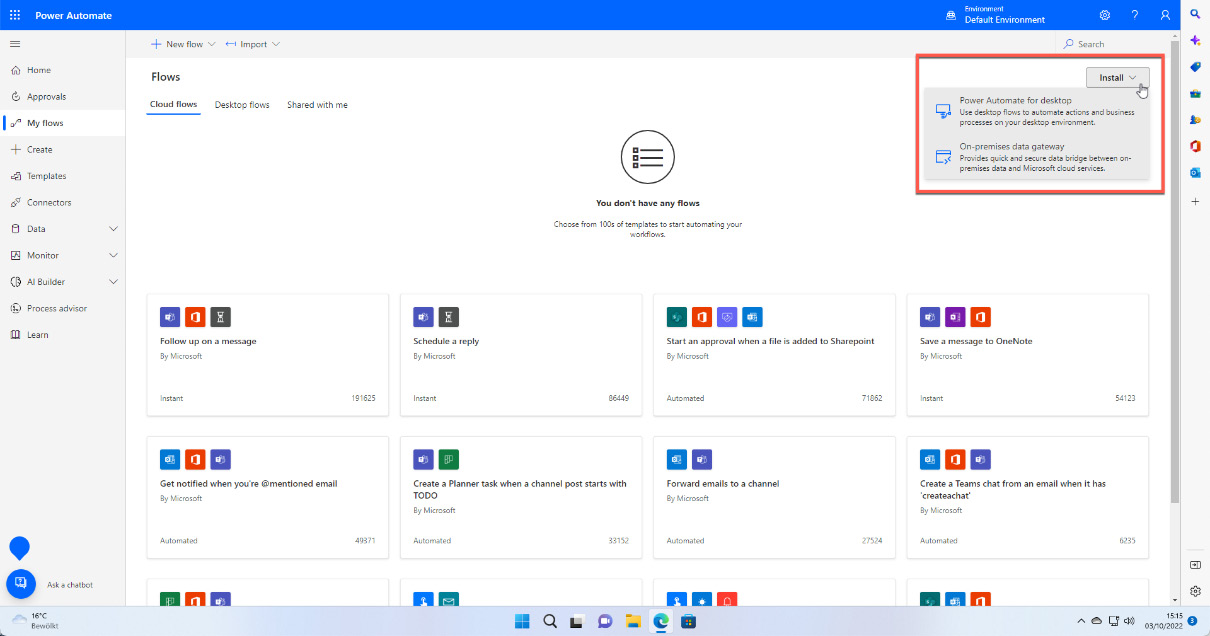
Figure 2.3 – Installation files for
Another way of installing PAD is via the Microsoft Store:
- Open the Microsoft Store app and type
Power Automatein the Search bar. - You will be presented with Power Automate as the first entry of the search result. Click the Install button to get the tool (I have already installed it, which is why I can open it):
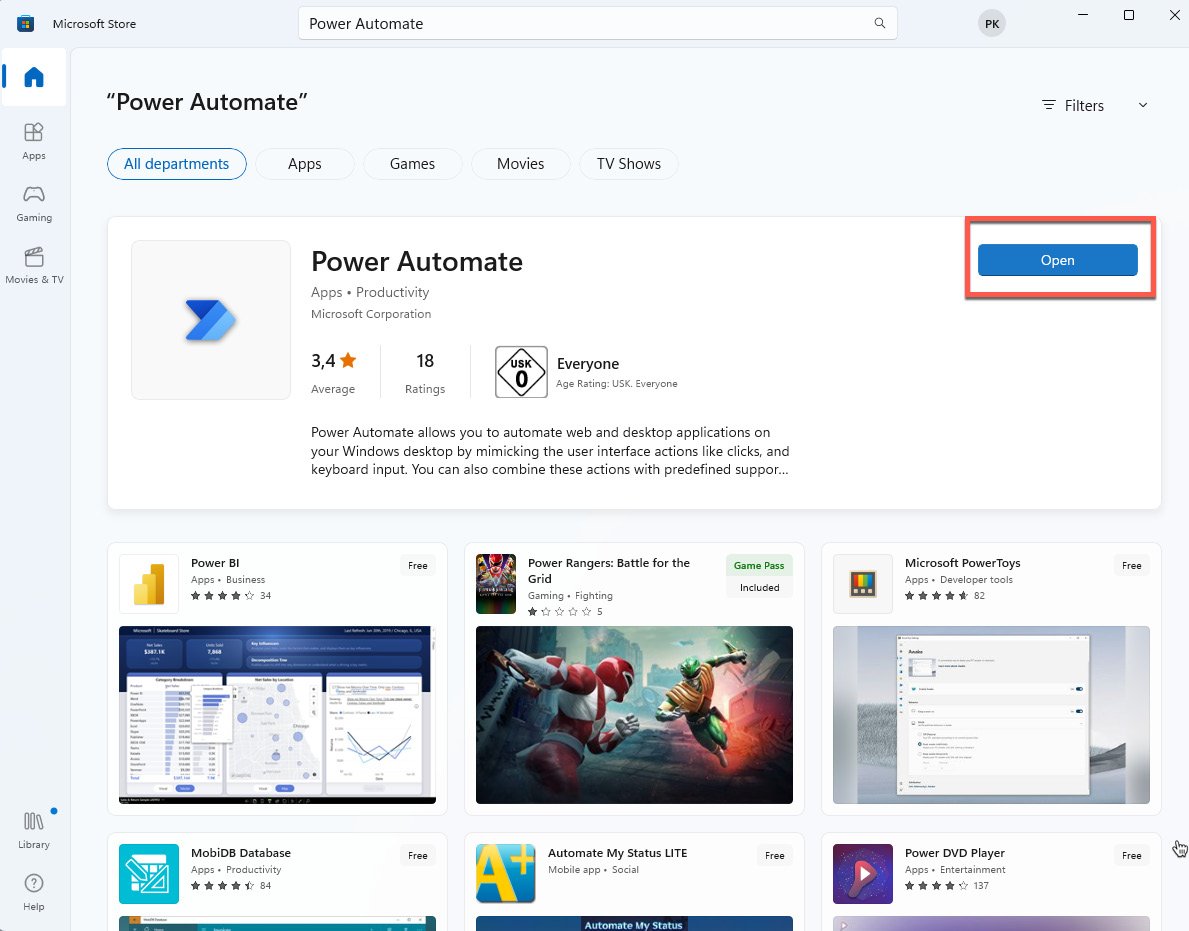
Figure 2.4 – Installing Power Automate from the Microsoft Store
- Whether it’s through the downloaded file or the store, run through the installation process; this is straightforward. You will get a message stating that the installation was successful.
- After that, click the Windows Start button and type
Power Automate. The installation procedure does not create any shortcuts, so it is a good idea to pin this program to the Start menu or the taskbar:
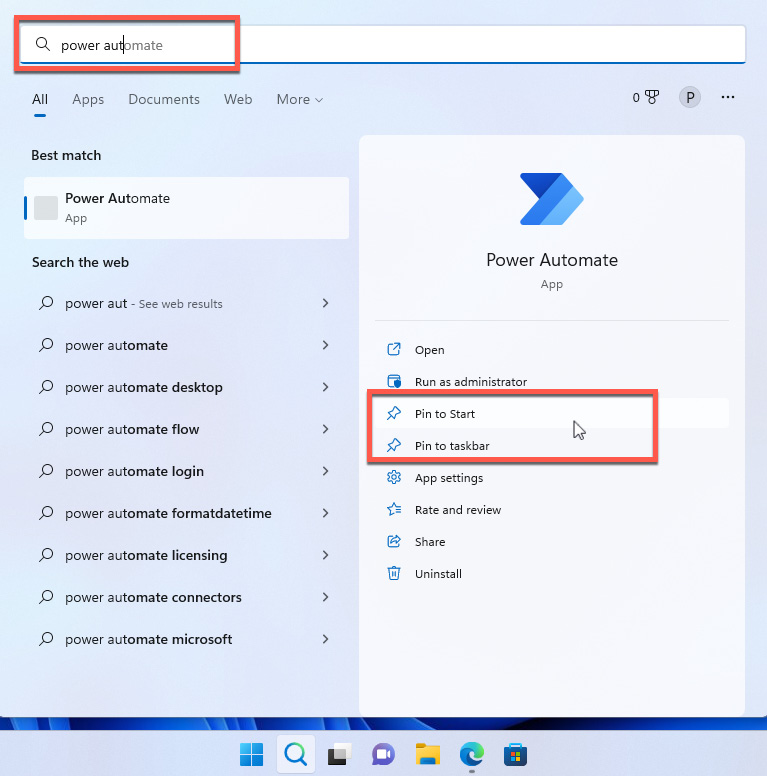
Figure 2.5 – Pinning and launching Power Automate locally
Important note
Please note that the program is called Power Automate and not Power Automate Desktop. Don’t be confused – we are in the right place. The program might find an updated version of the software and apply this automatically.
When the program finally starts, you will also need to log in with your Microsoft account. After this, you should choose a region again and go through the tour of Power Automate, which is also a confirmation that PAD has been successfully installed.
Creating our first flow
Now that we have installed PAD successfully, it’s time to create our first simple flow:
- At this point, the program has started and provides us with a welcome screen. Please note the different tabs, which allow you to switch to your flows or even look at the sample programs from Microsoft, which are worth a look. Starting on the flow container screen, choose + New flow either from the top-left menu bar or in the middle of the screen:
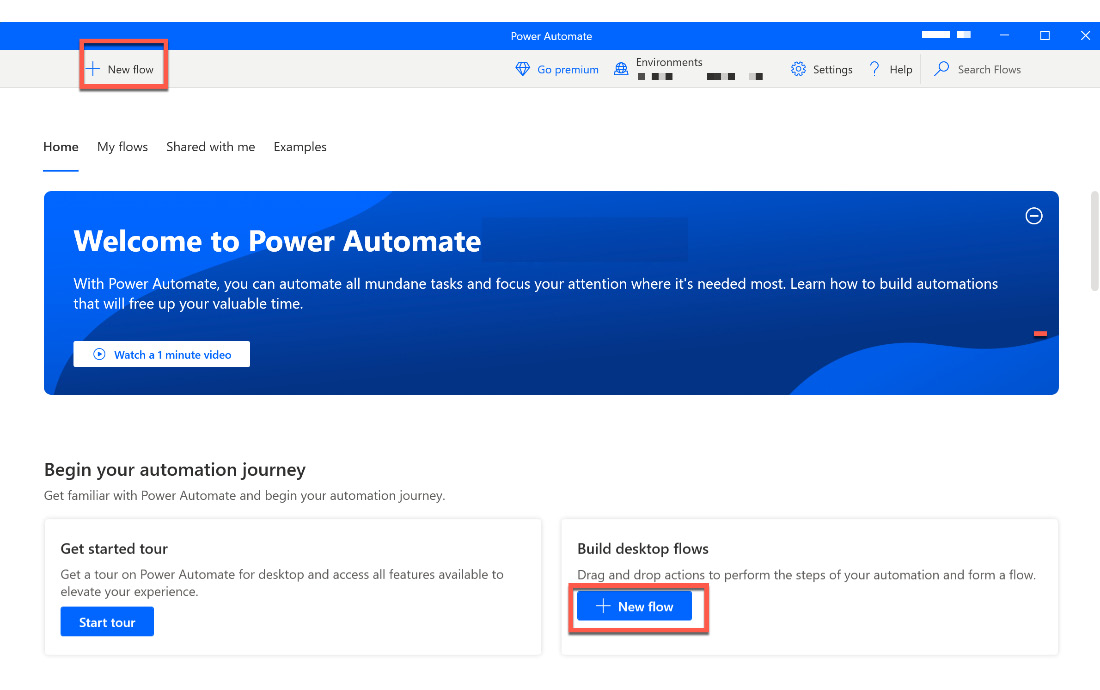
Figure 2.6 – Creating our first flow
- In the next dialog, you will be asked to name the flow. Although this is optional, it is good practice to name your flow accordingly. Let’s choose Welcome Flow this time. You can go ahead and click the Create button to start the designer:
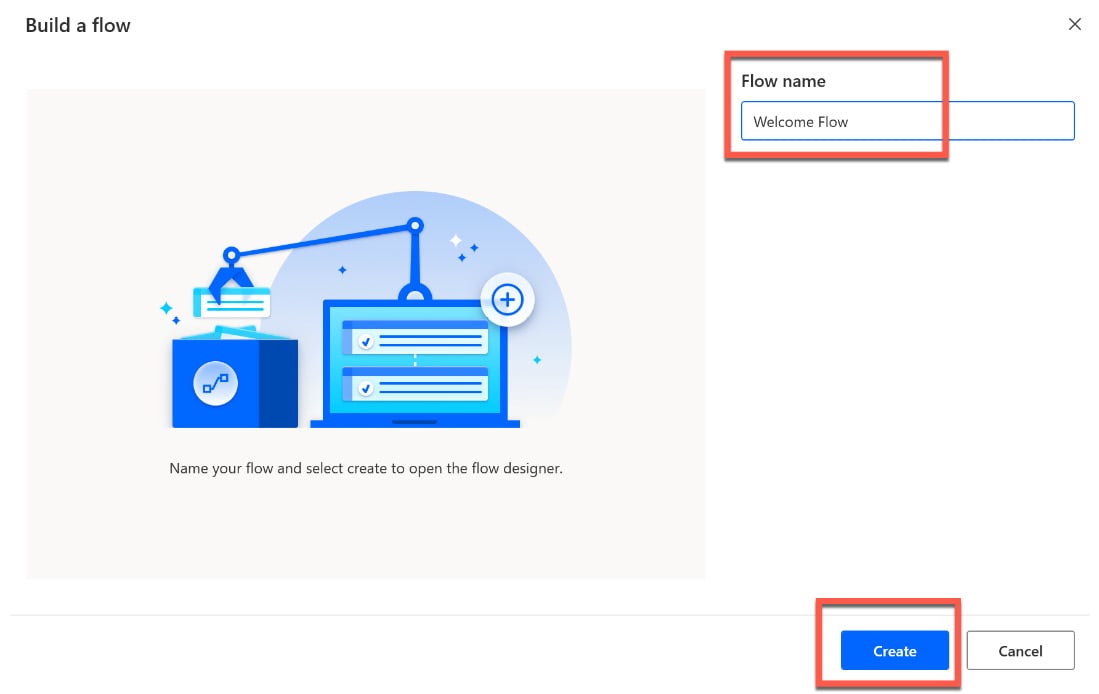
Figure 2.7 – Flow container screen with the + New flow option
- This launches the design interface for PAD flows, and this will probably be the place where we will spend most of our time in this book. In the next section, we will learn what all the individual areas mean and what functions they have. But for now, let’s create our first flow.
In our first flow, the idea here is that we want the flow to ask us for our name and then take this to display a nice welcome message. To achieve this, we are going to make use of the Message boxes actions. Take a look at the list of entries on the left-hand side and hover over the entry called Message boxes; you should see the following:
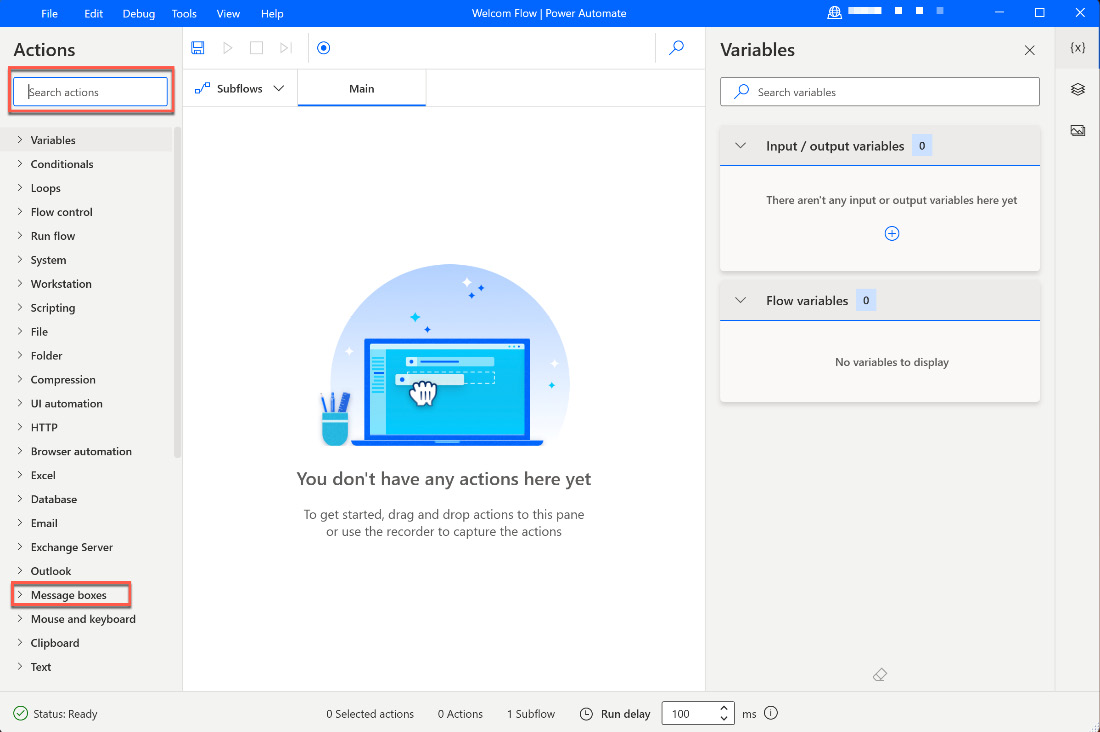
Figure 2.8 – Exploring the Actions pane
- Once you get more familiar with the different actions, you can also use the Search bar on the top left-hand side to reveal a specific set of actions. Try and click in the search box and enter
displayas some text. The left list of actions adapts as per the results of the search term:
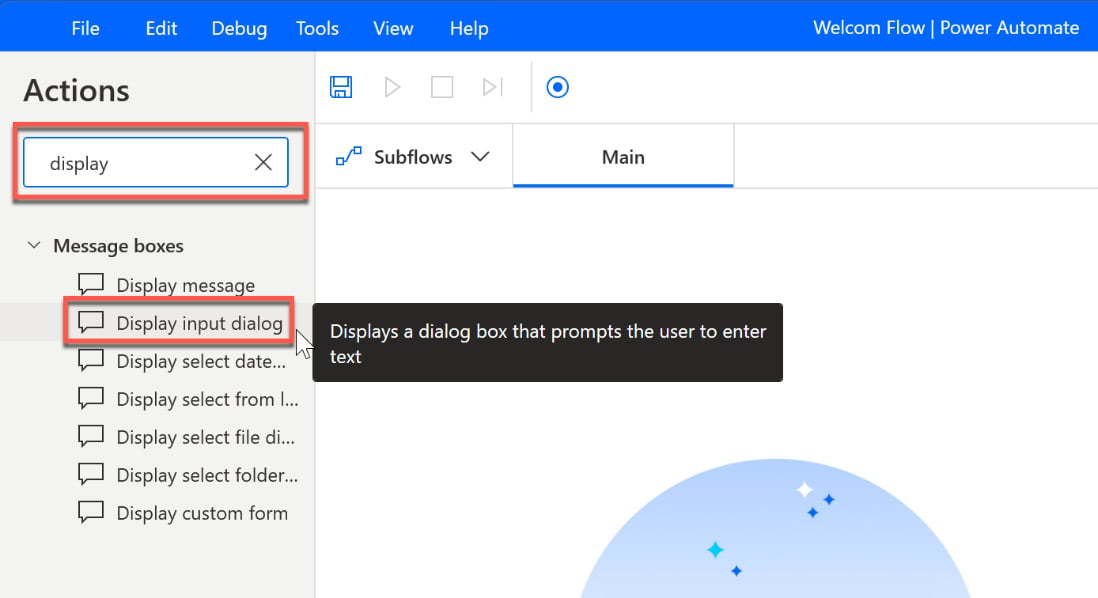
Figure 2.9 – Using the search bar
We are now interested in the Display input dialog action, which is the second entry in the list. Remember, you can also use the full list of actions on the left-hand side and expand the Message boxes action group:
- To place the action onto the design canvas, just click and hold the Display input dialog entry and drag and drop it into the middle of the window, right under the Main tab:
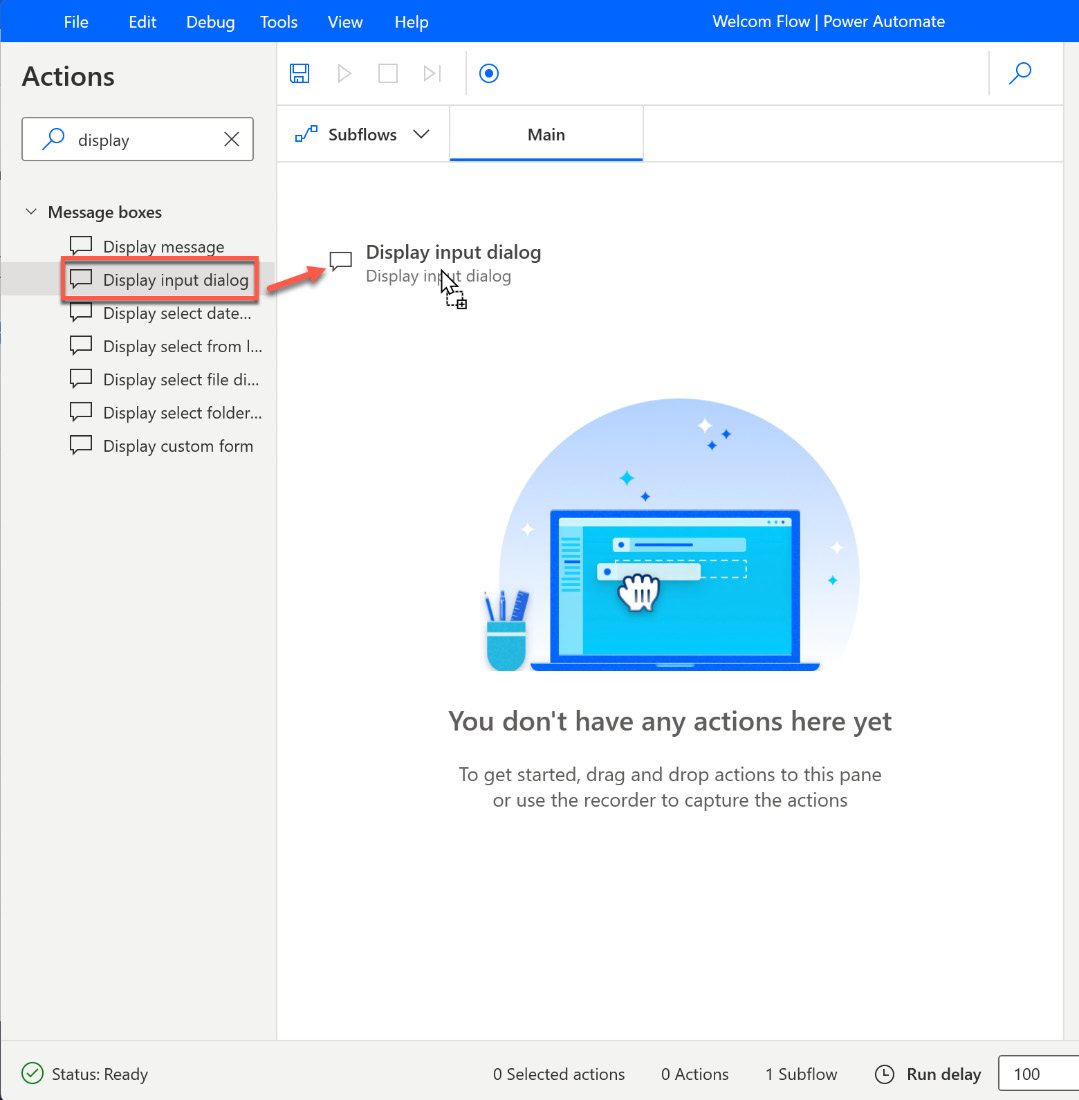
Figure 2.10 – Dragging an action onto the canvas
- Immediately after you release the mouse button, a dialog will appear. Here, we need to enter the required data:
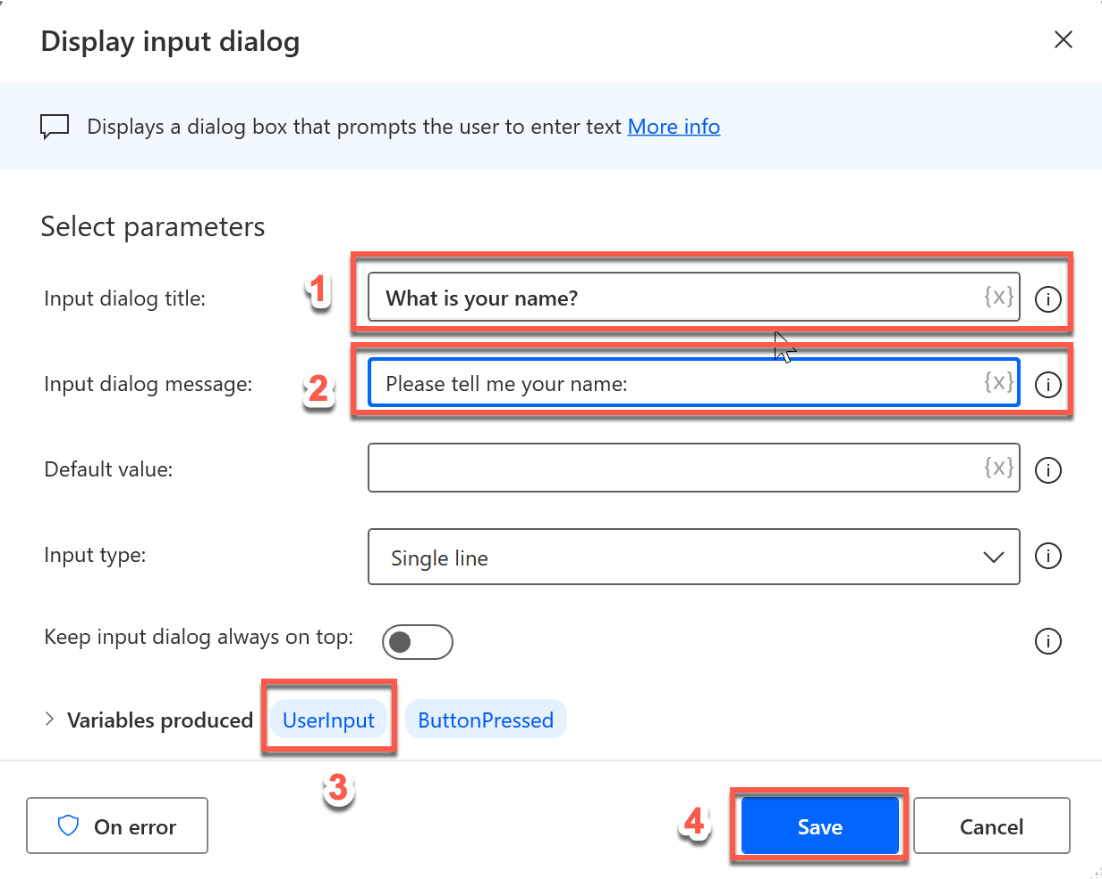
Figure 2.11 – The Display input dialog parameters
We need to provide the following information in this dialog:
- Enter a name for the title of the input dialog. This title appears in the header of the message box.
- Enter a message for the dialog. In this case, we want to know the name of the person.
- You don’t need to enter anything here. However, the value of the name that is entered by the user must be stored somewhere so that it can be displayed later. This action produces a variable as internal memory for where the input of the user is stored.
- Click on the Save button to save and close this dialog.
- The design canvas should now contain the first action and look like this:
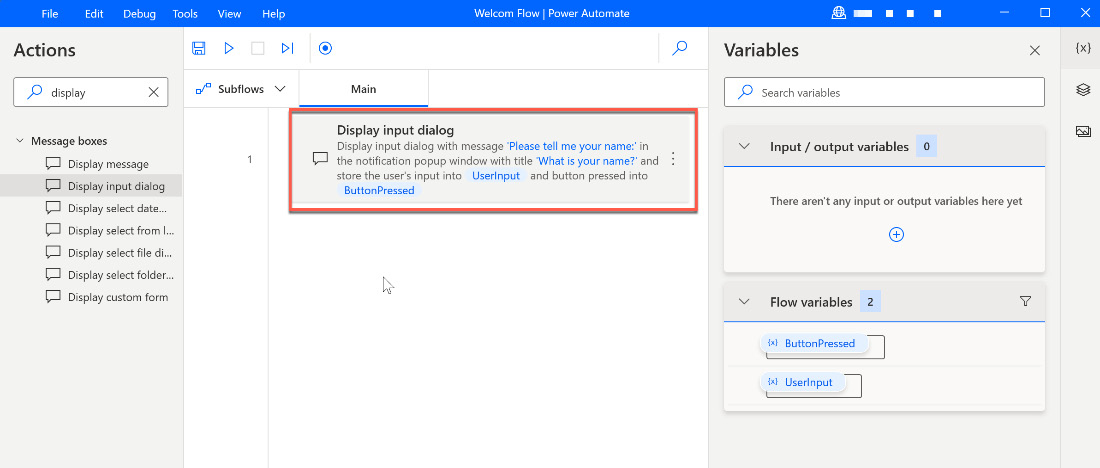
Figure 2.12 – The first action in the canvas
Now that we have a way to query the name, we want to display that name to the user again. For this, we are going to use the Display message action. Click and drag this action and place it under the existing action:
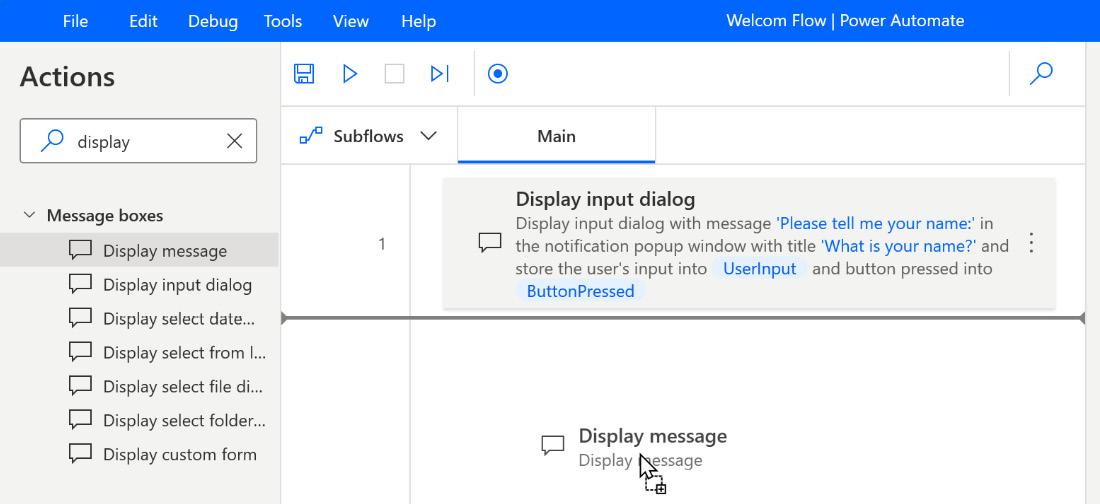
Figure 2.13 – Dragging the Display message action onto the canvas
It’s important to note that there is a line indicating where the action will be placed. Later, when we have larger flows with more actions, this will allow us to place an action in the middle of a flow and modify the sequence very easily. Like in our first action, immediately after releasing the mouse, a dialog will appear where we can specify the parameters of this action:
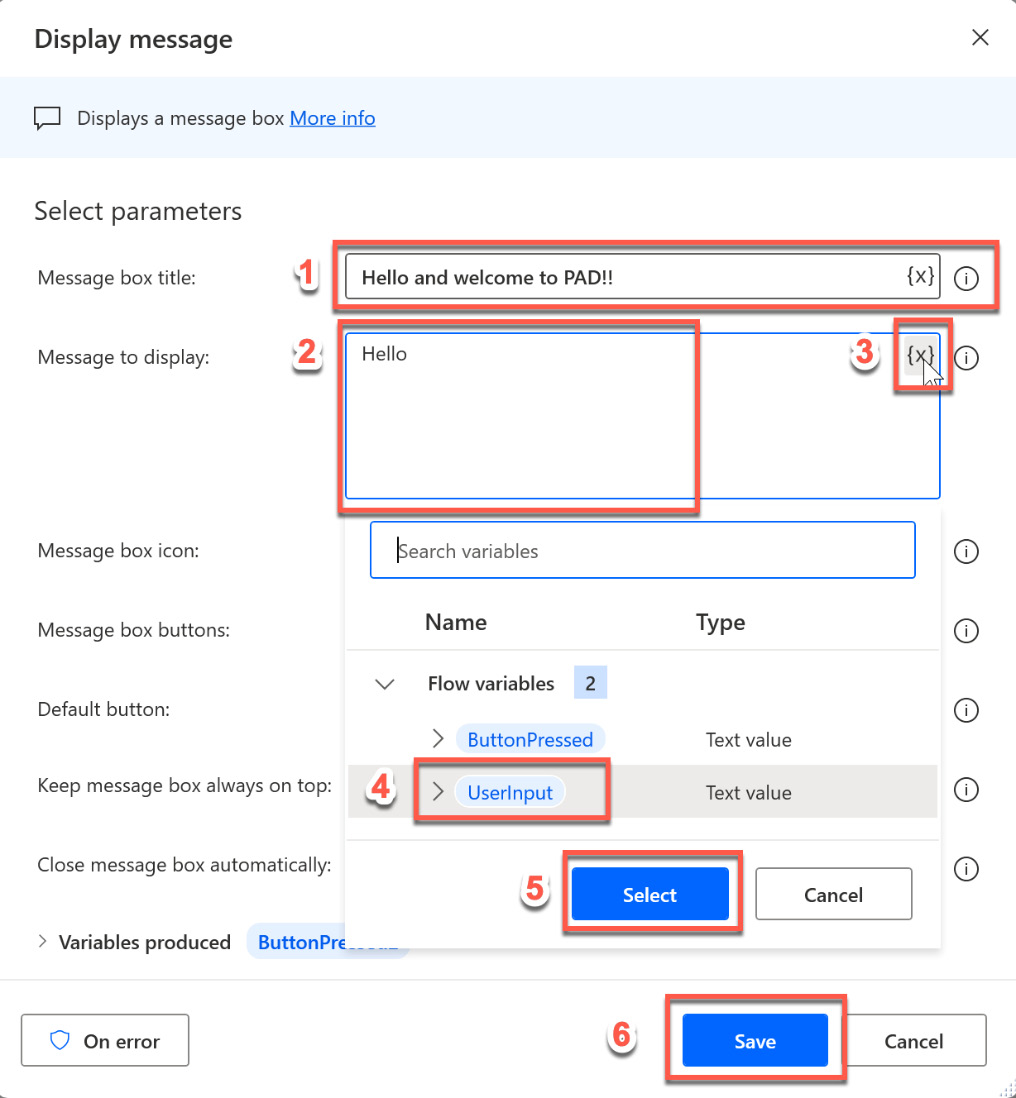
Figure 2.14 – Parameters for the Display message action
Again, we need to enter some information here:
- This will be the text a user will see in the title of the message box.
- The message text we want to display.
- To the right of the text field for the message box, there is a little X symbol in brackets. This is a button that can be used to insert dynamic content from variables in the flow. In the previous action, we stored the name of the user in a variable called UserInput. When clicking on the X button, another dialog will appear at the top that shows us the variables that are available in this flow. Here, we can select UserInput and click the Select button. The variable will be inserted into the text box for the message. It should look like this now:
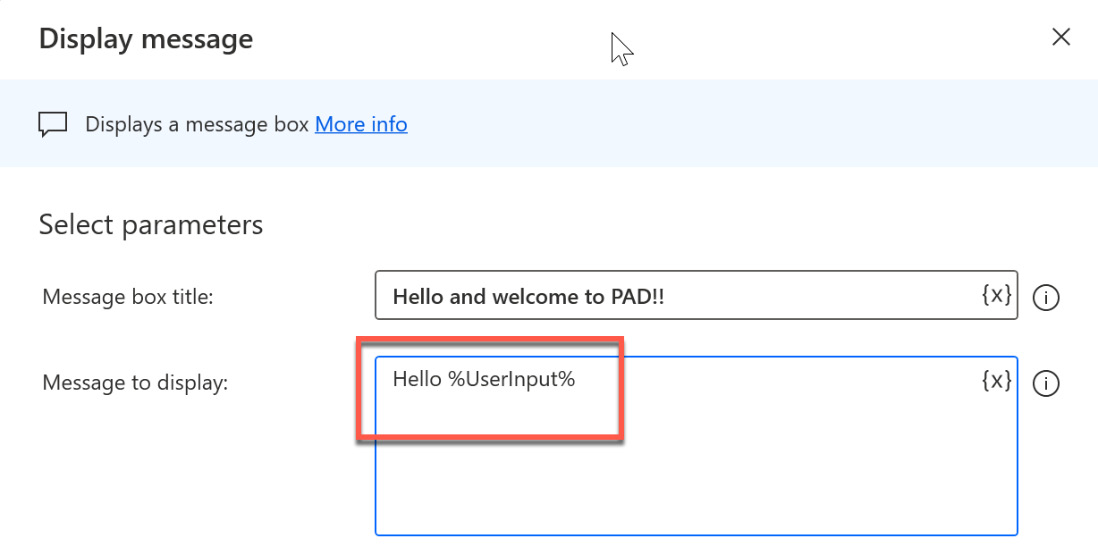
Figure 2.15 – Using a variable in the message
- Click the Save button to save and close the dialog.
- Our first UI flow now looks like this:
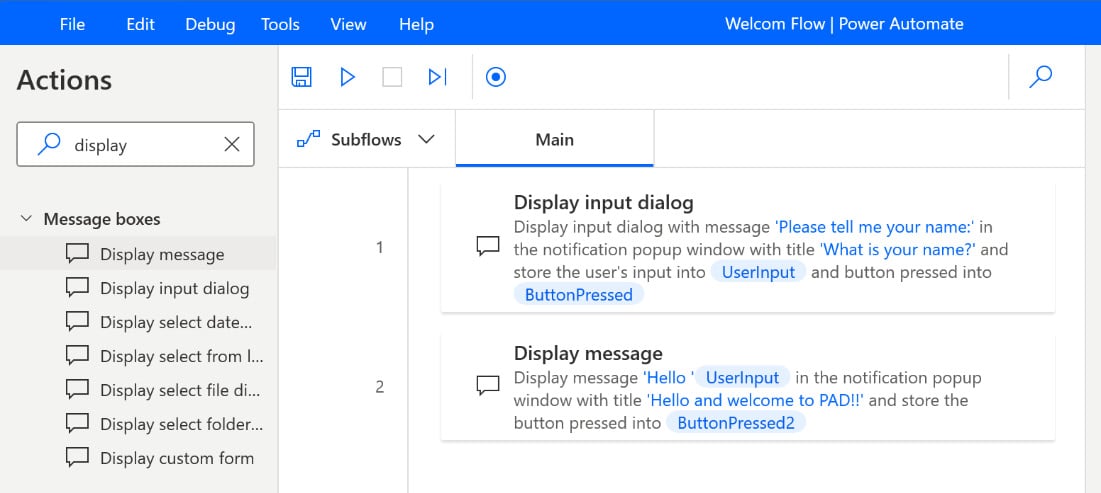
Figure 2.16 – Our first flow completed
- To test this flow, we need to run it. This can be done by pressing the Play button at the top of the action canvas or by going to the Debug menu and selecting Start. The shortcut for running a flow is F5.
As expected, an input dialog appears, asking us for our name, which we can now enter into the text box:
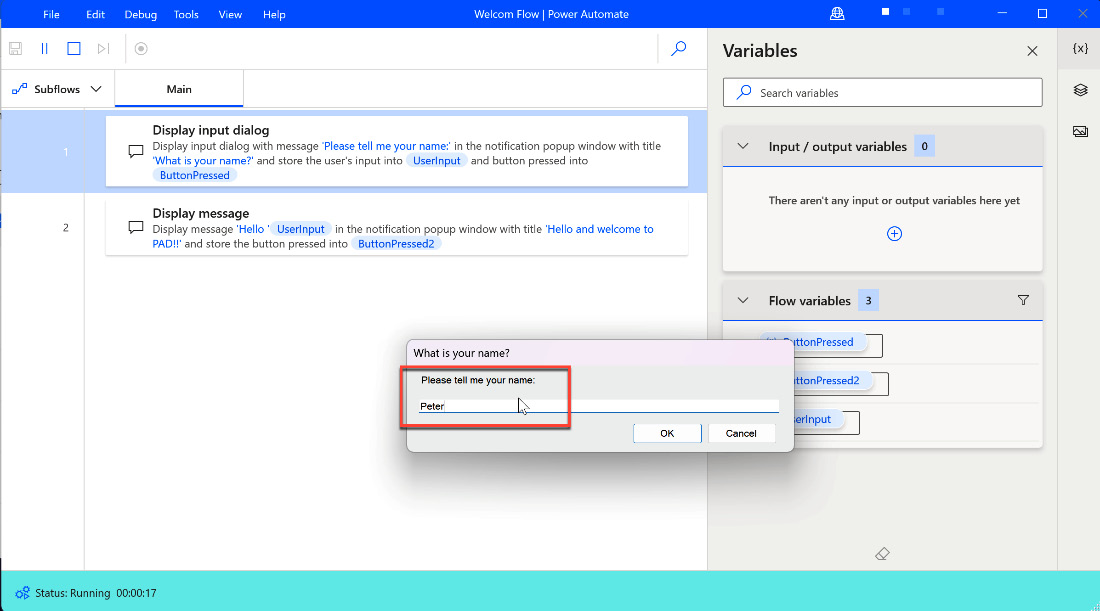
Figure 2.17 – Running our first flow – part 1
Also, notice that in the background, the UI of the program has changed a little bit. The entry with the blue background indicates the current step of the flow. Enter a name and click the OK button. The flow will continue with the next step and display a message box with the name you have entered:
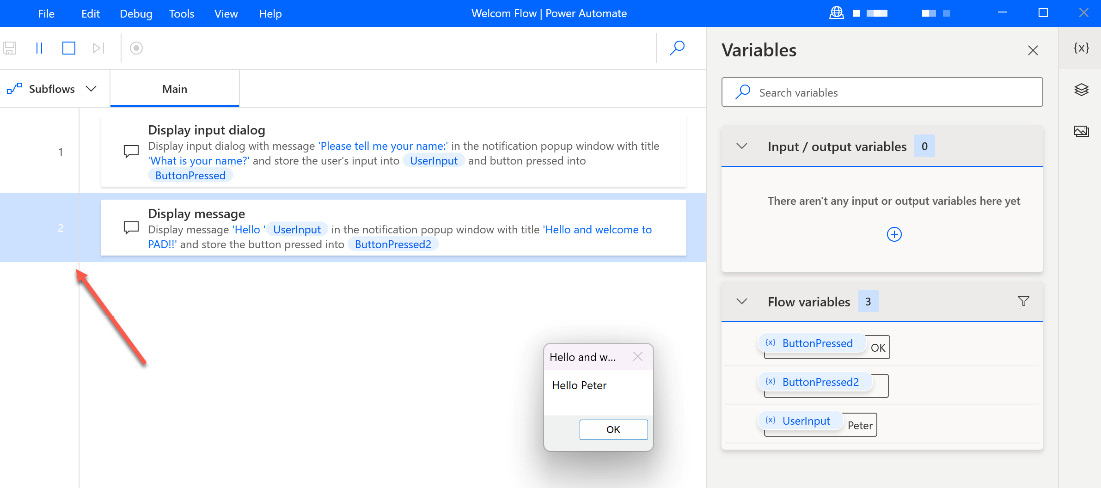
Figure 2.18 – Running our first flow – part 2
Again, the blue background in the application indicates the current step. Click OK to close the message box and end the flow. Congratulations – you’ve created and executed your first UI flow!
Artifacts of the user interface explained
Now that we have explored the basic possibilities of PAD, let’s take a detailed look at the application and its possibilities. PAD consists of two windows:
- The container window or Power Automate console
- The Desktop flow designer window
The Power Automate container window
The first window we will see when we start the program is the container window, also known as the Power Automate console. The following screenshot shows this window:
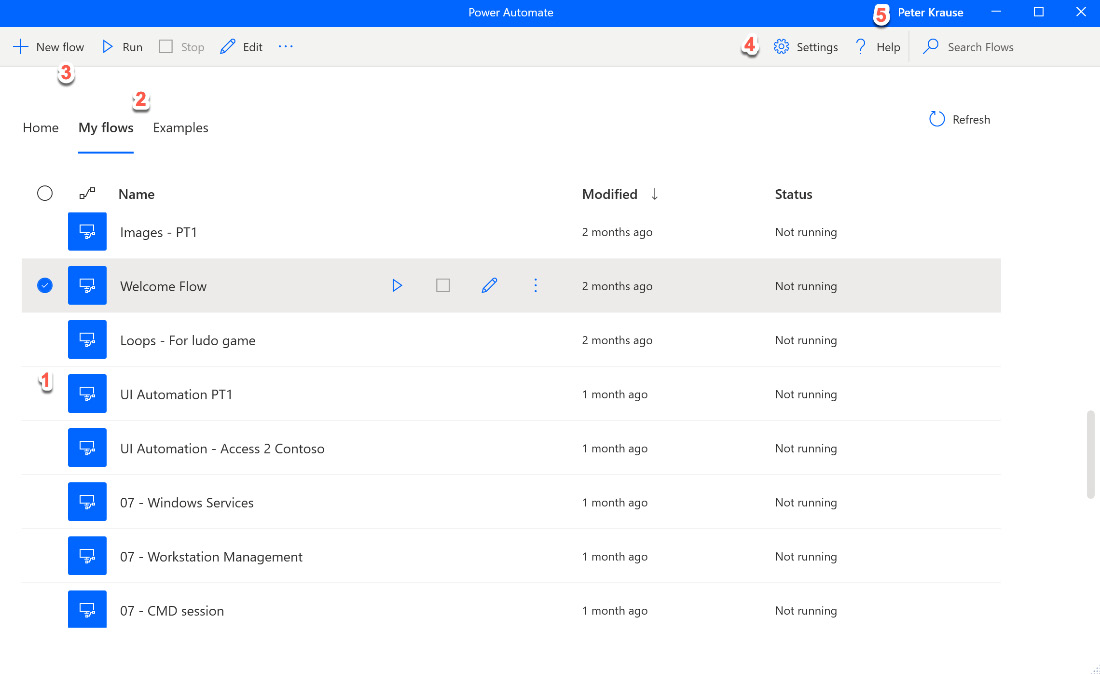
Figure 2.19 – PAD container window
It contains the following elements:
- List of UI flows: If you hover over an item in the list, you will be presented with different additional options, such as the play button or the edit button. While the edit button just opens the designer window (see the following figure), the start button runs the flow immediately without opening the designer window first.
You will also get some desktop notifications on the flow’s status (has been started, was successful, and so on):
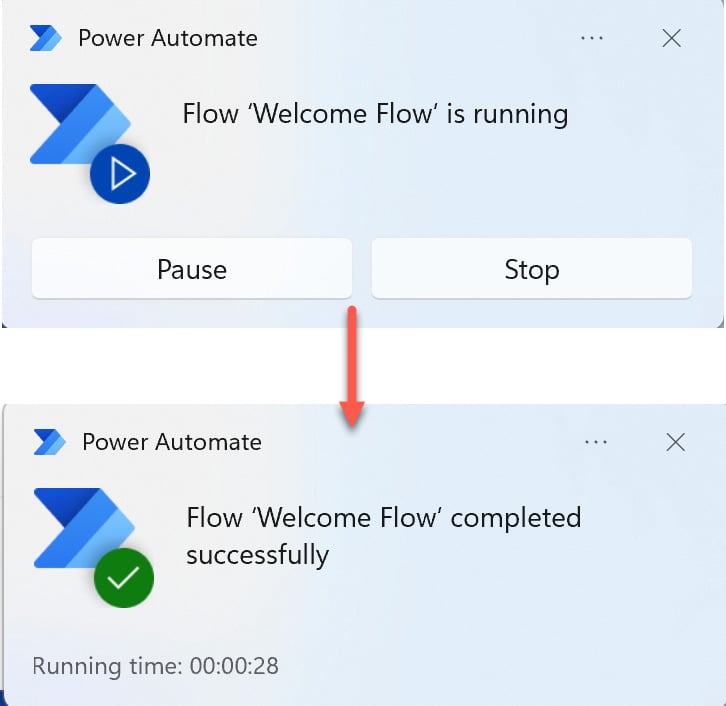
Figure 2.20 – Windows notification on the flow
The three dots to the right of the edit button will reveal a context menu where you can also run or edit the flow but also rename, delete, or copy the flow:

Figure 2.21 – Flow list context menu
The Details option gives shows the properties of the flow, including its name and description, owner, the date for creation, and the last modification.
- The console area switch: You can also switch from the My flows tab to the Examples tab. Here, different examples provided by Microsoft are presented, including automation for Excel, desktop, the web, and more. Although the examples do not cover the scope of the program, it may be worthwhile to have a look there to possibly try out one of them.
- Create a new flow: This button launches a dialog where you can enter the name for a new UI flow. Although this is optional, it is reasonable to provide a meaningful name for the flow. There is a Create button to confirm the name and launch the designer window with a blank canvas.
- PAD settings: This button launches the Settings dialog. Here, we can modify the launch behavior of PAD and also use a hotkey to stop a running flow. In addition, the monitoring and notification settings can be changed (Windows notification, flow monitoring window, or no notification).
- Login information: Clicking on the name in the title bar provides information about the current user and their login information. Here, it is also possible to sign out and log on with another user.
The designer window
Let’s take a closer look at the designer window now:
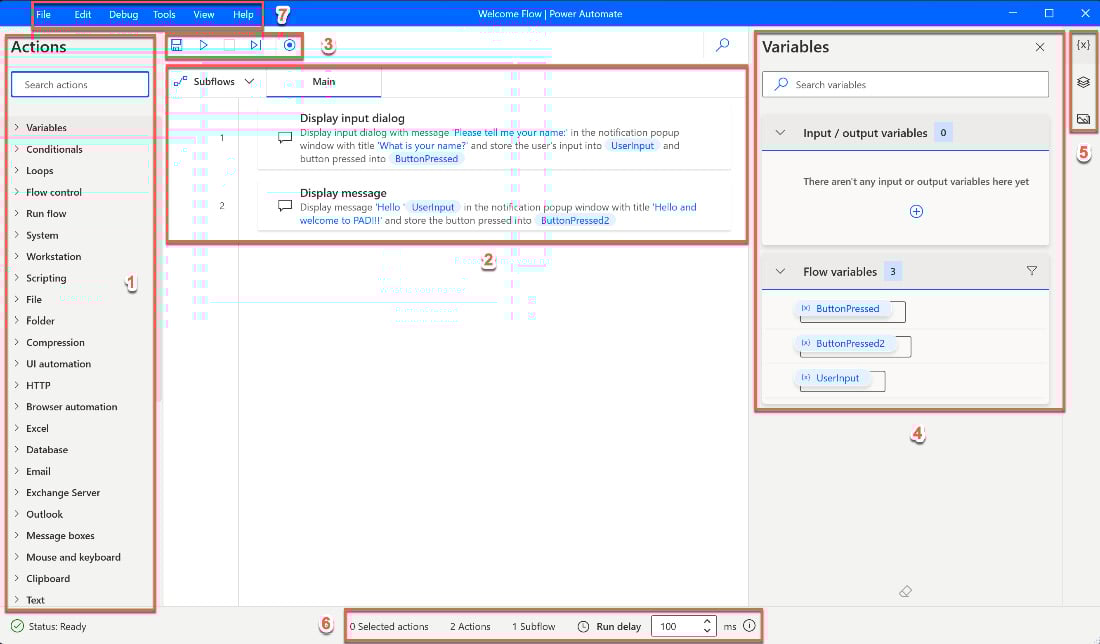
Figure 2.22 – The designer window of PAD
Here, we have the following elements:
- The Actions pane: The left-hand side of the window belongs to the Actions pane. Actions represent functionality that a flow is capable of, such as “Open Excel” or “Get files in a folder.” These actions are grouped into different categories such as System or Folder You can see all the actions that belong to a category by expanding the corresponding item. Just click on the arrow icon on the left of the category. Throughout this book, we will look at each of these actions. At the top of the list, there is also a Search box. If you enter a search term here, the list of actions gets filtered by this search term. We used this in our first flow.
- The flow designer area: In the middle of the window, there is a canvas that contains all the actions this flow is made of. Actions can be placed there by dragging them from the Actions pane. When a flow is started, the actions will run in the sequence in which they are listed here. This action list can be rearranged by just clicking and dragging an existing entry and putting it somewhere else. There will be a horizontal line displayed showing where an action can be placed. We saw this in our previous example. You can also double-click on an action to bring up the settings dialog for that action and modify the entries. In this area, there is also an option to look at the subflows. A subflow is just another UI flow that encapsulates a specific set of actions. By using subflows, it is possible to structure a large flow into different pieces. A subflow always belongs to a regular flow and is not shared between other flows.
- The flow control bar: The little bar at the top of the action list allows you to save, start, stop, and record a flow. There is also an option to start the flow and go action by action, which is also called debugging. We will take a closer look at this, as well as the recorder, in the next section.
- The Variables viewer pane: On the right-hand side, there’s an area that displays the variables of the flow. Variables are an important aspect of a flow for storing information during runtime. Variables will be covered in Chapter 5.
- The input elements switch: Please also notice the two additional little icons below the variables icon, {x}. These can be used to switch to the area containing UI elements and images, which will also be covered later. You can hide this area by clicking on the icon.
- Action and execution summary: At the bottom, there is a little bar that summarizes the current flow. It is also possible to set a specific delay for the flow to run – in this example, 100 milliseconds.
This is the applications menu bar. In addition to the typical functionality for saving and editing, the debug functionality is also available here once again, in which breakpoints can also be set. This allows a flow to be executed up to a certain point so that we can check the settings and variables in the event of an error:
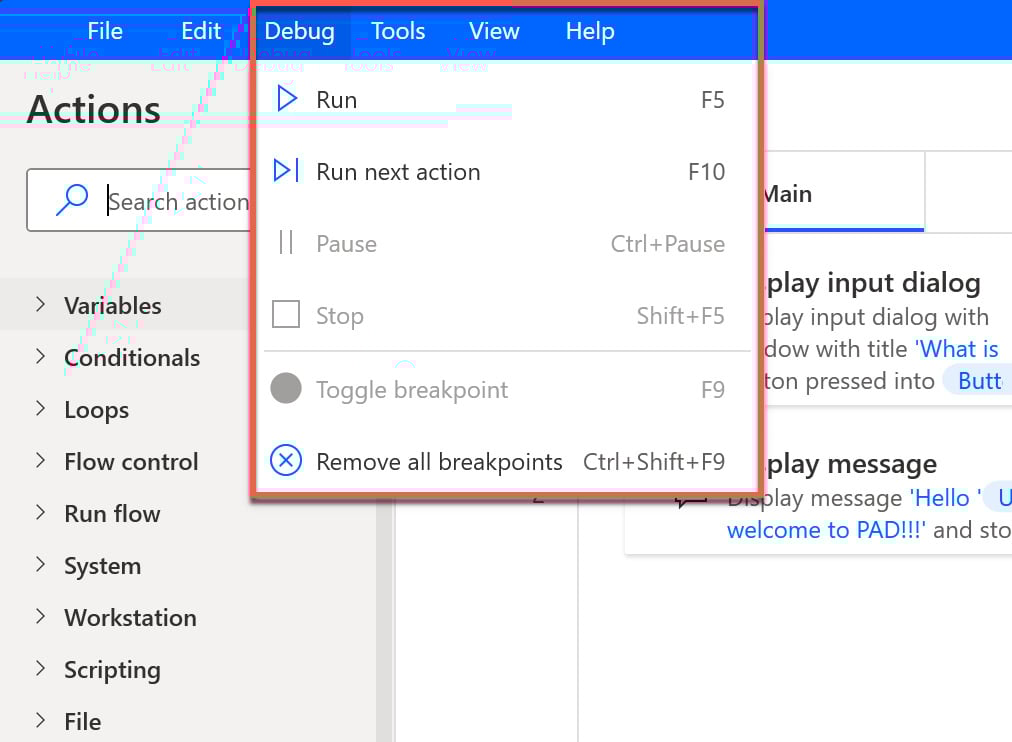
Figure 2.23 – The Debug menu
This designer window will also show up in another area at the bottom of the screen when a flow runs into an error. There will be detailed information about where the flow stopped and why. Now that we have a few more details, we’ll use the recorder to create another flow in the next section.
Making use of the recorder
As you saw in the previous chapter, the PAD designer window allows us not only to drag and drop actions onto the design canvas but also allows us to record a UI flow. This concept is comparable to a screen recorder that records every step, every mouse click, and keyboard stroke to play back this sequence the same way later.
We want to use this functionality once to create an overview of all book titles of the PacktPub publisher so that we can use this information elsewhere – for example, in a database. Unfortunately, we don’t have direct access to PacktPub’s underlying source, but we can get the book titles via their website at https://subscription.packtpub.com/search. However, we don’t want to highlight every single title on the website and then copy and paste them into another tool. That would take a very long time and also be quite boring. PAD can do this job for us.
In the following example, we will use a concept known as web scraping – that is, structurally extracting information from web pages. Note this also works with numerous other websites, so this technique can be used universally. However, the prerequisite for using this method is that we must install and activate a small extension for the browser we’re using so that PAD can access the elements of a web page. So, let’s get started:
- Create a new flow and give it a meaningful name, such as Web Scraping PacktPub.
- Locate the Browser automation actions group in the actions pane and expand it. You will see a Launch new... action for each of the browsers from Google, Firefox, and Microsoft Edge. I have Microsoft Edge installed on my machine, so I will click and drag this action onto the canvas:
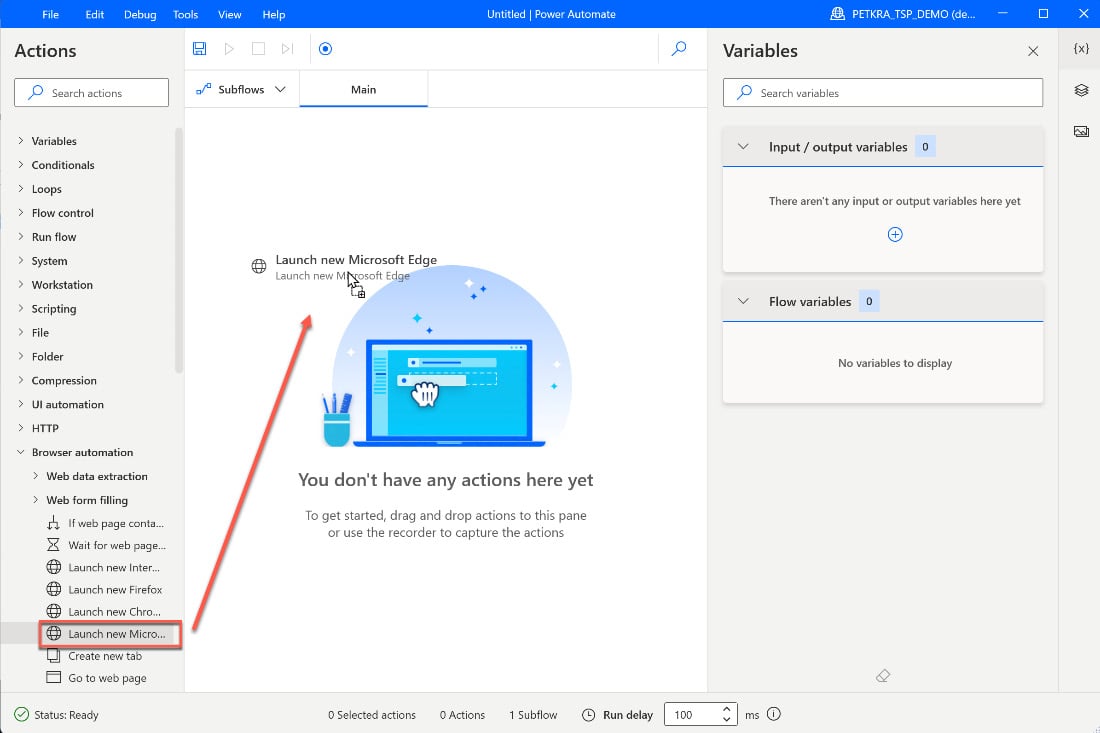
Figure 2.24 – Dragging the browser action onto the canvas
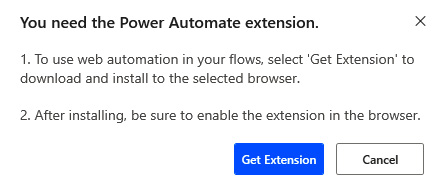
Figure 2.25 – Browser extension installation dialog
- This will only happen once. Get the extension and make sure that it is activated.
In the dialog for this action, enter the data accordingly and make sure that you use https://subscription.packtpub.com/search as the initial URL. Click on the Save button:
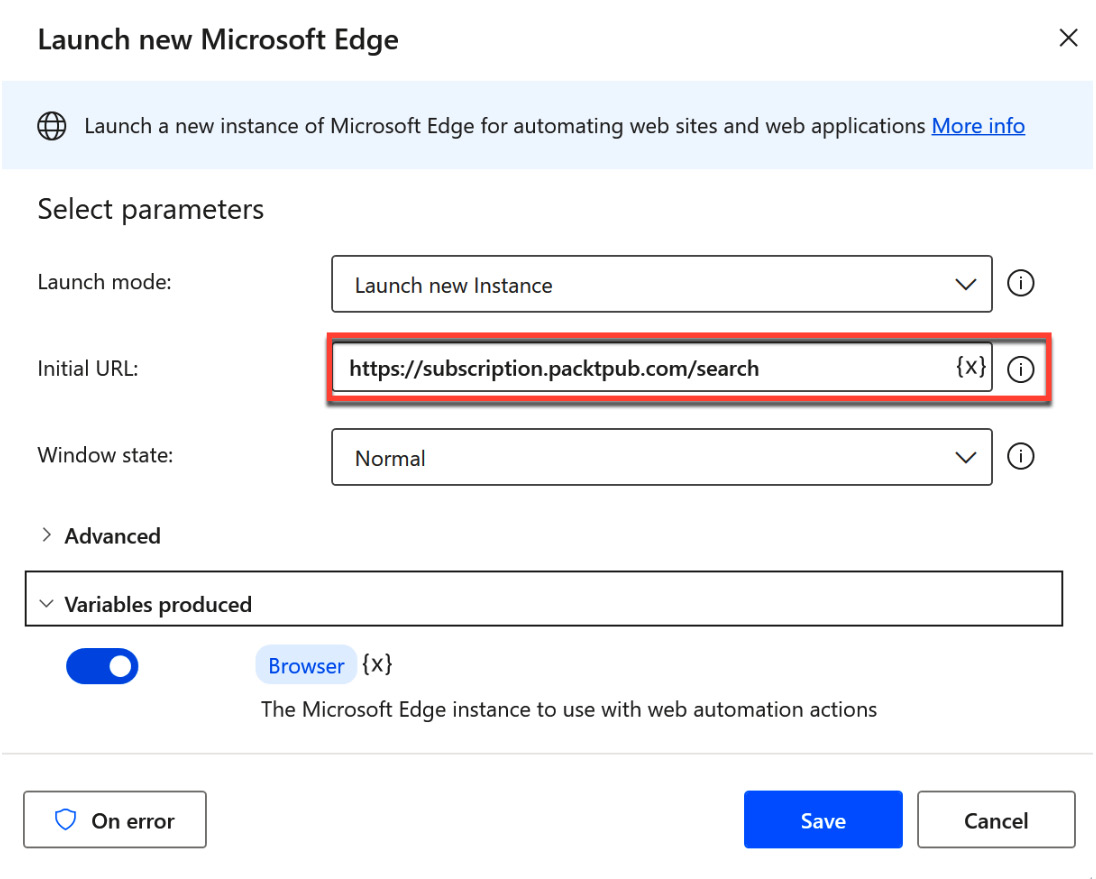
Figure 2.26 – Settings for the browser launch action
You should now have one action in the canvas that opens the website mentioned previously in a new browser instance. Test this flow now by pressing the Run button above the design canvas and leave the browser window open for now.
As mentioned previously, we can always add more functionalities to the flow. For this, we will use the recorder. With the browser window open, switch back to the design canvas/workspace window and click the Recorder button:
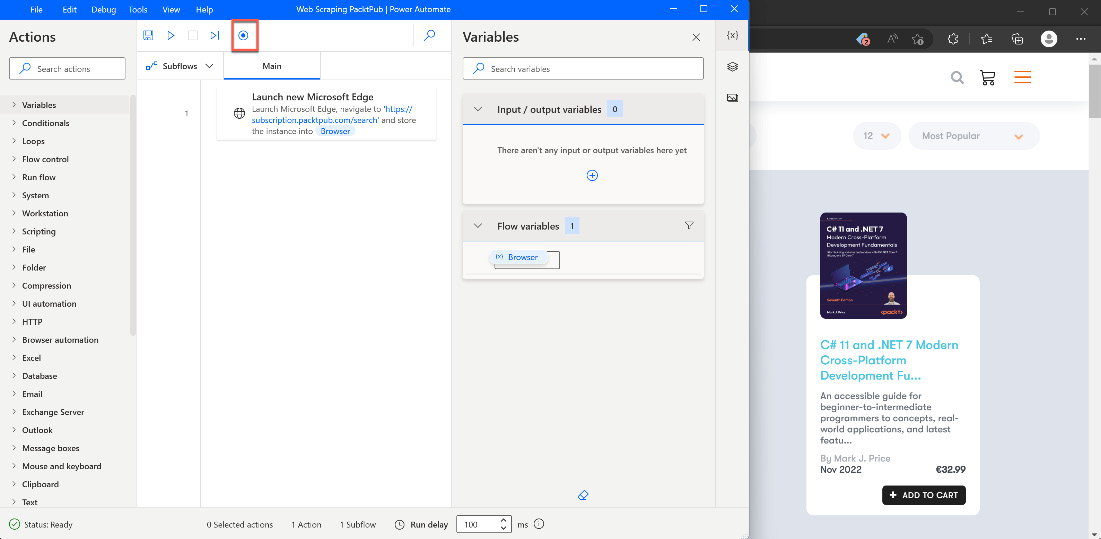
Figure 2.27 – The recorder button
At this point, the PAD designer will disappear, and a smaller recorder window will appear instead. It should look like this:
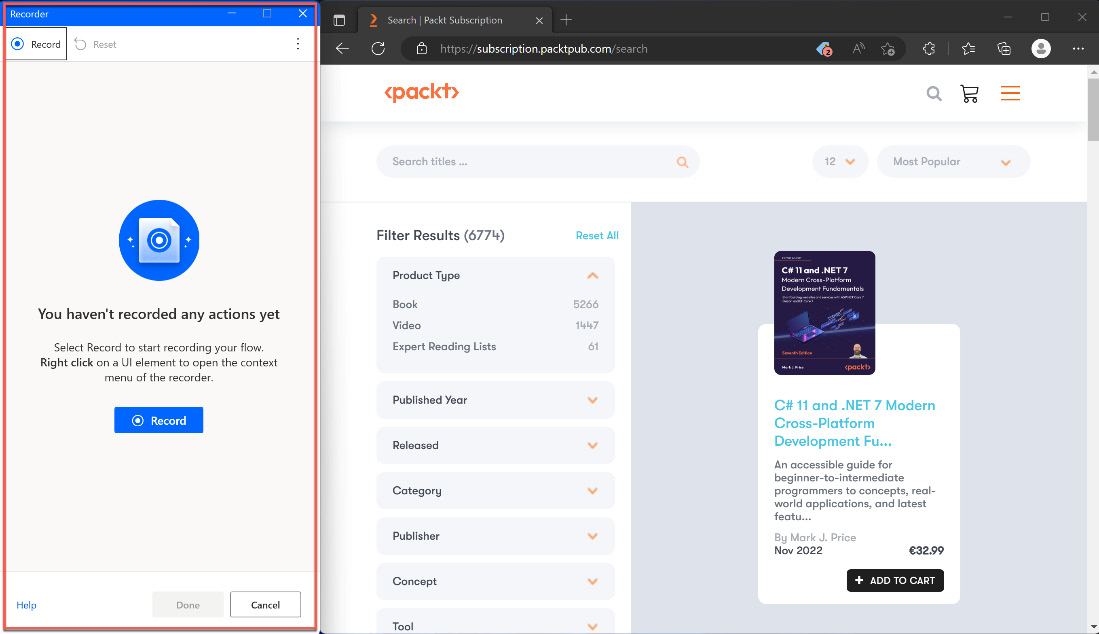
Figure 2.28 – The recorder window
Now, the funny part begins. Start the recording by either clicking the button in the middle of the screen or at the top. The recorder window will change and display an empty area under Recorded actions. Use your mouse and hover over different elements on the website, such as the book picture. You will see that PAD tries to identify the different elements on the website and frames them accordingly. In the following screenshot, I hovered over the book image:
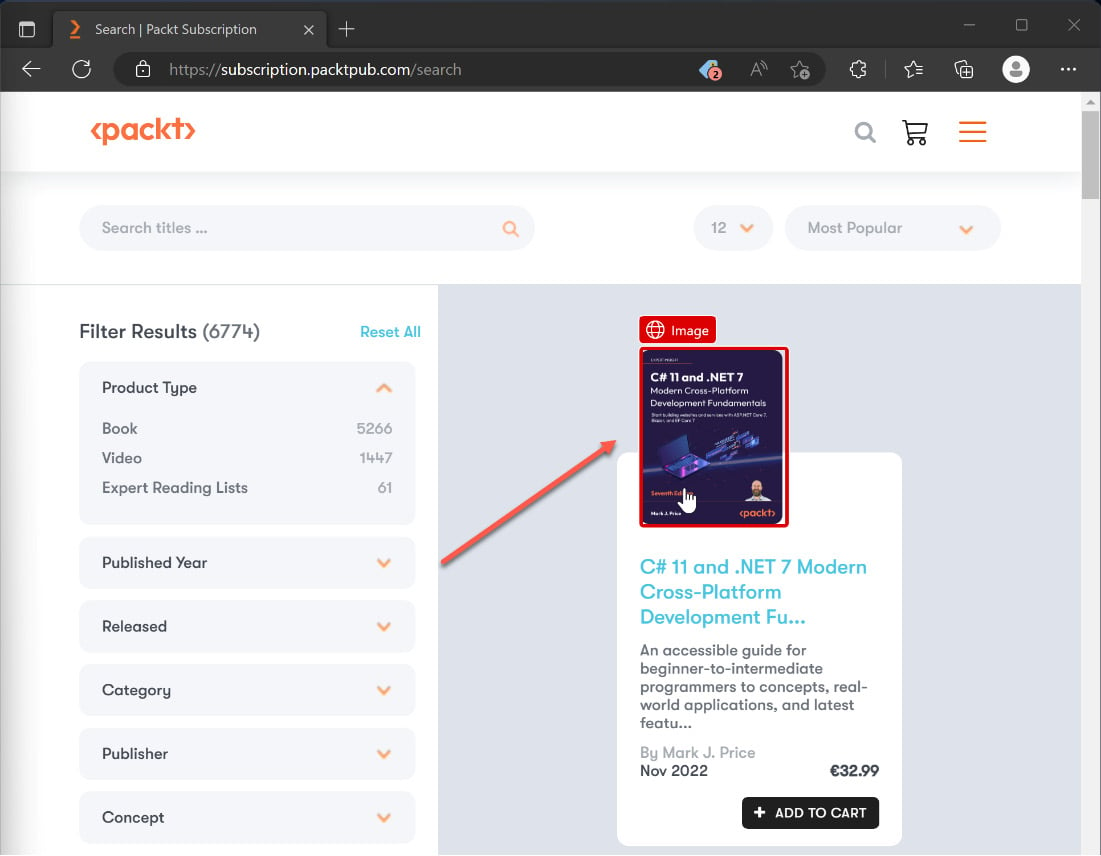
Figure 2.29 – Detecting web elements
For the recorder to recognize the web page elements correctly, it sometimes takes a bit of dexterity. It also helps to move the mouse out of the desired area and back in again to get the right mark. Once the correct element has been highlighted, click the right mouse button to be able to select the information we want to extract from this element. A context menu for this element will appear so that we can select different entries:
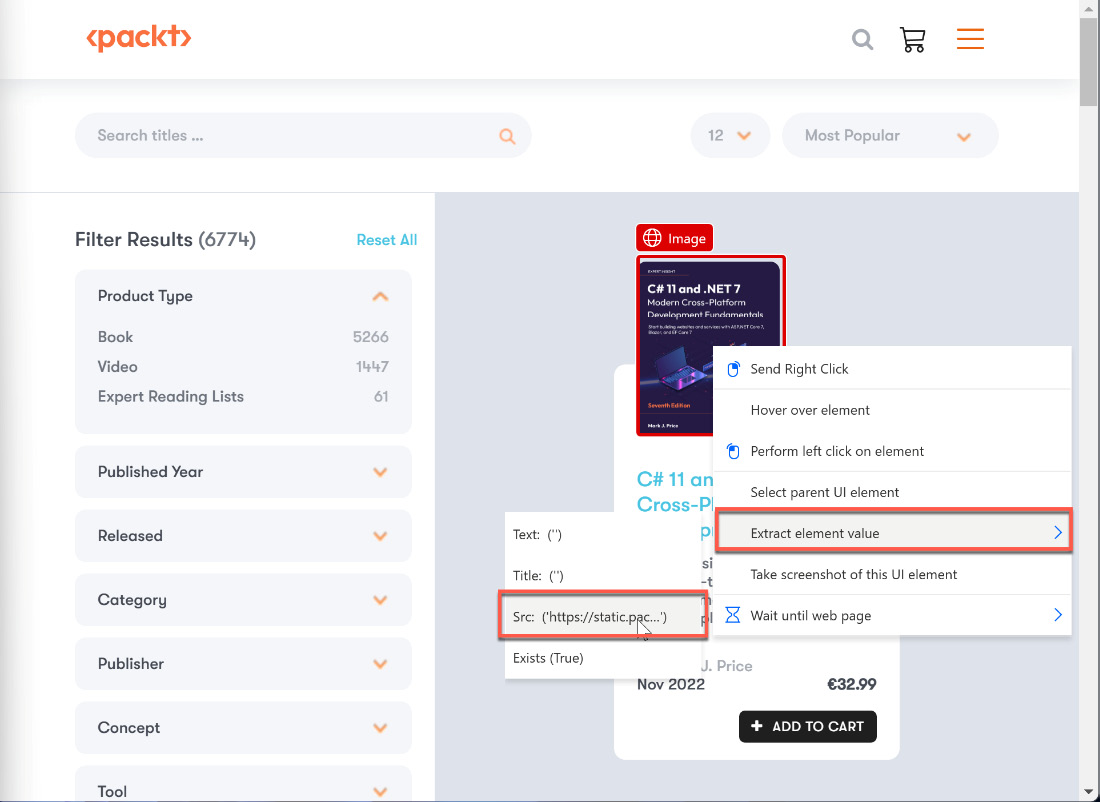
Figure 2.30 – Context menu for web elements
Let’s take a look at this in more detail:
- Extract element value: This allows us to extract information from this element. A web element can always have different properties, such as Text or Title.
- Wait until web page: This allows us to wait for specific events on the page, such as when an element contains a text or gets visible.
- Take screenshot of this UI element: This takes a screenshot and stores it in PAD flow.
In our case, we may want to extract the information of the image source, so we will choose Extract element value | Src. The recorder window should look like this now:
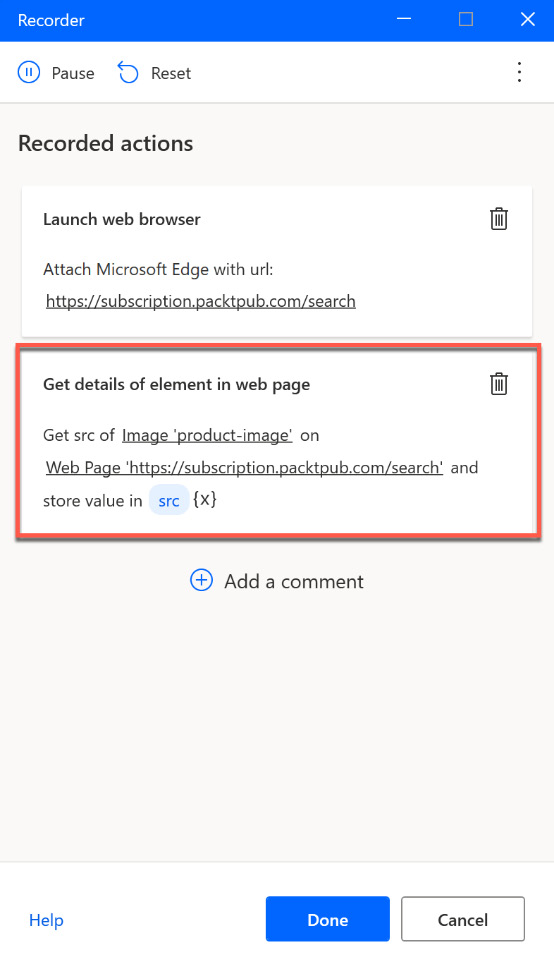
Figure 2.31 – A recorded action in the recorder
Important note – remove additional actions
You might have other actions that have been recorded by the recorder, depending on where you clicked and what keys you might have pressed. For our example, there must be only one action in the recorder. Use the Delete button (trashcan symbol) to remove any additional actions.
Now, repeat the same process for the title of the book. Use your mouse to hover over the elements and the title and click the right mouse button:
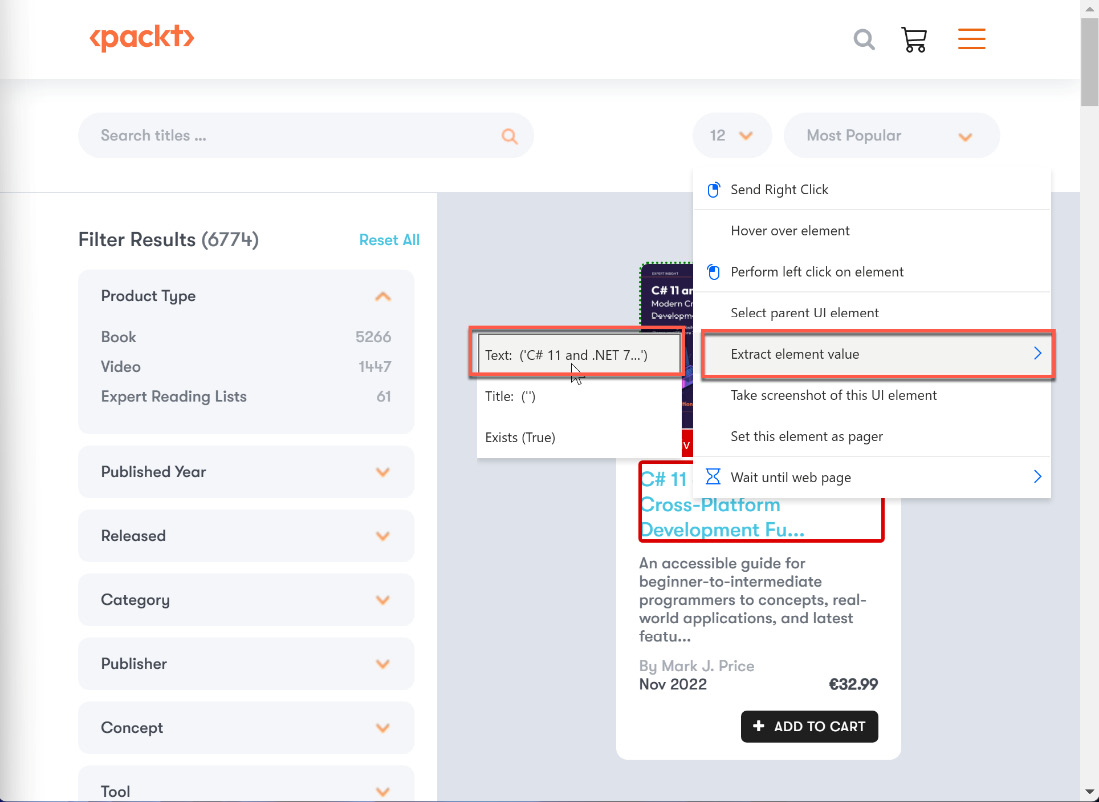
Figure 2.32 – Extracting data from a web element
This time, we want to extract the title of the element. With that, we have captured two elements on the web page, which are represented in the recorder window like this:
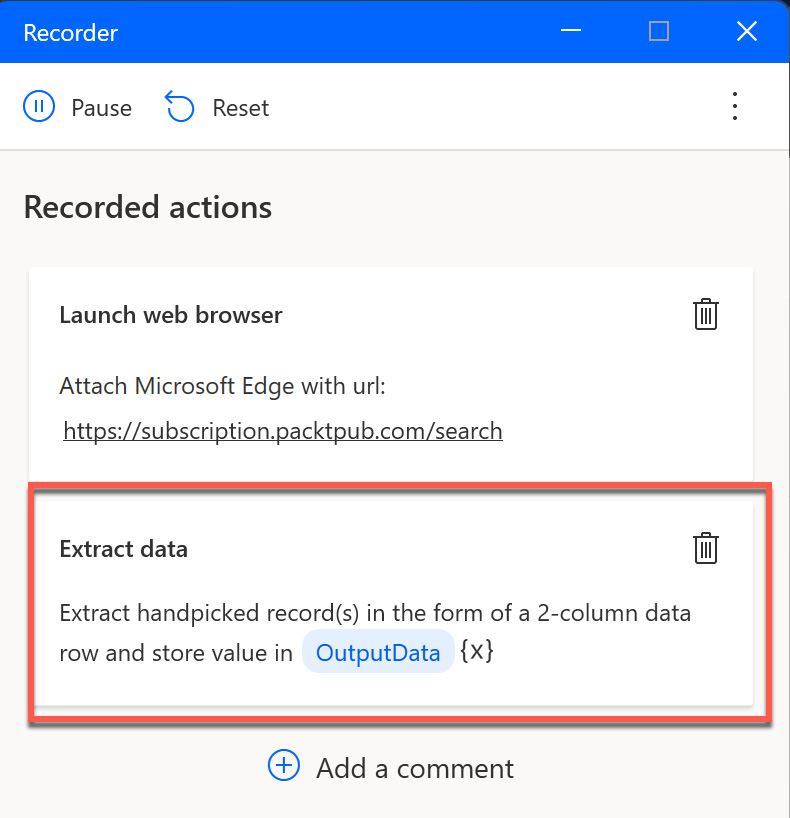
Figure 2.33 – Extracted data in the recorder
There is an important difference here: PAD already recognized that we captured two pieces of information from one record on the web page. Our next step will be to go to the next element, and this is where some magic starts. If you repeat the first step and mark the next book image and extract the Src information again, PAD will recognize this pattern and assume that you want to do the same as with the first element. We can see this on the web page because PAD has marked the corresponding elements with a green dotted line:

Figure 2.34 – Pattern recognition of the recorder
Pattern recognition
Please notice that it sometimes takes capturing more than two structures before the recorder recognizes the pattern. So, please proceed to the next element if PAD does not recognize the pattern immediately. Recognition also depends on the underlying structure of the HTML. After the third or fourth element at the latest, the pattern will be recognized.
This means that PAD will capture all the elements on this page now. But what about the next page of books? Let’s scroll down so that we can see the pagination control on that website:
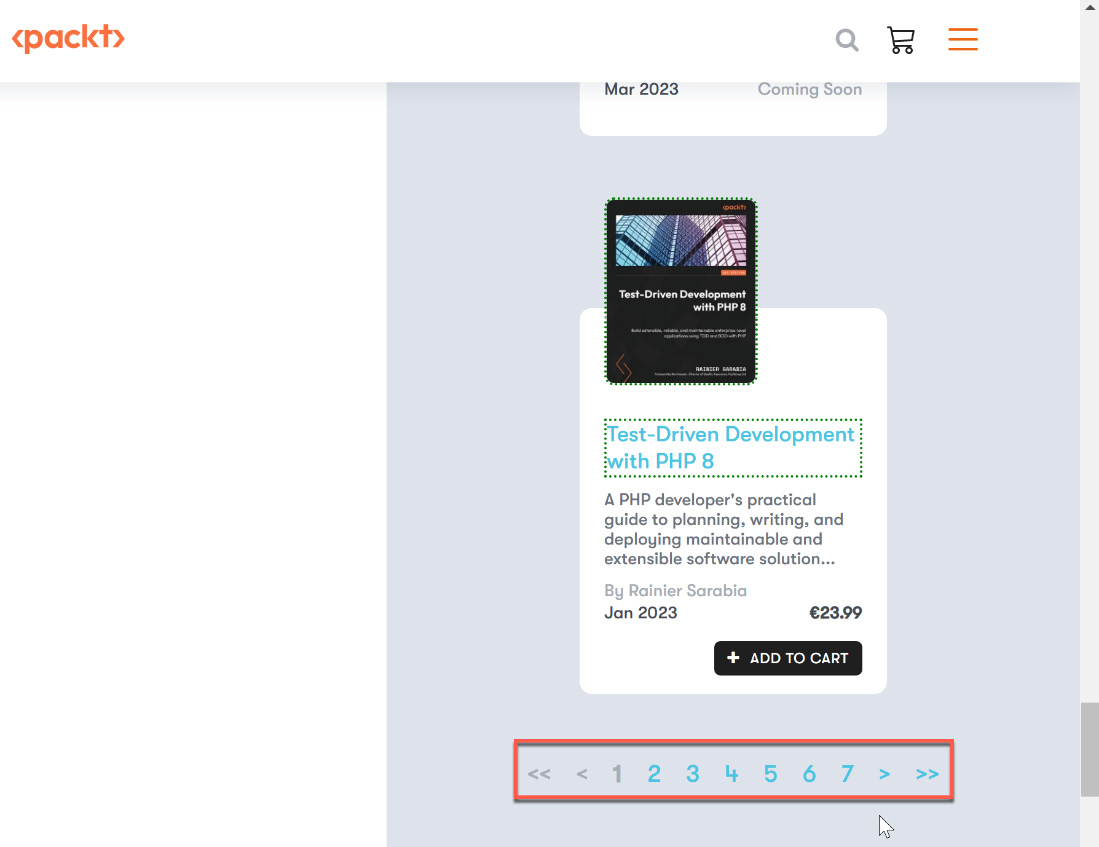
Figure 2.35 – Incorporating navigation
We can now use the single arrow button to load the next page. Right-click on the element shown in the following screenshot and choose Set this element as pager:
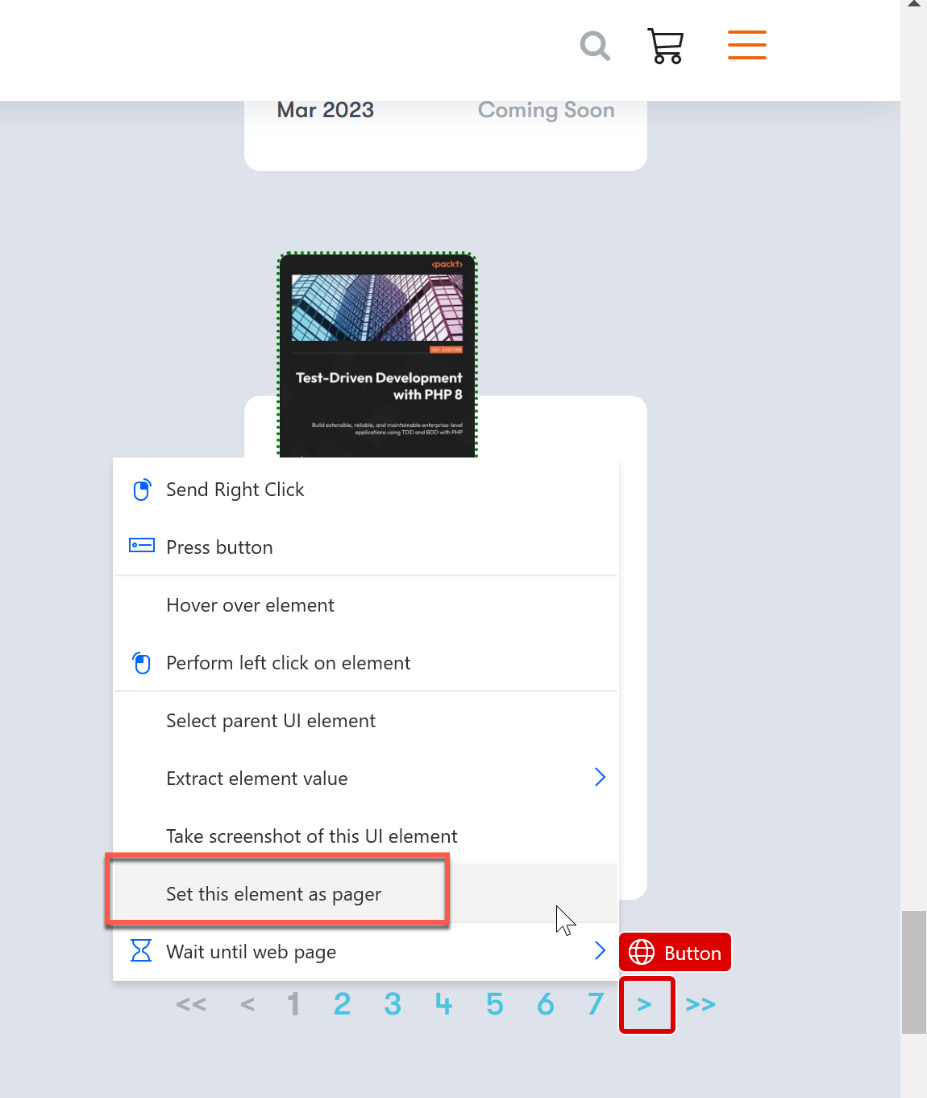
Figure 2.36 – Using a pager in a recording
The element now gets a little blue dotted border, indicating the pager functionality. Looking at the recorder window, just one element should be seen here:
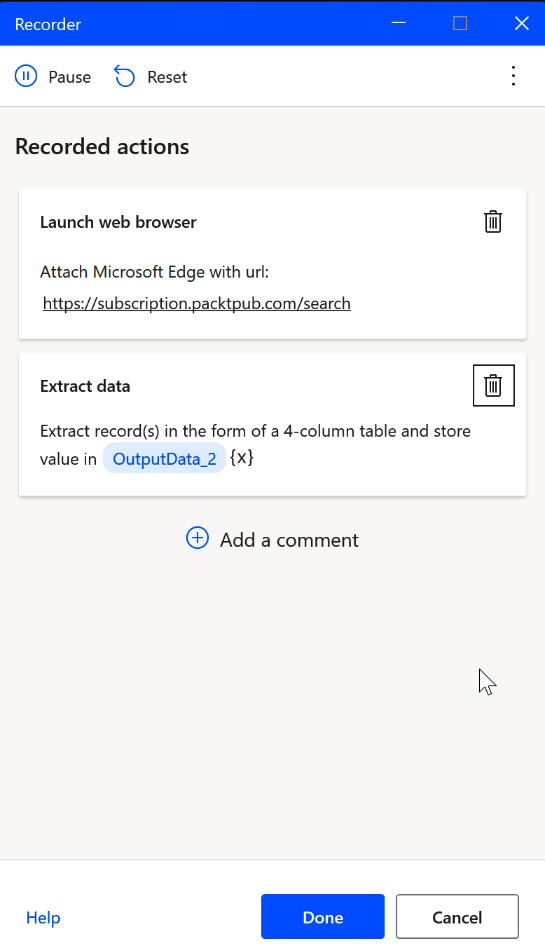
Figure 2.37 – Recorded web scraping actions
If other elements have been captured by mistake, just delete them. You can now stop the recording by clicking the Done button. Now, the recorded actions get transferred to the main PAD design window:
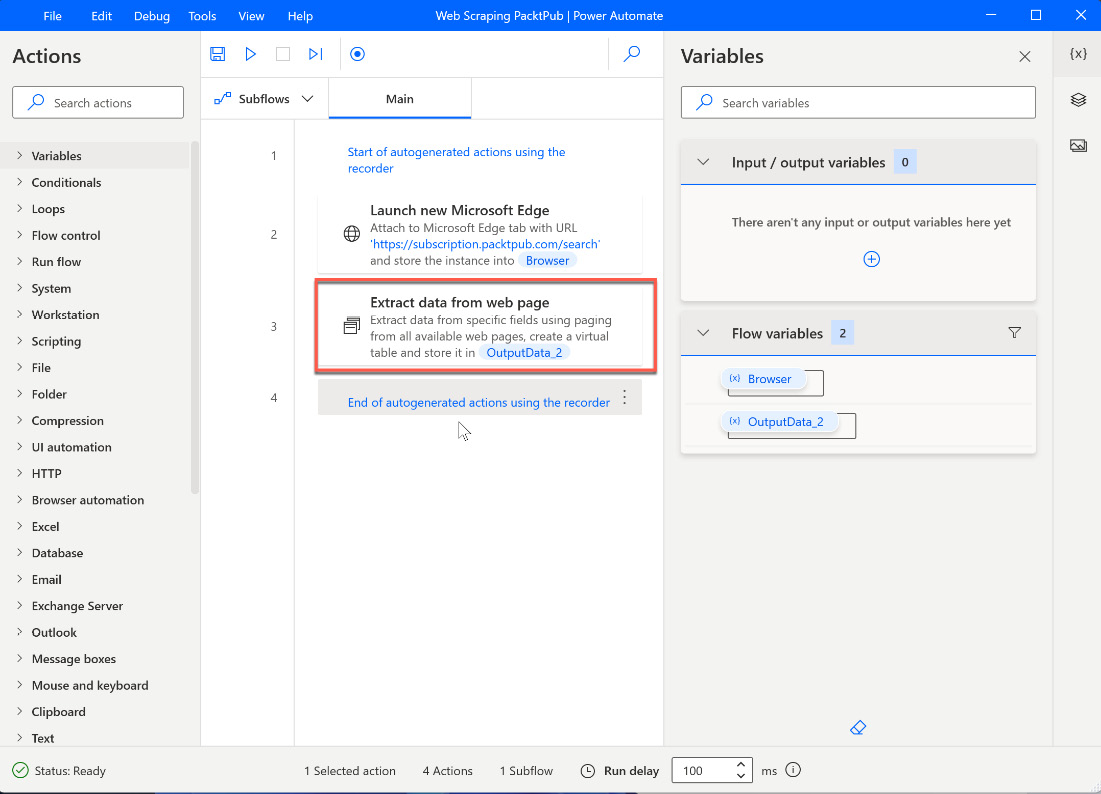
Figure 2.38 – Transferring recorded actions to the designer
There are also comments in the list of actions describing the start and end of the generated actions by the recorder. Let’s investigate the Extract data from web page action a bit more by double-clicking it:
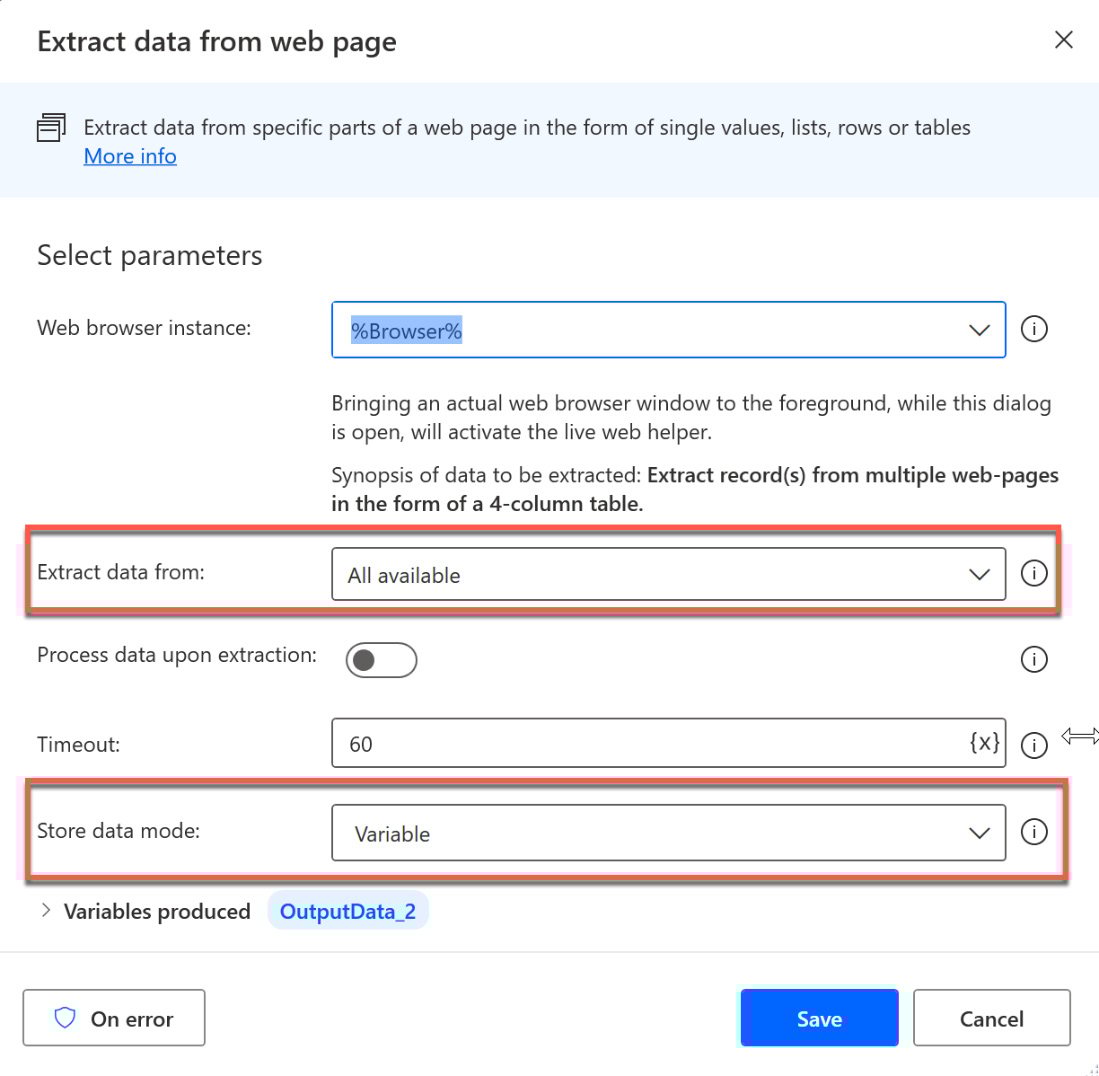
Figure 2.39 – Revealing the web data extraction
The interesting parts here are Extract data from and Store data mode. After the browser has been loaded by our first action in the flow, this action extracts all the data from the web page unless we don’t tell it otherwise. While on some occasions this might be useful, for our test, we only want to extract the first 10 pages. Click on the dropdown for the All available entry and change this to Only the first. Now, another text box will appear, where we can enter the number of web pages to process.
The last setting for this example is Store data mode. So far, the data that is captured is stored in a variable (DataFromWebPage, in my example). But of course, there are other ways to work with this data now. For example, you could take this variable and use it as input for another action after the web data has been extracted, or you could choose to store this in Excel. Therefore, click the dropdown for Store data mode and change the value from Variable to Excel spreadsheet:
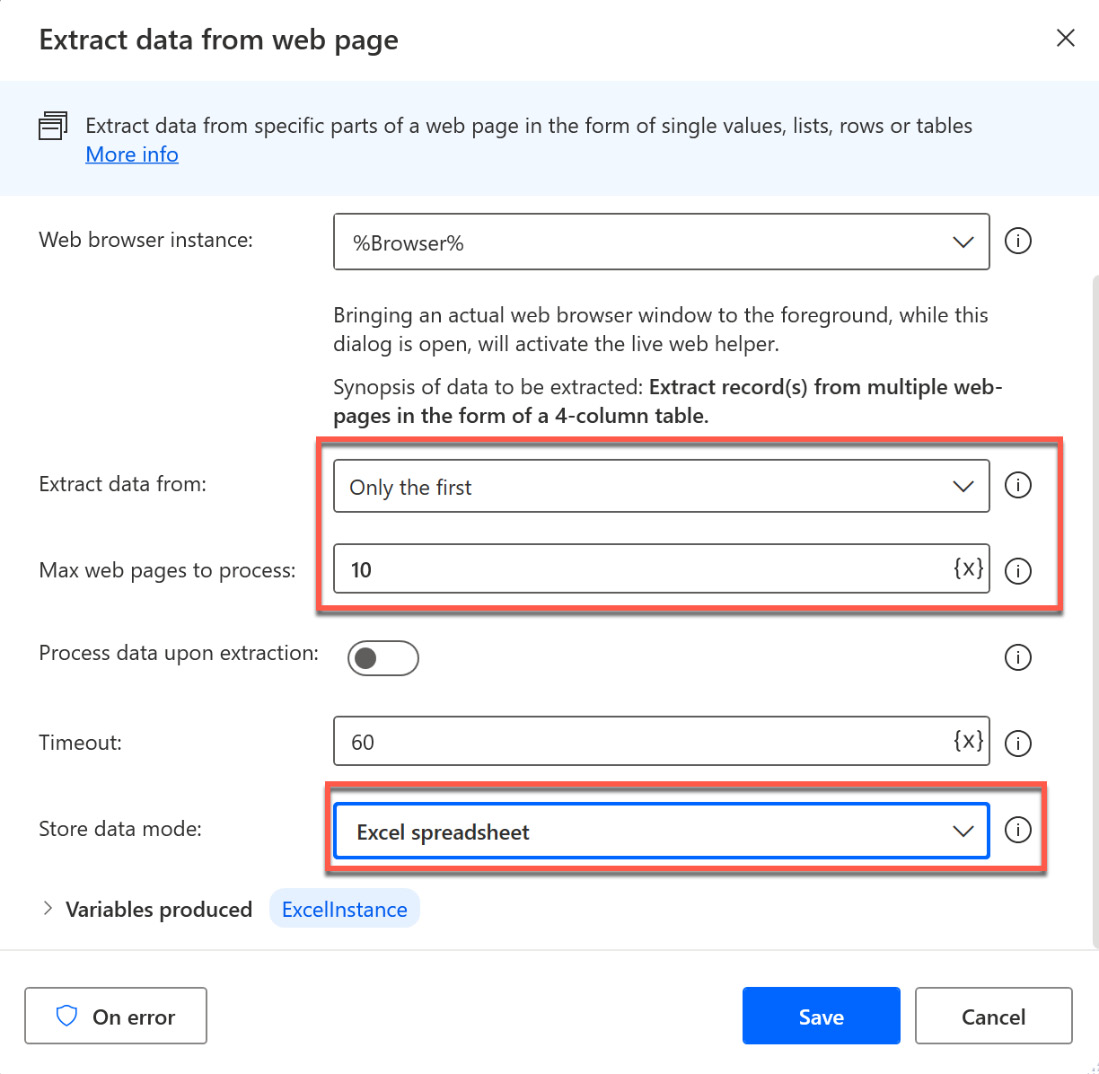
Figure 2.40 – Modifying the web data extraction parameters
Now, the web data extraction will only run for the first 10 pages, take the data, launch Excel with a new spreadsheet, and paste the captured data in there. Save the dialog now and let the show begin. On my machine, it took 45 seconds to extract 120 records and paste them into Excel.
Summary
Installing PAD is straightforward, just like installing any other Microsoft tool. Once you have signed up for a Microsoft account, you can log in to the program and start creating your UI flows right away.
It is recommended to try things out and use the tool even to automate simple tasks. This will make you more familiar with the program, as I explained in this chapter. The recorder can save you a lot of work and it can be used for new or existing flows. Especially if web scraping is a task, this tool can be very handy.
In the next chapter, we will continue our journey and look at the editing and debugging capabilities of PAD.
Further reading
To learn more about the topics that were covered in this chapter, take a look at the following resources:
- Install Power Automate Browser extensions: https://learn.microsoft.com/en-us/power-automate/desktop-flows/install-browser-extensions
- Record desktop flows: https://learn.microsoft.com/en-us/power-automate/desktop-flows/recording-flow