


Welcome to our cooking class! Your Chef is Monika—also known as Monika in Germany on the forums. There is no doubt about the fact that I absolutely love osCommerce, and thoroughly enjoy tweaking all parts of it to get the underlying code to perform at its best. In the following chapters, you will learn about all parts of the osCommerce structure and how to adapt them to your needs. Let's get cooking!
As starters, let's change a few design elements of the default osCommerce setup, namely, the stylesheet handling, and the three column layout, which is currently a bit inflexible.
In this chapter, we will see how to:
Add easy top-category driven stylesheets
Create flexible column definitions
This recipe allows you to personalize the look of your store with much more detail than one stylesheet alone could offer. You will be able to specify an extra stylesheet for use with any of your top categories. This will come in very handy for color driven categories like "Men's and Women's Perfumes", "Clothing", or "Food Groups". You can specify new stylesheets for all or only a few of your top categories; for all others the default stylesheet will be used. The new stylesheets are relevant for all product-related pages, which are:
index.phpproduct_info.phpproduct_reviews.phpproduct_reviews_info.phpproduct_reviews_write.phptell_a_friend.php
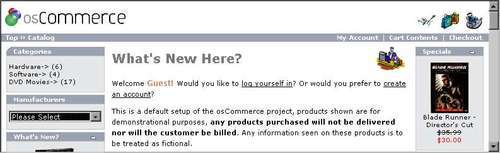
In our case, the three top categories of a default osCommerce installation are called Hardware, Software, and DVD Movies. We will have the following background colors assigned for easy referencing: Hardware is yellow, Software is red, and DVD Movies is blue.
Clicking on Software or any related subcategory shows the red background. As the rounded corners of the infoboxes are images and not stylesheet driven, they will be replaced by transparent images.

This is how the top category DVD Movies category will look:

Go fetch your butter, flour, and cream, and let's enrich your style!
Note
New:
catalog/stylesheet_hardware.css catalog/stylesheet_software.css catalog/stylesheet_dvd.css (these are modified versions of the stylesheet.css file) catalog/includes/modules/cat_driven_stylesheets.php
Modified:
catalog/images/infobox/corner_left.gif catalog/images/infobox/corner_right.gif catalog/images/infobox/corner_right_left.gif catalog/includes/functions/general.php catalog/index.php catalog/product_info.php catalog/product_reviews.php catalog/product_reviews_info.php catalog/product_reviews_write.php catalog/tell_a_friend.php
1. Create transparent images for your infobox corners, and drop them in the
catalog/images/infoboxfolder. Replace all three imagescatalog/images/infobox/corner_left.gif, catalog/images/infobox/corner_right.gif, andcatalog/images/infobox/corner_right_left.gifwith the new transparent image created in the same size while keeping the original filename.2. Create new stylesheets in the
catalogfolder by copyingstylesheet.cssand naming them according to their intended use for easy referencing. For each category that has its own design colors (we will call these secondary stylesheets, determined by thecategories_idused for that page), overwrite the default style parameters with new ones. Here our new files are calledstylesheet_hardware.css, stylesheet_software.css, andstylesheet_dvd.css, as they will be used for Hardware, Software, and DVD Movies respectively.
Note
Chef's suggestion:
A different naming convention could use the categories_id for naming the new stylesheets, so they would be called stylesheet_cat_1.css, stylesheet_cat_2.css, etc. If you are changing IDs often or are the visual type, using descriptive names is probably the better solution for you.
3. Make the changes in the new stylesheets for the desired new looks. Here only the style for
BODYwas assigned a new background color; so all other style classes were removed from the stylesheet files. The original code for theBODYclass is defined as follows with the highlighted part changed for your secondary stylesheets files to assign new background colors:
BODY {
background: #ffffff;

color: #000000;
margin: 0px;
}
4. Open
catalog/includes/functions/general.php, and add the following new function before the closing?>tag, it will return the top category for a product, which will in turn decide on which stylesheet to add as a secondary stylesheet to your pages:
function tep_get_top_category_id($product_id) {
$topcat_array = explode('_' , tep_get_product_path($product_id));
$top_cat = $topcat_array[0];
return $top_cat;
}
Note that the built-in function of osCommerce,
tep_get_product_path, only pulls one category for each product, which can prove tricky for linked products as those are assigned to several categories. If you have many linked products and want to change the category colors according to the current category, adding a clone of this function that takes$current_category_idas a second parameter may be an option for you. Another option would be to duplicate products so that they have their owncategories_id; this is recommended only if you are not tracking stock.Also remember that products set at top level will not show in your products listings and also not be able to use their own stylesheets.
<?php
/*
$Id: cat_driven_stylesheets.php, v 1.00 2006/06/05 00:00:00 mm Exp $
Module written by Monika Mathé
http://www.monikamathe.com
Module Copyright (c) 2006 Monika Mathé
osCommerce, Open Source E-Commerce Solutions
http://www.oscommerce.com
Copyright (c) 2003 osCommerce
Released under the GNU General Public License
*/
switch ($stylesheet_test) {
case '1':
$stylesheet_add = 'hardware';
break;
case '2':
$stylesheet_add = 'software';
break;
case '3':
$stylesheet_add = 'dvd';
break;
default:
$stylesheet_add = '';
break;
}
?>
6. Open the last six files of the ingredients list:
index.php, product_info.php, product_reviews.php, product_reviews_info.php, product_reviews_write.php, andtell_a_friend.php, and find this line in each of them:
<link rel="stylesheet" type="text/css" href="stylesheet.css">
Directly below it, put on the following lines to add a secondary stylesheet if one was detected for the top category of the selected area:
<?php
if ($stylesheet_add != '') {
echo '<link rel="stylesheet" type="text/css" href="stylesheet_' .
$stylesheet_add . '.css' . '">';
}
?>
7. In
index.php, find this code that deals with the different categories and their products:
// the following cPath references come from application_top.php
$category_depth = 'top';
if (isset($cPath) && tep_not_null($cPath)) {
$categories_products_query = tep_db_query("select count(*) as total from " . TABLE_PRODUCTS_TO_CATEGORIES . " where categories_id = '" . (int)$current_category_id . "'");
Replace with the following code to fill the parameter
$stylesheet_testwith the top-level category ID if the selected category, and then call the file that decides which stylesheet to include as a secondary stylesheet:
// the following cPath references come from application_top.php
$category_depth = 'top';
if (isset($cPath) && tep_not_null($cPath)) {
$cPath_array = explode('_', $cPath);
$stylesheet_test = $cPath_array[0];
include(DIR_WS_MODULES . 'cat_driven_stylesheets.php');

$categories_products_query = tep_db_query("select count(*) as total from " . TABLE_PRODUCTS_TO_CATEGORIES . " where categories_id = '" . (int)$current_category_id . "'");
8. In the other five product-related files,
product_info.php, product_reviews.php, product_reviews_info.php, product_reviews_write.php, andtell_a_friend.php, find this:
require('includes/application_top.php');
Immediately below it, add the following two lines that check the top category ID by the current
products_id, and then call the file that decides which stylesheet to include as a secondary stylesheet:
$stylesheet_test =
tep_get_top_category_id((int)$HTTP_GET_VARS['products_id']);
include(DIR_WS_MODULES . 'cat_driven_stylesheets.php');
You've created a fantastically rich starter! Bon appetit!
This recipe allows you to personalize the look of your store with much more detail than one stylesheet alone could offer. You will be able to specify an extra stylesheet for use with any of your top categories. This will come in very handy for color driven categories like "Men's and Women's Perfumes", "Clothing", or "Food Groups". You can specify new stylesheets for all or only a few of your top categories; for all others the default stylesheet will be used. The new stylesheets are relevant for all product-related pages, which are:
index.phpproduct_info.phpproduct_reviews.phpproduct_reviews_info.phpproduct_reviews_write.phptell_a_friend.php
In our case, the three top categories of a default osCommerce installation are called Hardware, Software, and DVD Movies. We will have the following background colors assigned for easy referencing: Hardware is yellow, Software is red, and DVD Movies is blue.
Clicking on Software or any related subcategory shows the red background. As the rounded corners of the infoboxes are images and not stylesheet driven, they will be replaced by transparent images.
This is how the top category DVD Movies category will look:
Go fetch your butter, flour, and cream, and let's enrich your style!
Note
New:
catalog/stylesheet_hardware.css catalog/stylesheet_software.css catalog/stylesheet_dvd.css (these are modified versions of the stylesheet.css file) catalog/includes/modules/cat_driven_stylesheets.php
Modified:
catalog/images/infobox/corner_left.gif catalog/images/infobox/corner_right.gif catalog/images/infobox/corner_right_left.gif catalog/includes/functions/general.php catalog/index.php catalog/product_info.php catalog/product_reviews.php catalog/product_reviews_info.php catalog/product_reviews_write.php catalog/tell_a_friend.php
1. Create transparent images for your infobox corners, and drop them in the
catalog/images/infoboxfolder. Replace all three imagescatalog/images/infobox/corner_left.gif, catalog/images/infobox/corner_right.gif, andcatalog/images/infobox/corner_right_left.gifwith the new transparent image created in the same size while keeping the original filename.2. Create new stylesheets in the
catalogfolder by copyingstylesheet.cssand naming them according to their intended use for easy referencing. For each category that has its own design colors (we will call these secondary stylesheets, determined by thecategories_idused for that page), overwrite the default style parameters with new ones. Here our new files are calledstylesheet_hardware.css, stylesheet_software.css, andstylesheet_dvd.css, as they will be used for Hardware, Software, and DVD Movies respectively.
Note
Chef's suggestion:
A different naming convention could use the categories_id for naming the new stylesheets, so they would be called stylesheet_cat_1.css, stylesheet_cat_2.css, etc. If you are changing IDs often or are the visual type, using descriptive names is probably the better solution for you.
3. Make the changes in the new stylesheets for the desired new looks. Here only the style for
BODYwas assigned a new background color; so all other style classes were removed from the stylesheet files. The original code for theBODYclass is defined as follows with the highlighted part changed for your secondary stylesheets files to assign new background colors:
BODY {
background: #ffffff;

color: #000000;
margin: 0px;
}
4. Open
catalog/includes/functions/general.php, and add the following new function before the closing?>tag, it will return the top category for a product, which will in turn decide on which stylesheet to add as a secondary stylesheet to your pages:
function tep_get_top_category_id($product_id) {
$topcat_array = explode('_' , tep_get_product_path($product_id));
$top_cat = $topcat_array[0];
return $top_cat;
}
Note that the built-in function of osCommerce,
tep_get_product_path, only pulls one category for each product, which can prove tricky for linked products as those are assigned to several categories. If you have many linked products and want to change the category colors according to the current category, adding a clone of this function that takes$current_category_idas a second parameter may be an option for you. Another option would be to duplicate products so that they have their owncategories_id; this is recommended only if you are not tracking stock.Also remember that products set at top level will not show in your products listings and also not be able to use their own stylesheets.
<?php
/*
$Id: cat_driven_stylesheets.php, v 1.00 2006/06/05 00:00:00 mm Exp $
Module written by Monika Mathé
http://www.monikamathe.com
Module Copyright (c) 2006 Monika Mathé
osCommerce, Open Source E-Commerce Solutions
http://www.oscommerce.com
Copyright (c) 2003 osCommerce
Released under the GNU General Public License
*/
switch ($stylesheet_test) {
case '1':
$stylesheet_add = 'hardware';
break;
case '2':
$stylesheet_add = 'software';
break;
case '3':
$stylesheet_add = 'dvd';
break;
default:
$stylesheet_add = '';
break;
}
?>
6. Open the last six files of the ingredients list:
index.php, product_info.php, product_reviews.php, product_reviews_info.php, product_reviews_write.php, andtell_a_friend.php, and find this line in each of them:
<link rel="stylesheet" type="text/css" href="stylesheet.css">
Directly below it, put on the following lines to add a secondary stylesheet if one was detected for the top category of the selected area:
<?php
if ($stylesheet_add != '') {
echo '<link rel="stylesheet" type="text/css" href="stylesheet_' .
$stylesheet_add . '.css' . '">';
}
?>
7. In
index.php, find this code that deals with the different categories and their products:
// the following cPath references come from application_top.php
$category_depth = 'top';
if (isset($cPath) && tep_not_null($cPath)) {
$categories_products_query = tep_db_query("select count(*) as total from " . TABLE_PRODUCTS_TO_CATEGORIES . " where categories_id = '" . (int)$current_category_id . "'");
Replace with the following code to fill the parameter
$stylesheet_testwith the top-level category ID if the selected category, and then call the file that decides which stylesheet to include as a secondary stylesheet:
// the following cPath references come from application_top.php
$category_depth = 'top';
if (isset($cPath) && tep_not_null($cPath)) {
$cPath_array = explode('_', $cPath);
$stylesheet_test = $cPath_array[0];
include(DIR_WS_MODULES . 'cat_driven_stylesheets.php');

$categories_products_query = tep_db_query("select count(*) as total from " . TABLE_PRODUCTS_TO_CATEGORIES . " where categories_id = '" . (int)$current_category_id . "'");
8. In the other five product-related files,
product_info.php, product_reviews.php, product_reviews_info.php, product_reviews_write.php, andtell_a_friend.php, find this:
require('includes/application_top.php');
Immediately below it, add the following two lines that check the top category ID by the current
products_id, and then call the file that decides which stylesheet to include as a secondary stylesheet:
$stylesheet_test =
tep_get_top_category_id((int)$HTTP_GET_VARS['products_id']);
include(DIR_WS_MODULES . 'cat_driven_stylesheets.php');
You've created a fantastically rich starter! Bon appetit!
This recipe allows you to define and redefine column width and column layout, and modify the traditional three column layout to any other combination including asymmetrical designs, within seconds.
You can completely remove the right column, freeing up all space taken up by it.

Or you may prefer to keep both columns, but use the right column for thumbnail display only, as you have long category and manufacturer names, and need more space on the left.
Let's take one of grandma's favorites and make it new!
// customization for the design layout
define('BOX_WIDTH', 125); // how wide the boxes should be in pixels (default: 125)
The default-box width is defined by this parameter. We divide the parameter into two using the left and right column respectively. Replace with this code:
// customization for the design layout
define('BOX_WIDTH_LEFT', 125); // how wide the boxes should be in pixels (default: 125)
define('BOX_WIDTH_RIGHT', 125); // how wide the boxes should be in pixels (default: 125)
This will set both columns at the same width, and will be your play area when the recipe is well done.
2. Find in
index.phpand the other root files (altogether 38) the following lines:
<td width="<?php echo BOX_WIDTH; ?>" valign="top"> <table border="0" width="<?php echo BOX_WIDTH; ?>" cellspacing="0" cellpadding="2">
<!-- left_navigation //-->
<?php require(DIR_WS_INCLUDES . 'column_left.php'); ?>
<!-- left_navigation_eof //-->
</table></td>
Replace this with the following lines, as we will be moving the column-cell definition directly into the column files:
<!-- left_navigation //-->
<?php require(DIR_WS_INCLUDES . 'column_left.php'); ?>
<!-- left_navigation_eof //-->
3. Repeat this for the right column, find:
<td width="<?php echo BOX_WIDTH; ?>" valign="top"> <table border="0" width="<?php echo BOX_WIDTH; ?>" cellspacing="0" cellpadding="2">
<!-- right_navigation //-->
<?php require(DIR_WS_INCLUDES . 'column_right.php'); ?>
<!-- right_navigation_eof //-->
</table></td>
Replace with this:
<!-- right_navigation //-->
<?php require(DIR_WS_INCLUDES . 'column_right.php'); ?>
<!-- right_navigation_eof //-->
4. For both columns, you have now removed the cell definition from the root files. This means that if the included file is empty, no additional cell will be added and the entire page width can be used for the site content.
The parts that were cut from the root files have to be added to the column files; so open
catalog/includes/column_left.php, and add the following line at the very top, above the opening php tag:
<td width="<?php echo BOX_WIDTH_LEFT; ?>" valign="top"> <table border="0" width="<?php echo BOX_WIDTH_LEFT; ?>" cellspacing="0" cellpadding="2">
</table></td>
5. Repeat this procedure for the
catalog/includes/column_right.phpfile using the column-right definition when replacing.
<td width="<?php echo BOX_WIDTH_RIGHT; ?>" valign="top"> <table border="0" width="<?php echo BOX_WIDTH_RIGHT; ?>" cellspacing="0" cellpadding="2">
Add the following code after the closing php tag of
catalog/includes/column_right.php:
</table></td>
If you'd now like to remove the whole column right without changing the underlying structure, so you can have it back as soon as you implement a new design, comment out everything in the file
catalog/includes/column_right.php. You can add all boxes you'd like to keep to the left column.
Note
Chef's suggestion:
This setup enables you to have more than three columns also (you may want to show a column for ads on your product pages); all it takes is a new include for the additional column in the relevant file and a new file created following this method for your includes folder, with its own width specified.
Just as easily, add a conditional statement at the top of the column file (close at bottom), so your right column only shows on certain pages.
Time to share a cup of tea with Grandma! You've done it! Bon appetit!
In this chapter, you have learned to add additional stylesheets for all top-category products that need a special flavor. You can now easily add more stylesheets and completely change the look of your sub-pages; they can use different colors and background images for each top-level category. In addition, you have learned to cut up your root files and take out the cell-definition part for your left and right columns, which allows you to make changes concerning the width of each column and allows you to remove one or both columns within seconds. Congratulations! You are now ready to tackle the next step in our culinary journey.