


In order to create any CRYENGINE game, there is a need to have a clear place to start. For us, this comes as a blank slate using my very own starter-kit. By using it, we rid ourselves of overcomplications and gain several advantages:
All code written is ours, so we have a clear and precise understanding of what the code does.
All code written is specifically for our game, so we don't have unnecessary code bloat.
Since all of our code is exactly and only what we need, our code will run faster.
All starter-kit code is written cleanly and is heavily documented. This allows us to have a better understanding of how to use CRYENGINE's interfaces.
Now that we know why we will be using my starter-kit, let's see how to download it:
Navigate to the download page at http://www.cryengine.com/community/viewtopic.php?f=355&t=124265. It should look like this:

Scroll down the page to the Download section and download Version 2.1.0 by clicking on its link.
Note
For the sake of clarity and consistency, even if there is a newer version of the starter-kit available, it is strongly recommended that you stick with Version 2.1.0. Version 2.1.0 of the starter-kit is fully compatible with CRYENGINE Version 3.8.1 and, as such, it is strongly recommended that you use that version for the remainder of this book.
Before the starter-kit can be used, it must be installed. Installing the starter-kit is very easy and it is responsible for adding a project wizard to Visual Studio and setting up the needed CRYENGINE environment variables. So let’s get started.
Now that we have downloaded the starter-kit, it's time to install it:
Unzip the downloaded archive using 7-Zip (http://www.7-zip.org/) or any other file archiver that supports the 7z file format with LZMA2 compression.
You should now see an application (
.exe) calledCRYENGINE Game Starter-Kit - Blank Installer V2.0.8.exe; launch it. It should look like this:
Click on the Browse button to search for the path to CRYENGINE's
Codefolder. It should look like this:
Note
It is important to note that CRYENGINE's
Codefolder is the one that contains all of CRYENGINE's code. It contains theCryENGINE,GameSDK, andSDKssubfolders. In the event that you do not have aCodefolder at all, you will need to extractCRYENGINE_GameCode_xxxxxor a similar zip archive located in CRYENGINE's root folder. It is very important that theCodefolder is in the right location. There should be exactly 2 subdirectories in CRYENGINE’s root folder, like this:CRYENGINE_ROOT/CRYENGINE_pc_eaascode/Code.Check all of the Visual Studio versions you want to install the starter-kit to, shown here:

Lastly, click on the Install button to actually install the starter-kit. After the installation completes, you will get the following message:

Now that we have successfully installed the CRYENGINE "Blank" Game Starter-Kit into Visual Studio, we can create our CRYENGINE game project:
Launch your preferred and supported Visual Studio IDE.
Now that we have launched Visual Studio, we can create our game project by using the CRYENGINE "Blank" Game Starter-Kit we installed earlier. To do this, go to File | New | Project. You will see the following menu options:

Go to Templates | Visual C++ | CRYENGINE. Select CRYENGINE Game Starter-Kit - Blank and fill in your project information.

Note
You are free to choose whatever name and location you wish. However, I strongly recommend you choose a location outside your CRYENGINE install directory. Throughout this book, we will be calling our game project GAS, which stands for Great Action Side-Scroller. Make sure to uncheck Create directory for solution.
Click the OK button. This will launch the CRYENGINE game starter-kit Project Creation Wizard. It should look like this:

Fill in all of the information for your game project, as shown here:
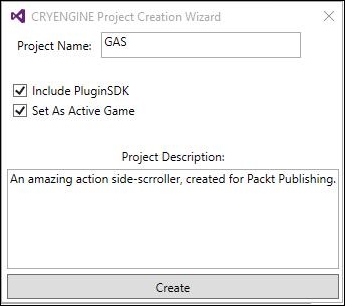
Since we have chosen to call our game GAS, it is recommended to set Project Name as GAS too. Also, it is strongly advised that you check the Include PluginSDK and Set As Active Game options. Including the PluginSDK developed by Hendrik Polinski allows users to add plugins to their game without modifying any actual game code. The advantage is that everything is modularized and features can be bundled up and shared between many projects. If you would like to get in contact with Hendrik, you can do so at https://github.com/hendrikp. Setting our game as active allows CRYENGINE to detect and use our game by modifying the
system.cfgfile in CRYENGINE's root folder. Although this is all advised, you are free to fill in the data however you wish.Click on the Create button. After the project has been created, you will get the following screen:

As we have concluded the setting up of the starter-kit, it is probably a good time to bring up a few disclaimers:
While starter-kits in general are extremely helpful, they are technically not a true blank slate.
There are a few interfaces and classes that will need to be explained before writing code.
Since there is absolutely no gameplay-specific or genre-specific code or classes, the gameplay mechanics and many other things must be implemented from scratch. Although I consider this to be a good thing, some may not.
To address the previous concerns, let's take a closer look at some of the more important classes within the starter-kit that we will be using on a regular basis, keeping in mind that the names of these classes will be different for you as they are based on the project's name:
CEditorGASGame: This class implements CRYENGINE'sIEditorGameinterface. It is used to create, update, and shut down your game while you are running it inside the CRYENGINE Sandbox Editor. You often need your game to behave differently while testing inside the editor; this class allows us to do just that. It acts as a proxy for our game, giving us the ability to add or remove functionality that should only exist while playing your game in the editor. For now, we simply forward most calls to the actualGameclass so that our game behaves similarly in the editor and in the Launcher.CGASGame: This class implements CRYENGINE'sIGameinterface. It is used to update your game and the rest of CRYENGINE's systems. It acts as a hub that manages every system that your game will use, controls communication between them, and facilitates all of the core mechanics of your game. You can view this class as your game's manager—something that orchestrates all of the little moving parts of your game. For now, we simply update the Game Framework, which, in turn, updates the rest of CRYENGINE's systems such as the Renderer, Input Manager, and Physics System.CGASGameRules: This class implements CRYENGINE'sIGameRulesinterface. It is used to carry out your game's rules and works hand-in-hand with yourGameclass. It is a class that does and should receive notifications about any gameplay-specific events so that it may decide how best to handle them in accordance with your game's rules. It is also common for this class to dispatch gameplay-specific events to yourGameclass. For now, this class simply creates the player when asked to do so.CGASModule: This class is a completely custom class in that it doesn't derive from any CRYENGINE interface. I created this class to help you; by definition, it is a helper class. Its sole purpose is to provide project-wide access to all of your game's systems and instantiate them only when needed. It does so by exposing itself as a global pointer calledg_pCGASModule, which can be used inside any scope, inside any class, and inside any file to retrieve/create any of your game's systems.CGASStartup: This class implements CRYENGINE'sIGameStartupinterface. It is used to create and initialize all of CRYENGINE's systems and yourGameclass. This class is instantiated automatically from outside your Game DLL by the Launcher, and is expected to create and initialize all of CRYENGINE's modules and ultimately create and run your game. For now, we loadCryGameFramework.dll, retrieve its exported factory method, and call it to instantiate an instance of theIGameFrameworkinterface. We then proceed to initialize it, which, in turn, loads, creates, and initializes all of CRYENGINE's modules.CPlayer: This class implements CRYENGINE'sIActorinterface. Every CRYENGINE game needs to have a player implementation. This is the place to implement the logic that concerns the player, such as moving around the world and interacting with objects.CSmoothCamera: This class implements CRYENGINE'sIGameObjectExtensionandIGameObjectViewinterfaces. It's used to provide a view for our player so that we may see the world. TheCSmoothCameraclass implementsIGameObjectViewso that it may control a CRYENGINEIViewinstance. It implementsIGameObjectExtensionso that they may be added to a game object that's in the game's world. This class is slightly advanced and it would be better to read the in-code documentation to get a clearer understanding of how this class works.IWindowEventSystem: This interface is a completely custom interface in that it doesn't derive from any CRYENGINE interface. I created this interface to help you; by definition, it is a helper interface. Its sole purpose is to provide a mechanism for which to dispatch and handle various window events, such as window activation, closing, and various mouse/keyboard events.CScriptBind_Game: This class implements CRYENGINE'sCScriptableBaseclass. It's used to expose your game's functionality to Lua. Although not required, any game-specific functionality you want to be exposed to Lua should be added here. For now, only the ability to set the game's current spawnpoint has been exposed.
By now, you should have a good understanding of what each of the classes do and what they are used for. For a more thorough understanding, you may want to take a look at the in-code documentation.
Now that we have all of the setup ready and have a clear understanding of what all of the important classes in our game do, let's compile our project. Get ready to venture into the world of game programming and create the Great Action Side-Scroller.
Right-click on your game project in the Solution Explorer and click on Build, as shown here:

This concludes the chapter. If you come across any issues while compiling the game project, I suggest that you take a look at the starter-kit Crydev forum thread at http://www.cryengine.com/community/viewtopic.php?f=355&t=124265. In this chapter, you learned how to download and install my CRYENGINE "Blank" Game Starter-Kit, what all of the important classes in the kit do, and how to compile a CRYENGINE game project. The future is very bright as we move forward with the rest of the book. Good job!
