Before we jump right into coding some simple games, we need to install and run the necessary programs that will make our applications come to life. Corona SDK is primarily a 2D development engine. If you've had experience developing for iOS or Android, you will find the experience working with Corona refreshing and simple to use. In no time you'll be creating finished products to distribute on the iPhone App Store and Google Play Store.
In this chapter, we will:
Set up Corona SDK on Mac OS X and Windows
Install Xcode for Mac OS X
Create a Hello World program in two lines
Add devices in the iOS Provisioning Portal
Load an application to an iOS device
Load an application to an Android device
You have the option of choosing the Mac OS X or Microsoft Windows operating system to develop on. Keep in mind the following system requirements required to run the program.
If you are installing Corona for Mac OS X, be sure that your system is as follows:
Mac OS® X 10.6 or later
An Intel-based system that runs Snow Leopard or Lion
64-bit CPU (Core 2 Duo)
An OpenGL 1.4 or higher graphics system
If you are running Microsoft Windows, be sure that your system is as follows:
Windows 7, Vista, or XP operating system
1 GHZ processor (recommended)
38 MB of disk space (minimum)
1 GB of RAM (minimum)
OpenGL 1.3 or higher graphics system (available in most modern Windows systems)
Let's begin by setting up Corona SDK on our desktop.
If you haven't downloaded the SDK, please do so at: http://www.anscamobile.com/corona/. You will have to register as a user before you can access the SDK.
The file extension for any Mac program should end in
.dmg, otherwise known as an Apple disk image. Once you've downloaded the disk image, double-click on the disk image file to mount it. The name should be similar toCoronaSDK.dmg.Once it is loaded, you should see the mounted disk image folder as shown in the following screenshot:

Next, drag the
CoronaSDKfolder into theApplicationsfolder. This will copy the contents of the Corona folder into/Applications. You will be prompted to enter an administrator password if you are not the main administrator of the account. You will be able to see theCoronaSDKfolder in/Applicationsonce it has been successfully installed.For easy access to the folder's contents, create an alias by dragging the
CoronaSDKfolder to the Dock of your Mac desktop.
First time Corona SDK users will have to perform a quick and easy one-time authorization process before it canbe accessible.
Launch the Corona Simulator in the SDK folder.
Assuming this is your first time, you will be presented with an End-user License Agreement (EULA). Once you have accepted the agreement, enter the e-mail you used to register for Corona and password to activate the SDK. Otherwise, click Register to create an account.
Note
If you register with Corona as a trial user, there is no fee to develop on iOS and/or Android devices. Developers that would like to publish their applications on the App Store or Google Play need to purchase the Corona SDK subscription on the website in order to do so at: http://www.anscamobile.com/corona/.

Upon successful login, you will get a confirmation dialog to show that the SDK is ready to use as shown in the following screenshot:

Click on the Continue button and you'll be presented with the Welcome to Corona screen as shown in the following screenshot:

Setting up Corona SDK on your Mac operating system is as simple as installing any other dedicated Mac program. After you have authorized the SDK on your machine and logged in with your e-mail and password it will be ready for use. From here on out, every time you launch Corona, it will automatically log in to your account. You will notice that you are greeted with a Corona SDK screen when this happens.
Let's set up Corona SDK on our desktop.
Download Corona SDK from the following URL: http://www.anscamobile.com/corona/. You will have to register as a user before you can access the SDK.
The file extension for the Windows version of Corona should end in
.msi, otherwise known as a Windows Installer, a component of Windows made for installing programs by Microsoft. Double-click on the file. The filename should be similar toCoronaSDK.msi.Follow the onscreen directions for installation.
Corona will install directly to your
Programsfolder by default. On Microsoft Windows, select Corona from the list of Programs in your Start menu or double-click the Corona icon on the desktop. Upon successful activation, you should begreeted with the following screen:Note
The process to activate the SDK should be the same as that of the Mac procedure once you launch Corona for the very first time.

To create device builds, Java 6 SDK needs to be installed on your PC. You will need to go to the JDK download page: http://jdk6.java.net/download.html and click the Download button under the Java SE 6 option.
On the next page, select the Accept License Agreement radio button and then click on the Windows x86 link to download the installer. You will be asked to log in or create a user account on the Oracle website if you don't already have one.
As soon as the JDK is downloaded, run the installer. Once installed, you'll be able to create device builds for Android on your PC.
Installing the SDK on Windows has a different setup to that of the Mac OS X. While executing the installer file, Windows will automatically present a designated location to install the application such as the Programs folder so you won't have to manually choose a destination. Upon a successful installation you will see the Corona SDK icon on your desktop for easy access or highlighted in the Programs list in the Start menu, assuming you're accessing it for the first time. When you authorize Corona on your machine and sign in with your login information, it is ready for you to use and will lo in automatically every time it is launched.
On Mac OS X, launch Corona SDK by either selecting Corona Terminal or Corona Simulator from the Applications Directory. Both selections will access the SDK. The Corona Simulator will only open the simulator. The Corona Terminal will open both the simulator and terminal window. The terminal is helpful for debugging your programs and displays simulator errors/warnings and print() messages.
On Microsoft Windows, select the Corona SDK folder and click on Corona Simulator from the list of Programs in your Start menu or double-click the Corona icon on the desktop. (The simulator and terminal are always opened together if you are using Windows).
Let's go over the useful contents contained in the Corona SDK folder (located in Applications/Corona SDK on Mac and Start/All Programs/Corona SDK on Windows:
Debugger (Mac)/Corona Debugger (Windows)—Tool for finding and isolating issues in your code.
Corona Simulator—The environment used to launch your application for testing. It simulates the mobile device you're developing on your local computer. (On Windows, it will open both the simulator and terminal).
Corona Terminal—Launches the Corona Simulator and opens a Terminal window to display error/warning messages and
print()statements. It is very helpful for debugging your code (only on Mac).Simulator—Has the same properties as
CoronaTerminal, but called from the command line (only on Mac).SampleCode—A set of sample applications to get you started with Corona. Contains code and art assets to work with.
The Corona SDK window opens by default when you launch the simulator. You can open a Corona project in the simulator, create a device build for testing or distribution, and view soe example games and apps to get you familiar with the SDK.
Let's take a look at the HelloPhysics sample project in the simulator:
Click on Simulator in the Corona SDK window.
In the Open dialog that appears, navigate to
Applications/CoronaSDK/SampleCode/Physics/HelloPhysics(Mac) orC:\Program Files\Ansca\Corona SDK\Sample Code\Physics\HelloPhysics(Windows). On Mac, click Open and it will automatically openmain.lua. On Windows, double-click onmain.luato open the file. TheHelloPhysicsapplication opens and runs in the Simulator.
Accessing the SDK through the Corona Terminal or Corona Simulator depends on your preference of action. Many Mac users prefer to use the Corona Terminal so they can track messages outputted in the terminal, especially for debugging purposes. When you launch the SDK through the Corona Simulator, the simulator will display, but not the terminal window. When Windows users launch the Corona Simulator, it will display both the simulator and terminal windows. This is nice to use when you want to play around with any of the example applications that are provided by Corona.
The main.lua file is a special filename that tells Corona where to start in a project folder. This file can also load other code files or other program resources such as sounds or graphics.
When you launch the HelloPhysics application in Corona, you will observe a box object fall from top of the screen in the simulator and collide with a ground object. The transition from launching the main.lua file to viewing the results in the simulator are almost immediate.
As you start getting familiar with the Corona Simulator, whether you're in Windows or Mac OSX, a default device is always used when you launch an application. Windows uses the Droid as the default device, while the Mac OS X uses the regular iPhone. Try launching the sample code on a different device shell to view the difference in screen resolution in all the devices the simulator has available.
When porting builds to more than one platform, you'll have to consider the variety of screen resolutions in both iOS and Android devices. A build is a compiled version of all your source code converted into one file. Having your game build configured for multiple platforms broadens the audience reach for your application.
Corona does not have a designated program editor to code in so you will have to find one that suits your needs.
For Mac OS, TextWrangler is a good one and free too! You can download it at http://www.barebones.com/products/textwrangler/download.html. Other text editors such as BBEdit at http://www.barebones.com/thedeck and TextMate at http://macromates.com/ are great, but you will need to purchase those in order to use them. TextMate is also compatible with the Corona TextMate Bundle: http://www.ludicroussoftware.com/corona-textmate-bundle/index.html.
For Microsoft Windows Notepad++ is recommended and can be downloaded at http://notepad-plus-plus.org/ or Crimson Editor at http://www.crimsoneditor.com/. Both editors are free.
Any text editor, such as TextEdit for Mac or Notepad for Windows, that is already included in each operating system works as well, but it'll be easier to work with one that is designed for programming. For Corona, using an editor that supports Lua syntax highlighting will work the best when coding. Syntax highlighting adds formatting attributes to keywords and punctuation in a way that makes it easier for the reader to separate code from text.
Apple's developer kit Xcode or the Android SDK is not necessary to download if you only want to use the Corona Simulator. In order to build and test your code on an iOS device (iPhone, iPod Touch and iPad), you will need to sign up as an Apple Developer and create and download provisioning profiles. If you want to develop on Android, you don't need to download the Android SDK unless you want to use the ADB tool to help with installing builds and viewing debug messages.
The trial version of Corona Simulator allows building Adhoc (for iOS) and Debug builds (Android) for testing on your own devices. The builds will contain a Trial User message box when the app runs on the device. You will need to purchase a Corona Subscription if you want to build for Apple's App Store or Android's Google Play Store. Corona Subscribers also get the benefit of subscriber-only features such as access to Daily Builds, Subscribers Only areas on the Corona forums and LaunchPad.
In order to develop any iOS application you will need to enroll in the Apple Developer Program, which costs $99 a year, and create an account on the Apple website http://developer.apple.com/programs/ios/.
Click on the Enroll Now button and follow Apple's instructions to complete the process.
When you have completed your enrollment, click on the iOS link under the section marked Dev Centers.
If you are using Snow Leopard, scroll down to the Downloads section and download the current Xcode. If you are using Lion, you can download Xcode in the Mac App Store.
Once you have fully downloaded Xcode, double-click on the
.mpkgInstaller package (icon is an open brown box). By default, Xcode will install in the folder/Developer. You will be asked to authenticate as an administrative user.
Aftr you have entered your credentials, click on the OK button to complete the installation.

When you have installed the Xcode developer tools, you can access the documentation by launching Xcode and choosing any of the items in the Help menu. Developer applications such as Xcode and Instruments are installed in
/Developer/Applications. You can drag those following app icons to your Dock for convenient accessibility.
We just went through the steps of how to install Xcode to Mac OS X. By enrolling in the Apple Developer Program, you will have access to up-to-date development tools on the website. Remember that to continue being an Apple Developer you have to pay a fee of $99 annually to keep your subscription.
The Xcode file is quite large so it will take a bit of time to download depending on how fast your Internet connection is. When your installation is complete, Xcode will be ready to go.
Now that we have the simulator and text editors set up, let's start making our very first Corona program! The first program we will be making is called Hello World. It is a traditional program that many people learn when starting a new programming language.
Open your preferred text editor and type the following lines:
textObject = display.newText( "Hello World!", 50, 40, native.systemFont, 36 )
textObject:setTextColor( 255,255,255)
Next, create a folder on your desktop called
Hello World. Save the preceding text as a file namedmain.luato the location of your project folder.Launch Corona. You will be greeted with the Corona SDK screen. Click on Simulator and navigate to the
Hello Worldfolder you just created. You should see yourmain.luafile in this folder as shown in the following screenshot:
On Mac, click on the Open button. On Windows, select the
main.luafile and click the Open button. You'll see your new program running in the Corona Simulator:
Before we dive into more complex examples, let's alter some minor things in your program.
Let's alter the second line of
main.luato display as follows:textObject = display.newText( "Hello World!", 50, 40, native.systemFont, 36 ) textObject:setTextColor( 124,252,0 )Save your file and go back to the Corona Simulator. The simulator will detect a change from your file and automatically re-launch with the new changes. If the simulator doesn't re-launch automatically upon saving your file, press Command + R (Mac)/Ctrl + R (Windows).

Now let's play around with the font name.
Change the first line to the following code:
textObject = display.newText( "Hello World!", 50, 40, "Times New Roman", 36 )
Be sure to save your
main.luafile after making any alterations, then press Command+R (Mac)/Ctrl+R (Windows) in Corona to re-launch the simulator to view the new font. If you're using a Mac, usually the simulator automatically re-launches after saving your file or it may ask you if you want to re-launch the program.
You have now made your first complete mobile application! What's even more amazing is that this is a completed iPhone, iPad, and Android application. This two-line program will actually install and run on your iOS/Android device if you were to create a build. You have now seen what the basic workflow in Corona is like.
If you take a look at line 2 in your main.lua file you will notice that setTextColor alters the color of the text for Hello World!.
Colors are made up of three sets of RGB numbers representing the amount of red, green, and blue contained within a color. They are displayed with three numbers with values ranging from 0 to 255. For example, the color black would be ( 0,0,0 ), blue would be ( 0,0,255 ), and the color white ( 255,255,255 ).
Continue playing around with different color values to see the different results. You can see the alterations to the code in the simulator when you save your main.lua file and re-launch Corona.
When you view the first line from the main.lua file you will notice that newText() is called by textObject, a name that is then used to reference the display text. The newText() function returns an object that will represent the text on the screen. newText is part of the display library.
When you want to access the display property of newText, type in display.newText. The two numbers after Hello World! control the horizontal and vertical positions of the text on the screen in pixels. The next item specifies the font. We used the name native.systemFont, which by default refers to the standard font on the current device. For example, the iPhone's default font is Helvetica. You can use any standard font name such as Times New Roman (used in the preceding example). The last number used is the font size.
Now that you're starting to get a taste of coding, try applying the following in your current project file:
Create a new display object using a different font and text color. Display it below the Hello World! text. Hint: Make sure your new text object has a different object name.
Continue changing values of the current display object,
textObject. Alter the x and y, the coordinates, the string text, the font name, and even the font size.While the object
setTextColor( r,g,b)sets the color of the text, there is an optional parameter you can add that controls the opacity of the text. Try using the objectsetTextColor( r, g, b [, a]). The values available foraalso range between 0 to 255 (255 is opaque, which is the default value). Observe the results of your text color.
If you are only interested in testing the application on an Android device, please skip past this section of the chapter to Testing Our Application on an Android Device. Before we can upload our first Hello World application on an iOS device, we need to log in to our Apple Developer account so we can create and install our signing certificates on our development machine. If you haven't created a Developer account yet, please do so at http://developer.apple.com/programs/ios/. Remember that there is a fee of $99 a year to become an Apple Developer.
Note
The Apple Developer account is only applied to users developing on Mac OS X. Make sure your version of Xcode is the same as or newer than the version of the OS on your phone. For example, if you have version 5.0 of the iPhone OS installed you will need Xcode that is bundled with the iOS SDK version 5.0 or later.
Make sure that you're signed up for the developer program; you will need to use the Keychain Access tool located in /Applications/Utilities so you can create a certificate request. A valid certificate must sign all iOS applications before they can be run on an Apple device in order to do any kind of testing.
Open Keychain Access | Certificate Assistant | Request a Certificate From a Certificate Authority.

In the User Email Address field, type in the e-mail address you used when you registered as an iOS developer. For Common Name, enter your name or team name. Make sure that the name entered matches the information that was submitted when you registered as an iOS developer. The CA Email Address field does not need to be filled in so you can leave it blank. We are not e-mailing the certificate to a Certificate Authority (CA). Check Saved to disk and Let me specify key pair information. When you click Continue, you will be asked to choose a save location. Save your file at a destination where you can locate it easily such as your desktop.

In the following window, make sure that 2048 bits is selected for the Key Size and RSA for the Algorithm, and then click Continue. This will generate the key and save it to the location you specified. Click Done in the next window.

Next, go to the Apple Developer website: http://developer.apple.com/, click on iOS Dev Center, and log in to your developer account. Select the iOS Provisioning Portal tab and navigate to Certificates on the left-hand column. Click on the Development tab if it's not already selected and then select the Add Certificate button on the right side of the page.

Click on the Choose File button, locate your certificate file that you saved to your desktop, and click on the Submit button.
Upon pressing the Submit button, you will get an e-mail notification you specified in the Certificate Authority (CA) request form from Keychain Access. The person who created the certificate will receive this e-mail and can approve the request by pressing the Approve button. You can download the certificate once it has been approved.

Click on the Download button and save the certificate to a location that is easy to find. Once this is completed, double-click on the file and you will see the following dialog:

Click OK. This will install your iPhone Development Certificate in your Keychain.
We now have a valid certificate for iOS devices. The iOS Development Certificate is used for development purposes only and is valid for about a year. The key pair is made up of your public and private keys. The private key is what allows Xcode to sign iOS applications. Private keys are available only to the key-pair creator and are stored in the system keychain of the creator's machine. The following are other websites you can refer to to create valid certificates:
Building for devices on the Ansca website: http://developer.anscamobile.com/content/building-devices-iphoneipad
iPhone provisioning setup and App Store submission (created by an Ansca engineer): http://www.authorstream.com/Presentation/anscamobile-509082-iphone-provisioning-setup-and-app-store-submission/
The AppCode blog: http://www.theappcodeblog.com/2011/04/28/getting-an-apple-developer-certificate/
You are allowed to assign up to 100 devices for development and testing purposes in the iPhone Developer program. To register a device, you will need the Unique Device Identification (UDID) number. You can find this in iTunes and Xcode.
To find out your device's UDID, connect your device to your Mac and open Xcode. In Xcode, navigate to the menu bar and select Window and click on Organizer. The 40 hex character string in the Identifier field is your device's UDID. Once the Organizer window is open, you should see the name of your device in the Devices list on the left. Click on it and select the identifier with your mouse, copying it to the clipboard:
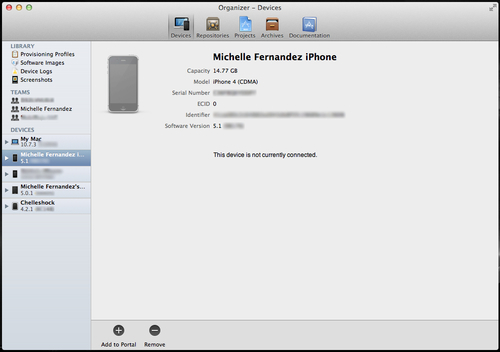
Usually when you connect a device to the Organizer for the first time, you'll receive a button notification that says Use for Development. Select it and Xcode will do most of the provisioning work for your device in the iOS Provisioning Portal.

To add a device to use for development/testing:
Select Devices in the iOS Provisioning Portal and click on Add Devices.
Create a name for your device in the Device Name field and put your UDID in the Device ID by pressing Command + V to paste the number you have saved on the clipboard.
Click Submit when you are done.

Now that you have added a device to the portal, you will need to create an App ID. An App ID has a unique 10-character Bundle Seed ID prefix generated by Apple and a Bundle Identifier suffix that is created by the Team Admin in the Provisioning Portal. An App ID could look similar to the following example: 7R456G1254.com.companyname.YourApplication. To create a new App ID follow these steps:
Click on the New App ID button in the App ID section of the portal.

Fill out the Description field with the name of your application.
You are already assigned a Bundle Seed ID (also known as Team ID).
In the Bundle Identifier (App ID Suffix) field, specify a unique identifier for your app. It is up to you as to how you want to identify your app, but it is recommended that you use the reverse-domain style string, that is
com.domainname.appname.Note
You can create a wildcard character in the Bundle Identifier that you can share among a suite of applications using the same Keychain access. To do this, simply create a single App ID with an asterisk (*) at the end. You would place this in the field for the Bundle Identifier either by itself or at the end of your string:
com.domainname.*.More information on this topic can be found in the App IDs section of the iOS Provisioning Portal: https://developer.apple.com/ios/manage/bundles/howto.action.
All UDIDs are unique on every device and we can locate them in Xcode and iTunes. When we added a device in the iOS Provisioning Portal we took the UDID, which consists of 40 hex characters and made sure we created a device name so we can identify what we're using for development.
We now have an App ID for applications we want to install on a device. An App ID is a unique identifier that iOS uses to allow your application to connect to the Apple Push Notification service, share keychain data between applications, and communicate with external hardware accessories that you wish to pair your iOS application with.
To create a Provisioning Profile, go to the Provisioning section of the iOS Provisioning Portal and click New Profile on the Development tab.
Enter a name for the Provisioning Profile. It could be the same name as your application.
Check the box next to Certificates.
Select the App ID that you created for your application in the pull-down menu.
Check the devices you wish to authorize for this profile.
Click on the Submit button when you are done.

You will be returned to the Development tab where the status will most likely say Pending. Click Refresh on your browser and it should show that your profile's status says Active.
Click the Download button. While the file is downloading, launch Xcode if it's not already open and press Shift + Command + 2 on the keyboard to open Organizer.
Under Library, select the Provisioning Profiles section. Drag the downloaded
.mobileprovisionfile to the Organizer window. This will automatically copy the.mobileprovisionfile to the proper directory.
Devices that have permission within the Provisioning Profile can be used for testing as long as the certificates are included in the profile. One device can have multiple provisioning profiles installed.
Currently our app has no icon image to display on the device. By default, if there is no icon image set for the application you will see a light gray box displayed along with your application name below it once the build has been loaded to your device. So launch your preferred creative developmental tool and let's create a simple image.
The application icon for iPhone/iTouch should be a 57 x 57 PNG image file or 72 x 72 for iPad. The image should always be saved as Icon.png and must be located in your current project folder. For iPhone / iPod touch devices that support Retina display, we need an additional high-resolution 114 x 114 icon named Icon@2x.png.
The contents of your current project folder will look like this:
Hello World/    name of your project folder
Icon.png         required for iPhone/iPod/iPad
Icon@2x.png       required for iPhone/iPod with Retina display
main.lua
In order to distribute your app, the App Store requires a 512 x 512 pixel version of the icon. It is best to create your icon at a higher resolution first. Please refer to the Apple iOS Human Interface Guidelines for the latest official App Store requirements:
Creating an application icon is a visual representation of your application name. You will be able to view the icon on your device once you compile a build together. The icon is also the image that launches your application.
We are now set to build our Hello World application for our device. Since we have our provisioning profiles in place, the build process from here on is pretty simple. Make sure that you are connected to the Internet before creating a device build. You can build your application for testing in the Xcode Simulator or on a device.
Follow these steps to creating a new iOS build in Corona SDK:
Open the Corona Simulator and select Simulator.
Navigate to your Hello World application and select your
main.luafile.Once the application is launched on the simulator, go to the Corona Simulator menu bar and select File | Build | iOS or press Command + B on your keyboard. The following dialog box appears:

Create a name for your app in the Application Name field. We can keep the same name Hello World. In the Version field, keep the number at 1.0. In order to test the app in the Xcode Simulator, select Xcode Simulator from the Build For drop-down menu. If you want to build for the device, choose Device to build an app bundle. Next, select the target device (iPhone or iPad) from the Supported Devices drop-down menu. Under the Code Signing Identity drop-down menu, choose the provisioning file you created for the specified devices you are building for. It is the same name as the Profile Name in the iOS Provisioning Portal on the Apple Developer website. In the Save to folder section, click Browse and choose where you would like your application to save in.
If all the information has been confirmed in the dialog box, click on the Build button.
Congratulations! You now have created your first iOS application file that can be uploaded to your device. As you start developing apps for distribution, you will want to create new versions of your application so you can keep track of the changes in every new build you make. All the information from your Provisioning Profile was created in the iOS Provisioning Portal and applied to the build. Once Corona has finished compiling the build, the application should be located in your preferred folder you saved it under.
Select the Hello World build that you created and choose either of the following to load your app onto your iOS device. iTunes, Xcode, or the iPhone Configuration Utility can be used to transfer the application file.
If using iTunes, drag your build into your iTunes library and then synch your device normally.
Another way to install your app onto your device is to use Xcode since it provides a convenient method for installing iOS device applications.
With the device connected, open Xcode's Organizer from the menu bar, Window | Organizer, and navigate to your connected device under the Devices list on the left.
If a proper connection is established, you will see a green indicator. If it is yellow after a couple minutes, try powering the device off and on again or disconnect the device and connect it again. This will usually establish a proper connection.

Simply drag your build file and drop it in the Applications area of the Organizer window and it will automatically install on your device.
Lastly, you can use the iPhone Configuration Utility that is available as a separate download from the Apple website under the Support tab: http://www.apple.com/support/iphone/enterprise/. It allows you to manage your configuration profiles, track and install provisioning profiles and authorized applications, and capture device information including console logs.
Click on the Download button and follow the directions on how to install the program.

Make sure that your device is connected to your computer, launch the iPhone Configuration Utility, and then click the Add button at the top left of the box. Navigate to your Hello World build on your desktop or wherever you saved it and then click Open.

When your device is recognized, select your device under the Devices section. You will see a list of applications that are currently installed or yet to be installed. Click on the Install button next to your Hello World app you added to the utility.

We just learned three different ways using iTunes, Xcode, and the iPhone Configuration Utility to load an application build to an iOS device.
Using iTunes provides a simple drag-and-drop feature into your Library and then allows you to transfer the build as long as your device is synced up.
The Xcode method is probably the easiest and most common way to load a build to a device. As long as your device is connected properly and ready to use in the Organizer, drag-and-drop the build to Applications and it loads automatically.
Finally, the iPhone Configuration Utility is a step-by-step tool where you can easily differentiate which applications have been installed on your device. When you load your build within the main Library, the Devices area will pull up a list of applications you want to install or uninstall. After you locate your build, all you have to do is click the Install button and the file is loaded.
Creating and testing our builds on an Android device does not require a developer account like how Apple does for iOS devices. The only tools you need to build for Android is a PC or Mac, Corona SDK, a JDK6 installation, and an Android device. If you plan on submitting an app to the Google Play Store, you'll need to sign up as an Google Play Developer at: http://play.google.com/apps/publish. There is a one-time $25 registration fee you have to pay if you want to publish software on the Google Play Store.
Building our Hello World application is fairly simple since we do not have to create a unique Keystore or Key Alias for debug builds. When you're ready to submit an application to the Google Play Store, you'll need to create a release build and generate your own private key to sign your app. We'll discuss release builds and private keys in more detail later on in this book.
Follow these steps to create a new Android build in Corona SDK:
Launch the Corona Simulator and select Simulator.
Navigate to your Hello World application and select your
main.luafile.Once your application is running on the simulator, go to the Corona Simulator menu bar and select File | Build For | Android (Windows)/Shift + Command + B on your keyboard (Mac). The following dialog box appears:

Create a name for your app in the Application name field. We can keep the same name
Hello World. In the Version Code field, set the number to1if that is not already the default number. This specific field must always be an integer and is not visible to users. In the Version Name field, keep the number at1.0. This attribute is the string shown to users. In the Package field, you will need to specify a name that uses the traditional Java scheme, which is basically the reverse format of your domain name. For example,com.mycompany.app.helloworldwould work as a package name. The Project Path shows the location of where your project folder is. Target OS Compatibility currently supports Android 2.2 and newer devices running the ArmV7 processor. In the Keystore field, you will be signing your build with theDebugKeystore that is already provided in Corona. In the Key Alias field, selectandroiddebugkeyfrom the pull-down menu if it's not selected. In the Save to folder section, click Browse and choose where you'd like your application to save in.If all the information has been confirmed in the dialog box, click on the Build button.
Note
For more information about Java package names, see the section on Unique Package Names in the Java documentation at: http://java.sun.com/docs/books/jls/third_edition/html/packages.html#40169.
You have created your very first Android build! See how simple that was? Since Corona SDK already provides the Debug Keystore and androiddebugkey Key Alias within the engine, most of the signing work is already done for you. The only requirement from you is to fill out the build information for your application and click on the Build button to make a debug build. Your Hello World application will save as an .apk file at the location you designated. The file name will appear as Hello World.apk.
There are several ways to load your Hello World build to your Android device that don't require you to download the Android SDK. Here are some simple methods:
The most fundamental method to upload an .apk file onto your device is to transfer it to the SD Card via the USB interface. If your device doesn't come with some kind of file manager application, a great one you can download from the Google Play Store is ASTRO File Manager at: https://play.google.com/store/apps/details?id=com.metago.astro. There are many other installers like AppInstaller at: https://play.google.com/store/apps/details?id=com.funtrigger.appinstaller. AppInstaller allows you to install .apk files from your SD card. You can always do a normal search for the preceding apps on the Google Play Store app on your device.
Under your device's Settings, select Applications and then select Development. Tap on USB Debugging if the mode is not active.
Go back a couple of screens to the Applications section. Enable Unknown Sources if it is not already active. This will allow you to install any non-market application (that is, debug builds). Select the home button on your device when done.
Connect the device to your computer with a USB cable. You will see a new notification that a new drive has connected to your PC or Mac. Access the SD drive and create a new folder. Name the folder something that you can identify easily for your Android builds. Drag-and-drop your
Hello World.apkfile from the desktop to the folder.Eject the drive from your desktop and disconnect your device from the USB cable. Launch ASTRO File Manager or AppInstaller, whichever app you decided to download from the Google Play Store. In ASTRO, select File Manager, search for the folder you added on your SD card and select it. In AppInstaller, search for your newly named folder and select it. In both apps, you will see your
Hello World.apkfile. Select the file and a prompt will appear asking you to install it. Select the Install button and you should see your Hello World application appear in the Apps folder of your device.
A convenient method is through Dropbox. You can create an account at: https://www.dropbox.com/. Dropbox is a free service that lets you upload/download your files on your PC/Mac and mobile devices.
Download the Dropbox installer and install it on your computer. Also, download the mobile app from the Google Play Store (which is also free) on to your device and install it.
Log in to your Dropbox account on your computer and mobile device. From your computer, upload your
Hello World.apkfile.Once it has finished uploading, go to the Dropbox app on your device and select your
Hello World.apkfile. You will be greeted with a screen that will ask you if you want to install the application. Select the Install button. Assuming that it installs correctly, another screen will appear saying Application installed and you can launch your Hello World app by pressing the Open button that is available.One of the easiest methods is through Gmail. If you don't already have a Gmail account, create one at: https://mail.google.com/.
Log in to your account, compose a new e-mail and attach your
Hello World.apkfile to the message.Address the recipient of the message to your own e-mail address and send it.
On your Android device, make sure you have your e-mail account linked on there as well. As soon as you receive the message, open the e-mail, and you will be given the option to install the application to your device. There will be an Install button or something similar displayed.
We just learned several ways on how to load a .apk file to an Android device. The preceding methods are some of the easiest ways to load an application quickly without running into any problems.
Using the file manager method allows you to access your .apk files easily without requiring any carrier data or Wi-Fi connection. By using a USB cable that is compatible with your device and connecting it to your computer, it's a simple drag-and-drop procedure.
The Dropbox method is the most convenient method of... once you have it set up on your computer and your mobile devices. All you have to do is drag-and-drop your .apk file to your account folder and it's instantly accessible to any device with the Dropbox app installed. You can also share your files through a download link—another great feature provided by Dropbox.
Setting up a Gmail account and sending your .apk files as attachments to yourself is a simple process if you don't want to download any file managers and other programs to your device and computer. The only thing you have to remember is that you can't e-mail an attachment over the size of 25 MB in Gmail.
When using Corona, which of the following statements is true?
a. You need a
main.luafile to launch your application.b. Corona SDK only runs on Mac OSX.
c. The Corona Terminal doesn't launch the simulator.
d. None of the above.
How many iOS devices can you use for development in the iPhone Developer Program?
a. 50.
b. 75.
c. 5.
d. 100.
What does the Version Code have to be when building for Android in Corona SDK?
a. A string.
b. An integer.
c. Has to follow the Java scheme format.
d. None of the above.
In this chapter, we covered some of the necessary tools needed to start developing applications for Corona SDK. Whether you are working on a Mac OS X or Microsoft Windows, you will notice the similarities on how to work on both operating systems and how simple it is to run Corona SDK.
To familiarize yourself with Corona better, try doing the following:
Take the time to look into the sample code provided by Corona to view the capabilities of the SDK
Feel free to alter any of the sample code to your liking to get a better understanding of programming in Lua
Whether you're working on iOS (if you're a registered Apple Developer) or Android, try installing any of the sample code to your device to see how the applications work outside the simulator environment
Take a look at the Ansca forums at http://developer.anscamobile.com/forum/ and browse through the latest discussions on Corona development by fellow Corona SDK developers and personnel
Now that you understand the process of displaying objects in Corona, we'll be able to dive into other functions that will help create an operational mobile game.
In the next chapter, we'll be going into more depth on Lua programming language and learning simple coding techniques that are similar to the sample code in Corona. You will get a better understanding of the Lua syntax and notice how fast and easy it is to learn compared to other programming languages. So let's get started!