


In this chapter, we'll get things up and running on your machine so you can get the most out of the examples in this book. This will include information on downloading the framework and creating a project as well as an overview of the basic structure of a Cocos2d-x application.
I will also point you to some extra tools you should consider getting to help you with the development process, such as tools to build sprite sheets, particle effects, and bitmap fonts. Although these tools are optional, and you can still learn how to use sprite sheets, particles, and bitmap fonts just by following the examples given in this book, you might consider these tools for your own projects.
Things you will learn in this first chapter are as follows:
How to download Cocos2d-x
How to run your first multiplatform application
What the basic project looks like and how to find your way around it
How to use the test project as a major reference source
All the examples in this book were developed in a Mac using Xcode and/or Eclipse. The example in the final chapter uses Cocos2d-x own IDE for scripting. Although you can use Cocos2d-x to develop your games for other platforms using different systems, the examples were built in a Mac and deployed to both iOS and Android.
Xcode is free and can be downloaded from the Mac App store (https://developer.apple.com/xcode/index.php), but in order to test your code on an iOS device and publish your games, you will need a developer account with Apple, which will cost you $99 a year. You can find more information on their website: https://developer.apple.com/.
For Android deployment, I recommend that you get the Eclipse and ADT bundle from Google, which you can find at http://developer.android.com/sdk/installing/installing-adt.html. You will be able to test your games in an Android device for free.
So, assuming you have an Internet connection, let's begin!
We start by downloading the necessary SDKs, NDKs, and general bits and bobs:
Go to http://www.cocos2d-x.org/download and download the latest stable version of Cocos2d-x. For this book, I'll be using version Cocos2d-x-3.4.
Uncompress the files somewhere in your machine you can remember later. I recommend that you add all the files we're going to download now to the same folder.
Go ahead and download the Code IDE as well. We'll be using this in the last chapter in this book.
Then, go to http://developer.android.com/sdk/installing/installing-adt.html and download the Eclipse ADT plugin (if you don't have Eclipse or the Android SDK installed, download them at https://eclipse.org/downloads/ and http://developer.android.com/sdk/installing/index.html?pkg=tools, respectively).
Note
If you have any problems installing the ADT plugin, you will find complete instructions at http://developer.android.com/sdk/installing/installing-adt.html.
Now, for Apache Ant, go to http://ant.apache.org/bindownload.cgi and look for the links to the compressed files, and download the
.zipone.Lastly, go to https://developer.android.com/tools/sdk/ndk/index.html and download the latest version of the NDK for your target system. Follow the installation instructions on this same page on how to extract the files as some systems will not allow these to be self-extractable. A word of warning: you must use a version of the NDK above r8e with Cocos2d-x 3.x.
You have successfully downloaded everything you'll need to set up Cocos2d-x in your machine and start development. If you are using a Mac, you will probably need to change your security settings in System Preferences to allow Eclipse to run. Also, go ahead and open the Android SDK Manager inside Eclipse by going to the Window-Android SDK Manager menu, and install the packages for at least Version 2.3.3 and then anything above that you might wish to target.
Also, make sure you have Python installed in your machine. Inside Terminal or command prompt, just type the word python and hit enter. If you don't have it installed, visit https://www.python.org/ and follow the instructions there.
So by the end of this step you should have Cocos2d-x, CocosIDE, the Android SDK the NDK, and Apache Ant all extracted inside a folder.
Now let's install Cocos2d-x.
Open Terminal or command prompt and navigate to the Cocos2d-x extracted folder:
You can do this by typing
cd(that is,cdand a space) and then dragging the folder to the Terminal window and hitting Enter. In my machine this looks like:cd /Applications/Dev/cocos2d-x-3.4
Next, type
python setup.py.Hit Enter. You will be prompted for the paths to the NDK, SDK and Apache ANT root. You must drag each one of the folders to the Terminal window, making sure to delete any extra spaces at the end of the path and hit Enter. So for the NDK I get:
/Applications/Dev/android-ndk-r10c
Next, it's the path for the SDK. Once again, I drag the folder that I have stored inside Eclipse's folder:
/Applications/eclipse/sdk
Next, it's the path to ANT. If you have it properly installed on your machine, the path will be something like
usr/local/binand the setup script will find it for you. Otherwise, you can use the one you downloaded and extracted. Just point to thebinfolder inside it:/Applications/Dev/apache-ant-1.9.4/bin
The last step is to add these paths to your system. Follow the last instruction in the window where it says: Please execute command: "source /Users/YOUR_USER_NAME/.bash_profile" to make added system variables take effect. You can copy the command inside the quotes, paste it, and hit Enter.
Open Terminal again and follow these easy steps:
You should have the path to the Cocos2d-x console already added to your system. You can test this by using the
cocoscommand inside Terminal. In order to create a new project calledHelloWorld, using C++ as its primary language and save it on your desktop, you need to run the following command, replacingYOUR_BUNDLE_INDETIFIERwith a package name of your choice, and replacingPATH_TO_YOUR_PROJECTwith the path to wherever you wish to save your project:cocos new HelloWorld -p YOUR_BUNDLE_IDENTIFIER -l cpp -d PATH_TO_YOUR_PROJECTAs an example, in my machine this is the line I typed:
cocos new HelloWorld -p com.rengelbert.HelloWorld -l cpp -d /Users/rengelbert/Desktop/HelloWorldAnd hit Enter. If you choose not to give a directory parameter
(-d), the Cocos console will save the project inside theCocos2d-xfolder.Now you can go to your desktop, or wherever you chose to save your project, and navigate to the folder
proj.ios_macinside theHelloWorldproject. Inside that folder you'll find the Xcode project file. Once you open the project inside Xcode, you can click the Run button and you're done.
Note
When you run a cocos2d-x application in Xcode, it is quite common for the program to post some warnings regarding your code, or most likely, the frameworks. These will mostly reference deprecated methods or statements that do not precisely follow more recent and stricter rules of the current SDK. But that's okay. These warnings, though certainly annoying, can be ignored.
You created your first Cocos2d-x application. The parameters used on the command line are:
-pfor package or bundle identifier-lfor language, and here, you have the optioncpp,lua, or JavaScript
Now let's run this app in Android.
Tip
Downloading the example code
You can download the example code files from your account at http://www.packtpub.com for all the Packt Publishing books you have purchased. If you purchased this book elsewhere, you can visit http://www.packtpub.com/support and register to have the files e-mailed directly to you.
We're going to open the project inside Eclipse:
Open Eclipse.
We need to fix the path to the NDK; this step may be optional in your system, and in any case, it must be done only once. Inside Eclipse, go to Eclipse-Preferences, then inside the C/C++ option select Build-Environment.
You need to add the NDK path and it must be called
NDK_ROOT. In order to do this, you must click Add…, and useNDK_ROOTas the name and then click inside the Value field to make sure the mouse cursor is active inside it, and then drag the NDK folder you downloaded inside the field. On my machine the result looked like this:
Click Apply. It might be good to restart Eclipse. (If you do not see the C/C++ option in Preferences, it means you do not have the CDT plugins installed. Look for complete instructions at http://www.eclipse.org/cdt/ on how to install them.)
Now we're ready to bring our project inside Eclipse. Select File | Import….
In the dialog box, select the Android option, and then select the Existing Android Code Into Workspace option and click Next:

Click on the Browse button and navigate to the
HelloWorldproject, and select theproj.androidfolder inside it and hit Next.You should see the project compiling. The entire framework library will be compiled and so will the classes used in the base template.
Sadly, with Version 3.4 of the framework, we have an extra step here. It was gone in Version 3.3, but now it's back. You must import the project's referenced Cocos2d-x library into Eclipse's package explorer. Repeat step 8, but instead of selecting the
proj.androidfolder, selectcocos2d/cocos/platform/android/java, and hit Next.This will select a library called
libcocos2dx; click on Finish.Once that's done, it might be good to run a build just in case your project failed to generate the correct resource files. So, navigate to Project | Build All.
Now, connect your Android device and make sure Eclipse has recognized it. You might need to turn on Development options in your device, or restart your device while connected to your computer and with Eclipse running.
Right-click on your project folder and select Run As | Android Application.
You ran your first Cocos2d-x application in Android. Don't bother with the simulator for your Android builds; it's a waste of time. If you don't have a device handy, consider investing in one.
Alternatively, you could open your project's root folder inside Terminal (or command prompt) and use the Cocos2d-x console compile command:
cocos compile -p android
The people behind Cocos2d-x have announced they will get rid of the build Python script in the future versions of the framework, so it's good to be prepared and know how to go without it.
While working with Eclipse, you might soon be faced with the dreaded java.lang.NullPointerException error. This might be related to conflicts in the ADT, CDT or NDK!
Note
When you're faced with this error you have no option other than reinstall whatever Eclipse points to as the culprit. This might happen after an update, or if for some reason you have installed another framework that uses a path to the NDK or ADT. If the error is tied to a particular project or library, just remove all projects from the package explorer in Eclipse and reimport them.
Now let's go over the sample application and its files.
First you have the Classes folder; this will contain the classes for your application, and are written entirely in C++. Below that is the Resources folder, where you find the images, fonts, and any kind of media used by the application.
The ios folder has the necessary underlying connection between your app and iOS. For other platforms, you will have their necessary linkage files in separate folders targeting their respective platform.
It is important to maintain this file structure. So your classes will go into the Classes folder and all your images, sound files, fonts, level data should be placed in the Resources folder.

Now let's go over the main classes of the basic application.
AppController and RootViewController are responsible to setting up OpenGL in iOS as well as telling the underlying operating system that your application is about to say Hello... To the World.
These classes are written with a mix of Objective-C and C++, as all the nice brackets and the .mm extension show. You will change very little, if anything, on these classes; and again that will reflect in changes to the way iOS handles your application. So other targets would require the same instructions or none at all, depending on the target.
In AppController for instance, I could add support for multitouch. And in RootViewController, I could limit the screen orientations supported by my application, for instance.
This class marks the first time your C++ app will talk to the underlying OS. It attempts to map the main events mobile devices we want to dispatch and listen to. From here on, all your application will be written in C++ (unless you need something else for a specific target) and from this point on, you can add conditional code for different targets.
In AppDelegate, you should set up the Director object (it is the Cocos2d-x all powerful singleton manager object), to run your application just the way you want. You can:
Get rid of the application status information
Change the frame rate of your application
Tell
Directorwhere your high definition images are, and where your standard definition images are, as well as which to useYou can change the overall scale of your application, so it will best fit different screens
The
AppDelegateclass is also the best place to start any preloading processAnd most importantly, it is here you tell the
Directorobject whatSceneto begin your application with
Here too, you will handle what happens to your application if the OS decides to kill it, push it aside, or hang it upside down to dry. All you need to do is place your logic inside the correct event handler: applicationDidEnterBackground or applicationWillEnterForeground.
When you run the application, you get a screen with the words Hello World and a bunch of numbers in one corner; those are the display statistics you decided you wanted around in the AppDelegate class.
The actual screen is created by the oddly named HelloWorldScene class. It is a Layer class that creates its own scene (don't worry if you don't know what a Layer or a Scene class is; you will know soon).
When it initializes, HelloWorldScene puts a button on the screen that you can press to exit the application. The button is actually a Menu item part of a Menu object that only has one button, with two image states for the button, and one call back event when the said button is pressed.
The Menu object automatically handles touch events targeting its members, so you don't get to see any of that code floating about. Then, there is also the necessary Label object to show the Hello World message and the background image.
If have you never worked with either Cocos2d or Cocos2d-x before, the way the initial scene() method is instantiated may lead to dizziness. To recap, in AppDelegate you have:
auto scene = HelloWorld::createScene();
director->runWithScene(scene);
Director needs a Scene object to run, which you can think of as being your application, basically. Scene needs something to show, and in this case, a Layer object will do. Scene is then said to contain a Layer object.
Here a Scene object is created through a static method scene inside a Layer derived class. So the layer creates the scene, and the scene immediately adds the layer to itself. Huh? Relax. This incestuous-like instantiation will most likely happen only once, and you get nothing to do with it when it happens. So you can easily ignore all these funny goings-on and look the other way. I promise instantiations will be a much easier task after this first one.
You can open the test project just like you would any other Xcode/Eclipse project:
In Eclipse, you can import the test project from inside the Cocos2d-x folder you downloaded. You'll find it in
tests/cpp-tests/proj.android.You can follow the same steps as before to build this project.
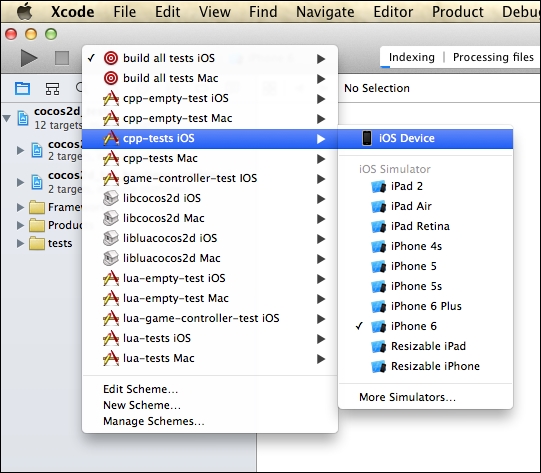
In Xcode, you must open the tests project file that you'll find in the Cocos2d-x framework folder inside the
buildfolder:build/cocos2d_tests.xcodeproj.Once the project is opened in Xcode, you must select the correct target next to the Run button as follows:
In order to actually review the code inside the tests, you may navigate to
tests/cpp-tests/Classesfor the C++ tests ortests/lua-tests/srcfor the Lua tests. Better yet, if you have a program such asTextWrangleror an equivalent, you can open these entire directories inside a Disk Browser window and have all that information ready for referencing right at your desktop.
With the test samples, you can visualize most features in Cocos2d-x, what they do, as well as see some of the ways you can initialize and customize them.
I will refer to the code found in the tests quite often. As usual with programming, there is always a different way to accomplish the same task, so sometimes, after showing you one way, I'll refer to a different one that you can find (and by then easily understand) inside the Test classes.
Now comes the part where you may need to spend a bit more money to get some extremely helpful tools (and do some extra bit of learning). In this book's examples, I use four of them:
A tool to help build sprite sheets: I'll use TexturePacker (http://www.codeandweb.com/texturepacker). There are other alternatives, such as Zwoptex (http://zwopple.com/zwoptex/), and they usually offer some features for free. Cocos2d-x now offers a free program called CocosStudio, which is somewhat similar to SpriteBuilder (previously CocosBuilder), and it offers ways to build sprite sheets, bitmap fonts, as well as a number of other goodies. At the time of writing this, the Windows version is somewhat superior to the Mac version, but they are free!
A tool to help build particle effects: I'll use Particle Designer (http://www.71squared.com/en/particledesigner). Depending on your operating system, you may find free tools online for this. Cocos2d-x comes bundled with some common particle effects that you can customize. But doing it blindly is a process I do not recommend. CocosStudio also allows you to create your own particle effects, but you may find its interface a bit daunting. It certainly requires its own book of tutorials!
A tool to help build bitmap fonts: I'll use Glyph Designer (http://www.71squared.com/en/glyphdesigner). But there are others: bmGlyph (which is not as expensive) and FontBuilder (which is free). It is not extremely hard to build a bitmap font—not nearly as hard as building a particle effect from scratch—but doing it once is enough to convince you to get one of these tools fast. Once again, you might give CocosStudio a go.
A tool to produce sound effects: No contest—sfxr for Windows or its Mac port cfxr. Both are free (http://www.drpetter.se/project_sfxr.html and http://thirdcog.eu/apps/cfxr, respectively).
You just learned how to install Cocos2d-x and create a basic application. You also learned enough of the structure of a basic Cocos2d-x application to start building your first game and you know how to deploy to both iOS and Android.
Keep the Test classes by your side as you go over the examples in this book and you will be a Cocos2d-x pro in no time!
But first, let's go over a few things regarding the framework and its native language.