


In this chapter we'll get things up and running on your machine so you can get the most out of the examples in this book. This will include information on downloading the framework and installing its templates, as well as an overview of the basic structure of a Cocos2d-x application.
I will also point you to some extra tools you could get to help you with the development process: tools to build sprite sheets, particle effects, and bitmap fonts. Although these tools are optional, and you can still learn how to work with sprite sheets, particles and bitmap fonts by following the examples given in this book, you might consider these tools for your own projects.
Things you will learn in this first chapter:
How to download and install Cocos2d-x templates
How to run your first application
What the basic template looks like and how to find your way around it
How to run the test samples that comes bundled with Cocos2d-x
All the examples in this book were developed on a Mac using Xcode. Although you can use Cocos2d-x to develop your games for other platforms, using different systems, the examples will focus on iOS and Mac. In Chapter 10, Code Once. Retire. I'll show you how to develop Android games with Cocos2d-x using the Eclipse IDE. But for now, I'll assume you are using a Mac and Xcode.
Xcode is free and can be downloaded from the Mac App store (https://developer.apple.com/xcode/index.php), but in order to test your code on an iOS device and publish your games, you will need a developer account with Apple, which will cost you USD 99 a year. You can find more information on their website: https://developer.apple.com/
So, assuming you have an internet connection, and that Xcode is ready to rock, let's begin!
We start by downloading the framework:
Go to http://download.cocos2d-x.org/ and download the latest stable version of Cocos2d-x. For this book I'll be using version Cocos2d-2.0-x-2.0.4, which means the 2.0.4 C++ port of version 2.0 of Cocos2d.
Uncompress the files somewhere on your machine.
Open Terminal and type
cd(that iscdand a space).Drag the uncompressed folder you just downloaded to the Terminal window. You should see the path to the folder added to the command line. Hit return to go to that folder in Terminal.
Now type:
sudo ./install-templates-xcode.sh -u
Hit return again and you're done.
You have successfully installed the Cocos2d-x templates in your machine. With these in place, you can select the type of Cocos2d-x application you wish to build inside Xcode, and the templates will take care of copying all the necessary files into your application.
Next, open Xcode and select Create a new Xcode Project. You should see something like this:

So let's build our first application.
Open Xcode and select File | New | Project... and follow these steps:
In the dialogue box select cocos2d-x under the iOS menu and choose the
cocos2dxtemplate. Hit Next.Give the application a name, but not
HelloWorld. I'll show you why in a second. You will be then asked to select a place to save the project and you are done.Once your application is ready, click Run to build it. After that, this is what you should see in the simulator:

Note
When you run a cocos2d-x application in Xcode it is quite common for the program to post some warnings regarding your code, or most likely the frameworks. These will mostly reference deprecated methods, or statements that do not precisely follow more recent, and stricter rules of the current SDK. But that's okay. These warnings, though certainly annoying, can be ignored.
You created your first Cocos2d-x application using the cocos2dx template, sometimes referred to as the basic template.
The other template options include one with Box2D, one with Chipmunk (both related to physics simulation), one with JavaScript, and one with Lua.
The last two options allow you to code some or all of your game using those script languages instead of the native C++; and they work just as you would expect a scripting language to work, meaning the commands written in either Javascript or Lua are actually replaced and interpreted as C++ commands by the compiler.
Now if you look at the files created by the basic template you will see a HelloWorldScene class file. That's the reason I didn't want you to call your application HelloWorld, because I didn't want you to have the impression that the file name was based on your project name. It isn't. You will always get a HelloWorldScene file unless you change the template itself.
Now let's go over the sample application and its files:
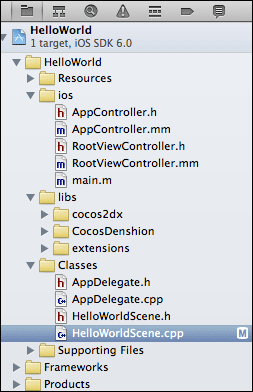
First you have the Resources folder, where you find the images used by the application.
The ios folder has the necessary underlying connections between your app and iOS. For other platforms, you will have their necessary linkage files in separate folders targeting their respective platform (like an android folder the Android platform, for instance.)
In the libs folder you have all the cocos2dx files, plus CocosDenshion files (for sound support) and a bunch of other extensions. Using a different template for your projects will result in a different folder structure here, based on what needs to be added to your project. So you will see a Box2D folder, for example, if you choose the Box2D template.
In the Classes folder you have your application. In here, everything is written in C++ and this is the home for the part of your code that will hopefully not need to change, however many platforms you target with your application.
Now let us go over the main classes of the basic application.
AppController and RootViewController are responsible for setting up OpenGL in iOS as well as telling the underlying operating system that your application is about to say Hello... To the World.
These classes are written with a mix of Objective-C and C++, as all the nice brackets and the .mm extensions show. You will change very little if anything in these classes; and again that will reflect in changes to the way iOS handles your application. So other targets would require the same instructions or none at all depending on the target.
In AppController for instance, I could add support for multitouch. And in RootViewController, I could limit the screen orientations supported by my application.
This class marks the first time your C++ app will talk to the underlying OS. It attempts to map the main events that mobile devices wants to dispatch and listen to. From here on, all your application will be written in C++ (unless you need something else).
In AppDelegate you should setup CCDirector (the cocos2d-x all powerful singleton manager object) to run your application just the way you want. You can:
Get rid of the application status information
Change the frame rate of your application
Tell
CCDirectorwhere your high definition images are, and where your standard definition images are, as well as which to useYou can change the overall scale of your application to suit different screens
The
AppDelegateclass is also the best place to start any preloading processAnd, most importantly, it is here you tell the
CCDirectorobject whatCCSceneto begin your application with
Here too you will handle what happens to your application if the OS decides to kill it, push it aside, or hang it upside down to dry. All you need to do is place your logic inside the correct event handler: applicationDidEnterBackground or applicationWillEnterForeground.
When you run the application you get a screen with the words Hello World and a bunch of numbers in one corner. These are the display stats you decided you wanted around in the AppDelegate class.
The actual screen is created by the oddly named HelloWorldScene class. It is a Layer class that creates its own scene (don't worry if you don't know what a Layer class is, or a Scene class, you will soon enough).
When it initializes, HelloWorldScene puts a button on screen that you can press to exit the application. The button is actually a Menu item, part of a Menu group consisting of one button, two image states for that button, and one callback event, triggered when the said button is pressed.
The Menu group automatically handles touch events targeting its members, so you don't get to see any of that code floating about.
There is also the necessary Label object to show the Hello World message and the background image.
If you never worked with either Cocos2d or Cocos2d-x before, the way the initial scene() method is instantiated may lead to dizziness. To recap, in AppDelegate you have:
CCScene *pScene = HelloWorld::scene();
pDirector->runWithScene(pScene);
CCDirector needs a CCScene object to run, which you can think of as being your application, basically. CCScene needs something to show, which in this case is a CCLayer class. CCScene is then said to contain a CCLayer class.
Here a CCScene object is created through a static method scene inside a CCLayer derived class. So the layer creates the scene, and the scene immediately adds the layer to itself. Huh?
Relax. This incestuous-like instantiation will most likely only happen once, and you have nothing to do with it when it happens. So you can easily ignore all these funny goings-on and look the other way. I promise instantiations will be much easier after this first one.
You open the test project just like you would do for any other Xcode project:
Go inside the folder you downloaded for the framework, and navigate to
samples/TestCpp/proj.ios/TestCpp.xcodeproj.Open that project in Xcode. When you run the project, you will see inside the simulator a long list of tests, all nicely organized by topic. Pick any one to review.
Better yet, navigate to
samples/TestCpp/Classesand if you have a program likeTextWrangleror some equivalent, you can open that entire directory inside a Disk Browser window and have all that information ready for referencing right at your desktop.
With the test samples you can visualize most features in Cocos2d-x and see what they do, as well as some of the ways you can initialize and customize them.
I will refer to the code found in the tests quite often. As usual with programming, there is always a different way to accomplish a given task, so sometimes after showing you one way, I'll refer to another one that you can find (and by then easily understand) inside the Test classes.
Now comes the part where you may need to spend a bit more money to get some extremely helpful tools. In this book's examples I use four of them:
A tool to help build sprite sheets: I'll use Texture Packer (http://www.codeandweb.com/texturepacker). There are other alternatives, like Zwoptex (http://zwopple.com/zwoptex/). And they usually offer some features for free.
A tool to help build particle effects: I'll use Particle Designer (http://www.71squared.com/en/particledesigner). Depending on your operating system you may find free tools online for this. Cocos2d-x comes bundled with some common particle effects that you can customize. But to do it blindly is a process I do not recommend.
A tool to help build bitmap fonts: I'll use Glyph Designer (http://www.71squared.com/en/glyphdesigner). But there are others: bmGlyph (which is not as expensive), FontBuilder (which is free). It is not extremely hard to build a Bitmap font by hand, not nearly as hard as building a particle effect from scratch, but doing it once is enough to convince you to get one of these tools fast.
A tool to produce sound effects: No contest. cfxr for Mac or the original sfxr for Windows. Both are free (http://www.drpetter.se/project_sfxr.html and http://thirdcog.eu/apps/cfxr respectively).
You just learned how to install Cocos2d-x templates and create a basic application. You also learned enough of the structure of a basic Cocos2d-x application to get started on building your first game.
Keep the Test classes by your side as you go over the examples in this book and you will be a Cocos2d-x pro in no time.
But first, let's go over a few things regarding the framework and its native language.