


In this chapter, we will cover the following topics:
Introduction
Drawing sprites
Coloring sprites
Animating sprites
Drawing OpenGL primitives
Playing video files
Grid, particle, and motion streak effects
Using Retina Display mode
1D and 2D Ease Actions
Rendering and texturing 3D Cubes
Rendering a texture filled polygon
Animating a texture filled polygon
Swapping palettes using layers
Swapping palettes using CCTexture2DMutable
Using AWTextureFilter for blur and font shadows
Taking and using screenshots
Using CCParallaxNode
Lighting using glColorMask
Cocos2d is first and foremost a rich graphical API which allows a game developer easy access to a broad range of functionality. In this chapter we will go over some more advanced features of Cocos2d and how you can use these features to serve a variety of different purposes. We'll also explain advanced techniques that are not yet part of the Cocos2d source.
For the purposes of this chapter Graphics can be considered an umbrella term. We will also go over advanced techniques using Actions and Particles.
The most fundamental task in 2D game development is drawing a sprite. Cocos2d provides the user with a lot of flexibility in this area. In this recipe we will cover drawing sprites using CCSprite, spritesheets, CCSpriteFrameCache, and CCSpriteBatchNode. We will also go over mipmapping
. To keep things fun and interesting, many recipes in this book will have a distinct theme. In this recipe we see a scene with Alice from Through The Looking Glass.

Tip
You can download the example code files for all Packt books you have purchased from your account at http://www.PacktPub.com. If you purchased this book elsewhere, you can visit http://www.PacktPub.com/support and register to have the files e-mailed directly to you.
Please refer to the project RecipeCollection01 for the full working code of this recipe.
Execute the following code:
@implementation Ch1_DrawingSprites
-(CCLayer*) runRecipe {
  /*** Draw a sprite using CCSprite ***/
  CCSprite *tree1 = [CCSprite spriteWithFile:@"tree.png"];

  //Position the sprite using the tree base as a guide (y anchor point = 0)
[tree1 setPosition:ccp(20,20)];
  tree1.anchorPoint = ccp(0.5f,0);
  [tree1 setScale:1.5f];
  [self addChild:tree1 z:2 tag:TAG_TREE_SPRITE_1];

  /*** Load a set of spriteframes from a PLIST file and draw one by name ***/

  //Get the sprite frame cache singleton
  CCSpriteFrameCache *cache = [CCSpriteFrameCache sharedSpriteFrameCache];

  //Load our scene sprites from a spritesheet
  [cache addSpriteFramesWithFile:@"alice_scene_sheet.plist"];

  //Specify the sprite frame and load it into a CCSprite
  CCSprite *alice = [CCSprite spriteWithSpriteFrameName:@"alice.png"];

  //Generate Mip Maps for the sprite
  [alice.texture generateMipmap];
  ccTexParams texParams = { GL_LINEAR_MIPMAP_LINEAR, GL_LINEAR, GL_CLAMP_TO_EDGE, GL_CLAMP_TO_EDGE };
  [alice.texture setTexParameters:&texParams];

  //Set other information.
  [alice setPosition:ccp(120,20)];
  [alice setScale:0.4f];
  alice.anchorPoint = ccp(0.5f,0);

  //Add Alice with a zOrder of 2 so she appears in front of other sprites
  [self addChild:alice z:2 tag:TAG_ALICE_SPRITE];

  //Make Alice grow and shrink.
  [alice runAction: [CCRepeatForever actionWithAction:
    [CCSequence actions:[CCScaleTo actionWithDuration:4.0f scale:0.7f], [CCScaleTo actionWithDuration:4.0f scale:0.1f], nil] ] ];

  /*** Draw a sprite CGImageRef ***/
  UIImage *uiImage = [UIImage imageNamed: @"cheshire_cat.png"];
  CGImageRef imageRef = [uiImage CGImage];
  CCSprite *cat = [CCSprite spriteWithCGImage:imageRef key:@"cheshire_cat.png"];
  [cat setPosition:ccp(250,180)];
  [cat setScale:0.4f];
  [self addChild:cat z:3 tag:TAG_CAT_SPRITE];

  /*** Draw a sprite using CCTexture2D ***/
  CCTexture2D *texture = [[CCTextureCache sharedTextureCache] addImage:@"tree.png"];
  CCSprite *tree2 = [CCSprite spriteWithTexture:texture];
  [tree2 setPosition:ccp(300,20)];
  tree2.anchorPoint = ccp(0.5f,0);
  [tree2 setScale:2.0f];
  [self addChild:tree2 z:2 tag:TAG_TREE_SPRITE_2];

  /*** Draw a sprite using CCSpriteFrameCache and CCTexture2D ***/
  CCSpriteFrame *frame = [CCSpriteFrame frameWithTexture:texture rect:tree2.textureRect];
  [[CCSpriteFrameCache sharedSpriteFrameCache] addSpriteFrame:frame name:@"tree.png"];
  CCSprite *tree3 = [CCSprite spriteWithSpriteFrame:[[CCSpriteFrameCache sharedSpriteFrameCache] spriteFrameByName:@"tree.png"]];
  [tree3 setPosition:ccp(400,20)];
  tree3.anchorPoint = ccp(0.5f,0);
  [tree3 setScale:1.25f];
  [self addChild:tree3 z:2 tag:TAG_TREE_SPRITE_3];

  /*** Draw sprites using CCBatchSpriteNode ***/

  //Clouds
  CCSpriteBatchNode *cloudBatch = [CCSpriteBatchNode batchNodeWithFile:@"cloud_01.png" capacity:10];
  [self addChild:cloudBatch z:1 tag:TAG_CLOUD_BATCH];
  for(int x=0; x<10; x++){
    CCSprite *s = [CCSprite spriteWithBatchNode:cloudBatch rect:CGRectMake(0,0,64,64)];
    [s setOpacity:100];
    [cloudBatch addChild:s];
    [s setPosition:ccp(arc4random()%500-50, arc4random()%150+200)];
  }

  //Middleground Grass
  int capacity = 10;
  CCSpriteBatchNode *grassBatch1 = [CCSpriteBatchNode batchNodeWithFile:@"grass_01.png" capacity:capacity];
  [self addChild:grassBatch1 z:1 tag:TAG_GRASS_BATCH_1];
  for(int x=0; x<capacity; x++){
    CCSprite *s = [CCSprite spriteWithBatchNode:grassBatch1 rect:CGRectMake(0,0,64,64)];
    [s setOpacity:255];
    [grassBatch1 addChild:s];
    [s setPosition:ccp(arc4random()%500-50, arc4random()%20+70)];
  }

  //Foreground Grass
  CCSpriteBatchNode *grassBatch2 = [CCSpriteBatchNode batchNodeWithFile:@"grass_01.png" capacity:10];
  [self addChild:grassBatch2 z:3 tag:TAG_GRASS_BATCH_2];
  for(int x=0; x<30; x++){
    CCSprite *s = [CCSprite spriteWithBatchNode:grassBatch2 rect:CGRectMake(0,0,64,64)];
    [s setOpacity:255];
    [grassBatch2 addChild:s];
    [s setPosition:ccp(arc4random()%500-50, arc4random()%40-10)];
  }

  /*** Draw colored rectangles using a 1px x 1px white texture ***/

  //Draw the sky using blank.png
  [self drawColoredSpriteAt:ccp(240,190) withRect:CGRectMake(0,0,480,260) withColor:ccc3(150,200,200) withZ:0];

  //Draw the ground using blank.png
  [self drawColoredSpriteAt:ccp(240,30) withRect:CGRectMake(0,0,480,60) withColor:ccc3(80,50,25) withZ:0];

  return self;
}

-(void) drawColoredSpriteAt:(CGPoint)position withRect:(CGRect)rect withColor:(ccColor3B)color withZ:(float)z {
  CCSprite *sprite = [CCSprite spriteWithFile:@"blank.png"];
  [sprite setPosition:position];
  [sprite setTextureRect:rect];
  [sprite setColor:color];
  [self addChild:sprite];

  //Set Z Order
  [self reorderChild:sprite z:z];
}

@endThis recipe takes us through most of the common ways of drawing sprites:
Creating a CCSprite from a file:
First, we have the simplest way to draw a sprite. This involves using the
CCSpriteclass method as follows:+(id)spriteWithFile:(NSString*)filename;
This is the most straightforward way to initialize a sprite and is adequate for many situations.
Other ways to load a sprite from a file:
After this, we will see examples of
CCSpritecreation usingUIImage/CGImageRef, CCTexture2D, and aCCSpriteFrameinstantiated using aCCTexture2Dobject.CGImageRefsupport allows you to tie Cocos2d into other frameworks and toolsets.CCTexture2Dis the underlying mechanism for texture creation.Loading spritesheets using CCSpriteFrameCache:
Next, we will see the most powerful way to use sprites, the
CCSpriteFrameCacheclass. Introduced inCocos2d-iPhone v0.99, theCCSpriteFrameCachesingleton is a cache of all sprite frames. Using a spritesheet and its associatedPLISTfile (created using Zwoptex, more on this later) we can load multiple sprites into the cache. From here we can createCCSpriteobjects with sprites from the cache:+(id)spriteWithSpriteFrameName:(NSString*)filename;
Mipmapping:
Mipmapping allows you to scale a texture or to zoom in or out of a scene without aliasing your sprites. When we scale Alice down to a small size, aliasing will inevitably occur. With mipmapping turned on, Cocos2d dynamically generates lower resolution textures to smooth out any pixelation at smaller scales. Go ahead and comment out the following lines:
[alice.texture generateMipmap];
  ccTexParams texParams = { GL_LINEAR_MIPMAP_LINEAR, GL_LINEAR, GL_CLAMP_TO_EDGE, GL_CLAMP_TO_EDGE };
  [alice.texture setTexParameters:&texParams];
Now you should see this pixelation as Alice gets smaller.
Drawing many derivative sprites with CCSpriteBatchNode:
The
CCSpriteBatchNodeclass, added inv0.99.5, introduces an efficient way to draw and re-draw the same sprite over and over again. A batch node is created with the following method:CCSpriteBatchNode *cloudBatch = [CCSpriteBatchNode batchNodeWithFile:@"cloud_01.png" capacity:10];
Then, you create as many sprites as you want using the follow code:
CCSprite *s = [CCSprite spriteWithBatchNode:cloudBatch rect:CGRectMake(0,0,64,64)];
  [cloudBatch addChild:s];
Setting the capacity to the number of sprites you plan to draw tells Cocos2d to allocate that much space. This is yet another tweak for extra efficiency, though it is not absolutely necessary that you do this. In these three examples we draw 10 randomly placed clouds and 60 randomly placed bits of grass.
Drawing colored rectangles:
Finally, we have a fairly simple technique that has a variety of uses. By drawing a sprite with a blank 1px by 1px white texture and then coloring it and setting its
textureRectproperty we can create very useful colored bars:CCSprite *sprite = [CCSprite spriteWithFile:@"blank.png"]; [sprite setTextureRect:CGRectMake(0,0,480,320)]; [sprite setColor:ccc3(255,128,0)];
In this example we have used this technique to create very simple ground and sky backgrounds.
In the previous recipe we used colored rectangles to draw both the ground and the sky. The ability to set texture color and opacity are simple tools which, if used properly, can create very cool effects. In this recipe we will create a cinematic scene where two samurai face each other with glowing swords.

Please refer to the project RecipeCollection01 for full working code of this recipe. Also, note that some code has been omitted for brevity.
#import "CCGradientLayer.h

@implementation Ch1_ColoringSprites

-(CCLayer*) runRecipe {
  [self initButtons];

  //The Fade Scene Sprite
  CCSprite *fadeSprite = [CCSprite spriteWithFile:@"blank.png"];
  [fadeSprite setOpacity:0];
  [fadeSprite setPosition:ccp(240,160)];
  [fadeSprite setTextureRect:CGRectMake(0,0,480,320)];
  [self addChild:fadeSprite z:3 tag:TAG_FADE_SPRITE];

  //Add a gradient below the mountains
//CCGradientDirectionT_B is an enum provided by CCGradientLayer
  CCGradientLayer *gradientLayer = [CCGradientLayer layerWithColor:
 ccc4(61,33,62,255) toColor:ccc4(65,89,54,255) withDirection:CCGradientDirectionT_B width:480 height:100];
  [gradientLayer setPosition:ccp(0,50)];
  [self addChild:gradientLayer z:0 tag:TAG_GROUND_GRADIENT];

  //Add a sinister red glow gradient behind the evil samurai
  CCGradientLayer *redGradient = [CCGradientLayer
 layerWithColor:ccc4(0,0,0,0) toColor:ccc4(255,0,0,100)
 withDirection:CCGradientDirectionT_B width:200 height:200];
  [redGradient setPosition:ccp(280,60)];
  [redGradient setRotation:-90];
  [self addChild:redGradient z:2 tag:TAG_RED_GRADIENT];

  // Make the swords glow
  [self glowAt:ccp(230,280) withScale:CGSizeMake(3.0f, 11.0f)
  withColor:ccc3(0,230,255) withRotation:45.0f withSprite:goodSamurai];
  [self glowAt:ccp(70,280) withScale:CGSizeMake(3.0f, 11.0f)
  withColor:ccc3(255,200,2) withRotation:-45.0f withSprite:evilSamurai];

  return self;
}

-(void) initButtons {
  [CCMenuItemFont setFontSize:16];

  //'Fade To Black' button
  CCMenuItemFont* fadeToBlack = [CCMenuItemFont itemFromString:@"FADE TO BLACK"
 target:self selector:@selector(fadeToBlackCallback:)];
  CCMenu *fadeToBlackMenu = [CCMenu menuWithItems:fadeToBlack, nil];
    fadeToBlackMenu.position = ccp( 180 , 20 );
    [self addChild:fadeToBlackMenu z:4 tag:TAG_FADE_TO_BLACK];
}

/* Fade the scene to black */
-(void) fadeToBlackCallback:(id)sender {
  CCSprite *fadeSprite = [self getChildByTag:TAG_FADE_SPRITE];
  [fadeSprite stopAllActions];
  [fadeSprite setColor:ccc3(0,0,0)];
  [fadeSprite setOpacity:0.0f];
  [fadeSprite runAction:
  [CCSequence actions:[CCFadeIn actionWithDuration:2.0f], [CCFadeOut actionWithDuration:2.0f], nil] ];
}

/* Create a glow effect */
-(void) glowAt:(CGPoint)position withScale:(CGSize)size
withColor:(ccColor3B)color withRotation:(float)rotation
withSprite:(CCSprite*)sprite {
  CCSprite *glowSprite = [CCSprite spriteWithFile:@"fire.png"];
  [glowSprite setColor:color];
  [glowSprite setPosition:position];
  [glowSprite setRotation:rotation];
  [glowSprite setBlendFunc: (ccBlendFunc) { GL_ONE, GL_ONE }];
  [glowSprite runAction: [CCRepeatForever actionWithAction:
    [CCSequence actions:[CCScaleTo actionWithDuration:0.9f
   scaleX:size.width scaleY:size.height], [CCScaleTo
   actionWithDuration:0.9f scaleX:size.width*0.75f
   scaleY:size.height*0.75f], nil] ] ];
  [glowSprite runAction: [CCRepeatForever actionWithAction:
    [CCSequence actions:[CCFadeTo actionWithDuration:0.9f opacity:150], [CCFadeTo actionWithDuration:0.9f opacity:255], nil] ] ];

  [sprite addChild:glowSprite];
}

@end
This recipe shows a number of color based techniques.
Setting sprite color:
The simplest use of color involves setting the color of a sprite using the following method:
-(void) setColor:(ccColor3B)color;
Setting sprite color effectively reduces the color you can display but it allows some programmatic flexibility in drawing. In this recipe we use
setColorfor a number of things, including drawing a blue sky, a yellow sun, black "dramatic movie bars", and more.ccColor3Bis a C struct which contains threeGLubytevariables. Use the following helper macro to createccColor3Bstructures:ccColor3B ccc3(const GLubyte r, const GLubyte g, const GLubyte b);
Cocos2d also specifies a number of pre-defined colors as constants. These include the following:
ccWHITE, ccYELLOW, ccBLUE, ccGREEN, ccRED,
ccMAGENTA, ccBLACK, ccORANGE, ccGRAY
Fading to a color:
To fade a scene to a specific color we use the
blank.pngtechnique we went over in the last recipe. We first draw a sprite as large as the screen, then color the sprite to the color we want to fade to, and then finally run aCCFadeInaction on the sprite to fade to that color:[fadeSprite setColor:ccc3(255,255,255)]; [fadeSprite setOpacity:0.0f]; [fadeSprite runAction: [CCFadeIn actionWithDuration:2.0f] ];
Using CCGradientLayer:
Using the
CCGradientLayerclass we can programmatically create gradients. To make the mountains in the background fade into the ground the two samurai are standing on we created a gradient using this method:CCGradientLayer *gradientLayer = [CCGradientLayer layerWithColor:ccc4(61,33,62,255) toColor:ccc4(65,89,54,255) withDirection:CCGradientDirectionT_B width:480 height:100]; [gradientLayer setPosition:ccp(0,50)]; [self addChild:gradientLayer z:0 tag:TAG_GROUND_GRADIENT];
Because
CCGradientLayerlets you control opacity as well as color, it has many uses. As you can see there is also a sinister red glow behind the evil samurai.Making a sprite glow:
To make the swords in the demo glow we use subtle color manipulation, additive blending and fading and scaling actions. First we load the fire.png sprite supplied by Cocos2d. By changing its X and Y scale independently we can make it thinner or fatter. Once you have the desired scale ratio (in this demo we use x:y 3:11 because the sword is so thin) you can constantly scale and fade the sprite in and out to give some life to the effect. You also need to set the blend function to
{ GL_ONE, GL_ONE }for additive blending. Finally this effect sprite is added to the actual sprite to make it seem like it glows.CCSprite *glowSprite = [CCSprite spriteWithFile:@"fire.png"]; [glowSprite setColor:color]; [glowSprite setPosition:position]; [glowSprite setRotation:rotation]; [glowSprite setBlendFunc: (ccBlendFunc) { GL_ONE, GL_ONE }]; [glowSprite runAction: [CCRepeatForever actionWithAction: [CCSequence actions:[CCScaleTo actionWithDuration:0.9f scaleX:size.width scaleY:size.height], [CCScaleTo actionWithDuration:0.9f scaleX:size.width*0.75f scaleY:size.height*0.75f], nil] ] ]; [glowSprite runAction: [CCRepeatForever actionWithAction: [CCSequence actions:[CCFadeTo actionWithDuration:0.9f opacity:150], [CCFadeTo actionWithDuration:0.9f opacity:255], nil] ] ]; [sprite addChild:glowSprite];
Now it is time to add some animation to our sprites. One thing that should be stressed about animation is that it is only as complicated as you make it. In this recipe we will use very simple animation to create a compelling effect. We will create a scene where bats fly around a creepy looking castle. I've also added a cool lightning effect based on the technique used to make the swords glow in the previous recipe.

Please refer to the project RecipeCollection01 for full working code of this recipe. Also note that some code has been omitted for brevity.
Execute the following code:
//SimpleAnimObject.h
@interface SimpleAnimObject : CCSprite {
  int animationType;
  CGPoint velocity;
}

@interface Ch1_AnimatingSprites {
  NSMutableArray *bats;
  CCAnimation *batFlyUp;
  CCAnimation *batGlideDown;
  CCSprite *lightningBolt;
  CCSprite *lightningGlow;
  int lightningRemoveCount;
}

-(CCLayer*) runRecipe {
  //Add our PLIST to the SpriteFrameCache
  [[CCSpriteFrameCache sharedSpriteFrameCache] addSpriteFramesWithFile:@"simple_bat.plist"];

  //Add a lightning bolt
  lightningBolt = [CCSprite spriteWithFile:@"lightning_bolt.png"];
  [lightningBolt setPosition:ccp(240,160)];
  [lightningBolt setOpacity:64];
  [lightningBolt retain];

  //Add a sprite to make it light up other areas.
  lightningGlow = [CCSprite spriteWithFile:@"lightning_glow.png"];
  [lightningGlow setColor:ccc3(255,255,0)];
  [lightningGlow setPosition:ccp(240,160)];
  [lightningGlow setOpacity:100];
  [lightningGlow setBlendFunc: (ccBlendFunc) { GL_ONE, GL_ONE }];
  [lightningBolt addChild:lightningGlow];

  //Set a counter for lightning duration randomization
  lightningRemoveCount = 0;

  //Bats Array Initialization
  bats = [[NSMutableArray alloc] init];

  //Add bats using a batch node.
  CCSpriteBatchNode *batch1 = [CCSpriteBatchNode batchNodeWithFile:@"simple_bat.png" capacity:10];
  [self addChild:batch1 z:2 tag:TAG_BATS];

  //Make them start flying up.
  for(int x=0; x<10; x++){
    //Create SimpleAnimObject of bat
    SimpleAnimObject *bat = [SimpleAnimObject spriteWithBatchNode:batch1 rect:CGRectMake(0,0,48,48)];
    [batch1 addChild:bat];
    [bat setPosition:ccp(arc4random()%400+40, arc4random()%150+150)];

    //Make the bat fly up. Get the animation delay (flappingSpeed).
    float flappingSpeed = [self makeBatFlyUp:bat];

    //Base y velocity on flappingSpeed.
    bat.velocity = ccp((arc4random()%1000)/500 + 0.2f, 0.1f/flappingSpeed);

    //Add a pointer to this bat object to the NSMutableArray
    [bats addObject:[NSValue valueWithPointer:bat]];
    [bat retain];

    //Set the bat's direction based on x velocity.
    if(bat.velocity.x > 0){
      bat.flipX = YES;
    }
  }

  //Schedule physics updates
  [self schedule:@selector(step:)];

  return self;
}

-(float)makeBatFlyUp:(SimpleAnimObject*)bat {
  CCSpriteFrameCache * cache = [CCSpriteFrameCache sharedSpriteFrameCache];

  //Randomize animation speed.
  float delay = (float)(arc4random()%5+5)/80;
  CCAnimation *animation = [[CCAnimation alloc] initWithName:@"simply_bat_fly" delay:delay];

  //Randomize animation frame order.
  int num = arc4random()%4+1;
  for(int i=1; i<=4; i+=1){
    [animation addFrame:[cache spriteFrameByName:[NSString stringWithFormat:@"simple_bat_0%i.png",num]]];
    num++;
    if(num > 4){ num = 1; }
  }

  //Stop any running animations and apply this one.
  [bat stopAllActions];
  [bat runAction:[CCRepeatForever actionWithAction: [CCAnimate actionWithAnimation:animation]]];

  //Keep track of which animation is running.
  bat.animationType = BAT_FLYING_UP;

  return delay;  //We return how fast the bat is flapping.
}

-(void)makeBatGlideDown:(SimpleAnimObject*)bat {
  CCSpriteFrameCache * cache = [CCSpriteFrameCache sharedSpriteFrameCache];

  //Apply a simple single frame gliding animation.
  CCAnimation *animation = [[CCAnimation alloc] initWithName:@"simple_bat_glide" delay:100.0f];
  [animation addFrame:[cache spriteFrameByName:@"simple_bat_01.png"]];

  //Stop any running animations and apply this one.
  [bat stopAllActions];
  [bat runAction:[CCRepeatForever actionWithAction: [CCAnimate actionWithAnimation:animation]]];

  //Keep track of which animation is running.
  bat.animationType = BAT_GLIDING_DOWN;
}

-(void)step:(ccTime)delta {
  CGSize s = [[CCDirector sharedDirector] winSize];
  for(id key in bats){
    //Get SimpleAnimObject out of NSArray of NSValue objects.
    SimpleAnimObject *bat = [key pointerValue];

    //Make sure bats don't fly off the screen
    if(bat.position.x > s.width){
      bat.velocity = ccp(-bat.velocity.x, bat.velocity.y);
      bat.flipX = NO;
    }else if(bat.position.x < 0){
      bat.velocity = ccp(-bat.velocity.x, bat.velocity.y);
      bat.flipX = YES;
    }else if(bat.position.y > s.height){
      bat.velocity = ccp(bat.velocity.x, -bat.velocity.y);
      [self makeBatGlideDown:bat];
    }else if(bat.position.y < 0){
      bat.velocity = ccp(bat.velocity.x, -bat.velocity.y);
      [self makeBatFlyUp:bat];
    }

    //Randomly make them fly back up
    if(arc4random()%100 == 7){
      if(bat.animationType == BAT_GLIDING_DOWN){ [self makeBatFlyUp:bat]; bat.velocity = ccp(bat.velocity.x, -bat.velocity.y); }
      else if(bat.animationType == BAT_FLYING_UP){ [self makeBatGlideDown:bat]; bat.velocity = ccp(bat.velocity.x, -bat.velocity.y); }
    }

    //Update bat position based on direction
    bat.position = ccp(bat.position.x + bat.velocity.x, bat.position.y + bat.velocity.y);
  }

  //Randomly make lightning strike
  if(arc4random()%70 == 7){
    if(lightningRemoveCount < 0){
      [self addChild:lightningBolt z:1 tag:TAG_LIGHTNING_BOLT];
      lightningRemoveCount = arc4random()%5+5;
    }
  }

  //Count down
  lightningRemoveCount -= 1;

  //Clean up any old lightning bolts
  if(lightningRemoveCount == 0){
    [self removeChildByTag:TAG_LIGHTNING_BOLT cleanup:NO];
  }
}

@endThis recipe shows us how to structure animation based classes through the use of SimpleAnimObject:
Animated object class structure:
When switching from one animation to another it is often important to keep track of what state the animated object is in. In our example we use
SimpleAnimObject, which keeps an arbitraryanimationTypevariable. We also maintain a velocity variable that has a Y scalar value that is inversely proportional to the animation frame delay:@interface SimpleAnimObject : CCSprite { int animationType; CGPoint velocity; }Depending on how in-depth you want your animation system to be you should maintain more information such as, for example, a pointer to the running
CCAnimationinstance, frame information, and physical bodies.
As you get more involved with Cocos2d game development you will become more and more tempted to use asynchronous actions
for gameplay logic and AI. Derived from the CCAction class, these actions can be used for everything from moving a CCNode using CCMoveBy to animating a CCSprite using CCAnimate. When an action is run, an asynchronous timing mechanism is maintained in the background. First time game programmers often over-rely on this feature. The extra overhead required by this technique can multiply quickly when multiple actions are being run. In the following example we have used a simple integer timer that allows us to
regulate how long lightning lasts onscreen:
  //Randomly make lightning strike
  if(arc4random()%70 == 7){
    if(lightningRemoveCount < 0){
      [self addChild:lightningBolt z:1 tag:TAG_LIGHTNING_BOLT];
      lightningRemoveCount = arc4random()%5+5;
    }
  }

  //Count down
  lightningRemoveCount -= 1;

  //Clean up any old lightning bolts
  if(lightningRemoveCount == 0){
    [self removeChildByTag:TAG_LIGHTNING_BOLT cleanup:NO];
  }
Synchronous timers like the one shown in the preceding code snippet are often, but not always, preferable to asynchronous actions. Keep this in mind as your games grow in size and scope.
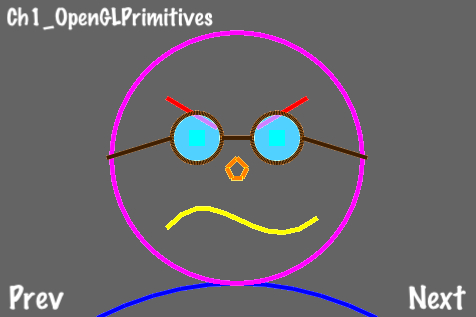
Sometimes in 2D game development we need to make use of good old-fashioned OpenGL primitives. With these we can make minimaps, heads up displays, and special effects like bullet tracers and lightning blasts to name a few. In the following scene I've created a simple figure using all of the primitive drawing functions supplied by Cocos2d as well as one I've tweaked and added.
/* Create a solid circle */
void ccDrawSolidCircle( CGPoint center, float r, float a, NSUInteger segs, BOOL drawLineToCenter)
{
  //Check to see if  we need to draw a line to the center
  int additionalSegment = 1;
  if (drawLineToCenter)
    additionalSegment++;

  const float coef = 2.0f * (float)M_PI/segs;

  GLfloat *vertices = calloc( sizeof(GLfloat)*2*(segs+2), 1);
  if( ! vertices )
    return;

  //Calculate line segments
  for(NSUInteger i=0;i<=segs;i++)
  {
    float rads = i*coef;
    GLfloat j = r * cosf(rads + a) + center.x;
    GLfloat k = r * sinf(rads + a) + center.y;

    vertices[i*2] = j * CC_CONTENT_SCALE_FACTOR();
    vertices[i*2+1] =k * CC_CONTENT_SCALE_FACTOR();
  }
  vertices[(segs+1)*2] = center.x * CC_CONTENT_SCALE_FACTOR();
  vertices[(segs+1)*2+1] = center.y * CC_CONTENT_SCALE_FACTOR();

  //Draw our solid polygon
  glDisable(GL_TEXTURE_2D);
  glDisableClientState(GL_TEXTURE_COORD_ARRAY);
  glDisableClientState(GL_COLOR_ARRAY);

  glVertexPointer(2, GL_FLOAT, 0, vertices);
  glDrawArrays(GL_TRIANGLE_FAN, 0, segs+additionalSegment);

  glEnableClientState(GL_COLOR_ARRAY);
  glEnableClientState(GL_TEXTURE_COORD_ARRAY);
  glEnable(GL_TEXTURE_2D);

  //Free up memory
  free( vertices );
}

@implementation ShapeLayer

-(void) draw {
  //Set line width.
  glLineWidth(4.0f);

  //Set point size
  glPointSize(16);

  //Enable line smoothing
  glEnable(GL_LINE_SMOOTH);

  //Draw a blue quadratic bezier curve
  glColor4ub(0, 0, 255, 255);
  ccDrawQuadBezier(ccp(100,0), ccp(240,70), ccp(380,0), 10);

  //Draw a hollow purple circle
  glColor4ub(255, 0, 255, 255);
  ccDrawCircle(ccp(240,160), 125.0f, 0.0f, 100, NO);

  //Draw a solid red lines
  glColor4ub(255, 0, 0, 255);
  ccDrawLine(ccp(170,220), ccp(220,190));
  ccDrawLine(ccp(260,190), ccp(310,220));

  //Draw a green point
  glColor4ub(0, 255, 0, 255);
  ccDrawPoint(ccp(200,180));
  ccDrawPoint(ccp(280,180));

  //Draw a turquoise solid circle
  glColor4ub(0, 128, 255, 50);
  ccDrawSolidCircle(ccp(200,180), 25.0f, 0.0f, 20, NO);
  ccDrawSolidCircle(ccp(280,180), 25.0f, 0.0f, 20, NO);

  //Draw a brown hollow circle
  glColor4ub(64,32, 0, 255);
  ccDrawCircle(ccp(200,180), 25.0f, 0.0f, 100, NO);
  ccDrawCircle(ccp(280,180), 25.0f, 0.0f, 100, NO);

  //Draw brown lines
  glColor4ub(64,32, 0, 255);
  ccDrawLine(ccp(225,180), ccp(255,180));
  ccDrawLine(ccp(305,180), ccp(370,160));
  ccDrawLine(ccp(175,180), ccp(110,160));

  //Draw an orange polygon
  glColor4ub(255, 128, 0, 255);
  CGPoint vertices[5]={ ccp(230,150),ccp(240,160),ccp(250,150),ccp(245,140),ccp(235,140) };
  ccDrawPoly(vertices, 5, YES);

  //Draw a yellow cubic bezier curve
  glColor4ub(255, 255, 0, 255);
  ccDrawCubicBezier(ccp(170,90), ccp(220,150), ccp(260,50), ccp(320,100), 10);

  //Restore original values
  glLineWidth(1);
  glDisable(GL_LINE_SMOOTH);
  glColor4ub(255,255,255,255);
  glPointSize(1);
}

@end

-(CCLayer*) runRecipe {
  ShapeLayer *layer = [[ShapeLayer alloc] init];
  [layer setPosition:ccp(0,0)];
  [self addChild:layer z:2 tag:0];

  return self;
}This recipe shows us how to use each primitive drawing function:
In order to use OpenGL drawing routines we must override the following method of a
CCNode:-(void) draw;
As stated in
CCNode.h, overriding this method gives us control of underlying OpenGL drawing routines. The following OpenGL statements are implicit:glEnableClientState(GL_VERTEX_ARRAY); glEnableClientState(GL_COLOR_ARRAY); glEnableClientState(GL_TEXTURE_COORD_ARRAY); glEnable(GL_TEXTURE_2D);
To overload this method we create a class named
ShapeLayerwhich inherits fromCCLayer, and therefore fromCCNode. Once attached to the scene this overriddendrawmethod will be called once every cycle.The following primitive drawing functions are available in Cocos2d:
  void ccDrawPoint( CGPoint point );
void ccDrawPoints( const CGPoint *points, NSUInteger numberOfPoints );
void ccDrawLine( CGPoint origin, CGPoint destination );
void ccDrawPoly( const CGPoint *vertices, NSUInteger numOfVertices, BOOL closePolygon );
void ccDrawCircle( CGPoint center, float radius, float angle, NSUInteger segments, BOOL drawLineToCenter);
void ccDrawQuadBezier(CGPoint origin, CGPoint control, CGPoint destination, NSUInteger segments);
void ccDrawCubicBezier(CGPoint origin, CGPoint control1, CGPoint control2, CGPoint destination, NSUInteger segments);
On top of all this we have tweaked
ccDrawCircleto createccDrawSolidCircleas follows:void ccDrawSolidCircle( CGPoint center, float r, float a, NSUInteger segs, BOOL drawLineToCenter);
Because we are controlling these OpenGL render calls for each frame this technique works well when used in a real-time minimap. We will explore this in a later recipe.
If you are planning to use primitive drawing extensively you may want to consider using the Vertex Buffer Object OpenGL extension
. Using the GL functions glGenBuffers, glBindBuffer, and glBufferData you can put vertex and other information into video memory rather than system memory. This can drastically improve performance depending on the situation. For more information view the section Best Practices for Working with Vertex Data in the Apple Developer document OpenGL ES Programming Guide for iOS located at http://developer.apple.com/library/ios/#documentation/3DDrawing/Conceptual/OpenGLES_ProgrammingGuide/TechniquesforWorkingwithVertexData/TechniquesforWorkingwithVertexData.html.
The cutscene is a concept that has existed since the early days of video games. Cutscenes are usually interspersed in between gameplay segments or shown when a game is loading. For more complex cutscenes it is often advantageous to use full motion video. In this recipe we will see how to insert a video into our game.

This recipe requires the extra step of linking the MediaPlayer iOS framework to our project:
Right-click your project under Groups & Files.
Click Add | Existing Frameworks
Under iOS SDK select MediaPlayer.framework
Keep in mind that RecipeCollection01 already has this library linked.
Now, execute the following code:
#import <MediaPlayer/MediaPlayer.h>

@interface Ch1_PlayingVideoFiles {
  MPMoviePlayerController *moviePlayer;
}

@implementation Ch1_PlayingVideoFiles

-(CCLayer*) runRecipe {
  //Load our video file
  NSURL *url = [NSURL fileURLWithPath:[[NSBundle mainBundle] pathForResource:@"example_vid" ofType:@"mov"]];

  //Create a MPMoviePlayerController object
  moviePlayer = [[MPMoviePlayerController alloc] initWithContentURL:url];

  //Register to receive a notification when the movie has finished playing.
  [[NSNotificationCenter defaultCenter] addObserver:self
    selector:@selector(moviePlayBackDidFinish:)
    name:MPMoviePlayerPlaybackDidFinishNotification
    object:moviePlayer];

  //Set the movie's control style and whether or not it should automatically play.
  if ([moviePlayer respondsToSelector:@selector(setFullscreen:animated:)]) {
    //Use the new 3.2 style API.
    moviePlayer.controlStyle = MPMovieControlStyleNone;
    moviePlayer.shouldAutoplay = YES;

    CGSize winSize = [[CCDirector sharedDirector] winSize];
    moviePlayer.view.frame = CGRectMake(45, 50, winSize.width-90, winSize.height-100);
    [[[CCDirector sharedDirector] openGLView] addSubview:moviePlayer.view];
  } else {
    //Use the old 2.0 style API.
    moviePlayer.movieControlMode = MPMovieControlModeHidden;
    [self playMovie];
  }

  return self;
}

-(void)moviePlayBackDidFinish:(NSNotification*)notification {
  //If playback is finished we stop the movie.
  [self stopMovie];
}

-(void)playMovie {
  //We do not play the movie if it is already playing.
  MPMoviePlaybackState state = moviePlayer.playbackState;
  if(state == MPMoviePlaybackStatePlaying) {
    NSLog(@"Movie is already playing.");
    return;
  }

  [moviePlayer play];
}

-(void)stopMovie {
  //We do not stop the movie if it is already stopped.
  MPMoviePlaybackState state = moviePlayer.playbackState;
  if(state == MPMoviePlaybackStateStopped) {
    NSLog(@"Movie is already stopped.");
    return;
  }

  //Since playback has finished we remove the observer.
  [[NSNotificationCenter defaultCenter] removeObserver:self
    name:MPMoviePlayerPlaybackDidFinishNotification
        object:moviePlayer];

  //If the moviePlayer.view was added to the openGL view, it needs to be removed.
  if ([moviePlayer respondsToSelector:@selector(setFullscreen:animated:)]) {
    [moviePlayer.view removeFromSuperview];
  }
}

-(void)cleanRecipe {
  [super cleanRecipe];
  [self stopMovie];
  [moviePlayer release];
}

@endThis recipe shows us how to load, play, and stop a movie.
Using MPMoviePlayerController:
This recipe is merely the tip of the iceberg regarding movie playback. Movies can also be played back in fullscreen mode, in portrait mode, and using a variety of other options. Please refer to official Apple documentation when customizing and/or adding to this technique.
The observer pattern is not used very often while doing Cocos2d programming, but it is a powerful mechanism and it is the recommended way of knowing when your video has finished playback. You can read more about observers by referring to the official
Objective-Cdocumentation.According to Apple documentation it is recommended that you compress your movies using
H.264/MPEG-4for video,AACaudio and one of the following file formats:MOV,MP4,MPV,3GP.It is also recommended that your movies be no larger than
640x480and run no faster than30 FPS.The movie used in the recipe was created and encoded using Apple's iMovie software.
For more information please consult official Apple iOS SDK documentation.
Cocos2d comes equipped with a variety of easy to use special effects. Here, we will only briefly go over all of the effects as they are fairly straightforward and are well covered in other texts.

To get grid effects to show up properly in your game you first need to set the EAGLView pixelFormat to kEAGLColorFormatRGBA8 (it is set to kEAGLColorFormatRGB565 by default).
Do this by going into your project file's ${PROJECT_NAME}AppDelegate.m file and changing the following code:
  EAGLView *glView = [EAGLView viewWithFrame:[window bounds]
                   pixelFormat: kEAGLColorFormatRGB565
                   depthFormat:0
            ];
Change it to this:
  EAGLView *glView = [EAGLView viewWithFrame:[window bounds]
                   pixelFormat: kEAGLColorFormatRGBA8
                   depthFormat:0
            ];
Then, execute the following code:
//Custom particle effect
@implementation ParticleWaterfall

-(id)init {
  return [self initWithTotalParticles:400];
}
-(id)initWithTotalParticles:(int)p {
  if(self != [super initWithTotalParticles: p])
    return nil;

  //Angle
  angle = 270;
  angleVar = 12;

  //Emitter position
  self.position = ccp(160, 60);
  posVar = ccp(16, 4);

  //Life of particles
  life = 2;
  lifeVar = 0.25f;

  //Speed of particles
  self.speed = 100;
  self.speedVar = 20;
  self.gravity = ccp(self.gravity.x, -5);

  //Size of particles
  startSize = 35.0f;
  endSize = 100.0f;

  //Color of particles
  startColor = ccc4(0.4f, 0.4f, 1.0f, 0.6f);
  startColorVar = ccc4(0,0,0,0);
  endColor = ccc4(0.5f, 0.5f, 0.5f, 0);
  endColorVar = ccc4(0,0,0,0);

  //Additive
  self.blendAdditive = NO;

  return self;
}

@end

@interface Ch1_GridParticleMotionEffects
{
  //Variables for motion streak effect
  CCSprite *rocket;
  CCMotionStreak *streak;
  CGPoint rocketDirection;
}

@implementation Ch1_GridParticleMotionEffects

-(CCLayer*) runRecipe {
  CGSize s = [[CCDirector sharedDirector] winSize];

  /*** Grid effect demo ***/

  //Create a CCSprite
  CCSprite *sprite = [CCSprite spriteWithFile:@"colorable_sprite.png"];
  [sprite setPosition:ccp(240,160)];
  [self addChild:sprite z:1 tag:TAG_SPRITE];

  //Create a grid effect
  CCAction *gridEffect = [CCShaky3D actionWithRange:5 shakeZ:YES grid:ccg(15,10) duration:10];

  //Run the effect
  [sprite runAction:gridEffect];

  /*** Particle effect demo ***/

//Create a simple fire particle effect
CCNode *fireEffect = [CCParticleFire node];
[self addChild:fireEffect z:1 tag:TAG_FIRE_EFFECT];

  //Create a waterfall particle effect
  CCNode *waterfallEffect = [ParticleWaterfall node];
  [self addChild:waterfallEffect z:1 tag:TAG_WATERFALL_EFFECT];

  /*** Motion streak demo ***/

  //Set the rocket initially in a random direction.
  rocketDirection = ccp(arc4random()%4+1,arc4random()%4+1);

  //Add the rocket sprite.
  rocket = [CCSprite spriteWithFile:@"rocket.png"];
  [rocket setPosition:ccp(s.width/2, s.height/2)];
  [rocket setScale:0.5f];
  [self addChild:rocket];

  //Create the streak object and add it to the scene.
  streak = [CCMotionStreak streakWithFade:1 minSeg:1 image:@"streak.png" width:32 length:32 color:ccc4(255,255,255,255)];
  [self addChild:streak];

  streak.position = ccp(s.width/2, s.height/2);

  [self schedule:@selector(step:)];

  return self;
}

-(void)step:(ccTime)delta {
  CGSize s = [[CCDirector sharedDirector] winSize];

  //Make rocket bounce off walls
  if(rocket.position.x > s.width || rocket.position.x < 0){
    rocketDirection = ccp(-rocketDirection.x, rocketDirection.y);
  }
  else if(rocket.position.y > s.height || rocket.position.y < 0){
    rocketDirection = ccp(rocketDirection.x, -rocketDirection.y);
  }

  //Slowly turn the rocket
  rocketDirection = ccp(rocketDirection.x, rocketDirection.y+0.05f);

  //Update rocket position based on direction
  rocket.position = ccp(rocket.position.x + rocketDirection.x, rocket.position.y + rocketDirection.y);
  [streak setPosition:rocket.position];

  //Set the rocket's rotation
  [rocket setRotation: radiansToDegrees(vectorToRadians(rocketDirection))];
}

@endIn this recipe we see a number of things. For the sake of brevity I've only included one grid effect and two particle effects in the book. Every stock grid and particle effect is viewable in RecipeCollection01, along with some customized particle effects like
Waterfall and WaterSplash.
Cocos2d particles have many variables and it is most often advantageous to sub-class a built-in particle to help create your own. Here is a list of the built-in Cocos2d particles:
    CCParticleExplosion, CCParticleFire, CCParticleFireworks,
  CCParticleFlower, CCParticleGalaxy, CCParticleMeteor,
  CCParticleRain, CCParticleSmoke, CCParticleSnow,
  CCParticleSpiral, CCParticleSun
A motion streak is a great way to add a dynamic element a
CCNode. These can often be combined with particles for a great effect.One thing to keep in mind when creating a motion streak is that the texture needs to look good when it bends in on itself. Vertical textures with transparent gradient edges usually look the best.
Both the iPhone 4 and the iPad support Apple's Retina Display mode. On the iPhone 4 this doubles the resolution to 960x640.
The creators of Cocos2d have taken a lot of care in integrating this feature into the framework. Retina display can be turned on with the flick of a switch. Getting your game to run similarly in both hi-definition and standard-definition can be tricky though. Luckily they have taken this into consideration as well. In this recipe we will enable Retina Display and then display a hi-resolution image, as shown in the following screenshot:

To properly see Retina Display you need a retina display device. In the simulator you need to do the following to switch to an iPhone Retina simulation:
Go to the iOS simulator.
In the file menu click on Hardware | Device | iPhone (Retina).
You may also of course use a real iPhone 4 or iPad device.
First you must enable Retina Display in your application. Go into
${PROJECT_NAME}AppDelegate.m and uncomment the following lines:
  if( ! [director enableRetinaDisplay:YES] )
    CCLOG(@"Retina Display Not supported");
Retina Display will now be turned on for devices that support it and turned off for devices that do not.
Now, execute the following code:
-(CCLayer*) runRecipe {
  //Switch to Retina mode to see the difference
  CCSprite *sprite = [CCSprite spriteWithFile:@"cocos2d_beginner.png"];
  [sprite setPosition:ccp(240,160)];
  [sprite setScale:1.0f];
  [self addChild:sprite];

  return self;
}One sprite for the price of two:
As you can see the sprite we created is now very large and detailed. If you turn Retina Display off or run this on a device that does not support it you will see a smaller blurrier sprite. This happens because Retina Display chooses the higher resolution version of every sprite if there is one available. We specify the higher resolution version with the
-hdsuffix. So, in Retina Display mode Cocos2d automatically displayscocos2d_beginner-hd.pnginstead ofcocos2d_beginner.png.Position, sizing, and so on:
Supposedly Cocos2d will convert all coordinate positions, size ratios, and anything else accordingly. The only thing you should have to change is adding the high resolution imagery.
It is recomended that a number of caveats are practiced with this. Lower level OpenGL hacking often doesn't display as you would want it to. Be wary of this and be sure to test any complex techniques in Retina Display mode before thinking about supporting both modes.
The downside of Retina Display:
The major downside of Retina Display is simply the amount of disk space it takes up. Including all of the HD images will more than double the space all of your art assets take up. Also, the higher resolution images take up more memory at runtime.
On the other hand Apple keeps increasing app size limits and device memory. With newer hardware coming out and the ability to make desktop applications, increased resolution is a must for triple-A game titles.
Ease Actions allow you to fine tune the actions used in your game using a number of formulae. They can be applied to any action: moving, scaling, fading, and so on. Regarding movement specifically, a small tweak can be applied to allow for independent Easing on both the X and the Y axis. This can be used to create a number of cool effects.

Execute the following code:
@interface CCMoveByCustom : CCMoveBy
{}
-(void) update: (ccTime) t;
@end

@implementation CCMoveByCustom
-(void) update: (ccTime) t {
  //Here we neglect to change something with a zero delta.
  if(delta.x == 0){
    [target_ setPosition:ccp( [(CCNode*)target_ position].x, (startPosition.y + delta.y*t ) )];
  }else if(delta.y == 0){
    [target_ setPosition:ccp( (startPosition.x + delta.x*t ), [(CCNode*)target_ position].y )];
  }else{
    [target_ setPosition:ccp( (startPosition.x + delta.x*t ), (startPosition.y + delta.y * t ) )];
  }
}
@end

@implementation Ch1_EasingActions

-(CCLayer*) runRecipe {
  /*** 1D Movement Ease Action ***/

  //Create the basic action to move by a certain X and Y vector
  CCActionInterval *action1D = [CCMoveBy actionWithDuration:2 position:ccp(200,200)];

  //Create a sprite to move
  CCSprite *spriteEase1D = [CCSprite spriteWithFile:@"colorable_sprite.png"];
  [spriteEase1D setPosition:ccp(150,50)];
  [self addChild:spriteEase1D z:1 tag:TAG_SPRITE_EASE_1D];

  //Create an 'eased' movement action with a CCEase class
  CCActionInterval *easeAction1D = [CCEaseInOut actionWithAction:action1D rate:2];

  //Run the action
[spriteEase1D runAction:easeAction1D];

  /*** 2D Movement Ease Action ***/

  //Create two movement actions, one in each dimension
  CCActionInterval *action2DX = [CCMoveByCustom actionWithDuration:2 position:ccp(200,0)];
  CCActionInterval *action2DY = [CCMoveByCustom actionWithDuration:2 position:ccp(0,200)];

  //Create a sprite to move
  CCSprite *spriteEase2D = [CCSprite spriteWithFile:@"colorable_sprite.png"];
  [spriteEase2D setPosition:ccp(150,50)];
  [self addChild:spriteEase2D z:1 tag:TAG_SPRITE_EASE_2D];

  //Create two 'eased' movement actions, one on each dimension
  CCActionInterval *easeAction2DX = [CCEaseSineIn actionWithAction:action2DX];
  CCActionInterval *easeAction2DY = [CCEaseBounceIn actionWithAction:action2DY];

  //Run both actions
  [spriteEase2D runAction:easeAction2DX];
  [spriteEase2D runAction:easeAction2DY];

  return self;
}

@endUpon executing this code you should see one character moving in a straight line toward the destination while the other moves there in a seemly erratic yet calculated way.
Uses of 2D eased movement actions :
While creating the iOS game GoldenAgeBaseball this summer I used
CCMoveByCustomto simulate different pitches. A slider moved down and away, a cutter only away and a sinker only down. This variation of pitch styles was crucial to the development of the pitching/batting gameplay mechanic.Overall, Ease Actions give your game a polished and professional feel. Whether you are smoothing out a camera movement or simulating a baseball pitch, Ease Actions are a fine tool to help tweak your game to perfection.
As odd as it sounds, sometimes in a 2D game you simply just want to add some simple 3D graphics. Whether you are creating a cool 2D/3D hybrid or a simple 3D game with a 2D HUD, 3D graphics are no easy thing to produce. The complexities of a third dimension often conflict with 2D programming paradigms.
For the sake of simplicity, this recipe will show you how to create a simple colored cube and a simple textured cube. The uses of simple geometry are varied even when making a 2D game. However, more examples including shaders and 3D models are beyond the scope of this book.

#import "Vector3D.h"

@interface Cube3D : CCSprite
{
  Vector3D *translation3D;
  Vector3D *rotation3DAxis;
  GLfloat rotation3DAngle;
  bool drawTextured;
}
@property (readwrite, assign) Vector3D *translation3D;
@property (readwrite, assign) Vector3D *rotation3DAxis;
@property (readwrite, assign) GLfloat rotation3DAngle;
@property (readwrite, assign) bool drawTextured;
-(void) draw;
@end

@implementation Cube3D
@synthesize translation3D,rotation3DAxis,rotation3DAngle,drawTextured;

-(void) draw {
  //Vertices for each side of the cube
  const GLfloat frontVertices[]={ -0.5f,-0.5f,0.5f, 0.5f,-0.5f,0.5f, -0.5f,0.5f,0.5f, 0.5f,0.5f,0.5f};
  const GLfloat backVertices[] = { -0.5f,-0.5f,-0.5f, -0.5f,0.5f,-0.5f, 0.5f,-0.5f,-0.5f, 0.5f,0.5f,-0.5f };
  const GLfloat leftVertices[] = { -0.5f,-0.5f,0.5f, -0.5f,0.5f,0.5f, -0.5f,-0.5f,-0.5f, -0.5f,0.5f,-0.5f };
  const GLfloat rightVertices[] = { 0.5f,-0.5f,-0.5f, 0.5f,0.5f,-0.5f, 0.5f,-0.5f,0.5f, 0.5f,0.5f,0.5f };
  const GLfloat topVertices[] = { -0.5f,0.5f,0.5f, 0.5f,0.5f,0.5f, -0.5f,0.5f,-0.5f, 0.5f,0.5f,-0.5f };
  const GLfloat bottomVertices[] = {-0.5f,-0.5f,0.5f,-0.5f,-0.5f,-0.5f,0.5f,-0.5f,0.5f, 0.5f,-0.5f,-0.5f  };

  //Coordinates for our texture to map it to a cube side
  const GLfloat textureCoordinates[] = { 0,0, 1,0, 0,1, 1,1,};

  //We enable back face culling to properly set the depth buffer
  glEnable(GL_CULL_FACE);
  glCullFace(GL_BACK);

  //We are not using GL_COLOR_ARRAY
  glDisableClientState(GL_COLOR_ARRAY);

  //We disable GL_TEXTURE_COORD_ARRAY if not using a texture
  if(!drawTextured){
    glDisableClientState(GL_TEXTURE_COORD_ARRAY);
  }

  //Replace the current matrix with the identity matrix
  glLoadIdentity();
  //Translate and rotate
  glTranslatef(translation3D.x, translation3D.y, translation3D.z);
  glRotatef(rotation3DAngle, rotation3DAxis.x, rotation3DAxis.y, rotation3DAxis.z);

  //Bind our texture if neccessary
  if(drawTextured){
    glBindTexture(GL_TEXTURE_2D, texture_.name);
  }

  //Here we define our vertices, set our textures or colors and finally draw the cube sides
     glVertexPointer(3, GL_FLOAT, 0, frontVertices);
  if(drawTextured){ glTexCoordPointer(2, GL_FLOAT, 0,  textureCoordinates); }
  else{ glColor4f(1.0f, 0.0f, 0.0f, 1.0f); }
  glDrawArrays(GL_TRIANGLE_STRIP, 0, 4);

      glVertexPointer(3, GL_FLOAT, 0, backVertices);
  if(drawTextured){ glTexCoordPointer(2, GL_FLOAT, 0,  textureCoordinates); }
  else{ glColor4f(1.0f, 1.0f, 0.0f, 1.0f); }
  glDrawArrays(GL_TRIANGLE_STRIP, 0, 4);

      glVertexPointer(3, GL_FLOAT, 0, leftVertices);
  if(drawTextured){ glTexCoordPointer(2, GL_FLOAT, 0,  textureCoordinates); }
  else{ glColor4f(1.0f, 0.0f, 1.0f, 1.0f); }
  glDrawArrays(GL_TRIANGLE_STRIP, 0, 4);

      glVertexPointer(3, GL_FLOAT, 0, rightVertices);
  if(drawTextured){ glTexCoordPointer(2, GL_FLOAT, 0,  textureCoordinates); }
  else{ glColor4f(0.0f, 1.0f, 1.0f, 1.0f); }
  glDrawArrays(GL_TRIANGLE_STRIP, 0, 4);

      glVertexPointer(3, GL_FLOAT, 0, topVertices);
  if(drawTextured){ glTexCoordPointer(2, GL_FLOAT, 0,  textureCoordinates); }
  else{ glColor4f(0.0f, 1.0f, 0.0f, 1.0f); }
  glDrawArrays(GL_TRIANGLE_STRIP, 0, 4);

      glVertexPointer(3, GL_FLOAT, 0, bottomVertices);
  if(drawTextured){ glTexCoordPointer(2, GL_FLOAT, 0,  textureCoordinates); }
  else{ glColor4f(0.0f, 0.0f, 1.0f, 1.0f); }
  glDrawArrays(GL_TRIANGLE_STRIP, 0, 4);

  //We re-enable the default render state
  glEnableClientState(GL_COLOR_ARRAY);
  glEnableClientState(GL_TEXTURE_COORD_ARRAY);
  glDisable(GL_CULL_FACE);
  glColor4f(1.0f, 1.0f, 1.0f, 1.0f);
}
@end


@interface Ch1_3DCubes {
  Cube3D *cube3d1;
  Cube3D *cube3d2;
}

@implementation Ch1_3DCubes

-(CCLayer*) runRecipe {
  //Load a textured cube and set initial variables
  cube3d1 = [Cube3D spriteWithFile:@"crate.jpg"];
  cube3d1.translation3D = [Vector3D x:2.0f y:0.0f z:-4.0f];
  cube3d1.rotation3DAxis = [Vector3D x:2.0f y:2.0f z:4.0f];
  cube3d1.rotation3DAngle = 0.0f;
  cube3d1.drawTextured = YES;
  [self addChild:cube3d1 z:3 tag:0];

  //Load a colored cube and set initial variables
  cube3d2 = [Cube3D spriteWithFile:@"blank.png"];
  cube3d2.translation3D = [Vector3D x:-2.0f y:0.0f z:-4.0f];
  cube3d2.rotation3DAxis = [Vector3D x:2.0f y:2.0f z:4.0f];
  cube3d2.rotation3DAngle = 0.0f;
  cube3d2.drawTextured = NO;
  [self addChild:cube3d2 z:1 tag:1];

  //Schedule cube rotation
  [self schedule:@selector(step:)];

  return self;
}

-(void) step:(ccTime)delta {
  cube3d1.rotation3DAngle += 0.5f;
  cube3d2.rotation3DAngle -= 0.5f;
}

@endWhat we see here is a crash course in OpenGL ES cube rendering with a Cocos2d twist. Like when we drew OpenGL primitives, here we create another CCNode and override its draw method to create more complex OpenGL geometry.
Texturing:
We harness a
CCSpritemethod to load a texture into memory to allow us to bind that texture for 3D drawing. This process is fairly straightforward.Depth testing, sizing, and translation:
Thanks to Cocos2d's built-in depth testing, cubes will be properly ordered based on the Z property. The
translation3D.zvalue affects the actual size of the cube while itstranslation3D.xandtranslation3D.yvalues affect where it is on the screen proportional totranslation3D.z.
For more information about 3D graphics, please refer to the recipe Using Cocos3d in Chapter 8, Tips, Tools, and Ports.
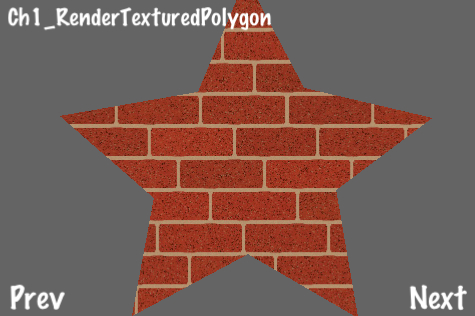
When creating games with large levels it is often easy to run into memory limitations. Large maps also contain repetitive drawing of things like grass, trees, mountains, and so on. This recipe will show you how to efficiently render a polygon that is filled in with a repeated texture. These can be drawn at any size and still only use a small amount of memory and CPU time.
Execute the following code:
#import "Vector3D.h"
//Included for CPP polygon triangulation
#import "triangulate.h"
#include <stdio.h>
#include <stdlib.h>
#include <string.h>
#include <assert.h>
@implementation TexturedPolygon
@synthesize vertices, triangles;
+(id) createWithFile:(NSString*)file withVertices:(NSArray*)verts {
/*** Create a TexturedPolygon with vertices only. ***/
/*** Perform polygon trianglulation to get triangles. ***/
//Initialization
TexturedPolygon *tp = [TexturedPolygon spriteWithFile:file];
tp.vertices = [[NSMutableArray alloc] init];
tp.triangles = [[NSMutableArray alloc] init];
//Polygon Triangulation
Vector2dVector a;
for(int i=0; i<[verts count];i+=1){
//Add polygon vertices
[tp.vertices addObject:[verts objectAtIndex:i]];
//Add polygon vertices to triangulation container
CGPoint vert = [[verts objectAtIndex:i] CGPointValue];
a.push_back( Vector2d(vert.x, vert.y) );
}
//Run triangulation algorithm
Vector2dVector result;
Triangulate::Process(a,result);
//Gather all triangles from result container
int tcount = result.size()/3;
for (int i=0; i<tcount; i++) {
const Vector2d &p1 = result[i*3+0];
const Vector2d &p2 = result[i*3+1];
const Vector2d &p3 = result[i*3+2];
//Add triangle index
[tp.triangles addObject: [tp getTriangleIndicesFromPoint1:
ccp(p1.GetX(),p1.GetY()) point2:ccp(p2.GetX(),p2.GetY())
point3:ccp(p3.GetX(), p3.GetY())] ];
}
//Set texture coordinate information
[tp setCoordInfo];
return tp;
}
+(id) createWithFile:(NSString*)file withVertices:(NSArray*)verts withTriangles:(NSArray*)tris {
/*** Create a TexturedPolygon with vertices and triangles given. ***/
//Initialization
TexturedPolygon *tp = [TexturedPolygon spriteWithFile:file];
tp.vertices = [[NSMutableArray alloc] init];
tp.triangles = [[NSMutableArray alloc] init];
//Set polygon vertices
for(int i=0; i<[verts count];i+=1){
[tp.vertices addObject:[verts objectAtIndex:i]];
}
//Set triangle indices
for(int i=0; i<[tris count];i+=1){
[tp.triangles addObject:[tris objectAtIndex:i]];
}
//Set texture coordinate information
[tp setCoordInfo];
return tp;
}
-(Vector3D*) getTriangleIndicesFromPoint1:(CGPoint)p1 point2:(CGPoint)p2 point3:(CGPoint)p3 {
/*** Convert three polygon vertices to triangle indices ***/
Vector3D* indices = [Vector3D x:-1 y:-1 z:-1];
for(int i=0; i< [vertices count]; i++){
CGPoint vert = [[vertices objectAtIndex:i] CGPointValue];
if(p1.x == vert.x and p1.y == vert.y){
indices.x = i;
}else if(p2.x == vert.x and p2.y == vert.y){
indices.y = i;
}else if(p3.x == vert.x and p3.y == vert.y){
indices.z = i;
}
}
return indices;
}
-(void) addAnimFrameWithFile:(NSString*)file toArray:(NSMutableArray*)arr {
/*** For textured polygon animation ***/
ccTexParams params = {GL_NEAREST,GL_NEAREST_MIPMAP_NEAREST,GL_REPEAT,GL_REPEAT};
CCTexture2D *frameTexture = [[CCTextureCache sharedTextureCache] addImage:file];
[frameTexture setTexParameters:¶ms];
CCSpriteFrame *frame = [CCSpriteFrame frameWithTexture:frameTexture rect:self.textureRect];
[[CCSpriteFrameCache sharedSpriteFrameCache] addSpriteFrame:frameTexture name:file];
[arr addObject:frame];
}
-(void) setCoordInfo {
/*** Set texture coordinates for each vertex ***/
if(coords){ free(coords); }
coords = (ccV2F_T2F*)malloc(sizeof(ccV2F_T2F)*[vertices count]);
for(int i=0;i<[vertices count];i++) {
coords[i].vertices.x = [[vertices objectAtIndex:i] CGPointValue].x;
coords[i].vertices.y = [[vertices objectAtIndex:i] CGPointValue].y;
float atlasWidth = texture_.pixelsWide;
float atlasHeight = texture_.pixelsHigh;
coords[i].texCoords.u = (coords[i].vertices.x + rect_.origin.x)/ atlasWidth;
coords[i].texCoords.v = (contentSize_.height - coords[i].vertices.y + rect_.origin.y)/ atlasHeight ;
}
}
-(void) dealloc
{
//Release texture coordinates if necessary
if(coords) free(coords);
[super dealloc];
}
-(void) draw
{
/*** This is where the magic happens. Texture and draw all triangles. ***/
glDisableClientState(GL_COLOR_ARRAY);
glColor4ub( color_.r, color_.g, color_.b, quad_.bl.colors.a);
BOOL newBlend = NO;
if( blendFunc_.src != CC_BLEND_SRC || blendFunc_.dst != CC_BLEND_DST ) {
newBlend = YES;
glBlendFunc( blendFunc_.src, blendFunc_.dst );
}
glBindTexture(GL_TEXTURE_2D, texture_.name);
unsigned int offset = (unsigned int)coords;
unsigned int diff = offsetof( ccV2F_T2F, vertices);
glVertexPointer(2, GL_FLOAT, sizeof(ccV2F_T2F), (void*) (offset + diff));
diff = offsetof( ccV2F_T2F, texCoords);
glTexCoordPointer(2, GL_FLOAT, sizeof(ccV2F_T2F), (void*) (offset + diff));
for(int i=0;i<[triangles count];i++){
Vector3D *tri = [triangles objectAtIndex:i];
short indices[] = {tri.x, tri.y, tri.z};
glDrawElements(GL_TRIANGLE_STRIP, 3, GL_UNSIGNED_SHORT, indices);
}
if(newBlend) { glBlendFunc(CC_BLEND_SRC, CC_BLEND_DST); }
glColor4ub( 255, 255, 255, 255);
glEnableClientState(GL_COLOR_ARRAY);
}
@end
@implementation Ch1_RenderTexturedPolygon
-(CCLayer*) runRecipe {
CGSize s = [[CCDirector sharedDirector] winSize];
//Set polygon vertices
CGPoint vertexArr[] = { ccp(248,340), ccp(200,226), ccp(62,202),
ccp(156,120), ccp(134,2), ccp(250,64), ccp(360,0), ccp(338,128),
ccp(434,200), ccp(306,230) };
int numVerts = 10;
NSMutableArray *vertices = [[NSMutableArray alloc] init];
//Add vertices to array
for(int i=0; i<numVerts; i++){
[vertices addObject:[NSValue valueWithCGPoint:vertexArr[i]]];
}
//Note: Your texture size MUST be a product of 2 for this to work.
//Set texture parameters to repeat
ccTexParams params = {GL_NEAREST,GL_NEAREST_MIPMAP_NEAREST,GL_REPEAT,GL_REPEAT};
//Create textured polygon
TexturedPolygon *texturedPoly = [TexturedPolygon createWithFile:@"bricks.jpg" withVertices:vertices];
[texturedPoly.texture setTexParameters:¶ms];
texturedPoly.position = ccp(128,128);
//Add textured polygon to scene
[self addChild:texturedPoly z:1 tag:0];
return self;
}
@end
TexturedPolygon takes a given set of vertices and uses a polygon triangulation algorithm
to find all triangles contained within the polygon. It then textures and draws these triangles using OpenGL triangles strips.
Triangulation:
Triangulation , depending on the polygon, can be a complex process. This is often performed while a map is loading. For very complex polygons it can be advantageous to perform polygon triangulation during level creation and store triangle indices along with the polygon vertices. This can speed up level load times.
Textured polygons have many uses including static map textures and background textures.
Using this technique you can efficiently draw polygons of virtually any size. Space requirements rely on the size of each texture used rather that the size of each polygon. To use less space, modify
TexturedPolygonto re-use pre-initialized textures.This technique has a few caveats. The textures used must be square and each side's size must be equal to 2n (16x16, 32x32, 64x64, and so on). Also, textures can only be single files, not sprite frames.
This recipe may be your first foray into combining Objective-C and C++ code. This is commonly referred to as Objective-C++. For more information please refer to Apple's official developer documentation Using C++ With Objective-C at http://developer.apple.com/library/mac/#documentation/Cocoa/Conceptual/ObjectiveC/Articles/ocCPlusPlus.html.
The TexturedPolygon can also be easily animated. This is useful for animated crowds, ocean waves, bubbling lava pits, and so on. In the example we see an animated field of wheat.

Execute the following code:
#import "Vector3D.h"
#import "TexturedPolygon.h"
@implementation Ch1_AnimateTexturedPolygon
-(CCLayer*) runRecipe {
CGSize s = [[CCDirector sharedDirector] winSize];
ccTexParams params = {GL_NEAREST, GL_NEAREST_MIPMAP_NEAREST, GL_REPEAT,GL_REPEAT};
//Create grass animated textured polygon
CGPoint grassVertexArr[] = { ccp(0,0), ccp(480,0), ccp(480,320), ccp(0,320) };
int grassNumVerts = 4;
NSMutableArray *grassVertices = [[NSMutableArray alloc] init];
for(int i=0; i<grassNumVerts; i++){
[grassVertices addObject:[NSValue valueWithCGPoint:ccp(grassVertexArr[i].x*1, grassVertexArr[i].y*1)]];
}
TexturedPolygon *grassPoly = [TexturedPolygon createWithFile:@"grass_tile_01.png" withVertices:grassVertices];
[grassPoly.texture setTexParameters:¶ms];
grassPoly.position = ccp(32,32);
[self addChild:grassPoly z:1 tag:1];
//Create swaying grass animation
NSMutableArray *grassAnimFrames = [NSMutableArray array];
//This is a two part animation with 'back' and 'forth' frames
for(int i=0; i<=6; i++){
[grassPoly addAnimFrameWithFile:[NSString stringWithFormat:@"grass_tile_0%d.png",i] toArray:grassAnimFrames];
}
for(int i=5; i>0; i--){
[grassPoly addAnimFrameWithFile:[NSString stringWithFormat:@"grass_tile_0%d.png",i] toArray:grassAnimFrames];
}
CCAnimation *grassAnimation = [[CCAnimation alloc] initWithName:@"grass_tile_anim" delay:0.1f];
for(int i=0; i<[grassAnimFrames count]; i++){
[grassAnimation addFrame:[grassAnimFrames objectAtIndex:i]];
}
CCActionInterval *grassAnimate = [CCSequence actions: [CCAnimate actionWithAnimation:grassAnimation restoreOriginalFrame:NO],
[CCDelayTime actionWithDuration:0.0f], nil];
CCActionInterval *grassRepeatAnimation = [CCRepeatForever actionWithAction:grassAnimate];
[grassPoly runAction:grassRepeatAnimation];
return self;
}
@endA vital tool in any game developer's repertoire is the ability to swap color palettes. From The Legend of Zelda on NES to Halo on the Xbox, palette swapping is a simple yet effective visual cue that can stretch a limited amount of art.
In the following example you learn how to palette swap using layers. We are using an animated baseball player for this example.

Please refer to the project RecipeCollection01 for full working code of this recipe.
For this recipe you will need an image manipulation program. I recommend the free and easy to use GIMP.
The first thing we will do is draw the sprite and the colorable areas:
Draw your texture with all dynamically colorable areas left blank. In your image editing program your texture should look something like the following:

Create a new layer and color a specific area white. In this example we are coloring his uniform (legs and shirt) white:

Hide the other layer and save that white-only layer as a separate texture.
Repeat this for any other separately colored sections.
Once we have our textures we can write some code:
@implementation Ch1_PaletteSwapping

-(CCLayer*) runRecipe {
  //Create a nice looking background
  CCSprite *bg = [CCSprite spriteWithFile:@"baseball_bg_02.png"];
  [bg setPosition:ccp(240,160)];
  bg.opacity = 100;
  [self addChild:bg z:0 tag:0];

  /*** Animate 4 different fielders with different color combinations ***/

  //Set color arrays
  ccColor3B colors1[] = {
     ccc3(255,217,161), ccc3(225,225,225), ccc3(0,0,150), ccc3(255,255,255) };
  ccColor3B colors2[] = {
    ccc3(140,100,46), ccc3(150,150,150), ccc3(255,0,0), ccc3(255,255,255) };
  ccColor3B colors3[] = {
    ccc3(255,217,161), ccc3(115,170,115), ccc3(115,170,115), ccc3(255,255,255) };
  ccColor3B colors4[] = {
    ccc3(140,100,46),  ccc3(50,50,50), ccc3(255,255,0),  ccc3(255,255,255) };

  //Animate fielders with colors
  [self animateFielderWithColors:colors1 withPosition:ccp(150,70)];
  [self animateFielderWithColors:colors2 withPosition:ccp(150,200)];
  [self animateFielderWithColors:colors3 withPosition:ccp(300,200)];
  [self animateFielderWithColors:colors4 withPosition:ccp(300,70)];

  return self;
}

-(void) animateFielderWithColors:(ccColor3B[])colors withPosition:(CGPoint)pos {
  //The names of our layers
  NSString *layers[] = { @"skin", @"uniform", @"trim", @"black_lines" };

  //Number of layers
  int numLayers = 4;

  for(int i=0; i<numLayers; i+=1){
    NSString *layerName = layers[i];
    ccColor3B color = colors[i];

    //We need each plist, the first frame name and finally a name for the animation
    NSString *plistName = [NSString stringWithFormat:@"fielder_run_%@.plist", layerName];
    NSString *firstFrameName = [NSString stringWithFormat:@"fielder_run_%@_01.png", layerName];
    NSString *animationName = [NSString stringWithFormat:@"fielder_run_%@", layerName];

    //Add plist frames to the SpriteFrameCache
    [[CCSpriteFrameCache sharedSpriteFrameCache] addSpriteFramesWithFile:plistName];

    //Get the first sprite frame
    CCSpriteFrame *firstFrame = [[CCSpriteFrameCache sharedSpriteFrameCache] spriteFrameByName:firstFrameName];

    //Create our sprite
    CCSprite *sprite = [CCSprite spriteWithSpriteFrame:firstFrame];

    //Set color and position
    sprite.position = pos;
    sprite.color = color;

    //Create the animation and add frames
    CCAnimation *animation = [[CCAnimation alloc] initWithName:animationName delay:0.15f];
    for(int i=1; i<=8; i+=1){
      CCSpriteFrame *frame = [[CCSpriteFrameCache sharedSpriteFrameCache] spriteFrameByName:[NSString stringWithFormat:@"fielder_run_%@_0%i.png",layerName,i]];
      [animation addFrame:frame];
    }

    //Run the repeating animation
    [sprite runAction:[CCRepeatForever actionWithAction: [CCAnimate actionWithAnimation:animation]]];

    //Finally, add the sprite
    [self addChild:sprite];
  }
}

@end
By drawing the swappable layers under the main layer (the black outline) we cover up any imprecision in the coloring. This technique is slightly more difficult for art that doesn't use a thick black outline like the drawings shown in the preceding section.
Keeping your iOS app below a certain size on the disk is always a good idea. This technique is fairly easy on your disk space as the swappable textures take up only a small amount of space due to easy PNG compression of simplistic textures.
Unfortunately the size of a texture in memory is determined by its pixel size. So, if you are palette swapping large animated textures you might run into memory consumption issues. Memory consumption for a palette swapped texture equals the normal memory size times the number of palettes to swap.
When animating a palette swapped texture the CPU time used by the animation routine will also be multiplied by the number of swappable layers. This is usually fairly inconsequential as animation takes up very little CPU time as it is.
Another way to palette swap involves sentinel colors and the ability to modify a texture pixel by pixel. This method can help reclaim some extra space on the disk and in memory but it tends to take a lot of CPU time. It is also messier than the previous technique when used with anti-aliased or blended textures.
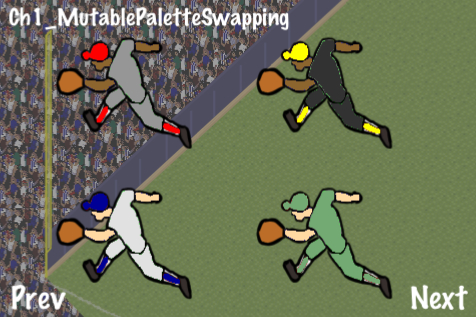
Please refer to the project RecipeCollection01 for full working code of this recipe. Also note the included library CCTexture2DMutable that is not included in the book itself.
For this recipe you will need an image manipulation program. Once again I recommend the free and easy to use GIMP.
The first thing we will do is draw a sprite that contains colorable areas defined by sentinel colors. A sentinel color is usually a primary color that is easily recognizable and can be replaced programmatically. In this case we will use red, blue, and green:
It is best to avoid aliasing and blending as much as possible when using this technique. Adjusting your coloring algorithm's tolerance according to your texture can be tricky.
Now, execute the following code:
#import "CCTexture2DMutable.h"

@implementation Ch1_MutablePaletteSwapping

-(CCLayer*) runRecipe {
  //Create a nice looking background
  CCSprite *bg = [CCSprite spriteWithFile:@"baseball_bg_01.png"];
  [bg setPosition:ccp(240,160)];
  bg.opacity = 100;
  [self addChild:bg z:0 tag:0];

  /*** Animate 4 different fielders with different color combinations ***/

  //Set color arrays
  ccColor4B colors1[] = { ccc4(255,217,161,255), ccc4(225,225,225,255), ccc4(0,0,150,255) };
  ccColor4B colors2[] = { ccc4(140,100,46,255), ccc4(150,150,150,255), ccc4(255,0,0,255) };
  ccColor4B colors3[] = { ccc4(255,217,161,255), ccc4(115,170,115,255), ccc4(115,170,115,255) };
  ccColor4B colors4[] = { ccc4(140,100,46,255),  ccc4(50,50,50,255), ccc4(255,255,0,255) };

  //Create texture copy to use as an immutable guide.
  CCTexture2DMutable* textureCopy = [[[CCTexture2DMutable alloc] initWithImage:[UIImage imageNamed:@"fielder_run_sentinel_colors.png"]] autorelease];

  //Create our sprites using mutable textures.
  CCSprite *sprite1 = [CCSprite spriteWithTexture:[[[CCTexture2DMutable alloc] initWithImage:[UIImage imageNamed:@"fielder_run_sentinel_colors.png"]] autorelease]];
  CCSprite *sprite2 = [CCSprite spriteWithTexture:[[[CCTexture2DMutable alloc] initWithImage:[UIImage imageNamed:@"fielder_run_sentinel_colors.png"]] autorelease]];
  CCSprite *sprite3 = [CCSprite spriteWithTexture:[[[CCTexture2DMutable alloc] initWithImage:[UIImage imageNamed:@"fielder_run_sentinel_colors.png"]] autorelease]];
  CCSprite *sprite4 = [CCSprite spriteWithTexture:[[[CCTexture2DMutable alloc] initWithImage:[UIImage imageNamed:@"fielder_run_sentinel_colors.png"]] autorelease]];

  //Set sprite positions
  [sprite1 setPosition:ccp(125,75)];
  [sprite2 setPosition:ccp(125,225)];
  [sprite3 setPosition:ccp(325,75)];
  [sprite4 setPosition:ccp(325,225)];

  //Swap colors in each sprite mutable texture and apply the changes.
  [self swapColor:ccc4(0,0,255,255) withColor:colors1[0] inTexture:sprite1.texture withCopy:textureCopy];
  [self swapColor:ccc4(0,255,0,255) withColor:colors1[1] inTexture:sprite1.texture withCopy:textureCopy];
  [self swapColor:ccc4(255,0,0,255) withColor:colors1[2] inTexture:sprite1.texture withCopy:textureCopy];
  [sprite1.texture apply];

  /* CODE OMITTED */

  //Finally, add the sprites to the scene.
  [self addChild:sprite1 z:0 tag:0];
  [self addChild:sprite2 z:0 tag:1];
  [self addChild:sprite3 z:0 tag:2];
  [self addChild:sprite4 z:0 tag:3];

  return self;
}

-(void) swapColor:(ccColor4B)color1 withColor:(ccColor4B)color2 inTexture:(CCTexture2DMutable*)texture withCopy:(CCTexture2DMutable*)copy {
  //Look through the texture, find all pixels of the specified color and change them.
  //We use a tolerance of 200 here.
  for(int x=0; x<texture.pixelsWide; x++){
    for(int y=0; y<texture.pixelsHigh; y++){
      if( [self isColor:[copy pixelAt:ccp(x,y)] equalTo:color1 withTolerance:200] ){
        [texture setPixelAt:ccp(x,y) rgba:color2];
      }
    }
  }
}

-(bool) isColor:(ccColor4B)color1 equalTo:(ccColor4B)color2 withTolerance:(int)tolerance {
  //If the colors are equal within a tolerance we change them.
  bool equal = YES;
  if( abs(color1.r - color2.r) + abs(color1.g - color2.g) +
    abs(color1.b - color2.b) + abs(color1.a - color2.a) > tolerance ){
      equal = NO;
  }
  return equal;
}

@endFor better or worse this technique works the same way color selection and replacement works in Adobe Photoshop, and similar drawing programs. Using CCTexture2DMutable can often be a slow process and this technique is only recommended for games that require pixel-perfect graphics or have very strict space/memory requirements.
By harnessing CCTexture2DMutable the class AWTextureFilter can be used to create some cool effects. These include Gaussian Blur
, selective Gaussian Blur, and dynamically generated font shadows as shown in the following scene:

Execute the following code:
#import "CCTexture2DMutable.h"
#import "AWTextureFilter.h"

@implementation Ch1_UsingAWTextureFilter

-(CCLayer*) runRecipe {
  CGSize winSize = [[CCDirector sharedDirector] winSize];

//Pixel Format RGBA8888 is required for blur effects
  [CCTexture2D setDefaultAlphaPixelFormat:kCCTexture2DPixelFormat_RGBA8888];

  /*** Display a blurred texture ***/

  //Create the blur mutable texture
  CCTexture2DMutable *mutableBlurTexture = [[[CCTexture2DMutable alloc] initWithImage:[UIImage imageNamed:@"cocos2d_beginner.png"]] autorelease];

  //Apply blur to the mutable texture
  [AWTextureFilter blur:mutableBlurTexture radius:3];

  //Create a sprite to show the blur
  CCSprite *blurSprite = [CCSprite spriteWithTexture:mutableBlurTexture];
  [blurSprite setPosition:ccp(winSize.width/2+blur.contentSize.width/2+1, winSize.height/2)];

  //Add sprite to the scene
[self addChild:blurSprite z:0 tag:0];

/*** Display a selectively blurred texture ***/

  //Create the mutable texture to selectively blur
  CCTexture2DMutable *mutableSelectiveBlurTexture = [[[CCTexture2DMutable alloc] initWithImage:[UIImage imageNamed:@"cocos2d_beginner.png"]] autorelease];

  //Apply selective blur to the mutable texture
  [AWTextureFilter blur:mutableSelectiveBlurTexture radius:8 rect:CGRectMake(240-200, (winSize.height-160)-75, 150, 150)];

  //Create a sprite to show the selective blur
  CCSprite *selectiveBlurSprite = [CCSprite spriteWithTexture:mutableSelectiveBlurTexture];
  [selectiveBlurSprite setPosition:ccp(winSize.width/2, winSize.height/2)];

  //Add sprite to the scene
[self addChild:selectiveBlurSprite z:0 tag:1];

/*** Display dynamic font shadow effect ***/

  //Create a background so we can see the shadow
  CCLayerColor *background = [CCLayerColor layerWithColor:ccc4(200, 100, 100, 255) width:300 height:50];
  [background setIsRelativeAnchorPoint:YES];
  [background setAnchorPoint:ccp(0.5f, 0.5f)];
  [background setPosition:ccp(winSize.width/2, winSize.height/2)];

  //Create a sprite for the font label
  CCSprite* labelSprite = [CCSprite node];
  [labelSprite setPosition:ccp(winSize.width/2, winSize.height/2)];

  //Create a sprite for the shadow
  CCSprite* shadowSprite = [CCSprite node];
  [shadowSprite setPosition:ccp(winSize.width/2+1, winSize.height/2+1)];

  //Color it black
  [shadowSprite setColor:ccBLACK];

  //Add sprites to a node and the node to the scene
  CCNode* node = [[CCNode alloc] init];
  [node addChild:background z:-1];
  [node addChild:shadowSprite z:0];
  [node addChild:labelSprite z:1];
  [self addChild:node z:-1 tag:2];

  //Create a mutable texture with a string
  CCTexture2DMutable *shadowTexture = [[[CCTexture2DMutable alloc] initWithString:@"Shadowed Text" fontName:@"Arial" fontSize:28] autorelease];

  //Copy the mutable texture as non mutable texture
  CCTexture2D *labelTexture = [[shadowTexture copyMutable:NO] autorelease];

  //Set the label texture
  [labelSprite setTexture:labelTexture];
  [labelSprite setTextureRect:CGRectMake(0, 0, shadowTexture.contentSize.width, shadowTexture.contentSize.height)];

  //Apply blur to the shadow texture
  [AWTextureFilter blur:shadowTexture radius:4];

  //Set the shadow texture
  [shadowSprite setTexture:shadowTexture];
  [shadowSprite setTextureRect:CGRectMake(0, 0, shadowTexture.contentSize.width, shadowTexture.contentSize.height)];

  return self;
}
AWTextureFilter uses CCTexture2DMutable to achieve a compelling Gaussian Blur effect. This is one example of complex pixel manipulation.
Font shadows:
CCTexture2DMutable inherits from CCTexture2D. This allows us to use the following method:
- (id) initWithString:(NSString*)string fontName:(NSString*)name fontSize:(CGFloat)size;
This creates a label texture that we can then use to create a blurred font shadow effect by creating a similar texture that we offset, darken, blur, and finally draw behind the original label texture.
Here are a few other suggestions for the use of this blurring technique:
As hinted in the last recipe, in-game screenshots can be taken and used in-game to create cool effects like a blurred background for a pause menu. For an example of this in a published app, take a look at the pause menu in 2K Sports NHL 2K11.

Please refer to the project RecipeCollection01 for full working code of this recipe. Also note the included library Screenshot that is not included in the book itself.
Execute the following code:
#import "Screenshot.h"

@implementation Ch1_TakingScreenshots

-(CCLayer*) runRecipe {
CCSprite* sprite = [CCSprite spriteWithTexture:[Screenshot takeAsTexture2D]];
[sprite setPosition:ccp(240,160)];
[sprite setScale:0.75f];

[self addChild:sprite z:0 tag:0];

  return self;
}The included Screenshot library uses some complex iOS techniques that are beyond the scope of this book. The library is included in RecipeCollection01. You can take a look at it there.
Simply put, Screenshot takes a capture of what's currently on the screen and shoves that into a CCTexture2D for you to manipulate.
Live screenshots can be used for a wide variety of things such as the following:
Screenshot highlights and recaps of interesting moments of gameplay at the end of a match or level
Considering the fact that you can analyze exactly what the player is currently seeing you could "break the fourth wall" (think Psycho Mantis in Metal Gear Solid for Sony PlayStation)
An in-game user controlled camera like in Pokemon Snap for Nintentdo 64
Parallaxing is a staple of 2D side-scrolling video games. A competent developer would be remiss if he didn't include a nice parallaxed background in a 2D side-scroller. Cocos2d makes parallaxing easy with CCParallaxNode.

Execute the following code:
@implementation Ch1_UsingCCParallaxNode

-(CCLayer*) runRecipe {
  //Create four parallax sprites, one for each layer
  CCSprite* parallaxLayer01 = [CCSprite spriteWithFile:@"parallax_layer_01.png"];
  CCSprite* parallaxLayer02 = [CCSprite spriteWithFile:@"parallax_layer_02.png"];
  CCSprite* parallaxLayer03 = [CCSprite spriteWithFile:@"parallax_layer_03.png"];
  CCSprite* parallaxLayer04 = [CCSprite spriteWithFile:@"parallax_layer_04.png"];

  //Create a parallax node and add all four sprites
  CCParallaxNode* parallaxNode = [CCParallaxNode node];
  [parallaxNode setPosition:ccp(0,0)];
  [parallaxNode addChild:parallaxLayer01 z:1 parallaxRatio:ccp(0, 0) positionOffset:ccp(240,200)];
  [parallaxNode addChild:parallaxLayer02 z:2 parallaxRatio:ccp(1, 0) positionOffset:ccp(240,100)];
  [parallaxNode addChild:parallaxLayer03 z:3 parallaxRatio:ccp(2, 0) positionOffset:ccp(240,100)];
  [parallaxNode addChild:parallaxLayer04 z:4 parallaxRatio:ccp(3, 0) positionOffset:ccp(240,20)];
  [self addChild:parallaxNode z:0 tag:1];

  //Move the node to the left then the right
  //This creates the effect that we are moving to the right then the left
  CCMoveBy* moveRight = [CCMoveBy actionWithDuration:5.0f position:ccp(-80, 0)];
  CCMoveBy* moveLeft = [CCMoveBy actionWithDuration:2.5f position:ccp(80, 0)];
  CCSequence* sequence = [CCSequence actions:moveRight, moveLeft, nil];
  CCRepeatForever* repeat = [CCRepeatForever actionWithAction:sequence];
  [parallaxNode runAction:repeat];

  return self;
}

@endCocos2d makes it very easy to create a professional looking scrolling background. CCParallaxNode breaks the concept of parallaxing down to its key components. In the following example we attach four sprites to an instance of CCParallaxNode. Keep in mind that you can attach any CCNode to a CCParallaxNode. We then set parallaxRatio and parallaxOffset to create the desired effect.
This ratio determines how real game coordinates affect the coordinates of this particular parallaxed layer. A ratio of
ccp(2,0)means the sprite will scroll twice as fast on the X and not at all on the Y. Higher (faster) ratios are typically drawn closer to the camera.Position Offset:
The position offset of each child node represents where it will be drawn when its parent (the
CCParallaxNode) is at the origin orccp(0,0). Once the mainCCParallaxNodeinstance moves the children will move with the proper ratio.
There are a number of ways to loop a parallaxed background. One involves checking the parallaxNode position at every step and adjusting all the child position offsets based on the integer value of the parallax node X position divided by the screen size:
parallaxNodeChildXOffset = baseXOffset + ((int) (self.position.x / winSize.width)) * winSize.width;
This effectively resets the child positions after the parallaxNode has moved one full screen width.
Lighting is a fundamental part of most 3D video games. 2D games do not naturally lend themselves to lighting effects, but with the right technique we can create a 2D experience where lighting plays a vital role. This adds suspense to our 2D scene.
In this recipe we see a monk walking through a dark cave carrying a lantern. The monk's lantern gives off light in a circular shape that illuminates dark parts of the scene. As the monk moves through the cave a colony of bats becomes visible.
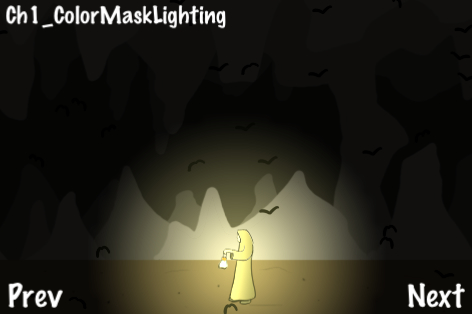
Please refer to the project RecipeCollection01 for full working code of this recipe. Also
note that code used to create the 'flying bats' effect has been omitted as that was covered in a previous recipe.
Execute the following code:
@interface Ch1_ColorMaskLighting : Recipe
{
  SimpleAnimObject *burnSprite;
  SimpleAnimObject *lightSprite;
  SimpleAnimObject *monkSprite;
  CCRenderTexture *darknessLayer;

  NSMutableArray *bats;
  CCAnimation *batFlyUp;
  CCAnimation *batGlideDown;
}

@end

@implementation Ch1_ColorMaskLighting

-(CCLayer*) runRecipe {
  //Add our PLISTs to the SpriteFrameCache singleton
  CCSpriteFrameCache * cache = [CCSpriteFrameCache sharedSpriteFrameCache];
  [cache addSpriteFramesWithFile:@"simple_bat.plist"];
  [cache addSpriteFramesWithFile:@"monk_lantern.plist"];

  //Add cave background
  CCSprite *caveBg = [CCSprite spriteWithFile:@"cave.png"];
  [caveBg setPosition:ccp(240,160)];
  [self addChild: caveBg z:0 tag:TAG_CAVE_BG];

  //Set up the burn sprite that will "knock out" parts of the darkness layer depending on the alpha value of the pixels in the image.
  burnSprite = [SimpleAnimObject spriteWithFile:@"fire.png"];
  burnSprite.position = ccp(50,50);
  burnSprite.scale = 10.0f;
  [burnSprite setBlendFunc: (ccBlendFunc) { GL_ZERO, GL_ONE_MINUS_SRC_ALPHA }];
  [burnSprite retain];
  burnSprite.velocity = ccp(1,0);

  //Add a 'light' sprite which additively blends onto the scene. This represents the cone of light created by the monk's candle.
  lightSprite = [SimpleAnimObject spriteWithFile:@"fire.png"];
  lightSprite.position = ccp(50,50);
  lightSprite.scale = 10.0f;
  [lightSprite setColor:ccc3(100,100,50)];
  [lightSprite setBlendFunc: (ccBlendFunc) { GL_ONE, GL_ONE }];
  lightSprite.velocity = ccp(1,0);
  [self addChild:lightSprite z:4 tag:TAG_LIGHT_SPRITE];

  //Add the monk
  monkSprite = [[SimpleAnimObject alloc] init];
  monkSprite.position = ccp(50,50);
  monkSprite.velocity = ccp(1,0);
  [self addChild:monkSprite z:1 tag:TAG_MONK];

  //Animate the monk to simulate walking.
  CCAnimation *animation = [[CCAnimation alloc] initWithName:@"monk_lantern_walk" delay:0.1f];
  for(int i=1; i<=5; i+=1){
    [animation addFrame:[cache spriteFrameByName:[NSString stringWithFormat:@"monk_lantern_0%i.png",i]]];
  }
  for(int i=4; i>=2; i-=1){
    [animation addFrame:[cache spriteFrameByName:[NSString stringWithFormat:@"monk_lantern_0%i.png",i]]];
  }
  [monkSprite runAction:[CCRepeatForever actionWithAction: [CCAnimate actionWithAnimation:animation]]];

  //Add the 'darkness' layer. This simulates darkness in the cave.
  darknessLayer = [CCRenderTexture renderTextureWithWidth:480 height:320];
  darknessLayer.position =  ccp(240,160);
  [self addChild:darknessLayer z:0 tag:TAG_DARKNESS_LAYER];

  //Schedule physics updates
  [self schedule:@selector(step:)];

  return self;
}

-(void)step:(ccTime)delta {
  CGSize s = [[CCDirector sharedDirector] winSize];

  //Clear the darkness layer for redrawing. Here we clear it to BLACK with 90% opacity.
  [darknessLayer clear:0.0f g:0.0f b:0.0f a:0.9f];

  //Begin the darkness layer drawing routine. This transforms to the proper location, among other things.
  [darknessLayer begin];

  //Limit drawing to the alpha channel.
  glColorMask(0.0f, 0.0f, 0.0f, 1.0f);

  //Draw the burn sprite only on the alpha channel.
  [burnSprite visit];

  //Reset glColorMask to allow drawing of colors.
  glColorMask(1.0f, 1.0f, 1.0f, 1.0f);

  //Finish transformation.
  [darknessLayer end];

  //Make the monk walk back and forth.
  if(monkSprite.position.x > 480){
    monkSprite.flipX = YES;
    burnSprite.velocity = ccp(-1,0);
    lightSprite.velocity = ccp(-1,0);
    monkSprite.velocity = ccp(-1,0);
  }else if(monkSprite.position.x < 0){
    monkSprite.flipX = NO;
    burnSprite.velocity = ccp(1,0);
    lightSprite.velocity = ccp(1,0);
    monkSprite.velocity = ccp(1,0);
  }

  //Update our SimpleAnimObjects
  [burnSprite update:delta];
  [lightSprite update:delta];
  [monkSprite update:delta];
}

@endCocos2d exposes just the right amount of OpenGL drawing logic to make complex manipulations of rendering order look easy. To achieve this effect we use CCRenderTexture. First, we clear the screen using the following call:
[darknessLayer clear:0.0f g:0.0f b:0.0f a:0.9f];
We then limit drawing to only the alpha channel
using a glColorMask call. This, in effect, tells OpenGL to modify the opacity (only the opacity, not the color) of the graphics buffer based on what we render. So, we render the fire.png texture to simulate light that is 2D and diffuses in a circle.
Finally, we additively draw another fire.png texture over this one to simulate the brightness and color of the light.
The node darknessLayer is only rendered within the screen's viewing area while burnSprite and lightSprite are rendered at the lantern's position.
Using a similar technique lights can be created in all shapes, sizes, and colors. These can include animated lights like torches, shaped lights like a car's headlights, or short, quick lighting effects like a bright flash from an explosion.
Most importantly, this effect gives us the ability to tease the player with what may or may not lurk in the shadows of the game world.