


In this chapter we will cover:
Setting up a CiviCRM theme in Drupal
Setting up cron using cPanel
Adding items to the CiviCRM navigation menu
Refreshing the dashboard
Changing display preferences
Replacing words
Setting up geocoding
Autofiling e-mails
Creating new activities
Adding custom fields
Using Scheduled Reminders for activities
Using CiviCase to create an HR system
Installing languages and localizing CiviCRM
CiviCRM administration screens take up a lot of browser real estate. How CiviCRM looks is determined by what themes you are using in your CMS. Problems arise when you use your main website theme to display CiviCRM pages. All the customizations, blocks of information, and layouts suddenly get in the way when you want to administer CiviCRM. The trick is to use a different theme for CiviCRM.
This is very easy to accomplish, and just uses a configuration screen in Drupal.
Make sure you have the CiviCRM theme module enabled.
Navigate to
admin/appearancein Drupal by clicking on the Appearance button. This page shows the themes that are currently installed within our CMS—in this case, Drupal.Make sure that any themes you wish to use are enabled.
At the foot of the screen, configure CiviCRM Administration theme.

Drupal uses the page URL to check if you are administering CiviCRM. If you are, the pages are displayed using the CiviCRM administration theme.
It's a good idea to select a flexible-width theme with sidebars. Garland is a good example. The flexible width accommodates CiviCRM displays nicely.
Once the administration theme is selected, navigate to admin/structure/blocks. Here you will see various blocks provided by the CiviCRM module. You can now place these blocks within your administrative theme.
Pay special attention to the visibility settings for these blocks, so that they only appear when using CiviCRM.
In Drupal, there is an additional setting that controls which theme is used to display public CiviCRM pages, for example, event sign-up pages.
You can explore hundreds of contributed Drupal themes at http://drupal.org/project/themes
Cron is a time-based scheduler that is used extensively throughout CiviCRM. For example, you might want to use CiviCRM to send out an e-mail newsletter at a particular time, or you might want to send out a reminder to participants to attend an event. CiviCRM has settings to accomplish all these tasks, but these, in turn, rely on having "master" cron set up. Cron is set up on your web server, not within CiviCRM.
There are many different ways of setting up cron, depending on your site-hosting setup. In this example, we are using cPanel, a popular control panel that simplifies website administration.
Make a note of your CMS site administrator username and password.
Make a note of your CiviCRM site key, which is a long string of characters used to uniquely identify your CiviCRM installation. It is automatically generated when CiviCRM is installed, and is stored in the
civicrm_settings.phpfile. Using a text editor, open up the CiviCRM settings file located at/sites/default/civicrm_settings.php. Around line 170, you will see the following entry:define( 'CIVICRM_SITE_KEY', '7409e83819379dc5646783f34f9753d9' );Make a note of this key.
Log in to cPanel and use the cPanel File Manager to explore the folders and files that are stored there. You are going to create a file that contains all the necessary information for cron to work. You can choose to create the cron file anywhere you like. It makes sense to keep it in the home directory of your webserver—that is, the first directory you get to once you start exploring.
Create a file called
CiviCron.php. The naming does not particularly matter, but it must be a PHP file.Insert the following code:
<?php
// create a new cURL resource
$ch = curl_init();
// set URL and other appropriate options
curl_setopt($ch, CURLOPT_URL, "http://myDrupalsite.com/sites/all/modules/civicrm/bin/cron.php?name=admin&pass=adminpassword&key=01504c43af550a317f3c6495c2442ab7");
curl_setopt($ch, CURLOPT_HEADER, 0);
// grab URL and pass it to the browser
curl_exec($ch);
curl_close($ch);
?>
Substitute
http://myDrupalsite.comwith your own domainSubstitute
adminwith your own CMS admin usernameSubstitute
adminpasswordwith your own CMS admin passwordSubstitute the key value with the site key from
civicrm_settings.php
Save this file and then navigate to
cronin cPanel.
Select an appropriate cron interval from the Common Settings list. Choosing an appropriate cron interval may take some experimentation, depending on how your site is set up. In the Command field, enter the following address:
php /home/site_account_name/public_html/CiviCron.php
The portion after
phpis the absolute path to theCiviCron.phpfile you created in step 4.
All cron does is execute the URL that is constructed in the cron file.
The following piece of code does the work:
curl_setopt($ch, CURLOPT_URL, "http://myDrupalsite.com/sites/all/modules/civicrm/bin/cron.php?name=admin&pass=adminpassword&key=01504c43af550a317f3c6495c2442ab7");The URL contains the information on permissions (the username, the password, and the site key) to execute the cron.php file provided by the CiviCRM module.
Getting cron to work is critical to getting CiviCRM working properly. If you get into difficulties with it, the best solution is to contact your hosting company and seek guidance.
Tip
To test that your cron job is actually working, carry out the following instructions. In the cPanel cron screen, set it to send you an e-mail each time the cron command is run. The e-mail will contain an error message if the cron fails. Failures are generally due to an incorrect setting of the path, or a permissions problem with the username, password, or site key.
As you begin to use CiviCRM, you will want to provide administrative shortcuts. You can do this by adding custom menu blocks within your CMS or editing the navigation menu in CiviCRM.
CiviCRM has a fully customizable navigation menu. You can edit this menu to get one-click access to the features you use most.
Navigate to a page that you want to use as the link destination for a menu item. For example, you could navigate to Contacts | Manage Groups, and then select a suitable group.
Copy the page URL in the browser location. In this example, it would be as follows:
civicrm/group/search?reset=1&force=1&context=smog&gid=2
Navigate to Administer | Customize Data and Screens | Navigation Menu. This displays the CiviCRM navigation menu in tree form.
Click on the left arrow on each Parent menu item to expand it. You can now explore all the child menu items.
Click on the Add Menu item button at the top of this screen. This brings up the Add Menu Item edit screen.

Enter the name of the menu item in the Title field.
Select a parent to make the menu item appear as the child of another menu item. If you don't select a parent, the item will appear on the main CiviCRM menu bar.
Select one or more permissions in the Permission field to control who can use the menu item. These are CMS permissions, so we must ensure that these are set correctly in our CMS for the menu item to behave properly.
CiviCRM stores new menu items, and displays them according to where they are placed in the menu tree and what permissions a user may have to use them.
You can fully explore CiviCRM customization at http://book.civicrm.org/user/current/initial-set-up/customizing-the-user-interface/
By default, CiviCRM sets the auto-refresh period for the home page dashboard to 1 hour. In a busy setting, this is too long, and you constantly have to click on the Refresh Dashboard data button to get the information on the dashboard up to date.
By default, CiviCRM displays a lot of data on the contact summary screen. Sometimes, this can lead to a cluttered display that is hard to use and slow to load.
CiviCRM components can add to the clutter on the screen. Here we can disable unwanted components and then fine-tune the display of other elements in the contact summary screen.
Navigate to Administer | System Settings | Enable CiviCRM Components, and disable any unused CiviCRM components.
Navigate to Administer | Customize data and screens | Display preferences.
Control which tabs are displayed in the detail screen (for each contact), using the checkboxes.

Control which sections you want to see when editing an individual contact, by checking the checkboxes in the Editing Contacts section.

Drag the double-arrow icon to move the sections up and down the contact editing screen.
You can fully explore the display preferences at http://book.civicrm.org/user/current/initial-set-up/customizing-the-user-interface/
This is useful for fine-tuning your website. For example, you could replace US spelling with UK spelling (thus avoiding installing the UK language translation). Or you might want to change the wording on parts of a standard form without having to make a custom template.
The words—or sentences—that we want to replace are called strings. In CiviCRM, we can enter the strings we don't want, and replace them with strings we do want.
Navigate to Administer | System Settings | Customize Data and Screens | Word Replacement.

In this example, I am replacing the US spelling of "Organization" with the UK version, "Organisation".
Use the Exact Match checkbox to match words precisely. This would then exclude plurals of the word from being matched. All word replacements are case sensitive.
Geocoding allows you to do location-based searching and to display the maps of contacts.
You need to set a mapping provider—that is a service that will provide you with the visual maps—and a geocoding provider, which will translate your contact addresses into latitude and longitude coordinates.
Navigate to Administer | Localization | Address settings. In Address Display, make sure that the Street Address Parsing checkbox is ticked.
Navigate to Administer | System Settings | Mapping and Geocoding. Set Mapping Provider to Google or Openstreetmap. Set Geocoding Provider to Google.
Navigate to Administer | System Settings | Scheduled Jobs. The Geocode and Parse Addresses scheduled job should now be enabled. You can set how regularly you want CiviCRM to geocode your address data.
Geocoding Provider finds latitude and longitude coordinates for each contact address. Mapping Provider uses this information to draw a local map, with a pointer for the contact. Geocode and Parse Addresses do the geocoding work each day, though you can change this in the settings.
Google currently limits geocoding requests to 2,500 per 24 hours. So, if you exceed this limit, Google may not process requests; it may even restrict access to their geocoding service should you continue to break this limit. This is a problem when you have thousands of addresses to process—for example, after a big import of address data.
CiviCRM does not have a tool to place a daily limit on the number of contacts that are processed each day. But you can put parameters into the Geocode and Parse Addresses scheduled job that provide a range of contact IDs to process. You would have to change this each day to work your way though all your contacts.
Navigate to Administer | System Settings | Scheduled Jobs, and edit the Geocode and Parse Addresses scheduled job.
In the Command Parameters box, enter:
start= 1
end=2500
1would be the ID of your first contact. If you have access to your database tables, check the database tablecivicrm_contactto know what the first value for your contacts is.
Further details about geocoding in CiviCRM are available at http://wiki.civicrm.org/confluence/display/CRMDOC43/Mapping+and+Geocoding
Interactions between your contacts and your organization are many and complex. A lot of these interactions will involve exchanges of e-mail. You may want to keep a record of these exchanges for each of your contacts. This is particularly useful in situations where you are dealing with a contact and you need to see a history of correspondence relating to the contact and other members of your organization. CiviCRM lets you do this by filing e-mail correspondence as an activity on each contact record.
We will set up an e-mail account that will act as a "dropbox" for messages that we want to file, and link this to CiviCRM.
Set up an e-mail account. You can use Gmail or an account provided by your hosting provider. In this recipe we will use an account called
filing@mycivicrmsite.com.Navigate to Administer | System Settings | Enable CiviCRM components, and make sure that CiviMail is enabled.
Navigate to Administer | CiviMail | Mail Accounts.
Click on the Add Mail Account button and complete the details for each account you are adding. Getting this right can sometimes be a matter of trial and error. Leave the Source field blank.

Create a test e-mail message in your e-mail client, and Bcc it to
filing@mycivicrmsite.com.Navigate to Administer | System Settings | Scheduled Jobs, and execute the job titled Process Inbound Emails.
Click on the View Job Log link to see the log entry. If the log error message is
Failure, this is highly likely to be a connection problem, so you must go back to Administer | CiviMail | Mail Accounts, and make the necessary changes.Navigate to Reports | Contact Reports | Activities. You will see that CiviCRM has recorded e-mail activities for the sender and the recipient of the e-mail.
Each time CiviCRM processes inbound e-mails, it checks the e-mail account you had set up. It then processes each message. If the sender or recipient e-mail address is not held within CiviCRM, it will create a new contact record for each, and will file the e-mail activity.
If the contacts do exist, it files the e-mails as an activity for the sender and an activity for the receiver.
You can find detailed guidance on configuring CiviMail accounts at http://wiki.civicrm.org/confluence/display/CRMDOC43/Autofiling+email+activities+via+EmailProcessor
Activities are fundamental to how CiviCRM works. They are a record of all interactions between your organization and your contacts. CiviCRM comes with a ready-made set of activity types, such as phone calls, meetings, and e-mails, that can be used in most circumstances.
You can add your own activity types to suit your organization's needs. For example, yours may be an organization that performs background checks on volunteers before they are allowed to work with its clients. You could create an activity type called Background Check that would help you manage this process.
You should consider what activity types you need as part of the planning stage of your CiviCRM deployment. Adding a new activity type in CiviCRM is easy.
Navigate to Administer | Customize Data and Screens | Activity Types. Click on the Add activity type button. In the Label field, enter your activity. In this case we will use Background Check.
In the Component field, we can choose to have the new activity set against Contacts.
Save the new activity type.
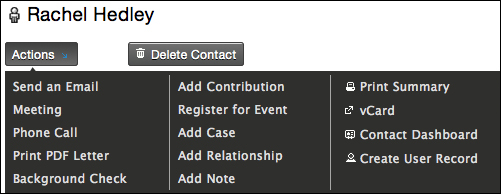
Test your new activity type by going to a contact and clicking on the Actions button present at the top left of the contact screen. This will show a drop-down list of available actions. Activities are listed in the first column.
The Adding custom fields recipe in this chapter
You can find further details about CiviCRM Activities at http://book.civicrm.org/user/current/organising-your-data/activities/
Custom fields are a great way of storing and organizing data in CiviCRM. Custom fields are contained in custom datasets, and you apply each set to an object in CiviCRM, such as a contact type, an activity, or an event. For example, if you were organizing soccer teams, you might want to have a custom fieldset called Soccer Data that contains custom fields for playing position, goals scored, games played, and so on. Custom fields are searchable using advanced search.
Custom fields need a bit of planning because once you have created a custom fieldset and applied it to an object, you cannot re-edit it and apply it to a different object. For example, let's say you are organizing a boat race. You want to collect information on boat size and boat type. You could choose to collect this custom information for each individual who applies to race, or for each actual participant in the race, or for each team in the race. So if you applied it to an individual contact and then changed your mind and only wanted to collect it for each participant, you would have to recreate the whole custom set of fields.
So you need to think about the following questions:
What sort of unique data do you want to collect?
What object do you want to apply the custom data set to?
In this example, we will add a simple custom field to the Phone Call activity. So when a phone call activity is recorded with a contact, the custom field will record if the call was general, a membership enquiry, or an event enquiry.
First we will create a custom data set, and then we will add some custom fields to it. In this recipe, we will add some fields to get data about phone calls.
Navigate to Administer | Customize Data and Screens | Custom Fields. You will see a screen that contains the current listing of custom datasets.

Click on the Add Set of Custom Fields button.

In this recipe, call the custom data set Phone call options, or substitute your own label.
In the Used For field, choose Activities and then choose Phone Call. This means that when a
Phone Callactivity is created, the fields will appear on the activity form for the user to complete.The Collapse this set on initial display checkbox is checked by default. This means that when you look at the contact record, the custom fields will be hidden until you click on the custom fieldset title. Uncheck it.
Save the new custom fieldset and add custom fields.

Add a set of three options to record the nature of the phone call. It is beyond the scope of this book to go into the details of the various field types available.
Save the custom fields.
Navigate to a contact and add the
Phone Callactivity. The custom field is available.
If you add custom fieldsets to contacts, you will get more options. You can add a fieldset multiple times to the same record. This is useful for recording employment histories or academic achievements.
You can create a custom fieldset for cases, relationships, groups, events, and memberships.
You can find further details about creating custom fields at http://book.civicrm.org/user/current/organising-your-data/custom-fields/
Scheduled Reminders are a great new feature in CiviCRM. For example, you might have created an Activity for a colleague—perhaps a meeting that you have scheduled for next Friday. With Scheduled Reminders, you can send an e-mail reminder (say, the day before), reminding them to read the agenda for the meeting, and about the meeting itself.
You can also use Scheduled Reminders to accomplish the activity itself, if it involves e-mailing something. For example, you might schedule an activity, called Welcome Information Pack, for a new contact. Welcome Information Pack is an e-mail message that contains useful information and links back to your site for resources and so forth. You can configure a Scheduled Reminder as the Welcome Information Pack itself and have it sent to the contact at the scheduled time. This is how the Scheduled Reminder e-mail actually accomplishes the task.
You do not need to have cron running on your site to test this recipe. But, for this recipe to work on your live site, you must have cron running.
You will need to know how to set up and use mail templates within CiviCRM.
First we will set up the activities we want to schedule and then we will create the Scheduled Reminder for each activity. Every Scheduled Reminder uses a mail template. We will configure the mail template to accomplish the original activity.
Navigate to Administer | Customized Data and Screens | Activity types.
Set up two new activities, Volunteer Pack 1 and Volunteer Pack 2. Make sure that the Component field is set to Contact. Now go to a test contact. Click on the Actions button and schedule the Volunteer Pack 1 activity.

You do not need to fill in the Subject and Location fields. Fill in the Date field. For testing purposes set this to 10 minutes from the current time.
You do not need to fill in the Duration field. Make sure the Status field is set to Scheduled.
Now set up the Volunteer Pack 2 activity in the same way. For testing purposes, set the date and time to 15 minutes from the current time.
Click on the Activities tab on the contact screen to check if your activities have been scheduled.
Navigate to Communications | Schedule Reminders, and click on Add a reminder.

Give the reminder a title such as Send Volunteer Pack 1. Select the Volunteer Pack 1 activity and select Scheduled for the activity status field.
For When, select the default values: 0, hour(s), before, Activity Date Time. For Recipient(s), select Activity Targets. Make sure the Send email checkbox is checked.
Now select an e-mail template, or prepare an e-mail using the rich text editor. Save the schedule.
Now add another schedule for the Volunteer Pack 2 activity.
Navigate to Administer | System Settings | Scheduled Jobs. Navigate to the Send Scheduled Reminder job.
Check that the job is enabled, and for testing purposes, set the interval to every time cron is run.
CiviCRM will now send out your reminders at the scheduled test times. Check your test e-mail account for incoming mails at regular intervals.
The Schedule Reminders system does not automate your workflow.
If you look at the Activities tab for your test contact, you will see that the status is still set to Scheduled even after the reminder has been sent. This is because Scheduled Reminder is sending out a reminder about the activity, not accomplishing the activity itself.
You may wish to investigate writing a module that switches the activity to the status Completed once the reminder is sent.
You can find further information about Scheduled Reminders at http://book.civicrm.org/user/current/email/scheduled-reminders/
CiviCase was developed to manage and track interactions between an organization and it's clients in case management situations. It can be adapted to suit any internal or external processes that have regular, predictable, and reasonably well-defined workflows or procedures. Many NGOs generally have human resource functions such as hiring and training staff. Using CiviCase to manage these processes provides consistency, compliancy, and accountability to our human resource procedures. In this recipe we will configure a CiviCase type that will enable us to create and manage the employment records of staff.
CiviCase does not have a user interface for configuring CiviCase types. Instead, we create all the activity types and relationships that we need, and then we create an XML file that generates and schedules these activities when a case is opened. The CiviCase type we are going to create will handle three activities:
Contract acceptance: This activity happens when our new employee signs the employment contract
Annual appraisal: This activity happens when our employee is appraised for performance each year
Exit interview: This activity happens when our employee leaves employment with our organization
We will use the XML file to also generate the relationship types associated with the employment record. These are:
Line Manager
HR Officer
Enable CiviCase by navigating to Administer | System Settings | Enable CiviCRM Components.
Check that you have set up a Custom Templates path for CiviCRM. This is a directory on your server that stores custom files for CiviCRM. This is where you will store the CiviCase XML file. Create a directory on your web server for your custom CiviCRM files called
custom_civicrm. You can give it any name you like. Navigate to Administer | System Settings | Directories to set the path to the directory you just created.
Create the following directory path in your
CustomTemplatesdirectory:custom_civicrm/CRM/Case/xml/configurationCreate a text file called
StaffRecord.xmlin thecustom_civicrm/CRM/Case/xml/configurationdirectory, so the path to the file will becustom_civicrm/CRM/Case/xml/configuration/StaffRecord.xml.Using a suitable text editor, enter the following XML code:
<?xml version="1.0" encoding="iso-8859-1" ?> <CaseType> <name>Staff Record</name> <ActivityTypes> <ActivityType> <name>Open Case</name> <max_instances>1</max_instances> </ActivityType> <ActivityType> <name>Contract acceptance</name> <max_instances>1</max_instances> </ActivityType> <ActivityType> <name>Annual appraisal</name> </ActivityType> <ActivityType> <name>Exit interview</name> <max_instances>1</max_instances> </ActivityType> <ActivityType> <name>Change Case Type</name> </ActivityType> <ActivityType> <name>Change Case Status</name> </ActivityType> <ActivityType> <name>Change Case Start Date</name> </ActivityType> <ActivityType> <name>Link Cases</name> </ActivityType> </ActivityTypes> <ActivitySets> <ActivitySet> <name>standard_timeline</name> <label>Standard Timeline</label> <timeline>true</timeline> <ActivityTypes> <ActivityType> <name>Open Case</name> <status>Completed</status> </ActivityType> <ActivityType> <name>Contract acceptance</name> <reference_activity>Open Case</reference_activity> <reference_offset>1</reference_offset> </ActivityType> <ActivityType> <name>Annual appraisal</name> <reference_activity>Open Case</reference_activity> <reference_offset>365</reference_offset> <reference_select>newest</reference_select> </ActivityType> </ActivityTypes> </ActivitySet> </ActivitySets> <CaseRoles> <RelationshipType> <name>HR Manager</name> <creator>1</creator> </RelationshipType> <RelationshipType> <name>Line Manager</name> </RelationshipType> </CaseRoles> </CaseType>Navigate to Administer | Customized Data and Screens |Activity types, and create the three activity types described in the XML document:
Contract acceptance
Annual appraisal
Exit interview
Make sure the names of the activity types are exactly the same as shown in the XML document.
Make sure that you select CiviCase as the component for each activity type.
Create the relationship types that are described in the XML document. Navigate to Administer | Customize Data and Screens , and create two relationship types,
HR OfficerandLine Manager. Make sure that these relationships have exactly the same names and capitalizations that you used in the XML file. Make sure you name the Relationship Label from B to A—exactly the same as the relationship type.Navigate to this file on your web server:
sites/modules/civicrm/CRM/Case/xml/configuration.sample/settings.xml, and copy it to the configuration directory,custom_civicrm/CRM/Case/xml/configurationyou previously created.This is a global settings file for CiviCase. You do not need to alter it.
Navigate to Administer | CiviCase. Add a case type called
Staff Record.Navigate to a test contact, click on the Actions button and add a case, choosing Staff Record.
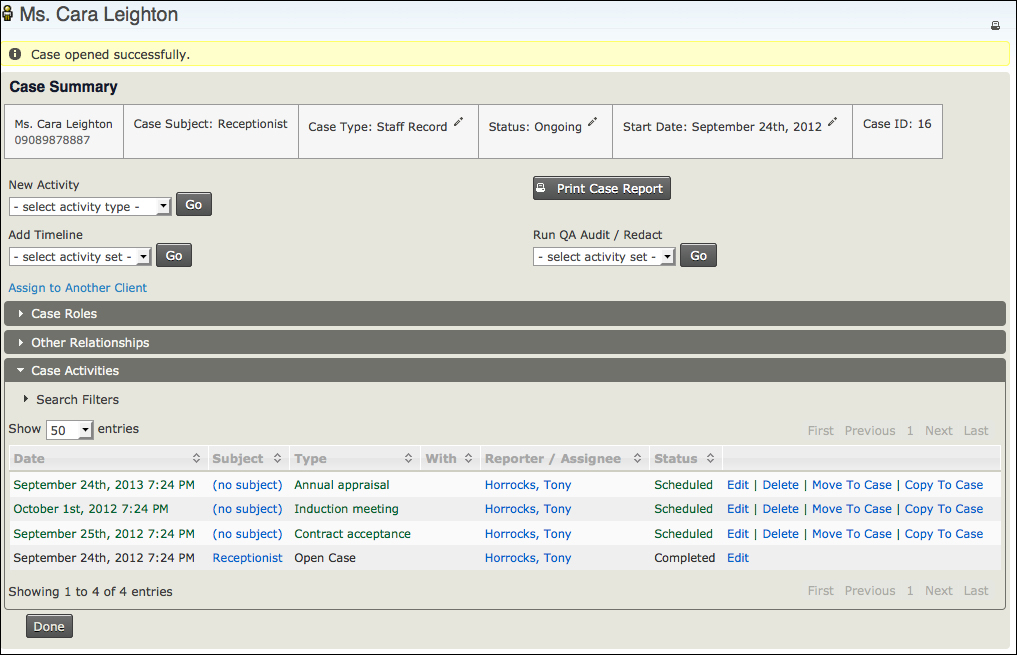
The XML code does all the work for us once it is set up. Let's go through the structure. This provides the name of the case type that we will use:
<?xml version="1.0" encoding="iso-8859-1" ?>
<CaseType>
<name>Staff Record</name>
We have a section called ActivityTypes (note the plural!). It is a container for each activity type that is going to be associated with the Staff Record case.
<ActivityTypes>
<ActivityType>
      <name>Open Case</name>
      <max_instances>1</max_instances>
    </ActivityType>
</ActivityTypes>
CiviCase always starts with <ActivityType> named Open Case.
<max_instances> tells CiviCase how many instances of the activity to create. As a case is opened only once, there is only one instance.
<ActivityType>
    <name>Contract acceptance</name>
    <max_instances>1</max_instances>
</ActivityType>
<ActivityType>
    <name>Annual appraisal</name>
</ActivityType>
<ActivityType>
    <name>Exit interview</name>
    <max_instances>1</max_instances>
</ActivityType>
The three activity types that we will use in our CiviCase are described next. You can see that the activity type named Annual appraisal does not have a <max_instances> tag. This is because annual appraisals take place each year and there is no defined maximum.
Now that we have set up what activities we will use for our case, we can schedule some of them on a timeline. For this, we create another section, called ActivitySets, in the XML file.
<ActivitySets>
<ActivitySet>
<name>standard_timeline</name>
<label>Standard Timeline</label>
<timeline>true</timeline>
<ActivityTypes>
<ActivityType>
<name>Open Case</name>
<status>Completed</status>
</ActivityType>
<ActivityType>
<name>Contract acceptance</name>
<reference_activity>Open Case</reference_activity>
<reference_offset>7</reference_offset>
<reference_select>newest</reference_select>
</ActivityType>
</ActivityTypes>
</ActivitySet>
</ActivitySets>
Here we have the section called ActivitySets. It is a container for one or more instances of ActivitySet.
ActivitySet is a set of scheduled activities that CiviCase will generate when our Staff Record case is opened. When the case is first generated, CiviCase uses the <standard_timeline> activity set to generate the initial set of activities. You can have additional ActivitySet instances that use a different timeline. This is used to create activity branches within a case. In our example it could be the case that if an employee has a poor annual appraisal, we need to generate another set of activities to deal with the outcome. We can do this by having it configured in our XML file and applying it in the Add Timeline section of the CiviCase screen.
Within each <ActivitySet> instance, we have <ActivityType> again, and we have some tags to schedule each type.
<reference_offset> is the time in days that the activity will be scheduled. The offset is measured from whatever activity is entered in the <reference_activity> tag.
If the referenced activity has multiple instances, such as a training course, then we use the <reference_select> tag to pick the newest instance of the activity. If we do not want an activity schedule, we do not include it in <ActivitySet>.
Finally, we have a <status> tag that allows us to see the initial status of the activity when it is scheduled.
In our previous example, we have set the Contract acceptance activity to be scheduled seven days after the Open Case activity.
<CaseRoles>
<RelationshipType>
<name>Human Resources Manager</name>
<creator>1</creator>
</RelationshipType>
<RelationshipType>
<name>Line Manager</name>
</RelationshipType>
</CaseRoles>
Finally, there is an XML section where we can create our relationships for each case. Each relationship we create becomes a role within the case.
This is just a very simplified example of what can be achieved using CiviCase. There are other ways you could apply the same principles: training schedules, volunteer induction programs, membership induction programs, as well as traditional casework applications.
Chapter 1, Creating Activity Types
You can find more about CiviCRM relationships at http://book.civicrm.org/user/current/organising-your-data/relationships/
You can find more about CiviCase at http://book.civicrm.org/user/current/case-management/what-is-civicase/
You might want your users to be able to use CiviCRM in a different language than US English. The CiviCRM user interface is available in many languages. This recipe shows you how to install these languages and localize your CiviCRM installation.
There are two stages to localizing CiviCRM. First we will download and install an interface translation and then we will configure CiviCRM using the Localization admin screens.
Go to http://sourceforge.net/projects/civicrm/files/civicrm-stable and open the latest stable version of CiviCRM. There you will see an archive that contains the translation files. It is called
civicrm-<version number>-l10n.tar.gz. If you uncompress this archive you will see there are two folders,l10nandsql.Copy the
l10nfolder into the CiviCRM module folder.Copy the contents of the
sqlfolder into thesqldirectory that already exists in your CiviCRM module folder. You can now explore what is in thel10nfolder. It contains subdirectories for each language that CiviCRM supports. The name of each subdirectory is a locale code for the translation. These are reasonably easy to understand. For example,es_ESis mainland Spanish,es_MXis Mexican Spanish.Remove languages that you do not wish to use from the
l10nfolder. Do the same for unused languages in thesqlfolder.Navigate to Administer | Localization | Languages, Currency, Location.
At the top of the screen, select a new Default Language. In this case we will use French.

Complete the other settings on this page for currency, date formats, and addressing. Save your settings. The site is now displayed in French and supports the date, currency, and addressing formats that were configured.
Optionally under Multiple Languages Support you can check the Enable Multiple Languages checkbox. This allows the CiviCRM user to switch between two or more languages using the CiviCRM Language Switcher block available in your CMS. It also enables data entry in a different language.
If you have checked Enable Multiple Languages, save your settings and then at the top of the screen add in the extra languages that you require.

Here we are adding French. We can add extra ones by checking the checkboxes under Available Languages.

Save the settings.
In your CMS—in this case Drupal—navigate to Structure | Blocks and enable the CiviCRM Language Switcher block. The user can now switch between languages within CiviCRM.

You can find more about CiviCRM localization at http://book.civicrm.org/user/current/the-civicrm-community/localising-civicrm/