


Xen originated as a research project at the University of Cambridge, led by Ian Pratt, senior lecturer at Cambridge and founder of XenSource, Inc. The first public release of Xen occurred in 2003. Citrix Systems acquired XenSource, Inc in October 2007 and subsequently renamed XenSource's products under the Citrix brand "XenServer".
On 21 October 2009, Citrix further announced their, now commercial, applications of XenServer would be fully open source and made freely available to the public under the name Xen Cloud Platform (XCP).
Although Citrix acquired XenSource, Xen is developed and maintained by the community as free software, licensed under the GNU General Public License (GPLv2).
Citrix XenServer 6.0 is the last release of the Citrix server virtualization platform. The XenServer package contains all you need to create and manage a deployment of virtual x86 and x64 computers running on Xen®, the open source paravirtualizing hypervisor with near-native performance.
XenServer runs directly on server hardware without requiring an underlying operating system, which results in an efficient and scalable system. XenServer works by abstracting elements from the physical machine (such as hard drives, resources, and ports) and allocating them to the virtual machines running on it.
In Xen systems the hypervisor is the lowest and most privileged software layer. This layer supports one or more guest operating systems that are run on the physical CPUs. The first guest operating system, called in Xen terminology Control Domain (dom0) is executed automatically when the hypervisor boots and receives special management privileges and direct access to all physical hardware. The Control Domain is a secure privileged Virtual Machine that runs the XenServer management toolstack. Besides providing XenServer management functions, the Control Domain also runs the driver stack that provides user-created virtual machines access to physical devices.
A virtual machine (VM) is a computer composed entirely of software that can run its own operating system and applications as if it were a physical computer. A VM behaves exactly like a physical computer and contains its own virtual (software-based) CPU, RAM, hard disk, and network interface card (NIC). XenServer is available in four editions:
Citrix XenServer (Free): Proven virtualization platform that delivers uncompromised performance, scale, and flexibility at no cost
Citrix XenServer Advanced Edition: Key high availability and advanced management tools that take virtual infrastructure to the next level
Citrix XenServer Enterprise Edition: Essential integration and optimization capabilities for production deployments of virtual machines
Citrix XenServer Platinum Edition: Advanced automation and cloud computing features for enterprise-wide virtual environments
You can find more information about features included in each edition at http://www.citrix.com/English/ps2/products/subfeature.asp?contentID=2300456.
Note
You can download XenServer http://www.citrix.com/English/ss/downloads/results.asp?productID=683148.
In this chapter we will cover the following topics:
XenServer resource pool overview and requirements
XenServer resource pool creation
Creating an heterogeneous XenServer resource pool
Designating a new Pool Master host
Removing a XenServer Host from a resource pool
Preparing a Pool of XenServer Hosts for Maintenance
Licensing XenServer hosts
A Citrix XenServer pool is a group of XenServer hosts and allows you to view multiple servers as a single resource, enabling flexible deployment of virtual machines based on the resource needs and business priorities.
A pool is comprised of multiple XenServer hosts bound together as a single managed entity. When combined with shared storage, virtual machines (VMs) can be started on any XenServer host in the pool that has sufficient available resources such as CPU or memory, and then dynamically moved between hosts while running, using the "XenMotion" feature with minimal downtime. If an individual XenServer host suffers a hardware failure, you can restart the failed VM(s) on another host in the same pool.
If the High Availability (HA) feature (only available to XenServer Advanced Edition or higher) is enabled, VMs are automatically moved to another host in the event of a host failure.
A pool always has at least one physical host, known as the "pool master", that provides a single point of contact for all of the servers in the pool, known as "slaves", managing communication to other members of the pool as necessary.
If the pool master is shut down or unavailable, you will not able to connect to the pool until the master is online again or until you nominate one of the other members as the new pool master for the pool. Virtual machines that are started at the time the pool master became unavailable continue running. Note that every member of a resource pool contains all the information necessary to take on the role of master, if you need to replace a pool master.
Note
If the pool's master fails, automatic master reselection will only take place if High Availability is enabled. You can learn about High Availability in Chapter 8, Managing High Availability and Snapshots.
A resource pool is a homogeneous aggregate of one or more XenServer hosts, up to a maximum of 16. What is the definition of homogeneous?
A XenServer pool is homogeneous when:
The CPUs on the server joining the pool are the same (in terms of vendor, model, and features) as the CPUs on servers already in the pool
The server joining the pool is running the same version of XenServer software, at the same patch level, as servers already in the pool
When you join a host to a pool, remember also that XenServer will enforce additional constraints, in particular:
It is not a member of an existing resource pool
It has no shared storage configured
There are no running or suspended Virtual Machines on the XenServer host you are joining to the pool
There are no active operations on the VMs in progress such as restart or shutdown
When you want to join a new host remember to check the following:
Clock of the host joining the pool is synchronized to the same time as the pool master (for example, by using NTP)
Its primary management interface is not bonded (you can configure this once the host has successfully joined the pool)
Its management IP address is static (either configured on the host itself or by using an appropriate configuration on your DHCP server)
Why have we introduced the concept homogeneous? Because In XenServer 6.0, you can also create a heterogeneous pool. A pool is heterogeneous when you join disparate hosts together.
XenServer 6.0 makes it possible to create a heterogeneous pool by leveraging technologies in recent Intel (FlexMigration) and AMD (Extended Migration) CPUs that provide CPU "masking" or "leveling". These features allow a CPU to be configured to appear as providing a different make, model, or functionality than it actually does. CPU masking enables you to create pools of hosts with disparate CPUs and permits you to use the XenMotion feature safely.
Using XenServer to mask the CPU features of a new server, so that it will match the features of the existing servers in a pool, requires the following:
The CPUs of the server joining the pool must be of the same vendor (that is, AMD, Intel) as the CPUs on servers already in the pool
The CPUs of the server joining the pool must support either Intel FlexMigration or AMD Enhanced Migration
The features of the older CPUs must be a subset of the features of the CPUs of the server joining the pool
The server joining the pool is running the same version of the XenServer software, with the same hotfixes installed, as servers already in the pool
After we have introduced the resource pool concept and requirements, we can start discussing how to create a resource pool in XenServer.
Resource pools can be created using either the XenCenter management console or the xe command-line interface (CLI). When you join a new host to a resource pool, the joining host synchronizes its local database with the pool-wide one, hosted and managed by the pool master, and inherits some settings from the pool:
VM, local, and remote storage configuration is added to the pool-wide database.
The joining host inherits existing shared storage repositories in the pool and appropriate PBD (Physical Block Devices) records are created, so that the new host can access existing shared storage automatically.
Networking information is partially inherited by the joining host: The structural details of NICs, VLANs, and bonded interfaces are all inherited, but policy information is not. This policy information, which must be re-configured, includes:
The IP addresses of management NICs, which are preserved from the original configuration.
The location of the primary management interface, which remains the same as the original configuration. For example, if the other pool hosts have their primary management interfaces on a bonded interface, then the joining host must be explicitly migrated to the bond once it has joined.
Dedicated storage NICs, which must be re-assigned to the joining host from XenCenter or the CLI, and the PBDs re-plugged to route the traffic accordingly.
Concepts related to storage and networking will be discussed in Chapter 2, Managing User Authentication, and Chapter 5, Managing Virtual Machines.
Now, we are ready to create a XenServer resource pool. Two hosts will be part of this pool, xenserver1 and xenserver2.
Host xenserver1 is configured with IP address 192.168.0.1 and host xenserver2 is configured with IP address 192.168.0.2.
We will configure the resource pool using XenCenter and CLI.
Usually XenCenter is a faster and user-friendly method for doing this task, so we will create the resource pool using XenCenter first:
Start XenCenter:

Click on Server | Add to add the
xenserver1host to the console.Type the IP address of
xenserver1and password for the userroot.
The first time you add a new host, the Save and Restore Connection State dialog box appears. This enables you to set your preferences for storing your host connection information and automatically restoring server connections.
Now, the
xenserver1host is visible on the XenCenter console:
Repeat the previous steps to add the
xenserver2host.Click on Pool | New Pool.
Type a name for the pool and, optionally, a description. Select the master and click on the servers that will be joined. In this example, we named the pool
XenPooland the masterxenserver1.
Click on Create Pool. The new pool will be created and configured:

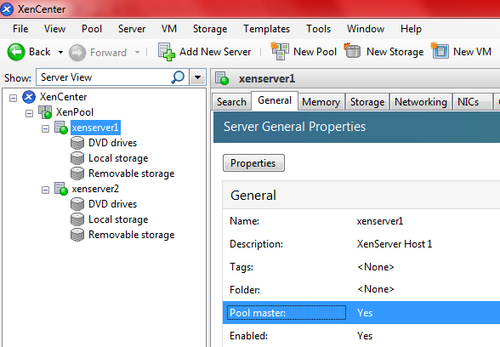
If you want to check if a XenServer host is the pool master for a pool, look at the Pool Master property available on the General tab of the host in XenCenter. If the value is Yes in the
Pool Master property the host is acting as the pool master for the pool. Also, when you connect to a XenServer pool, the first host displayed is the pool master. For example, if xenserver2 is the pool master of the pool, xenserver2 will be displayed first in XenCenter.
Now it is time to discover how to designate a pool master using the xe command-line interface. You can open the xe CLI from XenCenter by clicking on the Console tab or from a computer with XenCenter installed executing the xe.exe command from the path C:\Program Files\Citrix\XenCenter:
xe -s <server> -u <username> -pw <password> [-p <port>] <command> <arguments>
where:
The server parameter is used to specify the hostname or IP address
The username and password parameters are used to specify credentials for logging in
An optional port parameter can be used to specify the agent port on the remote XenServer Host (defaults to 443)
The command parameter is the
xenservercommand you want to executeThe arguments parameter is the argument related to the
xenservercommand you want to execute
In the following example, we use the xe CLI from XenCenter:
From XenCenter, select
xenserver1and click on the Console tab:
Press Enter to log in to the console.
XenServer hosts belong to an unnamed pool by default. To create your first resource pool, rename the existing nameless pool using the following command:
xe pool-param-set name-label=<"New Pool"> uuid=<pool_uuid>where
name-labelis the name to assign to the pool anduuidis the the unique identifier/object reference for the pool. To find the UUID for the pool, press the Tab key on your keyboard.We will run following command to create the pool named
XenPool:xe pool-param-set name-label="XenPool" uuid=8eaa281f-c7ae-20d3-f37d-00e8596e4bc4
Now we have to join the
xenserver2host to the pool. To do this, we will open the console onxenserver2and execute the following command:xe pool-join master-address=<host1> master-username=<administrator_username> master-password=<password>where
master-addressis the fully-qualified domain name or IP address of the pool master,master-usernameis the name of the master's administrator (root), andmaster-passwordmust be the administrator password set when the XenServer host acting as master was installed.We will run the following command to join
xenserver2to theXenPool:xe pool-join master-address=192.168.0.1 master-username=root master-password=xenserver
Host
xenserver2will join the pool, as shown in the following screenshots:

Note
You can use a program such as "PuTTY" to connect to XenServer hosts and execute console commands. You can download it from http://www.chiark.greenend.org.uk/~sgtatham/putty/download.html.
In the real world, virtual infrastructure grows according to the needs of the enterprise. It is often difficult to acquire multiple servers with the exact same CPUs and so minor variations are permitted. If you have a XenServer host in your environment with a different CPU you can join it to the pool by forcing the operation using the following xe command:
xe pool-join master-address=<host1> master-username=<administrator_username> master-password=<password> --force
where:
master-addressis the fully-qualified domain name or IP address of the pool mastermaster-usernameis the name of the master's administrator (root)master-passwordis the administrator password set when the XenServer host acting as master was installed
Creating heterogeneous resource pools is most easily done with XenCenter. XenCenter will automatically suggest using CPU masking whenever possible.
To add a heterogeneous XenServer host to a resource pool using the xe CLI use the following procedure:
Find the CPU features of the Pool Master by running the following command:
xe host-get-cpu-features
On the new server, run the
xehost-set-cpu-featurescommand and copy and paste the Pool Master's features into the features parameter. For example:xe host-set-cpu-features features= <pool_master's_cpu_features> xe host-set-cpu-features features=17bae3ff-bfebfbff-00000001-28100800

Restart the new server.
Run the
xepool-joincommand on the new server to join the pool.To return a server with masked CPU features back to its normal capabilities, run the following command:
xe host-reset-cpu-features
It can be useful to learn how to designate a new master host for our pool XenPool. Designating a new pool master is an important task that a XenServer administrator should know.
The first thing to remember is that you can only do it using CLI.
In the next example, we designate the xenserver2 host as the new pool master:
Open a console on any host of the pool.
Identify the UUID of the host that will be the new master executing the command:
xe host-list
Execute the following command to designate the new master:
xe pool-designate-new-master host-uuid=<host-uuid>where
host-uuidis the value you have found in the previous step.We will run the following command to designate
xenserver2the new master for the XenPool:xe pool-designate-new-master host-uuid=8791cc9e-e1e0-43f0-9104-d608bb033b9b
You may have the need to remove a XenServer host from a resource pool because that host is no longer available or because you decide to retire it.
When a XenServer host is removed (ejected) from a pool, the machine is rebooted, reinitialized, and left in a state equivalent to that after a fresh installation. It is important not to eject a XenServer host from a pool if there is important data on the local disks, because all of the data will be erased upon ejection from the pool.
Note: Before removing a XenServer host from a pool, ensure that you shut down all the VMs running on that host. You may see a warnin stating that the host cannot be removed.
Note
You cannot remove the host acting as pool master from a resource pool. First, designate another host as master.
You can remove a host using XenCenter or CLI.
You have decided to substitute your host xenserver2 with a new server so to complete this task you will have to remove it from the pool named XenPool:
Open XenCenter and select host
xenserver2. Right-click and select Remove server from Pool as shown in the following screenshot:
A warning will be displayed informing you that the operation will erase all the data. Click on Yes.

The server will be removed from the pool and will be restarted.

To perform the same task using the CLI, follow this procedure:
Identify the UUID of the host that you have to eject by executing the following command:
xe host-list
Execute the following command to start the removal process:
xe pool-eject host-uuid=<host_uuid>where
host-uuidis the value that you have found in the previous step.We will run following command to remove
xenserver2from theXenPool:xe pool-eject host-uuid=8791cc9e-e1e0-43f0-9104-d608bb033b9b
Type
yesto continue. The host will be ejected and left in a freshly-installed state.
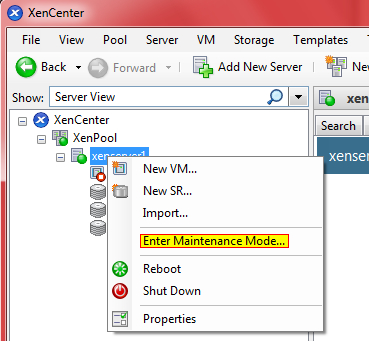
You may need to take a managed server offline for a number of reasons, such as a rolling upgrade of virtualization software, adding or testing connectivity to a new network, diagnosing an underlying hardware issue, or adding connectivity to a new storage system. In XenCenter, you can take a server offline temporarily by placing it into Maintenance Mode.
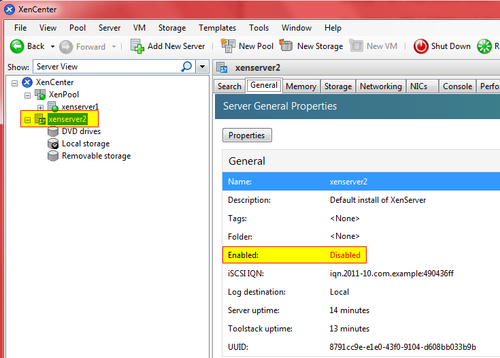
If the server is in a resource pool, when you place it into Maintenance Mode, all running VMs will be automatically migrated from it to another server in the same pool. If the server is the pool master, a new master will also be selected for the pool.
While a server is in Maintenance Mode you cannot create or start any VMs on it.
When all running VMs have been successfully migrated off the server, the server's status is changed to  and set to Disabled.
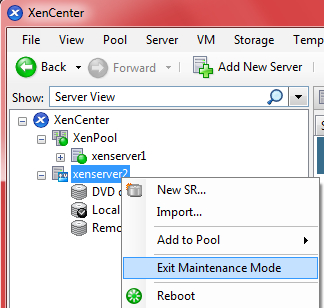
To take a server out of Maintenance Mode, select the server and then click on Exit Maintenance Mode in the shortcut menu, as shown in the following screenshot:
To prepare a XenServer host in a pool for maintenance operations using the CLI use the following procedure:
Open a console on any host of the pool.
Identify the UUID of the host you want to place in Maintenance Mode:
xe host-listExecute the following commands to start the removal process:
xe host-disable uuid=<host_uuid>
xe host-evacuate uuid=<host_uuid>
where the
host-uuidparameter is the value you have found in the previous step.This will disable the XenServer host and then migrate any running VMs to other XenServer hosts in the pool.

Once the maintenance operation is completed, enable the XenServer host by executing the following command:
xe host-enable
XenServer is available in four editions but you can move towards virtualization (if you have not yet done this in your enterprise) with just the free edition. It can be used without time limits and restrictions. Citrix requires you only to activate the product within 30 days after you have installed it and then renew the free license on an annual basis.
To activate the free edition, follow this procedure:
Request an activation key from Citrix using XenCenter.
Click on the Tools menu and select License Manager.
Select one or more hosts that you wish to activate. Click on Activate Free XenServer and then select Request Activation Key, as shown in the following screenshot:

XenCenter opens a web browser and takes you to the Citrix XenServer Activation page as shown in the following screenshot:

If XenCenter is unable to connect to the activation page (because the Internet connection is down, for example), then XenCenter gives you the option to save a
.txtfile locally with the activation request information.Note
You can upload the
.txtfile to https://activate.vmd.citrix.com at a later date.
Enter your details in the activation form, and then click on Submit. An e-mail with the activation key
(.xslicfile extension) will be sent to you shortly afterwards.Save the attached activation key to a known location on the computer running XenCenter or xe CLI.
Apply the activation key to your XenServer host using XenCenter or xe CLI.
To apply an activation key using XenCenter:
Click on the Tools menu and select License Manager.
Select the host you wish activate (you can only activate one host at a time). Click on Activate Free XenServer, and then select Apply Activation Key as shown in the following screenshot:
Browse to and select the activation key file, and select Open as shown in the following screenshot:

The information shown in the XenCenter License Manager will be updated as shown in the following screenshot:

To install an activation key using xe CLI, open a console on the host and run the following command:
xe host-license-add [license-file=<<path/license_filename>>]
XenServer Advanced, Enterprise, and Platinum editions use the same licensing model as other Citrix products.
XenServer Advanced editions and higher require a license for each XenServer host you use. All XenServer editions licenses must be added to and managed from a Citrix Licensing Server. If you are familiar with other Citrix products, you know this is the standard approach for licensing them. Citrix License Server stores licenses for all Citrix products and allocates them per users or devices.
Each XenServer host requires a license, but this does not limit the number of users that may connect to VMs on that host. While licensing must be configured for each XenServer host, the XenCenter License Manager allows you to apply the same settings to multiple hosts at once.
To license XenServer Advanced editions and higher:
Install the Citrix License Server and console on a Microsoft Windows Server machine.
Note
XenServer 6.0 requires Citrix Licensing 11.6.1 or higher. Refer to Citrix license server documentation for setup available at http://support.citrix.com/proddocs/topic/technologies/lic-library-node-wrapper.html.
Obtain your XenServer license files and load them onto the Citrix License Server.
Configure licensing for each XenServer host using XenCenter or xe CLI.
To configure licensing for XenServer hosts using XenCenter:
Select one or more host(s) that you wish to assign a license to. Click on Assign License.
The Apply License dialog box opens.
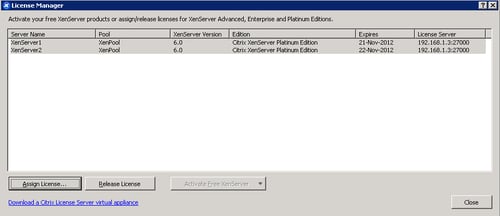
In the Apply License dialog box, choose the XenServer license edition and then enter the Citrix Licensing Server details. 27000 is the port that the licensing server uses by default for communication with Citrix products. If you changed the default port on the licensing server, enter the new number in the Port number box as shown in the following screenshot:

XenCenter contacts the specified license server and checks out a license for the specified host(s). The information shown in the XenCenter License Manager will be updated.
To release a license (to set a licensed host to the free XenServer edition) from the License Manager, select a host, and then click on Release License.
You can use the CLI to configure licensing for XenServer hosts as well.
To assign a license, execute the following command:
xe host-apply-edition edition=advanced|enterprise|platinum|enterprise-xd license-server-address=<license_server_address> host-uuid=<uuid_of_host> license-server-port=<license_server_port>
The
editionparameter is the edition of XenServer you have boughtThe
license-server-addressparameter is the IP address of the license serverThe
host-uuidparameter is the unique identifier/object reference of the XenServer hostThe
license-server-portparameter is the port number you have set on the license server configuration
We will run following command to assign a Platinum license to xenserver1:
xe host-apply-edition edition=platinum license-server-address=192.168.1.3 host-uuid=bdced52b-2228-4fb4-b02e-211f9aef1db6 license-server-port=27000
You only need to supply the license server IP address and port number parameters the first time you assign a license. The values are stored and used automatically if you do not specify the license server parameters in the future.
If no host UUID is specified, the license will be applied to the host that you are running the command on.
In this chapter we have learned resource pool concepts and requirements. Specifically:
Homogeneous and heterogeneous resource pool concepts
Creating a resource pool using XenCenter and xe CLI
Removing a XenServer host from a pool
Preparing a XenServer host for maintenance mode
Designating a new pool master host
Licensing a XenServer host
Knowing the commands and operations for managing the pool master and resource pool is the first step to successfully managing virtualization infrastructure based on Citrix XenServer.
In the next chapter we will discuss how to manage user authentication.
