


XenDesktop 5.6 is the latest version of the Citrix end user virtualization platform. System engineers can choose between two architectural implementations – Machine Creation Services (MCS), which consist of hosted desktops and applications published to users based on given accessibility permissions, and Provisioning Services (PVS), which consist of a single desktop or a pool of them, booted over a network and streamed on demand to end users.
In both cases, information is stored in a Citrix database repository, based on Microsoft SQL Server (Standard or Express edition); it's used and populated with data coming from the main architectural components (Desktop Controller, Desktop Studio, Provisioning Services server). Configured resources, such as virtual desktops, can be accessed by end users through a web portal called Web Interface.
The MCS and PVS architectures can be combined together, and used within the same company for different desktop distribution areas; this is the implementation of the Citrix FlexCast technique.
Tip
For a number of delivered virtual desktops equal to or greater than 500, you should always consider using the PVS architecture.
The main goal of this chapter is for you to understand the differences between the two main kinds of architectures, MCS and PVS. Once you've understood this, you'll be able to better comprehend what and how to implement a consistent and coherent XenDesktop installation.
Starting from the database server and licensing configuration, we'll walk through the XenDesktop components, Web Interface, and the complex configuration of the PVS architecture.
The first implementable architecture type is MCS; its most important part is based on hosted virtual desktops.
How can we determine whether MCS is the better solution for us? We've got a set of main parameters to decide, as follows:
MCS is the right solution if we only want to deploy the VDI infrastructure
We should choose MCS when the number of deployed desktops is under 2,500
MCS is preferable when we don't only want standardized machines, but we also want to give users the ability to install and customize their desktops
It should be better to use MCS when we need to frequently upgrade base images; despite the complexity of the operations required with the use of the PVS architecture, this is a quite simple process for the machine creation platforms
Consider implementing this architecture when you have a shared storage, such as Network File System (NFS) or Storage Area Network (SAN); especially in the second case, it's preferable to have the MCS architecture, thanks to its large IOPS capacity
To implement a pure MCS architecture, you need the following components:
Desktop Director
Desktop Controller
Web Interface
License server
The second kind of XenDesktop infrastructure is PVS, a Citrix implementation fully based on desktop streaming technology.
PVS is the right choice for the following cases:
When we need to provide users with not only hosted desktops, but especially with streamed workstations.
When we have more than one site with a number of desktops per location higher than 2,500.
When we don't have a shared storage, or when we're in the situation of a low performance data area. In this case, we'll take advantage of PVS memory caching activity.
When we have a lot of users logging on or logging off simultaneously; this is known as a boot storm phenomenon. Choosing PVS, we could avoid this problem by passing storage constraints.
To implement PVS instead of MCS, you must configure the following components in your architecture:
Desktop Director
Desktop Controller
Web Interface
License server
Citrix Provisioning Services
Tip
You should consider combining MCS and PVS together, especially in cases where your architecture has the right balance of RAM quantity and storage performance. This is what Citrix calls the FlexCast approach – a way to combine different architectures to satisfy all the requirements for a set of different end users' topologies.
XenDesktop 5.6 needs a repository to store all information about clients, users, permissions, and so on. The supported DBMS is Microsoft SQL Server. Depending on the specific application's requirements, we're able to choose between an integrated version of it, or a separate database installation, as discussed later in this chapter.
Citrix XenDesktop 5.6 supports the following versions of Microsoft SQL Server:
SQL Server 2008 Express Service Pack 1 (32 or 64 bit)
SQL Server 2008 Service Pack 2 or 3 (32 or 64 bit)
SQL Server 2008 R2 Express (64 bit only)
SQL Server 2008 R2 (64 bit only)
How can we choose the correct database version? It depends on what level of performance and availability is needed. For standalone installations (integrated with the XenDesktop Controller server) within a small environment, the Express edition should be the right choice. In the presence of a huge number of clients and users, if you want to create a clustered database instance, you should implement the non-Express version of SQL Server.
If we have decided to implement an integrated version of the database, we only need to flag the Install SQL Server Express option when installing XenDesktop; all the components and the configuration parameters will automatically be created and configured.
For a separate database installation, we need to perform the installation operations, as explained in the following section.
Perform the following steps to generate a SQL Server database, which will be used by XenDesktop:
From the SQL Server installation media, launch the executable setup file.
If you want, you can launch System Configuration Checker to perform a pre-installation test, and verify that all the requirements are met:

Click on the Installation tab, which you can see in the left-hand side menu and select New installation or add features to an existing installation. For the purpose of this book, we won't execute all the steps required to complete the database installation:

If you've got available resources, you can select to create a new named instance, not using the default SQL Server instance (MSSQLSERVER).
On the database server, create a database on the desired instance (preferably having a dedicated instance for Citrix, as previously seen) with the following parameters:
Create a new database instance on the database server, and set Collation sequence to Latin1_General_CI_AS_KS.
Configure the authentication method only as Windows authentication.
Configure the Permissions settings, as shown in the following table:
Activity
Server role
Database role
Database creation
dbcreatorSchema creation
securityadmindb_ownerController addition
securityadmindb_ownerController removal
db_ownerSchema update
db_owner
This permission will be granted to the operating system user, who will perform configuration activities through the Desktop Studio console.
We've configured the most common format for the collation sequences (the same used by Citrix), and also restricted the way to log on to the database at Windows authentication, because XenDesktop does not support SQL or Mixed mode. For the collation, you are free to use not only the indicated version, but the most important thing is that you will choose one that is a member of the *_CI_AS_KS category (collation family is case and accent insensitive, but kanatype sensitive).
You must be careful when increasing the size of database logging. Despite the normal data component (you should expect to have a database size of 250 MB with some thousands of clients), logs could unexpectedly increase in 24 hours, in the presence of many thousands of desktops. Based on the following table for MCS architectures, we'll be able to calculate the database log and data files occupation:
|
Component |
Data/log |
Occupation |
|---|---|---|
|
Registration information |
Data |
2.9 KB per desktop |
|
Session state |
Data |
5.1 KB per desktop |
|
Active Directory computer account info |
Data |
1.8 KB per desktop |
|
MCS machine info |
Data |
1.94 KB per desktop |
|
Transaction log for idle desktop |
Log |
62 KB per hour |
Note
For a more detailed SQL Server installation, please refer to the official Microsoft online documentation at http://technet.microsoft.com/en-us/sqlserver/bb265254.aspx.
In case of necessity to redeploy one or more Desktop Delivery Controller servers configured in your VDI infrastructure, the first action to perform is cleaning the Citrix XenDesktop configured database. To perform this task, you have to set all the Citrix components' database connection to null, using the custom Citrix PowerShell running the following commands:
Set-ConfigDBConnection -DBConnection $null
Set-AcctDBConnection -DBConnection $null
Set-HypDBConnection -DBConnection $null
Set-BrokerDBConnection -DBConnection $null
Once you've finished these operations, you can proceed with the manual deletion and the recreation of the SQL Server database.
Citrix permits users to buy XenDesktop in different versions, as shown in the following list:
The choice is based on personal needs; in this book, when we refer to XenDesktop 5.6, it will be about Platinum Edition, which has the ability to show and implement the full functionality of the platform.
The associated version of license server for XenDesktop 5.6 is Version 11.0. Starting from this release, we also have the ability to use a virtual appliance for XenServer (called License Server VPX). The system requirements for the usual setup (not VPX) are as follows:
Windows Server 2003, 2008, or 2008 R2 version; or Windows 7 (32 or 64 bits)
50 MB for licensing components and 2 GB for user and/or device licenses
.NET Framework 3.5
A compatible browser
In this section we are going to perform the required operations for the Citrix license server installation and configuration:
After downloading the software from your personal Citrix account, run the
CTX_Licensing.msiinstaller.Accept the Citrix license agreement.
Select a destination folder's path for the program, which is by default
C:\Program Files (x86)\Citrix\.Click on the Finish button when license server is successfully installed.
On the first configuration screen, you must assign port numbers for the License Server Port, Vendor Daemon Port, and Management Console Web Port fields, as shown in the following screenshot:
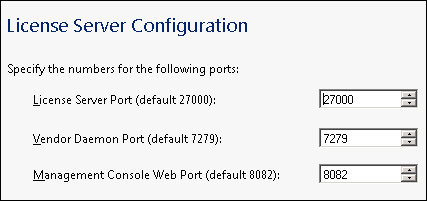
You can decide to leave default ports for these three options, or change them. In any case, the ports you'll decide to use must be opened on Windows Server's personal firewall.
To generate the license file for importing it to our license server, run a web browser installed on your client machine, connect to www.citrix.com/MyCitrix, and log in using your credentials.
Go to Manage licenses.
Click on Allocate licenses.
Insert the Full Qualified Domain Name (FQDN) of your license server, and select the number of licenses you want to allocate.
Generate the license file by clicking on the Allocate button.
Now you'll be able to save the file. When prompted for the location, select the path on which the license manager will read the file with the
.licextension, asC:\Program Files (x86)\Citrix\Licensing\MyFiles.Then, to configure the license server, click on Start | All programs | Citrix | Management consoles, and select License Administration Console.
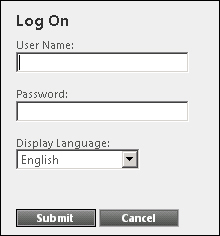
You'll see the summary dashboard; click on the Administration button and insert the administrative credentials for your machine (domain or local admin account):
After a quick look in the Summary tab, click on the first button on the left-hand side menu, User Configuration.
Add a new user account to differentiate from standard administrative machine credentials; we can decide to create this account as locally managed or a domain admin. After this operation, click on Save.
Now it's time to configure alerting. Depending on our needs, we can set up critical and important alerts. It's preferable to leave them as default settings, and click on Save to archive the options.
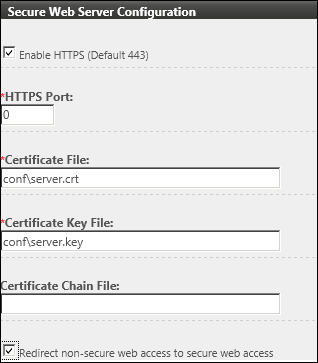
In the Server Configuration menu, configure the port for the Web server (default is 8082) and session timeout period (default is 30 minutes, but if possible, you should reduce this value, so you can avoid inactive sessions locking unused resources). For security reasons, it's a good practice enabling SSL (port 443) and eventually using a personal certificate for strong authentication (as shown in the following screenshot).
For security reasons, you should change default license server port number, which is 27000. The default ports range is from 27000 to 27009:
At the end is the most important part, Vendor Daemon Configuration. After the license file has been generated, click on Import License, browse for the file location, and upload it.
If everything is ok, you'll receive a confirmation message about the success of the loading operation.
Click on Vendor Daemon in (in our case, the default daemon is called Citrix), and click on Reread license file, to make sure that everything's correct.
The XenDesktop license file is generated on the personal area on the MyCitrix Web portal. When you generate a .lic file, it must be generated and registered with the FQDN of the license server on which you're going to use the file. This means that, if for any reason you'll need to reinstall the server or change its name, you must deallocate the license currently assigned, and reassign it to the new server, always referring to its FQDN, regenerating a new file that must be reimported, as seen previously.
It's also possible to install the license server from the command line, using the Windows command, msiexec
, with the following parameters:
/I: This is the installation option./qn: This is for a silent installation.INSTALLDIR: This is used to specify the path of the installation folder (if not specified, default isC:\Program files\Citrix\Licensingfor a 64-bit system, orC:\Program files(x86)\Citrix\Licensingfor a 32-bit system).LICSERVERPORT: This is the port that the license server will listen to for connections (default is 27000).ADMINPASS: This is the administrative password for the user admin on the licensing console. In the presence of an active directory, you have to use administrative domain credentials.VENDORDAEMONPORT: This is the port of the vendor daemon component (default is 7279).MNGMTCONSOLEWEBPORT: This is the administrative license console port (default is 8082).
So, for example, if we would install Licensing in a silent way, using the LICSERVER folder on port 27004 and assigning TestCase01 as the administrative password, the following will be the required string to run:
msiexec /I /qn INSTALLDIR=C:\LICSERVER  LICSERVERPORT=27004 ADMINPA
SS=TestCase01
We've implemented two fundamental components of a VDI infrastructure: database server and license server. Now we've got to implement the core of Citrix XenDesktop, which includes Desktop Director Controller, Desktop Director, and Desktop Studio.
In a Citrix environment, most of the activities are related to the Desktop Director Controller, also known as DDC; with this component we're able to interface with hypervisors, generate machine pools, and provision desktops and applications. This component is the engine of the VDI Citrix platform, also known as the broker. Combined with it there's Desktop Studio, a snap-in interface that allows administrators to manage desktop components. Last is Desktop Director, a centralized console management that gives us statistics about desktop usage and performance, allowing us to change machine assignments and user permissions.
The following are the steps by which we will perform the installation of the core components of the XenDesktop platform:
After downloading the ISO file from your personal Citrix account, burn it or mount it as a virtual CD (for example, if performing the installation with a virtual machine).
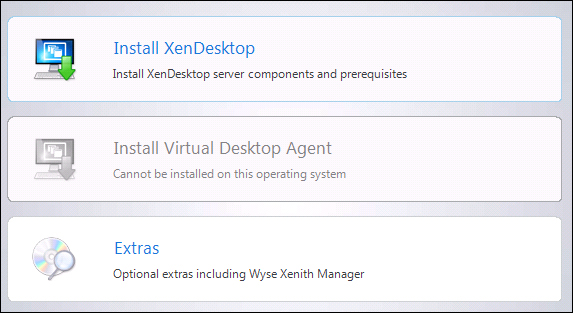
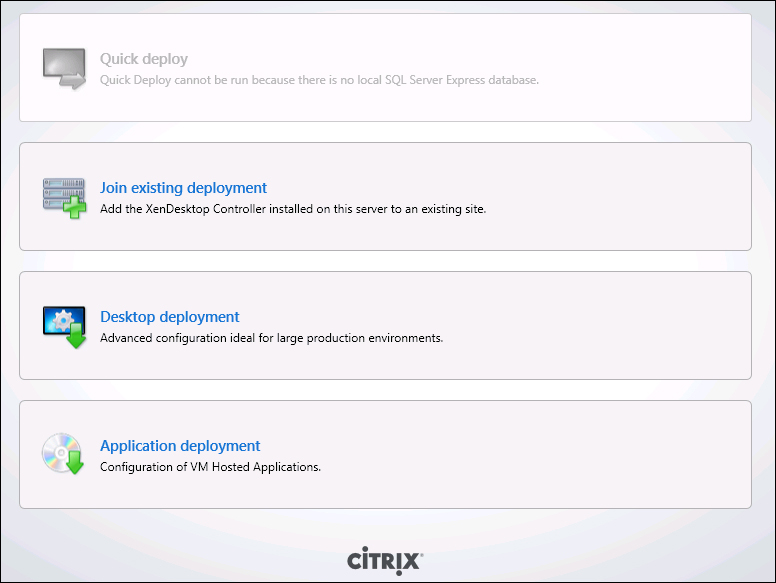
Double-click on Autoselect.exe, and then launch the XenDesktop installation by clicking on Install XenDesktop, as shown in the following screenshot:
After the setup initialization, accept the licensing agreement.
At this point, select the components you want to install (Desktop Controller, Desktop Studio, and Desktop Director).
It's also possible to change the installation folder, by clicking on the Change install location… link.
Tip
Don't check the Web Access installation checkbox, because we'll perform this operation in the next recipe.

You'll be presented with the Summary window. If you agree with the summary details, click on the Install button to proceed.
At the end of the installation, leave the Configure XenDesktop after closing checkbox checked so that we can launch the XenDesktop MMC snap-in:
Now that we've accomplished these installation tasks, in the Program menu we have a
Citrixfolder with two links: one for Desktop Director and another for Desktop Studio.
Desktop Controller is the component that allows one-to-one association between the user and the virtual desktop, and permits resource distribution based on what kind of desktop groups have been created; also known as a broker. It has the purpose of verifying and associating user accounts and assigned resources. Once this association is realized, the broker stops its intermediary channel activities and direct communication is established between the user's physical workstation and the delivered desktop.
A best practice for XenDesktop infrastructure is to implement components separately; you should install every single part of it on a single physical or virtual server. With Desktop Director, it's possible to implement a clustered broker infrastructure.
The Configuring XenDesktop to interact with Microsoft Hyper-V recipe in Chapter 2, Deploying Virtual Machines for XenDesktop
Users can access their personal desktops in a set of different ways, which we'll cover throughout this book. All of them converge to a web portal called Web Interface. This is a special website able to balance requests (in case of clustered configuration), which also offers different ways to perform login.
Included with XenDesktop 5.6 is Web Interface 5.4; this portal presents users with resources mapped to them, such as applications (linked to XenApp or XenDesktop) and personal desktops (linked to XenDesktop). It's made up of two components: a website that is used to perform logon operations through a supported web browser, and a service site that is used by the Citrix online plugin to link to a XenDesktop/XenApp farm.
Note
You can install the Web Interface site components under web servers, such as IIS 6.x/7.x and Java Application Servers (Apache Tomcat, Oracle Sun Glassfish, IBM WebSphere).
The following are the steps required to install and configure the Citrix Web Interface platform:
On a separate server, launch the XenDesktop Autoselect setup, choose to install XenDesktop components, and flag the Web Access option.
Click on Install and continue; the Web Interface setup will automatically install Microsoft Visual J# 2.0 SE, as shown in the following screenshot:

After the installation is complete, go to Start | All Programs | Citrix | Management Consoles, and click on Citrix Web Interface Management.
Click on the Site link on the left-hand side, then select the right-hand side link, Site maintenance – Uninstall site, and confirm the operation to remove both created websites. Now we can recreate them from scratch.
Select XenApp Website from the left-hand side menu, and click on Create Site.
Give a name to the site, leave the path with its default settings, and check the Set as the default page for IIS site checkbox; then click on Next:

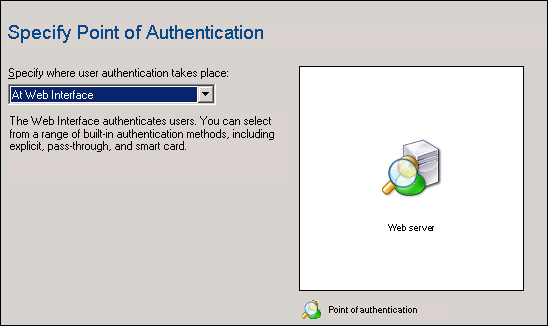
For the moment, select the authentication method, At Web Interface; throughout this book, we'll describe different ways to log in.
Click on Next and wait for the completion of the site creation. At the end, uncheck the Configure this site now checkbox.
Repeat the website creation operations for XenApp Services Site.
Select Website and click on the first configuration link, Server Farms; with this, we can do the following:
We can add any configured web farm to our infrastructure, for example, a separate XenApp Web Interface. In this way, it's possible to manage XenDesktop and XenApp farms from one centralized management console:
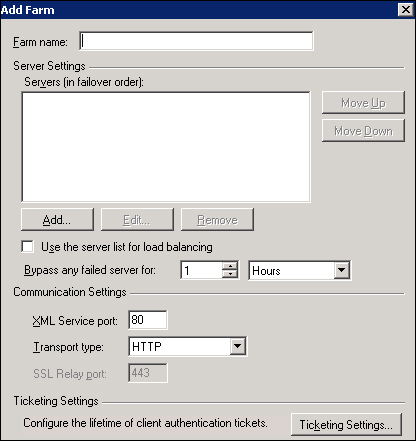
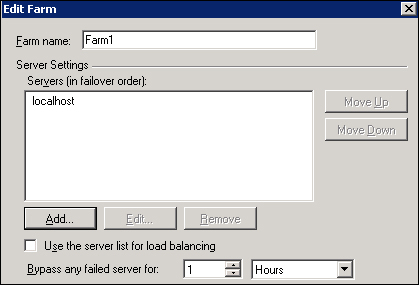
We can insert the farm name and then add an alternative server that you want to configure:
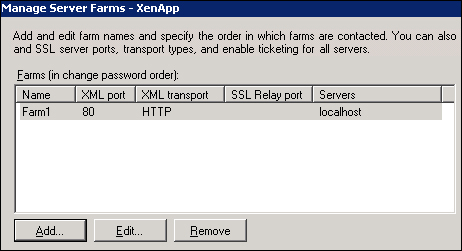
We can add more servers to this website (for load-balancing); from the Manage Server Farms menu, highlight XenDesktop farm, click on Edit, and add one or more additional hosts:
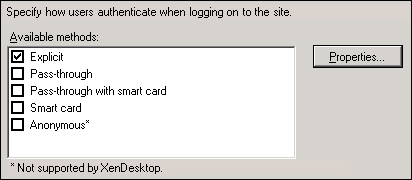
Click on the Authentication Methods link in the right-hand side menu. We'll use only explicit authentication, so check the Explicit checkbox, as you can see in the next screenshot.
Explicit authentication requires you to supply a username and a password. You also have the ability to select the Pass-through (you don't have to retype the credentials because you'll pass your Windows login username and password), Smart card and Pass-through with smart card (same thing, but using a smart card and not only a user/password combination), or Anonymous authentication methods; this last option is not supported by XenDesktop.
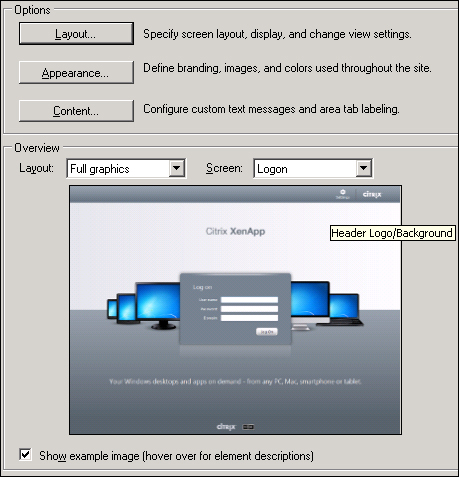
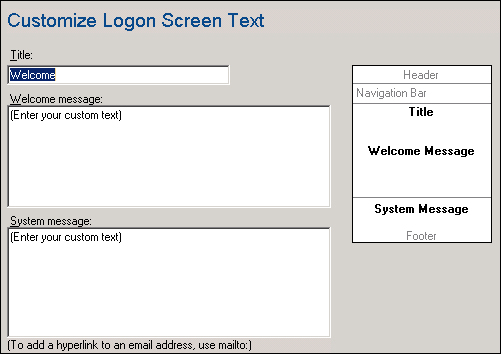
Using Web Site Appearance, we can customize the way in which the Web Interface is presented to users. At this level, we can decide to present a full-appearance site, or a minimal and performing web portal:
We could also insert customized elements, such as welcome text and national language. Click on the Content… button first, then click on Add, and select your language.
Select areas to customize, then enter the contents you want to visualize:
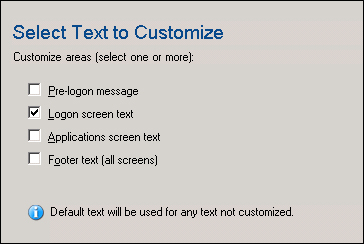
Type in a welcome message and a system message that you want to visualize on your Web Interface login screen, in the Welcome message and System message fields, respectively:
The following is a table with general configuration parameters of interest; leave all the parameters we haven't already discussed to their default values, for the moment.
Area
Link
Parameters
Notes
Website
Resource types
Dual mode
In this way, users are able to perform login in both online and offline modes.
Services site
Authentication method
Prompt (default)
Web Interface will ask you for login credentials.
Services site
Resource types
Dual mode
In this way, users are able to perform login in both online and offline modes.
When launching the Web Interface console for the first time, or after a web server's restart, using Internet Explorer as a browser, it could take a very long time; to solve this problem you have to uncheck the Check for publisher's certificate revocation checkbox in Internet Explorer under Internet Options | Advanced | Security.
Web Interface is a middleware component used as a connector for the interface between the end user and server broker; the user authenticates himself on this portal, and by the web server on which sites are configured, credentials are passed to the Citrix XML service (installed on a farm's server). This service retrieves information about the user, and passes it back to Citrix Receiver data for desktops and applications assigned to the user; XML is also able to load-balance a Citrix farm.
As described previously, it's possible to use different kinds of web servers to install the Web Interface's sites. In the following steps, we'll perform a Web Interface implementation under Apache Tomcat:
After you've started Tomcat from the Citrix installation media, copy the Java archive (
WebInteface.jar) to a preferred location.From the command line, launch the
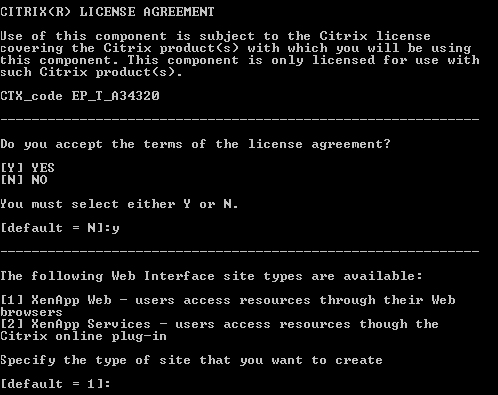
.jarinstallation by typing in the following command:java –jar <path>\WebInterface.jarRead and accept the license agreement.
You will be prompted for the kind of site you want to install. As the first step, select option number 1, XenApp Web, as shown in the following screenshot:
Provide the setup with the required information:
Hostname of Citrix XML service
Connection protocol (HTTP/HTTPs)
Connection port
User login appearance (Full/minimal)
Resources being delivered (Online/offline/dual)
Acceptance to copy client installation files, and specify the location where the setup can find installation files (you have to search for the
Citrix ReceiverandPlug-insfolders on installation media), then give the default.warnameIf all the information is ok, accept to proceed by hitting the Y key
Repeat all the steps to configure a service website.
Once all the configurations are complete, under the temporary folder where we copied the JAR file, we will have a .war file and a .xml file. We have to copy them under CATALINA_HOME\webapps, and wait for Tomcat autodeploy operations. Now we're ready to use Web Interface running under Java Application Server.
The Configuring the Citrix Access Gateway virtual appliance recipe in Chapter 8, XenDesktop Tuning and Security
At this point, we've configured all the principal components to implement the MCS architecture. As described in the chapter's introduction, we've got the ability to implement two different kinds of infrastructures; the second of these is the Provisioning Services infrastructure. In this recipe, we're going to implement the last missing component, PVS.
To implement Provisioning Services we need, together with Citrix software setup, to have the availability of a DHCP server and a TFTP server, to be able to perform network boot operations, in order to be able to deliver desktops via the network.
Tip
To avoid unexpected problems such as undelivered IP address from the DHCP server to the clients, you could consider the use of an IP Helper, also known as a DHCP relay, a way to use intermediate network devices (such as routers) used to forward DHCP client request to a DHCP server (for instance, located on a different network).
In this recipe, we are going to execute all the steps required to install and configure the Citrix Provisioning Services platform, as follows:
Download the PVS ISO software from the Citrix website (log in using your credentials on www.citrix.com/MyCitrix, then click on the Download section, and search for Version 6.1, the most current and bug-free version of this product).
It's necessary to install .NET Framework 3.5; if not present on your PVS server, you can install it from Windows Server Features.
Run
Autorun.exefrom the installation media.When requested for the installation type, select Custom, as shown in the following screenshot:

On the Custom Setup screen, select all the components from the installation objects' list, such as Streaming Service, Network Boot Services, Documentation, Management API, and Image Update Service, as shown in the following screenshot:

Wait until all the components' installations have been completed.
Then from the main installation menu, choose Console installation.
Again, select the Custom installation, and select all the components (Provisioning Services Console and Boot Device Manager), as shown in the following screenshot:

Now we're ready to start with the configuration of this Citrix role; select Provisioning Services Configuration Wizard from Start | All Programs | Citrix | Provisioning Services.
For DHCP configuration, select the The service that runs on another computer radio button:
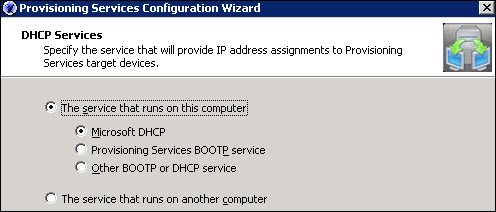
For the PXE Services component, choose the local server as the provider by selecting the The service that runs on this computer radio button.
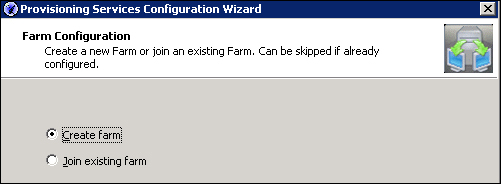
On the Farm Configuration screen, select Create farm, as shown in the following screenshot:
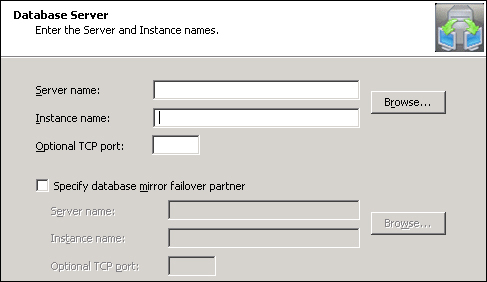
Enter the database's Server name on which we want to create an PVS DB instance, then type in Instance name, Optional TCP port, and in case of a failover architecture, specify the second database node in the cluster:
On the New Farm screen, configure the parameters for provisioning the farm (Database name, Farm name, Site name, and Collection name), then populate the Farm Administrator group field with an Active Directory group with a high elevated permission to manage the farm, as follows:

Select a name and the default path for the PVS store; then locate your license server name and port, to allow the PVS server to validate available licenses.
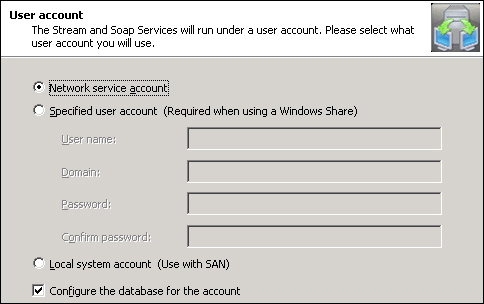
Select Network service account as the user account for stream and soap services, then check Configure the database for the account, as shown in the following screenshot:
Select a value, in days, for the automation of computer account password updates (the default is seven days).
Select an available network card for streaming services, and choose a starting port number used to communicate (default is 6890), and also the console port number (default is 54321).
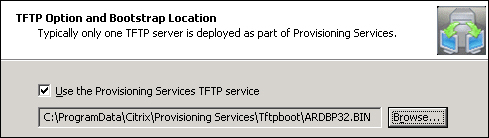
Check the Use the Provisioning Services TFTP service checkbox, and leave the default image boot path, as shown in the following screenshot:
At the end, the wizard will perform service installation and it starts after all the operations have been completed.
Note
Remember that active Windows Firewall might be a problem for your installation process; you have to open the required ports, or turn it off. The ports are TCP 389 (LDAP), TCP 27000,7279 (license server traffic), TCP 1433 (SQL Server instance), TCP 54321-54322 (SOAP), UDP 67,4011 (PXE), UDP 69 (TFTP), and UDP 6509-6909 (internal server communication).
If everything is ok, you'll see the following screen:

Now we're able to connect for the first time to our PVS farm. Go to Start | All Programs | Citrix | Provisioning Services, and click on Provisioning Services Console.
Then, type in
localhostin the Name field as the farm location, insert the number of the configured listening port in the Port field, and check the radio button for Use my Windows credentials to log in.Now we have to install the last PVS component, target device. To perform this operation, we first need to install a client Windows machine (virtual or physical with Windows XP, Windows Vista, or Windows 7 as the operating system).
After this, run Target device setup on the client machine.
Refer to the target device as the client machines that will use this prepared disk to perform a network boot. Accept the license agreement, insert information about your company, and then select a path for the installation.
After the installation is complete, check the checkbox for Launch Imaging Wizard and click on the Finish button.
After the Welcome screen, we have to insert the PVS server credentials:

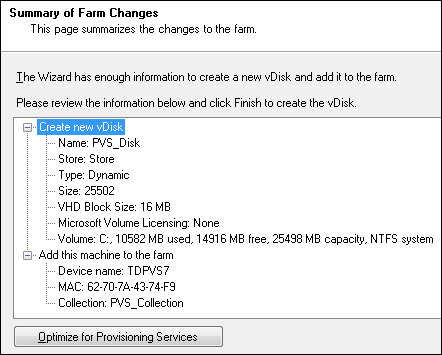
Select to create a new vDisk, assign it a name, a store, and a type, Fixed or Dynamic; in the second case, it's also possible to select disk block size (2 MB or 16 MB).
Select the kind of Microsoft Volume Licensing you need (MAK for cumulative licenses, KMS if an activation server is available):

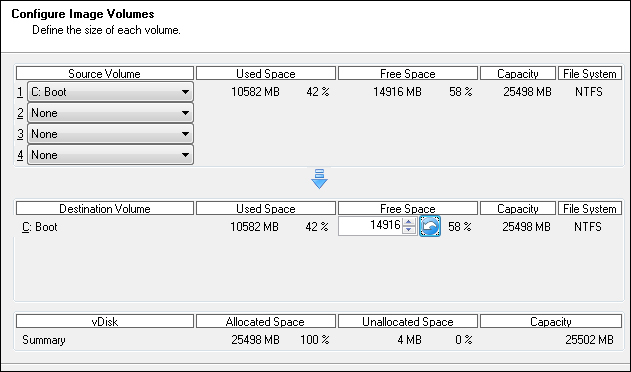
When possible, you should always consider the use of Key Management Service (KMS), in order to avoid problems of depletion of licenses. Then, configure the disk image size, starting from the original disk; of course, the disk size must be at least the minimum original disk dimension:
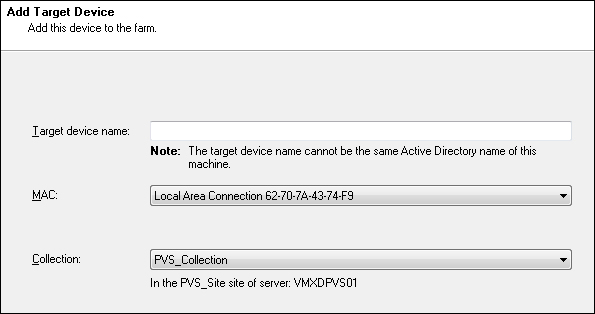
Configure Target device name (a different name from the Active Directory computer account), MAC (network card) from the drop-down list, and Collection (PVS server collection name), as shown in the following screenshot:
Now we're ready to complete the target device installation. After that configuration has completed, in order to set up a network boot for a TD image, we need to reboot the Windows client, and configure the boot order from BIOS.
Be sure to have enabled the PXE boot on the network card of your client machine.
After connecting to the PVS server, we can ensure that vDisk has been correctly created under the management console, as shown in the following screenshot:

As seen with implementation procedures, after infrastructural components' installation, we have to create a vDisk, which is an operating system's image that is copied by creating a snapshot from an installed operating system (known as Master Target Device). This vDisk will be streamed on demand to clients configured to boot from the network (target devices), pointing to the Provisioning Services server; the desktops are streamed from the memory of the PVS server every time they're needed by users. This process permits having high elevated network performance, dramatically reducing the impact on storage activities.
As discussed earlier in this recipe, when creating a vDisk we have the ability to choose between two kinds of disk formats, fixed disks and dynamic disks. The first type pre-allocates all assigned disk space, while dynamic allocation populates disk files during data writing activities (if you're familiar with virtualization concepts, it's the same as thick and thin disk allocation). The following is a set of information and best practices to understand how to choose between the fixed and dynamic disks:
Because of the nature of a fixed disk (full space pre-allocation), it could be a waste of storage space.
PVS uses memory caching mechanisms that reduce disk I/O activities. For this reason, dynamic allocation should be the right choice, because of the huge reduction of storage reading activities. The only interfacing with a disk component is given by writing operations. Also in this case, after configuring a PVS vDisk image in the read-only mode, we'll have almost no more storage activities. To have a responsive system, on the other hand, this infrastructure needs to be supported by 64-bit systems, the right memory sizing (for a PVS server you should have a quantity of RAM between 8 GB and 32 GB), and a block-level storage device (SAN or iSCSI, and not a network share repository on NAS).
Using a fixed disk is a standard way to operate, which at the moment won't offer the advantages that memory cache along with dynamic disk mode could give to IT departments (in terms of performance and cost saving).
The main purpose of this lab is preparing infrastructural components, shown in this chapter, to have the base components on which we want to perform advanced configurations and implementations in the next labs throughout the book.
Using a hypervisor supported by Citrix XenDesktop (VMware ESX, Microsoft Hyper-V, Citrix XenServer), install five virtual machines, as indicated:
Configure a Windows 2008 R2 virtual machine as a domain controller, with the following parameters:
Recommended virtual hardware resources are one vCPU, 4 GB of RAM, 30 GB of hard disk
vmctxdc01as the hostname192.168.1.50as the IP addressDomain controller, DNS, and DHCP installed roles
ctxlab.localas the domain nameDHCP IP range from
192.168.1.100to192.168.1.150
Configure a Windows 2008 R2 virtual machine as the Citrix XenDesktop platform (follow the installation procedure explained in this chapter), with the following parameters:
Recommended virtual hardware resources are two vCPUs, 4 GB of RAM, 50 GB of hard disk
vmctxddc01as the hostname192.168.1.60as the IP addressJoin it to the
ctxlab.localdomain, before configuring any software roleFrom XenDesktop setup install the components, XenDesktop Controller, Desktop Studio, Desktop Director
Select Express edition of SQL Server 2008 R2 for the installation
Configure a Windows 2008 R2 virtual machine as the Citrix license server (follow the installation procedure explained in this chapter), with the following parameters:
Recommended virtual hardware resources are one vCPU, 2 GB of RAM, 30 GB of hard disk
vmctxlc01as the hostname192.168.1.70as the IP addressJoin it to the
ctxlab.localdomain, before configuring any software role
Configure a Windows 2008 R2 virtual machine as the Citrix Web Interface (follow the installation procedure explained in this chapter), with the following parameters:
Recommended virtual hardware resources are one vCPU, 2 GB of RAM, 30 GB of hard disk
vmctxlc01as the hostname192.168.1.80as the IP addressJoin it to the
ctxlab.localdomain, before configuring any software role
Configure a Windows 7 64-bit virtual machine as master target device for PVS, with the following parameters:
Recommended virtual hardware resources are one vCPU, 4 GB of RAM, 30 GB of hard disk
vmctxtd01as the hostnameDHCP assigned IP address
Join it to the
ctxlab.localdomain, before configuring any software role