


Welcome to the warm-up chapter! Every textbook has one; some stretching and a little jogging before we get to the main exercises. This chapter will give you a brief introduction to Cinema 4D that many designers tend to agree as a very user-friendly program, especially compared to other longstanding 3D applications.
This chapter contains a few recipes to help you navigate through the program and get comfortable with Cinema 4D. It's important to get to know some good keyboard shortcuts and a few interface tips now, while you are still new and impressionable to the program. The objective of the chapter is to help you to look in the right direction and encourage you to explore some more features on your own. Let's not waste time and get started.
This first recipe is going to start by going over the interface inside Cinema 4D. The idea is to get used to where certain features are, to make it easier to understand recipes later throughout the book.
For most of the recipes in this chapter, we will be using the Obstacle_Course.c4d file. So load it up now and use it to get your feet wet inside Cinema 4D. Open the file by navigating to its location on your computer with the
C4D Content Pack and double-clicking on it—it will automatically launch Cinema 4D. Likewise, you can open Cinema 4D first by double-clicking on its icon inside the folder where it is stored on your system, then going under the File menu and selecting Open, where you can navigate to the Obstacle_Course.c4d file on your system and load it from there.
Tip
Downloading the C4D Content Pack for this book
You can download the C4D Content Pack for this book from your account at http://www.PacktPub.com. If you purchased this book elsewhere, you can visit http://www.PacktPub.com/support and register to have the files e-mailed directly to you.
If this is your first time using Cinema 4D, you are probably unsure as to what all these fancy panels inside this project are for. If you have used Cinema 4D a little bit, you may have a general idea of what the different windows and menus do, but it's a good idea to go through this recipe once, just to make sure we are all on the same page. The following is an image of the Cinema 4D interface with each area of the layout numbered so that we can focus on each part individually:
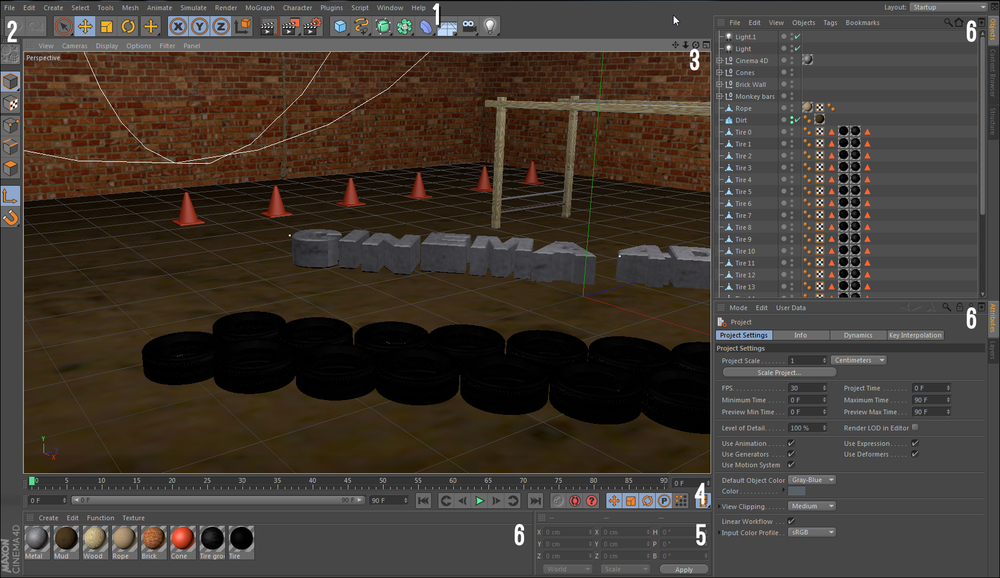
As with about every other software program, Cinema 4D has a menu bar along the top with many application-specific menus; it is labeled as #1 in our image. There are some familiar ones, such as File, Edit, and Help, and there are plenty of other items in between. Many of the options within these menus can be activated in several ways apart from within the actual menus, and we will call upon plenty of them throughout the book.
In the Edit menu, you'll find Cinema 4D's Preferences setting all the way towards the bottom. Most of this stuff doesn't need to be tinkered with very often, or at all, but you may want to examine the first set of options for the Interface. You can set the program to have a dark or light color scheme and adjust font sizes, in case you want to make Cinema 4D look a little different or be more readable.
Take a look at the OpenGL tab, where you can control the quality and speed of your previews based on how sophisticated your computer graphics card is. The settings can be changed to get more detailed previews in the Viewer. If you have a very strong graphics card, you may want to increase these settings, or you may want to decrease or disable the settings if you are dealing with a very heavy and intensive 3D project. For detailed notes on your computer's OpenGL capabilities, click on the Show OpenGL Capabilities button.
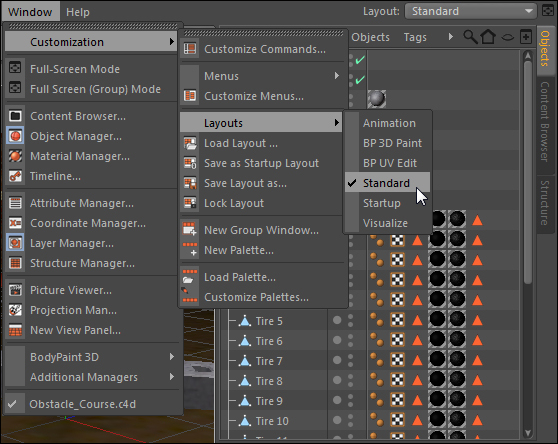
I'd also like to highlight the Window menu, the second to last tab on the right. Look inside and mouse over the Layouts submenu where you'll find all sorts of options for customizing the look of your Cinema 4D interface. As you work in the program and get the hang of it, I suggest you explore this menu to get a layout that you feel comfortable with. For now though, so that your interface looks the same as mine, select the Standard layout option in case your windows are out of place compared to mine. A new feature in Cinema 4D 13 is the Layout drop-down menu at the top right-hand corner of the application window, which allows you to quickly switch between the different layouts:
The blue areas comprise item #2, the Command Palettes, located beneath the application menus and the column along the left-hand side. The buttons are either known as Icons or Icon Palettes if they contain multiple options within, noted by the small black triangle at the bottom right-hand corner of the icon. As indicated in the previous section, these icons are also found within the various menus up top, and they are the most frequently-used tools in the program made easily accessible with these icons. In the upcoming recipes, we will use these palettes to add objects, splines, lights, cameras, and more.
The Viewer is #3, the big green area; it's where you actually see your 3D scene. Whenever you add objects to your scene, like those from the icons in the Command Palette, they appear at the origin. The origin is located at (0,0,0) point inside your 3D space; the numbers correspond to your X, Y, and Z coordinates. The Viewer has a menu bar at its top with helpful tools that apply to only the Viewer. The menu options have a wide variety of features from managing your cameras to adjusting the look of your preview. The X axis moves across the length of your frame, the Y axis corresponds vertically over the height of your frame, and the Z axis is the key to 3D—it represents the depth in your scene from the front of the Viewer all the way to the back towards infinity.
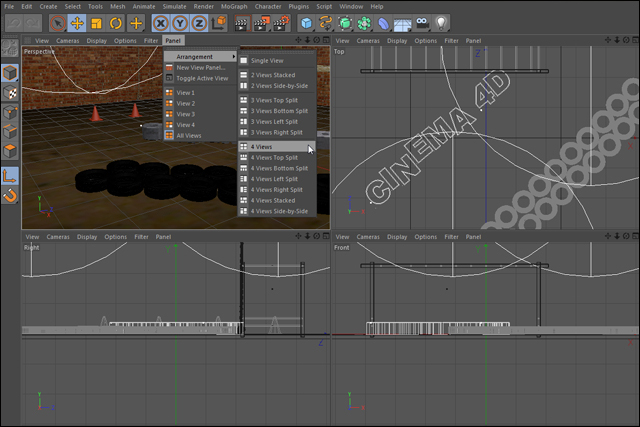
Under the Panel menu, hover over the Arrangement option and you'll see different options for dividing up the Viewer into two, three, and four different windows to see your scene. You can set up different views and cameras in each window to see work from different perspectives and work a little faster at times. Try selecting the 4 Views option and see how the viewer gets divided up. Change the option back to Single View to focus on just one window. Switching between different views can be very useful when modifying objects in your 3D environment; we'll explore this in Chapter 2, Super Modeling:
Towards the bottom of the screen you'll find #4, the purple Animation toolbar, which allows you to control the time of your 3D scene. The timeline bar has small tick marks representing each frame in your project, and you can pull the small green play head by clicking-and-dragging it back and forth. The small set of seven playback buttons give you control much like any video player you've ever used. The buttons have the following functions:
Shift + F: Jumps to the start of the Animation toolbar
Ctrl or command + F: Moves back to the previous key frame
F: Moves back by one frame
F8: Plays the animation
G: Moves forward by one frame
Ctrl or command + G: Moves forward to the next key frame
Shift + G: Jumps to the end of the Animation toolbar
Note
You can adjust the length of your project by opening the Project Settings window inside the Edit menu. Change the number in the field for Maximum Time to shorten or lengthen your timeline. It's a good idea to keep your length as small as you need, so eliminate any extra frames via this setting. When you first open a new project, the Project Settings are available at the bottom right-hand side of the screen in the Attribute Manager.
The Coordinate Manager is #5; it's a panel that displays the position, size, and rotation of a selected object. You can enter adjustments to these parameters in the Coordinate Manager and the changes will appear to your object inside the Viewer.
The other windows that are labeled #6, the Object Manager, Attribute Manager, and Material Manager, are all more important managers, and they require their own recipe to go over all of their features.
Tip
The most useful tip in the book
"Help!" One extremely useful feature of Cinema 4D, which will really help you learn the program more thoroughly is the built-in help browser. You can right-click on any icon or menu option within the program and select Show Help from the menu. Try and use it whenever you come across a feature you are curious about or don't understand. You can also access it by going to the Help menu and selecting Show Help. The built-in help is extensive, helpful, and well written with numerous examples. This, probably more than any other tool in the book, will help you master Cinema 4D if you can get into the habit of using it.
Commander
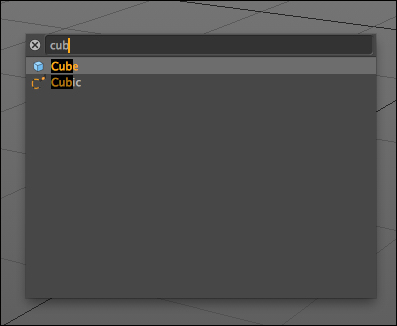
The Commander is a very useful new feature that helps you to find what you're after, within Cinema 4D. You can press Shift + C and the Commander will appear. Then, begin typing and the Commander will search for the command or object you're looking for. It's kind of like Google for Cinema 4D and will help you find items without having to know where they are in the menus. You can also access the Commander by clicking in the magnifying glass at the very top right of the interface:
This recipe is designed to help you understand how to navigate the viewer in Cinema 4D, whether it be adjusting the angle of view or position objects in 3D space. A 3D application such as Cinema 4D has the added dimension of depth so we can view the object from any angle. There are several tools used for altering the perspective of our scene and positioning objects wherever we want in 3D space.
If we were somehow able to teleport inside your project in Cinema 4D (Maxon will probably have this feature in Release 27 or 27.1), the Viewer would represent the perspective of looking at our 3D obstacle course with your own eyes. We could walk around and angle our head to look at this scene from any angle we want. This is what the default Viewer is like when you load a new project; you have a few mouse and keyboard controls, as well as some interface buttons at your disposal to change the view.
Let's focus on movements that go left and right as well as up and down. This would be the equivalent to us taking steps directly to either side, or let's say if we are climbing higher or lower on a ladder. Start by resetting the Viewer to the default view, by going to the View menu in the Viewer and selecting Frame Default. Now, take your mouse and hold down the 1 key while clicking-and-dragging throughout the scene. Your view is repositioned in any direction, but it remains on the same plane, only moving left, right, up, or down. You can also move through the Viewer in this manner by holding down the Alt or option key while clicking-and-dragging with the middle-mouse button if it's available. The same movement can be done with a button that is a circle surrounded by four arrows on the Viewer interface. Click on this button and drag the mouse in any direction and the view will shift accordingly. This movement is referred to as trucking or tracking with real cameras to represent a change in the X position of your view. Changing the Y position is called dollying, where you are moving vertically in your scene.
Now for that third dimension. Let's say we want to get closer or farther away from the objects in our scene. There are four main options for moving the camera in and out; reset your Viewer to the default view again before attempting the movements. If your mouse has a scroll wheel, try scrolling the wheel back and forth and you'll see the Viewer zooming in and out. Next, try holding down the 2 key while clicking-and-dragging with the mouse; it accomplishes the same result. You can also use the Alt or option key and then right-click and drag around to move deeper in the scene. The final method to move in and out is by clicking-and-dragging on the two-way arrow icon in the top right-hand corner of the Viewer. Moving closer or farther from the subject is a dolly zoom, and it helps utilize the depth available in your 3D environment.
Being in 3D means we can rotate in three dimensions as well, which would alter the view in the same way that turning your head around to any angle would. Try holding down the 3 key while clicking-and-dragging; you'll see this rotates the view along the X and Y axis, or you can hold the Alt or option key and drag the mouse while holding the left-click. The same effect can be done by clicking-and-dragging the icon at the top right-hand corner of the view with the circular arrows fixed around the dot. This movement corresponds to tilting the camera if you change the angle up and down, or panning if you move the angle side to side.
If you wanted to tilt the view, which is a technique called Dutch Angle , you have to hold down the 3 key and right-click while dragging the mouse. Likewise, you can right-click and drag the icon in the Viewer to get this tilted angle as well. Frame your scene to the default view for the next part of the exercise.
Changing the view is different from actually moving objects in space. All objects are created at the origin, when added to the scene so not every object can occupy the same coordinates; hence, we need to reposition them in 3D space. Click on the cube primitive icon and hold down the mouse, and select a new Sphere from the menu and load into the scene. It automatically snaps into place the origin, but we already have objects placed there. We need to have it occupy its own space somewhere else.
When the Sphere object is selected, a red, green, and blue axis with arrows appears in the center, which can sometimes be referred to as a gizmo in Cinema 4D. This colored gizmo provides controls for the Move Tool, which allows us to change the position of our objects. The Move Tool, which can be activated by pressing the E key as well, is the yellow four-way arrow icon located in the Command Palette. It sits next to the Scale Tool (T key) and the Rotate Tool (R key), which alters the scale and rotation in the same way the Move Tool alters the position of an object. When any of these tools are selected within Model mode, which is represented by the icon with an orange outline around a gray cube on the left-hand side of the interface, you can make live adjustments by clicking-and-dragging in the Viewer. Click-and-drag the cube up higher in the scene so that it's above the other objects. If you click-and-drag the colored handles of the gizmo, you can move the cube in just the direction that the arrow on the gizmo is pointing. Zoom out with the Viewer if you want more room to operate.
Hit Ctrl or command + Z to undo the move you just did. A smart way to move objects is to grab-and-drag the red, green, or blue arrow on the gizmo and hold down the Shift key. This will move the object in intervals of 10. Grab-and-drag the green arrow on the axis and hold the Shift key and move your arrow up 50 units; you'll see how the counter in the center of the screen jumps up 10 units with every move, so you'll always get nice round numbers to work with. This makes calculations and adjustments a lot easier to work with and allows for more precision and organization in your projects.
There are different ways to move our view and our objects in Cinema 4D. Our view can be adjusted with a variety of keyboard commands, mouse movements, and buttons on the interface. This makes it easy to adjust exactly how we want to look at our scene. Moving objects is easy with the combination of using our Move Tool and our Model Tool; we can drag the object anywhere in 3D space to make it fit within our project and prevent it from overlapping with other objects.
Try using the Scale and Rotate tools, right next to the button for the Move Tool. You can click-and-drag to make those similar respective alterations to your cube, and holding the Shift key keeps those parameters nice and orderly too.
Take this recipe a step further, and instead of thinking of the Viewer as your eyes, think of it as the image being captured by a camera. You have to position your camera wherever you want to capture your image, as well as place the objects into the field of view. We cover all sorts of techniques for moving and adjusting cameras in Chapter 4, Cameras are Rolling.
Your view will most often rotate around either the origin or a particular object if you have it selected. If you hold down the Ctrl key while you rotate, the view will rotate around from its own perspective, like if you were panning with a camera and looking through the viewfinder.
Tip
Highlighting and selections
You can see which object is selected in the viewer because it will have an orange outline surrounding it. If you move your mouse around the viewer a white outline will appear around any object the cursor is over. If you then left-click on the object, it will be selected.
Depending on the graphics card in your computer you may need to turn this function on manually by selecting Options from the viewport menus and then selecting Enhanced OpenGL
Also, if you put your cursor over almost any item or icons, an explanation will appear in the very bottom left of Cinema 4D. This can be very helpful in trying to understand what each element does and help you understand the program more deeply.
If you think of Cinema 4D as the CEO of your design project, it employs several managers to focus on and control specific parts of your project. The three most important managers in Cinema 4D are the Object Manager, the Attribute Manager, and the Material Manager. This recipe will give you an overview of what kind of functionality these managers provide.
Keep using the Obstacle_Course.c4d project for this recipe. If you want to start your project fresh like it was before the previous recipes, click on Revert to Saved under the File menu.
Object Manager is the hub that lists all of the components of your project that comprise your scene. Whenever you add pieces like primitives, deformers, lights, cameras, and so on to your scene, they appear inside the Object Manager window. By default, it appears as the bigger panel on the right-hand side of Cinema 4D. As your scene grows in complexity, it's important to be able to keep your Object Manager window tidy and labeled so that objects remain organized, so you can clearly find the particular piece of the puzzle you need.
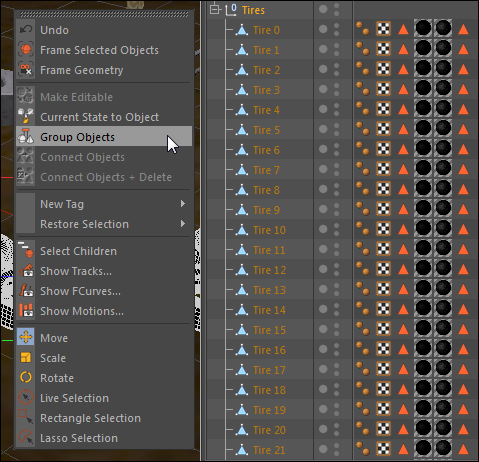
Look in the Object Manager window and find the Tire objects. They are all the same kind of objects but occur as separate instances, each with their own individual properties. However, it's smart to keep them grouped together for organizational purposes. Hold down the Ctrl key and select the items individually or select the first and last ones while holding the Shift key to select all of the objects, and then hit the Alt or option + G keys, and you'll see that the objects have now become a group. You could also right-click or context-click on the selected items and hit Group Objects. We can click on the + symbol at the top of the group name to unfold the group and view its contents, and click on the – symbol to close that group. The tires still retain their individual properties and can be modified, but they have now become part of a group with its own properties, so all of the tires can be moved, scaled, or rotated at once. Click on the name of Group 1 and change it to Tires so that we know what it is, and fold it up by clicking on the - symbol:
Note
Objects in the Object Manager window do not follow any sort of vertical stacking rules like in programs such as Photoshop and After Effects . If you have object A listed first in the Object Manager window ahead of object B, it won't appear on top of, or in front of, the object like it would in other programs where the stacking order determines the visibility of the objects. Cinema 4D presents objects in terms of their position within 3D space, so you have to physically place objects in front, behind, on top, and so on, in order to get them to appear in the manner you choose. It makes no difference where they appear in the Object Manager.
Within our group of tires, you'll notice that each tire has small square icons to the left-hand side of their object names. Each tire contains different tags, which are specialized modifiers used to add different properties and functions to the objects we apply them to. The tags can be added from the Tags menu at the top of the Object Manager window, which actually contains several different groups of tags that are organized for you to browse. They are also accessed via right-clicking or context-clicking on an object that is selected in the Object Manager window. Select the Tire 0 object in the group and go into the Tags menu, and then under Cinema 4D Tags, select the Compositing tag and notice how the image of a small slate has appeared at the end of our row of tags. Now, we can fiddle with extra parameters added by this tag to just the Tire 0 object (the Compositing tag is one of the most useful; it has its own recipe within Chapter 7, Rendering Strategy):

The next crucial feature of Object Manager is what is often referred to as the Traffic Light in Cinema 4D. It has two small dots very close to the right-hand side of the object's name. The dots default to a gray state, but these can be changed from red and to green by clicking directly on them. Find the Monkey bars object, click on the top dot to change it to green and then click on it again to change it to red. The monkey bars disappears from the scene as red, but reappears once you cycle back to gray or green. This traffic light toggles the visibility of objects in the editor, represented by the top dot, and the renderer, which is represented by the bottom dot.
Note
Objects can be visible with both the default gray dot and the green dot. The difference is that when the green dot is active, it means that the visibility of the object is forced. For example, if you have several objects that are in a group and you force the group to have red dots, meaning that they are invisible in the editor and renderer, you could still have select objects within that group appear visible if you set their traffic lights to green. The objects that are left to the default gray dots will remain invisible:
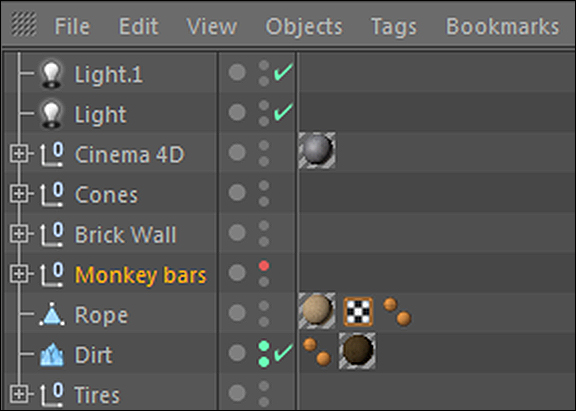
Now, make sure the top dot is turned red, and the bottom dot is gray or green, and do a render preview by hitting the Ctrl or command + R. The scene renders the Monkey bars object even though you don't actually see it in the Viewer. By having control of both dots, you can show and hide different objects in a cluttered scene and still have them rendered as part of your previews and final output, which can be useful if you are working with scenes filled with high-polygon objects:

The green checkmark next to the traffic light controls if an object is active or not. It essentially eliminates an object from your scene without deleting it, and it's an easy way to turn an object completely off in both the editor and renderer with just one click. Click on any green checkmark you see in the Object Manager and watch it turn into a red X. The object no longer affects your scene and it will only become activated again if you change the setting back to the green checkmark.
The last main feature of Object Manager is the ability to place your objects in layers to keep your project organized. It takes ideas from the traffic light and the idea of grouping in Cinema 4D, but it can control as many objects as you wish at once, as long as they are all applied to the same layer. We already hit upon this a little bit by selecting all or certain objects in the Object Manager window and using the + and – symbols in groups to fold and unfold the contents. There are a few other options for these actions that help sort and organize our project. Highlight the Cones object in the scene and unfold the group by going under the View menu in the Object Manager window, followed by the Folding submenu, and then select Unfold Selected. With the Cones group selected, go under the Edit menu and click on Select Children to highlight all of the objects below. With everything highlighted, go under the Edit menu in the Object Manager window and select Add to New Layer. A small colored swatch pops up right next to the names of the objects. Click on any one of the color swatches and select the Layer Browser... option to open the panel that will list all the different layers we apply throughout our scene. It replaces the area where the Attribute Manager is found.
We can double-click on the name Layer and change it to something more descriptive, such as Cones. Click on the eyeball under the V column in the browser and you'll notice that in the Viewer our objects have disappeared. This row of options is a set of controls for all of the objects within our layer; toggling them affects all the objects equally. The dot in the S column acts as a solo switch, which isolates all the objects in that layer inside the Viewer.
In the File menu of the Layer Browser, select New Layer, and a new color swatch pops up in the browser. Take the color swatch for the new layer and drag it from the Layer Browser on top of the Cones group in the Object Manager. Then, click on the new swatch and drag your mouse down the column of swatches, where your cursor should change to a brush icon, and paint your swatches with the new color. An alternative is to select the Cone object and right-click or context-click on them and then select Add to New Layer, where you'll find both of your created layers, and select the layer that you want to add to them. Because our new layer has the eyeball option open, our cones become visible again. As a result, you can add multiple layers and freely switch the objects between them as you develop your project. Getting familiar with all the icons and buttons in the Object Manager is crucial for helping you navigate through your projects smoothly.
When an object is selected in Object Manager, the window directly below it (in the default layout) loads all the particular controls for that object into the Attribute Manager. This is where we can tweak the settings and parameters to make changes to our objects and set key frames to adjust parameters over time. The manager places these parameters inside different tabs to help organize all the information you have control of. The bottom window may still be set to the Layer tab on the right-hand side, so flip it over by clicking on the tab that says Attribute.
Almost every object has three main tabs to start: Basic, Coordinates (abbreviated as Coord.), and Object. Select the Dirt object in the Object Manager and click on the Basic tab in the Attributes Manager. The Basic tab contains some fundamental properties about the object selected. The Name field and Layer field are self-explanatory; they contain what the object is called and what layer grouping the object pertains to. The other most useful properties in the Basic tab are the Visible in Editor, Visible in Renderer, and Enabled options.
Switch the Visible in Editor field from the default setting to Off; you'll notice the Attributes object will disappear and the top dot in the traffic light is now red. These two fields are linked directly to the traffic light in Object Manager, so any changes made in one will affect the other. The same goes for the enabled checkbox; by un-checking the box, the green checkmark by the Attributes object name switches to a red X.
Note
There are times you may want to switch on or off the visibility of an object, and that value can be controlled and key framed from inside the Attribute Manager, not the Object Manager. Simply set one key frame in the On state and the other in the Off state, and you'll get an action that is like someone hitting a switch to make your object disappear. We will discuss key framing in the next recipe.
The next tab over is the Coord. tab. This contains the properties that determine where and how your object occupies space in your 3D Scene. The three properties are broken down into Position, Scale, and Rotation, each with their own sub-properties that control the parameter in the X, Y, and Z dimensions.
Take the Dirt object and change its X position from -250 to 0, its Y position to 100, and its Z position to 150. Note how the object jumps to a new position every time you enter a new value and how our dirt is now in the entirely wrong position. These position coordinates are based on the World Coordinates position, where the center (0,0,0) is the origin and the position properties indicate how far away your object is from the origin. Change the dirt back to -250 for X and 0 for both Y and Z dimensions.
The Scale parameters control the size of the object in the X, Y, and Z dimensions. Enter a value of 2 for all three scale values. Notice how the scale options are independent of each other and you can adjust the values to distort the object in any dimension; the values do not have to be uniform. Change the value back to 1 for each dimension, which represents the actual scale of the object.
Note
Don't use scale to size up objects unless you absolutely have to. If you have a sphere object, change its radius to make it bigger instead of using the scale. Projects can get messy if you have different objects with varying scale values, and there are some instances where scale values will be ignored and overridden like when using cloners in MoGraph. Only change scale values when you want to perhaps keep a group of objects proportional in size because adjusting them individually will throw off their relation to one another. Or, you can use scale to change just one dimension to modify a shape, such as taking a sphere and increasing its scale in the X value to make it into more of an egg shape.
The last column is for the Rotation properties of your object. They are labeled as R.H, R.P, R.B, which correspond to the rotation in the Heading, Pitch , and Bank respectively. They will rotate the object around the origin of the Object Axis, which we can adjust to a different spot. Adjust the R.H value of the Dirt object to 45, and you'll notice our object has turned 45 degrees. Reset the rotation value back to 0.
Our dirt rotates around the exact center of itself, but there are times where we want to adjust to where the rotation point is and where our axis occurs.
This will be covered more in Chapter 2, Super Modeling, but we need to convert our dirt from its primitive state into a polygonal object. With the Dirt object highlighted in the Object Manager, press the C key on your keyboard and the object won't change the way it looks; it will just lose some of the editable properties that were in the Attribute Manager. We move from mathematically defined geometry to objects the user can define. All the magic lies in this transition. Now, we can freely reposition the axis within our Dirt object.
Look on the left-hand side of the Command Palette and click on the two orange arrows that form a right angle, which is the command for Enable Axis Modification. This tells Cinema 4D we want to reposition the actual axis by moving the gizmo around, rather than using the gizmo to move the entire object while the axis remains in place. Take the red, green, and blue colored axis in the center of the object and grab the red handle, and slide it to the left 500 units (directed towards the back of the scene). In order to keep your values nice and even, click-and-hold the Shift key down to get exact measurements in multiples of 10. With the axis now shifted, enter the R.H value of 45 again, and you'll notice the Dirt object has now rotated around the newer pivot point, and we have a different-looking rotation.
The Object tab is unique to every object; it contains the parameter specific to modifying that particular object. Unfold the groups and click on the different objects in our project file, and notice how their Object tab loads different controls each time you change objects. The Attribute Manager also contains tabs for any specific tags that are applied to your object. Click on your tags next to your tire objects and you'll see them instantly load into the Attribute Manager.
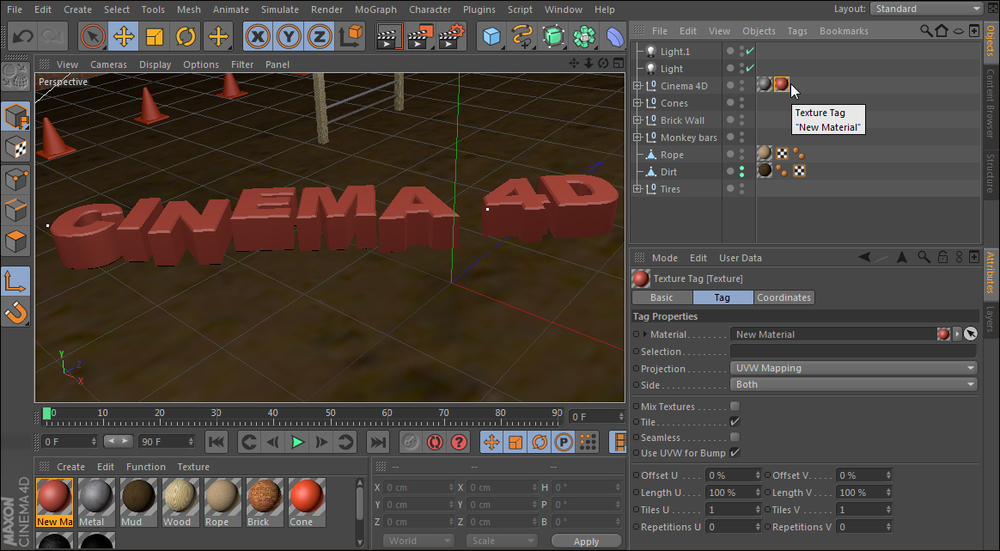
The final manager of the recipe is our Material Manager . This window loads at the bottom of the screen in the default layout, and it's reserved for viewing and sorting our materials, which are applied to objects in order to give them specific visual qualities such as color, texture, transparency, and reflection. Notice how there are materials already loaded in the manager, because they were applied to objects and saved into the project.
Double-click on the Mud thumbnail in the Material Manager and Cinema 4D will open up the Material Editor, which contains all of the channels we need to create the visual look we are going for. Each thumbnail in the Material Manager loads a different material, which can all have a unique combination of parameters for creating different materials like metal, wood, and glass.
Double-click on an empty space in the Material Manager to create a new material, and then double-click on the new thumbnail to open it in the Material Editor. Change the name of the material by entering the word
New Materialin the box under the thumbnail image of the gray sphere directly.The column on the left lists the channels that are active and combine as properties of the material. The Color and Specular channels are on by default. Highlight the Color channel and note the color slider that appears inside the Material Editor. By default, it should be set to an RGB slider with values from 0-255; if it's not, you can change it to that mode by selecting those options inside the small-rounded rectangular button right below the color swatch. Adjust the sliders so that you have values of 204 for red, 87 for green, and 72 for blue, to create a reddish-pink color.
Now you can take this material and apply it to an object in your scene. Simply take the thumbnail from the Material Manager and drag it on top of any object in your scene or on the name of the object directly in the Object Manager. Apply it to the Cinema 4D group and note that a new texture tag appears in the Object Manager, represented by a small icon of the material. This can be loaded into the Attribute Manager to make adjustments to the way the material is applied to your object. This is how you get all three managers working together:
Note
You can drag a material from the Material Editor onto the Texture tag in the Object Manager in order to replace the texture. Simply adding the material to an object that already has a material on it will just add another texture on it, and you may want to replace it and not end up being confused by extra Texture tags on an object.
The Object Manager, Attribute Manager , and Material Manager serve special purposes to help manage your projects in Cinema 4D. The Object Manager displays all our objects that are contained within your project, and we can use the Alt or option + G keys command to group them together, as well as assign layers to them, so our project stays organized. The Attribute Manager displays our editable parameters for whatever object we have selected, including any tags we add to provide extra functionality. The Material Manager is the key towards sorting and applying materials to our objects, and it can launch the Material Editor that we can use to design our materials to look a certain way.
Cinema 4D has a comprehensive list of all of the keyboard commands that come into Cinema 4D by default and it's where you can assign custom shortcuts. It's located inside the Window menu and under the Customization submenu, under Customize Commands. There are tons, and I mean tons, of shortcuts by default, and I will try to bring up many useful ones throughout the book, but if you are a keyboard shortcut fiend, you may need to sift through this manager and absorb all of them and maybe set your own once you get better acquainted with the program.
Basically, you will be using these different managers in every recipe in this book, so it's important to get familiar with the different options and functionality they provide. As far as the Material Manager and Material Editor go, there's a whole chapter on materials that uses these features extensively.
Keyframes are the bookends of animation. They are specified values that we set at particular frames in a timeline and the differences between their values result in animation. Setting keyframes is the most basic method for generating movement and changing your scene from static to dynamic. If you can set keyframes, you can make the 3D objects you design jump, shake, dance, spin, slide, explode, and just about any other verb in the dictionary. This recipe will demonstrate how to set keyframes to get things moving in your scene.
Start by using the skills you learned to position our Viewer so we can see the rope on the back brick wall clearly. We are going to animate it swinging back and forth. Select the Rope object in the Object Manager and our rope will be highlighted inside the Viewer. Now, any transformations we apply with the Move Tool, Rotate Tool, or Scale Tool will occur on our rope.
The main focus of keyframing is done inside the Attribute Manager. Because the manager controls all the properties of our objects, it makes sense to be able to set keyframes inside it to animate the attributes of our object. Select the Coordinates tab for your rope inside the Attribute Manager, which contains the position, scale, and rotation properties of our rope. The property we are going to focus on is the R.B column or the bank of our Rope object, which is currently set to 0.
Notice, that to the left of each property there is a small circle with a black outline; this is our indicator that tells us if the property is keyframed. To set a keyframe, make sure you are on frame 1 in your Animation toolbar, then hold down the Ctrl key or the command key and click on the circle, which should now become a red-filled dot. Congratulations on setting a keyframe. Let's move on to the next recipe then.
Just kidding! We need to do more than that to see how keyframes actually work; setting one keyframe will not animate anything. Make sure you switch back
OFFthe Enable Axis Modification icon on the left-hand side in the Command Palette if you just finished the last recipe. Now, select the Rotate Tool from the Command Palette and grab the blue ring around the rope that corresponds to the rotation of our R.B value. Drag the ring clockwise and hold down the Shift key so that we rotate in intervals of 10, and stop when you get to 45 degrees. Notice how your keyframe dot has changed from red to yellow, meaning that we have changed the value at which our keyframe was previously set. If we skip to another frame, then Cinema 4D will revert back to the previously-set keyframe value. Therefore, we need to do the same command to set a new keyframe with our value of 45. Hold Ctrl or command and click on the dot to change it from yellow to red, meaning our keyframe is set with our new value:
Movement by keyframes comes from the change in values between two or more keyframes, so let's set another one at another point in time. Move to frame 15 in your Animation toolbar, and instead of using the Rotate Tool, just enter a value of -45 directly in the R.B field in the Attribute Manager. The dot has turned into a yellow circle, meaning the value has been changed but not keyframed. Try setting a keyframe by right-clicking on the yellow circle and selecting Add Keyframe from the Animation menu. Go to the beginning frame of the timeline and click on the Play button in the Animation toolbar, and watch your rope swing from one side to the other.
Note
It helps to think about the motion you want to achieve and try to translate that into numerical values occurring throughout the timeline. The rope's starting point is like you are holding it up high and waiting to let it go. Upon the release, it would swing and reach its farthest rotation on the initial swing then it would swing back and forth with a gradually decreasing rotation at similar intervals, which gives it the final look of slowing down and coming to rest.
Now's the time to go crazy and set the rest of our keyframes, one after another. Jump to frame 30 and set the keyframe for R.B to 25, then go to frame 45 and set it to -25, then a value of 5 at frame 60, -5 at frame 75, and finally back to 0 at frame 90. Press the Play button in the Animation toolbar and watch your animation. Your rope should drop and swing back and forth and come to a complete rest.
If you would like to see the results of your keyframes visually, go into the Window menu at the top and select the Timeline option. This keeps track of all the keyframed values in your project and allows you to make adjustments to your keyframes as if they were points plotted on a graph. The default view shows your keyframes that you can slide into different moments in time, but we are more interested in the graphical view. Click on the small icon of a curve equation, next to the key in the top right-hand corner, and then select the Rope object on the far left-hand side, or press the spacebar to toggle between the two. You should see a curve that looks somewhat like a sine wave; this is the rotation value we plotted. These curves are called F-Curves, where the F stands for function, and you can use them to adjust the temporal (time) interpolation of the values between keyframes:
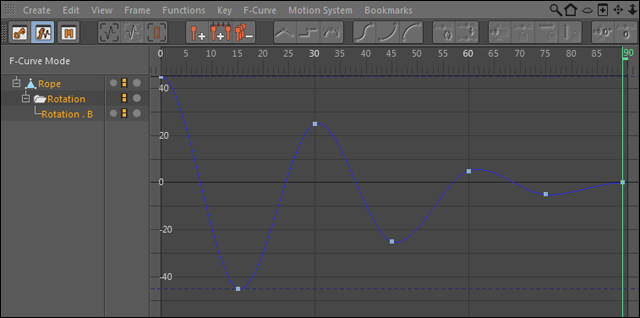
In this window, we can select individual points and slide them around the graph. The Y axis represents the actual rotation value, and the X axis corresponds to the frames in our composition. Click-and-drag your mouse to create a box around all the points on the graph, so that they are selected and highlighted in orange. Notice how the points have little levers called Bezier handles that can be stretched out or tilted in different angles to adjust the shape of the curve around the point representing the keyframe:

With the points selected, right-click and change the highlighted option from Spline to Linear. Your curve turns into straight lines, making a very sharp and jagged shape on your graph. Go play with your animation and observe what this has done to your rope, it now swings stiffly and sharply, changing direction just like the new shape of your graph would indicate. Hit Ctrl or command + Z to undo your change to the graph, so that we now have curves again, which represent a more appropriate motion for our rope.
We use the properties inside the Attribute Manager to set keyframes to create animations inside Cinema 4D. The keyframes need to be set at different points in time and have different values in order to cause change and motion in our scene. We can also use the Timeline window to view a visual representation of our keyframes as points on a graph. This window allows us to adjust our points with Bezier handles and also change the way our keyframes ease from one to the next.
You can keyframe any parameter with that small circle next to it. Technically, any object in Cinema 4D can be keyframed in some way. I promise we will make a better animation than this swinging rope if you keep reading my book.
If you end up keyframing a parameter and you hate the way it looks, you can delete all of your keyframes simply by right-clicking on the keyframed dot and selecting Delete Track.
Interpolation is the method in which our animation changes between keyframes. Bezier curves represent the concept of easing into and out of different keyframe values. In the case of our rope, the rope doesn't change directions instantly and switch directions immediately; it slows down and gradually shifts back in the other direction. The linear method made our animation look awful, but in some cases it's the appropriate kind of interpolation for your keyframes. Let's say you have a fighter jet flying through your scene; if the position keyframes are set to Bezier, your plane will appear to gradually speed up in the beginning and slow down at the end of your keyframed animation. In actuality, the plane should be traveling at a constant rate through your scene, so you would want to have a linear interpolation between your keyframes. You have to picture how your object is supposed to move, and imagine how that looks plotted on a graph.
It's early in the book, but I like to include any extra tools I use just for reference. I easily created the rope used in this recipe using Reeper X , a free plugin for Cinema 4D that specializes in creating ropes (http://www.codeworkers.de/garage-plugins-reeperx.html).
Depending on which version you've purchased, Cinema 4D comes equipped with additional content and presets that you can easily import into your projects. These extra files are found in the Content Browser, which is an organized Viewer for you to browse through all the additional content that comes with Cinema 4D. The Content Browser has 3D models, materials, sample projects, and perhaps much more if you have Cinema 4D Prime, Visualize, Broadcast, or Studio. This recipe shows you where to find this additional content within Cinema 4D.
Start a new project for this recipe; you don't need to use the obstacle course any more.
Head up to the Window menu, look inside, and find the Content Browser option and click on it to open it. A new window pops up with a listing of folders and places on your computer located on the left-hand side. Untwirl the Presets folder to reveal even more folders inside; this is where the additional content is stored. It works very similar to your operating system's folder and file structure.
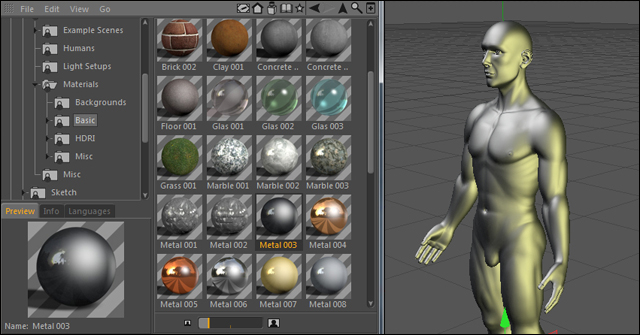
We are only going to explore the Prime folder because that is the most basic package available in Cinema 4D and all other versions should include those presets as well. Un-twirl the Prime folder, this reveals even more sub-folders. The folders should include Example Scenes, Humans, Light Setups, Materials, and Misc.
Double-click on the Humans folder and you'll find two models, Fred and Lisa, that you can double-click and they will import into your scene directly. Place Fred in the scene and notice how he resides at the origin of your new project:

Reopen the Content Browser by pressing Shift + F8 if you've closed it. Now, go under the Light Setups folder and double-click on the 3 Point Light Stage option, and Cinema 4D will add a basic light setup to your scene with Fred:
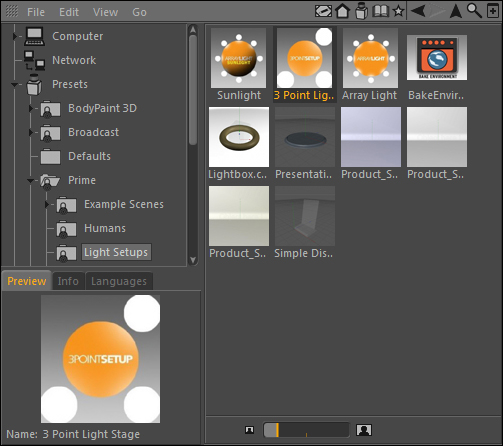
Reopen the Content Browser once more, and now navigate to the folder labeled Materials. Once in this folder, go to the next level in the Basic folder and scroll down to find the material named Metal 003. Take this material and drag it directly onto Fred; on the release of your mouse, Fred will go from being made of flesh to being made of metal. The metal material is now also imported into your Material Manager:
The Content Browser is found inside the Window menu and is a great tool for using the extra presets and projects Maxon provides with their software. It's a great way to get quick results by using prebuilt items, and you can even add your own presets as well as purchase and install other content from third parties.
Be sure to go through all of your folders inside the Content Browser to see what kinds of files are available to you. It can save tons of time by having professional quality presets ready to go at your fingertips. The Content Browser can import them into your scene instantly; use it to your advantage.
The beauty of the Content Browser and its presets are that you can easily import them into your project and open them up to learn how a particular effect is achieved. If you want to know some good techniques for creating metallic textures, examine the metal material we imported as well as the others available and determine what goes into creating a good metal texture. Once you examine all of the content available, open up any project or preset that piques your interest and examine how it's done.
In case you haven't noticed yet, Cinema 4D uses actual units of measurement for their values for things, such as size and position. Mine is labeled in centimeters, and you can pick what kind of units you default to by going under the Edit menu, followed by Preferences, and then the options for Units, and selecting your Unit Display to be a bunch of different Metric or U.S. forms of measurement. The animators usually aren't concerned with what set of measurements they are using; your animation will look the same whether you are using miles or millimeters. But, let's say you are designing a model that needs to be accurate to scale, say for an architectural model, and you've designed a piece that is set in the wrong units. Whether it's too big or too small, there's a way in Cinema 4D to adjust the scale of your object so it's resized properly.
Open the Trashcan.c4d file from the C4D Content Pack
. You'll be creating this object from scratch in the next chapter.
Add a Cube primitive to our scene, and in my case, it's the default 200 centimeters in every dimension, making it a bit taller than the size of my trash can. Use the Move tool to position the cube to the right of the Trash Can to compare the size. Let's say you want your Trash Can to appear much smaller but keep the cube at that size. You could click on the Trash Can group in the Object Manager and change the Scale X, Y, and Z values to a fraction of 1, so that the Trash Can shrinks in size:

This method is good, but what if you want to keep your scale values proportioned at 1? The answer lies in the Edit menu under the Scale Project command. Delete the cube from the scene and then find the Scale Project option inside the Edit menu up top. A small pop-up window appears and asks you what your Current Scale is and what you want your Target Scale to be. If right now you have it set that 1 unit is equal to 1 centimeter, you'd have to decrease the Target Scale to have the Trash Can become smaller. Change the Target Scale from Centimeters to Millimeters and click on OK. The Trash Can just shrunk, but any new object we add will appear just as big as it would have before. Add a Cube object and you'll notice it is gigantic compared to our Trash Can, but it's the same size and measurement in centimeters as before.
If you want to undo the change you can't just hit your undo keyboard shortcut. You have to go back into the Scale Project setting and apply the opposite transformation. Change the Target Scale to have a value of 10 and watch how your Trash Can springs back to the size it was before. Create another Cube object and you'll see it is back to the proportion it was originally. You basically have to undo the math you did with new math by converting the units properly.
This function is useful if you need to scale your scene to fit into an appropriate measurement. If your model appears absurdly large or small, then you can size it properly with the
Scale Document function so it fits your scene better. We are able to quickly adjust the entire scale of what's in your .c4d file without messing up the scale settings in the Coordinates tab. This is just a more precise way to resize your models than applying fractions to your scale settings.
This is a good tip in case you encounter a file that someone designed using a different unit of measurement in their version of the application, and it appears to be really large or small when you integrate it with your model. The same is true when you perhaps buy pre-made models; you'll be able to adjust the scale so they fit within your scene properly.
The Scale Project function works on everything in your document, so you need to isolate only the objects you want to scale with the command. Copy and paste them into a new, empty C4D file and make the changes to the scale in there, then copy and paste the smaller version back into the C4D file you are working with.

