


ChromeOS Basics
ChromeOS is a ground-breaking, cloud-first (designed to take advantage of cloud services) operating system (OS) developed by Google. Its affordability, unique design, low hardware requirements, and ease of use have made it a popular choice with consumers of all types. From bedrooms to boardrooms, you’ll find ChromeOS being used. So, as an administrator, it is important that you understand how to best leverage ChromeOS’s power and flexibility.
In this chapter, we’ll take a look at the core features and functions of ChromeOS. You’ll learn how to use ChromeOS’s built-in tools to perform essential tasks such as managing user accounts, working with data, and launching applications. By the end of the chapter, you’ll know many of the ins and outs of working with ChromeOS and why it’s so different from other OSs on the market.
Ready to get started? We thought so!
In this chapter, we will be covering the following topics:
- ChromeOS versus the competition
- Getting up and running on ChromeOS
- Personalizing ChromeOS
- OS updates, upgrades, and ChromeOS Flex
Technical requirements
In order to get the most out of your introduction to the fundamental features of ChromeOS, you’ll need access to the OS. You have two options:
- Use Chromebook or Chromebox hardware, which comes with ChromeOS natively installed
- Install ChromeOS Flex (which we will discuss later in the chapter) onto a PC or Mac
ChromeOS versus the competition
An OS is the most important piece of software you can install on your computer. Without it, we can’t issue commands to our hardware, organize files, or even log in to a system. It is essential! Therefore, it’s no wonder why there are several major OS platforms on the market.
With major competitors such as Microsoft and Apple, you may ask, “What does ChromeOS have to offer that they don’t?” In this section, we will explore some of the things that help ChromeOS stand out from the crowd.
Cloud-focused
Most computer OSs are designed with a focus on localized computing and storage. This means that these OSs rely heavily on the hardware components installed in your computer to perform data processing and storage. This design is fine if you rely on locally installed applications, but is not as necessary if you primarily use cloud-based applications.
As the world’s first commercially successful, cloud-first OS, ChromeOS shifts the burden of processing and storage from your device to the cloud. It does this by building on the foundational technologies introduced in Google’s popular Chrome web browser. In fact, as you’ll see later in the chapter, the Chrome browser is the central component of ChromeOS. This cloud-based approach allows hardware manufacturers to focus on developing lower-power, terminal-like, computer devices that are built to take full advantage of all of the benefits that moving to the cloud has to offer.
Ease of use
Managing and maintaining an OS can be challenging. Traditional OSs can be very complex because they are responsible for managing local hardware, applications, processing, storage, data I/O, and so much more. This complexity trickles down to you, the administrator, who now has to learn how to navigate and configure the hundreds of settings each OS provides. This can be a daunting task and it’s why there are entire courses and books dedicated to the subject.
ChromeOS takes a different approach. By shifting many of the duties of a traditional OS to the cloud, what you are left with is a sleek, simplistic, bowser-centric OS. The reduced number of configurations and settings make learning how to manage the OS a very straightforward process, empowering users of all skill levels to control the management of their systems.
Priced to move
As previously mentioned, traditional OS designs rely on the use of directly attached hardware. However, there is a major drawback to this approach. In order to guarantee high levels of performance for the OS running these hardware platforms, vendors have used higher-end hardware components. The inclusion of these higher-end components in turn drives up the overall cost of the computer device and that cost gets passed along to you, the consumer.
Google has been able to use the cloud-first design of ChromeOS to create a niche in the computer hardware market. ChromeOS’s streamlined design and heavy reliance on the cloud for computing power and storage have resulted in its ability to run on less expensive hardware. As a result, hardware manufacturers can create Chromebook (laptops designed with ChromeOS as their native OS) and Chromebox (desktops designed with ChromeOS as their native OS) computers at a fraction of the cost of other computer devices. These savings are then passed along to consumers resulting in inexpensive but reliable computers.
Now that you know a little about how ChromeOS compares to the competition, let’s look at how to get started using the platform.
Getting up and running on ChromeOS
ChromeOS is the native OS of Chromebox desktops and Chromebook laptops. This means that out of the box you have access to the OS. Much like its mobile device counterpart, Google’s Android OS, ChromeOS requires the creation of or the use of an existing Google Account in order to access the full functionality of the system.
The first time you power on the system, you will be greeted with the Who’s using this Chromebook? screen, as seen in the following figure:
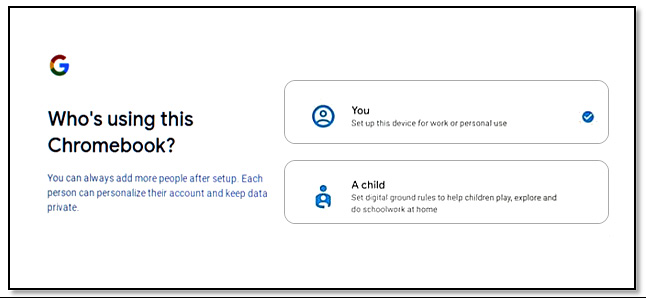
Figure 1.1 – The Who’s using this Chromebook? setup screen
The primary options on this screen provide you with links to set up your personal user account or to set up a restricted account for a child. However, hidden below these options, you’ll find links that will allow you to browse as a guest or perform enterprise enrollment of your device. Browsing as a guest allows you to bypass entering your Google account information by providing you with a limited computing environment. This is ideal for someone who just needs to use the internet on a Chrome device that doesn’t belong to them. Enterprise enrollment is a feature used by organizations that want to have centralized management over multiple devices running ChromeOS. We will discuss enterprise enrollment in more depth in Chapter 9, Google Workspace Admin Console.
Assuming you will be the primary user of the Chrome device, perform the following steps to set up your account:
- On the Who’s using this Chromebook? Screen, select the You button, then press Next.
- You’ll be presented with a Sign into your Chromebook screen. At this point, you will choose to do one of the following options:
- Enter the email address or phone number of your existing Google Account.
- Select the More Options link, which will allow you to create a new account or perform enterprise enrollment. Let’s choose to create a new account.
- On the Create a Google Account screen, enter your first name and last name and press Next.
- You are then prompted to enter some basic information, including your birthday and gender. Enter the required information and press Next.
- On the Choose your Gmail address screen, you will be given several suggestions for potential Gmail addresses. You can either choose one of these addresses for your account or create your own unique email address. After you have chosen or created an email address for your account, press Next.
- Now you’ll be prompted to create a password. In order to ensure that your password isn’t easily guessed, be sure to implement password complexity by using a mixture of upper and lower-case letters, numbers, and special symbols. Once you have a strong password in place, press Next.
- (Optional) You can include a phone number on the Add phone number? screen. Adding a phone number provides you with the following benefits:
- Password recovery if you forget your ChromeOS login
- The ability to receive video calls and messages
- Connectivity to other Google services
- On the Review your account info screen, you have one final chance to verify your Google account’s email address and username. If these settings are correct, then you can click Next.
- Google’s Privacy and Terms policy is then shown. Once you’ve read and agreed to it, you can click the I agree button.
- (Optional) The Sync your Chromebook/Chromebox screen gives the opportunity to sync ChromeOS with your Chrome browser settings from other devices. You can select Accept and continue to perform the sync:
Note
You can bypass this section by selecting the Review sync options following setup checkbox option.
- (Optional) By pressing the More button on the Google Play apps and services screen, you’ll be provided with the terms and conditions for using the Google Play store on your ChromeOS device. This feature will be discussed in more detail in Chapter 3, Exploring Google Apps. You will also have the option to enable the Back up to Google Drive feature, which we’ll dive into in Chapter 5, Recovering from Disasters. Once you’ve viewed the terms and made your selection on backups, click the Accept button to continue.
Note
You can bypass this section by selecting the Review Google Play options following setup checkbox option.
- (Optional) On the Your Google Assistant is ready to help screen, you get the option of enabling Google Assistant to help you with managing ChromeOS and its apps via voice commands. Select the No thanks button to leave this option disabled or the I agree button to activate it:
We will discuss Google Assistant in more detail later in this chapter
- Finally, you’ll arrive at the You are all set! screen. Here you’ll have the option of signing up to receive email communications from Google. Once you’ve made that choice, you can click the Get started button to fully log in to the system and view your ChromeOS desktop.
Now that we have the initial setup on our ChromeOS device taken care of, let’s look at how we can personalize the OS to make it our own.
Personalizing ChromeOS
Although ChromeOS is designed with simplicity in mind, it still provides users with tons of opportunities to modify its look and feel. Some of the available configurations are purely cosmetic but many of them can have a profound impact on user experience. As a systems administrator, it will be important for you to understand how to locate and adjust these settings to ensure you and your users have the ideal computing experience.
The desktop and its tools
Like other OS, ChromeOS provides users with a desktop workspace once they’ve successfully logged into the system. However, this desktop differs from most OS desktops because it does not allow file, folder, or applications shortcut icons to be stored on it. Instead, it provides you with adjustable wallpaper graphics and a centralized location to access primary tools for organizing and navigating in ChromeOS: Shelf, App Launcher and Status Tray, as shown here:
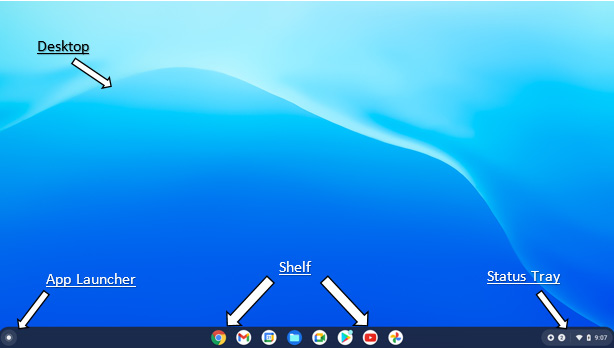
Figure 1.2 – The ChromeOS desktop
Let’s look at each tool in detail in the following sections.
The shelf
The shelf acts as a storage location for tools and apps in ChromeOS. The shelf is home to App Launcher and the status tray. It also displays shortcuts for both pinned and running apps. Apps can be pinned or unpinned from the shelf by using the following steps:
- Pinning apps:
- Locate the app that you want to pin using App Launcher.
- Click and hold the chosen app.
- Drag the app’s icon to the shelf.
- Unpinning apps:
Pro-tip
By default, the shelf is located at the bottom of your screen on the desktop, but it doesn’t have to be. To adjust the position of the shelf and to make it automatically hide when not in use, do the following:
1. Right-click (using the mouse) or tap with two fingers (using the touchpad) to open the Quick Settings menu.
2. Select the Shelf position menu option and then choose left, bottom, or right to move the shelf to its new location.
3. Or, select the Autohide Shelf menu option to allow the shelf to collapse from view when another screen opens.
Figure 1.3 illustrates how you can rearrange the shelf to suit your needs.
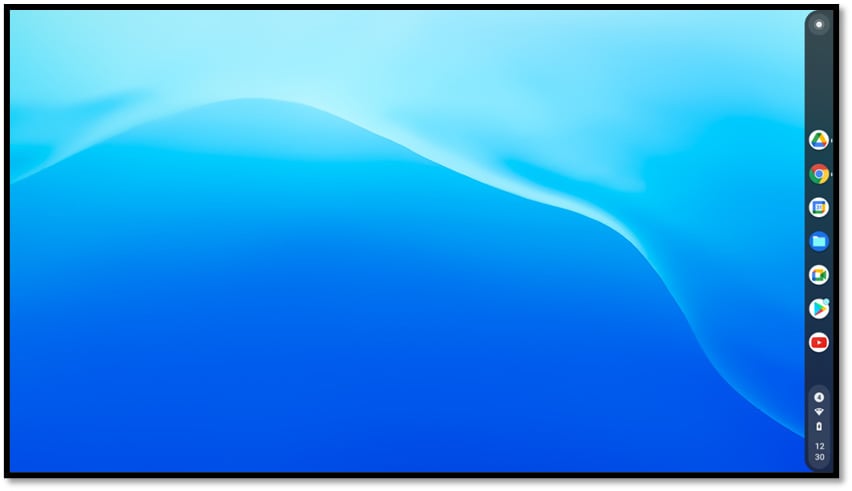
Figure 1.3 – The shelf moved to the right position
App Launcher
App Launcher is your primary tool for navigating ChromeOS and the internet. It provides you with search capabilities and shortcuts to popular tools and apps. You also use App Launcher to access the full selection of utilities and apps that ChromeOS has to offer. Simply click on App Launcher’s icon and expand it to full screen to see everything you have installed on your ChromeOS device. Here’s what that looks like:
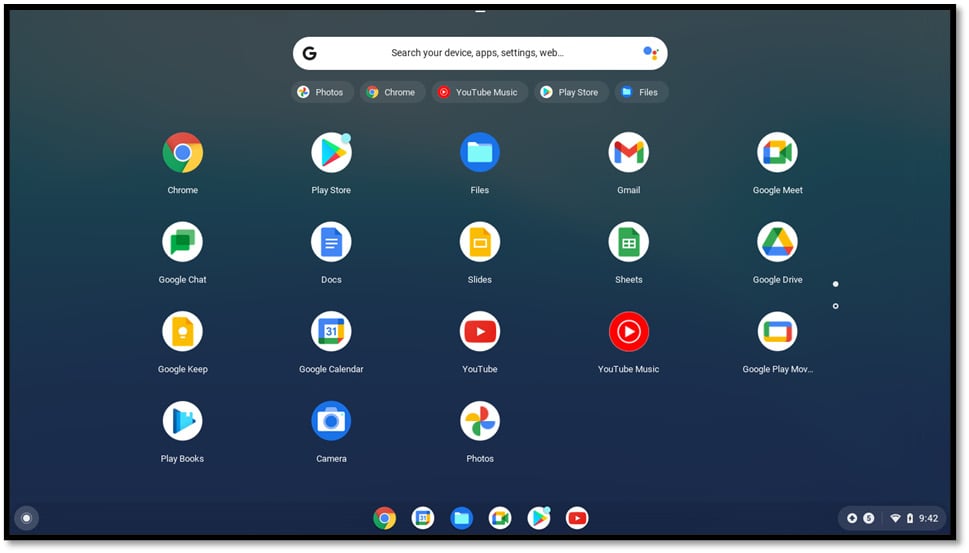
Figure 1.4 – App Launcher in normal full-screen view
Pro-tip
If you prefer more of a Microsoft Windows-style navigational experience, you can adjust App Launcher by activating one of ChromeOS’s many experimental features. To access this enhancement, do the following:
1. In your Chrome browser, search for chrome://flags/#productivity-launcher.
2. Locate the Productivity experiment: App Launcher option.
3. Change its configuration setting from Default to Enabled.
4. Press the Restart button to reboot ChromeOS and apply the change.
Figure 1.5 shows how the Productivity experiment: App Launcher flag will appear in your Chrome browser.
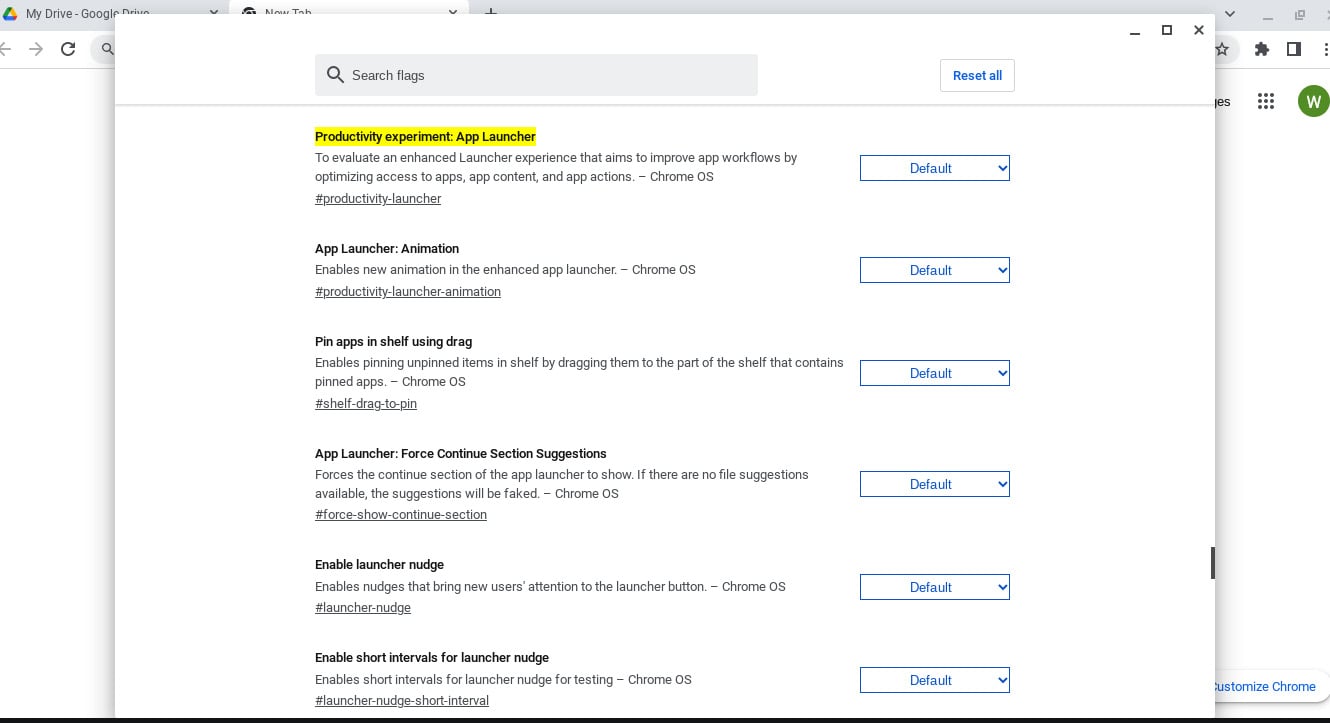
Figure 1.5 – ChromeOS experimental features
Once the flag is applied, your App Launcher screen takes on a Windows-style appearance, as seen in Figure 1.6.
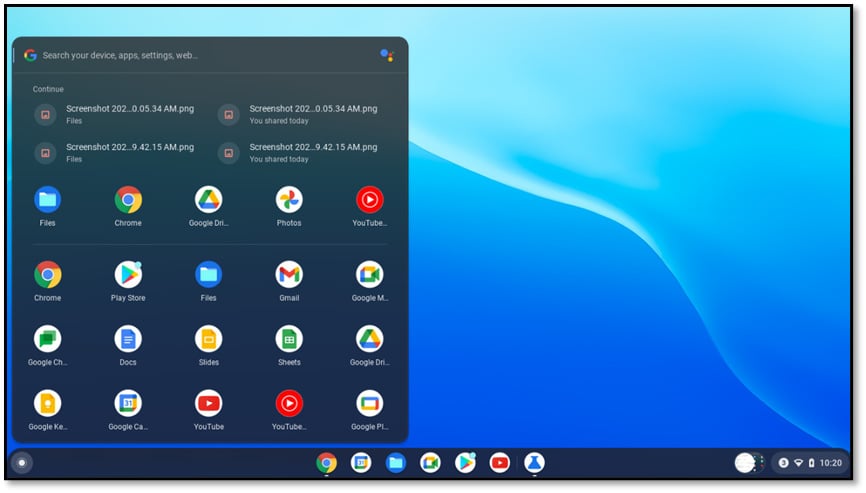
Figure 1.6 – ChromeOS with Windows-style App Launcher enabled
The status tray
Now that we have explored App Launcher, let’s move to the opposite end of the shelf where we will find the status tray. In its default state, the status tray displays indicator icons for your system’s battery and network. It’s also where you’ll see the time and settings. However, when you click on this tool to expand it, you’ll be presented with a myriad of additional settings as seen in the following figure:
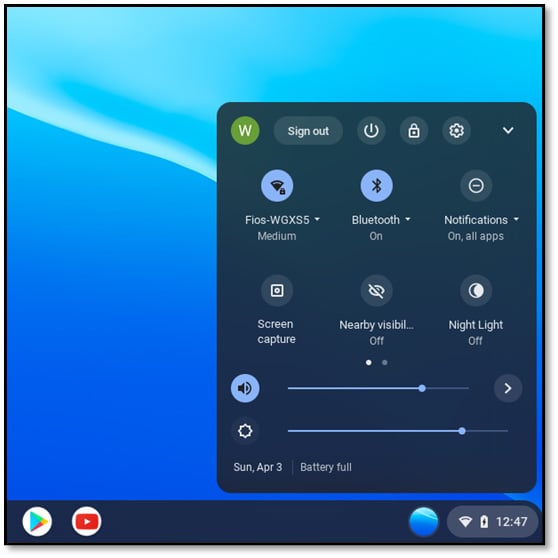
Figure 1.7 – The expanded status tray
The status tray setting links include the following:
- Sign out – allows you to sign out of your Google account.
- Shutdown – allows you to do a software shutdown of your ChromeOS device.
- Lock – allows you to lock your devices, forcing a password to be entered to regain access.
- Settings – allows quick access to the full settings menu discussed later in this chapter.
- Network Connections – allows you to choose a wired or wireless network connection. For wireless networks, it also shows you the strength of your wireless signal.
We will discuss networking with ChromeOS in more detail in Chapter 2, Getting Connected.
- Bluetooth – enables or disables Bluetooth functionality. It also allows you to scan, pair, and connect to Bluetooth-capable devices (such as Bluetooth headphones and speakers).
- Notifications – allows you to configure which apps can give you pop-up notifications. You can also turn on the Do not disturb option, which blocks all notifications.
- Screen Capture – allows you to take still-frame pictures of your display or record video of your on-screen actions. Both still-frame pictures and videos can then be edited and saved to your device or the cloud.
- Nearby Visibility – allow your device to be seen on your network by other devices running ChromeOS or Android OS for the purpose of sharing files.
We will discuss connecting to other devices with ChromeOS in more detail in Chapter 2, Getting Connected.
- Night Light – allows you to manually or automatically dim your display to make it easier to read in low light.
- Cast – allows you to (wirelessly) share your full display or a specific Chrome browser tab with a wireless-capable monitor or television. You can also connect to devices that are using Google’s Chromecast hardware.
Chromecast is a plug-in hardware component that gives normal televisions smart TV functionality.
- Volume/Audio Settings – allows you to adjust the speaker volume for your system using a slider bar, control speaker, and microphone settings using its advanced features.
Advanced speaker and microphone settings include the ability to choose which speaker or microphone you would like to use. This is useful in situations where you have multiple speakers or mics connected to the ChromeOS device.
- Brightness – allows you to control how bright or dim your display is.
Controlling the screen brightness is a good way to make it easier to read your screen in different lighting situations. It’s also useful when you need to conserve battery power (dimming your display can extend your battery power considerably).
Now that we’ve explored the desktop and its tools, let’s take a closer look at how we can manage our ChromeOS device using tools in the Device menu.
The Device menu
As you continue to customize ChromeOS, you will need to explore the Settings screen. This area provides you with a centralized location for managing all of the configuration options ChromeOS has available. The configurable options are grouped together by searchable categories, making finding what you’re looking for a very straightforward process.
One of the Settings screen’s categories that you will find useful during the setup of your ChromeOS device is the Device category, as shown in the following screenshot:
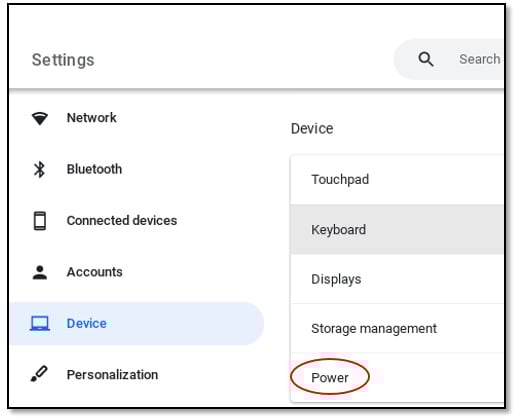
Figure 1.8 – The Device category of the Settings screen
The Device category provides you with the following configuration options:
- Mouse/touchpad
- Keyboard
- Displays
- Storage management
- Power
Let’s explore each to see how the administrator can use them to improve the user experience.
Mouse and touchpad
Under Device Mouse and Touchpad, you will find settings to adjust the functionality of your mouse or touchpad device, as shown in Figure 1.9. If you are on a ChromeOS device that only has one of the two input devices, you’ll only see options for adjusting that device’s settings (for example, a Chromebook with no external mouse will only show touchpad settings).
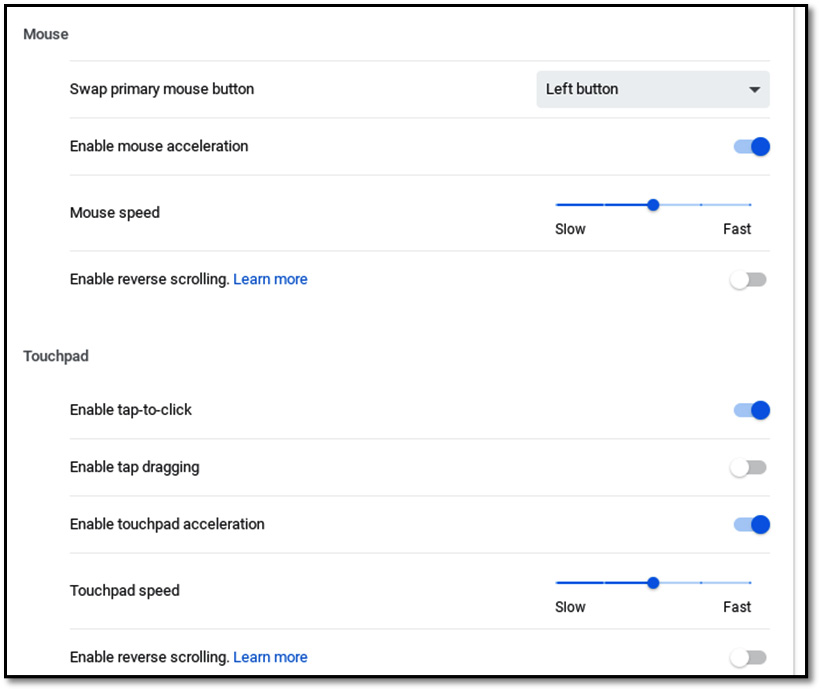
Figure 1.9 – The Mouse and Touchpad settings screen
The Mouse settings include the following:
- Swap primary mouse button – allows you to switch the functionality of the left and right mouse buttons.
- Enable mouse acceleration – allows you to adjust how fast or slow the mouse moves your pointer across the screen.
The mouse speed slider is only active when Enable mouse acceleration has been enabled.
- Enable reverse scrolling – makes upward scrolling action move pages downward and downward scrolling action move pages upward.
The Touchpad settings include the following:
- Enable tap-to-click – allows you to enable or disable the ability to tap the touchpad to select an object instead of clicking on it.
- Enable tap dragging – allows you to enable or disable the ability to double-tap an object and drag it around the screen.
The alternative method for dragging objects is to use the touchpad to click and hold an object with one finger while using another finger to drag the object.
- Enable touchpad acceleration – similar to mouse acceleration, this setting allows you to control how fast or slow the touchpad moves your pointer across the screen.
The touchpad speed slider is only active when Enable touchpad acceleration has been enabled.
- Enable reverse scrolling – this setting functions the same with the touchpad as it does with a mouse. It makes the upward scrolling action move pages downward and downward scrolling action move pages upward.
Keyboard
Under Device Keyboard, you will find several settings that allow you to customize how certain keys on a ChromeOS device’s keyboard function, as shown in Figure 1.10. You can also adjust the sensitivity of the keyboard to accommodate users who may have physical conditions that affect their typing abilities.

Figure 1.10 – The Keyboard settings screen
The Keyboard settings include the following:
- The ability to change the keys used to represent the Search, Ctrl, Alt, Escape, and Backspace functions.
- Treat top-row as function keys – allows you to enable or disable the ability to hold the Search key in order to change the behavior of the top-row keys.
- Enable auto-repeat – allows you to enable to disable the ability to adjust how long your ChromeOS device will wait after you press a key before it begins to repeat. You can also adjust how fast or slow a key repeats:
- When enabled, you can adjust the Delay before repeat and Repeat rate settings using their sliders
- Change input setting – allows you to access a sub-menu with advanced settings that enable you to do the following:
- Show an input options shortcut on the shelf
- Add additional keyboard input languages
- Customize the spelling and grammar check dictionary, as shown in the following figure:
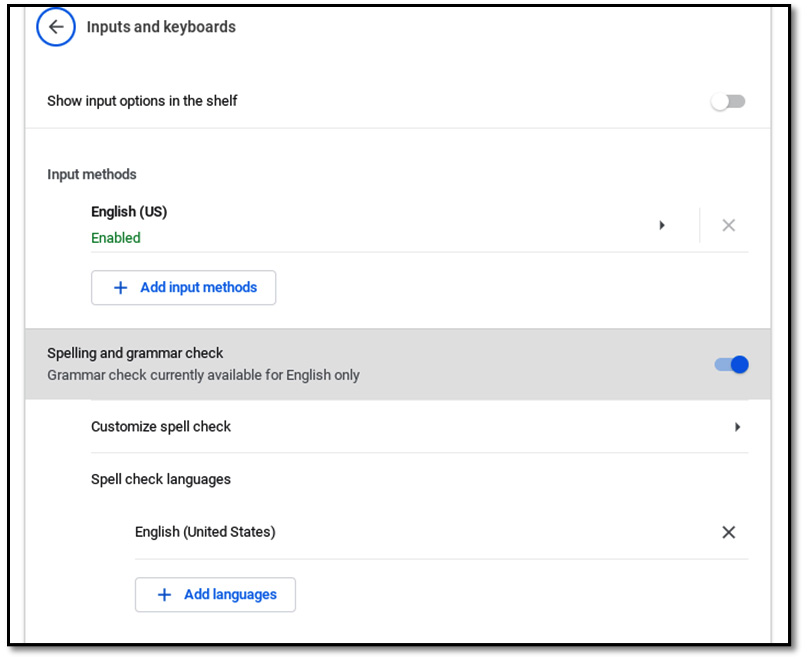
Figure 1.11 – The Inputs and keyboards settings screen
Pro-tip
The mouse and touchpad are great tools to use when navigating the many features and functions of ChromeOS. However, if you really want to increase your productivity, then you’ll need to master the many keyboard shortcuts available to you in ChromeOS.
To see a full listing of these handy shortcuts, select the View keyboard shortcuts link on the Devices Keyboard settings screen, and this is what you’ll get:
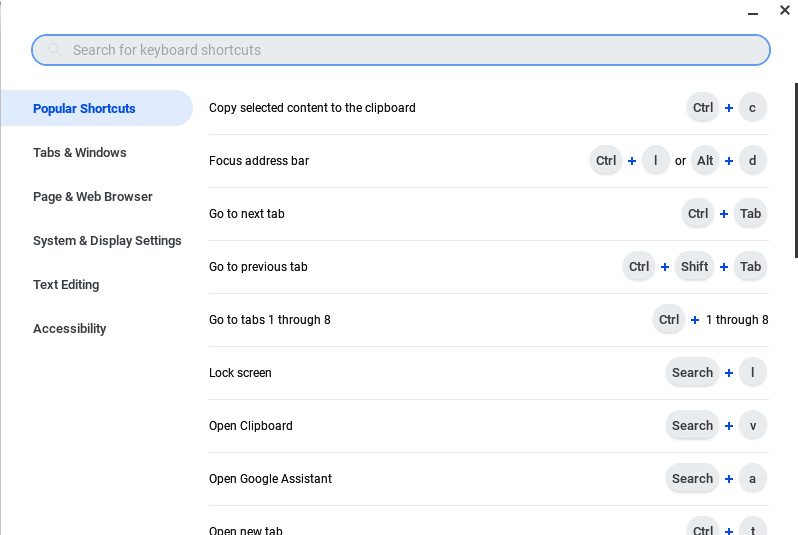
Figure 1.12 – Sample of the ChromeOS keyboard shortcuts
Displays
Under Device Displays, you will find settings that allow you to configure how your ChromeOS devices’ built-in and connected displays operate. The settings for the built-in display are simple and limited but once an external display is connected, a host of additional configuration options become available for you to use as you tailor the monitor’s settings to your viewing needs.
The Built-in display settings include the following:
- Display size – allows you to adjust how small or large items appear on the screen.
This setting emulates making changes to a screen’s resolution.
- Orientation – allows you to rotate the screen 0, 90, 180, or 270 degrees.
- Night Light – as mentioned earlier in the chapter, this feature adjusts the screen to make it easier to read in dim light. Once enabled, you also have the option of activating this feature on an automated schedule.
Here’s what they look like on screen:
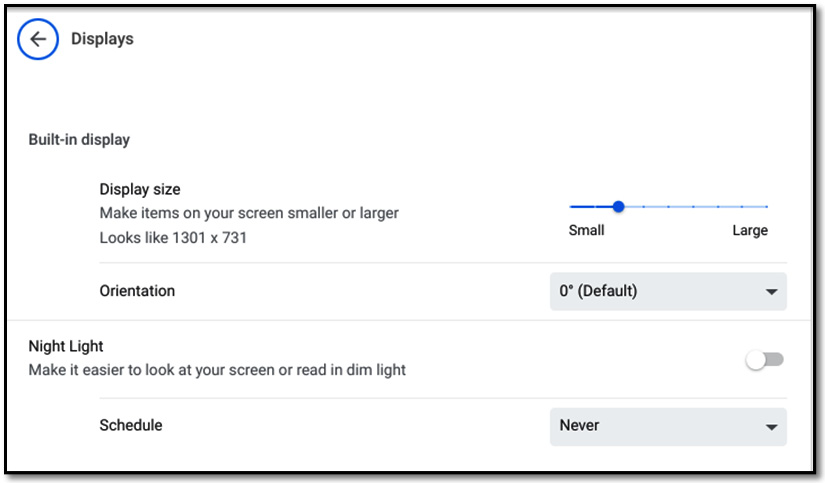
Figure 1.13 – The Built-in display settings
The external display settings include the following:
- Arrangement – allows you to determine the order of extended monitors by dragging them or using the arrow key to move them into your desired order. This affects how your pointer moves from screen to screen when your displays are in Extended Mode.
The Arrangement setting also provides an option to duplicate the built-in display. You can enable this option by clicking the checkbox labeled Mirror Built-in display as shown in the following figure:
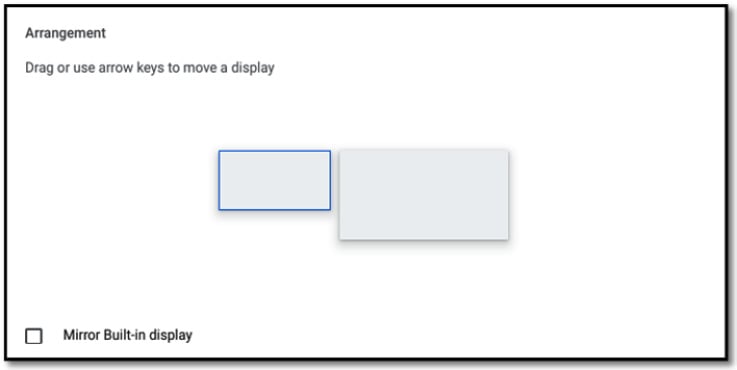
Figure 1.14 – The Arrangement settings for an external display
- Screen – when displays are in Extended Mode, this setting allows you to select which screen will be the primary display, and which will be the extended display.
- Display size – the same as the built-in display settings.
- Resolution – allows you to adjust the display resolution, which affects how large or small images and text appear on the screen.
- Refresh Rate – allows you to configure how often the image on your display is updated per second.
Higher refresh rates cause the movement of images on your screen to appear smoother.
- Orientation – The same as the built-in display settings.
- Overscan – allows you to adjust the boundaries of your display to ensure that the edges of your desktop display are not cut off from view.
- Night Light –The same as the built-in display settings.
Figure 1.15 illustrates how each of the previously mentioned configuration options will appear on-screen:
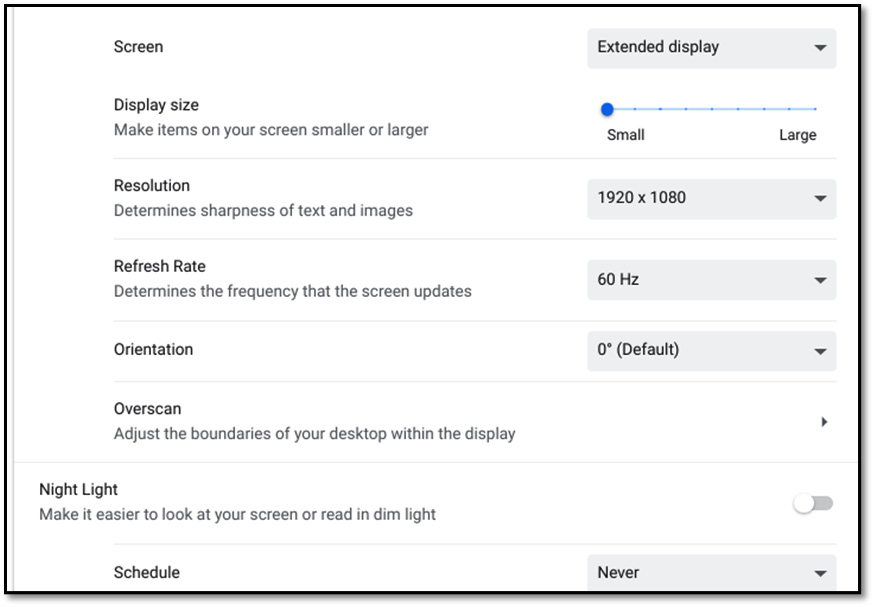
Figure 1.15 – The other external display settings
Storage management
Under Device Storage management, you won’t find many customizations, as seen in Figure 1.16. However, you will be provided with several important pieces of information regarding storage resource usage on your ChromeOS device. Additionally, you will be presented with several links to other areas of the OS and Chrome browser that will allow you to customize how your device’s storage is used and maintained.
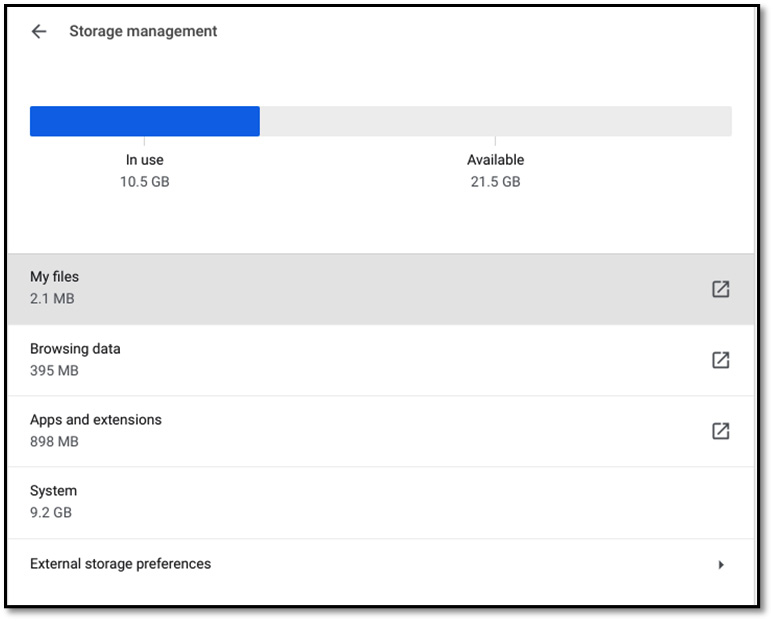
Figure 1.16 – The Storage management settings
The Storage management screen displays the following:
- The amount of used and available storage in your ChromeOS device, in bar chart form.
- A My files link, which redirects you to the ChromeOS file manager, known as Files.
This is the default storage location for any files that you create or download to your ChromeOS device.
- A Browsing data link that redirects you to the Chrome browser’s Clear browsing data screen.
We will discuss managing browsing data in-depth in Chapter 4, ChromeOS Security.
- An Apps and Extensions link that redirects you to the Device Apps section of the settings menu where you can see and manage the apps that are available to your ChromeOS device.
We will discuss accessing and managing apps in more detail in Chapter 3, Exploring Google Apps.
Power
Under Device Power, you will be able to access information about your ChromeOS device’s current power usage, as seen in the following image. Also, you’ll be provided with a few options for changing power-related settings.
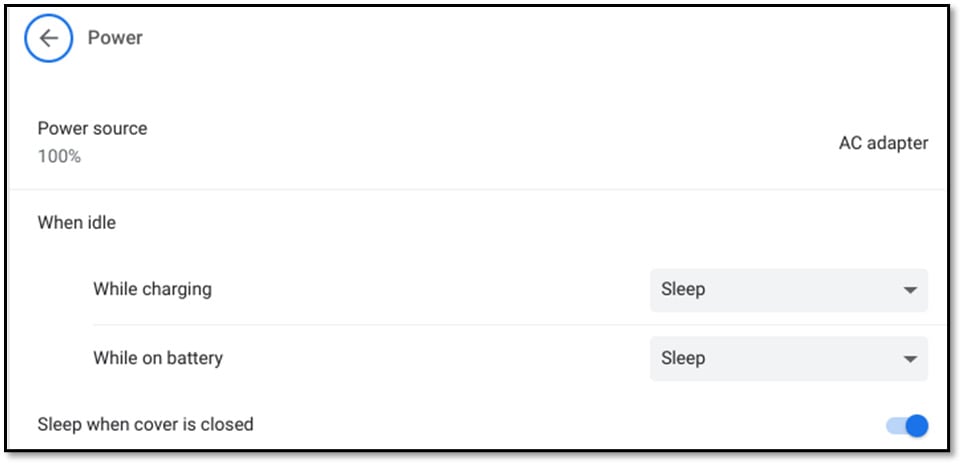
Figure 1.17 – The Power settings
The Power settings menu includes the following:
- Power Source – displays if your ChromeOS device is currently using the AC adapter or battery as a power source. When on battery power, you will also be shown the percentage of the remaining battery and an estimate of how many hours/minutes you have before the device needs to be recharged.
- When idle – allow you to configure what happens to your ChromeOS device when it is being actively used. On ChromeOS devices with batteries (such as Chromebooks), you’ll be able to define different settings using the AC adapter versus using battery power:
- While Charging – controls what happens to idle systems while they are being powered by the AC adapter; the options are Sleep, Turn off display, and Keep display on
- While on battery – controls what happens to idle systems while they are being powered by battery; the options are Sleep, Turn off display, and Keep display on
- Sleep when cover is closed – provides enable/disable toggle switch that allows you to control if a ChromeOS device with a lid cover (such as a Chromebook) goes to sleep or stays active when the device’s cover is closed.
The Personalization menu
Many of the customization settings addressed in the Device menu affect the functionality of ChromeOS and the device that it’s installed on. But sometimes customizing your OS is more about aesthetics than functionality. This is why ChromeOS also includes several options for customizing the look and feel of the OS. These settings are grouped together under the Settings Personalization menu, as you can see in the following figure:
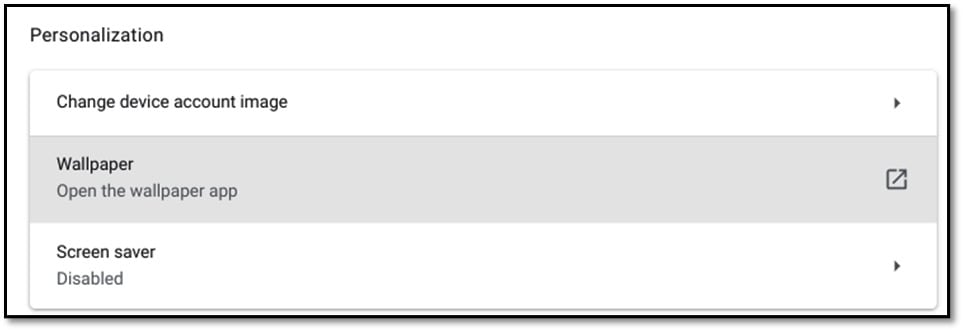
Figure 1.18 – The Personalization menu
In this section, we’ll discuss some of the key configurations that you’ll be able to alter to make ChromeOS your own.
Account image
Under Personalization Change device account image, you’re given the ability to change the picture that is associated with your account on the sign-in page, as you can see in Figure 1.19. This is a good way to visually distinguish between multiple accounts on your ChromeOS devices. It’s also a cool way to show off your own unique style and personality.
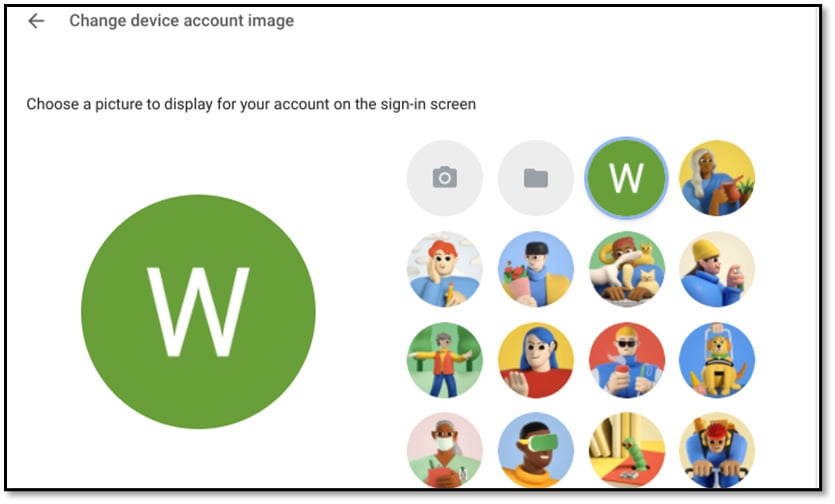
Figure 1.19 – The Change device account image options
Choose between the following options when selecting your account image:
- Keep the default, which is typically the initials of your user account name
- Choose from an array of ChromeOS-provided account images
- Take a picture with your webcam
- Select a stored image from My files
Wallpapers
Under Personalization Wallpaper, you’ll have access to a link that redirects you to the Wallpaper app, as seen in Figure 1.20. Configuring a wallpaper will change the image that appears on the desktop screen when you first sign in to ChromeOS.
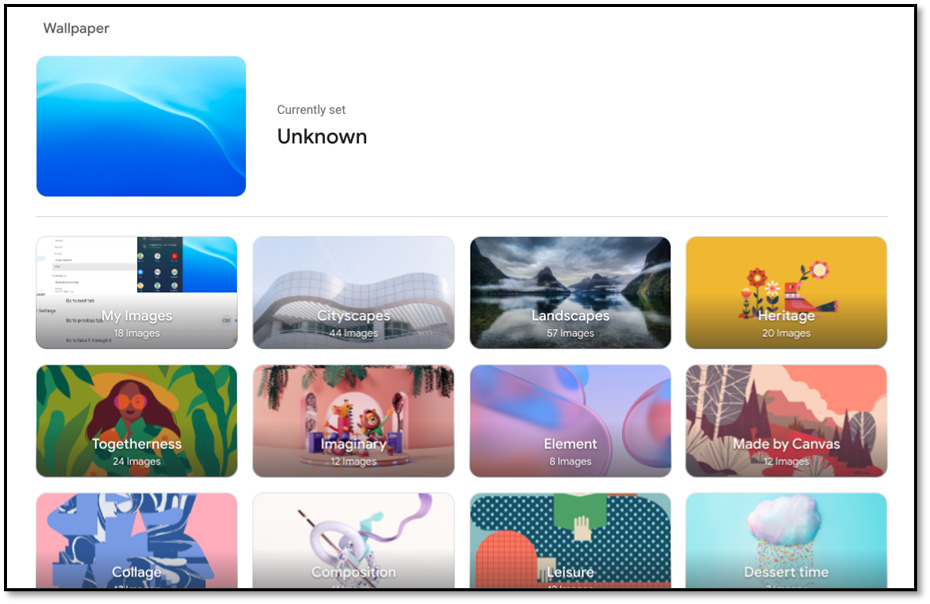
Figure 1.20 – The Wallpaper app
In the Wallpaper app, you are presented with the option of choosing from images that you have stored in My Files or collections of images made available by Google. Once you’ve chosen your image source, you also get the option to choose a single, static wallpaper or to have the wallpaper automatically change every day. Let’s see what this page looks like:
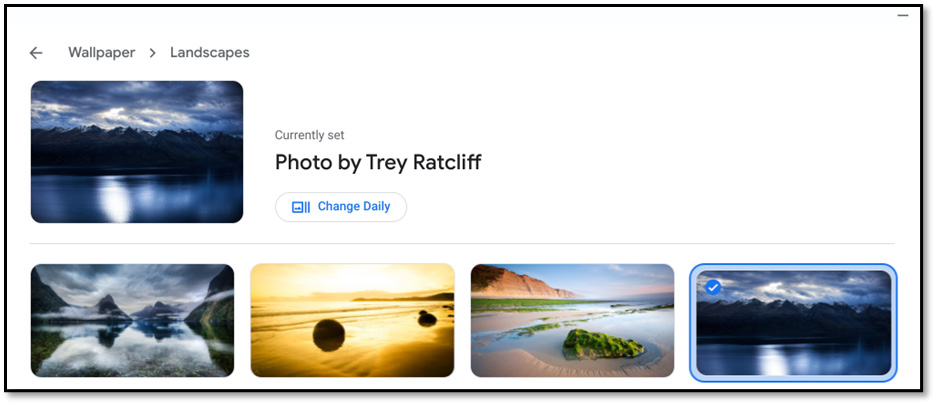
Figure 1.21 – The change daily option for Wallpaper
Screen saver
Under Personalization Screen saver, you’ll be presented with a toggle switch to enable/disable the ChromeOS screen saver as you can see in the following image. The screen saver displays when the system is idle. It can be configured to show photos, the time, the weather, and media information. Enabling this setting will also allow your display to remain on while using an AC adapter.
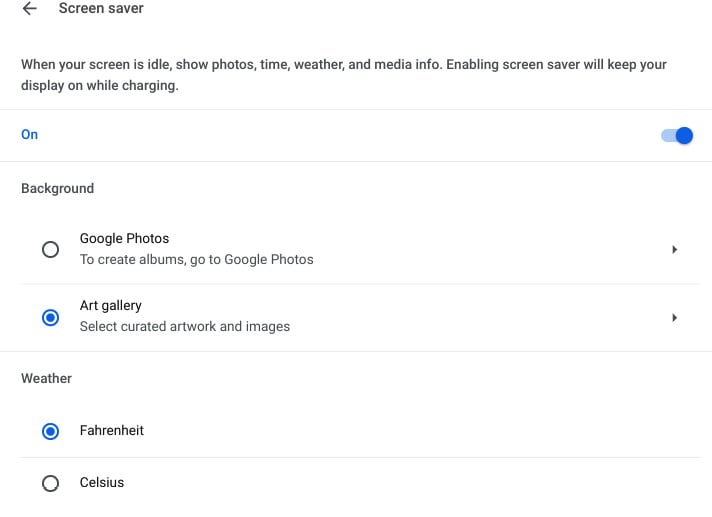
Figure 1.22 – The Screen saver settings menu
The Screen saver menu options include the following:
- Background – allows you to configure the source of your screen saver images as Google Photos or the Art gallery
- Weather – allows you to select the temperature measurement used for the weather on the screen saver
Now that you’ve made it through this section, not only have you mastered configuring many of ChromeOS’s core settings, but you’ve also learned how to give it your own personal touch and customized look and feel with the personalization menu.
In the next section, you will get a preview of how you can keep Chrome up to date with the latest and greatest features. We will also explore a new, breakthrough implementation of the OS; ChromeOS Flex.
OS updates, upgrades, and ChromeOS Flex
Now that you have ChromeOS up and running, let’s talk about keeping it up and running! A large part of maintaining a healthy OS is ensuring that routine maintenance activities are performed. In this section, we will introduce two of the most important maintenance tasks that administrators can perform on their ChromeOS devices: updates and upgrades. We will also explore Google’s solution for making ChromeOS more hardware independent with the release of ChromeOS Flex.
Importance of ChromeOS updates
Updates are an important task on ChromeOS. Administrators need to ensure that updates are being performed on a regular basis, so the latest and greatest tools and features are always available for use on the platform. Updates also ensure that your device and OS are protected against potential cybersecurity risks. We’ll discuss the process of updating ChromeOS more in-depth in Chapter 4, ChromeOS Security.
Upgrade time
Although updates are a critical part of maintaining a healthy ChromeOS installation, there will come a time when they aren’t enough. This occurs when Google releases a change to ChromeOS that is so drastic that a mere patch to the existing software won’t suffice. This is when we need to perform an upgrade. An upgrade replaces the current version of ChromeOS with a newer version of the software, which incorporates all major enhancements and bug fixes. Some of the benefits of performing upgrades when they become available are as follows:
- Improved performance and stability
- Corrections to identified errors in the OS source code
- A new and enhanced feature experience
We’ll discuss the process of performing ChromeOS upgrades in-depth in Chapter 4, ChromeOS Security.
Hardware flexibility with ChromeOS Flex
In previous versions of ChromeOS, the OS was bound to specific hardware. This meant in order to get access to ChromeOS, you had to purchase a Chromebook or Chromebox device. It also meant that as your device aged, it would eventually no longer be able to support the most up-to-date version of the OS. Although this isn’t a problem unique to Chrome’s OS, Google is one of the few vendors who have provided a solution other than purchasing upgraded hardware. That solution is ChromeOS Flex.
In 2022, Google released ChromeOS Flex as a way for people to continue to utilize aging computer hardware. What makes ChromeOS Flex so powerful is that it can be installed on any PC or Mac. Systems that were once bound for landfills and recycling plants are now able to be reborn as ChromeOS devices. Once ChromeOS Flex is installed onto a system, it provides the same functionality and user experience as a native ChromeOS device.
Summary
We have now come to the end of this chapter. We explored what makes Google’s ChromeOS special when compared to other OSs on the market. We walked through the steps for setting up a brand-new ChromeOS device and customizing its functionality and aesthetics via the Device and Personalization settings menus. Finally, we introduced the concept of OS updates and upgrades, and explored how ChromeOS Flex can turn even outdated hardware into your new ChromeOS device.
In the next chapter, we will explore the many ways that ChromeOS allows you to connect to other devices and the internet.