


Let's get right on with setting up Cacti. Take a look at what we will do next.
In this chapter, we are going to:
Install Cacti's prerequisites
Install Cacti on both a CentOS and a Windows system
Compile and install the spine poller
Upgrade an existing Cacti installation
Run Cacti for the first time
Provide a quick overview on the Cacti web frontend
Here we go….
In order to install and run Cacti, we need to make sure that all system prerequisites are met. Here we'll give an overview of the different components needed.
As most of Cacti is built as a web interface, a web server is needed. This can be Apache's httpd or Microsoft's Internet Information Server (IIS) if installing on Windows, but in fact, any PHP-capable web server can be used to run the web interface. For optimal support, the use of Apache or IIS is suggested.
Cacti is built with the PHP programming language and therefore needs PHP to be installed on the system. Most Linux distributions already have a base PHP environment installed, but some might need additional packages for Cacti to function properly. In particular, the LDAP, SNMP, and MySQL extensions should be installed.
You're now going to install Cacti from source on a CentOS 5 system. You should use at least Centos 5.5 as it is 100% binary compatible with RedHat Enterprise Linux 5, but in fact you can follow most of the installation processes on other Linux distributions, such as Ubuntu or SuSe Linux, as well. By installing from source you'll get some insight into the inner workings of Cacti, and it will also provide you with a system which most Cacti and plugin developers are used to. There are differences between a source installation and a Yum/APT installation, but they will be described later on. Let's get started.
The default CentOS installation is missing several important packages. So, we are now going to install these.
Install the RPMForge repository. For a 32bit CentOS installation this can be achieved by executing the following command (all on one line):
rpm -Uhv http://apt.sw.be/redhat/el5/en/i386/rpmforge/RPMS/rpmforge-release-0.3.6-1.el5.rf.i386.rpmThe RPMForge repository includes an RRDtool version for CentOS.
Issue the following command to install all required packages:
yum install mysql-server php-mysql net-snmp-utils rrdtool php-snmp
You just gave the system a location to find the remaining packages needed for the Cacti installation and then installed them; therefore, you are now ready to start the next installation phase.
Go to http://www.cacti.net and download the latest version of Cacti. In the top-left corner, under Latest Files, right-click on the tar.gz file and save the link address to the clipboard. You are going to need this link later. For simplicity we're assuming that your server has an Internet connection.
It's now time to download the latest version of Cacti to your server. You will need your system username and password to login to your CentOS installation. If you have installed your CentOS system with the default settings, you should already have an SSH server running. If you're already logged on to the machine, you can ignore the first step.
From a Windows machine, logon to your system using an SSH client such as Putty. If this is the first time you have connected to the server, Putty will display a security alert and ask you to accept the RSA key. By doing so, Putty will display the logon prompt where you can logon to the system.
Maximize the window, so that long text lines do not break at the end of the line. This will make things easier.
You'll need to become the root user in order to be able to setup Cacti properly. Should that not be an option, performing these steps with
sudoshould achieve the same results.Navigate to
/var/www/html. This is the document root for Apache.To download Cacti you can use the
wgetcommand. Enter the following command to download Cacti. After entering thewgetcommand, right-clicking into the window client using Putty will paste the URL you copied earlier after the command:wget http://www.cacti.net/downloads/cacti-0.8.7g.tar.gzYou should see the following output on your screen:

You now have the
tar.gzfile on your system, so let's move on and extract it. To do this, enter the following command:tar-xzvf cacti-0.8.7g.tar.gzThis will extract the files and directories contained in the archive to the current directory.
Finally you are going to create a symbolic link to this new Cacti directory. This will allow you to easily switch between different Cacti versions later, for example, when upgrading Cacti. To create a symbolic link, enter the following command:
ln –s cacti-0.8.7g cactiThis will create a link named
cactiwhich points to thecacti-0.8.7gdirectory:
You downloaded the latest Cacti version to the root directory of the web server and created a symbolic link to the extracted directory. With the Cacti files in place, you are now ready for the next phase of the installation process.
The database isn't automatically created during the installation of Cacti. Therefore, you need to create it here. At the same time, a database user for Cacti should be created to allow it to access the database. It's also a good idea to secure the MySQL database server by using one of the included CentOS tools.
To keep it simple let's assume that you're going to host the database on the same server as Cacti.
Execute the following command to logon to the MySQL CLI:
mysql –u root mysqlThe default MySQL root account does not have a password set, so you can set one as follows:
SET PASSWORD FOR root@localhost = PASSWORD('MyN3wpassw0rd');You can now also remove the example database, as it is not needed:
DROP DATABASE test;Together with the example database, some example users may have been created. You can remove these with the following command:
DELETE FROM user WHERE NOT (host = "localhost" AND user = "mydbadmin");On a CentOS distribution you can use the following command to guide you through the above steps:
/usr/bin/mysql_secure_installationNow that MySQL is secured, let's create the Cacti database. Enter the following command:
mysqladmin -u root -p create cactiThis will ask for the MySQL root password which you provided in Setup Step 1. When finished, you will have an empty database called
cacti.As the database is still empty, you need to create the tables and fill it with the initial data that comes with Cacti. The following command will do just that:
mysql -p cacti < /var/www/html/cacti/cacti.sqlAgain it will ask for the MySQL root password. Once the command finishes you'll have a working Cacti database. Unfortunately Cacti is still unable to access it, therefore you are now going to create a database user for Cacti.
Enter the following command:
mysql -u root -p mysqlYou'll see the following on the screen:

Type the next few lines in the MySQL prompt to create the user. Make sure to choose a strong password:
GRANT ALL ON cacti.* TO cactiuser@localhost IDENTIFIED BY 'MyV3ryStr0ngPassword'; flush privileges; exit
You used some tools to secure the MySQL server and created a database. You also filled the Cacti database with the initial data and created a MySQL user for Cacti. However, Cacti still needs to know how to access the database, so let's move on to the next step.
In case you are not using CentOS to install Cacti, you can use some MySQL internal functions to secure your installation.
The database and some other special configuration tasks are done by editing the information in the config.php file.

You changed the database configuration for Cacti to the username and password that you created earlier. These settings will tell Cacti where to find the database and what credentials it needs to use to connect to it. You also changed the default URL path to fit your installation. As you install Cacti to /var/www/html/cacti, a sub-directory of the document root, you need to change this setting to /cacti/, otherwise Cacti will not work correctly.
To create a Cacti system user called
cactiuser, issue the following command as root:adduser cactiuserNavigate to the
cactidirectory:cd /var/www/html/cactiChange the ownership of the
rraandlogdirectory to the newly created user:chown –R cactiuser rra/ log/Add the poller cron entry. Edit the file
cactiin/etc/cron.d:vi /etc/cron.d/cactiAdd the following line to the file:
*/5 * * * * cactiuser /usr/bin/php /var/www/html/cacti/poller.php > /dev/null 2>&1Save the file.
You just created a system user which runs the Cacti poller and scheduled the poller to run every 5 minutes. Five minutes is the default interval, but it can be changed to 1 minute if needed. For more information on how to do so, go the following post in the Cacti forums: http://forums.cacti.net/viewtopic.php?p=116403.
By default, Cacti comes with a poller written in PHP. For small-to-medium installations, this poller does its job just fine, but for larger installations, an alternative poller, spine, needs to be used. It is written in C and is much faster than the original poller, as it makes use of the multi-tasking capabilities of modern operating systems and hardware.
Here we will deep-dive into installing and configuring the spine poller.
You now need to prepare the development environment for Spine. On CentOS you can do this by issuing the following command:
yum install gcc mysql-devel net-snmp-devel autoconf automake libtool
Download the spine source code. For this, go to http://www.cacti.net and click on Download under the Spine (Cactid) section. Right-click on Spine Source in the
tar.gzformat and copy the link address.Navigate to
/tmp/and issue the following command:wget http://www.cacti.net/downloads/spine/cacti-spine-0.8.7g.tar.gztar –xzvf cacti-spine-0.8.7g.tar.gzNavigate to the newly created
cacti-spine-0.8.7gdirectory.Prepare the directory for compilation. Please note that this step may not work on other distributions, or additional steps need to be taken to accomplish it:
./bootstrapConfigure the compiling environment:
./configureCompile Spine:
makeOnce the make command finishes, install Spine:
make installYou now have Spine installed, but it needs to be configured. Therefore, copy the sample configuration file to a location where Spine will find it:
cp /usr/local/spine/etc/spine.conf.dist /etc/spine.confEdit the file in
vi:vi /etc/spine.confChange the database configuration to match the settings from earlier.
Create a symbolic link in
/sbinto the spine binary:ln -s /usr/local/spine/bin/spine /sbin/spine
You just set up a basic development environment for compiling Spine, compiled it, and then installed it. You also configured Spine to use the correct database information.
Tip
Compiling Spine on other Linux distributions
When compiling Spine on other Linux distributions such as Ubuntu, you will have to go through some additional steps. Look at the following URL for more information on how to do so:
http://docs.cacti.net/manual:087:1_installation.1_install_unix.6_install_and_configure_spine.
The main difference between installing Cacti from source and using APT/Yum-based installations is the location of configuration files and availability of patches. Cacti, by default, does not follow the Filesystem Hierarchy Standard (FHS) defined for the Linux operating systems. The FHS defines directories where applications should add their configuration or log files. APT/Yum-based installations usually follow this standard. Due to this, add-ons such as the Plugin Architecture may not be available on all platforms using APT/Yum.
The main advantage of using APT/Yum-based installations is the ease of installation but as we've just seen, installing Cacti isn't very difficult.
However, the disadvantage of using APT or Yum is the availability of newer Cacti versions. Source-based Cacti installations can be upgraded to the latest version as soon as it is available on the Cacti website, while APT/Yum-based installations might need to wait until the package maintainers update their repositories.
Here is a little challenge for you. It's not difficult but it will allow you to alter the installation to suit your needs. What if you want to use a remote database server? Maybe you want to use an existing dedicated MySQL server, instead of hosting the database on the same system as Cacti, or you want to separate the roles to allow more growth. Can you figure out what to change?
Solution: Create the MySQL database on the remote system using the same command as if you were installing it locally, but this time use the -h <hostname> option to specify the remote server. When creating the user and granting it permissions, use the following command, assuming the Cacti server has the IP '192.168.0.10':
GRANT ALL ON cacti.* TO cactiuser@'192.168.0.10' IDENTIFIED BY 'MyV3ryStr0ngPassword';
flush privileges;
exit
This will allow the Cacti user access to the database from the Cacti server. Now change $database_hostname in config.php and DB_Host in spine.conf on the Cacti server to point to your remote database server.
The installation of Cacti on a Windows system is quite different from Linux. Most of the prerequisites that are already available on a Linux platform need to be installed on a Windows system. The MySQL database is an example of such a prerequisite. In the following sections you can find more information about the Windows installation and how you can overcome most of the manual installation procedures by making use of the community-built Windows Installer.
Download the Windows Installer to the system on which you want to install Cacti. To retrieve the latest version, go to http://forums.cacti.net/viewtopic.php?t=14946 and click on the download link at the end of the first post. Save the installer to your desktop.
Double-click on the setup file. The installer will check what has already been installed and give you a report. Click Next > after you have read the information.

The next screen shows the GPL license. Accept it and click on Next >.
Next comes the selection of the web server to be used. If you have IIS installed, you can select it here, otherwise Apache will be installed.

In the next step you can choose the components to install. For now, you will only install the Cacti Core Files, so click on Next > without adding any additional components.
Keep the defaults for the installation locations and click on Next >.
The final step provides an overview of the paths to be created. Click on Install to start the installation process.

Please note the default Cacti admin and MySQL root passwords.
Open the Post-Install Instructions and follow the tasks.
Unlike
Linux, where compilation from source is the preferred method, Cacti has pre-compiled binaries for Windows. You can download the latest versions from http://www.cacti.net. Click on Download under the Spine (Cactid) section and download the latest Windows binary from there. Extract the archive to the computer running Cacti and edit spine.conf to fit your database settings. In case you want to compile spine yourself, you will have to install a working copy of Cygwin. The following URL will provide you with some information on how to compile Spine using Cygwin:
Create a backup of the database:
mysqldump –u root -p --lock-tables --add-drop-table cacti > /root/cacti_backup.sqlThis will back up the Cacti database to a file called
cacti_backup.sql. You will be asked for the MySQL root password.Change to the
/var/www/htmldirectory. From http://www.cacti.net download the source of the version to which you want to upgrade.Extract the file:
tar –xzvf cacti-0.8.7g.tar.gzYou will have a new directory named
cacti-0.8.7g.Change to the newly created directory and edit
include/config.php. Change the database entries in there to match your installation.Before copying the files, you should stop the poller using the web interface. Go to the Configuration | Settings and change to the Poller tab. Disable the poller by unchecking it.
Copy the files from your existing installation to the new one. Execute the following commands, replacing
0.8.xwith the new version:cp /var/www/html/cacti/rra/* /var/www/html/cacti-0.8.x/rra/ cp –u /var/www/html/cacti/scripts/* /var/www/html/cacti-0.8.x/scripts/ cp –u –R /var/www/html/cacti/resource/* /var/www/html/cacti-0.8.x/resource/
Set the permissions on the log and
rrafolders:cd /var/www/html/cacti-0.8.7g/ chown –R cactiuser log/ rra/
Change the symbolic link so that it points to the new directory:
cd /var/www/html/
ln –fs cacti-0.8.x cacti
The final upgrade process is done using the web interface. Point your browser to
http://<yourserver>/cacti/installand follow the steps. Make sure you select Upgrade on the second page.You can now enable the poller again using the Cacti web interface.
Once you have made sure that everything is working fine, you can remove or archive the original Cacti directory.
You upgraded Cacti to a newer version. As a safety net, you created a backup of the database so you can revert back to the old version in case of an error. You copied the RRD files and other resources to the new installation and switched over by changing the symbolic link to point to the new location. You finished the upgrade process by going to the install URL which provided the final web-based upgrade process.
Go to the installation URL
http://<yourserver>/cacti/install. Read the license agreement and click on Next >>.The next page asks if you are installing a new system, or upgrading an existing one. Choose New Install then click on Next >>.

The last page provides an overview of all required binaries and paths. If you have followed the installation steps correctly, all fields should be green:

Click on Finish and you should be redirected to the Cacti login screen.
You finalized your Cacti installation by running the included web-based installer. If you have been following the instructions correctly, you will now have a working Cacti installation.
The installation will leave you with the default cmd.php poller. If you want to use Spine, you will now have to logon to the Cacti web interface and set the Spine Poller File Path in the Paths section of the Settings page. You also have to change the Poller Type to Spine in the Poller section.
The first time you login, use the username admin and password admin (for Linux) or cactipw (for Windows). You will be forced to change the admin password but, after doing so, you will be presented with the Cacti web interface:
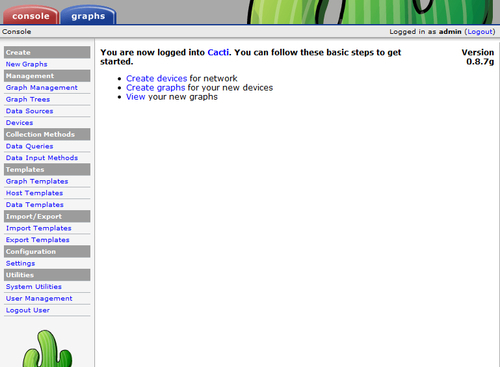
The initial page is called the Console and only administrators and users with special access rights are able to see it. From here you can fully administer Cacti.
The Console tab is where you manage your Cacti installation. From here you can add devices and users or create graphs and assign them to a tree. We're going to explain each of the menu sections next.
The Create section provides an easy access for new graph creations for specific devices. It's a shortcut to the Create Graphs link within each device.
The Management section, as its name suggests, allows the management of graphs, devices, data sources, and graph trees. Within this section you can add/edit or delete devices, delete graphs, add devices to trees, and much more.
The Collection Methods section describes the different ways in which Cacti retrieves data from devices or systems. Here you can manage data queries such as SNMP retrieve methods, or manage the different input methods which are used by external scripts called from the poller.
The Templates section provides an easy way of combining data templates into a graph (graph templates), graphs, and data queries for a specific type of host (host templates), or different data source items (data templates). Many graph, data, and host templates are available on the Cacti forums.
The Import/Export section allows the import and export of templates. This is especially useful for providing templates of exotic devices to the Cacti community, or to import them from one of the many provided on the Cacti forum.
Cacti doesn't yet provide a method for importing or exporting other data (for example, device lists) from within the web interface.
Within the Configuration section we can change the settings of Cacti. These settings include:
General settings (for example, logging levels)
Paths settings (similar to the paths page from the installer)
Poller settings (number of threads, or poller type to use)
Graph export settings (graphs can be exported to a local path or remote FTP server)
Visual settings (size of the graphs, font size to use)
Authentication settings (local authentication, LDAP, or HTTP Basic)
The Graphs tab is the main screen for end users. Here they can view the graphs for their devices and systems and also change some personal settings:
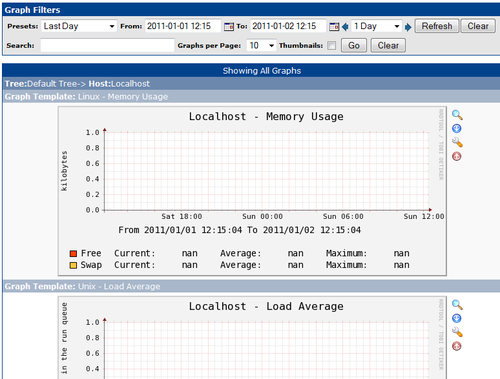
The Graphs tab contains a hierarchical tree to the left containing all of the devices which a user is allowed to view. The main part of the page contains the graphs and a filtering system which can be used to customize the timeframe or to search for specific graphs.
You now have a rough overview of the Cacti web interface and how it interacts with the database. You're going to dive a bit deeper into the details in the next few chapters so it is not important at this stage to know in detail where everything is or how it works.
If you are using a remote database server, which configuration files do you need to change?
a. The
config.phpfile andspine.confb. The
global.phpfile andconfig.phpc. The
global.phpfile onlyWhich section on the Console tab allows you to change the path to the Cacti log file?
a. The System Utilities section
b. The Path tab within the Configuration Section
c. The General tab within the Configuration Section
On a CentOS system, how can you configure the MySQL server to start automatically during system startup?
a. You can use the
enableservicecommandb. The
setstartupcommand allows you to do soc. You can use the
chkconfigcommand
You learned a lot in this chapter about installing Cacti.
We covered:
Obtaining and installing Cacti—where to download it and how to set up the files
MySQL database setup—how to create a database and fill it with the base Cacti data
Configuring Cacti—how to tell Cacti where to find its database and how to access it
Configuring the system components—how to add a Cacti system user and create the poller's cron entry
Spine poller—how to download, compile, and install the spine poller
Upgrading Cacti—how to upgrade an existing Cacti installation
The Cacti web interface—a brief look at the different sections of the web interface
You're now ready to create your first few devices and graphs. In the next chapter, you're going to create your own graphs using the RRDtool as well as add your first devices to Cacti.


