


This chapter provides an introduction to Object-Oriented Programming (OOP) in C++. We start by looking into a simple program that rolls a dice. We write the code and compile, link, and execute the program.
Then we continue by constructing a simple object-oriented hierarchy, involving the Person base class and its two subclasses, Student and Employee. We also look into pointers and dynamic binding.
Finally, we create two simple data types—stack and queue. A stack is constituted of a set of values ordered in a bottom-to-top manner, where we are interested in the top value only. A queue is a traditional queue of values, where we add values at the rear and inspect values at the front.
In this chapter, we will cover the following topics:
- We start by implementing a simple game: rolling the dice. Its main purpose is to provide an introduction to the environment and teach you how to set up the project, and how to compile, link, and execute the program.
- Then we start looking at object-oriented programming by writing a class hierarchy with
Personas the base class andStudentandEmployeeas subclasses. This provides an introduction to inheritance, encapsulation, and dynamic binding. - Finally, we write classes for the abstract data types stack and queue. A stack is a structure where we both add and remove values at the top, while a queue is more like a traditional queue where we add values at the rear and remove them from the front.
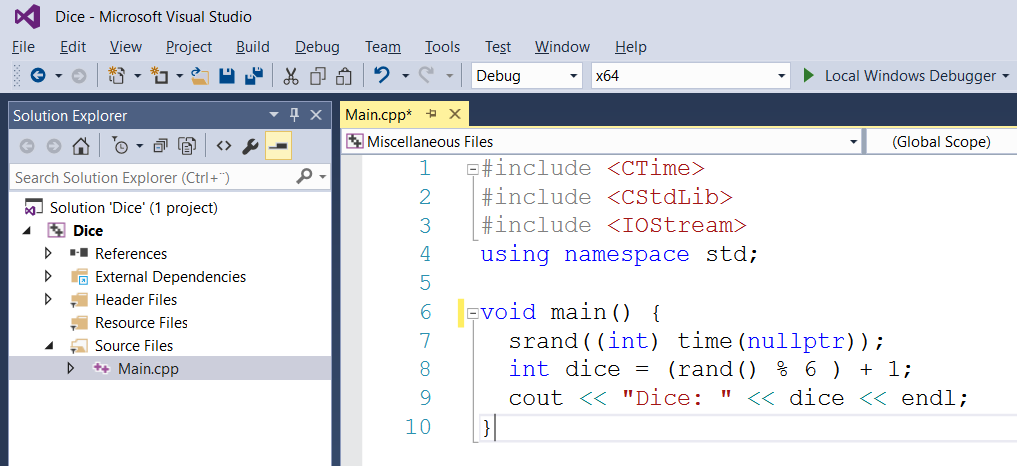
As an introduction, we start by writing a program that rolls a dice. We use the built-in random generator to generate an integer value between one and six, inclusive:
Main.cpp
#include <CStdLib>
#include <CTime>
#include <IOStream>
using namespace std;
void main() {
  srand((int) time(nullptr));
  int dice = (rand() % 6 ) + 1;
  cout << "Dice: " << dice << endl;
}
In the preceding program, the initial include directives allow us to include header files, which mostly hold declarations of the standard library. We need the CStdLib header file to use the random generator, the CTime header file to initiate the random generator with the current time, and the IOStream header file to write the result.
The standard library is stored in a namespace called std. A namespace can be considered a container holding code. We gain access to the standard library with the using namespace directive.
Every C++ program holds exactly one main function. The execution of the program always starts in the main function. We use the srand and time standard functions to initialize the random generator, and rand to generate the actual random value. The percent (%) is the modulus operator, which divides two integers and gives the remainder of the division. In this way, the value of the dice integer variable is always at least one and at most six. Finally, we write the value of the dice variable with cout, which is an object used by the standard library to write text and values.
The programs of the first four chapters were written with Visual Studio, while the programs of the remaining chapters are written with Qt Creator.
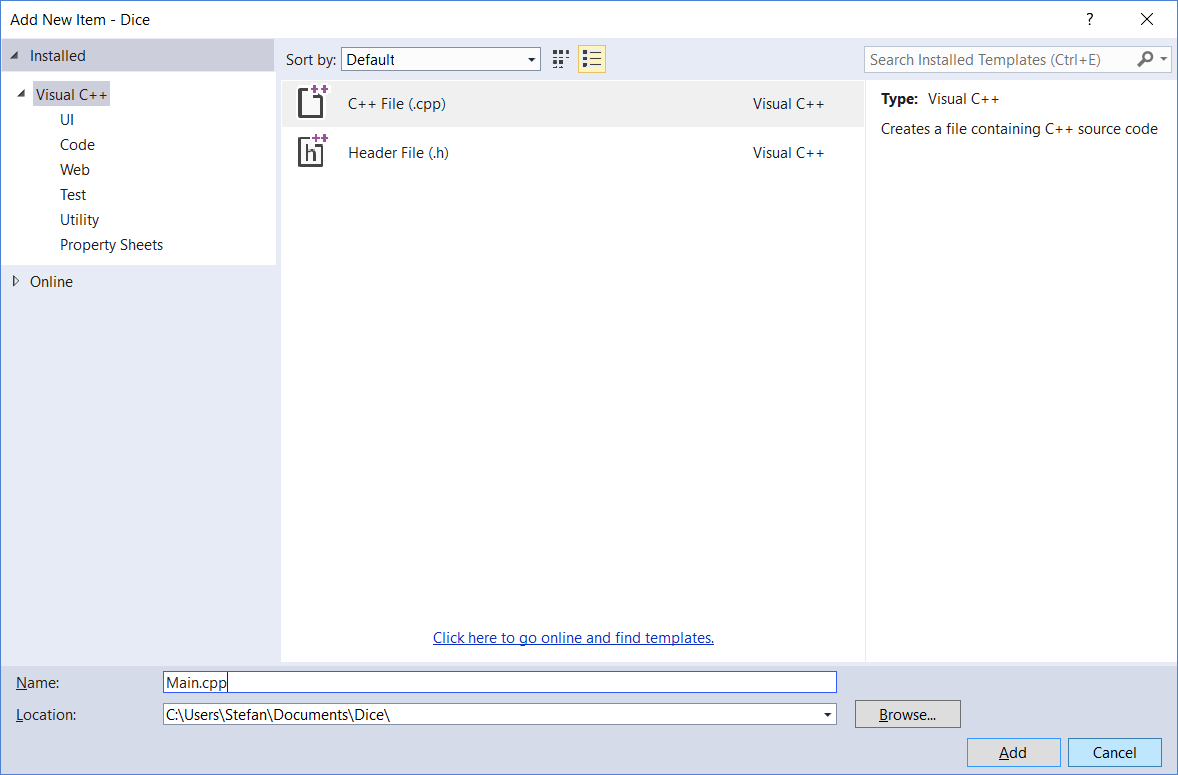
The following are instructions on how to create a project, write the code, and execute the application. When we have started Visual Studio, we follow the following steps to create our project:
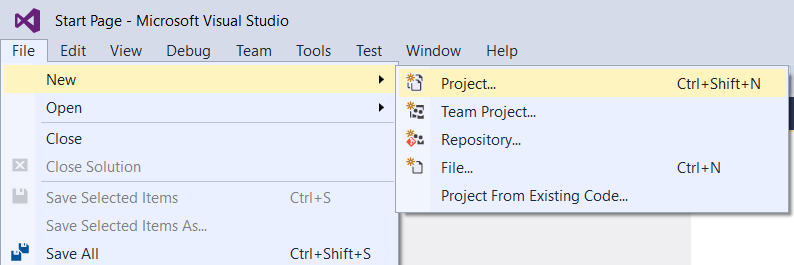
- First, we select the New and Project items in the File menu, as shown in the following screenshot:
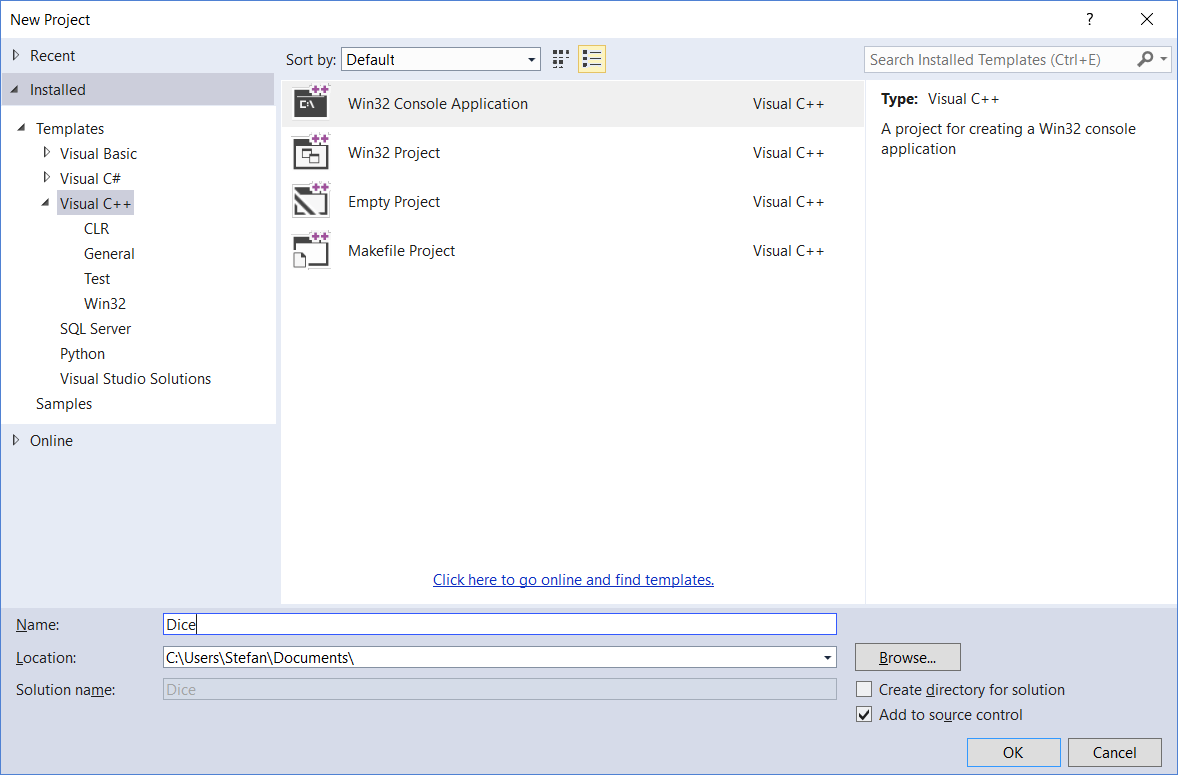
- We choose the
Win32 Console Applicationtype, and name the projectDice:
- In the first dialog we just press the
Nextbutton:

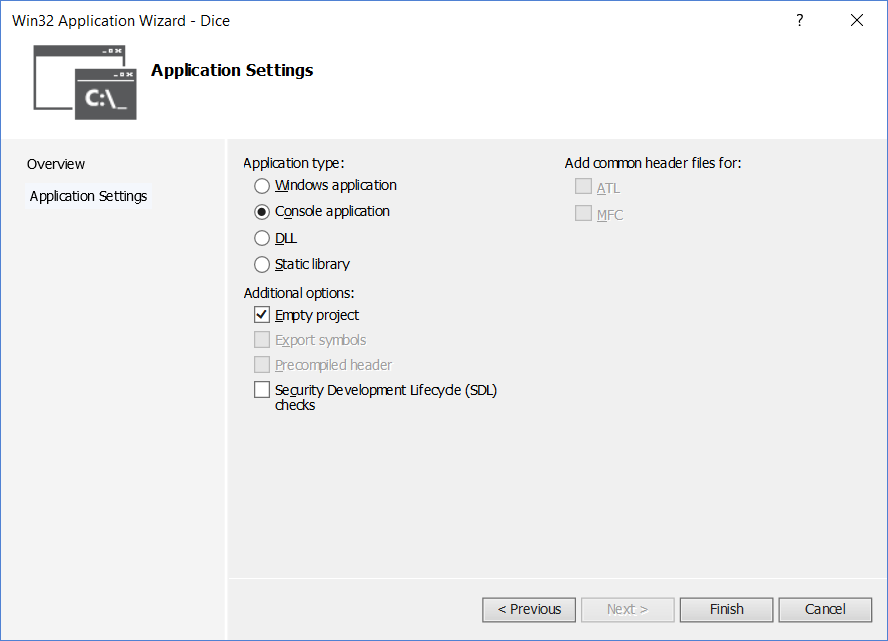
- In the second dialog, we choose the
Empty projectcheckbox and click on theFinishbutton. In this way, a project without files will be created:
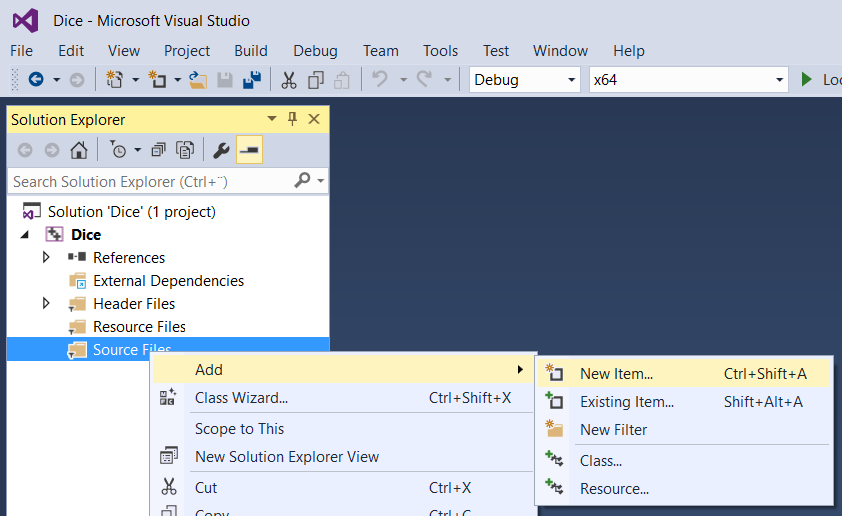
- We choose a
C++ File(.cpp)and name itMain.cpp:
- Then, we input the code in the
Main.cppfile:
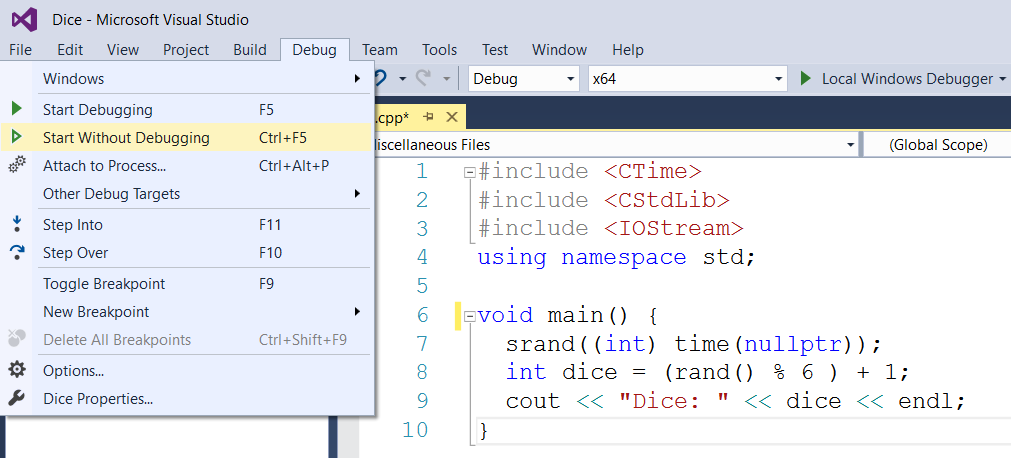
- Finally, we execute the program. The easiest way to do this is to choose the
Start DebuggingorStart Without Debuggingmenu option. In this way, the program is compiled, linked, and executed:
Let's continue by looking at a simple class that handles a car, including its speed and direction. A class is a very central feature in object-oriented languages. In C++, its specification is made up of two parts—its definition and implementation. The definition part is often placed in a header file (with the .h suffix), while the implementation part is placed in a file with the .cpp suffix, as in the Car.h and Car.cpp files. However, template classes, which are introduced in Chapter 3, Building a Library Management System, are stored in one file only.
A class is made up of its members, where a member is a field or a method. A field holds a value of a specific type. A method is a mathematical abstraction that may take input values and return a value. The input values of a method are called parameters. However, in C++ it is possible to define a function without parameters and without return types.
An object is an instance of the class; we can create many objects of one class. The methods can be divided into the following:
Ideally, the methods of a class don't give direct access to the fields, as this would mean that the method names/types would have to change if the fields change. Instead, the methods should give access to a class property. These are the conceptual elements of a class that may not map to a single field. Each member of the class is public, protected, or private:
- A
publicmember is accessible by all other parts of the program. - A
protectedmember is accessible only by its own members or members of its subclasses, which are introduced in the next section. - A
privatemember is accessible by its own members only. However, that is not completely true. A class can invite other classes to become its friends, in which case they are given access to itsprivateandprotectedmembers. We will look into friends in the next chapter.
The following Car class definition has two constructors and one destructor. They always have the same name as the Car class in this case. The destructor is preceded by a tilde (~). A constructor without parameters is called the default constructor.
Note
More than one method can have the same name, as long as they have different parameter lists, which is called overloading. More specifically, it is called context-free overloading. There is also context-dependent overloading, in which case two methods have the same name and parameter list, but different return types. However, context-dependent overloading is not supported by C++.
Consequently, a class can hold several constructors, as long as they have different parameter lists. However, the destructor is not allowed to have parameters. Therefore, a class can hold only one destructor:
Car.h
     class Car {
       public:
       Car();
       Car(int speed, int direction);
       ~Car();
The getSpeed and getDirection methods are inspectors returning the current speed and direction of the car. The return values hold the int type, which is short for integer. They are marked as constant with the const keyword since they do not change the fields of the class. However, a constructor or destructor cannot be constant:
    int getSpeed() const;
    int getDirection() const;
The accelerate, decelerate, turnLeft, and turnRight methods are modificators, setting the current speed and direction of the car. They cannot be marked as constant since they change the fields of the class:
    void accelerate(int speed);
    void decelerate(int speed);
    void turnLeft(int degrees);
    void turnRight(int degrees);
The m_speed and m_direction fields hold the current speed and direction of the car. The -m prefix indicates that they are members of a class, as opposed to fields local to a method:
    private:
      int m_speed, m_direction;
    };
In the implementation file, we must include the Car.h header file. The #include directive is part of the preprocessor and simply causes the content of the Car.h file to be included in the file. In the previous section, we included system files with the angle bracket characters (< and >). In this case, we include local files with quotes ("). The system include files (with angle brackets) include system code that are part of the language, while local include files (with quotes) include code that we write ourselves, as part of our project. Technically, the system include files are often included from a special directory in the file system, while the local include files are often included locally in the filesystem:
Car.cpp
#include "Car.h"
The default constructor initializes both speed and direction and set it to 0. The colon (:) notation is used to initialize the fields. The text between two slashes (//) and the end of the line is called a line comment and is ignored:
Car::Car()
 :m_speed(0),
  m_direction(0) {
  // Empty.
}
The second constructor initializes both speed and direction to the given parameter values:
Car::Car(int speed, int direction)
 :m_speed(speed),
  m_direction(direction) {
  // Empty.
}
In the preceding constructors, it would be possible to use the assignment operator (=) instead of the class initialization notation, as in the following code. However, that is considered to be inefficient since the code may be optimized with the preceding initialization notation. Note that we use one equals sign (=) for assignments. For the comparison of two values, we use two equals signs (==), a method which is introduced in Chapter 2, Data Structures and Algorithms:
Car::Car() {
  m_speed = 0;
  m_direction = 0;
}
The destructor does nothing in this class; it is included only for the sake of completeness:
Car::~Car() {
  // Empty.
}
The getSpeed and getDirection methods simply return the current speed and direction of the car:
int Car::getSpeed() const {
  return m_speed;
}

int Car::getDirection() const {
  return m_direction;
}
A plus sign directly followed by an equals sign is called compound assignment and causes the right value to be added to the left value. In the same way, a minus sign directly followed by an equals sign causes the right value to be subtracted from the left value.
The text between a slash (/) directly followed by an asterisk (*), and an asterisk directly followed by a slash, is called a block comment and is ignored:
void Car::accelerate(int speed) {
  m_speed += speed; /* Same effect as: m_speed = m_speed + speed; */
}

void Car::decelerate(int speed) {
  m_speed -= speed;
}

void Car::turnLeft(int degrees) {
  m_direction -= degrees;
}

void Car::turnRight(int degrees) {
  m_direction += degrees;
}
Now it is time to test our class. To do so, we include the Car.h file, just as we did in the Car.cpp file. However, we also include the system IOStream header file. As in the previous section, the system headers are enclosed in arrow brackets (< and >). We also need to use the namespace std to use its functionality.
Main.cpp
    #include <IOStream>
    using namespace std;
    #include "Car.h"
In C++, a function can be a part of a class or can be free-standing without a class. Functions of a class are often called methods. A function is a mathematical abstraction. It has input values, which are called parameters, and returns a value. However, in C++ a function is allowed to have zero parameters, and it may return the special type void, indicating that it does not return a value.
As mentioned in the previous section, the execution of the program always starts at the function named main, and every program must have exactly one function named main. Unlike some other languages, it is not necessary to name the file Main.
However, in this book, every file holding the main function is named Main.cpp out of convenience. The void keyword indicates that main does not return a value. Note that while constructors and destructors never return values, and are not marked with void, other methods and functions that do not return values must be marked with void:
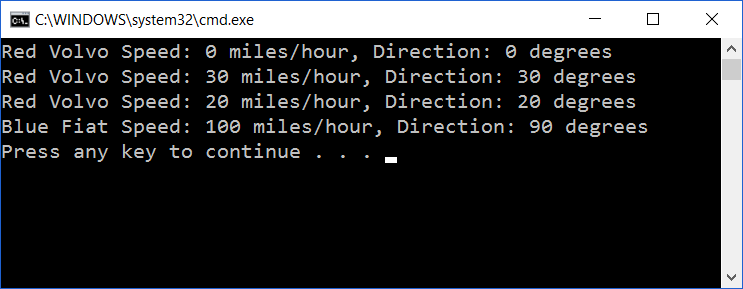
void main() { We create an object of the Car class that we call redVolvo. An object is an instance of the class; redVolvo is one of many cars:
Car redVolvo;
When writing information, we use the cout object (short for console output), which normally writes to a text window. The operator made up of two left arrow brackets (<<) is called the output stream operator. The endl directive makes the next output start at the beginning of the next line:
  cout << "Red Volvo Speed: " << redVolvo.getSpeed()
       << " miles/hour" << ", Direction: "
       << redVolvo.getDirection() << " degrees" << endl;

  redVolvo.accelerate(30);
  redVolvo.turnRight(30);
  cout << "Red Volvo Speed: " << redVolvo.getSpeed()
       << " miles/hour" << ", Direction: "
       << redVolvo.getDirection() << " degrees" << endl;

  redVolvo.decelerate(10);
  redVolvo.turnLeft(10);
  cout << "Red Volvo Speed: " << redVolvo.getSpeed()
       << " miles/hour" << ", Direction: "
       << redVolvo.getDirection() << " degrees" << endl;
A blueFiat object is a constant object of the Car class. This means that it can only be initialized by one of the constructors and then inspected, but not modified. More specifically, only constant methods can be called on a constant object, and only methods that do not modify the fields of the object can be constant:
const Car blueFiat(100, 90);
cout << "Blue Fiat Speed: " << blueFiat.getSpeed()
<< " miles/hour" << ", Direction: "
<< blueFiat.getDirection() << " degrees" << endl;
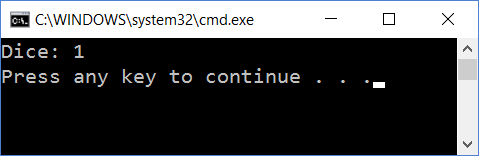
} When we execute the code, the output is displayed in a command window:
In this section, we modify the Car class. In the earlier version, we initialized the fields in the constructors. An alternative way to initialize the fields is to initialize them directly in the class definition. However, this feature shall be used with care since it may result in unnecessary initializations. If the second constructor in the Car class is called, the fields are initialized twice, which is ineffective.
Car.h
class Car {
  public:
    // ...

  private:
    int m_speed = 0, m_direction = 0;
};
While the Car class is defined in the Car.h file, its methods are defined in the Car.cpp file. Note that we begin by including the Car.h file, in order for the definitions of the methods to comply with their declaration in Car.h:
Car.cpp
#include "Car.h"

Car::Car() {
  // Empty.
}

Car::Car(int speed, int direction)
 :m_speed(speed),
  m_direction(direction) {
  // Empty.
}
Moreover, the Car class of the previous section has some limitations:
- It is possible to accelerate the car indefinitely, and it is possible to decelerate the car to a negative speed
- It is possible to turn the car so that the direction is negative or more than 360 degrees
Let's start by setting the maximum speed of the car to 200 miles/hour. If the speed exceeds 200 miles per hour we set it to 200 miles/hour. We use the if statement, which takes a condition, and executes the following statement if the condition is true. In the case here, the statement (m_speed = 200;) is enclosed by brackets. This is not necessary since it is only one statement. However, it would be necessary in the case of more than one statement. In this book, we always use the brackets for clarity, regardless of the number of statements.
Car.cpp
void Car::accelerate(int speed) {
  m_speed += speed;

  if (m_speed > 200) {
    m_speed = 200;
  }
}
If the speed becomes negative, we change the sign of the speed to make it positive. Note that we cannot write m_speed -= m_speed. That would set the speed to zero since it would subtract the speed from itself.
Since the value is negative, it becomes positive when we change the sign. We also turn the car by 180 degrees to change its direction. Note that we also, in this case, must check that the car does not exceed the speed limit.
Also, note that we must check whether the direction is less than 180 degrees. If it is, we add 180 degrees; otherwise, we subtract 180 degrees to keep the direction in the interval 0 to 360 degrees. We use the if...else statement to do that. If the condition of the if statement is not true, the statement after the else keyword is executed:
void Car::decelerate(int speed) {
  m_speed -= speed;

  if (m_speed < 0) {
    m_speed = -m_speed;

    if (m_speed > 200) {
      m_speed = 200;
    }

    if (m_direction < 180) {
      m_direction += 180;
    }
    else {
      m_direction -= 180;
    }
  }
}
When turning the car, we use the modulo (%), operator. When dividing by 360, the modulo operator gives the remainder of the division. For instance, when 370 is divided by 360 the remainder is 10:
void Car::turnLeft(int degrees) {
m_direction -= degrees;
m_direction %= 360;
if (m_direction < 0) {
m_direction += 360;
}
}
void Car::turnRight(int degrees) {
m_direction += degrees;
m_direction %= 360;
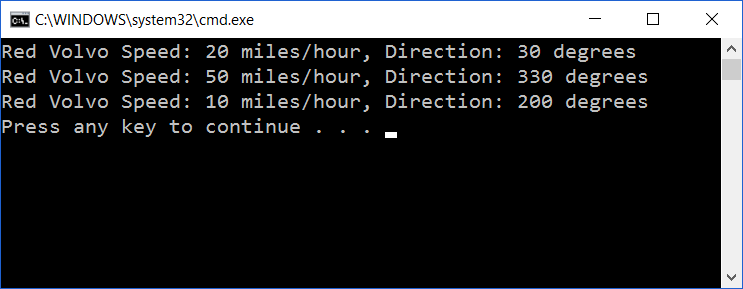
} The main function creates one object of the Car class—redVolvo. We start by writing its speed and direction, then we accelerate and turn left and again write its speed and acceleration. Finally, we decelerate and turn right and write its speed and direction one last time:
Main.cpp
#include <IOStream>
using namespace std;
#include "Car.h"

void main() {
  Car redVolvo(20, 30);
  cout << "Red Volvo Speed: " << redVolvo.getSpeed()
       << " miles/hour" << ", Direction: "
       << redVolvo.getDirection() << " degrees" << endl;

  redVolvo.accelerate(30);
  redVolvo.turnLeft(60);
  cout << "Red Volvo Speed: " << redVolvo.getSpeed()
       << " miles/hour" << ", Direction: "
       << redVolvo.getDirection() << " degrees" << endl;

  redVolvo.decelerate(60);
  redVolvo.turnRight(50);
  cout << "Red Volvo Speed: " << redVolvo.getSpeed()
       << " miles/hour" << ", Direction: "
       << redVolvo.getDirection() << " degrees" << endl;
}
When we execute the code, the output is displayed in a command window as follows:
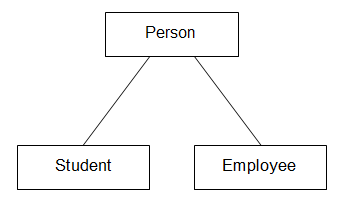
Let's continue with a class hierarchy, where Person is the base class with Student and Employee as its subclasses:
As a person has a name, we use the C++ standard class string to store the name. The virtual keyword marks that the print method is subject to dynamic binding, which we will look into later in this section:
Person.h
class Person {
  public:
    Person(string name);
    virtual void print();

  private:
    string m_name;
};
We include the String header, which allows us to use the string class:
Person.cpp
#include <String>
#include <IOStream>
using namespace std;

#include "Person.h"

Person::Person(string name)
 :m_name(name) {
  // Empty.
}

void Person::print() {
  cout << "Person " << m_name << endl;
}
The Student and Employee classes are subclasses of Person, and they inherit Person publicly. Sometimes the term extension is used instead of inheritance. The inheritance can be public, protected, or private:
- With
publicinheritance, all members of the base class have the same access to the subclass - With
protectedinheritance, allpublicmembers of the base class become protected in the subclass - With
privateinheritance, allpublicandprotectedmembers of the base class become private in the subclass
The Student and Employee classes have the text fields m_university and m_company:
Student.h
class Student : public Person {
  public:
    Student(string name, string university);
    void print();

  private:
    string m_university;
};
The file Student.cpp defines the methods of the Student class:
Student.cpp
#include <String>
#include <IOStream>
using namespace std;

#include "Person.h"
#include "Student.h"
The subclass can call a constructor of the base class by stating its name with the colon notation (:). The constructor of Student calls the constructor of Person with the name as a parameter:
Student::Student(string name, string university)
 :Person(name),
  m_university(university) {
  // Empty.
}
We must state that we call print in Person rather than Student by using the double colon notation (::):
void Student::print() {
  Person::print();
  cout << "University " << m_university << endl;
}
The Employee class is similar to Student. However, it holds the field c_company instead of m_university.
Employee.h
class Employee : public Person {
  public:
    Employee(string name, string company);
    void print();

  private:
    string m_company;
};
The file Employee.cpp defines the methods of the Employee class.
Employee.cpp
#include <String>
#include <IOStream>
using namespace std;

#include "Person.h"
#include "Employee.h"
The constructor initializes the name of the person and the company they are employed by:
Employee::Employee(string name, string company)
:Person(name),
m_company(company) {
// Empty.
}
void Employee::print() {
Person::print();
cout << "Company " << m_company << endl;
}
Finally, the main function starts by including the system header files String and IOStream, which hold declarations about string handling and input and output streams. Since all standard headers are included in the standard namespace, we gain access to the system declaration with the using the namespace directive.
Main.cpp
#include <String>
#include <IOStream>
using namespace std;

#include "Person.h"
#include "Student.h"
#include "Employee.h"
We define the three objects, Monica, Demi, and Charles, and we call print on each of them. In all three cases the print method of the class Person, Student, and Employee is called:
void main() {
  Person monica("Monica");
  person.print();

  Student demi("Demi", "MIT");
  student.print();

  Employee charles("Charles", "Microsoft");
  employee.print();
The asterisk (*) marks that personPtr is a pointer to an object of Person, rather than an object of Person. A pointer to an object holds the memory address of the object, rather than the object itself. However, at the moment it does not hold any address at all. We will soon assign it to the address of an object:
Person *personPtr;
The ampersand (&) is an operator that provides the address of an object, which is assigned to the pointer personPtr. We assign personPtr in turn to the addresses of the Person, Student, and Employee objects and call print in each case. As print is marked as virtual in Person, print, in the class of the object the pointer currently points at, is called. Since print is marked as virtual in the base class Person, it is not necessary to mark print as virtual in the subclasses Student and Employee. When accessing a member of a pointer to an object, we use the arrow (->) operator instead of the point operator.
When personPtr points at an object of Person, print in Person is called:
    personPtr = &person;
    personPtr->print();
When personPtr points at an object of Student, print in Student is called:
    personPtr = &student;
    personPtr->print();
When personPtr points at an object of Employee, print Employee is called:
    personPtr = &employee;
    personPtr->print();
   }
This process is called dynamic binding. If we omit the virtual marking in Person, static binding would occur and print in Person would be called in all cases.
The concept of object-oriented programming is built on the three cornerstones of encapsulation, inheritance, and dynamic binding. A language that does not support any of these features cannot be called object-oriented.
A stack is a simple data type where we add values to the top, remove the value on the top, and can only inspect the top value. In this section, we implement a stack of integers. In the next chapter, we look into template classes that can hold values of arbitrary types. We use a linked list, which is a construction where a pointer points at the first cell in the linked list, and each cell holds a pointer to the next cell in the linked list. Naturally, the linked list must end eventually. We use nullptr to mark the end of the linked list, which is a C++ standard pointer to a special null address.
To begin with, we need a class to hold each cell of the linked list. The cell holds an integer value and a pointer to the next cell in the list, or nullptr if it is the last cell of the list. In the following section, we will look into cell classes that hold pointers to both the previous and the next cell.
Cell.h
class Cell {
  public:
    Cell(int value, Cell *next);
It is possible to implement methods directly in the class definition; they are called inline methods. However, it is usually done for short methods only. A rule of thumb is that inline methods shall not exceed one line:
    int value() const { return m_value; }
    Cell *next() const { return m_next; }
Each cell holds a value and the address of the next cell in the linked list:
  private:
    int m_value;
    Cell *m_next;
};
Cell.h
#include "Cell.h"
A cell is initialized with a value and a pointer to the next cell in the linked list. Note that m_next has the value nullptr if the cell is the last cell in the linked list:
Cell::Cell(int value, Cell *next)
 :m_value(value),
  m_next(next) {
  // Empty.
}
In a stack, we are in interested in its top value only. The default constructor initializes the stack to be empty. Push adds a value at the top of the stack, top returns the top value, pop removes the top value, size returns the number of values in the stack, and empty returns true if the stack is empty. The bool type is a logical type that can hold the values true or false.
Stack.h
class Stack {
  public:
    Stack();
    void push(int value);
    int top();
    void pop();
    int size() const;
    bool empty() const;
The m_firstCellPtr field is a pointer to the first cell of the linked list holding the values of the stack. When the stack is empty, m_firstCellPtr will hold the value nullptr. The m_size field holds the current size of the stack:
  private:
    Cell *m_firstCellPtr;
    int m_size;
};
The CAssert header is included for the assert macro, which is used to test whether certain conditions are true. A macro is part of the preprocessor that performs certain text replacements.
Stack.cpp
#include <CAssert>
using namespace std;

#include "Cell.h"
#include "Stack.h"
The default constructor sets the stack to empty by initializing the pointer to the first cell to nullptr and the size to zero:
Stack::Stack()
 :m_firstCellPtr(nullptr),
  m_size(0) {
  // Empty.
}
When pushing a new value at the top of the stack, we use the new operator to dynamically allocate the memory needed for the cell. If we run out of memory, nullptr is returned, which is tested by the assert macro. If m_firstCellPtr equals nullptr, the execution is aborted with an error message. The exclamation mark (!) followed by an equals sign (=) constitutes the not-equal operator. Two plus signs (++) constitute the increments operator, which means that the value is increased by one.
The increment operator actually comes in two versions—prefix (++m_size) and postfix (m_size++). In the prefix case, the value is first increased and then returned, while in the postfix case the value is increased but the original value is returned. However, in this case, it does not matter which version we use since we are only interested in the result—that the value of m_size is increased by one:
void Stack::push(int value) {
  m_firstCellPtr = new Cell(value, m_firstCellPtr);
  ++m_size;
}
When returning the top value of the stack, we must first check that the stack is not empty, since it would be illogical to return the top value of an empty stack. If the stack is empty, the execution is aborted with an error message. The single exclamation mark (!) is the logical not operator. We return the top value, which is stored in the first cell in the linked list:
int Stack::top() {
  assert(!empty());
  return m_firstCellPtr->getValue();
}
We must also check that the stack is not empty when popping the top value of the stack. We set the pointer to the first cell in the linked list to point at the next cell. However, before that, we must store the first pointer, deleteCellPtr, in order to deallocate the memory of the cell it points at.
We deallocate the memory with the delete operator:
void Stack::pop() {
  assert(!empty());
  Cell *deleteCellPtr = m_firstCellPtr;
  m_firstCellPtr = m_firstCellPtr->getNext();
  delete deleteCellPtr;
In the same way as the increment operator above, two minus signs (--) constitutes the decrement operator, which decreases the value by one:
  --m_size;
}
The size method simply returns the value of the m_size field:
int Stack::size() const {
  return m_size;
}
A stack is empty if the pointer to the first cell pointer equals nullptr. Informally, we say that the pointer is null if it equals nullptr:
bool Stack::empty() const {
  return (m_firstCellPtr == nullptr);
}
We test the stack by pushing, topping, and popping some values.
Main.cpp
#include <String>
#include <IOStream>
using namespace std;

#include "Cell.h"
#include "Stack.h"

void main() {
  Stack s;
  s.push(1);
  s.push(2);
  s.push(3);
When printing a Boolean value, the stream operator does not print true or false, but rather one for true and zero for false. In order to really print true or false we use the condition operator. It takes three values, separated by a question mark (?) and a colon (:). If the first value is true the second value is returned. If the first value is false the third value is returned:
  cout << "top " << s.top() << ", size " << s.size()
       << ", empty " << (s.empty() ? "true" : "false") << endl;

  s.pop();
  s.pop();
  s.push(4);
  cout << "top " << s.top() << ", size " << s.size()
       << ", empty " << (s.empty() ? "true" : "false") << endl;
}
A queue is a model of a traditional queue; we enter values at the rear, and inspect and remove values at the front. It is also possible to decide on the number of values it holds and whether it is empty.
Similar to the stack in the previous section, we implement the queue with a linked list. We reuse the Cell class; however, in the queue case, we need to set the next link of a cell. Therefore, we rename next to getNext and add the new setNext method:
Cell.h
class Cell {
  public:
    Cell(int value, Cell *next);
    int value() const {return m_value;}
    Cell *getNext() const { return m_next; }
    void setNext(Cell* next) { m_next = next; }

  private:
    int m_value;
    Cell *m_next;
};
We implement the queue with a linked list in a manner similar to the stack. The constructor initializes an empty queue, enter enters a value at the rear of the queue, remove removes the value at its front, size return the current size of the queue, and empty returns true if it is empty:
Queue.h
class Queue {
  public:
    Queue();
    void enter(int value);
    int first();
    void remove();
    int size() const;
    bool empty() const;
In the stack case, we were only interested in its top, which was stored at the beginning of the linked list. In the queue case, we are interested in both the front and rear, which means that we need to access both the first and last cell of the linked list. Therefore, we have the two pointers, m_firstCellPtr and m_lastCellPtr, pointing at the first and last cell in the linked list:
  private:
    Cell *m_firstCellPtr, *m_lastCellPtr;
    int m_size;
};
Queue.cpp
#include <CAssert>
using namespace std;

#include "Cell.h"
#include "Queue.h"
When the queue is created, it is empty; the pointers are null and the size is zero. Since there are no cells in the linked list, both the cell pointers points at nullptr:
Queue::Queue()
 :m_firstCellPtr(nullptr),
  m_lastCellPtr(nullptr),
  m_size(0) {
  // Empty.
}
When entering a new value at the rear of the queue, we check if the queue is empty. If it is empty, both the pointers are set to point at the new cell. If it is not empty, the last cell next-pointer is set to point at the new cell, and then the last cell pointer is set to be the new cell:
void Queue::enter(int value) {
  Cell *newCellPtr = new Cell(value, nullptr);

  if (empty()) {
    m_firstCellPtr = m_lastCellPtr = newCellPtr;
  }
  else {
    m_lastCellPtr->setNext(newCellPtr);
    m_lastCellPtr = newCellPtr;
  }

  ++m_size;
}
The first method simply returns the value of the first cell in the linked list:
int Queue::first() {
  assert(!empty());
  return m_firstCellPtr->value();
}
The remove method sets the first cell to point at the second cell. However, first we must store its address in order to deallocate its memory with the C++ standard delete operator:
void Queue::remove() {
  assert(!empty());
  Cell *deleteCellPtr = m_firstCellPtr;
  m_firstCellPtr = m_firstCellPtr->getNext();
  delete deleteCellPtr;
  --m_size;
}

int Queue::size() const {
  return m_size;
}

bool Queue::empty() const {
  return (m_firstCellPtr == nullptr);
}
We test the queue by entering and removing a few values. We enter the values one, two, and three, which are placed in the queue in that order. We then remove the first two values, and enter the value four. Then the queue holds the values three and four:
Main.cpp
#include <CMath>
#include <String>
#include <IOStream>
using namespace std;

#include "Cell.h"
#include "Queue.h"

void main() {
  Queue q;
  q.enter(1);
  q.enter(2);
  q.enter(3);
  cout << "first " << q.first() << ", size " << q.size()
       << ", empty " << (q.empty() ? "true" : "false") << endl;

  q.remove();
  q.remove();
  q.enter(4);
  cout << "first " << q.first() << ", size " << q.size()
       << ", empty " << (q.empty() ? "true" : "false") << endl;
} In this chapter, we have looked into the basics of object-oriented programming. We have started by creating a project and executing a program for rolling a dice. We have also created a class hierarchy, including the base class Person and its two subclasses Student and Employee. By defining pointers to the objects, we have performed the dynamic binding.
Finally, we have created two data types—stack and queue. A stack is a structure where we are interested in the value at the top only. We can add values at the top, inspect the top value, and remove the top value. A queue is a traditional queue where we enter values at the rear while we inspect and remove values from the front.
In the next chapter, we will continue to create data types, and more advanced data types, such as lists and sets. We will also look into to more advanced features of C++.
