


Note
Lesson Objectives
By the end of this chapter, you will be able:
Explain the C++ compilation model
Execute the main() function
Illustrate the declaration and definition of variables
Determine built-in arithmetic types, references, and pointers
Explain the scope of a variable
Use control flow statements
Define and utilize arrays
C++ has been a major player in the software development industry for more than 30 years, supporting some of the most successful companies in the world.
In recent years, interest in the language has been growing more than ever, and it is an extremely popular choice for large-scale systems, with many big companies sponsoring its advancement.
C++ remains a complex language, which puts a lot of power in the hands of the developer. However, this also comes with a lot of opportunities to make mistakes. It is a unique language as it has the ability to enable programmers to write high-level abstractions while retaining full control of hardware, performance, and maintainability.
It is fundamental to know how C++ compilation works to understand how programs are compiled and executed. Compiling C++ source code into machine-readable code consists of the following four processes:
Preprocessing the source code.
Compiling the source code.
Assembling the compiled file.
Linking the object code file to create an executable file.
Let's start with a simple C++ program to understand how compilation happens.
Create a file named HelloUniverse.cpp and save it on the Desktop after copy-pasting the following code:
#include <iostream>
int main(){
	// This is a single line comment
	/* This is a multi-line
        comment */
	std::cout << "Hello Universe" << std::endl;
	return 0;
}
Now, using the cd command on the Terminal, navigate to the location where our file is saved and execute the following command if you are on UNIX:
> g++ -o HelloUniverse HelloUniverse.cpp
> ./HelloUniverse
If you are on a Windows system, a different compiler must be used. The command to compile the code with the Visual Studio compiler is as follows:
> cl /EHsc HelloUniverse.cpp
> HelloUniverse.exe
This program, once executed, will print Hello Universe on the Terminal.
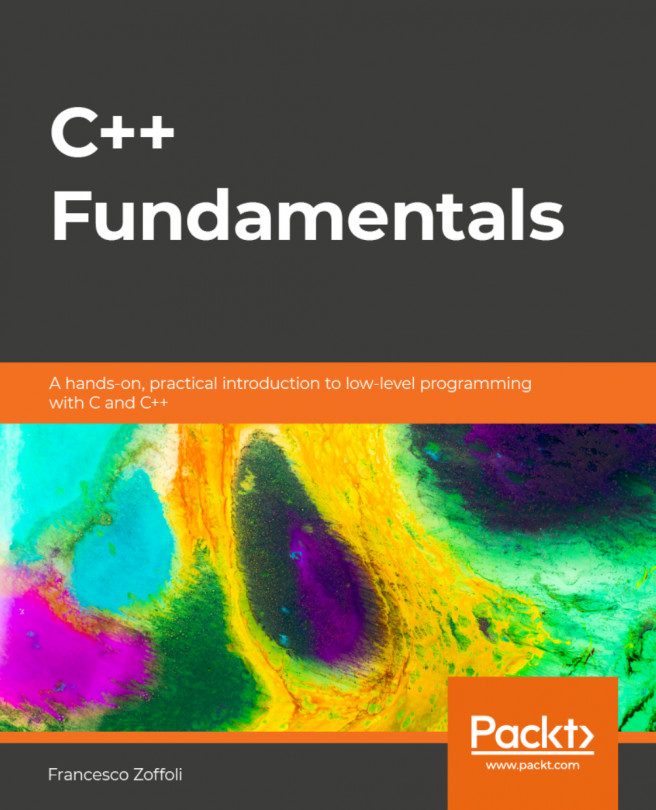
Let's demystify the C++ compilation process using the following diagram:

Figure 1.1: C++ compilation of the HelloUniverse file
When the C++ preprocessor encounters the #include <file> directive, it replaces it with the content of the file creating an expanded source code file.
Then, this expanded source code file is compiled into an assembly language for the platform.
The assembler converts the file that's generated by the compiler into the object code file.
This object code file is linked together with the object code files for any library functions to produce an executable file.
Source files contain the actual implementation code. Source files typically have the extension .cpp, although other extensions such as .cc, .ccx, or .c++ are also quite common.
On the other hand, header files contain code that describes the functionalities that are available. These functionalities can be referred to and used by the executable code in the source files, allowing source files to know what functionality is defined in other source files. The most common extensions for header files are .hpp, .hxx, and .h.
To create an executable file from the header and the source files, the compiler starts by preprocessing the directives (preceded by a # sign and generally at the top of the files) that are contained in them. In the preceding HelloUniverse program, the directive would be #include. It is preprocessed by the compiler before actual compilation and replaced with the content of the iostream header, which describes standard functionality for reading and writing from streams.
The second step is to process each source file and produce an object file that contains the machine code relative to that source file. Finally, the compilers link all the object files into a single executable program.
We saw that the preprocessor converts the content of the directives into the source files. Headers can also include other headers, which will be expanded, creating a chain of expansions.
For example, let's assume that the content of the logger.hpp header is as follows:
// implementation of logger
Let's also assume that the content of the calculator.hpp header is as follows:
#include <logger.hpp>
// implementation of calculator
In the main.cpp file, we include both directives, as shown in the following code snippet:
#include <logger.hpp>
#include <calculator.hpp>

int main() {
  // use both the logger and the calculator
}
The result of the expansion will be as follows:
// implementation of logger
// implementation of logger
// implementation of calculator
int main() {
  // use both the logger and the calculator
}
As we can see, the logger has been added in the resulting file twice:
It was added the first time because we included logger.hpp in the main.cpp file
It was added the second time because we included calculator.hpp, which then includes logger.hpp
Included files that are not directly specified in a #include directive in the file we are compiling, but are instead included by some other included file, are called transitive included files.
Often, including the same header file multiple times creates a problem with multiple definitions, as we will see in Lesson 2, Functions, and the Lesson 03, Classes.
Including the same file multiple times is very likely because of the transitive included files we explained before, and will often result in a compilation error. In C++, there is a convention to prevent problems that originate from including a header file multiple times: include guards.
An include guard is a specific pattern of instructing the preprocessor to ignore the content of the header if it has been included before.
It consists of writing all the header code inside the following structure:
#ifndef <unique_name>
#define <unique_name>
// all the header code should go here
#endif /* <unique_name> */
Here, <unique_name> is a name unique throughout the C++ project; it typically consists of the header file name, such as LOGGER_HPP for the logger.hpp header.
The preceding code checks whether a special preprocessor variable, <unique_name>, exists. If it does not exist, it defines it and it proceeds to read the content of the header. If it exists, it will skip all the code until the #endif part.
Since initially the special variable does not exist, the first time the preprocessor includes a header, it creates the variable and proceeds to read the file. The subsequent times, the variable is already defined, so the preprocessor jumps to the #endif directive, skipping all the content of the header file.
Compilation is a process that ensures that a program is syntactically correct, but it does not perform any checks regarding its logical correctness. This means that a program that compiles correctly might still produce undesired results:
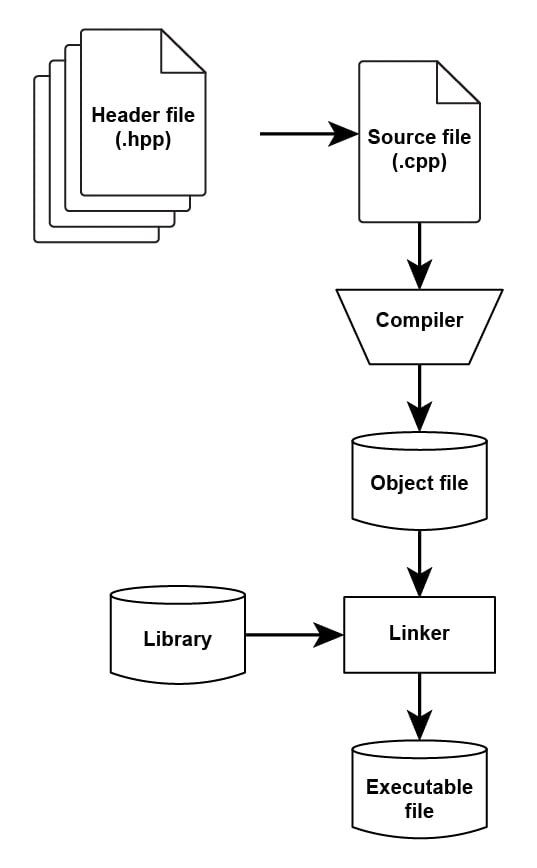
Figure 1.2: Compilation and linking processes for an executable file
Every C++ program needs to define a starting point, that is, the part of the code the execution should start from. The convention is to have a uniquely named main function in the source code, which will be the first thing to be executed. This function is called by the operating system, so it needs to return a value that indicates the status of the program; for this reason, it is also referred to as the exit status code.
Let's see how we can compile a program.
Together with C, C++ is the language with the most supported hardware and platforms. This means that there are many C++ compilers, produced by many different vendors. Each compiler can accept parameters in a different way, and it's important to consult the manual of the compiler you are using when developing in C++ to understand the available options and their meaning.
We'll now see how to compile a program with two of the most common compilers: the Microsoft Visual Studio compiler and GCC.
To compile the myfile.cpp file in to an object file named myfile.obj, we can run the following commands:

Figure 1.3: Compiling the CPP file
When we compile, it is common to include some headers.
We can include the headers defined in the C++ standard without performing any action, but in case we want to include user-defined headers, we need to tell the compiler in which folders to look up the header files.
For MSVC, you need to pass the parameter as /I path, where path is the path to the directory to look in for the header.
For GCC, you need to pass the parameter as -I path, where path has the same meaning as in MSVC.
If myfile.cpp is including a header in the include directory, we would compile the file with the following commands:

Figure 1.4: Compiling the CPP file with the include directory
We can compile several files in their respective object files, and then link them all together to create the final application.
To link together two object files called main.obj and mylib.obj into an executable, we can run the following commands:
Figure 1.5: Compiling two object files
With MSVC, we will create an executable named main.exe, while with g++, the executable will be named main.
For convenience, MSVC and GCC offer a way to compile several files into an executable, without the need to create an object file for each file, and then link the files together.
Even in this case, if the files are including any user-defined header, you need to specify the header location with the /I or -I flags.
To compile the main.cpp and mylib.cpp files together, which uses some headers from the include folder, you can use the following commands:

Figure 1.6: Compiling files with include folder
In the next chapter, we will discuss functions in more depth; for now, we can define the main function, which does nothing, apart from returning a successful status code in the following way:
int main()
{
  return 0;
}
The first line contains the definition of the function, constituted by the return type int, the name of the main function, and the list of arguments, which in this case is an empty list. Then, we have the body of the function, delimited by curly braces. Finally, the body is composed of a single instruction that will return a successful status code.
Note
As opposed to C, in a C++ program, the return statement is optional. The compiler automatically adds return 0 if you don't explicitly return a value.
We will discuss these topics in more detail later; what is important to know is that this is a valid C++ program that can be compiled and executed.
In this exercise, we will create a source file named main.cpp containing the code. Compile the file and run the program. We will be using it to explore the C++ environment:
Using your favorite text editor (Sublime Text, Visual Studio Code, Atom, or Notepad++ if you use Windows), create a new file and name it main.cpp.
Write the following code in the main.cpp file and save it:
int main()
{
  return 0;
}
Compile the main.cpp file using the following command:
//On UNIX:
> g++ main.cpp

//On Windows:
> cl /EHsc main.cpp
The compilation process will produce an executable file, which will be named main.exe on a Windows system and main.out on a UNIX one.
In most programming languages, data is stored in variables, which are labels that refer to the part of memory defined by the programmer. Each variable has an associated type. The type defines what kind of values the variable can hold.
The built-in data types of C++ are divided into two categories:
Primitive data types: Can be used directly by the user to declare variables
Abstract or user defined data types: Are defined by the user, for example, to define a class in C++ or a structure
Primitive data types consist of the following types:
Integer: The int type stores a whole number value ranging from -2147483648 to 2147483647. This data type usually takes up 4 bytes of memory space.
Character: The char type stores character data. It is guaranteed to be big enough to represent any UTF-8 single byte code unit; for UTF-16 and UTF-32, char16_t and char32_t are used, respectively. char typically takes 1 byte of memory space.
Boolean: The bool data type is capable of holding one of two values: true or false.
Floating-point: The float type is used for storing single precision floating point values. This data type usually takes up 4 bytes of memory space.
Double floating point: The double type is used for storing double precision floating point values. This data type usually takes up 8 bytes of memory space.
Void: The void type is a valueless data type that is used for functions that do not return a value.
Wide character: The wchar_t type is also used to represent character sets, but allows for greater size. While char supports characters between 8 and 32 bits, a wide character is 2 to 4 bytes long.
The character types char and wchar_t hold numeric values corresponding to the characters in the machine's character set.
The numeric types offered by the C++ programming language fall into three categories:
Signed
Unsigned
Floating point
The signed and unsigned types come with different sizes, which means each of them can represent a smaller or larger range of values.
Integer types can be signed or unsigned, where signed types can be used to distinguish between negative or positive numbers, while unsigned can only represent numbers greater than or equal to zero.
The signed keyword is optional; the programmer only needs to specify it if the type is unsigned. Thus, signed int and int are the same types, but they are different from unsigned int, or just unsigned for brevity. Indeed, if it is not specified, an unsigned type always defaults to int.
Integers, as previously mentioned, can come in different sizes:
int
short int
long int
long long int
The short int type, or just short, is guaranteed to be at least 16 bits according to the standard. This means it can hold values in the range of -32768 to 32767. If it was also unsigned, so unsigned short int or just unsigned int, this range would be 0 to 65535.
Note
The effective size in memory of types can change based on the platform for which the code is compiled. C++ is present in many platforms, from supercomputers in data centers to small embedded chips in industrial settings. To be able to support all these different types of machines, the standard only sets the minimum requirements on built-in types.
A variable is named storage that refers to a location in memory that can be used to hold a value. C++ is a strongly-typed language and it requires every variable to be declared with its type before its first use.
The type of the variable is used by the compiler to determine the memory that needs to be reserved and the way to interpret its value.
The following syntax is used to declare a new variable:
type variable_name;
Variable names in C++ can contain letters from the alphabet, both upper and lower case, digits and underscores (_). While digits are allowed, they cannot be the first character of a variable name. Multiple variables of the same type can all be declared in the same statement by listing their variable names, separated by commas:
type variable_name1, variable_name2, …;
This is equivalent to the following:
type variable_name1;
type variable_name2;
type ...;
When declaring a variable, its value is left undetermined until an assignment is performed. It is also possible to declare a variable with a given value; this operation is also referred to as variable initialization.
One way – and probably the most common one – to initialize a variable, also referred to as C-like initialization, uses the following syntax:
type variable_name = value;
Another solution is constructor initialization, which we will see in detail in Lesson 3, Classes. Constructor initialization looks like this:
type variable_name (value);
Uniform initialization or list initialization introduces brace initialization, which allows for the initialization of variables and objects of different types:
type variable_name {value};When a variable is initialized, the compiler can figure out the type needed to store the value provided, which means that it is not necessary to specify the type of the variable. The compiler is indeed able to deduct the type of the variable, so this feature is also referred to as type deduction. For this reason, the auto keyword has been introduced to replace the type name during initialization. The initialization syntax becomes this:
auto vvariable_name = value;
Another way to avoid directly providing a type is to use the decltype specifier. It is used to deduce a type of a given entity and is written with the following syntax:
type variable_name1;
decltype(variable_name1) variable_name2;
Here, variable_name2 is declared according to the type deducted from variable_name1.
Note
Type deduction using the auto and decltype keywords has been introduced by the C++11 standard to simplify and facilitate variable declaration when the type cannot be obtained. But at the same time, their extended use when not really needed can reduce code readability and robustness. We will see this in more detail in Lesson 4, Generic Programming and Templates.
In the following code, we will check a valid statement for variables by creating a new source file named main.cpp and analyzing the code one line at a time.
Which one of the following is a valid statement?
int foo;
auto foo2;
int bar = 10;
sum = 0;
float price = 5.3 , cost = 10.1;
auto val = 5.6;
auto val = 5.6f;
auto var = val;
int a = 0, b = {1} , c(0);In the previous section, variables have been defined as portions of memory that can be accessed by their name. In this way, the programmer does not need to remember the memory location and size that's reserved, but can conveniently refer to the variable name.
In C++, the way to retrieve the actual memory address of a variable is done by preceding the variable name with an ampersand sign (&), also known as the address-of operator.
The syntax to use the concept of the address-of operator is as follows:
&variable_name
Using this in code will return the physical memory address of the variable.
A data structure that's capable of storing a memory address in C++ is known as a pointer. A pointer always points to an object of a specific type, and because of that we need to specify the type of the object that's pointed to when declaring the pointer.
The syntax to declare a pointer is as follows:
type * pointer_name;
Multiple declarations in the same statement are also possible when it comes to a pointer, but it is important to remember that an asterisk (*) is needed for each pointer declaration. An example of multiple pointer declaration is as follows:
type * pointer_name1, * pointer_name2, *...;
When the asterisk is specified only for the first declaration, the two variables will have different types. For example, in the following declaration, only the former is a pointer:
type * pointer_name, pointer_name;
Note
Independently of the pointed variable type, a pointer will always occupy the same size in memory. This derives from the fact that the memory space needed by the pointer is not related to a value stored by the variable, but to a memory address that is platform-dependent.
Intuitively, a pointer assignment has the same syntax as any other variable:
pointer_name = &variable_name;
The previous syntax will copy the memory address of the variable_name variable into the pointer named pointer_name.
The following code snippet will first initialize pointer_name1 with the memory address of variable_name, and then it initializes pointer_name2 with the value stored in pointer_name1, which is the memory address of variable_name. As a result, pointer_name2 will end up pointing to the variable_name variable:
type * pointer_name1 = &variable_name;
type * pointer_name2 = pointer_name1;
The following implementation is invalid:
type * pointer_name1 = &variable_name;
type * pointer_name2 = &pointer_name1;
This time, pointer_name2 would be initialized with the memory address of pointer_name1, resulting in a pointer that points to another pointer. The way to point a pointer to another pointer is to use the following code:
type ** pointer_name;
Two asterisks (*) indicate the type that's pointed is now a pointer. In general, the syntax simply requires an asterisk (*) for each level of indirection in the declaration of the pointer.
To access the actual content at a given memory address, it is possible to use the dereference operator (*), followed by the memory address or a pointer:
type variable_name1 = value;
type * pointer_name = &variable_name1;
type variable_name2 = *pointer_name;
The value contained by variable_name2 is the same as the one contained by variable_name1. The same applies when it comes to assignment:
type variable_name1 = value1;
type * pointer_name = &variable_name1;
*pointer_name = value2;
Unlike a pointer, a reference is just an alias for an object, which is essentially a way to give another name to an existing variable. The way to define a reference is as follows:
type variable_name = value;
type &reference_name = variable_name;
Let's examine the following example:
#include <iostream>
int main()
{
  int first_variable = 10;
  int &ref_name = first_variable;
  std::cout << "Value of first_variable: " << first_variable << std::endl;
  std::cout << "Value of ref_name: " << ref_name << std::endl;
}
//Output
Value of first_variable: 10
Value of ref_name: 10
We can identify three main differences with pointers:
Once initialized, a reference remains bound to its initial object. So, it is not possible to reassign a reference to another object. Any operations performed on a reference are actually operations on the object that has been referred.
Since there is not the possibility to rebind a reference, it is necessary to initialize it.
References are always associated with a variable that's stored in memory, but the variable might not be valid, in which case the reference should not be used. We will see more on this in the Lesson 6, Object-Oriented Programming.
It is possible to define multiple references to the same object. Since the reference is not an object, it is not possible to have a reference to another reference.
In the following code, given that a is an integer, b is a float, and p is a pointer to an integer, verify which of the variable initialization is valid and invalid:
int &c = a;
float &c = &b;
int &c;
int *c;
int *c = p;
int *c = &p;
int *c = a;
int *c = &b;
int *c = *p;
In C++, it is possible to define a variable whose value will not be modified once initialized. The way to inform the compiler of this situation is through the const keyword. The syntax to declare and initialize a const variable is as follows:
const type variable_name = value;
There are several reasons to enforce immutability in a C++ program, the most important ones being correctness and performance. Ensuring that a variable is constant will prevent the compilation of code that accidentally tries to change that variable, preventing possible bugs.
The other reason is that informing the compiler about the immutability of the variable allows for optimizing the code and logic behind the implementation of the code.
Note
After creating an object, if its state remains unchanged, then this characteristic is known as immutability.
An example of immutability is as follows:
#include <iostream>
int main()
{
  const int imm = 10;
  std::cout << imm << std::endl;
  //Output: 10
  int imm_change = 11;
  std::cout << imm_change << std::endl;
  //Output: 11
  imm = imm_change;
  std::cout << imm << std::endl;
  //Error: We cannot change the value of imm
}
An object is immutable if its state doesn't change once the object has been created. Consequently, a class is immutable if its instances are immutable. We will learn more about classes in Lesson 3, Classes.
Modern C++ supports another notion of immutability, which is expressed with the constexpr keyword. In particular, it is used when it is necessary for the compiler to evaluate the constant at compile time. Also, every variable declared as constexpr is implicitly const.
The previous topic introduced pointers and references; it turns out that even those can be declared as const. The following is pretty straightforward to understand, and its syntax is as follows:
const type variable_name;
const type &reference_name = variable_name;
This syntax shows how we can declare a reference to an object that has a const type; such a reference is colloquially called a const reference.
References to const cannot be used to change the object they refer to. Note that it is possible to bind a const reference to a non-const type, which is typically used to express that the object that's been referenced will be used as an immutable one:
type variable_name;
const type &reference_name = variable_name;
However, the opposite is not allowed. If an object is const, then it can only be referenced by a const reference:
const type variable_name = value;
type &reference_name = variable_name;
// Wrong
An example of this is as follows:
#include <iostream>
int main()
{
  const int const_v = 10;
  int &const_ref = const_v;
  //Error
  std::cout << const_v << std::endl;
  //Output: 10
}
Just like for references, pointers can point to the const object, and the syntax is also similar and intuitive:
const type *pointer_name = &variable_name;
An example of this is as follows:
#include <iostream>
int main()
{
  int v = 10;
  const int *const_v_pointer  = &v;
  std::cout << v << std::endl;
  //Output: 10
  std::cout << const_v_pointer << std::endl;
  //Output: Memory location of v
}
const object addresses can only be stored in a pointer to const, but the opposite is not true. We could have a pointer to const point to a non-const object and, in this case, like for a reference to const, we are not guaranteed that the object itself will not change, but only that the pointer cannot be used to modify it.
With pointers, since they are also objects, we have an additional case, which is the const pointer. While for references saying const reference is just a short version of reference to const, this is not the case for the pointer and has a totally different meaning.
Indeed, a const pointer is a pointer that is itself constant. Here, the pointer does not indicate anything about the pointed object; it might be either const or non-const, but what we cannot change instead is the address pointed to by the pointer once it has been initialized. The syntax is as follows:
type *const pointer_name = &variable_name;
As you can see, the const keyword is placed after the * symbol. The easiest way to keep this rule in mind is to read from right to left, so pointer-name > const > * > type can be read as follows: pointer-name is a const pointer to an object of type type. An example of this is as follows:
#include <iostream>
int main()
{
  int v = 10;
  int *const v_const_pointer = &v;
  std::cout << v << std::endl;
  //Output: 10
  std::cout << v_const_pointer << std::endl;
  //Output: Memory location of v
}As we have already seen, variable names refer to a specific entity of a program. The live area of the program where this name has a particular meaning is also called a scope of a name. Scopes in C++ are delimited with curly braces, and this area is also called a block. An entity that's declared outside of any block has a global scope and is valid anywhere in the code:
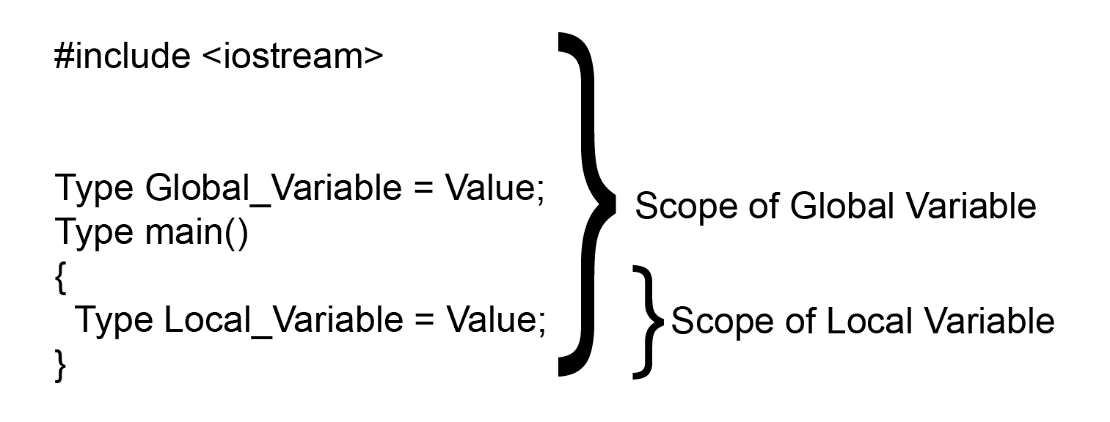
Figure 1.7: Scope of a variable
The same name can be declared in two scopes and refers to different entities. Also, a name is visible once it is declared until the end of the block in which it is declared.
Let's understand the scope of global and local variables with the following example:
#include <iostream>
int global_var = 100;
//Global variable initialized

int print(){
  std::cout << global_var << std::endl;
  //Output: 100
  std::cout << local_var << std::endl;
  //Output: Error: Out of scope
}
int main()
{
  int local_var = 10;
  std::cout << local_var << std::endl;
  //Output: 10
  std::cout << global_var << std::endl;
  //Output: 100
  print();
  //Output:100
  //Output: Error: Out of scope
}
Scopes can be nested, and we call the containing and contained scope the outer and inner scope, respectively. Names declared in the outer scope can be used in the inner one. Re-declaration of a name that was initially declared in the outer scope is possible. The result will be that the new variable will hide the one that was declared in the outer scope.
Let's examine the following code:
#include <iostream>
int global_var = 1000;

int main()
{
  int global_var = 100;
  std::cout << "Global: "<< ::global_var << std::endl;
  std::cout << "Local: " << global_var << std::endl;
}
Output:
Global: 1000
Local: 100
In the next chapter, we will explore how to use local and global variables with functions.
In the following code, we will find the values of all the variables without executing the program.
The following program shows how variable initialization works:
#include <iostream>
int main()
{
  int a = 10;
  {
    int b = a;
  }
  const int c = 11;
  int d = c;
  c = a;
}In a program, it is rare to provide useful functionality by just executing a linear sequence of operations. Commonly, a program must be able to react in different ways in response to different situations or execute the same operation multiple times in different contexts.
We will now see the control flow statements C++ offers to the programmer to control the sequence of operations to be executed.
C++ provides conditional execution support, where the if keyword indicates whether or not to execute the following statement or block, depending on the fulfillment of the condition provided:
if (condition) statement
If the expression named condition evaluates to true, then the statement is executed; otherwise, it will be ignored and the program will continue with the subsequent code.
The conditionally executed code can be a single statement or an entire block containing multiple ones. These statements needs to be enclosed in braces ({}) to form a block:
if (condition) {
  statement_1;
  statement_2;
  statement_N;
}
Note
It is common to forget the brace brackets and write the control statement in the following manner:
if (condition)
  statement1
  statement2
Note
In such a case, the compiler will not warn you, and it will execute statement1 depending on the condition, but always execute statement2. To avoid such a situation, it can be a good practice to always add the braces.
It is possible to specify what to execute instead when the condition evaluates to false. This is done through the else keyword, which is followed by a statement or a block.
The following syntax is used to indicate that statement1 should be executed if the case condition evaluates to true, and otherwise statement2 is executed:
if (condition) statement1 else statement2
Finally, we can concatenate on multiple if-else statements to produce a more complex branching logic. Let's examine the following example:
if (condition1) {
  statement1
} else if (condition2) {
  statement2
} else {
  statement3
}
With this generic structure, it is possible to check the unlimited number of conditions and execute only the corresponding statement or the final one contained in the else branch.
It is important to be aware that once one of the conditions is met, all of the ones that follow are discarded, for example:
if (x > 0) {
  // When x is greater than 0, statement1 is executed.
  // If that is not the case, the control jumps to the else block.
  statement1
} else if (x > 100) {
  statement2
}
The previous code will always execute statement1 for any positive x, regardless of whether it is greater than 100 or not.
An alternative way is to sequence several if keywords, as follows:
if (condition1)
  // If condition1 is true, statement1 is executed
  statement1
if (condition2)
  // if condition2 is true then statement2 is executed
  statement2
  /* independently whether condition1 and condition2 is true or not, the statement3 will be executed */
statement3
Let's demystify the previous logic with the following example:
#include <iostream>
int main()
{
  int x = 10;
  if  (x > 0){
    std::cout << x << std::endl;
  }
  if (x > 11 ){
    std::cout << x << std::endl;
  }
  else{
    std::cout << x-1 << std::endl;
  }
}

Output:
10
9
In this way, all the conditions are evaluated independently and more than one statement can potentially be executed.
Another selection statement, with similarities to the if-else concatenation construction, is the switch statement. It is limited to constant expressions and is mainly used to check for a value among a number of possible expressions:
switch (expression)
{
  case constant1:
    group-of-statements-1;
  break;

  case constant2:
    group-of-statements-2;
  break;
...
  default:
    default-group-of-statements;
  break;
}
The expression present in the parentheses following the switch keyword is evaluated against multiple cases, searching for the first equality between the expression and the constants. If none of the cases match, the default one (if it exists, since it is optional) is executed.
It is important to keep in mind that the order of evaluation is sequential, and as soon as one of the constants matches, the corresponding group of statements are executed. The break keyword prevents them from further execution. If the break keyword is not included, all statements following the case, including the ones under different labels, are also executed.
We will explore the break keyword more in the Jump statements – break and continue section.
The for loop is a construct that's used to repeat a statement a certain number of times. The syntax of the for loop is as follows:
for (initialization; condition; increase){
  statement1;
  statement2;
...
  statementN;
}
The for loop consists of two parts: the header and the body. The former controls how many times the latter is repeated. The header is the part enclosed by parentheses and it is formed by initialization, condition, and increase statements. The body can be a single statement or a block of multiple ones.
The initialization statement is typically (but not necessarily) used to declare a new variable, usually a counter, and to initialize it to a certain value. The initialization statement is executed only once, at the beginning of the loop.
Secondly, the condition statement is checked. This is similar to the condition that's checked for an if statement. If the condition is true, the body of the loop is executed, otherwise the program continues its execution with the instruction after the body of the for loop.
After the body executes, the increase statement is executed. This usually changes the counter of the initialization statement. The condition is then checked again and, if true, the steps are repeated. The loop ends when the condition evaluates to false.
The fields in the header of a for loop are optional and can be left blank, but the semicolons cannot be omitted. When the condition is omitted, it always evaluates to true. For example, the following corresponds to an infinite loop where the statement is executed unconditionally:
for ( ; ; ) statement;
Another variant of the for loop is called a range-based for loop, the syntax for which is as follows:
for ( declaration : range ) statement;
A range is a sequence of elements, like arrays, which are explained in the next section. This range-based for loop is used to iterate over all elements of these sequences. The range is the name of the sequence, and in the for declaration, the name is a temporary variable that's declared for every iteration of the loop. This is used to store the current element. The declaration needs to be the same type as the elements contained in the range.
Note
A range-based for loop is a good example where type deduction and the use of the auto keyword for the declaration makes the code more readable and helps the programmer find the right type to use.
A loop placed inside a loop is known as a nested loop. Let's look at the following diagram to understand what a nested for loop is:
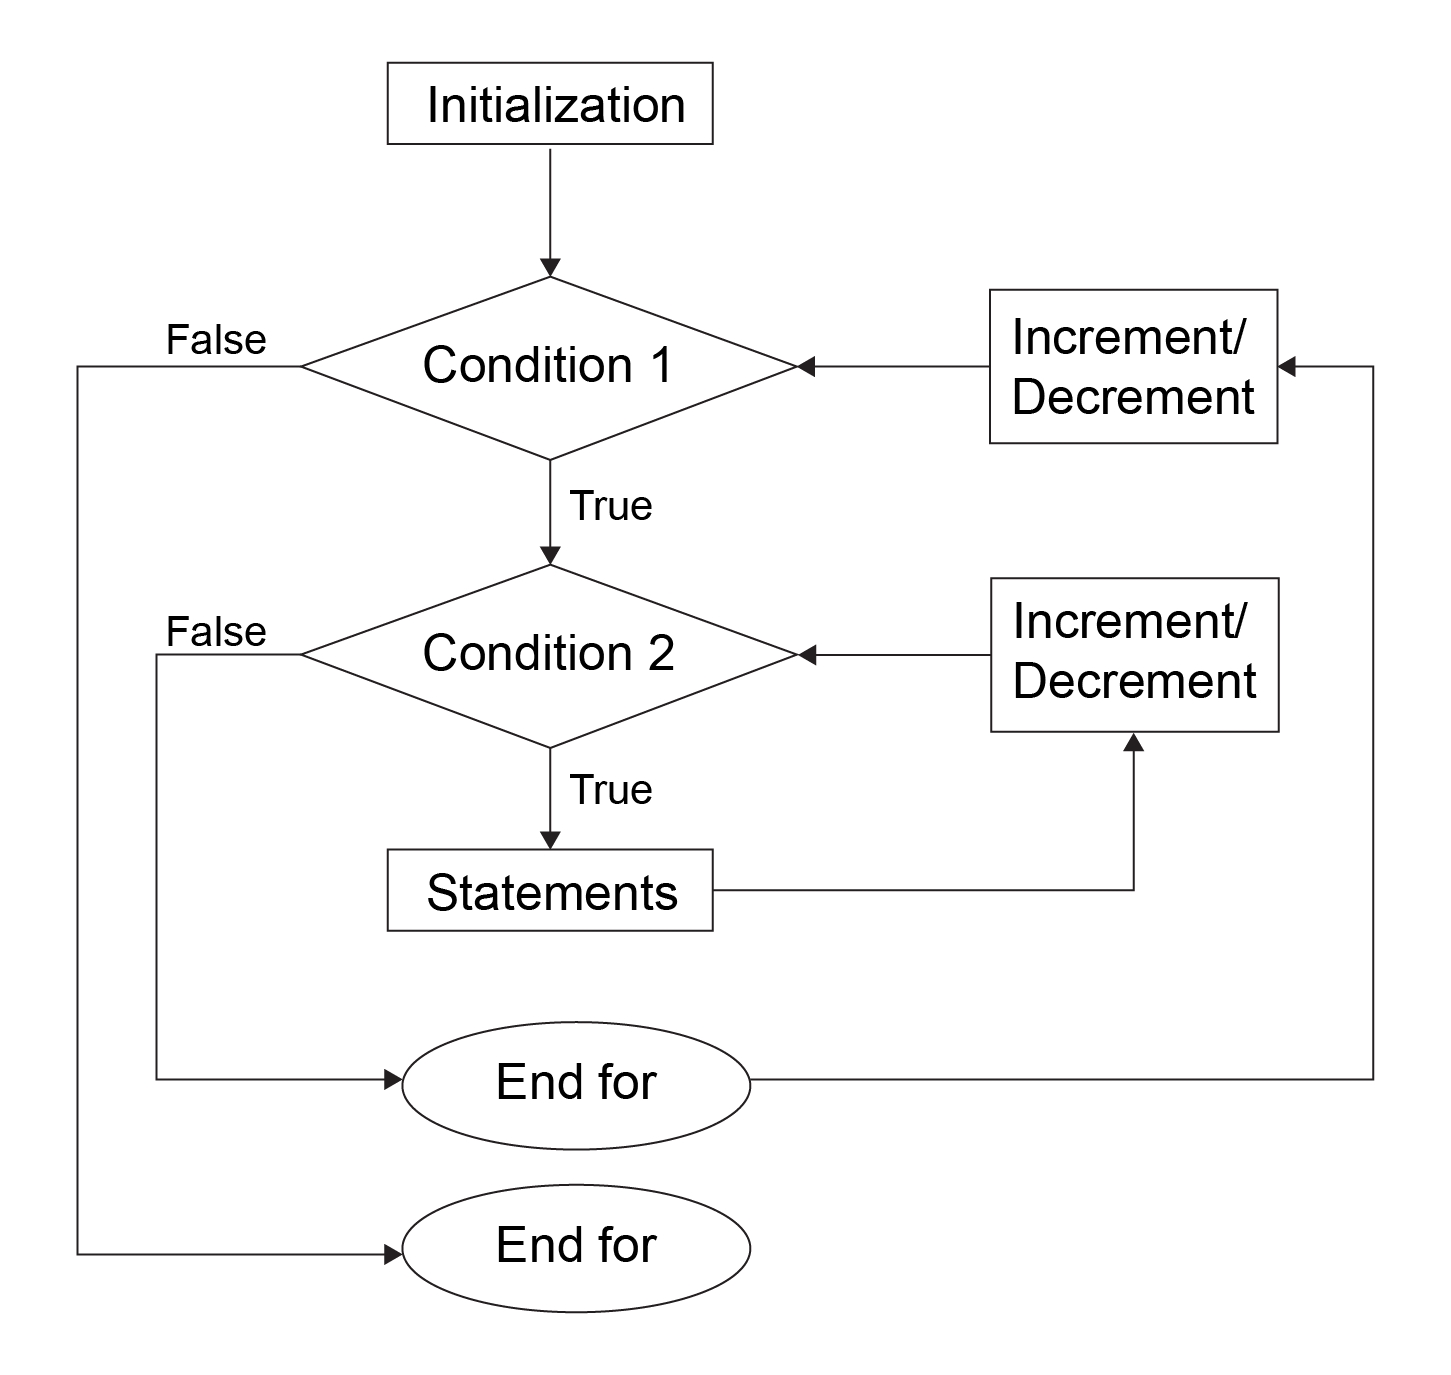
Figure 1.8: Nested for loop
Using the following example, let's explore how a nested for loop works and print a reverse half-triangle on the console:
#include <iostream>
int main()
{
  for (int x = 0; x < 5; x++){
    for (int y = 5; y > x; y--){
      std::cout << "*";
    }
    std::cout <<"\n" ;
  }
}
Output:
*****
****
***
**
*Another iteration statement is the while loop. It is simpler than the for loop. The syntax for it is as follows:
while (condition) statement;
It repeats the statement until the condition is met. When the condition is not true anymore, the loop ends and the program continues its execution right after the loop:
A similar loop is the do-while loop, where the condition is checked after the execution of the statement, instead of before. It uses the following syntax:
do statement while (condition);
It guarantees at least one execution of the statement, even though the condition never evaluates to true.
The break keyword is used to end a loop independently, regardless of whether it fulfils its condition. In the following program, when condition2 becomes true, the break statement will immediately terminate the while loop:
while (condition1){
    statement1;
    if (condition2)
        break;
}
Alternatively, the continue statement is used to skip the rest of the body's loop in the current iteration. In the following example, when condition2 evaluates to true, continue is called, causing the program to reach the end of the loop, skipping statement2 and continuing with the next iteration:
while (condition1){
    statement1;
    if (condition2)
        continue;
    statement2;
}During the execution of a program, an anomaly may occur. We refer to these runtime problems as exceptions, and they represent the response to an exceptional circumstance that arises outside of the normal functioning of a program. Designing code that's resilient to errors is one of the hardest things a programmer has to deal with.
Exceptions are generally thrown using the throw keyword when something that cannot be handled is encountered by the program. This is also referred to as raising an exception.
The try keyword is followed by a block containing statements that might throw one or more exceptions. These exceptions can be caught by one or more catch clauses, which are sequentially listed after the try block. The syntax for this is as follows:
try {
  statement1;
} catch (exception-declaration1) {
  statement2;
} catch (exception-declaration2) {
  statement3;
}
...
A catch block consists of the catch keyword, the exception declaration, and a block. Based on the exception thrown inside the try block, one catch clause is selected and the corresponding block is executed. Once the catch block has terminated, the program continues its execution with the statement following the last catch clause.
Let's examine the following example to understand how try-catch conditional statements handle exceptions:
#include <iostream>
int main()
{
  int x = 10;
  try {
    std::cout << "Inside try block" << std::endl;
    if (x > 0) // True
    {
      throw x;// Following statement will be skipped
      std::cout << "After throw keyword" << std::endl;
    }
  }
  catch (int x ) {
    std::cout << "Inside catch block: Exception found" << std::endl;
  }
  std::cout << "Outside try-catch block" << std::endl;
}
Output:
Inside try block
Inside catch block: Exception found
Outside try-catch blockIn this exercise, we will discuss using the if statement and a for loop to count our magic number. Here, we will be trying to find all numbers that are divisible by 3, ranging from 1 to 30.
Now, let's perform the following steps:
Import all the required header files:
#include <iostream>
We need to store the number of times a number is divisible by 3 in a counter. For this reason, we define and initialize the count variable to 0:
unsigned count = 0;
Now, we will use a for loop that produces values from 1 to 30 so that we can check whether they are divisible by 3 or not:
for(unsigned x = 1; x <= 30; x++){
}
Finally, we will check in the body of the for loop by using an if statement and the expression x%3 == 0, which evaluates to true if the division has a remainder equal to 0:
if (x%3 == 0) {
  count++;
}
If the previous condition returns to true, then the X variable is divisible by 3 and we can increment the counter.
Finally, we can print count:
std::cout << count << std::endl;
Bonus exercises:
Find how many numbers are divisible by 11 within the range of 1 to 100
Print all the numbers that are not divisible by 3 within the range of 1 to 30
In the following activity, we will use a while loop and implement the previous concept from the earlier exercise to print the numbers between 1 and 100 that are divisible by 7.
Now, let's rewrite the previous code using a while loop in the following way:
Create a variable of the unsigned type.
Now, write the logic to print the numbers that are divisible by 7 using the while loop.
Then, we have to increase the value of i after each iteration. Use the following code:
i++;
An array is a data structure containing a series of elements of the same type that have been placed in contiguous memory locations that can be individually accessed by their position.
Arrays have fixed sizes and cannot be extended; this contributes to their runtime performance, with a cost in terms of limited flexibility.
Like any other variable, arrays need to be declared before they can be used. An array declaration has the following form:
type name [elements];
Here, type is the type of the contained elements, name is the identifier of the array variable, and elements is the length of the array, so it signifies the number of elements contained within.
The term elements needs to be a constant expressions that is known at compile time, since that is the time when the array size is evaluated to determine the dimension of the block of static memory to allocate.
When an array is declared, its content is left undetermined, which means that the elements are not set to any specific value. This is often confusing for programmers as you might expect that the elements are initialized to the default value for the array type.
Array elements can be specifically initialized at declaration time by enclosing these initial values in braces:
int foo [5] = { 1, 2, 11, 15, 1989 };When we initialize a list array, we can also omit its length as it will be determined by the number of values provided. The following declaration is equivalent to the previous one:
int foo [] = { 1, 2, 11, 15, 1989 };If the number of elements is provided, but the array is initialized with fewer elements, then the remaining value will be zero-initialized, for example:
int foo [5] = { 1, 2, 11 };The previous code is equivalent to the following:
int foo [5] = { 1, 2, 11, 0, 0 };The values of an array can be accessed in the same way as any other values of the same type. The following is the syntax to access an array:
name[index]
An element of an array can be accessed to store a new element or to read its value.
For example, the following statement updates the value at position 4 of the previously declared array named foo:
foo [4] = 15
The following is used to copy the content of the element at position 2 into a new variable:
int x = foo [2]
It is important to notice that the elements at positions 4 and 2 refer to the fifth and third elements, respectively. This is due to the fact that indexing starts from 0. The following diagram illustrates how index entries work in arrays:
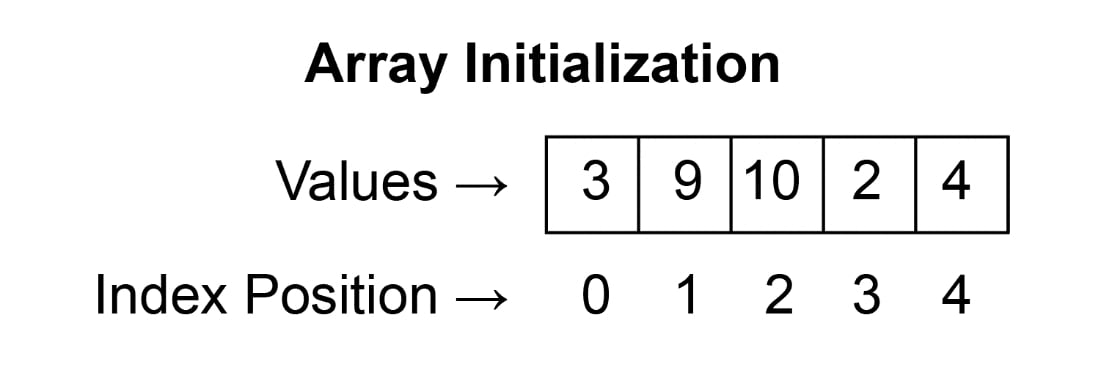
Figure 1.9: Initializing a one-dimensional array
Exceeding the valid range of indices for an array is syntactically correct, so the compiler will not produce any errors. Accessing an array out of bounds in C++ is considered an undefined behavior, which means that the code's behavior is not prescribed by the language specification. This can result in runtime errors such as bugs caused by access to an unallocated location in memory or program termination (segmentation fault) due to an attempt to access memory not owned by the program.
Multidimensional arrays are commonly described as arrays of arrays, where an array's elements are other arrays.
The following syntax illustrates a bi-dimensional array:
type name [n][m];
int bi_array [3][4]
Here, n is the dimension of the array and m is the dimension of its elements.
Typically, in a bi-dimensional array like the previous one, the first dimension is referred to as the row and the second one is referred to as the column.
Multidimensional arrays are not limited to two dimensions; they can have as many dimensions as needed, but keep in mind that the memory that's used increases exponentially with each dimension. Similar to one-dimensional arrays, multidimensional arrays can be initialized by specifying a list of initializers, one for each row. Let's examine the following code:
#include <iostream>
int main()
{
  int foo [3][5] = {{ 1, 2, 11, 15, 1989 }, { 0, 7, 1, 5, 19 }, { 9, 6, 131, 1, 2 }};
  for (int x = 0; x < 3; x++)
  {
    for (int y = 0; y < 5; y++)
    {
      std::cout <<"Array element at [" << x << "]" << "[" << y << "]: "<< foo[x][y] << std::endl;
    }
  }
}
Output:
Array element at [0][0]: 1
Array element at [0][1]: 2
Array element at [0][2]: 11
Array element at [0][3]: 15
Array element at [0][4]: 1989
Array element at [1][0]: 0
Array element at [1][1]: 7
Array element at [1][2]: 1
Array element at [1][3]: 5
Array element at [1][4]: 19
Array element at [2][0]: 9
Array element at [2][1]: 6
Array element at [2][2]: 131
Array element at [2][3]: 1
Array element at [2][4]: 2
Alternatively, since the compiler can infer the length of the internal arrays from the definition, the nested braces are optional and provided only for readability:
int foo [3][5] = {1, 2, 11, 15, 1989, 0, 7, 1, 5, 19, 9, 6, 131, 1, 2};In this section, we will define a bi-dimensional array (3x3) of type integer and write a program to assign each element the addition of their corresponding index entries in the array:
Define an array of integers of size 3x3.
Iterate over each element of the array using a nested for loop and assign the product values x and y to the index.
In this chapter, we saw the basic structure and syntax of the language. We started with an overview of the compilation model, the process of transforming C++ source code into an executable program. We wrote, compiled, and ran our first program, a simple main function that successfully returns an exit/return code.
We described the built-in arithmetic types that the language offers.
We learned how to declare and define variable names, and what the difference is between references and pointers. We also saw the use of the const qualifier and its advantages.
Furthermore, we talked about control flow statements and how to exploit them to perform more complex actions.
Finally, we presented arrays and multidimensional arrays, and the operation to perform to initialize them and access their values. In the next chapter, we will learn what functions in C++ are, and how and why we should use them in our code.


