


LINQPad is a free IDE (Integrated Development Environment) that allows you to create programs and query databases. You might already be using software such as Microsoft Visual Studio or Microsoft SQL Management Studio. As such, LINQPad does not replace them (even if you could for some scenarios). Instead, it complements them as a handy tool. As its name suggests, LINQPad's main purpose is to write and run LINQ queries, but it can also execute C# or VB scripts directly from its editor.
In this chapter we will cover the following topics:
Download and install LINQPad
Discover LINQPad interface
Learn how to configure LINQPad
To download LINQPad, go to http://www.linqpad.net in your browser and click on the big download button in the upper-right corner.
Once the setup file has been downloaded, execute it and proceed with the installation, which is pretty straightforward. Unless you have custom preferences, you can leave the default options of the installer.
You can also download other versions of LINQPad. For example, you can find a 64-bit version available (which is especially useful with queries that require more than 3 Gb memory) or the next beta version that might have a feature or a fix that you need.
While most of LINQPad is free, you can buy either a Pro or Premium edition. These two editions are exactly the same as the free one, except with more options. For example, the Pro version will set the editor closer to what you might know in Visual Studio by adding autocompletion and tooltips information. The Premium edition will also add cross-database querying, full NuGet integration (http://nuget.org), and direct SQL database editing. You can find more details on licensing and versions on the LINQPad website.
You can now start LINQPad. This is how the startup screen looks:

The upper-left window is the connection window. Here you will create and manage your connections to your databases or other data sources, such as OData. We will start using it in Chapter 5, Databases and Relational Data.
On the lower-left are the queries and samples pane. Using this pane, you will be able to access your saved queries quickly.
The upper-right is the code editor. It is not as evolved as Visual Studio, but it has a lot of great features.
In the lower-right corner, which is not visible right now, is the result pane.
The top menus feature many commands and options. Some of them are pretty standard or self-explanatory, so we'll focus on the specific or important ones.
The file menu's main purpose is to handle LINQPad-related files (with a .linq extension). The following screenshot shows us the menu in a expanded view:
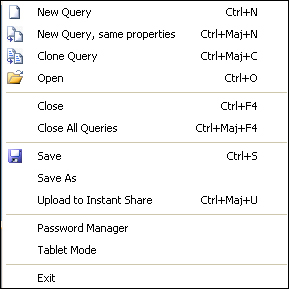
The following table gives a detailed description of the individual menu items along with the shortcut keys:
The edit menu handles standard text operations such as copy and paste, and also all of the autocompletion features. The following screenshot shows us the menu in a expanded view:
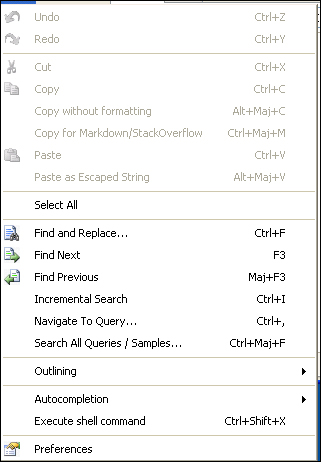
A detailed description of the individual menu items, along with the shortcut keys, is covered in the following table:
|
Menu Item |
Shortcut Key |
Description |
|---|---|---|
|
Copy without formatting |
Alt + Shift + C |
If you try to paste text that you have copied or cut into a rich text editor, such as Microsoft Word, you will also get the text style (font, color, size, and so on). If you need just the raw text, without formatting, use this option. |
|
Copy for Markdown/StackOverflow |
Ctrl + Shift + M |
Markdown is a markup language, used on www.stackoverflow.com (the best technical website to find answers and share knowledge in my opinion). So if you are asking or answering a question and need to paste formatted code, you can copy it from LINQPad using this command, and paste it as it is. |
|
Paste as Escaped String |
Alt + Shift + V |
If you have a string that needs escaping, and you don't want to lose time doing it by hand, use this option. It will escape backslash and double quote characters, add opening and closing double quotes, and format it on a 90 characters per line basis. |
|
Find and Replace… |
Ctrl + F |
Open the find and replace dialog to search for a specific string, and replace it with another one as shown in the following screenshot:.  Here is a short explanation of two specific features:
|
|
Incremental Search |
Ctrl + I |
It is really useful for simple search. Hit Ctrl + I, the cursor changes to a goggle with a down arrow. Start typing your search and while you add characters the search will refine. To get the next result, hit Ctrl + I again, and use Ctrl + Shift + I to get the previous result. By using backspace, you can correct a typo in the search. |
|
Navigate to Query |
This will open the Navigate To Query dialog. Following are the options:
Note that if you don't check either Search My Queries or Search Samples you won't get any result. | |
|
Search All Queries / Samples |
Ctrl + Shift + F |
Opens the Search All Queries & Samples dialog, which gives you more options than the Navigate To Query dialog to find the query you are looking for. |
|
Outlining | Toggle Outlining Expansion |
Ctrl + M, M |
Collapses or expands a section of code. A wide range of elements can be collapsed: class declaration, properties, methods, multiline comments, and so on. In the following example, the constructor and the Most of these keyboards shortcuts also work in Visual Studio. |
|
Outlining | Toggle All Outlining |
Ctrl + M, L |
This command expands or collapses all sections of code. It requires the Pro version at least. |
|
Autocompletion | Complete Word |
Ctrl + Space |
Automatically complete what you are typing with the selection of the members list. Require Pro version at least. |
|
Autocompletion | List Members |
Ctrl + K, L |
List possible members based on the current context. This is especially useful if you closed the list while typing and need to reopen it. Requires the Pro version at least. |
|
Autocompletion | List Just Tables and Enumerate Objects |
Ctrl + T |
Shows the Members List, but filtered to only show database tables and collections. Requires the Pro version at least. |
|
Autocompletion | Parameter Info |
Shift + Ctrl + Space |
Shows the yellow tooltip that lists the current method's signatures. Requires the Pro version at least. |
|
Autocompletion | Insert Snippet… |
Ctrl + K, X |
Insert one of the existing snippets. LINQPad supports existing Visual Studio snippets too. Requires the Premium version. |
|
Autocompletion | Surround With… |
Ctrl + K, S |
Quickly surround the selection with one of the many code blocks, such as a region, a loop, a condition, and so on. Requires the Pro version at least. |
|
Execute shell command |
Ctrl + Shift + X |
Insert in your query a call to |
The query menu deals with everything related to the current query. The following screenshot shows us the menu in expanded view:
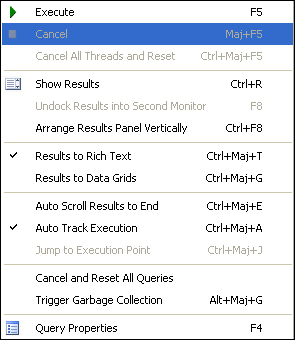
A detailed description of the individual menu items, along with the shortcut keys, is covered in the following table:
The default configuration of LINQPad is quite good and we won't need any alteration of its default for the examples of this book, but feel free to change it to match your needs or taste.
Open the Edit menu, and then choose Preferences, as shown in the following screenshot:
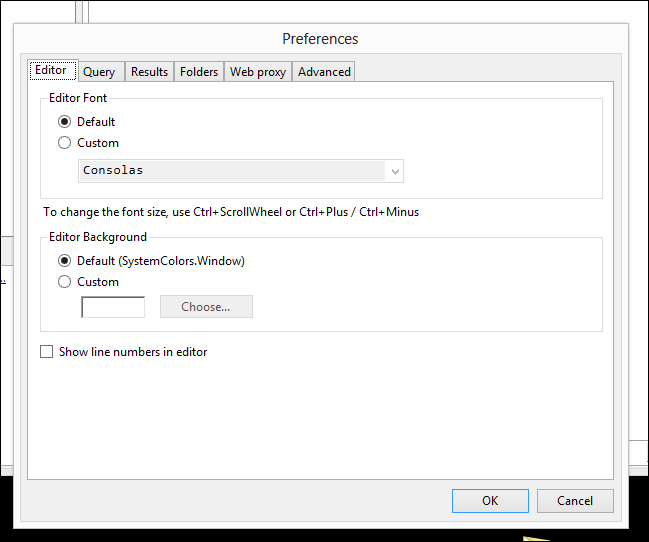
Here you can customize the visual appearance of LINQPad, such as the font, the background color, or display line numbers in the editor.
In this tab, you can set up the default query language you would like LINQPad to start with. For example, if you're like me, you realize at some point that the first thing you do is change the query type when you start a new query. It's time to change your default. You can also change the compiler's optimization options.
The results tab allows you to change the default display of the result windows, and customize the font and colors (using CSS) of the rich text display. Also, you can set a default for DateTime formatting, and increase or decrease the maximum number or rows returned in a single query (a lower number will produce faster results).
LINQPad stores your queries, snippets, and plugins in the My Document folder, inside separate subfolders, each prefixed with LINQPad. You can change this default behavior on the Folders tab. Note that when you change one of those folders, LINQPad does not copy or move the previous folder content.
The advanced tab holds specific settings, with a detailed description for every one of them. For example, you can define tab sizes (and if they need to be converted to spaces), enable MARS (Multiple Active Results Sets, see http://msdn.microsoft.com/en-us/library/h32h3abf(v=vs.80).aspx for more information on this feature) for database connections, or limit the column width of the result pane.
In this chapter, you have learned all of the basics to use LINQPad: how to set it up and how to configure it. You also discovered its menus and options. In the next chapter we are going to start using it by typing some code, see how you can use it to test your code, and see what useful feature it adds to your workflow.