


Presentations are one of the most effective ways of communicating our ideas to people who are interested in the topic. A perfect presentation will grab the attention of the audience and keep them interested in our ideas, while a bad presentation can bore our audience and ruin our reputation. This means that, the presentation creation tools play a vital role in designing a good presentation.
We used to create presentations with popular desktop programs such as Microsoft PowerPoint and Open Office Impress. Things have changed dramatically now and web-based presentations are gaining more interest from users. impress.js is one of the stand out frameworks among the web-based presentation creation libraries and tools. We are going to work on creating impressive visualizations with this framework from here on.
In this chapter, we are going to cover the following topics:
What is impress.js?
Built-in features
Beyond presentations with impress.js
Why is it important?
Downloading and configuring impress.js
Creating your first presentation
Ideally you should have basic knowledge of CSS and HTML to understand this chapter. Everything will be explained using detailed and simple examples and by the end of this chapter you will have the knowledge to create basic presentation with impress.js.
So let's get started!
impress.js is a presentation framework build upon the powerful CSS3 transformations and transitions on modern web browsers. Bartek Szopka is the creator of this amazing framework. According to the creator, the idea came to him while he was playing with CSS transformations. Prezi.com was the source that got him inspired. On w3.org we have the following mentioned about CSS transforms:
CSS transforms allows elements styled with CSS to be transformed in two-dimensional or three-dimensional space
For more information on CSS transformations for those who are interested, visit http://www.w3.org/TR/css3-transforms/.
Creating presentations with impress.js is not a difficult task once you get used to the basics of the framework. Slides in impress.js presentations are called steps and they go beyond the conventional presentation style. We can have multiple steps visible at the same time with different dimensions and effects. impress.js step designs are built upon HTML. This means we can create unlimited effects and the only limitation is your imagination.
impress.js comes with advanced support for most CSS transformations. We can combine these features to provide more advanced visualizations in modern browsers. These features are as follows:
Positioning: Elements can be placed in certain areas of the browser window enabling us to move between slides.
Scaling: Elements can be scaled up or scaled down to show an overview or a detailed view of elements.
Working on 3D space: Presentations are not limited to 2D space. All the previously mentioned effects can be applied to 3D space with the z axis.
This framework was created to build online presentations with awesome effects with the power of CSS and JavaScript. Bartek, who is the creator of this framework, mentions that it has been used for various different purposes expanding the original intention. Here are some of the most common usages of the impress.js framework:
Creating presentations
Portfolios
Sliders
Single page websites
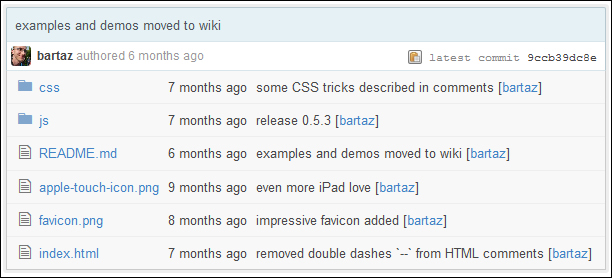
List of demos containing various types of impress.js presentations can be found at https://github.com/bartaz/impress.js/wiki/Examples-and-demos.
You must be wondering why we need to care about such a framework when we have quality presentation programs such as PowerPoint. The most important thing we need to look at is the license for impress.js. Since it is licensed under MIT and GPL we can even change the source codes to customize the framework according to our needs. Also most of the modern browsers support CSS transformations, allowing you to use impress.js, eliminating the platform dependency of presentation programs.
Both desktop-based presentations and online presentations are equally good at presenting information to the audience, but online presentations with impress.js provide a slight advantage over desktop-based presentations in terms of usability. The following are some of the drawbacks of desktop program generated presentations, compared to impress.js presentations:
Desktop presentations require a presentation creation software or presentation viewer. Therefore, it's difficult to get the same output in different operating systems.
Desktop presentations use standard slide-based techniques with a common template, while impress.js presentation slides can be designed in a wide range of ways.
Modifications are difficult in desktop-based presentations since it requires presentation creation software. impress.js presentations can be changed instantly by modifying the HTML content with a simple text editor.
Creating presentations is not just about filling our slides with a lot of information and animations. It is a creative process that needs to be planned carefully. Best practices will tell us that we should keep the slides as simple as possible with very limited information and, letting presenter do the detailed explanations.
Let's see how we can use impress.js to work with some well-known presentation design guidelines.
The audience does not have any idea about the things you are going to present prior to the start of the presentation. If your presentation is not up to standard, the audience will wonder how many boring slides are to come and what the contents are going to be. Hence, it's better to provide a preliminary slide with the outline of your presentation.
Tip
A limited number of slides and their proper placement will allow us to create a perfect outline of the presentation.
Steps in impress.js presentations are placed in 3D space and each slide is positioned relatively. Generally, we will not have an idea about how slides are placed when the presentation is on screen. You can zoom in on the steps by using the scaling feature of impress.js. In this way, we can create additional steps containing the overview of the presentation by using scaling features.
People prefer to read the most important points articles rather than huge chunks of text. It's wise to put these brief points on the slides and let the details come through your presenting skills. Since impress.js slides are created with HTML, you can easily use bullet points and various types of designs for them using CSS. You can also create each point as a separate step allowing you to use different styles for each point.
We cannot keep the audience interested just by scrolling down the presentation slides. Presentations need to be interactive and animations are great for getting the attention of the audience. Generally, we use animations for slide transitions. Even though presentation tools provide advanced animations, it's our responsibility to choose the animations wisely.
impress.js provides animation effects for moving, rotating, and scaling step transitions. We have to make sure it is used with purpose. Explaining the life cycle of a product or project is an excellent scenario for using rotation animations. So choose the type of animation that suits your presentation contents and topic.
Most people like to make the design of their presentation as cool as possible. Sometimes they get carried away and choose from the best themes available in the presentation tool. Themes provided by tools are predefined and designed to suit general purposes. Your presentation might be unique and choosing an existing theme can ruin the uniqueness. The best practice is to create your own themes for your presentations.
impress.js does not come with built-in themes. Hence there is no other option than to create a new theme from scratch. impress.js steps are different to each other unlike standard presentations, so you have the freedom to create a theme or design for each of the steps just by using some simple HTML and CSS code.
Apart from the previous points, we can use typography, images, and videos to create better designs for impress.js presentations. We have covered the background and the importance for impress.js. Now we can move on to creating real presentations using the framework throughout the next few sections.
You can obtain a copy of the impress.js library by downloading from the github page at https://github.com/bartaz/impress.js/. The downloaded .zip file contains an example demo and necessary styles in addition to the impress.js file. Extract the .zip file on to your hard drive and load the index.html on the browser to see impress.js in action. The folder structure of the downloaded .zip file is as given in the following screenshot:
Configuring impress.js is something you should be able to do quite easily. I'll walk you through the configuration process. First we have to include the impress.js file in the HTML file. It is recommended you load this file as late as possible in your document. Create a basic HTML file called chapter1.html and place the following code:
<!doctype html>
<html lang="en">
    <head>
        <title>impress.js </title>
    </head>
    <body>
        <script src="js/impress.js"></script>
    </body>
</html>
Tip
Downloading the example code
You can download the example code files for all Packt books you have purchased from your account at http://www.packtpub.com. If you purchased this book elsewhere, you can visit http://www.packtpub.com/support and register to have the files e-mailed directly to you.
We have linked the impress.js file just before the closing body tag to make sure it is loaded after all the elements in our document. Then we need to initialize the impress library to make the presentations work.
We can place the following code after the impress.js file to initialize any existing presentation in the document which is compatible with the impress library:
<script>impress().init();</script>Since we have done the setup of the impress.js library, we can move on to creating our first impressive presentation.
You might be familiar with creating presentations with software tools that provides a slide-by-slide view. Presenting on a web browser is completely different from standard slideshows. We have an infinite space to position the slides in web-based presentations where as we get slide after slide in software-based presentations. Unless we plan the design of the presentations slides in a creative way, we are going have problems using presentations with impress.js.
Note
Get a pencil and paper and design your presentation without using tools on your computer. Using a computer to design will limit our creative thinking capabilities.
Let's plan the design for a basic presentation to learn how to use the impress.js library. Once we have the design in mind, it's better to create an outline of the presentation with exact positions of the slides, as shown in the following diagram:
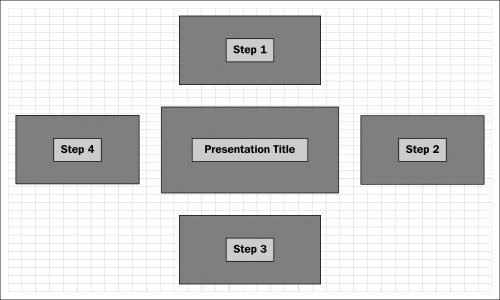
We are going to use five slides for the presentation including the slide with the title. The title of the presentation will be the first slide and it will be placed in the center of the screen. The remaining four slides will be positioned around the first slide at a 90 degree angle allowing the presentation to flow in a circular path. Keeping the design in mind let's start learning about the impress.js elements necessary to create a presentation.
impress.js uses predefined ID's and classes to identify the components in the presentation. Every step of the presentation should be wrapped inside a container with the ID impress and should have a CSS class called step to identify it as a single slide. Here is how a slide will be coded inside the #impress container:
<div id="impress">
            <div class="step">Slide Content</div>
</div>
The title of the presentation will be the first step of our presentation. According to the design the first step is positioned in the center of the screen and it will be larger than the steps around it. Let's create the first slide using the data attributes mentioned earlier:
<div id="impress">
<div id="intro" class="step slide" data-x="-1000" data-y="-1000" data-scale="3">
    <div><h2 class="title1">Building Impressive Presentations</h2>
    <h3 class="title1">with</h3>
    <h3 class="title2">Impress.js</h3>
    </div>
    </div></div>
We can assign a unique ID to each step and the ID can be used in the URL to point directly to a specific step. The first slide can be accessed directly by using #/intro. It will default to #/step-N in scenarios where the ID is omitted. Here N is the step number.
Tip
The ordering of the steps is important when creating impress.js presentations. The presentation will start with the immediate step element after the #impress container. Therefore, you need to place each step in the order you want it to appear on the presentation.
These steps then need to be positioned in the presentation canvas. Data attributes of impress.js can be defined in the step element. We have used the data-x, data-y, and data-scale attributes for the first slide. We have used -1000 for both data-x and data-y attributes. Hence the first slide will be positioned at -1000 px in the x axis and -1000 px in the y axis in the presentation canvas. impress.js uses the HTML data attributes for adding effects and necessary configurations. You can learn more about HTML5 data attributes at http://www.w3.org/TR/2011/WD-html5-20110525/elements.html.
Each step can be scaled using the data-scale attribute which is set to 1 by default. This is similar to the zoom-in and zoom-out features of the web browser. We wanted to make the first step relatively large compared to the other steps. The first step has been scaled three times as compared to the other steps. The next step is going to be on the default scale, so stepping the transition from the first step to the next one can be considered as a zoom-out since the steps are scaled from 3 to 1. Scaling from 1 to 3 will provide the zoom-in feature when necessary.
The first step has been configured successfully and now we can focus on the contents. These steps are built using HTML elements and hence we can use any design inside the presentation steps. We have separated the presentation title contents into three heading tags with different CSS classes. You also might have noted that we have used another class called slide for the steps. The step class is for identifying the steps in the presentation. Thus we are going to use a different class called slide to specify the common styles for all the steps. Styles can be applied on individual steps by providing CSS for the ID in cases where you need custom styles for specific steps.
A demo presentation provided in the downloaded files contains a stylesheet called impress-demo.css for styling the sample presentation. It is not required to use that stylesheet and the creator of impress.js strongly recommends creating your own style files for new presentations.
Note
impress.js doesn't depend on any external stylesheet. The script adds all the styles it needs for the presentation to work.
First take a look at the demo CSS file to get an idea about how the styles are defined. Then, create a new styles file called styles.css. We are going to use common element styles to reset the element styles. Here is how the styles are defined for the slide class in our CSS file:
.slide {
    display: block;
    width: 1000px;
    height: 700px;
    border-left:25px solid #eee;
    color:#fff;
}
Each step has been given a specific width and height to make it consistent. We can design the steps in different sizes unlike most presentation tools. It's up to you to choose the specific dimensions for certain steps. Styles used to design the contents of the first step are self explanatory and anyone with basic CSS knowledge will be able to understand. Look for the #intro section in the styles.css file for specific styles used for the first step.
Step 1 needs to be created after the step with the presentation title. Step 1 is located on top of the title step, so the data-x value will remain the same and we need to adjust the data-y value to position Step 1.
We had -1000 for the data-y value of the title step. Since we are moving towards the top of screen the y value needs to be decreased. The code for the Step 1 slide with the data-y value of -2500 px will be as follows:
<div id="guidelines" class="step slide" data-x="-1000" data-y="-2500" >
<div class="round"><p>Step 1</p></div>
</div>
Apart from the data-x and data-y values, make sure that you include the step class for identifying it as a step, and a slide class for common styles for steps. The rest of the HTML content contains the step data used for the presentation and has no relation with the framework. Custom styles for Step 1 can be found under # guidelines ID of the style.css file.
Step 2 is going to be different to the previous step according to our planned design. All the steps apart from the title are placed in a circular path. Rotations can be used to move the steps in a circular path. The contents of Step 2 will be angled by 90 degree to get the circular path. Consider the following code for the Step 2 slide in our design:
<div id="graphic" class="step slide" data-x="1000" data-y="-1500" data-rotate="90">

    <div class="round">Step 2</div>
    </div>
Step 2 is positioned to the right of title and the data-x value increases from left to right of your screen. We have thus increased the data-x value from -1000 to 1000. Then we need to rotate the slide by 90 degrees in the slide transition process. impress.js provides the data-rotate attribute to define rotation angles. In this scenario, steps are rotated around the z axis and we can use either data-rotate-z or data-rotate to define the rotations. The rest of the HTML code is the contents of the step and the relative styles can be found in the #graphic section of the style.css file.
The remaining two steps are similar to the step we just discussed. We need to adjust the data-x and data-y values to get the proper placement according to our original design plan.
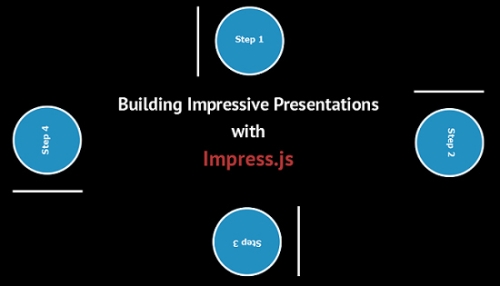
Generally, all the steps will be positioned relative to each other. Unless we have considerable space between the steps, it is possible to get issues displaying during the presentation. The following screen shows the presentation in the earlier scenario:

We are looking at the first step with the title of the presentation and the contents of other steps which are displayed partially. This is one of the problems we face when positioning steps on an infinite screen and we can solve this issue by using simple CSS codes.
There are some CSS classes assigned to the body element by impress.js during the various processes. Once the presentation is initialized the impress-enabled class will be added to the body element. First we hide all the steps by using the following CSS code:
.impress-enabled .step {
    margin: 0;
    opacity: 0;
}
We have used the opacity attribute for hiding the steps in the default view. Alternatively, we can use the visibility attribute instead of opacity. Setting the margins for steps is optional and you can define your own margin values to suit the presentation. Once the presentation is started, the active step is given a class called active. Hence we can display just the active slide and hide all the other steps using the following simple CSS code:
.impress-enabled .step.active { opacity: 1;border:none; }Now we have all the individual styles of the presentation. Creating an overview is very important for the people in the audience as well as for the presenter to know exactly where you are in the presentation. Overview can be considered as a step containing all the other steps. The content of the overview step is intentionally kept blank as follows:
<div id="overview" class="step" data-x="-1000" data-y="-1500" data-scale="5"> </div>The impress.js framework allows you to scale steps using the data-scale attribute. All the steps apart from the title will be considered scale 1 since we haven't specified the data-scale attribute. Overview uses a data-scale value of 5 and it will be five times larger than the other steps. When you increase the scale, more detailed information and steps will be displayed on screen.
Consider the following screen for the overview of our presentation:
Overview doesn't have any information and shows all the steps in our presentation. We can allow users to click on steps from the overview and directly load the step on the screen. By default, the overview is also considered as a step and it will be clickable. Hence we need to first disable clicking on the overview by hiding it using CSS:
#overview { display: none }Now the other steps in overview should be directly accessible. We can enhance the user experience by showing a cursor pointer to the step links using the following code block:
.impress-on-overview .step {
    opacity: 1;
    cursor: pointer;
}
I have kept the overview step at the end of the presentation for explanation purposes. You can make overview the first slide if necessary.
We now have a completed version of our first impressive presentation. Open the chapter1.html file in the web browser and use the arrow keys or Space bar to run the presentation. Impress presentations use the complete browser space to run presentations by default. We will be discussing how we can limit the scope of impress presentations to a specific portion of a web page in the upcoming chapters.
We started this chapter by looking at the background of the impress.js framework and how it was created. Then we talked about the importance of impress.js in creating web-based presentations and various types of usage beyond presentations.
Then we obtained a copy of the framework from the official github page and completed the setup. Finally we created a basic impress.js presentation by explaining the structure of the presentation and effects.
We have covered most of the basics of this framework during the chapter. Now you should be able to create and design a simple presentation using the impress.js framework. In the next chapter, we will be looking at the effects of impress.js in detail and how to combine those effects to produce better presentations.
So stay tuned to create amazing effects with impress.js in the next chapter.

