


Making a website using the Squarespace platform is one of the easiest and most cost-effective ways to create a professional, polished website in a short amount of time. However, starting any website project without doing the groundwork can lead to confusion, missed deadlines, and just plain bad websites. This chapter covers everything you need to do before you even sign up for Squarespace to ensure that your website project is successful. We will cover the following topics in this chapter:
The right way to make a website
The different components of a website
How to create an effective Website Toolkit, which includes the following:
Writing your website plan
Creating idea boards
Creating your sitemap
Gathering your raw materials
Constructing a website is a lot like constructing a building, and many of the steps and processes are similar conceptually. To construct a building, we first need to consider what type of building it will be: a hospital, shop, house, office, or any other building. Who will use it? What functions will be performed there? This will tell us what shape, size, and structure the building needs to take. We then need to gather our raw materials before the construction can start. Once we have put together the shell and framework, we can start installing the core elements, such as plumbing and fixtures, which make the building operational. Finally, we apply the paint and furnishings and are ready for the opening day.
These are the same steps we will use in this book to construct your website. First, we will set the main objectives for your site, its purpose, your audience, and the types of functions that visitors will perform there. Next, we will gather the materials needed to create your site, such as text, images, and graphic elements. We will then select a site template, fill the template with your content, and customize the site's appearance, thus making it ready for launch.
This chapter focuses on the first two parts of the process: defining your site and gathering references and materials. These two parts make up your Website Toolkit, and you will refer back to the Toolkit time and time again throughout the project. You might find it tempting to skip ahead to the hands-on parts of the book. This is understandable, but be warned; every building needs a solid foundation, and every successful website needs a solid Website Toolkit. Starting here and spending time getting your foundation right will really pay off later.
Tip
A good Website Toolkit will make the rest of the project easier and quicker, keep you focused, and help smooth the road when things get bumpy (and they will get bumpy). Don't rush through this part of the process.
You might also be tempted to jump around and perform the steps in a different order. Just remember: you wouldn't paint the walls before installing the electricity in a building. Likewise, it doesn't make sense to focus on font sizes and fine-tuning colors before you have a site framework with some content in it. Now, if you have ever worked with a design agency on a website project, this may sound different to the order of their process. This book is laid out in this way because you are probably not a web designer by trade, and you don't need to impress your client with pretty visuals to win the contract.
If you are a designer, feel free to use this book in the manner that makes the most sense to your business model. However, for all the non-designers out there, following the order laid out in this book will make it far more likely that you launch your site on time, in full working order. It's easy to get bogged down in design details, so we'll leave this until the end, ensuring that all the major elements are sorted first.
Before we dive into building your Website Toolkit, let's start by breaking down a website into components so that you can better understand how to make one. Each component is distinct, but some are closely related to one another, and it's easy to mix them up. The sum total of all the components put together makes up the process of designing and building a website, which is the final goal of this book.
Structure refers to the way in which the different elements of a web page or website are put together. In the web industry, we often use tools such as sitemaps and wireframes to define a site's structure. A sitemap is simply an outline that shows the hierarchy of web pages in terms of navigation. You can think of a sitemap like a table of contents in a book, or an organizational chart.
A wireframe is a schematic drawing of a web page, showing where the main elements of the page sit. Wireframes show only the relative size and position of content and functions; they do not include visual elements such as color or images nor do they contain real blocks of text. You can think of a wireframe like a pencil sketch.
A function is an action-oriented part of a website, for example, a shopping cart, inquiry form, or downloads. Functions always relate to actions that we want our website users to perform, and it's important to know from the beginning what these are and what priority each function has. Functions are enabled and restricted by the technology we use. So, in our case, the set of functions available to us is defined by what is possible using the Squarespace system.
This one is pretty self-explanatory. The content of a website refers to the text and other media (such as PDFs or videos) that sit within each web page. Sometimes, the content will be provided by someone other than you, such as a marketing or communications staff member, or from a third party, such as a photographer, stock photo agency, or copywriter. Often, the content will need to be reformatted or reworked in order to make it suitable for use on a website.
Many people would refer to aesthetics as design. However, other components such as structure (the size and placement of things) and content (photographs or length of text) also play a role in design. Therefore, it's easier to keep things distinct if we avoid this term, which can be broadly interpreted, and instead narrow our focus down to the way things look and feel. This means we are talking about colors, fonts, and graphic elements such as lines and patterns, not content or structure. The feel part of look and feel is quite important but harder to define. This is the tricky bit: it refers to how the website appeals to your emotions. Authoritative, refreshing, playful, vibrant, or zen are just a few examples of emotive words that can describe a site's feel or overall impression. These words will be critical in helping you choose colors, fonts, and other visual elements to fit with your desired impression. They will also play a role in content choices such as types of photography, tone of voice, and writing style.
Now that we understand the different components of a website, we can start to lay out the project plan or roadmap for this project. Your website plan keeps you focused, ensures that your messages are right, and sets the overall direction of your project. Your website plan is one of the most important parts of your Website Toolkit, so take your time on it, get it right, and keep it close to hand so that you can refer back to it easily.
Tip
You can download a sample website plan template from this book's support bundle page on the http://www.packtpub.com/support website.
The website plan is laid out for you in the following sections, along with some sample answers and helpful questions to ask yourself so that you can ensure that you are on the right track when writing yours. Some of this information may already be available in your business, such as within your branding guidelines or annual reports. Don't just leave it there; put it into your website plan. For smaller businesses or those without such documents, there's no time like the present to sharpen up the way you communicate about your business, so let's get started. Many of the items included here can be used for other communication projects too.
The first section of your website plan summarizes your business and how it should be presented online.
Describe your business in 2-3 sentences. Focus on what you do, what makes you different, and what your strongest selling points are. What are the key reasons your customers choose you instead of the competition?
Here's an example: Floribunda is a boutique florist that specializes in supplying unusual varieties of flowers to the wedding and catering trade. We create truly unique and distinctive arrangements by including colors and types of flowers that aren't available through any other florist in the tri-county area. Unlike other local florists, we have direct links with the best growers and only ever select the freshest, highest quality blooms.
Now, condense it down even further: does your business have a slogan or strapline that clearly defines what you offer in terms of uniqueness, benefits, or features? If not, you may find it useful to write one, as it will come in handy for your website. Ensure that it is no more than 10 words long, and open up thesaurus.com if you need word inspiration. Think about some of your favorite brands and the kinds of short, punchy phrases they use to communicate about their business.
The following are some examples:
List your company's brand values. If you don't have some already, think about how you would like your business to be perceived and list 4-5 descriptive words or phrases that you want people to feel about your business when they encounter your website.
Some examples are fresh, confident, down to earth, powerful, simple, rational, fun, energetic, cheeky, inexpensive, relaxed, quirky, luxurious, trustworthy, edgy, youthful, and refined.
This section describes who will be coming to your website and why.
Describe your typical customers. Pay special attention to their demographics (income, interests, gender, and age) and comfort with technology. If your website is a business-to-business site, exactly what sort of companies are you hoping to attract, and which level and type of staff members will access your site? If you have more than one type of customer, split them into primary and secondary audiences.
It may help you to think about your customer as a single individual, including his/her life experiences, job, favorite TV shows, brands, or books. How often does s/he go online, and what websites does s/he visit? In the web industry, we call this a user persona, and we always think about what this person would want or do, whenever we are developing the site.
What is the main reason that your target customers would come to your website? What action do you want them to perform? If there is more than one desired outcome, please prioritize them.
Some examples include buying a product, joining your online community, downloading a brochure, sending an enquiry, or calling your company.
The About your website part of your website plan helps you focus on what you want your website to do and includes some considerations you may need to take into account for this project.
What are the main goals you have for your website? What business objectives are you hoping to meet through this project? If this website will be replacing your old site, what do you want to be different/better about this one?
Some examples include generating sales, increasing leads, improving brand awareness, and reducing emails to your customer support team.
Thinking about your customers and the primary purpose described in the previous section, list the functions that your website will need to perform, in order of priority.
Some examples are: online shop, newsletter signup, RSS feed, and calendar of events.
Briefly summarize the source, volume, and type of content for your site. Where will the content (text, images, downloadable files, videos) come from? Approximately how much content do you have in terms of number of pages? Is it available now? If not, when will it be ready? If it's coming from an existing source, will it need to be adjusted in any way to make it fit for your website?
Tip
A content preparation checklist is included in this book's support bundle on the http://www.packtpub.com/support website.
The last part of your website plan is about the logistics of this project.
Who will be involved in this project, and what role will each person play? Even if you are doing this on your own, it's useful for you to note the project roles, because you will need to allow time for them in your schedule.
Some role examples are: final decision maker, content provider, proofreader, tester, designer, copywriter, cost approver, and project manager.
When do you want your website to go live? Are there any key dates to bear in mind (for example, big meetings or holidays)? Setting a realistic timeline is important, and the amount of time your project will take depends on many variables. When setting your target date, review what you have written in your plan so far, as follows:
Content: How ready is it? Always allow time to reformat and adjust it.
Functions: How many and how complex are they? For example, if you need to set up an online shop, think about how many products you will need to configure.
Team: Will everyone you need be available at the drop of a hat?
Remember to factor in your own availability or any other restrictions. Based on all of this, you should be able to come up with an estimated date. Now, add 30 percent extra time to this estimate, as contingency. Put this date in your calendar… in pencil.
What is your budget for this project? You will need to budget for your Squarespace subscription, domain name (Squarespace includes one for free if you pay your subscription annually), and you might also want to set aside some money for things such as stock photo licenses and logo design. Remember, you don't need web hosting with Squarespace, so you won't need to budget for that.
Now that you have your website plan and you know where you are headed, the next steps are to do some research and put together the rest of your Website Toolkit. The following sections can be carried out in any order, with some parts leading naturally to others as you work.
An idea board is a collection of ideas or inspiration that you can use as reference when creating your site. An idea board is similar to the concept of a mood board in fashion or interior design, but you will use them for more than just inspiration on color and style (mood), and ideally, you should have multiple boards for your website project.
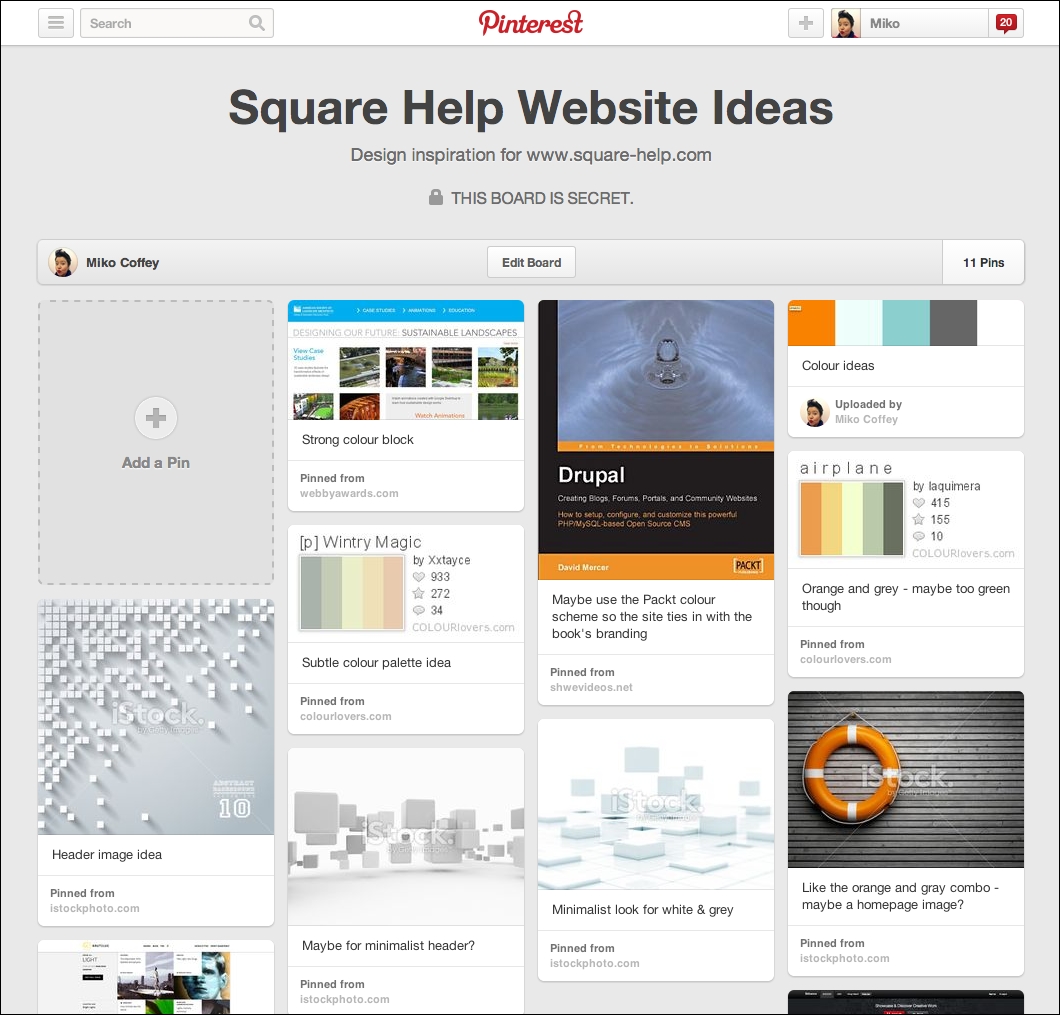
Online tools such as https://www.pinterest.com/ or https://evernote.com/ allow you to collect things from around the Web and store them in different boards (Pinterest) or notebooks (Evernote). Although Pinterest is the easiest to use, Evernote allows you to store screen grabs with annotations such as arrows or circles, in addition to photos and web links. Either tool will work for your website project idea boards. The following screenshot example shows a private Pinterest board that was used for planning the http://www.square-help.com/ website:
Your idea boards will be used for the work we'll do in the rest of this book, so it's a good idea to start them now and continue to add to them and edit them as you move through the early stages of your project.
Just as an architect studies existing buildings and draws upon them for inspiration, I encourage you to start your research by looking at other websites to find out what you like and what you think would work well for your target audience.
Tip
Visit http://winners.webbyawards.com and check out the winners in the Best Practice, Best User Experience, and Best Visual Design categories for inspiration of websites to help inspire you.
When looking at other websites, remember the four components of a website: structure, content, function, and aesthetics. If you find a site you like, mentally break it down into these components and try to figure out exactly why you like the site. Which of the four components are really working well on the site?
Play close attention to the following:
Call to action: Is it clear what action the website owners want site visitors to perform?
Page elements: Does the page have a clearly defined header, navigation area (possibly more than one), body, footer, and/or sidebar that would work well on your site?
Audience fit: What elements of the site make it work well for its target audience?
Brand image and perception: What emotive words do you feel when you look at the site? How does the choice of words, images, and aesthetics support this?
Tip
Keep good, clear notes in your idea boards. Consider creating an idea board for each of the four different website components, or add a text note or screen grab that shows what component(s) you like when you add the site to your idea board so that you can easily remember them later.
Don't just look at your competitors' sites; doing so means you will likely focus too much on content alone. Try to expand your research into other categories. After all, your target customers are probably visiting a wide variety of websites.
Whereas looking at other websites is an activity that can help you narrow down your preferences, looking at things such as colors, fonts, and imagery can quickly become overwhelming and seemingly endless due to the sheer volume of choices available. We'll tackle these elements in earnest in Chapter 5, Editing, and Arranging Content in Your Web Pages, and Chapter 8, Tailoring Your Site's Look and Feel, where you'll be introduced to some resources and tools to help make things easier. For now, just make a note of any aesthetic elements you like as you go along, and be rest assured that we'll do more research and hone things down when we start building your site.
Your sitemap lays out the overall structure of your website, acting as a blueprint for building. The sitemap is the foundation of your information architecture, which is a fancy word to describe the way in which visitors move around your site. Good information architecture is essential to enable your target audience to take the desired actions on your site. If visitors can't easily find what they need, they will leave—in an instant.
Even if you start out by writing things on paper, it's a good idea to make an electronic version of your sitemap, because you will be able to copy/paste page titles directly into Squarespace later.
Some people like to use software such as Microsoft PowerPoint, Apple Keynote, or Google Drive Drawings to layout their sitemap in a flowchart (organizational chart) style. Others prefer to use a word processor and create the sitemap as a text outline. Whichever way you choose, remember the following tips.
Remember your customers' primary purpose and ensure that your site structure makes it easy for them to perform that action. Put yourself in their shoes and think about what they expect to see in your site, and where.
This is especially important if you are creating a website to replace an existing one. Don't just copy your existing site structure; take the time to revisit your site through the eyes of a customer.
You may have many or just a few pages for your website. Either way, it's worth remembering that not every page or link is created equal. You can use a footer or sidebar on your website to house links to the less important information, such as terms and conditions, newsletter signup, or delivery information.
If you have several key areas, you might want to break them down into subpages to keep each page short and sweet.
Don't use jargon or uncommon words as labels for site pages or sections. A first-time customer won't know that The Scoop is your news page, KDD Lite is the internal name for one of your services, or Gimme Gimme Gimme is your online shop section. You have less than 2 seconds to show your customers what they came for; don't make them have to think about what things mean.
Try to use common words such as Home, Shop, and Contact, because today's web users are accustomed to these labels. Unless your brand or product names are well known, consider using more general terms as labels for the pages or sections.
Even if one of your brand values is quirkiness or playfulness, you can convey this through your text, images, and visual elements—keep your navigation labels clear and concise.
One trend in website navigation is to use action words. This can make your site feel more inclusive and dynamic, and encourage your visitors to perform certain tasks. If you do this, be careful to ensure that the words are still clear and concise. The following table shows some examples:
|
Passive words |
Equivalent action words |
|---|---|
|
Newsletter |
Sign Up |
|
Store |
Go Shopping or Buy Now |
|
Enquiry Form |
Contact Us or Get In Touch |
|
About Us |
Meet the Team |
|
Location |
Find Us |
|
Membership |
Join Now |
As you go along, include any notes to yourself that you need to remember, such as cross-linking pages between sections or links to external sites such as Facebook.
You might find it easier to keep some notes in separate schematic drawings for certain pages. If so, go ahead and make some page wireframes (sketches) in addition to your sitemap. Tools such as https://moqups.com/, http://lumzy.com/, or Google Drive Drawings can create simple wireframes and are useful if you need to share your ideas or get approval from colleagues.
Once you have finished your sitemap and wireframes, have someone else look them over to sense-check. This could be a colleague or friend, ideally someone who fits your target audience.
One of the most time-consuming parts of creating your Website Toolkit is likely to be gathering your raw materials. You might have some of the materials you need already, or you might need to get them from someone else. Starting the process now rather than later in the project means you/they will have enough time to pull everything together in the right format without causing delays to your overall timeline.
Create a folder called Materials in your Website Toolkit folder. Take a moment now to run through each of the following sections, and place copies of your materials inside. If your materials are not ready yet, now is the time to get the ball rolling on sourcing and finalizing them. You don't necessarily have to have everything 100 percent complete before moving on to the next chapter, but you should definitely start gathering materials now, and continue to fine-tune things as you progress into the early stages of building your website. Refer to the content preparation checklist (included in this book's support bundle) to help with your content gathering.
If your company has a logo, approved brand colors, and fonts, you'll have a head start on your site's look and feel. If you don't have these things, don't worry; you can create them or source them inexpensively.
If you don't have a logo yet, you have a few options:
Create a text-based logo as part of your site design. There are hundreds of fonts to choose from in Squarespace, so you can simply create your logo on the fly directly in the Squarespace system as part of the designing process later.
Use Squarespace Logo (http://squarespace.com/logo) to create a simple logo design yourself. Squarespace subscribers can create a logo for free with Squarespace Logo. Alternatively, try the logo creation tool at https://www.graphicsprings.com/ to make your own logo.
Tip
We'll cover Squarespace Logo in more detail in Chapter 8, Tailoring Your Site's Look and Feel.
Pay a graphic designer to create a custom logo for you. If you don't know a designer, try an online marketplace such as http://www.guru.com/, http://99designs.com/, or https://www.freelancer.com/ to find one.
Use a stock illustration as your logo. Most of the main stock websites such as http://www.istockphoto.com/ or www.shutterstock.com offer illustrations for a very reasonable cost. Try searching for the word "logo" or "icon" in the Illustrations category. You might wish to collect a few different options on an idea board before committing to buy your final choice.
If you already have a logo or will be sourcing one, it's important to get a copy in the right format:
File format:
.pngor.jpgformatColor space: RGB or sRGB (not CMYK, which is used for print only)
Resolution: 72 dpi/ppi (pixels per inch)
Maximum dimensions: 1500 pixels wide
The dimensions and resolution are not as important as the other formatting options, as you can adjust the size in Squarespace's image editor later, if necessary.
If your company has brand colors, you will need to get the colors in the RGB or hex format. RGB (red, green, blue) is the method that backlit screens such as computer monitors or smartphones use to present colors. Hex (hexadecimal) color is a 6-digit alphanumeric way of presenting RGB colors, used in web design. Squarespace can use either RGB or hex colors.
The following is an example:
Color: dark gray
Hex: #333333
RGB: rgb (51,51,51)
Note
Store your color references in a .txt file so that you can easily copy/paste them into Squarespace later.
If you don't have brand colors or you need to source additional colors, we'll do so in Chapter 8, Tailoring Your Site's Look and Feel.
Once we start building the site, you'll be able to choose fonts from the 300+ fonts available within Squarespace, but some companies have specified fonts in their branding guidelines—and some require paid licenses for use. If your brand includes fonts such as these, you might need to source similar alternatives from the fonts that Squarespace offers, unless your brand uses Typekit fonts, which can be integrated and used on your site. We'll cover fonts in more detail in Chapter 8, Tailoring Your Site's Look and Feel. For now, make note of any special fonts associated with your brand, and find out about any licensing issues so that you'll have plenty of time to resolve them before the go-live date.
If you will be migrating content from another website to your new site or drawing from printed materials such as brochures, it's a good idea to carry out an audit of that content with your new sitemap as your guide. Regardless of whether you will be writing from scratch or reformatting the existing text, remember the following:
As a general rule, search engines prefer web pages that have at least 250 words.
Use as many words as necessary to convey your message, but keep your text focused.
Use short paragraphs and dividing elements such as subheaders and bullets to help break up long pages. Consider breaking really long pages into multiple pages.
Keep in mind your brand image and your site's desired feel when writing; ensure that your writing style, tone of voice, and choice of words reflect the image you want to convey.
If you already have photographs that you want to use on your site, do a quick review of them with your brand image and site's desired feel in mind.
Note
Unless you will be using them for very small thumbnails or icons only, all images should be at least 800 pixels on their longest side and, ideally, 1500 pixels on the longest side.
Squarespace caters for all sizes of screen, from large computer monitors to small phones, and it will resize images automatically to fit. There are also cropping and other image-adjustment tools built into Squarespace as well.
If you don't have photos yet but want to source some, have a look at http://www.istockphoto.com/, http://www.thinkstockphotos.com/, https://creativemarket.com/, or http://www.shutterstock.com/ for ideas. You should probably hold off on purchasing photos until you have selected your template in Chapter 3, Working with Squarespace Templates, but you can create a shortlist of photos in an idea board.
If you will be offering any downloadable files on your site, ensure that they are formatted in an accessible way.
Avoid file formats that will require users to have platform-specific or niche software to open them.
Squarespace does not offer video hosting or streaming, but you can embed videos hosted on other sites such as http://www.youtube.com/ or http://vimeo.com/. You can also embed streaming audio from sites such as http://soundcloud.com/ into a Squarespace web page.
You've now made a good start on creating your Website Toolkit, which will act as the foundation for everything we'll do in the rest of this book. It can take time to gather all of the materials and background research that goes into your toolkit, so don't worry if you don't have absolutely everything compiled at this stage. You can keep adding to it as we move into the next chapter and beyond.
You've done a lot of hard work so far, learning the concepts of making websites and doing your research, so have a well-deserved cup of tea before diving into Chapter 2, Getting Started with Squarespace, where we will finally get you signed up and started in the Squarespace system. We'll then introduce all of the key areas of the Squarespace interface so that you will know how to find your way around.


