


 Download code from GitHub
LibGDX's development is very powerful, and that is why we will set up a nice and stable structure to work with before jumping into the code and project structure. We will use IntelliJ IDEA to do most of our development for the simply because it's productive (and of course, there are few neat tricks to combine with LibGDX), though it's very common to use Eclipse for development too. There are other ways to set up a 3D game with LibGDX, but to start off this book; we will build the game with basic assets created by code. In this chapter, we will explain how to download and set up all the required tools to get you started with setting up an environment to build 3D games with LibGDX, and to work on desktop and Android platforms. Although LibGDX also builds for HTML (WebGL) and iOS, we won't cover these builds because they do not fit with our game, but they are as easy as the following documentation guidelines on the official site (http://libgdx.badlogicgames.com/). You will learn more about this in this chapter.
Assuming you know LibGDX, you already have the Java Development Kit (JDK) installed and the Android software development kit (SDK) updated (you need API 22 with the LibGDX version [1.6.4]); otherwise, a simple Google search will do. The steps are OS-free and we will use Windows to implement them.
We will cover the following topics in this chapter:
Downloading and installing IntelliJ IDEA
Setting up the LibGDX project and importing it to IntelliJ IDEA
Running and debugging the game
LibGDX is a Java cross-platform game development framework that released its first version in 2009. It lets you go as low-level as you want to and gives you direct access to all kinds of areas of development. It also comes with an OpenGL ES 2.0 and 3.0 wrapper interface, which is the one that lets us perform 3D development.
3D development with LibGDX already has a nice array of games under its belt already. The following screenshot shows a very popular game called Grandpa's Table, which is available on Android, iOS, and Amazon:

The following is a screenshot of an Android game named Apparatus:

The following screenshot is of the game Ingress, which is available on Android and iOS:

These are just a few of the most popular games out there.
We will not only cover as much as we can from this 3D API—to get the most of it and show a general structure for how to keep things organized and optimal—but also the use of other LibGDX tools to get the most of the framework too.
Download the latest version of IntelliJ IDEA Community Edition for Java developers from https://www.jetbrains.com/idea/download/; it will suggest the download versions compatible with your current operating system. Select the version that best suits your operating system platform, which will either be 32-bit or 64-bit.
At the time of writing this book, IntelliJ IDEA Community Edition (14.1.4) is the latest version.
At the time of writing this book, LibGDX was in version 1.6.4 and we will use that version. Download the setup app from http://libgdx.badlogicgames.com/download.html and open it:
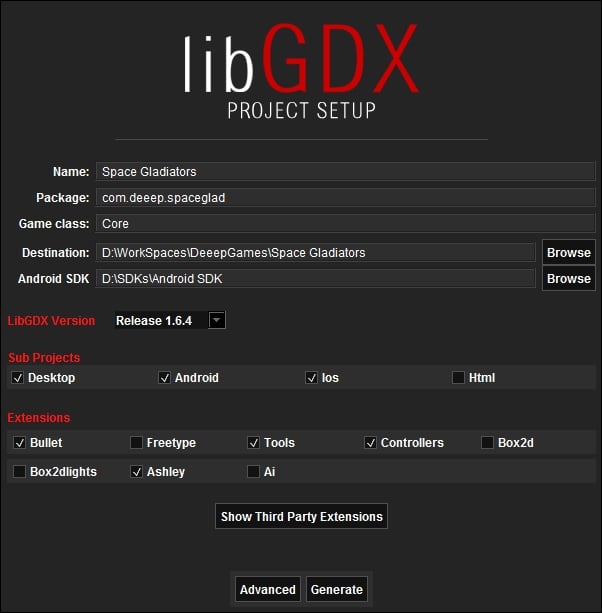
Set up your project name (ours will be called Space Gladiators) and package name (ours is com.deeep.spaceglad). Enter the game's main class name (ours is Core), set the destination path to your preferred directory, and point out the Android SDK directory location.
We will check the Desktop, Android, and iOS project, but leave out Html since we will use the Bullet physics API, which doesn't work on HTML because of the Google Web Toolkit (GWT) backend (for more information, check out http://www.badlogicgames.com/wordpress/?p=2308).
From Extensions, we'll select Bullet (Bullet physics API), Tools (Bitmap Font Generator [Hiero], 3D Particle Editor, and TexturePacker), Controllers (Controller Input API), and Ashley (Entity System API).
LibGDX comes, as you can see, with a lot of very useful tools that you should use for some time and explore them. We'll cover these selected APIs in some depth over the course of this book.
Click on Generate and wait. After it is done, open IntelliJ IDEA and click on Import Project. Go to your newly created project and look for a file called build.gradle, and IntelliJ will do everything else.
Running and debugging the app with IntelliJ IDEA is as simple as a click, but sometimes, we need to perform extra configurations on the IDE to avoid exceptions.
Once IntelliJ is done with all the processes, the default app to run will be Android. To run it, click on the Bug or Play buttons to the right of the navigation bar:
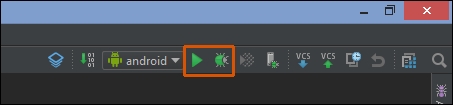
Gradle will build and the Choose Device dialog will pop up, from which you'll choose the Android device on which you'll run the app (either an emulator or a physical device), for which you just have to plug in your device.
To run the desktop app we have to change the default configuration and add the desktop launcher:

Click on android and select Edit Configurations; the Run/Debug Configurations dialog should pop up.
Click on the + icon at the top left of it and select Application.
Name it
desktop. In the Main class field, selectDesktopLauncher. For Working directory, go to your Android project and double-click theassetsfolder.Click on the Use Classpath of module field, select desktop, and then click on the OK button at the bottom.
Now instead of android at the top, you'll see desktop. You can run or debug with the two buttons to the right of it.

In this chapter, we introduced IntelliJ IDEA and its basic use; we also explained how to download and install it, and set up LibGDX Project for 3D work. We configured our work environment and launched the Android application into an actual device and the desktop application.
In the next chapter, we'll take the plunge to it and learn about LibGDX's 3D rendering API, perspective camera, 3D workflow, and more.