Download code from GitHub
Chapter 2: Building Your First BOOST Robot – Tabletop Fan
In the summers when we feel hot, a tabletop fan comes in handy! Have you ever come across a situation where you thought of having a portable tabletop fan to beat the summer heat? Let's try to build and code our own portable tabletop fan that we can take anywhere and use!
In this chapter, we will cover the following topics:
- Building the tabletop fan
- Programming the tabletop fan
- Running your tabletop fan at different speeds
- Time for a challenge
By the end of this chapter, you will have a clear idea of how to build basic robots that are similar in complexity to this tabletop fan, as well as completing basic forward-backward programming using the Scratch 3.0 programming language.
Building the tabletop fan
Before building this fan using your LEGO bricks from the LEGO BOOST kit, let's look at the elements needed to build this fan:
- BOOST Hub
- Motor
- The wings of the fan
Great! We will be building the tabletop fan shown in the following figure:

Figure 2.1 – Building a tabletop fan with a LEGO BOOST kit
Follow these steps to build this tabletop fan. Make sure that you select the right pieces from your kit, as mentioned in the building instructions:
- Take your LEGO BOOST Hub. Make sure that the BOOST Hub has fully charged batteries in it:

Figure 2.2
- Take five 4x6 bricks and stack them on the BOOST Hub, as shown here:

Figure 2.3
- Take two 1x6 plates (orange) and place them on the top of the stack:

Figure 2.4
- Now, take the external motor and mount it on the orange plates that you just attached:

Figure 2.5
- Now, take a 1/2 bush and one 3M yellow cross axle and attach them to the motor:

Figure 2.6
- Take a 2x2 round brick and insert it into the 3M axle:

Figure 2.7
- Take a 2x6 plate and attach it to the white brick with a cross:

Figure 2.8
- Take two 2x3 white plates and attach them to the 2x6 blue plate:

Figure 2.9
- Take another 2x8 plate and attach it between the two white plates. This will form the base for the fan's wings:

Figure 2.10
- Take four 2x6 black bricks with bows and attach them to the white and gray plates. These are the wings of your fan:

Figure 2.11
- Take four orange 1x2 plates and attach them to the fan's wings:

Figure 2.12
- Take a 2M cross axle and one white brick with a cross. Attach it to the gray plate, as shown here:

Figure 2.13
- Take a sprocket and attach it to the 2M cross axle. At this point, your tabletop fan is ready to use! Connect your motor to port C:

Figure 2.14
Now that your tabletop fan is ready, let's program it.
Programming the tabletop fan
In this section, we will be coding the model we created using the LEGO BOOST kit. There are various ways you can code your BOOST:
- The LEGO BOOST official app:
a. It can only be used on mobile and tablets.
b. Only the offline version is available.
c. Only works on Android, Windows, and iOS devices.
d. It has built-in building instructions for some of the coolest BOOST robots!
Most of you will be first-time users of this app.
- LEGO BOOST extension in the Scratch 3.0 programming language:
a. It can be used on any device – mobile/tablet/laptop.
b. It is available as an online as well as an offline version.
c. It can be used on any OS – Chrome OS/MacOS/Windows/Linux.
d. The building instructions can be easily and freely downloaded from LEGO Education's official website.
Most of you will have come across the Scratch programming language at least once!
Important Note
Scratch is a block-based programming language developed by MIT Media Labs, US. It is one of the most widely used programming languages by elementary school students across the globe, owing to its user-friendly interface, easy-to-understand programming blocks, and flexibility to connect to various platforms such as BOOST, WeDo, EV3, Arduino, micro:bit, and so on.
Considering these pointers, we shall be using the Scratch 3.0 offline/online editor to code our BOOST robots. Before you begin coding, here are some important instructions you must follow:
- Before you use the Scratch programming language, you need to install Scratch Link on your device, which will help you connect your BOOST kit to the device over Bluetooth. You can download Scratch Link from https://scratch.mit.edu/boost.
- Now, make sure that it is active and appears on your toolbar and that your laptop's Bluetooth is on. Now, let's look at the Scratch programming software.
- If you wish to use the offline version of Scratch 3.0, you can download it from here: https://scratch.mit.edu/download.
- If you wish to use the online editor for Scratch 3.0, bookmark this link on your device: https://scratch.mit.edu/.
- Once you open this link, click on Create. The coding screen will open.
Tip
You may consider signing in on this software for the online version if you wish to save your program and eventually share it with the world, or even use it for yourself in the future!
- Now that the programming screen is open, click on the Add Extension icon, as shown in the following screenshot. This icon has been highlighted with a square here:

Figure 2.15 – Programming screen
- Now, select/click on LEGO BOOST, as shown in the following screenshot:

Figure 2.16 – Adding the BOOST extension
- Now, turn on your BOOST by pressing the blue button. Make sure that it has six AAA-sized battery cells in it. It will start flashing blue the moment you press it.
- The following screen will appear on your device. Click on Start Searching:

Figure 2.17 – Starting the scanning process
- Keep your BOOST on and close to the device. The following screen will appear once it has detected your BOOST kit and is connecting:

Figure 2.18 – Connecting with BOOST
- Once connected, the following message will appear:

Figure 2.19 – Connection successful
If you face any difficulties connecting your BOOST Hub to your device via Bluetooth, please visit https://scratch.mit.edu/boost for troubleshooting help.
- The LEGO BOOST programming blocks will be available just below My Blocks, under the BOOST header:
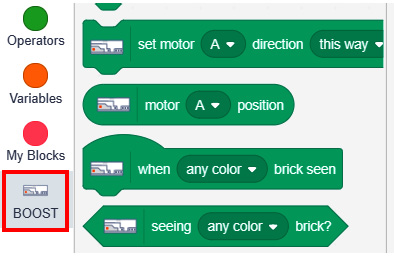
Figure 2.20 – BOOST programming blocks
Voilà! With that, you are all set.
In the next section, we will challenge ourselves by running the tabletop fan you built at different speeds!
Running your tabletop fan at different speeds
Now, let's code our tabletop fan motor (motor C) so that it moves this way at 70% speed for 10 seconds when the green flag is clicked.
Tip
Break down your problem statement into small problems before approaching it!
Let's break our problem statement into smaller steps:
- Step 1: Set the event to when the green flag is clicked.
- Step 2: Set motor C's speed to
70percent. - Step 3: Set motor C's direction to this way.
- Step 4: Turn motor C on for
10seconds. - Step 5: Turn motor C off.
If you break down your problem statement like this and write these step-by-step instructions each time, your coding job will be extremely easy and fun! Since this is your first time coding, please use the following sample code for this task:

Figure 2.21 – Sample program
Test it and see how much fun it is to use your fan to beat the summer blues!
Now, can you write some code that will move your tabletop fan motor C that way at 50 percent power for 10 seconds when the green flag is clicked?
Write down your problem steps here:
- Step 1: ____________________________________________________________
- Step 2: ____________________________________________________________
- Step 3: ____________________________________________________________
- Step 4: ____________________________________________________________
- Step 5: ____________________________________________________________
Now, write your code and see how it works! Identify any errors and rectify them. Make sure that your code works exactly the way we want it to work!
Now that you know how to run your tabletop fan, the next section will test your skills.
Time for a challenge
Now, it's time to test your learning! Read the following problem statement twice:
P1: Code your tabletop fan to move this way at 80 percent power for 5 seconds, then move this way at 50 percent power for 5 seconds, and then stop!
Problem fragmentation:

P2: Code your tabletop fan to move that way at 70 percent power for 6 seconds, then move that way at 30 percent power for 3 seconds, and then stop!
Problem fragmentation:

Use your imagination and use the sound and display blocks creatively to make your project more interactive and fun! For example, you can display the power that your tabletop fan is currently moving at, use sound blocks that replicate the humming sound of a fan, or anything of your choice!
Tip
You can find the display and sound blocks in the looks and sound programming pallets, respectively.
Remember that the sky is the limit due to the tools and the coding platform that you have at your disposal.
Fun Fact
Did you know that the tabletop fan was invented by Schuyler Skaats Wheeler in 1882?
Summary
In this chapter, you built your first robot using the LEGO BOOST kit: a tabletop fan. Your excitement level was taken one step up by us introducing coding in this chapter. You also learned how to add the BOOST extension to the Scratch 3.0 programming language and connect your BOOST to your device using Bluetooth. By completing a basic exercise, you explored the basics of programming, including turning the motor in a certain way, setting the motor's power, and exploring blocks from the looks and sound pallets. With this basic knowledge, you should be able to build some basic robots using your BOOST kit and write some code to make them move.
In the next chapter, we will be building a robot that will be able to move forward and backward without wheels! Exciting, isn't it?
Further reading
To enhance your Scratch programming skills, go to https://scratch.mit.edu/projects/editor/?tutorial=all and build some cool games and animations. This will help you enhance your coding skills, which you will use in the upcoming chapters of this book.