


As developers, we can find it difficult to create great-looking user interfaces from scratch when using HTML and CSS. This is especially hard when developers have years of developing Windows Forms applications experience. Microsoft introduced Web Forms to abstract the complexities of building websites away for Windows Forms developers and to ease the switch from Windows Forms to the Web, this in turn made it very hard for Web Forms developers to switch to ASP.NET MVC and even harder for Windows Forms developers.
Twitter Bootstrap is a set of stylized components, plugins, and a layout grid that takes care of the heavy lifting. Microsoft included Bootstrap in all ASP.NET MVC project templates since 2013. In the sample project, we'll start by creating a new ASP.NET MVC project either by using the standard Visual Studio MVC project template or by starting with an empty MVC project and adding the necessary files as we need them.
In this chapter, we will cover the following topics:
The files included in the Bootstrap distribution
How to create an ASP.NET MVC site using the standard Visual Studio project template and Bootstrap
How to create an empty ASP.NET MVC site and add the Bootstrap files manually
How to create a
Layoutfile that references the Bootstrap filesAdding Bootstrap files using NuGet
Improving site performance with bundling and minification
Before we can get started with Bootstrap, we first need to download its source files. At the time of writing this book, Bootstrap was at Version 3.1.1. You can download the latest version from http://getbootstrap.com.
The zip archive contains the following three folders:
cssfontsjs
Do not be alarmed with the amount of files inside the css folder. This folder contains four .css files and two .map files. We would only need to include the bootstrap.css file in our project for the Bootstrap styles to be applied to our pages. The bootstrap.min.css file is simply a minified version of the aforementioned file.
The .map files can be ignored for the project we'll be creating. These files are used as a type of debug symbol (similar to the .pdb files in Visual Studio), which allow developers to live edit their preprocessor source files—something which is beyond the scope of this book.
Bootstrap uses Font Awesome to display various icons and glyphs in Bootstrap sites. Font Awesome was designed specifically for Bootstrap and the fonts folder contains the following four different formats of the font files:
Embedded OpenType (
glyphicons-halflings-regular.eot)Scalable Vector Graphics (
glyphicons-halflings-regular.svg)TrueType font (
glyphicons-halflings-regular.ttf)Web Open Font Format (
glyphicons-halflings-regular.woff)
It is a good idea to include all these files in your web project as this will enable your site to display the fonts correctly in different browsers.
The js folder contains two files. All the Bootstrap plugins are contained in the bootstrap.js file. The bootstrap.min.js file is simply a minified version of the aforementioned file. Before including the file in your project, make sure that you have a reference to the jQuery library because all Bootstrap plugins require jQuery.
The default project template automatically adds the jQuery library to your project and creates a bundle for it. The jQuery bundle will be included in your pages if you have the following line of code inside your view:
@Scripts.Render("~/bundles/jquery")Tip
Downloading the example code
You can download the example code files for all Packt books you have purchased from your account at http://www.packtpub.com. If you purchased this book elsewhere, you can visit http://www.packtpub.com/support and register to have the files e-mailed directly to you.

From Visual Studio 2013, when creating an ASP.NET project, you only have one project template to choose from, that is, the ASP.NET Web Application project template, as shown in the following screenshot:
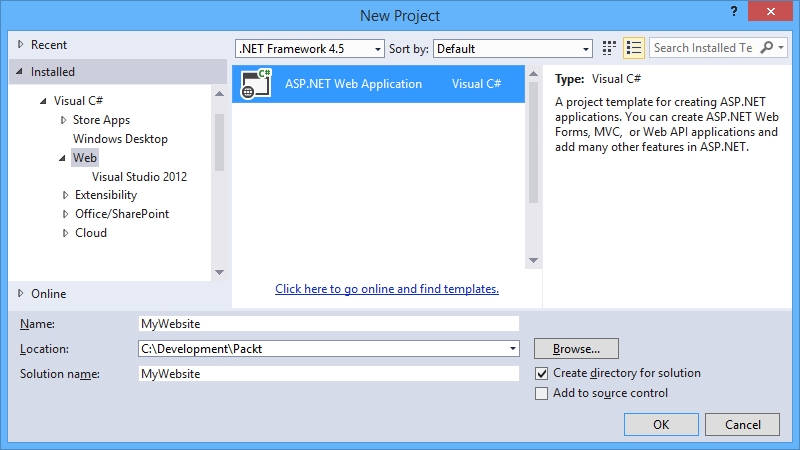
In the New ASP.NET Project dialog, you have a choice to select the type of ASP.NET web application you would like to create. To create an ASP.NET MVC web app that uses Bootstrap for its styling and layout, select the MVC template. You'll notice that the MVC checkbox is automatically selected, as shown in the following screenshot:

Click on the OK button to finish the creation of the MVC project in Visual Studio. You'll notice that the project template automatically adds a number of NuGet packages to your project, including the Bootstrap NuGet package.
The default project template adds all the necessary Bootstrap files we discussed earlier, although it does not use the same folder naming convention as the default Bootstrap distribution. The default project layout will look similar to the following screenshot:

The
Content folder contains both the bootstrap.css and bootstrap.min.css files as well as a style sheet called Site.css. This file is used to apply any additional styling on top of the default styles provided by Bootstrap, and it is also used to specify the styles to use for the jQuery validation plugin required by ASP.NET MVC for form validation. For example, the following CSS highlights any input element with a reddish color and draws a border around the element if the validation for that field failed:
.field-validation-error {
    color: #b94a48;
}

.field-validation-valid {
    display: none;
}

input.input-validation-error {
    border: 1px solid #b94a48;
}

input[type="checkbox"].input-validation-error {
    border: 0 none;
}

.validation-summary-errors {
    color: #b94a48;
}

.validation-summary-valid {
    display: none;
}
The
Scripts folder contains a number of scripts. Most notably for this book, it contains the bootstrap.js and bootstrap.min.js JavaScript files. The default ASP.NET MVC project template also adds both minified and normal files for the following JavaScript libraries and plugins:
jQuery
jQuery validation plugin
jQuery and jQuery validation support library for unobtrusive validation
Modernizr
Respond JS
Visual Studio enables intelliSense for jQuery, Bootstrap, and Modernizr as well as responds by adding the _reference.js file to the Scripts folder. This is a very useful feature when working with JavaScript and well worth using when working with the Bootstrap components.
Most of these libraries and files are beyond the scope of this book, but we will touch on some of them as we progress.
The default project layout is a good start for any ASP.NET MVC project, but for the sample project we'll be building throughout this book, we'll create an empty ASP.NET MVC site and add the necessary files manually. This is done by performing the following steps:
Start by creating a new ASP.NET web application project in Visual Studio and name the project
Northwind.Web.This time, select the Empty template in the New ASP.NET Project dialog and make sure the MVC checkbox is selected, as shown in the following screenshot:

An empty project layout will be created for you and you'll notice that we do not have the
Content,Fonts, orScriptsfolder—we'll add them ourselves!
To add the Bootstrap style sheet files to your project, complete the following steps:
Create a new folder by right-clicking on the new project's name inside Visual Studio's Solution Explorer and navigating to Add | New Folder, name the new folder
css.Next, right-click on the newly created
cssfolder and navigate to Add | Existing Item… from the context menu.Browse to the folder in which you've extracted the Bootstrap distribution files and select the
bootstrap.cssfile that you can locate in thecssfolder.
Add the required Bootstrap fonts by performing the following steps:
As with the style sheets, create a new folder called
fonts.Next, browse to the location to where you've extracted the Bootstrap download and add all the files from the
fontsfolder to yourfontsfolder in Visual Studio.There should be four files in total, each named
glyphicons-halflings-regularbut with the following different file extensions:.eot.svg.ttf.woff
The final Bootstrap file we'll need is bootstrap.js. To add it, perform the following steps:
Before adding the
bootstrap.jsfile to your Visual Studio project, create a new folder calledjs.Add the
bootstrap.jsfile to this folder.Once completed, the project layout should look similar to the following screenshot in the Visual Studio's Solution Explorer:

To maintain a persistent look across our site's pages, we'll use a Layout file. This layout file will use the basic Bootstrap HTML template at first and we'll build onto it as we progress throughout the book. To create this file, complete the following steps:
Create a new
Layoutfile by right-clicking on theViewsfolder in the Visual Studio's Solution Explorer and navigate to Add | New Folder. Name the new folderShared.Next, right-click on the
Sharedfolder and navigate to Add | New Item…. Select the MVC 5 Layout Page (Razor) item template, name the new item_Layout.cshtmland click on Add, as shown in the following screenshot: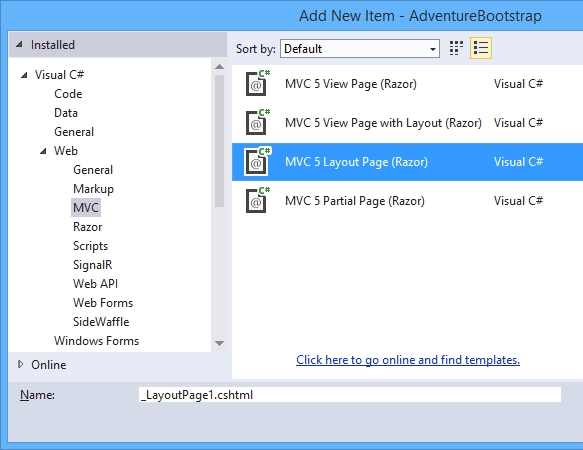
After the new file is added to you project, open it and replace its contents with the following HTML markup:
<!DOCTYPE html>
<html lang="en">
<head>
    <meta charset="utf-8">
    <meta http-equiv="X-UA-Compatible" content="IE=edge">
    <meta name="viewport" content="width=device-width, initial-scale=1">
    <title>@ViewBag.Title</title>
    <!-- Bootstrap -->
    <link href="@Url.Content("~/css/bootstrap.css")" rel="stylesheet">
    <!--[if lt IE 9]>
      <script src="https://oss.maxcdn.com/libs/html5shiv/3.7.0/html5shiv.js"></script>
      <script src="https://oss.maxcdn.com/libs/respond.js/1.4.2/respond.min.js"></script>
    <![endif]-->
</head>
<body>
    @RenderBody()
    <script src="https://ajax.googleapis.com/ajax/libs/jquery/1.11.0/jquery.min.js"></script>
    <script src="@Url.Content("~/js/bootstrap.js")"></script>
</body>
</html>
In the preceding markup, we set the viewport's
widthproperty to the device's width and theinitial-scalevalue to1. This will cause our site to adapt to the screen size of the device the user is viewing it from.Next, we reference the Bootstrap style sheet by using the
Url.Contenthelper method. This helper method converts a virtual or relative path to an absolute path, making sure that when the web page is opened, the style sheet will be loaded correctly.We then check if the browser accessing the site is Internet Explorer 9 or earlier; if it is, we include the
HTML5Shivworkaround that enables styling of HTML5 elements in Internet Explorer Version 9 and earlier. We also include the version of theRespond JSlibrary suitable for versions of IE9 and earlier.Just before the closing the
<body>tag of the file, we include the jQuery library and thebootstrapJavaScript library.Tip
Note that the
HTML5Shivworkaround, Respond JS, and jQuery files are loaded from a Content Delivery Network (CDN). This is a good approach to use when referencing to most of the widely used JavaScript libraries. This should allow your site to load faster if the user has already visited a site, which uses the same library from the same CDN, because the library will be cached in their browser.
At the moment, the site we've created will return an error message that states that the requested resource cannot be found, when we run the project. We first need to add a new home controller and associate a view with its default action in order to avoid any errors. To add a new controller, perform the following steps:
Right-click on the
Controllerfolder in the Solution Explorer section and navigate to Add | Controller….In the Add Scaffold dialog, select the MVC 5 Controller - Empty item, as shown in the following screenshot:

When prompted, in the Add Controller dialog, enter
HomeControlleras the new controller name and click on Add.After the controller has been added, right-click inside the empty Index method and select Add View. The method is considered empty if it has only the one
return View()statement in it.In the Add View dialog, leave all the fields at their default values and select the layout page we've added earlier. Click on Add to continue, as shown in the following screenshot:
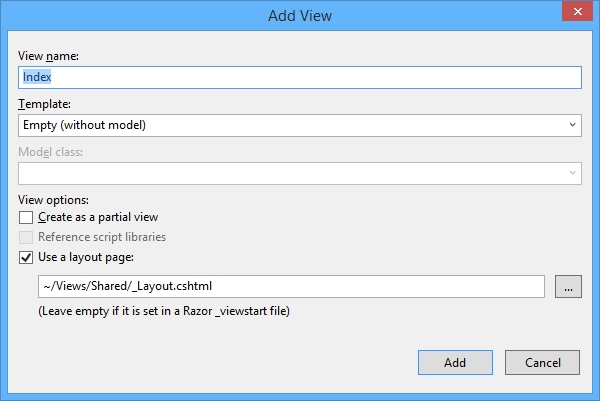
An empty view will be generated and you'll notice the
ViewBag.Titleproperty as well as the layout page to use for this view have been added at the top of the view. Consider the following example:@{ ViewBag.Title = "Index"; Layout = "~/Views/Shared/_Layout.cshtml"; }There will also be a single
<h2>element in the view that you can leave as is. If you run your project, you should see the view displayed with the default Bootstrap styling applied to the<h2>element.
So far we've created two ASP.NET MVC projects that use the Bootstrap frontend framework. The first included the Bootstrap assets by default because we created it with the standard ASP.NET MVC Visual Studio project template. The second, we created an empty ASP.NET MVC project and added the Bootstrap files manually.
NuGet is a package manager for the .NET framework and can be used to automatically add files and references to your Visual Studio projects. A Bootstrap package exists on the NuGet gallery site, which enables you to automatically add the Bootstrap assets to your project.
Bear in mind that though the Bootstrap NuGet package assumes that you want your Bootstrap files in the Content and Scripts folders and will create the folders and files as such, it will also automatically check whether you have the jQuery library referenced and if not, add it by design.
Tip
NuGet is a package manager for the Microsoft development platform that makes it easy to add references to existing libraries. You can read more about it on https://www.nuget.org/.
One option for adding the Bootstrap NuGet package to your project is to use the Manage NuGet Packages dialog box. To access the Manage NuGet Packages dialog and add the Bootstrap NuGet package, perform the following steps:

The second method of adding NuGet packages to your Visual Studio project is via the Package Manager Console and completing the following steps:
Inside Visual Studio, from the Tools menu, navigate to Library Package Manager | Package Manager Console. This will open the Package Manager Console window.
To install the Bootstrap NuGet packages, type
Install-Package bootstrap, as shown in the following screenshot: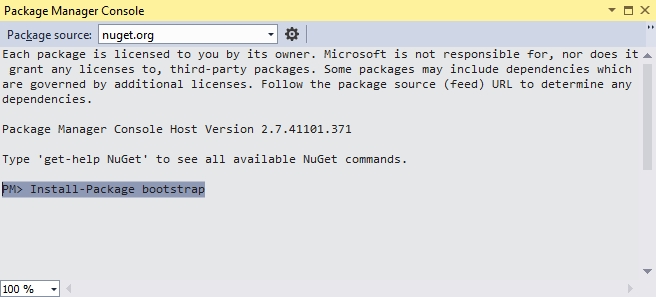
This will create the
Content,fonts, andScriptsfolders and add the necessary Bootstrap files to each.
Bundling and minification is a feature in ASP.NET that allows you to increase the speed at which your site loads. This is accomplished by limiting the number of requests to CSS and JavaScript files your site needs to make by combining these types of files into one large file and removing all unnecessary characters, such as comments, white spaces, and new line characters from the files.
Note
Most modern browsers have a limit of six concurrent connections per hostname. This means that if you reference more than six CSS or JavaScript files on a page, the browser will only download six files at a time and queue the rest. Limiting the number of CSS and JavaScript files is always a good idea.
Because we created an empty ASP.NET MVC site, the necessary reference for adding bundling was not automatically added to our project. Luckily, this can easily be added by using the NuGet Package Manager Console as follows:
Open the Package Manager Console window and enter the following command:
install-package Microsoft.AspNet.Web.OptimizationThis will install the
Microsoft.AspNet.Web.OptimizationNuGet package as well as all the packages it has dependencies on. These dependencies are as follows:Microsoft.Web.InfrastructureWebGreaseAntlrNewtonsoft.Json
After the NuGet packages have been installed successfully, create a new static class called
BundleConfiginside theApp_Startfolder.Inside this class, we'll create a new static method called
RegisterBundles, which accepts a parameter calledbundles, whose type is aBundleCollectionobject. The code for the class is as follows:public class BundleConfig { public static void RegisterBundles(BundleCollection bundles) { bundles.Add(new ScriptBundle("~/bootstrap/js").Include( "~/js/bootstrap.js", "~/js/site.js")); bundles.Add(new StyleBundle("~/bootstrap/css").Include( "~/css/bootstrap.css", "~/css/site.css")); } }Bundles come in the following two types:
ScriptBundleStyleBundle
The
StyleBundleobject is used to add style sheets to a bundle and theScriptBundleobject is used to add JavaScript files. TheAddmethod of theBundleCollectionobject accepts both types of objects. TheStyleBundleandScriptBundleobjects accept a string parameter, which specifies the virtual path of the files, and you should therefore, use theIncludemethod to specify the path to the files you would like to include in the bundle.
To include the bundles we created earlier in our Layout file, perform the following steps:
Open the
_Layout.cshtmlfile in theSharedfolder and change its markup to reflect the following (changes are highlighted):<!DOCTYPE html> <html lang="en"> <head> <meta charset="utf-8"> <meta http-equiv="X-UA-Compatible" content="IE=edge"> <meta name="viewport" content="width=device-width, initial-scale=1"> <title>@ViewBag.Title</title> @Styles.Render("~/bootstrap/css") <!--[if lt IE 9]> <script src="https://oss.maxcdn.com/libs/html5shiv/3.7.0/html5shiv.js"></script> <script src="https://oss.maxcdn.com/libs/respond.js/1.4.2/respond.min.js"></script> <![endif]--> </head> <body> @RenderBody() <script src="https://ajax.googleapis.com/ajax/libs/jquery/1.11.0/jquery.min.js"></script> @Scripts.Render("~/bootstrap/js") </body>If the Visual Studio HTML editor indicates that it cannot find the
ScriptsorStylesobjects (that is indicated by the words being highlighted), this means a reference is missing from theWeb.configfile inside theViewsfolder.To fix this, add a reference to
System.Web.Optimizationto the list of namespaces in thisWeb.configfile. Consider the following example:<namespaces> <add namespace="System.Web.Mvc" /> <add namespace="System.Web.Mvc.Ajax" /> <add namespace="System.Web.Mvc.Html" /> <add namespace="System.Web.Routing" /> <add namespace="AdventureBootstrap" /> <add namespace="System.Web.Optimization" /> </namespaces>
In order to enable bundling and minification, open the Web.config file inside the root of your project and change the debug attribute of the compilation element to true as follows:
<system.web>
  <compilation debug="true" targetFramework="4.5" />
  <httpRuntime targetFramework="4.5" />
</system.web>
The same can be achieved by setting the EnableOptimizations property of the BundleTable object to true. This statement can either be added to the Global.asax file's Application_Start method or to the RegisterBundles method of the BundleConfig class as follows:
BundleTable.EnableOptimizations = true;
After you've added references to the bundles inside your Layout file and set either the debug attribute or the EnableOptimizations property to true, build and run your project. Once the site is open in a browser, view its source. You should see a markup similar to the following:
<!DOCTYPE html>
<html lang="en">
<head>
    <meta charset="utf-8">
    <meta http-equiv="X-UA-Compatible" content="IE=edge">
    <meta name="viewport" content="width=device-width, initial-scale=1">
    <title>Index</title>
    <link href="/bootstrap/css?v=Tmmo-oSKW9MFWr7qyt2LfyMD1tap2GokH7z1W2bhfgY1" rel="stylesheet"/>
    <!--[if lt IE 9]>
      <script src="https://oss.maxcdn.com/libs/html5shiv/3.7.0/html5shiv.js"></script>
      <script src="https://oss.maxcdn.com/libs/respond.js/1.4.2/respond.min.js"></script>
    <![endif]-->
</head>
<body>
<h2>Index</h2>
<script src="https://ajax.googleapis.com/ajax/libs/jquery/1.11.0/jquery.min.js"></script>
<script src="/bootstrap/js?v=raqa-So7giLQpXYq5LQiW8D-yNoxOAJewB8VXtgFHfE1"></script>
</body>
</html>
Note that the highlighted lines contain the relative paths we've specified in our bundles and when clicking on, for example, the /bootstrap/js link, the browser will open a minified version of the Bootstrap JavaScript file. You can see it is minified because most white spaces and line breaks have been removed. The code will also be a combination of the Bootstrap JavaScript file as well as any other JavaScript files, which we might have added to the bundle.
In this chapter, you've learned what is inside the Bootstrap download and how to include these files in your own ASP.NET MVC projects. We've also covered the various techniques of how to include these files and how to increase the performance of your site using bundling and minification.
In the next chapter, we'll dive into the inner working of Bootstrap's CSS and HTML elements and how to use them to design the layout of your site.

