


 Download code from GitHub
Working with Product Information Management
Have you ever wondered how businesses keep track of all their products across different locations and legal entities? Well, that’s where product information management comes in! It’s a process that centralizes all the information about a product, such as its definition, categorization, and identifiers, so that it can be easily accessed and used by various departments within the organization.
Product information is essential for supply chain and commerce applications, and it includes everything from product names and descriptions to images, units of measure, and translations. This information is used to manage specific product or category business processes.
When defining a product, several factors exist, such as product type, subtype, dimensions, and configuration models. Product data can be imported from various sources, such as product life cycle management or product information management systems, and exported to other business applications.
In this chapter, we will cover the following topics:
- Understanding and creating products and product variants
- Identifying product types
- Creating a BOM and understanding all its details
- Designing product configurations by constraining their options
- Creating and handling hazardous materials
- Working with direct delivery products and learning about their capabilities
- Understanding product configurations about costs and pricing
Creating and managing products and product variants
In product management, it’s crucial to establish clear and consistent product definitions that transcend individual legal entities. These definitions encompass core values such as product number, type, and name, which are shared across the organization. While some of these core values, such as the search name, can be customized at the legal entity level, other key attributes remain unchanged, forming the foundation of the product definition.
The approval process is super important when it comes to handling different versions of a product and making sure they’re available within different parts of a company. This process is helped along by a release function, which lets users pick products that have different versions and make them available in one or more parts of the company. Thanks to this handy feature, companies can easily manage how different versions of a product are spread out and make sure they’re available in the markets where they’re needed.
Let’s look at a couple of examples of product variants utilization in Dynamics 365 Supply Chain Management.
Clothing
Product: T-shirt
Variants:
Size: Small, medium, large, XL
Color: red, blue, green, black
Utilization
A customer wants to buy a medium-sized blue T-shirt. The retailer can use the product variant feature instead of having a separate product for each combination. The retailer can easily track inventory for each size and color combination, manage replenishments based on sales of specific variants, and offer promotions on specific sizes or colors.
Electronics manufacturer
Product: Smartphone
Variants:
Storage: 64 GB, 128 GB, 256 GB
Color: Silver, Gold, Space Grey
Utilization
A customer is interested in purchasing a 128 GB Gold smartphone. Using Dynamics 365 Supply Chain Management, the manufacturer can manage production runs based on the demand for specific variants. They can also analyze which variants are more popular and adjust their production and marketing strategies accordingly.
To further streamline the product management process, a decentralized approach is adopted. This enables the creation and maintenance of products directly from the Released Products page within the Product Information Management module. It’s important to note that users must possess the necessary security role to carry out these actions. Specifically, these responsibilities are included in the Product Designer and Product Design Manager roles. By granting the appropriate access and permissions, organizations can empower their teams to effectively create and manage products, promoting a decentralized and agile product management approach.
When a product is created within a specific legal entity, it is worth mentioning that an automatic core product definition is generated in the shared products repository. This ensures that the product is accurately represented and shared across the organization, thereby maintaining consistency and eliminating redundant efforts.
Organizations can optimize their product management efforts by establishing clear product definitions, leveraging the authorization process, and adopting a decentralized approach to product creation and maintenance. This streamlined process enhances efficiency, promotes collaboration across legal entities, and fosters effective product design and distribution throughout the organization.
In Dynamics 365 Supply Chain Management, we can define a product by adding the following details:
- First, we need to define the product type, differentiating if it is an item or a service.
- The second important definition is distinguishing whether it is a product or a product master. The difference between them is that a product master will create product variants related to that product. For example, a T-shirt will have different sizes and colors. With a product master, we can define these variants under the same product number.
We can also define the categorization of the product – for example, a purchase category for office supplies.
The unit of measure of the product is an important definition to control in which unit the product will be handled, such as units, kilograms, liters, ounces, feet, and so on. We can also define the unit conversion if needed. This lets us know how many ounces a unit of this item has.
If the product is traded in other countries, we can input translations for the name and descriptions. This will allow documents to be printed in other languages. The system will allow us to upload an image or miniature of the product shown in related applications or documents printed on the system.
Also, we need to define the product variant model if we define a product master as the product type. This will include dimensions and dimension groups, the nomenclature of the variant, and the configuration model if needed. We will review these concepts later in this chapter.
It’s important to note that product information changes frequently in dynamic organizations, so maintaining accurate and up-to-date data is crucial for business success.
Product data and sources
Now that we know how important it is to keep track of product information, let’s talk about how that information is distributed and managed.
Firstly, product data can be created and managed within Supply Chain Management. But if you already have product information in other systems, such as product life cycle or product data management, there is no need to worry! You can import that data into Supply Chain Management too.
When working with multiple instances of Supply Chain Management, one instance is usually designated as the “master” for all the other instances. This makes it easier to manage product data across different locations.
Supply Chain Management also lets you use a tool called Microsoft Dataverse to share product data across different applications. You can export your product definitions from Supply Chain Management to Dataverse and then use that data to provision other business applications, such as Dynamics 365 Sales.
It’s important to remember that product information constantly changes in dynamic and agile organizations. That’s why it’s critical to maintain accurate and up-to-date data. It’s a business process that requires attention and effort to ensure your product information stays reliable and valuable.
Product masters and product variants
When it comes to creating products that meet customer demands quickly, being agile is key. To do this, product definitions are used to specify a set of generic products rather than distinct ones. Within Supply Chain Management, these generic products are called product masters.
Product masters encompass the guidelines and definitions that dictate the description and behavior of individual products across diverse business operations. These definitions enable the creation of unique products, referred to as product variants.
Products in the master list are linked to specific dimension groups and configurations, such as color, size, style, and configuration, to ensure precise implementation of business rules. This makes it easy for users to find and identify the products they need.
Configuration technologies for product customization
When it comes to configuring products to meet specific requirements, you have the option to choose among three different configuration technologies. Each technology offers distinct advantages based on your business needs. It is crucial to select the appropriate configuration technology during the implementation of Supply Chain Management since transitioning from one model to another after implementation is not feasible. Let’s explore these technologies.
Predefined variants
The predefined variants configuration technology allows you to define product dimensions, such as color, style, and size, which determine the available options for customization. By specifying valid combinations of dimensions, unique product variants are created. This technology is suitable for businesses looking to offer predefined choices to customers, ensuring consistent and distinct product options.
Dimension-based configuration
The technology of dimension-based configuration is frequently utilized in production environments. This technique allows the configuration dimension to establish the Bill of Materials (BOMs). When a particular configuration is chosen, the system leverages the relevant subset of BOM lines for that configuration for strategizing and manufacturing. This method is often termed a universal BOM, given its use of a common BOM for all product configurations. It proves advantageous when you’re overseeing intricate production procedures with diverse components.
Constraint-based configuration
The technology of constraint-based configuration employs a product configuration model to encapsulate all potential characteristics and elements needed to detail every product variant within a unified model. Attribute combinations are outlined using standard expressions or table-based limitations. Configuration models and configurators play a pivotal role in managing product information across a multitude of sectors. This technology is invaluable when navigating complex product configurations and facilitates extensive customization options.
Choosing the right configuration technology for your business process is vital to ensuring efficient and accurate product customization. Carefully consider your industry’s unique requirements and the flexibility needed to meet customer demands. By making an informed decision, you can effectively enhance your Supply Chain Management implementation and deliver tailored products.
Now that we understand the concept of the products and their variants, let’s start by configuring these options in Dynamics.
The Product Variant Model Definition workspace
The Product Variant Model Definition workspace serves as a comprehensive hub for managing product masters. It provides an overview of the product variants and their status in terms of release to specific legal entities. This workspace is designed to facilitate efficient monitoring and maintenance of released products.
By utilizing the Product Variant Model Definition workspace, organizations can effectively handle the release and maintenance of products, ensuring seamless coordination with specific legal entities and their unique requirements.
Let’s review some more specific concepts related to products, especially at the legal entity level.
Released products
Products approved for distribution to a particular legal entity are released products. These products can be released individually or in bulk to one or multiple legal entities simultaneously. To cater to the specific requirements of each legal entity, additional properties and attributes may need to be assigned.
The Released Product Maintenance workspace
The Released Product Maintenance workspace empowers users to monitor and complete the necessary tasks associated with recently released products. It offers a centralized location to track and manage released products across various legal entities or sub-organizations within a legal entity. This workspace ensures streamlined released-product management, enabling efficient maintenance and monitoring processes.
Configuring the Released Product Maintenance workspace
To customize the Released Product Maintenance workspace and make it more efficient for your daily job, perform the following steps. By doing so, you will make it more friendly and effective:
- Customize the workspace: Start by customizing the Released Product Maintenance workspace to your liking. This can be done by accessing the Configure My Workspace option from the menu.
- Select a category: Choose a category hierarchy and a category that aligns with your specific needs. This will filter the workspace accordingly.
- Define time fences: Set time fences, in days, for Recently Released Products and Stopped Released Products. This will help adjust the relevant product data within the workspace.
- Review product change cases: Within the workspace, locate the list of product change cases related to products within the selected category hierarchy that are not yet completed or closed.
- Check the Recently Released list: Look at the Recently Released list, which displays products released within the time fence you set in the workspace configuration.
- Validate items: Note that each item in the list undergoes validation, and the validation status is presented. This status indicates whether the necessary configurations for the corresponding legal entity have been completed.
- Access pages for configuration: From the list, navigate to various pages to complete the necessary product configurations. These pages include Released Product Details, Product Attribute Maintenance, Product Category Maintenance, Default Order Settings, and Text Translations.
- Complete configurations: Upon directly accessing these pages from the list, efficiently fulfill the required configurations for the product, ensuring that the necessary adjustments are made for the specific legal entity.
By utilizing the configuration options available in the Released Product Maintenance workspace, you can tailor the workspace to your preferences, filter products based on category hierarchies, define time fences, and easily access relevant pages to complete product configurations. This empowers you to efficiently manage and configure released products, ensuring that the necessary adjustments are made to meet the requirements of the corresponding legal entities.
Manually creating a newly released product
Based on the company’s operational procedures and regulations that dictate the use of this feature, you can manually generate a freshly launched product in one go. This functionality facilitates the development of an entirely new product and instantaneously releases it to the existing legal entity. To kick-start the creation process, you can opt to click on Released Products within the Released Product Maintenance workspace or on the Released Product List page:

Figure 2.1 – Newly released product
Understanding product types in supply chain management
Let’s start by explaining some definitions before creating our first product. In the realm of Dynamics 365 Supply Chain Management, products can be categorized into two distinct types:
- Item: Items are purchased products that can be used for consumption, distribution, reselling, or as components to produce other manufactured items (BOM). These products are crucial in supply chain operations, fulfilling various purposes and meeting customer demands.
- Service: Services are products that are utilized to quantify hourly services or other non-tangible offerings. These products differ from physical items as they represent intangible deliverables that are part of the service-oriented aspects of a business.
In Figure 2.2, we can identify the types we can utilize when we create a new release product:
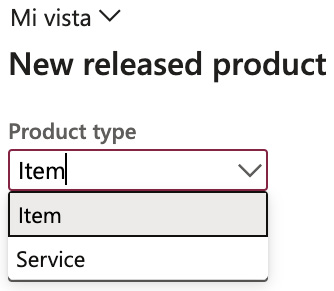
Figure 2.2 – Product types
After defining the product type, it is mandatory to define the product subtype. There are two distinct subtypes:
- Product: This refers to a uniquely distinguishable product that functions as the base model. It is characteristically unchangeable, meaning no additional product dimensions can be appended to its definition.
- Product Master: This comprehensive guide contains the definitions and regulations that outline how unique products are portrayed and operate within business procedures. From these foundational principles, unique products or product variants can be derived.
In Dynamics 365 Supply Chain Management, a Product Master is a crucial element that helps establish business rules and protocols. It is connected to a group of product characteristics and a configuration technology. These characteristics, such as color, size, style, and configuration, are used in Dynamics 365 Supply Chain Management to define and track how specific products behave. These characteristics make it easier for users to search for and identify products.
Think of a Product Master as a blueprint or prototype for different versions of a product. The different versions, also known as variants, can be pre-defined or created on the spot during sales situations using a product configurator. A Product Master is linked to one or more product characteristics, allowing for flexibility and customization:
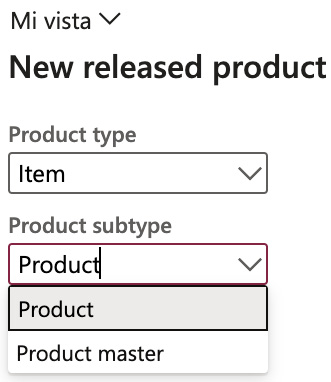
Figure 2.3 – Product subtype
Finally, as we’ve explained, if we define the product as Product Master, it is mandatory to define the product variants; let’s review what these are:
- Product variants: A product variant is determined by the selected configuration technology. This variant can either be pre-established using the product dimensions of its parent product, the Master Product, or be configured with the assistance of a product configuration tool.
- Product creation: Let’s review the most important steps to follow during the product creation process; formulating a new product entails the subsequent steps:
- Design and detail the product.
- Launch the product to legal entities.
- Specify data particular to the legal entity.
When generating a new product definition, the primary attributes to include are the type and subtype.
To create released products, navigate to Product Information Management > Products > Released Products.
Product Type discerns whether a product is a tangible object (item) or an intangible service, while the subtype further classifies the product.
When we create a new release product, this will be the first field we must select based on the aforementioned criteria:
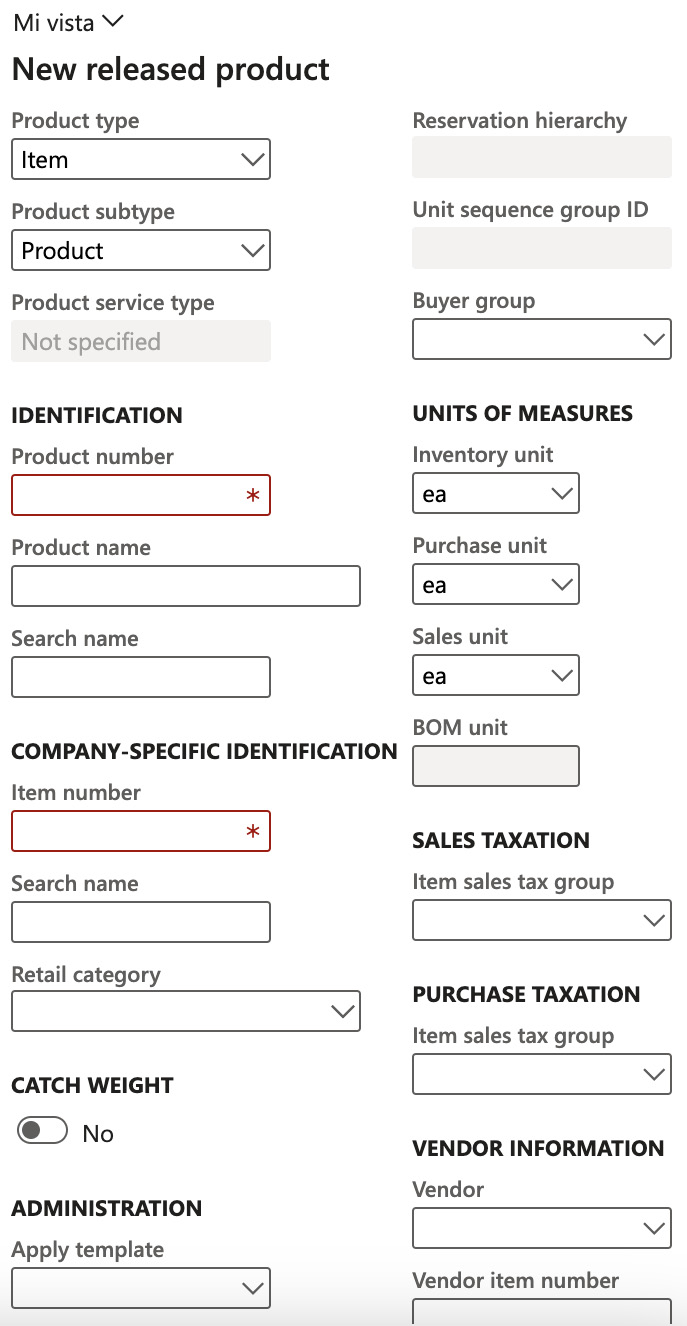
Figure 2.4 – The New released product dialogue
Product translation
The Translation feature allows for multilingual product descriptions. You can input product names and descriptions in numerous languages in this section. It’s important to note that only the product number is mandatory, while the product name and description are voluntary. To access the Translation section, click the Translation button in the action pane of any product-related page or list.
Product translations primarily serve the purpose of being utilized in external documents. In contrast, the data values are always displayed in the system’s default language when viewing product-associated pages and lists:

Figure 2.5 – Product translations
For external documents, the product name will appear in the company’s chosen language or the customer’s or vendor’s preferred language.
Now that we’ve covered the product definition, let’s discuss using a product in more than one legal entity.
Product setup authorization within a legal entity
Before you can use a Master Product in a transaction such as a sales or purchase order, you need to make sure the Master Product and at least one of its versions are available in the relevant parts of the company. This is especially important when the configuration technology is used to predefine versions. When it’s time to release the product, there are many different combinations you can choose from to distribute to one or more parts of the company:
- You can release individual products or groups of products
- You can release a single version of a product or multiple versions
- You can release the product to one legal entity or several
The product release process allows users in the company to share product definitions with different parts of the organization. By releasing a product or a Master Product, you’re connecting it to a specific part of the company and permitting it to be used in that area.
To proceed, navigate to Product Information Management > Products > All Products and Master Products. Upon clicking the Release Products button, select one or multiple products that you aim to authorize for one or more legal entities. This will allow you to utilize the product in processes such as inventory management, purchasing, sales, and production:
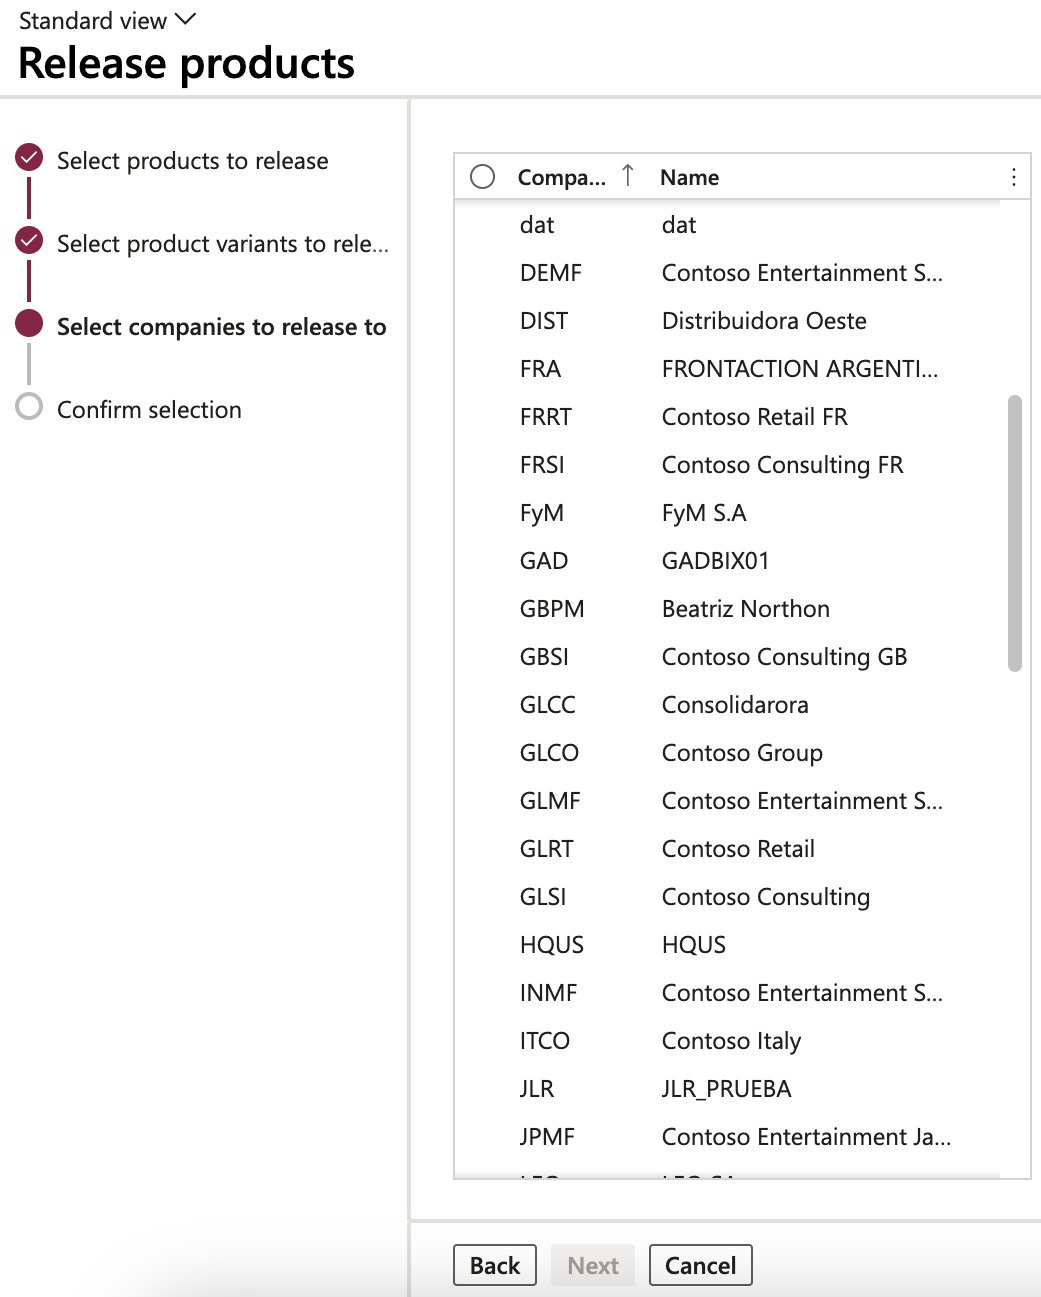
Figure 2.6 – Releasing a product to legal entities
Once a product has been released, we can finish by setting its final details.
Finalizing released products
After a product’s release to a legal entity, finalizing its definition is paramount before it can be incorporated into transactions such as sales orders or purchase orders. The product definition needs to be fully completed in every legal entity to which it has been released. You can click on the Validate button in the product’s action pane to check the finalization status of the product.
To complete a product, you need to provide some important information. You can fill in these fields by entering the details manually or using a pre-designed template.
The four main setups for a product to be set up are as follows:
- Item model groups: This defines how the item will be processed. Here, we set up whether the item is a stocked product or not and how to manage its costs by defining the inventory model.
This setup is critical in terms of definitions; once you have defined it, it can’t be changed if any transactions with the item exist:
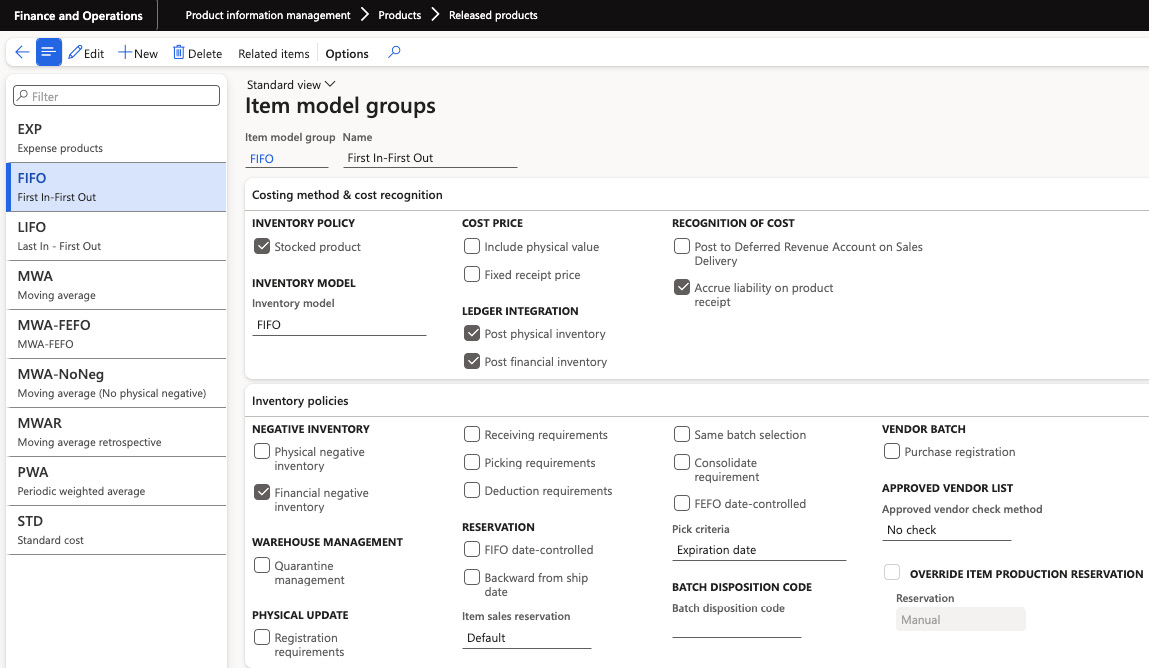
Figure 2.7 – Item model groups setup
- Item groups: This groups the item and defines its accounting on each transaction of every model – for example, which accounts will be used when the item is sold:
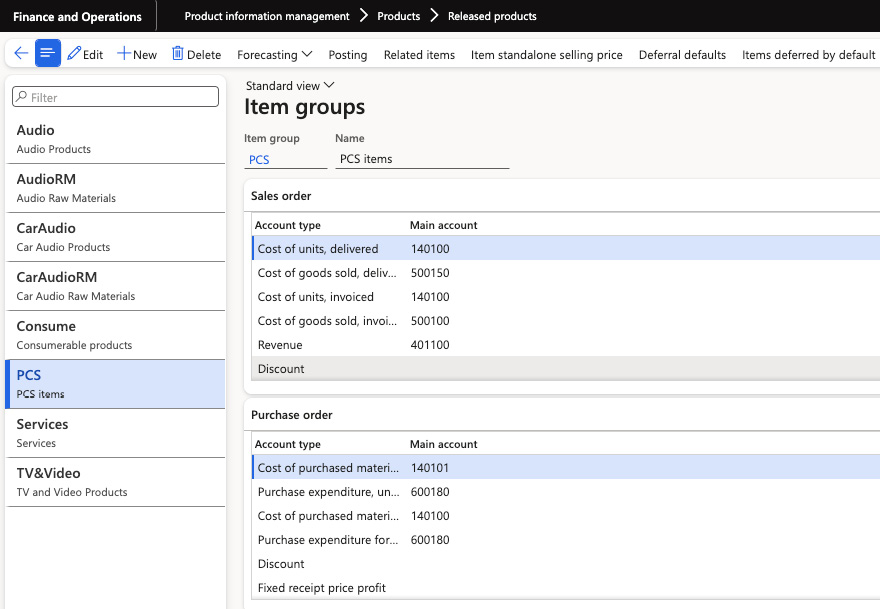
Figure 2.8 – Item groups setup
Storage dimension groups (if not already specified): Specify the dimensions related to storing the product, such as location or shelf. Also, one of the key setups here is if the items contained under this storage dimension group use a warehouse management process.
Deciding if the item will use WMS or will be a standard item is another decision to make before performing transactions with the items:
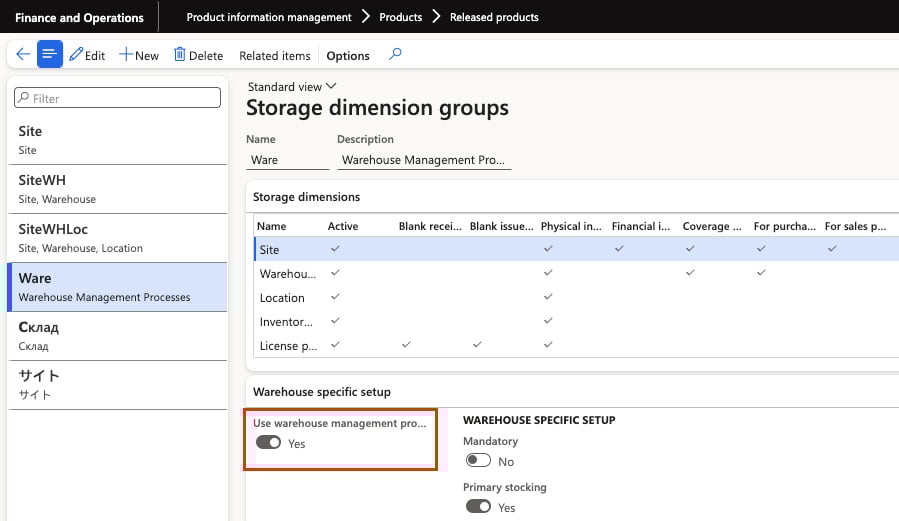
Figure 2.9 – Storage dimension groups setup
- Tracking dimension groups (if not already specified): Define the dimensions used for tracking the product, such as serial number or batch.
Defining the tracking dimension group is another fundamental decision that must be made before any transactions with the item occur:
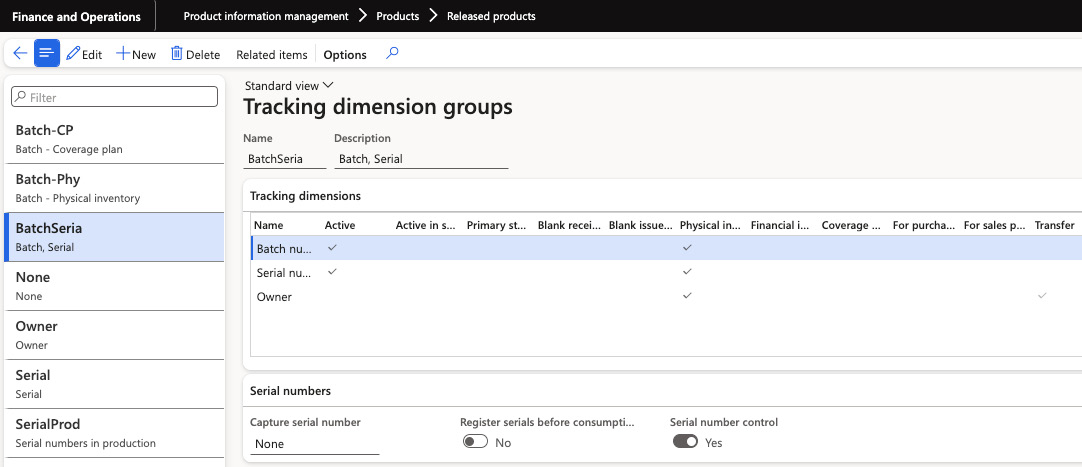
Figure 2.10 – Tracking dimension groups setup
The following are some other important setups:
- Sales, purchase, inventory, bill of materials (BOM) units: Determine the units of measurement used for sales, purchases, inventory management, and creating the bill of materials
- Reservation hierarchy (if using warehouse management procedures): Set up the hierarchy to manage inventory reservations effectively
- Unit sequence group ID (if using warehouse management procedures): Define the sequence group for units to maintain proper order in the warehouse
On the Product Details page, you’ll find various tabs where you can enter specific information about each module and customize their settings:
- In the General tab, we can add or review any additional data related to the product.
- The Purchase tab lets us define details about the procurement process, such as pricing, and discounts on the purchase orders.
- The Promote tab controls whether the product can be linked to a coupon in commerce functions.
- The Deliver tab works with features such as Direct Delivery and applies specific rules for packaging the product.
- The Sell tab lets us define details about the sales process, such as pricing, and discounts on the sales orders.
- The Manage Inventory tabs let us define details about physical dimensions, handling and packaging requirements, and how the item is processed in the inventory management module.
- The Engineer tab contains all the detailed information about the manufacturing process, such as the item’s production type, manufacturing measurements, and production specification.
- The Plan tab lets us associate the product with a coverage group that will be handled by the master planning module.
- The Manage Projects tab lets us associate the product with a project category that will be tracked by the project management and accounting module.
- The Manage Cost tab reviews all the cost-related information, such as cost price and cost group, and defines the ABC classification.
- The Financial Dimensions tab defines the default item financial dimensions that will be used when this product is accounted.
- The Warehouse tab relates to the warehouse management module and lets us set up the parameters specifically for products stored in warehouses managed by the Warehouse Management module.
- The Retail tab enables and sets values for the product’s use within the Retail module.
- The Transportation tab relates to the Transportation Management module to enable this process for the product.
- The Product Variants tab is only applicable to Product Masters. You can specify default values for product dimensions such as size, color, style, and configuration, making it easier to manage different product versions.
Note
Once you’ve defined the unit of measure for an item, this can’t be changed after you perform transactions in the system with the item. Defining the correct unit of measure is a crucial decision and needs to be planned carefully.
Country of origin classification
For enterprises that operate internationally, it’s often necessary to provide details about the origin of the products they deal with. A specific field is available in the Released Products table to indicate the country of origin. You can find this under Product Information Management > Products > Released Products in the Foreign trade FastTab:
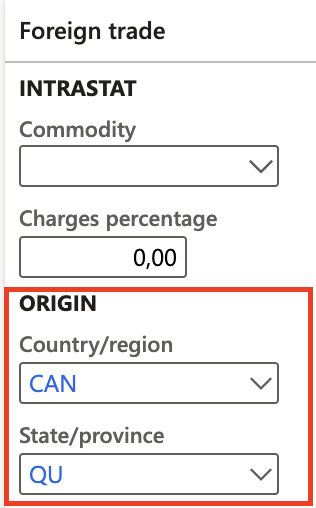
Figure 2.11 – Country of origin classification
Figure 2.6 demonstrates a rule that designates a specific product’s destination and origin countries. This rule can be accessed via Product Information Management > Setup > Product Compliance > Country of Origin > Country of Origin Rules.
Occasionally, vendors supply a certificate (with an expiry date and certificate number) to their clientele. Armed with this documented information, customers can generate the requisite shipping documentation. Moreover, this data enables the customer to coordinate with suppliers when a certificate nears expiration.
Additionally, this data can assist a seller in verifying any specific details about a product headed to a country with requirements or tariffs, before concluding a sale.
Managing hazardous material product information
To ensure compliance with shipping and transport regulations, businesses involved in shipping hazardous materials must adhere to specific paperwork requirements. These additional documents are essential for classifying and managing dangerous goods during shipping. To streamline this task, Dynamics 365 Supply Chain Management provides a valuable feature known as the hazardous materials function.
This feature allows customers to store and access pertinent information about their released items conveniently. This stored information plays a crucial role in facilitating the preparation of accurate and comprehensive shipping documentation. However, it’s important to note that while Dynamics 365 Supply Chain Management is a helpful tool in generating the required documents, organizations must establish robust processes and procedures for effectively managing the shipping of dangerous goods. By combining the power of Dynamics 365 and well-defined internal protocols, businesses can maintain compliance, enhance operational efficiency, and ensure the safe transportation of hazardous materials.
The first step here is to do the proper setup; it’s crucial to maintain additional information about these products. This not only aids in compliance with regulations regarding shipping and handling but also ensures safety and efficiency. Additional setup options for these parameters can be found under Product Information Management > Products > Released Products in the Manage Inventory action tab:

Figure 2.12 – The Item hazardous material option
Documentation for shipping hazardous materials
The fields displayed on the Released Products screen can be configured under the Hazardous material shipping documentation menu item:

Figure 2.13 – The Hazardous material shipping documentation options
The key options in this list are as follows:
- Hazardous material label: This field specifies what’s printed on the shipping label
- Hazardous material identification: This provides information about the nature of the hazardous material
- Emergency response: This field guides the correct response if the material interacts with a person or other items, helping prevent or mitigate damage
- Hazardous material packing instructions: This includes special packing instructions related to the hazardous material to ensure safe transportation and handling
Creating product masters with variants
Product dimensions, as opposed to product attributes, allow their values to be tracked across major processes, such as cost evaluation, inventory management, and analytical purposes. While product attributes can be linked with products and product masters, product dimensions are paired with product masters (excluding those configured using the Constraint-based configuration option) as they contribute to the distinctiveness of a product master’s variations.
When creating a product master, you can decide which product dimensions are mandatory by choosing the corresponding product dimension group. To create product dimension groups, navigate to Product Information Management > Setup > Dimension and Variant Groups > Product dimension groups:
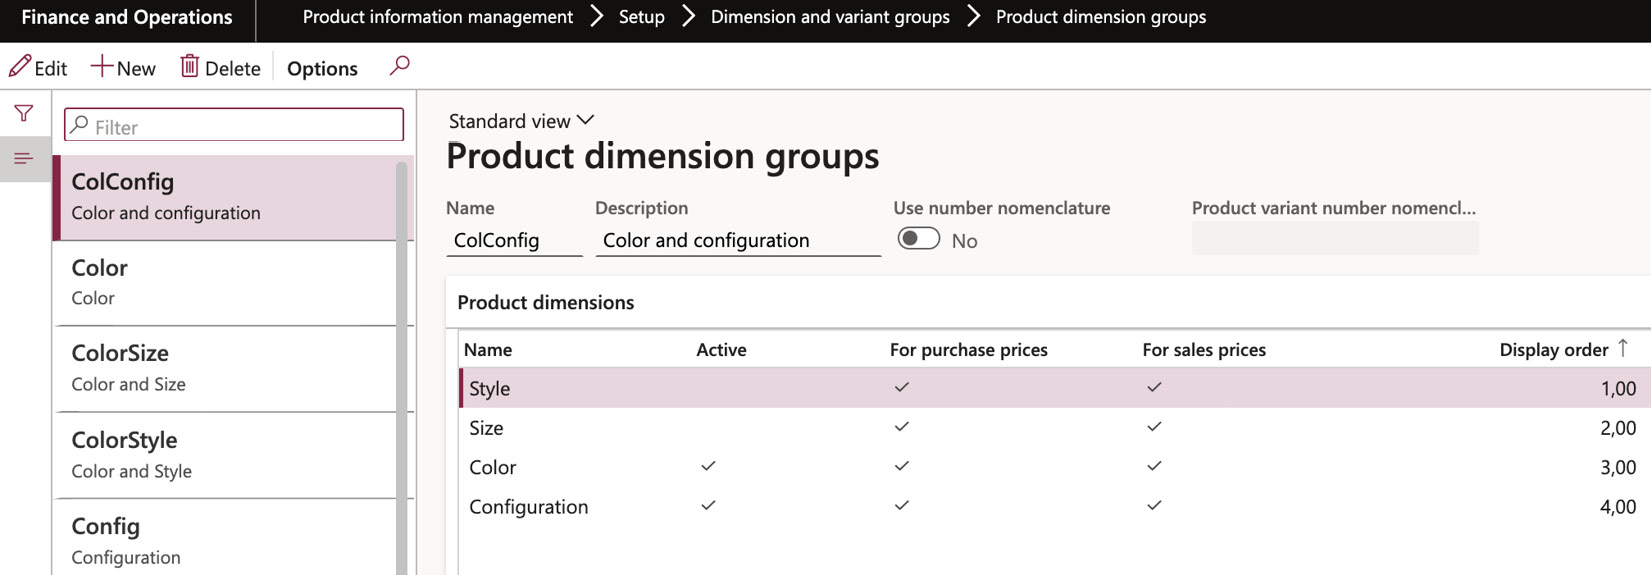
Figure 2.14 – The Product dimension groups screen
As product dimensions contribute to the uniqueness of a variant, several rules are to be followed:
- The dimension must be specified during the creation of product transactions, such as when a purchase or sales order line is initiated.
- The stipulated dimension is specific to the product transaction and cannot be modified – either wholly or partially – for related inventory transactions upon physical issue or receipt.
- Products are always reserved per each dimension. Reservations for product dimensions other than those specified in the active product transaction are not permitted.
Conceptualizing configurable products
To set up configurable products, access the Product Information Management section and navigate to Products > Released Products > New. This allows you to design products with different variations. When working with product masters, it’s important to define how variations of a master product are created. Often, certain mandatory attributes need to be specified to generate a new variation.
The configuration technology, which is applied to the product master, determines how such variations are defined:
- Predefined variant: By selecting this option, you can model the product according to its dimensions, such as color, configuration, and size. This is the only method that enables you to directly set up product variants and allows for any combination of dimensions.
- Dimension-based configuration: With this technology, you can create different product variations by selecting specific values for the product dimensions. You can freely choose any combination of dimensions to make your desired variations.
- Constraint-based configuration: To use the Product Configurator, the product must have this mode enabled. This option can be selected if the Configuration feature is enabled for the product dimension group and no other product dimensions are activated:
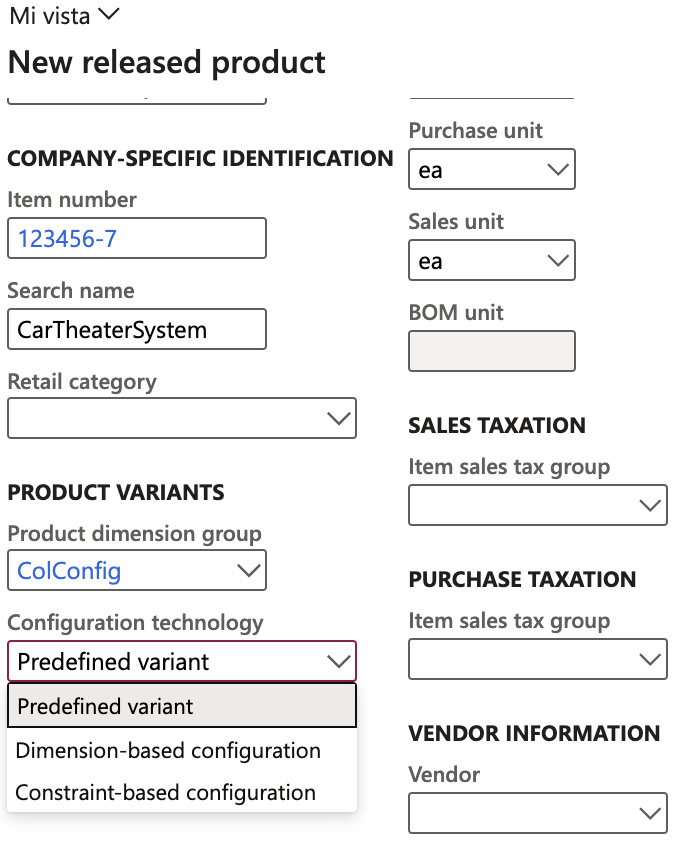
Figure 2.15 – The New released product screen
Setting up product masters and predefined product variants
When utilizing the predefined variant configuration technology, the uniqueness of each variant comes from the combination of one or more product dimensions applied to it.
Let’s take the example of the USMF company, which sells refrigerators in different colors. Each color represents a specific product variant, containing the relevant details for that particular product. On the other hand, the product master retains default values that are common across all refrigerator models.
In the USMF company, you have the flexibility to create a released product as either a standalone product or as a product master, allowing you to define predefined variants.
The dimension group associated with the product master determines which product dimensions are mandatory when defining its variant(s). Once you select a product dimension group and create the initial product variant or assign dimension values, those choices become fixed and cannot be changed afterward:
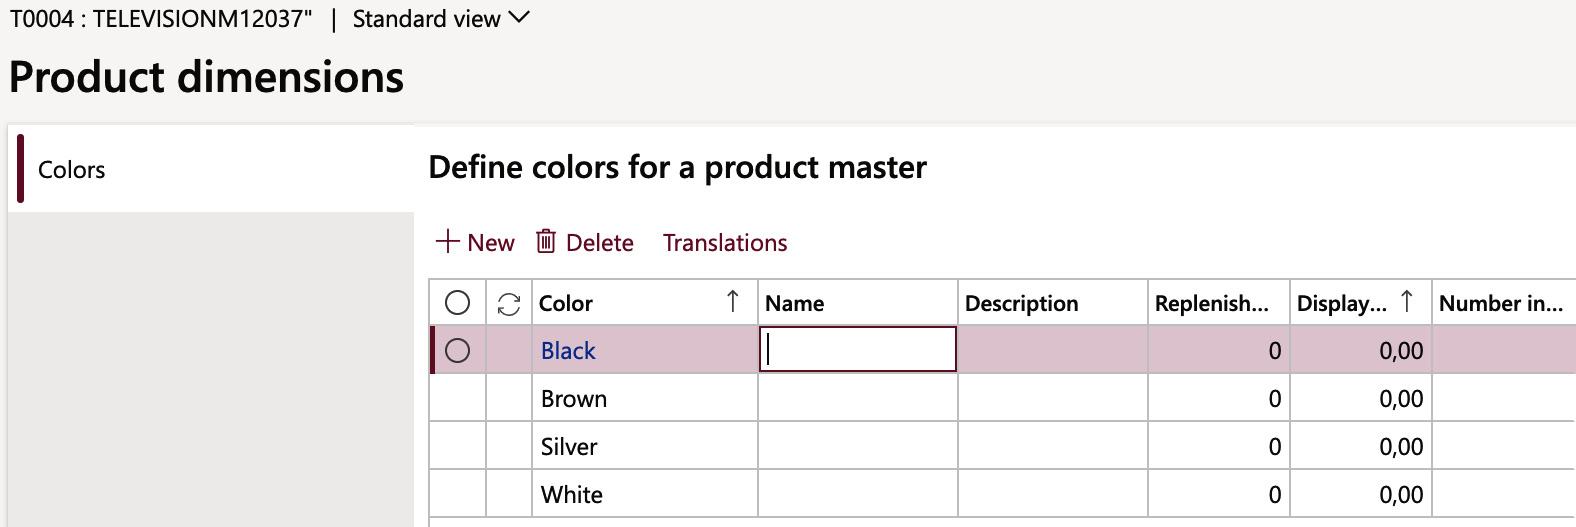
Figure 2.16 – The Product dimensions form
As shown in Figure 2.11, we can define each variant for a product dimension, on the related group for the item.
Product master and dimension-based configured product variants
Much like the predefined variants configuration technology, dimension-based configuration calls for using one or more product dimensions. The major advantage of this method is the ability to establish configuration rules and maintain configurations of Bill of Materials (BOM), simplifying the product configuration process during sales orders:
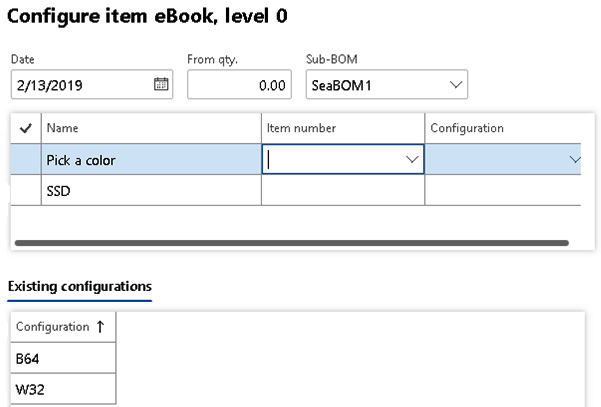
Figure 2.17 – Defining a variant from a sales order
Figure 2.13 shows how we define a variant from a sales order, where we previously created the rules on which options we can select in this process. This example shows an SDD card sales process where we define a color and memory size. With dimension-based configuration, we can define that when the sales clerk selects different colors, different items in the BOM of the manufactured item will be used depending on that selection.
Dimension-based product configuration
Dimension-based product configuration offers a straightforward approach for deriving numerous product variants from a singular product master and its BOM. It is grounded in the following foundational concepts:
- Product masters: To initiate product configuration, the product master is the essential first step. With dimension-based product configuration, both the product master equipped with this technology and a product dimension group that includes the configuration dimension are imperative.
- Configuration product dimension: This feature allows for the distinction of product variations within a product master through dimension-based configuration. By entering a configuration dimension value, the user can identify and select specific product variants.
- Configuration groups: A central repository stores these groups that apply to all dimension-based product configuration models. They are linked to specific lines in the BOM and make sure that only one line from a group can be chosen for a single product variant.
- BOM: The BOM must be used to create product configurations based on dimensions. It must list all individual products that can be utilized in any variant of the product. Each line of the BOM must be linked to a configuration group, and any line that doesn’t belong to a group must be included in all product variants.
- Configuration route: The order in which the configuration groups are presented to the user during product configuration is determined through the configuration route.
- Configuration rules: To ensure proper product configuration, it is crucial to follow these rules that dictate whether a product in one group of the BOM must require or exclude a product in another group within the same BOM.
In dimension-based configured products, the selection and creation of a variant for a product master are based on the choice made by the sales order taker, following the defined configuration rules.
Product configuration
A robust feature of Dynamics 365 Supply Chain Management, the product configuration toolset includes an interactive user interface that visually displays the product configuration model’s architecture. It also offers a declarative constraint syntax that eliminates the need for traditional compilation, enabling companies to easily adopt configuration practices.
By using the product configurator, you can create and maintain configuration models.
For more information, see Get started with product configuration in Dynamics 365 Supply Chain Management (https://learn.microsoft.com/en-us/training/modules/get-started-product-configuration-dyn365-supply-chain-mgmt/).
Creating and managing product states in the life cycle of a product
Every product experiences a unique journey, embarking on a voyage from inception, through active use, culminating in its eventual sunset. Establishing these phases allows you to dictate which transactions – be it sales orders, purchase orders, or production orders – are permitted, and which are blocked.
The evolution of products, particularly in engineering, is intrinsically intertwined with the product’s engineering version. Imagine orchestrating a scenario that utilizes a product dimension alongside a version – this setting enables you to use the life cycle state as a roadmap, guiding which transactions are permissible for each distinct version.
Establishing product life cycle states
To activate life cycle states, navigate to Engineering Change Management > Setup > Product Lifecycle State. Choose New to breathe life into a fresh life cycle or Edit to recalibrate the settings of existing states. In this form, you will find the following configurations:
- Header: Here, you need to add the name, the description, and the LifeState.
- General FastTab: This area presents two selections:
- Default when released to legal entity: Typically, this is for conventional products. You should choose Yes if you want the life cycle state to govern products when they’re unveiled to legal entities. Select No if you plan to apply the life cycle state manually at a later stage. For engineering products, this option is moot, as their life cycle is cemented upon assignment to an engineering change category.
- Is active for planning: Choosing Yes for this function signifies that it will factor in products that reside within this life cycle state when performing computations for master planning and BOM levels. If No is your choice, products inhabiting this state will be excluded from these calculations:
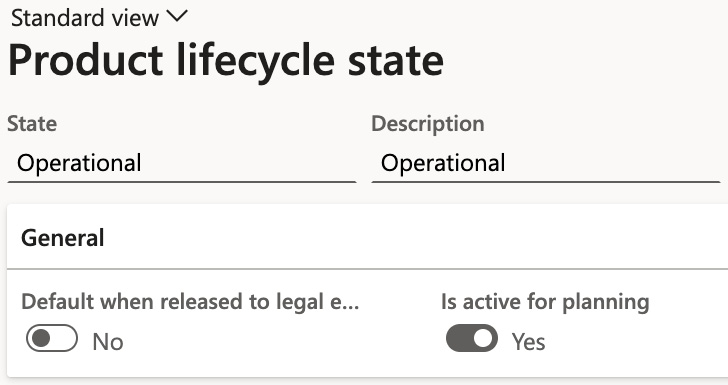
Figure 2.18 – The Product lifecycle state form
Situated within the Enabled Business Processes FastTab, you’ll find the Process column, which enumerates a pre-defined selection of potential business operations. The Process area column carries a default value that can be revised, though such a modification doesn’t yield any tangible impact.
The Policy column introduces three options to choose from:
- Enabled: This selection greenlights the corresponding business operation.
- Blocked: If this is chosen, the specified business operation is barred. Any attempt to proceed with this operation will be halted by the system, exhibiting an error message. An illustration of this scenario would be an attempt to issue a purchase order on an item that’s been classified as obsolete.
- Enabled with Warning: Opting for this introduces a cautionary measure. The system will flash a warning for certain circumstances, such as a production order employing a product that is currently in the design phase:
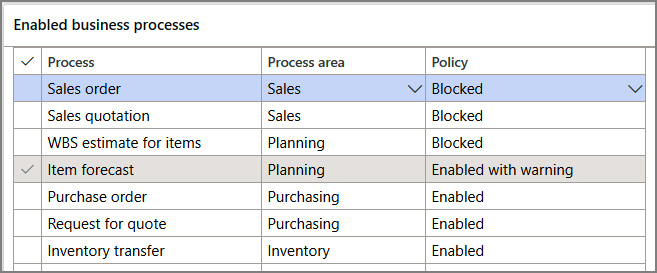
Figure 2.19 – Enabled business processes
Product templates
Product templates serve as vital tools, enabling seamless duplication of information from a released product to other chosen released products. These templates are instrumental in streamlining the process of establishing legal entity-specific data for products, particularly when numerous values are identical across different products:
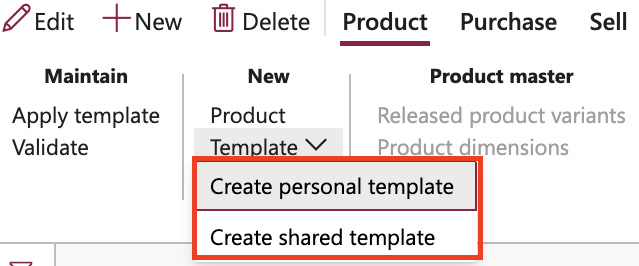
Figure 2.20 – New product template
Two categories of templates are at your disposal: personal templates and shared templates. A personal template serves as an exclusive tool for the creator, accessible only to the user who brought the template into existence. On the other hand, shared templates broaden the scope of accessibility, being available to any user within the system.
Designing and creating a BOM
A BOM is a list of all the important components needed to make a product. These components can include raw materials, partially finished items, or ingredients. Sometimes, even services can be included in a BOM. However, the main purpose of a BOM is to outline the materials required. When combined with a production plan that details the steps and resources needed to make the product, the BOM helps calculate the estimated cost of the product.
In this section, you will learn how to create BOMs and different versions of them using the BOM designer in Dynamics 365 Supply Chain Management.
You will need the following preconditions:
- Proficiency in supply chain management concepts
- Comprehension of how to generate products in Dynamics 365 Supply Chain Management
- Familiarity with inventory procedures within Dynamics 365 Supply Chain Management
Working with the BOM designer
The BOM Designer is a tool within Dynamics 365 Supply Chain Management that allows users to create and manage BOMs effectively. It provides a user-friendly interface and a range of features to simplify the process of defining and maintaining BOMs for various products. With the BOM Designer, users can easily add or remove components, specify quantities, define routing operations, and incorporate any necessary resources or services required for production. The tool helps streamline the creation of BOMs, ensuring accurate documentation of the materials and processes needed to manufacture a product.
Creating a BOM with the BOM designer
When you access the Designer page via the Released Products page, it reveals the hierarchy of active and approved BOMs for the chosen item, its default order site, and the current date. You can get there by going to Product Information Management > Products > Released Products > Engineer > BOM > Designer.
The BOM Designer consists of two main segments:
- Tree: This view provides a hierarchical view of the BOM structure.
- Details: This section offers detailed information on selected data. Selecting a node in the Tree view refreshes the FastTabs in the Details section to reflect that node, displaying relevant BOM line details, item data, BOM header, related route, and associated route operations.
The BOM Designer serves as a versatile tool for the following aspects:
- Constructing new BOM versions or modifying existing ones
- Editing and erasing BOM lines
- Validating BOMs for potential errors, such as BOM circularity
- Determining which BOM versions (if any) are linked to the selected BOM
- Tracking site assignments for BOM versions
- Printing BOMs and BOM lines for the chosen BOM
- Confirming the site linked to the BOM line
- Adding and editing BOMs and BOM lines
BOM lines or BOM functions can be utilized to alter BOM lines or the BOM itself. The functions available depend on the type of node selected in the tree. These functions can include editing BOM line attributes, deleting or adding BOM lines, creating new BOM versions, and more.
Here’s a brief overview of the BOM creation process:
- Create all products encompassed within all BOM versions that include the BOM itself.
- Generate a BOM.
- Construct BOM version(s), and then approve and activate them. This can be done either before or after adding the component products.
- Include products to specify which items should be encompassed in the BOM.
- If required, create configurations and associated rules for the BOM.
- Generate site-specific BOMs/routes to allow for automatic selection of the appropriate BOM and route version, as well as item dimensions, when working with multiple sites.
Creating a basic BOM without linking any items or versions
In Dynamics 365 Supply Chain Management, it is possible to create simple BOMs without the need to include any items. This provides the flexibility to build and alter as many simple BOMs as needed.
Follow these steps to navigate to the right location:
- Go to Product Information Management > Bills of Materials and Formulas > Bill of Materials.
Here, you can initiate the process of constructing your simple BOM with ease:

Figure 2.21 – The Bill of materials form
- The BOM Designer page serves as your creative canvas for designing and managing tree structures for BOMs. By selecting Setup, you can customize different configurations and dictate the information that graces each line of your tree.
- If you want to change the main selection in your view, simply click Filter. You can then choose to display only the specific BOM or route versions you want by selecting either Selected/Active or Selected. You also have the option to include non-approved and non-active BOM versions in your view if needed.
Keep in mind that if you access the BOM Designer from the Bill of materials list page, it won’t show any route information. When you select a BOM or route version, it applies to all instances of the BOM Designer. So, the changes you make will be reflected universally.
Selecting a BOM and route
In the BOM Designer, you can adjust the filter for the BOM and route by using the Filter dialogue box. You can modify the following fields:
- Configuration: If the finished product is a product master, you can select the active product dimensions for the primary selection. However, if it’s a non-product master, you cannot choose the product dimension selection in the Filter dialogue box.
- Site: You can modify the site represented by the BOM tree. By default, it shows the inventory site of the finished item.
- Display principle: This feature enables you to choose how BOM and route versions are presented in the current BOM structure. With Active or Selected/Active enabled, it shows the valid BOM or route version for the current date. With Selected/Active or Selected, you can select a specific BOM or route version by clicking BOM > BOM versions or Route > Route versions.
- Version date: You can indicate the date for the BOM and route version you want to use. This determines which BOM version is relevant for a specific date, based on the version dates established for the BOM versions.
- From quantity: You can filter the versions according to a specific “from quantity.” Depending on this value, different BOM and route versions may be chosen.
- Show valid only: If you tick this option, the tree structure will only display BOM lines with valid dates. By right-clicking or double-clicking on a BOM line, you can open the Edit BOM line page, where you can see the validity dates of that specific BOM line.
When working with BOMs that include one or more levels of phantoms, the route associated with the top item often covers the entire BOM hierarchy. To simplify the view, you can lock the top-level route display by selecting View | Lock route. To unlock it, choose View | Unlock route.
If the Resource consumption checkbox is unmarked and the Warehouse field is empty, the picking warehouse defaults to that from the item master data.
BOM and formula versions
If you want to link a specific BOM or formula with a product that can be produced, you need to create a BOM or formula version.
These versions can have restrictions based on different factors:
- A specific time frame
- Quantity of the product
- The site of production
- Unique product dimensions
- And any other special requirements
Formula versions also have essential features, such as the following:
- The expected yield or output
- Information about coproducts and by-products
- Guidelines on how costs should be distributed within the formula
To tweak these settings, you’ll have to go to Product Information Management | Bills of Materials and Formulas | Bills of Materials. Choose a product, then go to Header. It’s like following a treasure map to find the hidden settings you need!
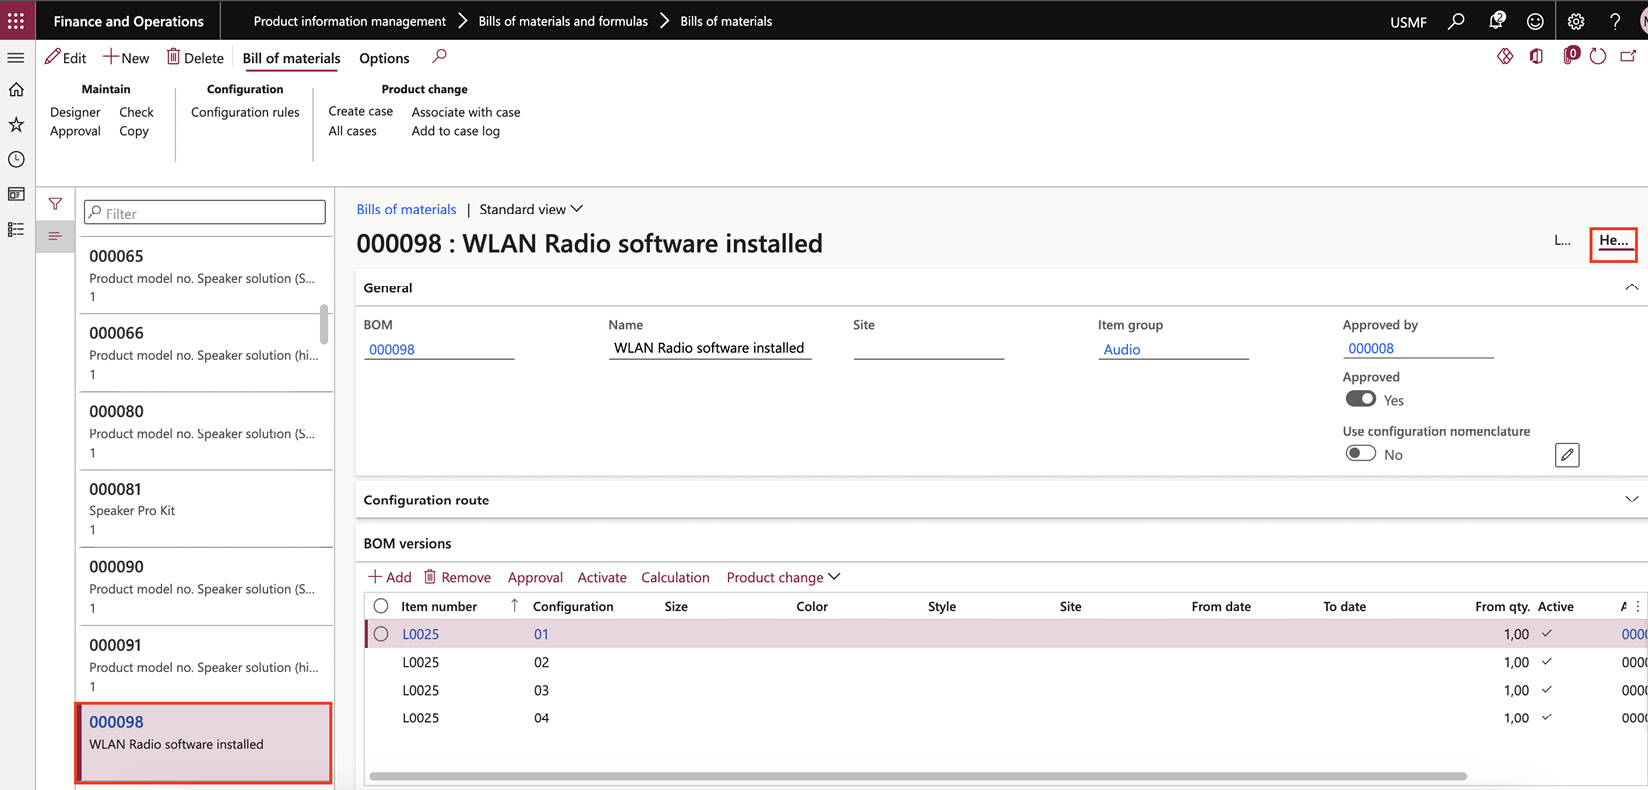
Figure 2.22 – Bill of materials detailed form
Approving and activating BOM and formula versions
Before incorporating a BOM version into your planning or manufacturing workflow, it’s important to obtain prior approval. This approval functions like a stamp of approval that ensures the document is officially usable. Additionally, the BOM linked to the version can also receive approval at the same time, but this depends on whether the user chooses this option and has the necessary permissions.
Remember, a BOM version can only obtain its stamp of approval if the BOM it’s linked to has already been approved. This is like a prerequisite in a course sequence where you must complete and pass the foundational course before advancing to the advanced one.
Activating the default BOM or formula version
To set a particular BOM or formula as the default version for master planning or production order creation, the version needs to be activated. Upon activation, the system verifies the version’s exclusivity for given constraints such as period, site, or quantity. Should the activated version conflict with an already active version, you’ll receive an error message. To resolve this, either deactivate the conflicting version or adjust the version constraints, typically the period, to avoid an ambiguous activation.
Product change with case management
The product change case offers an easy way to overview the BOM version constraints for approval and activation of new or altered BOMs and BOM versions. It also allows you to approve and activate all BOMs and formulas linked to a specific change for a certain activation date.
Alternative BOM versions
There may be times when you’d prefer not to use the active BOM version or formula version for forecasting, sales, or a parent product. In such cases, you can opt for a specific approved BOM as part of the requirement (be it a forecast line, sales line, or BOM line), provided an approved BOM version or formula version exists for the alternate BOM or formula.
When creating planned orders, production orders, or Kanbans, the planner or shop floor supervisor has the flexibility to use any approved BOM version that’s valid on the requested planned production date to plan or produce a particular product. The BOM version that’s used in this context isn’t obligated to be activated as the default BOM version. It’s like using a different recipe from the usual one when baking a cake, so long as it has been tested and approved, and is appropriate for the baking day.
For this, you must go to Product information management > Bills of materials and formulas > Bills of materials > Lines:
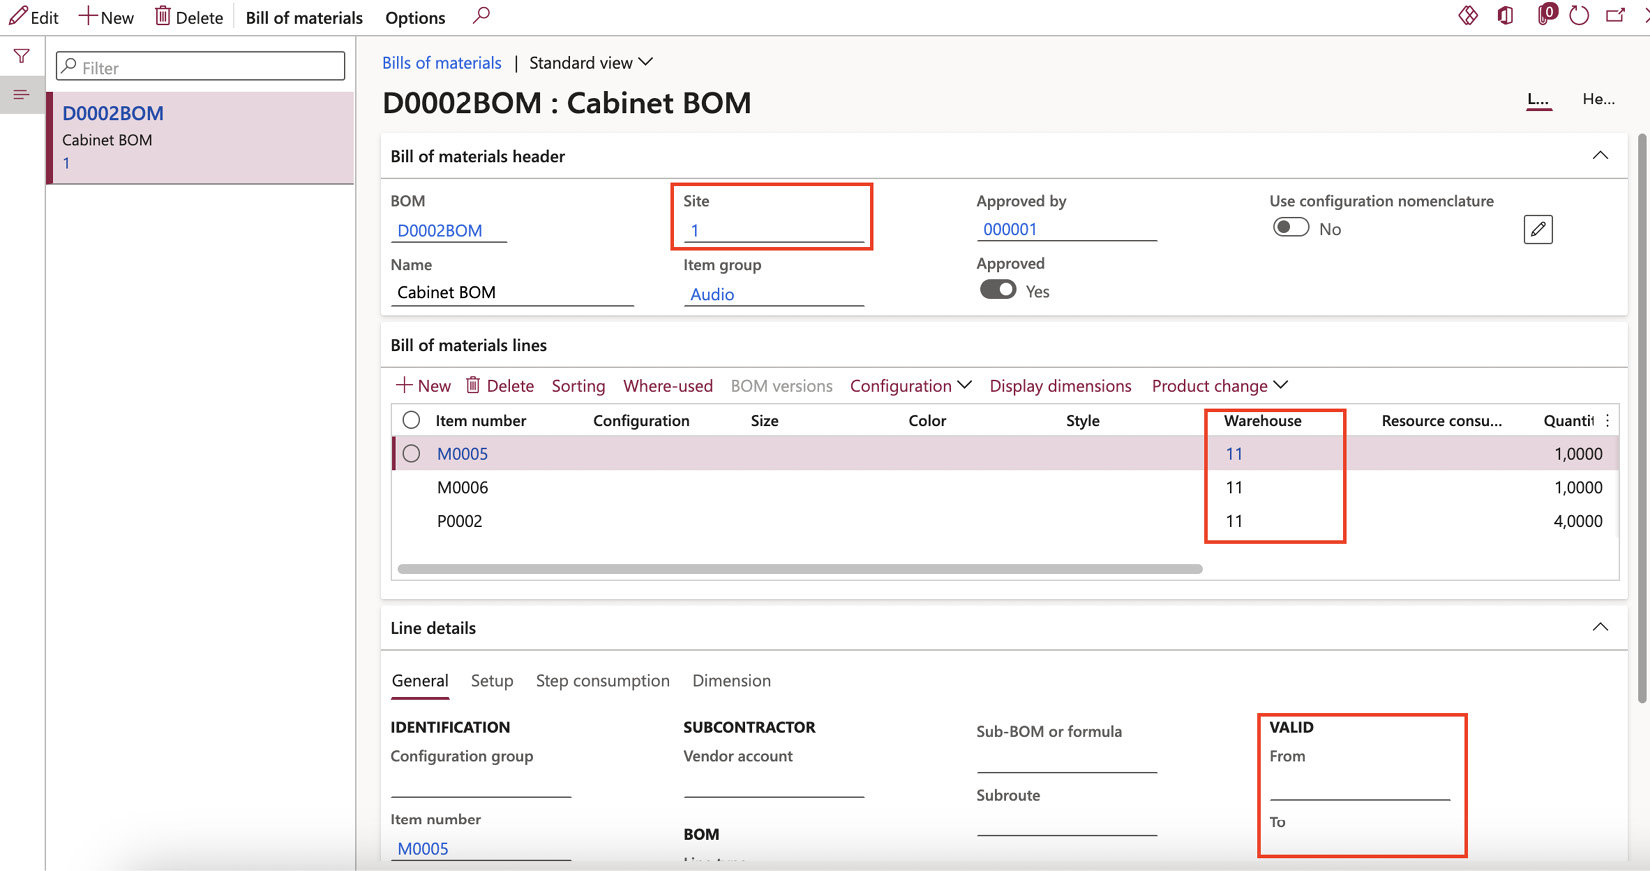
Figure 2.23 – Alternative BOM versions
BOM version control is crucial for accommodating ongoing changes to the item and employing various configurations, depending on the manufacturing circumstance. It allows for the phasing out of old components and the introduction of new ones.
Version control methods let you start and stop the production of select BOM versions. All BOM versions have an expiration date, but this can be avoided by approving and activating the new version. The system will then immediately start planning and purchasing based on the new active BOM version’s details.
For example, a company could decide to initiate production of its best-selling subwoofer model at a second operational site. A new BOM version for this subwoofer model, identical to the main version but for a different site, is then created, approved, and activated.
In addition to activating or deactivating versions, Dynamics 365 Supply Chain Management offers several other ways to control which BOM version is used in production. These methods include control by date and quantity and site control.
Legal entities can create multiple BOM versions (identical in quantity and dates) produced at different sites. In such a case, a BOM version can be created on the BOM line page and the site for which the BOM version is valid can be specified in the Site field. If a site is not specified, the BOM version is valid for all sites.
Site-based version control enables you to control which BOM versions are ready for production depending on the site where they are produced. Legal entities can assign a BOM to multiple products or versions, depending on where it originates and if the product must undergo different manufacturing processes.
Copying BOM versions
When BOMs are similar in Dynamics 365 Supply Chain Management, the copy functionality can simplify the creation of new versions. You can copy existing BOMs on the Copy BOM/route page. After copying the BOM items, you can change or delete the BOM lines that do not align with the new version, and then insert new lines. If the existing BOM contains configurations, the system also copies the configurations, together with their rules and routes, to the new BOM.
Changing BOM versions
You may need to alter BOM versions due to component changes, shifts in the associated vendor, stock shortages, or necessary upgrades of the original item.
Here are the steps to change a BOM version:
- Create a BOM and a BOM version.
- Approve the new version.
- Specify the dates/site for the active period of this version and activate it.
- Copy the BOM from an existing version.
- Make any required changes to the item or items in the new version.
BOM line types
Dynamics 365 Supply Chain Management provides a variety of BOM line types:
- For materials or services that are directly consumed and do not require further explosion or pegged supply, use the Item line type.
- If you want to create a sub-production, a BOM line event Kanban, or a direct purchase order for any product variant referenced by the BOM line, choose the Supply line type. The necessary item quantities are automatically reserved for the consuming production order when you estimate the production order.
- When you want to explode any lower-level BOM items included on the BOM line, choose the Phantom line type. Note that Phantoms are typically used to simplify the engineering process, but extensive use of phantom BOMs at many levels can affect performance. To improve performance, avoid deep hierarchies of phantoms and use pre-exploded production BOMs and routes instead.
- Use the Vendor line type if a subcontractor is involved in the production process and you want a sub-production or purchase order to be automatically created for the subcontractor.
Navigate to Product information management > Bills of material and formulas > Bills of materials:
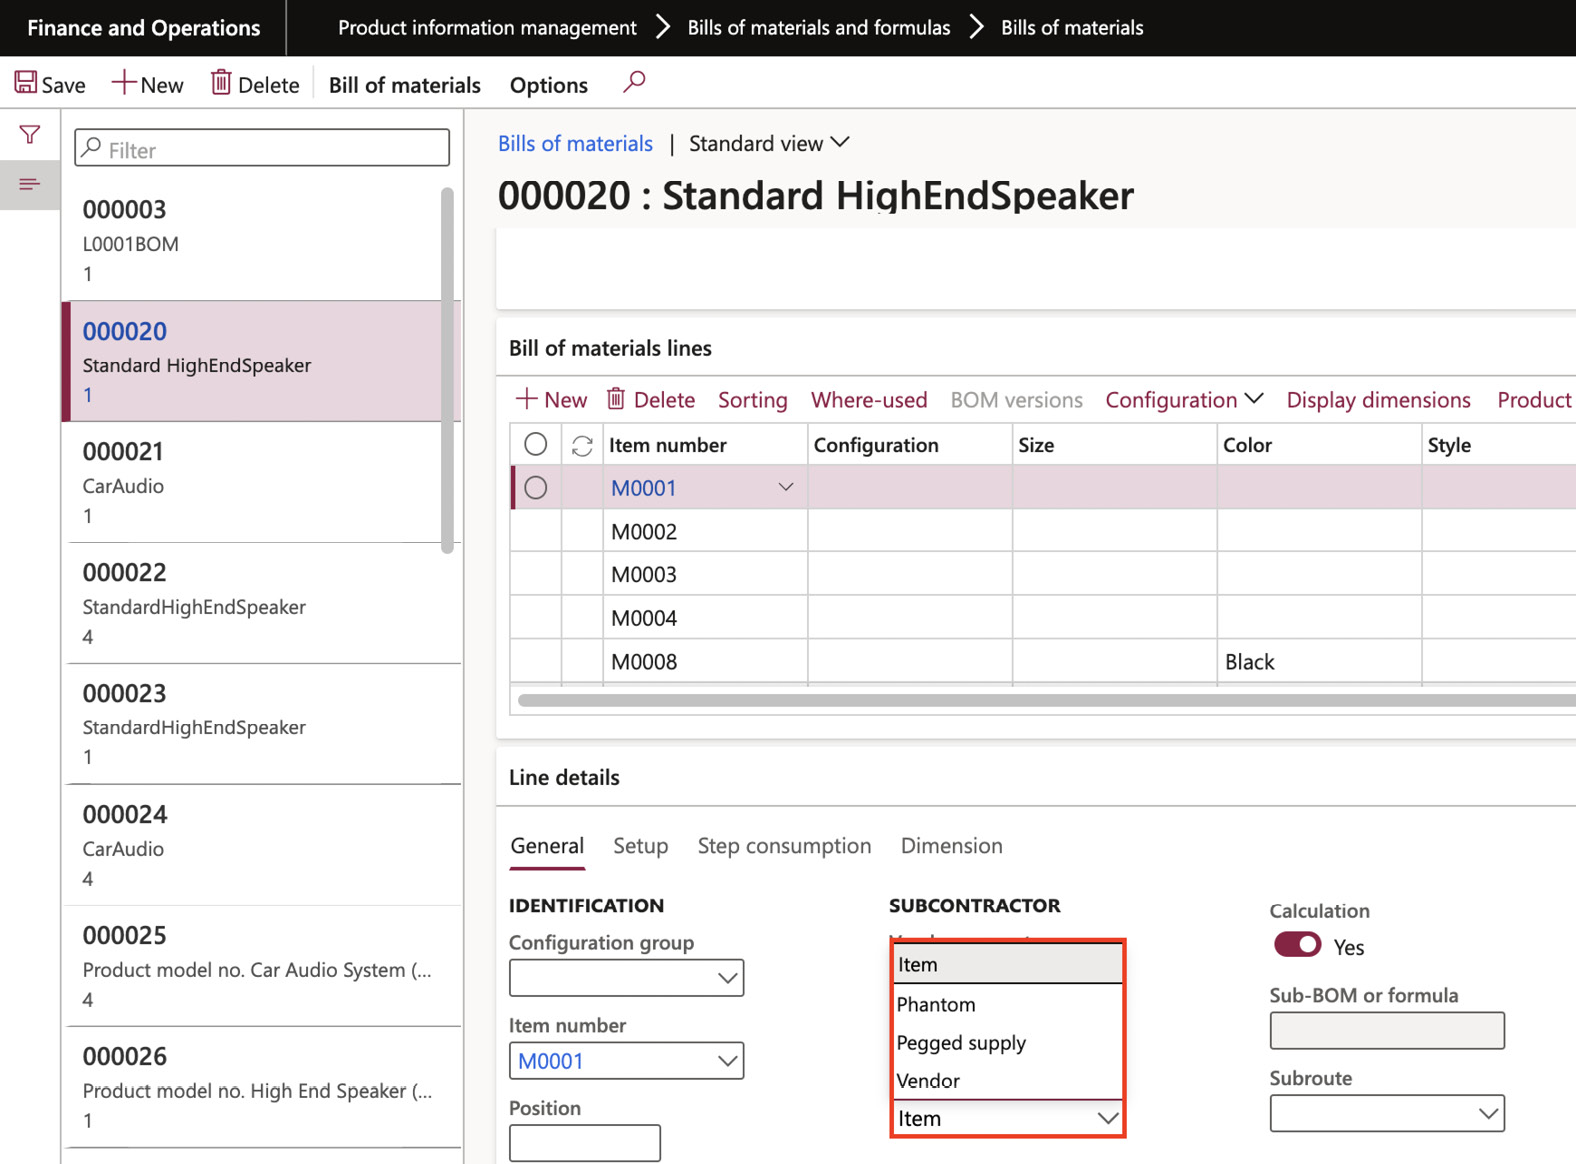
Figure 2.24 – Item line type options
BOM levels
BOMs outline the components necessary to produce a product. The complexity of these structures can vary:
- Single-level BOM: This type of BOM includes only the immediate components required to construct the product. It does not delve into the constituents of these components.
- Multi-level BOM: A multi-level BOM occurs when a BOM contains another BOM as a part of its composition. In this scenario, the subordinate BOM is considered the first level, and its components form the second level. Depending on the intricacy of the product being manufactured, BOMs can have as many levels as needed.
To access and manage these structures, navigate to Product information management > Bills of materials and formulas > Bill of materials > (select product) > Maintain > Designer:
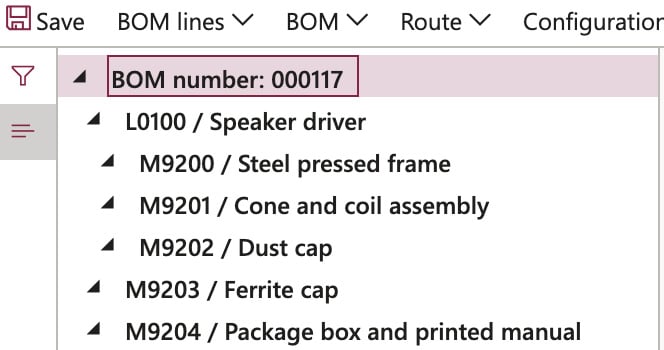
Figure 2.25 – BOM Designer
In the world of process manufacturing, a formula plays a crucial role in determining the materials, ingredients, and results of a specific process. It is accompanied by a corresponding route that outlines the entire process, which is used to plan and create products.
A formula usually contains one or more formula lines that identify the items or ingredients included in the formula. These lines can feature various items, including BOM items, formula items, catch weight items, purchased items, co-products, or by-products.
To create a new formula, you must start with the creation of a formula version before adding the formula line items. It is vital to have at least one version for every formula. Each formula version corresponds to one or more co-products and by-products that are produced alongside the final product.
Formulas come with unique features such as version control, graphical representation, formula size, formula multiples, yield, and quantity-dependent formula versions. Other features include total cost allocation, use for calculation, plan group, step consumption, and scalable lines.
These features provide advanced control and flexibility when managing formulas:
- Version control: Like BOMs, formula version control assists in phasing out outdated ingredients and incorporating new ones. It also allows for selecting alternative versions, depending on production or planning needs.
- Graphical formula: The formula designer allows you to visualize the formula structure in a graphical format. This graphic includes formula versions, co-products, and by-products.
- Formula size: The formula size, given in the Per quantity field on the formula lines, serves as a baseline. Modifying this field will update all Per quantity fields in the formula lines.
- Formula multiples: Formula multiples help determine the permissible batch order size for production through master planning or manual batch order. The formula size should meet the multiples requirement.
- Yield: You can specify a yield on the formula versions. The yield factor is applied to all formula lines when a batch order is created and is calculated as (actual output / theoretical output) * 100%.
- Quantity-dependent formula versions: Depending on the ordered amount of a formula item, you can choose different formula versions. For instance, for orders less than 500 kg, you might use Version 1; for orders over 500 kg, Version 2 might be applied.
- Total cost allocation: This feature allows you to allocate the total production cost across co-products and the formula item. For planning items, the entire cost is allocated across the co-products.
- Use for calculation: This feature determines which formula size should be used if there are percent-controlled items to calculate quantity on the formula line.
- Plan group: Plan groups facilitate the substitution of items based on a priority ranking. Items within a group can be interchanged based on this priority.
- Step consumption: This functionality enables setting up complex (non-linear) consumption rules without the need for multiple BOMs or formulas.
- Scalable lines: This indicates whether a formula line is scalable based on the Formula size field or other scalable formula lines. If these quantities are updated, all scalable lines will adjust to maintain current ratios.
- Approving and activating formulas: Before they can be used for planning and production, formulas and formula versions need to be approved. Usually, formulas are activated before use. However, during production, a formula version that is approved but not activated can be selected.
The following are important mechanisms to ensure data integrity and maintain rigorous control over formulas and their versions:
- Block Editing: By activating this option, no fields on the formula lines can be edited or deleted once the formula has been approved. However, if the approval of the formula is removed, changes can be made to the formula lines. New formulas and new formula versions can also be created, regardless of this setting.
- Block Removal of Approval: When this option is selected, the approval of an approved formula or formula version cannot be removed. Nevertheless, the creation of new formulas and new formula versions is allowed, as is the removal of a formula version’s activation.
- Signature: Utilizing the electronic signature functionality can enhance the security and control mechanisms in a system. If configured to necessitate an electronic signature upon formula approval, an interface requiring signature validation appears upon the formula’s activation.
The user must possess proper electronic signing credentials, and the certificate must be validated successfully before the system commits any alterations. If the system fails to authenticate the signature, it denies the approval or reversal of approval, reverting all changes that initiated the respective processes.
These security layers assist organizations in maintaining precise and reliable records of their formula evolution. This traceability is paramount in regulated sectors where strict compliance and accountability are obligatory.
From a more technical perspective, a BOM is a comprehensive inventory of all the essential components, assemblies, and sub-assemblies required to fabricate a product. It often includes detailed procedures necessary for procuring and employing the requisite materials.
Now that we’ve reviewed the bill of materials functionalities let’s dive into the product configurator functionality to extend those options.
Product configurator – purpose and advantages
A product configuration model is a system that allows manufacturers to manage various product variants in an organized manner. This model ensures products meet customer specifications, streamlines production, and reduces costs associated with carrying unnecessary inventory. The model consists of several key elements:
- Components: These are the building blocks of a product configuration model. Each component represents a portion of the product that can be defined and used multiple times in different product models.
- Attributes: These are properties associated with a component. The chosen attributes during the configuration process will determine the characteristics of the final product. They control inter-component and intra-component relationships and can influence the physical parts that make up the product.
- Expression constraints and table constraints: These constraints control the attribute values that can be chosen when configuring products for various types of orders. Users can build these constraints using either expression or table constraints, depending on their preference.
- User requirements: These represent specific needs or desires for the product configuration from the user’s perspective. They contain all the elements of a subcomponent, but unlike a subcomponent, they’re not bound to a product master. This means that any BOM lines or route operations defined within a user requirement are integrated into the parent component BOM structure or route, much like a phantom BOM.
A Phantom BOM is a type of BOM that represents a group of materials that are processed together but not stored as a single unit. This approach allows manufacturers to create and manage complex products more effectively.
These elements, together, enable a comprehensive and versatile product configuration model, giving manufacturers the ability to create a wide range of product variants without significantly increasing complexity or inventory costs.
Configuring catch weights
Catch weight is a key concept in industries where products vary in their weight or size, yet are packaged similarly. It allows for dual tracking in both an inventory unit and a catch weight unit. Here’s a deeper explanation:
- Inventory unit: This unit of measure is how the product is usually stored or inventoried. For example, this could be by the number of bags, boxes, or packages.
- Catch weight unit: This unit of measure relates to how the product is sold or used. This could be by weight (kilograms, pounds) or volume.
A catch weight item has a specified range of inventory units, meaning each unit can vary in actual weight, but it stays within a set range. This helps accurately price items and allows for fair transactions, considering the inherent weight discrepancies.
Here are some examples in the food industry:
- Fish: Typically counted in inventory by the number of crates or boxes, but when sold, it is priced and weighed by the kilogram or pound.
- Cheese wheels: Stored and inventoried by the number of wheels, but when sold, they are priced and weighed by the kilogram or pound, as each wheel can vary in weight.
- Bulk grains or seeds: Stored as sacks or bags, sold by weight. While the number of sacks is inventoried, the weight of each sack can vary and therefore needs to be recorded.
To manage catch weight items, two methods can be employed:
- Partial visibility
- Full visibility
Let’s take a closer look.
Partial visibility
In this method, the catch weight is known and visible only after the inventory unit is packed and ready for shipment or at the point of sale.
In certain industries, such as those dealing with bulk grains or seeds, the principle of partial visibility within catch weight management is profoundly beneficial. These industries typically employ machines to package containers, each holding a quantity of the product that falls within a specified weight tolerance. The collective weight of these manufactured containers holds significance, while the minute weight differences between individual bags do not warrant separate tracking.
For a catch weight item applying partial visibility, multiple inventory units can be grouped under a common batch or serial number. In this case, only the total value of the inventory unit is recorded, eliminating the need to log individual unit values. Therefore, for every transaction involving the inventory unit, the aggregate weight becomes a necessary input.
Given that individual container weights are not monitored, every inventory transaction, whether it be a transfer or shipment, necessitates recording the number of containers and their cumulative weight in the system for effective weight management.
When employing the partial visibility approach, if the entire catch weight quantity or dimension isn’t earmarked, a portion equivalent to the minimum catch weight inventory will be set aside for that particular dimension. The gap between the physically reserved and the nominal quantity on order will remain on order until actual picking is conducted.
Consider, for instance, a scenario where three bags of bulk grains or seeds, all sharing the same batch number, arrive in the warehouse. During the product receipt process, a single transaction records both the quantity of bags and their combined weight. This total weight is an aggregation of all three bags and does not reflect the individual weights of each bag.
Full visibility
Here, the catch weight is known and tracked through all inventory transactions and stages of the product life cycle, starting from the receiving dock to the point of sale.
Full visibility is crucial in industries where the exact weight of a container must always be known, and this weight doesn’t change once the container has been created – a prime example being wheels of cheese. Each wheel is produced and packaged, its weight precisely measured, and given a unique serial number. This known weight remains constant until the point of shipment, at which time it is invoiced to the customer.
Catch weight items with full visibility necessitate that every inventory unit is assigned a distinct serial number, and the specific weight of that unit is meticulously recorded. Thus, a unique serial number becomes intrinsically linked with the weight of the inventory unit.
The full visibility catch weight truly excels in certain conditions:
- When the weight of individual physical units, or handling units, needs to be tracked
- When finished products leave the factory or warehouse and do not require re-weighing, such as a 10 kg box of frozen chicken drumsticks
- When a variation in weight between individual handling units has implications for the cost and sales price of those units
- When the weight, once entered at a certain stage in the process, is expected to remain the same
Catch weight items serve several purposes:
- They allow for the creation of sales and purchase agreements in catch weight units. This is particularly handy for items priced per box, not by weight, such as boxes of oranges.
- They enable customer orders to be made in terms of boxes/packages, with the payment being based on weight.
- They make it possible to create purchase orders in catch weight units, which is ideal when ordering items priced per container.
- They provide the capability to view net requirements in catch weight units.
- They facilitate the creation of shipment staging in catch weight units.
- They aid in producing picking lists in catch weight units.
- They offer visibility into on-hand inventory in catch weight units.
- They permit the creation of formula lines in catch weight units when a whole container is used in a formula line.
The choice between partial and full visibility largely depends on the industry requirements, the nature of the product, and the information available at different stages of handling the product. Catch weight management helps companies improve inventory control, reduce waste, enhance product pricing, and increase overall operational efficiency.
Direct delivery products
Direct delivery presents an efficient method for users to craft a purchase order straight from a sales order, allowing the vendor to ship the order to the customer directly, thereby circumventing the need for the selling company to physically handle the goods. This streamlines the delivery process, diminishes delivery times, and mitigates the costs associated with maintaining inventory, as products are no longer required to be stored in your warehouse before being dispatched to the customer.
Setting up products for direct delivery
To designate a product for direct delivery, navigate to Product information management > Products > Released products. On the Deliver FastTab, slide the Direct delivery switch to Yes and define the warehouse for direct delivery:

Figure 2.26 – The Direct delivery flag
Executing the direct delivery process
Imagine you’re at your desk, all set to organize some direct deliveries. You’ve got your trusty Sales order page open on your screen. First things first, you start a new sales order and make a list of order lines – it’s a bit like writing a shopping list. Now, go ahead and look for the Direct delivery button. It’s hanging out on the Sales order tab in the action pane. Click that button and start pointing out which lines on your list are meant to be a direct delivery.
This is when the magic happens! Your sales order lines that you marked for direct delivery are now linked with their matching purchase order lines. It’s like they’re two friends holding hands.
There’s something you should remember, though. If some of the stuff you ordered has already been sent your way, you’ll have to do a little bit of juggling with the leftover quantity. It’s like splitting a pizza with friends after a few slices are already taken – you have to adjust. So, if you originally ordered 15 items and already got 5, make a new line for the remaining 10 items. Just don’t forget to take this amount from the original line.
Once you’ve created this bridge of direct delivery between the sales order lines and the purchase order lines, you’re ready to tweak the sales order with a packing slip. It’s sort of like wrapping up a present and putting a bow on it – it just makes it look finished. From the purchase order, you can do a packing slip update or an invoice update. But remember, if you’re doing an invoice update, you’ve got to do it from the Sales order page. And one more thing – the invoice update should not make the quantity on the sales order bigger than the amount you have received. After all, you can’t claim to have more pizza than you received, right?
Understanding delivery dates and addresses
You’ve got your sales order line on your screen, and you decide to update the requested receipt date. As soon as you do this, the delivery date on the related purchase order line changes as well. It’s like two twins who always want to match their clothes; you change one and the other one automatically updates!
Now, when you’re dealing with a direct delivery, there’s a twist. Normally, we’d use the company’s address as the delivery address. But not this time. Instead, we write in the customer’s address. It’s kind of like sending a postcard to a friend – you write their address, not your own!
Let’s say you need to change the delivery address on a direct delivery order line. Well, guess what? The sales order line is like a copycat – it will also update its delivery address to match. Just like when you tell your buddy you’ve moved house, they’d update your address in their contacts too. It’s just that simple!
Handling deletions and warehouse requirements
Trying to remove a direct delivery sales order line is like trying to pick a card from a house of cards. The system alerts you because purchase order lines are linked to it, like cards in your tower.
And if some of the order is already on their way, you can’t delete the sales order line or the linked purchase orders. It’s like you can’t take back a move in a board game once it’s played.
Even though direct delivery items don’t visit your warehouse, you still have to pretend and note down a warehouse on the sales order line. You might have picking rules for the item, but they’re ignored for direct deliveries. It’s like having a rule for a game that you don’t use when playing a different version of the game.
Summary
At this point, we have gained a deeper understanding of the Product Information Management (PIM) module in Dynamics 365 Supply Chain Management, which has equipped us with a powerful suite of tools to design, centralize, manage, and optimize product data. By using PIM, we can ensure consistent and high-quality product information across multiple channels, streamline product introduction processes, and improve collaboration between different business units.
With this chapter, you should have gained a strong understanding of PIM and how crucial it is to comprehensively address various business processes and unlock the full potential of Dynamics 365. Now that you’ve acquired this knowledge, you will be able to effectively utilize the tool’s capabilities. Instead of struggling with module customization or acquiring additional tools, many queries and challenges can be resolved through straightforward configuration adjustments or flag activation.
If you are still considering a change in your career path, having a strong proficiency in PIM not only makes you an invaluable asset to organizations utilizing Microsoft Dynamics 365 but also prepares you for diverse roles such as PIM Administrator, Product Manager, or Supply Chain Consultant.
In the next chapter, we will learn the most important topics related to Inventory Management in Dynamics 365 Supply Chain Management, Inbound Operations, Outbound Operations, and the internal operations required to maintain the stocks of our businesses in optimal conditions.

