


Note
"If I had eight hours to chop down a tree, I'd spend six hours sharpening my axe."
Abraham Lincoln, 16th US President
Behind every successful execution is hours or days of preparation, and Wireless Penetration testing is no exception. In this chapter, we will create a wireless lab that we will use for our experiments in this book. Consider this lab as your preparation arena before you dive into the real-world penetration testing!
Wireless Penetration testing is a practical subject and it is important to first setup a lab where we can try out all the different experiments in this book in a safe and controlled environment. It is important that you set up this lab first before proceeding ahead in this book.
In this chapter, we shall look at the following:
Hardware and software requirements
BackTrack 5 installation
Setting up an access point and configuring it
Installing the wireless card
Testing connectivity between the laptop and the access point
So let the games begin!
We will need the following hardware to set up the wireless lab:
Two laptops with internal Wi-Fi cards: We will use one of the laptops as the victim in our lab and the other as the penetration tester's laptop. Though almost any laptop would fit this profile, laptops with at least 3 GB RAM is desirable. This is because we may be running a lot of memory-intensive software in our experiments.
One Alfa wireless adapter: We need a USB Wi-Fi card that can support packet injection and packet sniffing, and that is supported by Backtrack. The best choice seems to be the Alfa AWUS036H card from Alfa Networks as BackTrack supports this out-of-the-box. This is available on Amazon.com for a retail price of $34 at the time of writing.
One access point: Any access point which supports WEP/WPA/WPA2 encryption standards would fit the bill. I will be using a D-LINK DIR-615 Wireless N Router for the purpose of illustration in this entire book. You can purchase it from Amazon.com where it is retailing at around $35 at the time of writing.
An Internet connection: This will come in handy to perform research, download software, and for some of our experiments.
We will need the following software to set up the wireless lab:
BackTrack 5 : BackTrack can be downloaded from their official website located at http://www.backtrack-linux.org. The software is open source and you should be able to download it directly from the website.
Windows XP/Vista/7: You will need any one of Windows XP, Windows Vista, or Windows 7 installed in one of the laptops. This laptop will be used as the victim machine for the rest of the book.
It is important to note that even though we are using a Windows-based OS for our tests, the techniques learnt can be applied to any Wi-Fi capable devices such as Smart Phones and Tablets, among others.
BackTrack is relatively simple to install. We will run BackTrack by booting it as a Live DVD and then install it on the hard drive.
Perform the following instructions step-by-step:
Burn the BackTrack ISO (we are using the BackTrack 5 KDE 32-Bit edition) that you have downloaded into a bootable DVD.
Boot the laptop with this DVD and select the option BackTrack Text – Default Boot Text Mode from the boot menu:

If booting was successful then you should see the familiar BackTrack screen:

You can boot into the graphical mode by entering startx on the command prompt. Enjoy the boot music! Once you are in the GUI, your screen should resemble the following:

Now click on the Install BackTrack icon to the top-left of the desktop. This will launch the BackTrack installer as shown next:

This installer is similar to the GUI-based installers of most Linux systems and should be simple to follow. Select the appropriate options in each screen and start the installation process. Once the installation is done, restart the machine as prompted, and remove the DVD.
Once the machine restarts, it will present you with a login screen. Type in the login as "root" and password as "toor". You should now be logged into your installed version of BackTrack. Congratulations!
I will be changing the desktop theme and some settings for this book. Feel free to use your own themes and color settings!
We have successfully installed BackTrack on the laptop! We will use this laptop as the penetration tester's laptop for all other experiments in this book.
We can also install BackTrack within virtualization software such as Virtual Box. For readers who might not want to dedicate a full laptop to BackTrack, this is the best option. The installation process of BackTrack in Virtual Box is exactly the same. The only difference is the pre-setup, which you will have to create in Virtual Box. Have a go at it! You can download Virtual Box from http://www.virtualbox.org.
One of the other ways we can install and use BackTrack is via USB drives. This is particularly useful if you do not want to install on the hard drive but still want to store persistent data on your BackTrack instance, such as scripts and new tools. We would encourage you to try this out as well!
Let us begin! We will set the access point up to use Open Authentication with an SSID of "Wireless Lab".
Follow these instructions step-by-step:
Power on the access point and use an Ethernet cable to connect your laptop to one of the access point's Ethernet ports.
Enter the IP address of the access point configuration terminal in your browser. For the DIR-615, it is given to be 192.168.0.1 in the manual. You should consult your access point's setup guide to find its IP address. If you do not have the manuals for the access point, you can also find the IP address by running the
route –ncommand. The gateway IP address is typically the access point's IP. Once you are connected, you should see a configuration portal which looks like this:
Explore the various settings in the portal after logging in and find the settings related to configuring a new SSID.
Change the SSID to Wireless Lab. Depending on the access point, you may have to reboot it for the settings to change:

Similarly, find the settings related to Authentication and change the setting to Open Authentication. In my case, the Security Mode configuration of None indicates that it is using Open Authentication mode.
Save the changes to the access point and reboot it, if required. Now your access point should be up and running with an SSID Wireless Lab.
An easy way to verify this is to use the Wireless Configuration utility on Windows and observe the available networks using the Windows Laptop. You should find Wireless Lab as one of the networks in the listing:
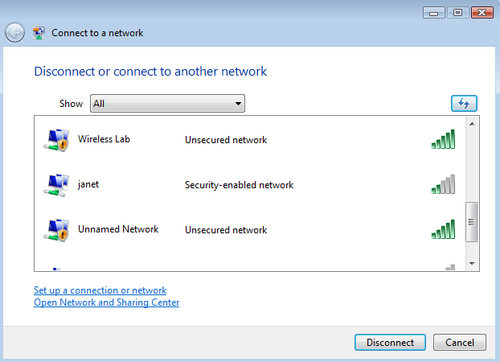
We have successfully set up our access point with an SSID Wireless Lab. It is broadcasting its presence and this is being picked up by our Windows laptop and others within the Radio Frequency (RF) range of the access point.
It is important to note that we have configured our access point in Open mode, which is the least secure. It is advisable not to connect this access point to the Internet for the time being, as anyone within the RF range will be able to use it to access the Internet.
Play around with the configuration options of your access point. Try to see if you can get it up and running using encryption schemes such as WEP and WPA/WPA2. We will use these modes in the later chapters to illustrate attacks against them.
We will be using the Alfa wireless card with the penetration tester's laptop.
Please follow these instructions step-by-step to set up your card:
Plug in the card to one of the BackTrack laptop's USB ports and boot it.
Once you log in, open a console terminal and type in
iwconfig. Your screen should resemble as follows:
As you can see,
wlan0is the wireless interface created for the Alfa wireless card. Type inifconfig wlan0 upto bring the interface up. Then type inifconfigwlan0to see the current state of the interface:
The MAC address
00:c0:ca:3e:bd:93should match the MAC address written under your Alfa card. This is a quick check to ensure that you have enabled the correct interface.
BackTrack ships with all the required drivers for the Alfa card. As soon as the machine booted, the card was recognized and was assigned the network interface wlan0. By default, all network interfaces in BackTrack are disabled on boot. We enabled the interface using the ifconfig command. Now our Alfa card is up and functional!
Here we go! Follow these steps to connect your wireless card to the access point:
Let us first see what wireless networks our Alfa card is currently detecting. Issue the command
iwlist wlan0 scanningand you will find a list of networks in your vicinity:
Keep scrolling down and you should find the
Wireless Labnetwork in this list. In my setup, it is detected asCell 05, it may be different in yours. TheESSIDfield contains the network name:
As multiple access points can have the same SSID, verify that the MAC address mentioned in the
Addressfield above matches your access point's MAC. A fast and easy way to get the MAC address is underneath the access point or using the web-based GUI settings.Now, issue the command
iwconfig wlan0 essid "Wireless Lab"and theniwconfig wlan0to check the status. If you have successfully connected to the access point, you should see the MAC address of the access point in theAccess Point:field in the output ofiwconfig, as shown in the following screenshot:
We know the access point has a management interface IP address "192.168.0.1" from its manual. Alternatively, this is the same as the default router IP address when we run the
route –ncommand. Let's set our IP address in the same subnet by issuing the commandifconfig wlan0 192.168.0.2 netmask 255.255.255.0 up. Verify the command succeeded by typingifconfig wlan0and checking the output:
Now let's ping the access point by issuing the command
ping 192.168.0.1. If the network connection has been set up properly, then you should see the responses from the access point. You can additionally issue anarp –ato verify that the response is coming from the access point. You should see that the MAC address of the IP 192.168.0.1 is the access point's MAC address we have noted earlier. It is important to note that some of the more recent access points might have response to ICMP Echo Request packets disabled. This is typically done to make the access point secure out-of-the-box with only the bare minimum configuration settings available. In such a case, you could try to launch a browser and access the web interface to verify that the connection is up and running.
On the access point, we can verify the connectivity by looking at the connection logs. As you can see in the following log, the MAC address of the wireless card
00:c0:ca:3a:bd:93has been logged:
We just connected to our access point successfully from BackTrack using our Alfa wireless card as the wireless device. We also learnt how to verify that a connection has been established at both the wireless client and the access point side.
Here is a challenging exercise for you—set up the access point in WEP configuration. For each of these, try establishing a connection with the access point using the wireless adapter. Hint: Check the manual for the iwconfig command by typing man iwconfig for how to configure the card to connect to WEP.
After issuing the command
ifconfig wlan0 up, how do you verify the wireless card is up and functional?Can we run all our experiments using the BackTrack live CD alone? And not install it to the hard drive?
What does the command
arp –ashow?Which tool should we use in BackTrack to connect to WPA/WPA2 networks?
This chapter provided you with detailed instructions on how to set up your own wireless lab. Also, in the process, you have learned the basic steps towards:
Installing BackTrack on your hard drive and exploring other options like VMware and USB
Configuring your access point over the web interface
Understanding and using several commands to configure and use your wireless card
How to verify the connection state between the wireless client and the access point
It is important that you gain confidence in configuring the system. If not, it is advisable that you repeat these examples a couple of times. In later chapters, we will be designing more complicated scenarios.
In the next chapter, we will learn about the inherent insecurities in WLANs because of design. We will be using the network analyzer tool Wireshark to understand these concepts in a practical way.