


In this chapter, we will cover the following points:
Designing an application with the MVC pattern
Defining business logic with models and collections
Modeling an application's behavior with views and a router
Creating an application structure from scratch
Writing your first Backbone application
Implementing URL routing in your application
Extending an application with plugins
Contributing to the Backbone project
Backbone.js is a lightweight JavaScript framework that is based on the Model-View-Controller (MVC) pattern and allows developers to create single-page web applications. With Backbone, it is possible to update a web page quickly using the REST approach with a minimal amount of data transferred between a client and a server.
Backbone.js is becoming more popular day by day and is being used on a large scale for web applications and IT startups; some of them are as follows:
Groupon Now!: The team decided that their first product would be AJAX-heavy but should still be linkable and shareable. Though they were completely new to Backbone, they found that its learning curve was incredibly quick, so they were able to deliver the working product in just two weeks.
Foursquare: This used the Backbone.js library to create model classes for the entities in foursquare (for example, venues, check-ins, and users). They found that Backbone's model classes provide a simple and light-weight mechanism to capture an object's data and state, complete with the semantics of a classical inheritance.
LinkedIn mobile: This used Backbone.js to create its next-generation HTML5 mobile web app. Backbone made it easy to keep the app modular, organized, and extensible, so it was possible to program the complexities of LinkedIn's user experience. Moreover, they are using the same code base in their mobile applications for iOS and Android platforms.
WordPress.com: This is a SaaS version of Wordpress and uses Backbone.js models, collections, and views in its notification system, and is integrating Backbone.js into the Stats tab and into other features throughout the home page.
Airbnb: This is a community marketplace for users to list, discover, and book unique spaces around the world. Its development team has used Backbone in many latest products. Recently, they rebuilt a mobile website with Backbone.js and Node.js tied together with a library named Rendr.
You can visit the following links to get acquainted with other usage examples of Backbone.js:
http://backbonejs.org/#examples
Backbone.js was started by Jeremy Ashkenas from DocumentCloud in 2010 and is now being used and improved by lots of developers all over the world using Git, the distributed version control system.
In this chapter, we are going to provide some practical examples of how to use Backbone.js, and we will structure a design for a program named Billing Application by following the MVC and Backbone pattern. We will also refer to this structure in the later chapters of this book. Reading this chapter is especially useful if you are new to developing with Backbone.js. If you feel that you're an experienced developer, you can skip this chapter.
MVC is a design pattern that is widely used in user-facing software, such as web applications. It is intended for splitting data and representing it in a way that makes it convenient for user interaction. To understand what it does, understand the following:
There could be some differences in the MVC implementation, but in general it conforms to the following scheme:

Worldwide practice shows that the use of the MVC pattern provides various benefits to the developer:
Following the separation of the concerned paradigm, which splits an application into independent parts, it is easier to modify or replace
It achieves code reusability by rendering a model in different views without the need to implement model functionality in each view
It requires less training and has a quicker startup time for the new developers within an organization
To have a better understanding of the MVC pattern, we are going to design a Billing Application. We will refer to this design throughout the book when we are learning specific topics.
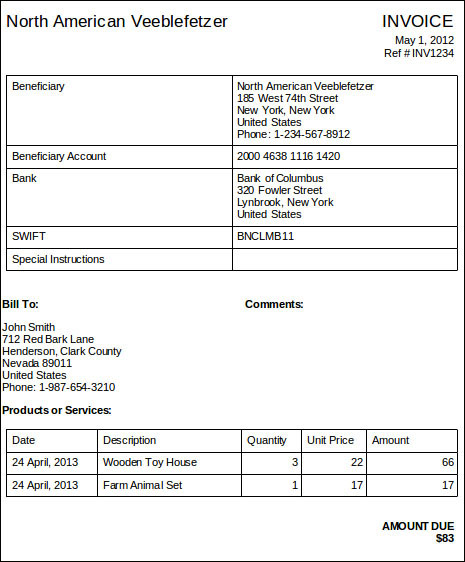
Our Billing Application will allow users to generate invoices, manage them, and send them to clients. According to the worldwide practice, the invoice should contain a reference number, date, information about the buyer and seller, bank account details, a list of provided products or services, and an invoice sum. Let's have a look at the following screenshot to understand how an invoice appears:
Let's follow the ensuing steps to design an MVC structure for the Billing Application:
Let's write down a list of functional requirements for this application. We assume that the end user may want to be able to do the following:
Generate an invoice
E-mail the invoice to the buyer
Print the invoice
See a list of existing invoices
Manage invoices (create, read, update, and delete)
Update an invoice status (draft, issued, paid, and canceled)
View a yearly income graph and other reports
To simplify the process of creating multiple invoices, the user may want to manage information about buyers and his personal details in the specific part of the application before he/she creates an invoice. So, our application should provide additional functionalities to the end user, such as the following:
The ability to see a list of buyers and use it when generating an invoice
The ability to manage buyers (create, read, update, and delete)
The ability to see a list of bank accounts and use it when generating an invoice
The ability to manage his/her own bank accounts (create, read, update, and delete)
The ability to edit personal details and use them when generating an invoice
Of course, we may want to have more functions, but this is enough for demonstrating how to design an application using the MVC pattern.
Next, we architect an application using the MVC pattern.
After we have defined the features of our application, we need to understand what is more related to the model (business logic) and what is more related to the view (presentation). Let's split the functionality into several parts.
Then, we learn how to define models.
Models present data and provide data-specific business logic. Models can be related to each other. In our case, they are as follows:
InvoiceModel
InvoiceItemModel
BuyerModel
SellerModel
BankAccountModel
Then, will define collections of models.
Our application allows users to operate on a number of models, so they need to be organized into a special iterable object named Collection. We need the following collections:
InvoiceCollection
InvoiceItemCollection
BuyerCollection
BankAccountCollection
Next, we define views.
View present a model or a collection to the application user. A single model or collection can be rendered to be used by multiple views. The views that we need in our application are as follows:
EditInvoiceFormView
InvoicePageView
InvoiceListView
PrintInvoicePageView
EmailInvoiceFormView
YearlyIncomeGraphView
EditBuyerFormView
BuyerPageView
BuyerListView
EditBankAccountFormView
BankAccountPageView
BankAccountListView
EditSellerInfoFormView
ViewSellectInfoPageView
ConfirmationDialogView
Finally, we define a controller.
A controller allows users to interact with an application. In MVC, each view can have a different controller that is used to do following:
Map a URL to a specific view
Fetch models from a server
Show and hide views
Handle user input
Now, it is time to design business logic for the Billing Application using the MVC and OOP approaches.
In this recipe, we are going to define an internal structure for our application with model and collection objects. Although a model represents a single object, a collection is a set of models that can be iterated, filtered, and sorted.
Relations between models and collections in the Billing Application conform to the following scheme:

For each model, we are going to create two tables: one for properties and another for methods:
We define BuyerModel properties.
Name
Type
Required
Unique
id
Integer
Yes
Yes
name
Text
Yes
address
Text
Yes
phoneNumber
Text
No
Then, we define SellerModel properties.
Name
Type
Required
Unique
id
Integer
Yes
Yes
name
Text
Yes
address
Text
Yes
phoneNumber
Text
No
taxDetails
Text
Yes
After this, we define BankAccountModel properties.
Name
Type
Required
Unique
id
Integer
Yes
Yes
beneficiary
Text
Yes
beneficiaryAccount
Text
Yes
bank
Text
Yes
SWIFT
Text
Yes
specialInstructions
Text
No
We define InvoiceItemModel properties.
Name
Arguments
Return Type
Unique
calculateAmount
-
Decimal
Next, we define InvoiceItemModel methods.
We don't need to store the item amount in the model, because it always depends on the price and the quantity, so it can be calculated.
Name
Type
Required
Unique
id
Integer
Yes
Yes
deliveryDate
Date
Yes
description
Text
Yes
price
Decimal
Yes
quantity
Decimal
Yes
Now, we define InvoiceModel properties.
Name
Type
Required
Unique
id
Integer
Yes
Yes
referenceNumber
Text
Yes
date
Date
Yes
bankAccount
Reference
Yes
items
Collection
Yes
comments
Text
No
status
Integer
Yes
We define InvoiceModel methods.
The invoice amount can easily be calculated as the sum of invoice item amounts.
Name
Arguments
Return Type
Unique
calculateAmount
Decimal
Finally, we define collections.
In our case, they are InvoiceCollection, InvoiceItemCollection, BuyerCollection, and BankAccountCollection. They are used to store models of an appropriate type and provide some methods to add/remove models to/from the collections.
Models in Backbone.js are implemented by extending Backbone.Model, and collections are made by extending Backbone.Collection. To implement relations between models and collections, we can use special Backbone extensions, which are described in the later chapters of this book.
To learn more about object properties, methods, and OOP programming in JavaScript, you can refer to the following resource:
https://developer.mozilla.org/en-US/docs/JavaScript/Introduction_to_Object-Oriented_JavaScript
Unlike traditional MVC frameworks, Backbone does not provide any distinct object that implements controller functionality. Instead, the controller is diffused between Backbone.Router and Backbone. View and the following is done:
A router handles URL changes and delegates application flow to a view. Typically, the router fetches a model from the storage asynchronously. When the model is fetched, it triggers a view update.
A view listens to DOM events and either updates a model or navigates an application through a router.
The following diagram shows a typical workflow in a Backbone application:

Let's follow the ensuing steps to understand how to define basic views and a router in our application:
First, we need to create wireframes for an application.
Let's draw a couple of wireframes in this recipe:
The Edit Invoice page allows users to select a buyer, to select the seller's bank account from the lists, to enter the invoice's date and a reference number, and to build a table of shipped products and services.

The Preview Invoice page shows how the final invoice will be seen by a buyer. This display should render all the information we have entered in the Edit Invoice form. Buyer and seller information can be looked up in the application storage. The user has the option to either go back to the Edit display or save this invoice.

Then, we will define view objects.
According to the previous wireframes, we need to have two main views: EditInvoiceFormView and PreviewInvoicePageView. These views will operate with InvoiceModel; it refers to other objects, such as BankAccountModel and InvoiceItemCollection.
Now, we will split views into subviews.
For each item in the Products or Services table, we may want to recalculate the Amount field depending on what the user enters in the Price and Quantity fields. The first way to do this is to re-render the entire view when the user changes the value in the table; however, it is not an efficient way, and it takes a significant amount of computer power to do this.
We don't need to re-render the entire view if we want to update a small part of it. It is better to split the big view into different, independent pieces, such as subviews, that are able to render only a specific part of the big view. In our case, we can have the following views:

As we can see, EditInvoiceItemTableView and PreviewInvoiceItemTableView render InvoiceItemCollection with the help of the additional views EditInvoiceItemView and PreviewInvoiceItemView that render InvoiceItemModel. Such separation allows us to re-render an item inside a collection when it is changed.
Finally, we will define URL paths that will be associated with a corresponding view. In our case, we can have several URLs to show different views, for example:
/invoice/add
/invoice/:id/edit
/invoice/:id/preview
Here, we assume that the Edit Invoice view can be used for either creating a new invoice or editing an existing one. In the router implementation, we can load this view and show it on specific URLs.
The Backbone.View object can be extended to create our own view that will render model data. In a view, we can define handlers to user actions, such as data input and keyboard or mouse events.
In the application, we can have a single Backbone.Router object that allows users to navigate through an application by changing the URL in the address bar of the browser. The router object contains a list of available URLs and callbacks. In a callback function, we can trigger the rendering of a specific view associated with a URL.
If we want a user to be able to jump from one view to another, we may want him/her to either click on regular HTML links associated with a view or navigate to an application programmatically.
Chapter 2, Views
In this recipe, we are going to talk about how to create a Backbone project from scratch. There is important information of which we should be aware when dealing with the later chapters of this book.
We are going to speak about Backbone dependencies and the directory structure for our project. Let's follow the ensuing guidelines:
Visit http://backbone.js and download the Backbone.js library. There are several versions available: production, development, and an edge version.
You can use the production version for the best performance because it has been optimized and minimized. The development version may be good to use when working on the application, so you can use the code completion and debugging features of your IDE. And finally, you can use the edge version of Backbone, but do it at your own risk, because it may not be fully tested.
Download Backbone dependencies.
Backbone.js depends on the Underscore.js library, which can be downloaded from http://underscorejs.org. Underscore is also shipped in three different versions.
Also, Backbone.js depends on either the jQuery or Zepto libraries. These libraries have the same syntax and both provide useful functionality to the developer. They simplify work with the document tree, event handling, AJAX, and JavaScript animations.
For many examples in this book, we are going to use the jQuery library, which can be downloaded from http://jquery.com. It is provided with both the development and production versions.
Create a project directory structure.
If you follow a specific directory structure, it would be easier to find any file and work with it, because such an application structure brings more order into your project. Here is an example of a directory structure that can be used by a simple Backbone application:
lib/: This is a directory for third-party libraries, such as the following:
backbone.js: This is the source code of Backbone.js
underscore.js: This is the source code of Underscore.js
jquery.js: This has sources of jQuery
js/: This is the directory of the project's JavaScript files.
main.js: This is the main JavaScript file that has been used in the project
index.html: This is the main file of our application.
Create the main file of the application, which is index.html. It should include third-party libraries and your application files, as shown in the following code:
<!DOCTYPE html>
<html>
  <head>
    <meta charset="utf-8">
    <title>Backbone.js Cookbook – Application Template</title>

    <script src="lib/jquery.js"></script>
    <script src="lib/underscore.js"></script>
    <script src="lib/backbone.js"></script>

    <script src="js/main.js"></script>
  </head>
  <body></body>

</html>
Create the main JavaScript file named main.js that will contain the code of your application.
(function($){

  // Your code is here

})(jQuery);
As we include our scripts into the head tag, they are executed before the body content is processed by a browser and before the whole HTML document is loaded.
In a Backbone application, as in many other JavaScript applications, we want to make sure our program starts to run right after the document is loaded, so main.js should look like the following code snippet:
(function($){

  // Object declarations goes here

  $(document).ready(function () {

   // Start application code goes here

  });
})(jQuery);
In this recipe, we are going to write our first Backbone application. Let it be a simple part of the billing system.
For example, we can implement a model and a view for the invoice item. Let's create InvoiceItemModel that contains the Quantity and Price fields and calculates the item's amount. We also need to have PreviewInvoiceItemView that is used to render a model.
The output of our demo application could be very simple, as shown in the following screenshot:

The new code in this recipe should go into the main.js file that we created in the previous recipe; we will do this as follows:
Define the model by extending it from the Backbone.Model object.
  var InvoiceItemModel = Backbone.Model.extend({

    // Set default values.
    defaults: {
      price: 0,
      quantity: 0
    },

    // Calculate amount.
    calculateAmount: function() {
      return this.get('price') * this.get('quantity');
    }
  });
In the InvoiceItemModel object, we have initialized the default values and performed the business logic, a function that calculates the total amount.
    var invoiceItemModel = new InvoiceItemModel({
      price: 2,
      quantity: 3
    });
Define the view that will render the model.
  var PreviewInvoiceItemView = Backbone.View.extend({

    // Define template using templating engine from
    // Underscore.js.
    template: _.template('\
      Price: <%= price %>.\
      Quantity: <%= quantity %>.\
      Amount: <%= amount %>.\
    '),

    // Render view.
    render: function () {

      // Generate HTML by rendering the template.
      var html = this.template({

        // Pass model properties to the template.
        price: this.model.get('price'),
        quantity: this.model.get('quantity'),

        // Calculate amount and pass it to the template.
        amount: this.model.calculateAmount()
      });

      // Set html for the view element using jQuery.
      $(this.el).html(html);
    }
  });
As we can see, our view uses the this.model and this.el properties that are passed to the view when it is created.
    var previewInvoiceItemView = new PreviewInvoiceItemView({
      model: invoiceItemModel,
      el: 'body'
    });
Inside a view, we used the jQuery library to set the content for the element associated with the view $(this.el).html(html). In our case, this.el contains 'body' that is also a jQuery selector.
Such selectors are similar to CSS selectors and allow jQuery to find an arbitrary HTML element using the $() function.
To render a view, we simply need to execute the render() method.
previewInvoiceItemView.render();
When rendering a view, we also used a templating engine provided by Underscore.js. This templating engine substitutes templates with data and outputs static HTML. More information about templates is available in the Using templates in a view recipe of Chapter 6, Templates, Forms, and UX Sugar.
Start the application.
There are several ways to start an application. If your application has only a single view, you can create a new instance of it and render it manually.
An application should be started right after the HTML page is loaded. Let's write some code that will start a simple Backbone application:
  // When document is ready create the Model and show
  // the View.
  $(document).ready(function () {

    // Create InvoiceItemModel instance and set
    // model attributes.
    var invoiceItemModel = new InvoiceItemModel({
      price: 2,
      quantity: 3
    });

    // Create PreviewInvoiceItemView instance.
    var previewInvoiceItemView = new PreviewInvoiceItemView({

      // Pass our model.
      model: invoiceItemModel,

      // Set element where to render HTML.
      el: 'body'
    });

    // Render view manually.
    previewInvoiceItemView.render();
  });
The Backbone.Router object is used for navigation inside your application. You should use it if you want to access different view pages by hitting the appropriate URLs. Users can also navigate through an application using the browser's history bar.
By default, the router works well with hash paths, such as index.html#path/to/page. Any string that is placed after a hash character is supposed to be a route and is processed by Backbone.Router.
Here, we are going to explain how to create our own router in our application:
Define a router by extending Backbone.Router into the Workspace object and setting pairs of routes and callback functions for them inside the routes property that is passed to the extend() method. This gives the router information of which callback should be executed in case the appropriate route is accessed.
  var Workspace = Backbone.Router.extend({
    routes: {
      // Default path.
      '': 'invoiceList',

      // Usage of static path.
      'invoice': 'invoiceList',
    },
  });
Add a callback method to the router object.
    invoiceList: function() {
      var invoiceListView = new InvoiceListView({
        el: 'body'
      });
      invoiceListView.render();
    }
If the user visits index.html or index.html#invoice, the invoiceList() callback is executed, which renders InvoiceListView. Here, InvoiceListView is a simple stub.

Tell Backbone to use this router and start the application.
  $(document).ready(function () {
    new Workspace();
    Backbone.history.start();
  });
Here, we create a new Workspace object and execute the start() method of the Backbone.history object that is used for global application routing. As always, we should start our application right after the HTML page has loaded completely.
Backbone.Router is used just for defining routes and callbacks. All the important jobs are done by Backbone.history that serves as a global router (per frame) to handle hashchange or pushState events, match the appropriate route, and trigger callbacks. You shouldn't ever have to create an instance of the global router—you should use the reference to Backbone.history that will be created for you automatically if you make use of routers with routes.
Backbone router allows the defining of routes with parameters, which we are going to explain in this section.
If we want the router to parse parameters in a URL, we need to use the colon character (:) before the parameter's name. Here is an example that demonstrates how Backbone.Router parses URLs with a parameter.
  var Workspace = Backbone.Router.extend({
    routes: {
      // Usage of fragment parameter.
      'invoice/:id': 'invoicePage',
    },

    // Shows invoice page.
    invoicePage: function(id) {
      var invoicePageView = new InvoicePageView({
        el: 'body',

        // Pass parameter to the view.
        id: id
      });
      invoicePageView.render();
    },
  });
Paths such as index.html#invoice/1 and index.html#invoice/2 will be parsed by a router. In both cases, the invoicePage() callback is executed; it passes the ID parameter to InvoiceLPageView and renders it.

Backbone's core is small, well-tested, and nicely maintained. However, developers may need additional functionalities to be used by a complex web application. The power of the Backbone framework depends on modularity and flexibility. Existing components can easily be either extended or replaced; thus, many developers create their own plugins.
There are over 100 plugins that can be downloaded and used in your application from https://github.com/documentcloud/backbone/wiki/Extensions,-Plugins,-Resources. In this book, we are going to use some of them, so we need to know how to extend our application with plugins.
If the plugin is a single JavaScript file, simply copy it into the lib folder of the project and include it in index.html.
<script src="lib/backbone.plugin.js"></script>
Alternatively, if the plugin has been shipped with additional files, such as CSS and images, place all the plugin files in the plugin-name directory under the lib folder, and then include the JS and CSS files in index.html.
The Creating a Backbone.js extension with Grunt recipe in Chapter 8, Special Techniques
Backbone.js is an open source project that has been developed by a strong community. In this recipe, we are going to speak about things that will help you became a part of this community and improve Backbone.js.
Let's follow the ensuing steps to make Backbone.js better:
If you found a bug in Backbone.js or want a new feature to be implemented, you can submit your issue to the issue queue at https://github.com/documentcloud/backbone/issues. Before doing this, make sure there is no similar issue; otherwise, you can update the existing issue queue.
You can submit your own code to the Backbone project. Such a contribution can be very helpful to the community and the project itself.
By using Backbone, you save your own time. By contributing to the project, you save the time of other developers who use it and your own time in the future instead of having to work on the same issue again.
Detailed guidelines for the code contributing process can be found on the wiki page at https://github.com/documentcloud/backbone/wiki/Contributing-to-Backbone.
Work on the documentation of Backbone.js.
The official documentation, which is located at http://backbonejs.org, is based on a recent version of Backbone.js in the GitHub repository. You can improve the documentation by either updating the index.html file or the docs directory. If you want to add a new example, use the examples folder.