Developing Cloud Applications Using Function Triggers and Bindings
In this chapter, we will cover the following recipes:
- Building a backend Web API using HTTP triggers
- Persisting employee details using Azure Storage table output bindings
- Saving the profile images to Queues using Queue output bindings
- Storing the image in Azure Blob Storage
Introduction
Every software application needs backend components that are responsible for taking care of business logic and storing the data in some kind of storage, such as databases and filesystems. Each of these backend components could be developed using different technologies. Azure serverless technology also allows us to develop these backend APIs using Azure Functions.
Azure Functions provide many out-of-the-box templates that solve most common problems, such as connecting to storage, building Web APIs, and cropping images. In this chapter, we will learn how to use these built-in templates. Apart from learning about the concepts related to Azure serverless computing, we will also try to implement a solution to a basic domain problem of creating components, which is required for any organization who wants to manage internal employee information.
The following is a simple diagram that will help you understand what we will achieve in this chapter:

Building a backend Web API using HTTP triggers
We will use the Azure serverless architecture to build a Web API using HTTP triggers. These HTTP triggers can be consumed by any frontend application that is capable of making HTTP calls.
Getting ready
Let's start our journey of understanding Azure serverless computing using Azure Functions by creating a basic backend Web API that responds to HTTP requests:
- Refer to https://azure.microsoft.com/en-in/free/?&wt.mc_id=AID607363_SEM_8y6Q27AS for creating a free Azure Account.
- Visit https://docs.microsoft.com/en-us/azure/azure-functions/functions-create-function-app-portal to understand the step-by-step process of creating a function app, and https://docs.microsoft.com/en-us/azure/azure-functions/functions-create-first-azure-function to create a function. While creating a function, a Storage Account is also created for storing all the files. Remember the name of the Storage Account, as it will be used later in other chapters.
- Once you have created the Function App, please go through the basic concepts of Triggers and Bindings, which are the core concepts of how Azure Functions work. I highly recommend that you to go through the https://docs.microsoft.com/en-us/azure/azure-functions/functions-triggers-bindings article before you proceed.
How to do it...
Perform the following steps:
- Navigate to the Function App listing page by clicking on the Function Apps menu, which is available on the left-hand side.
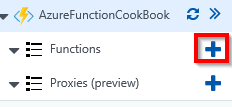
- Create a new function by clicking on the + icon:
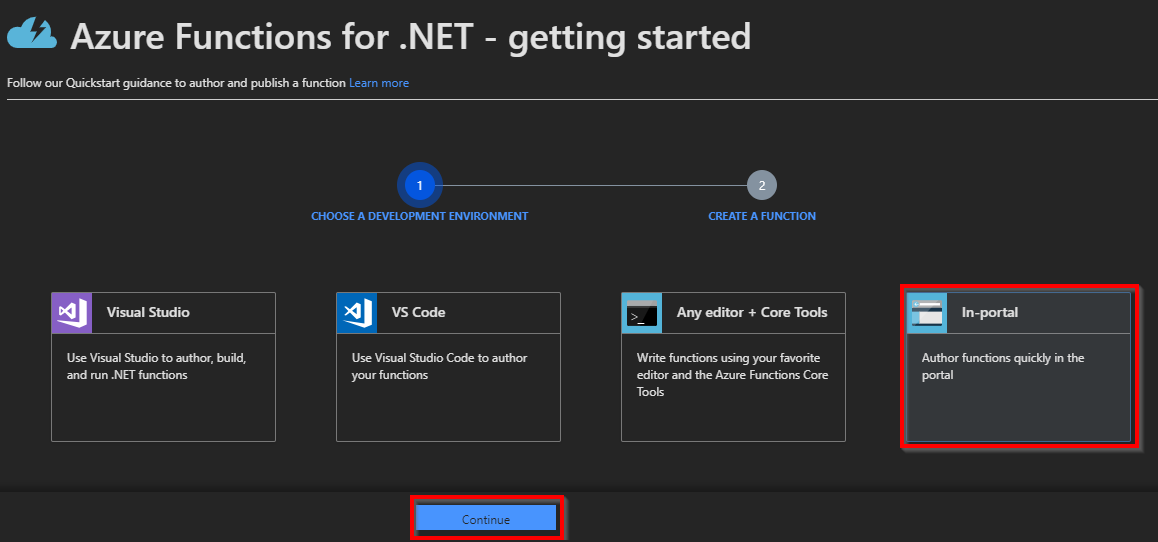
- You will see the Azure Functions for .NET - getting started page, where you will be prompted to choose the type of tools you would like to use. You can choose the one you are the most interested in. For the initial few chapters, we will use the In-portal option, where you can quickly create Azure Functions right from the portal without any tools. Later, in the following chapters, we will use Visual Studio and Azure Functions Core Tools to create our functions:
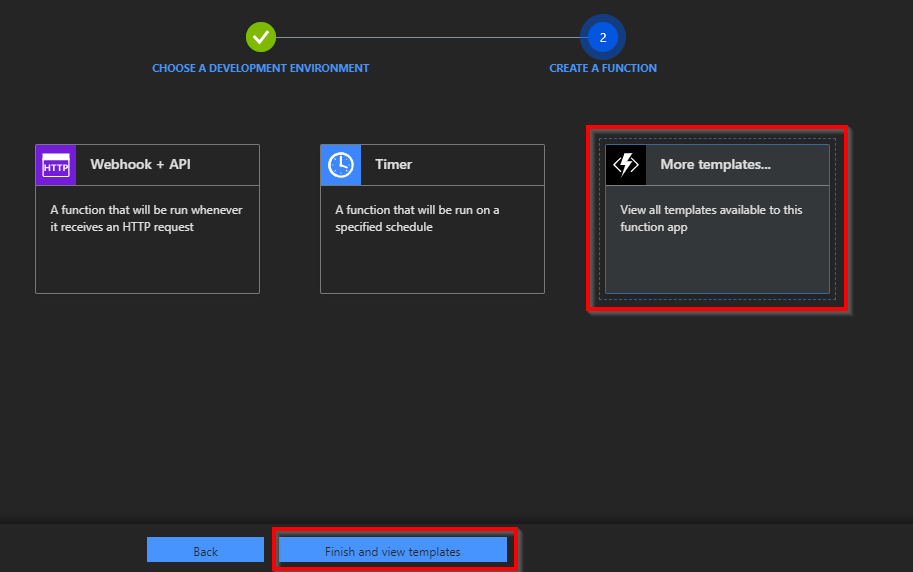
- Next select More templates and click on Finish and view templates, as shown in the following screenshot:
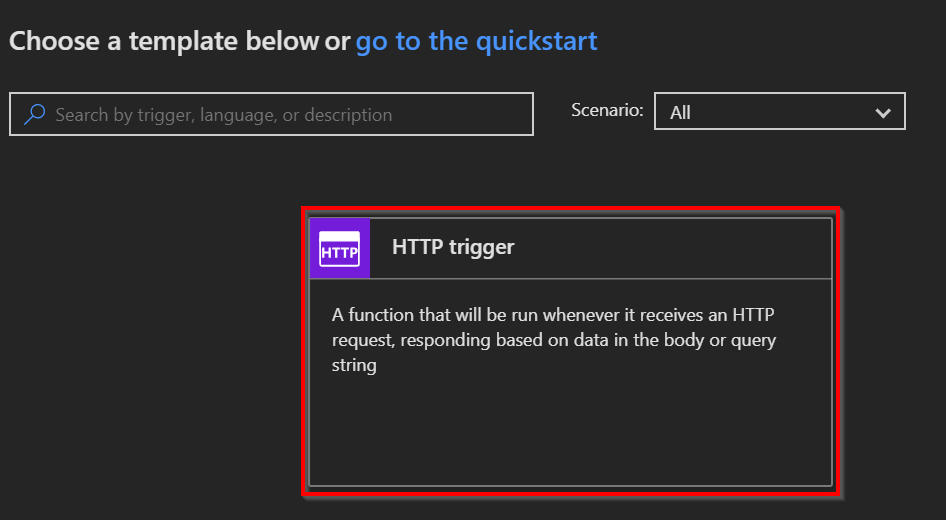
- In the Choose a template below or go to the quickstart section, choose HTTP trigger to create a new HTTP trigger function:
- Provide a meaningful name. For this example, I have used RegisterUser as the name of the Azure Function.
- In the Authorization level drop-down, choose the Anonymous option. We will learn more about the all authorization levels in Chapter 9, Implementing Best Practices for Azure Functions:

- Click on the Create button to create the HTTP trigger function.
- As soon as you create the function, all the required code and configuration files will be created automatically and the run.csx file will be opened for you so that you can edit the code. Remove the default code and replace it with the following code. I have added two parameters (firstname and lastname), which will be displayed in the output when the HTTP trigger is triggered:
#r "Newtonsoft.Json"

using System.Net;
using Microsoft.AspNetCore.Mvc;
using Microsoft.Extensions.Primitives;
using Newtonsoft.Json;

public static async Task<IActionResult> Run(
                    HttpRequest req,
                    ILogger log)
{
  log.LogInformation("C# HTTP trigger function processed a request.");
  string firstname=null,lastname = null;
  string requestBody = await new StreamReader(req.Body).ReadToEndAsync();

 dynamic inputJson = JsonConvert.DeserializeObject(requestBody);
 firstname = firstname ?? inputJson?.firstname;
 lastname = inputJson?.lastname;

 return (lastname + firstname) != null
 ? (ActionResult)new OkObjectResult($"Hello, {firstname + " " + lastname}")
 : new BadRequestObjectResult("Please pass a name on the query" + "string or in the request body");
}
- Save these changes by clicking on the Save button, which is available just above the code editor.
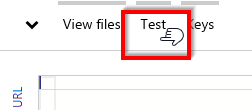
- Let's try and test the RegisterUser function using the Test console. Click on the Test tab to open the Test console:
- Enter the values for firstname and lastname in the Request body section:
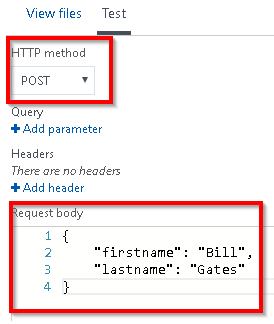
Make sure that you select POST in the HTTP method drop-down.
- Once you have reviewed the input parameters, click on the Run button, which is available at the bottom of the Test console:
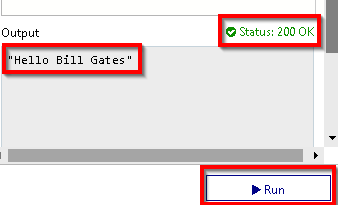
- If the input request workload is passed correctly with all the required parameters, you will see a Status 200 OK, and the output in the Output window will be like what's shown in the preceding screenshot.
How it works...
We have created the first basic Azure Function using HTTP triggers and made a few modifications to the default code. The code just accepts the firstname and lastname parameters and prints the name of the end user with a Hello {firstname} {lastname} message as a response. We also learned how to test the HTTP trigger function right from the Azure Management portal.
See also
The Enabling authorization for function apps recipe in Chapter 9, Implementing Best Practices for Azure Functions.
Persisting employee details using Azure Storage table output bindings
In the previous recipe, you learned how to create an HTTP trigger and accept the input parameters. Now, let's work on something interesting, that is, storing the input data into a persistent medium. Azure Functions gives us the ability to store data in many ways. For this example, we will store the data in Azure Table storage.
Getting ready
In this recipe, you will learn how easy it is to integrate an HTTP trigger and the Azure Table storage service using output bindings. The Azure HTTP trigger function receives the data from multiple sources and stores the user profile data in a storage table named tblUserProfile.
We will take the following prerequisites into account:
- For this recipe, we will use the same HTTP trigger that we created in the previous recipe.
- We will be using Azure Storage Explorer, which is a tool that helps us work with the data that's stored in the Azure Storage account. You can download it from http://storageexplorer.com/.
- You can learn more about how to connect to the Storage Account using Azure Storage Explorer at https://docs.microsoft.com/en-us/azure/vs-azure-tools-storage-manage-with-storage-explorer.
How to do it...
Perform the following steps:
- Navigate to the Integrate tab of the RegisterUser HTTP trigger function.
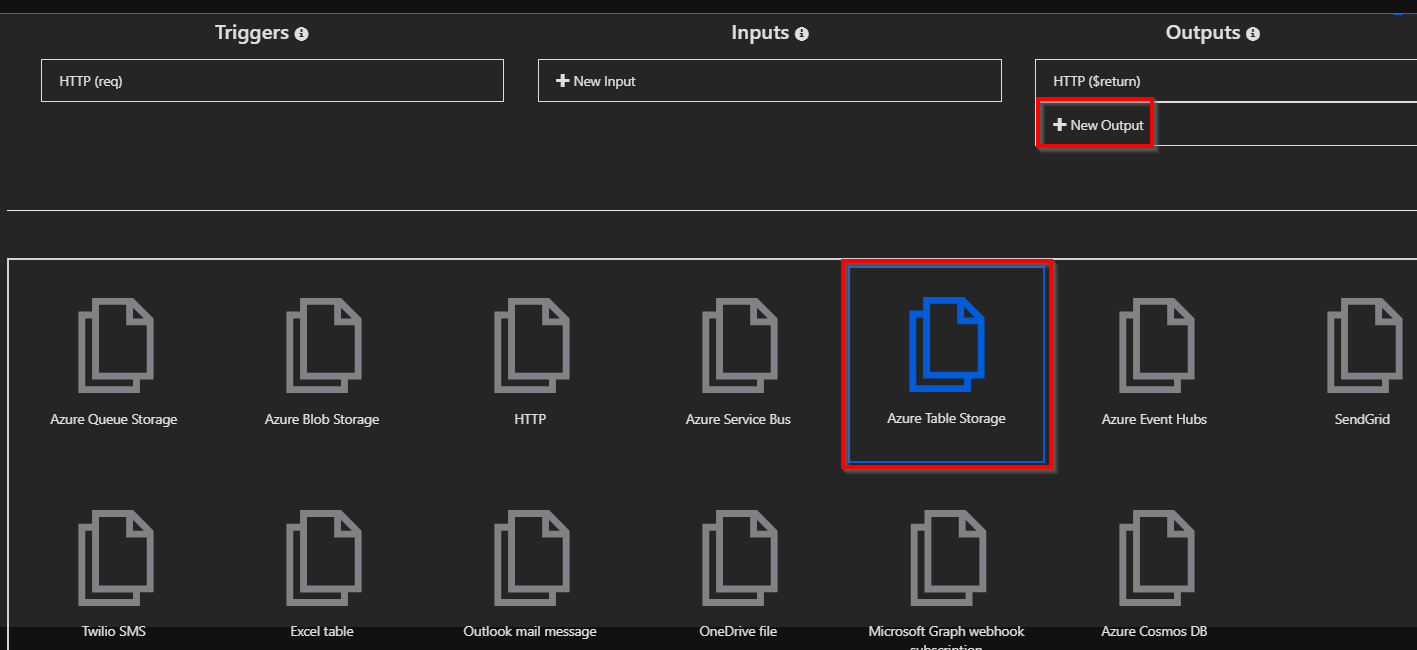
- Click on the New Output button, select Azure Table Storage, and then click on the Select button:
-
You will be prompted to install the bindings. Click on Install. This should take a take a few minutes. Once the bindings are installed, choose the following settings of the Azure Table storage output bindings:
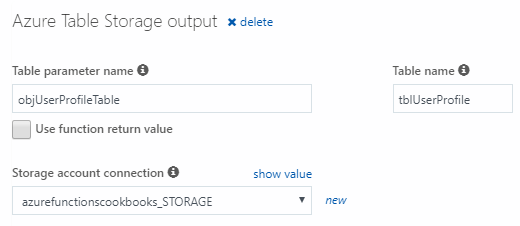
- Table parameter name: This is the name of the parameter that you will be using in the Run method of the Azure Function. For this example, provide objUserProfileTable as the value.
- Table name: A new table in Azure Table storage will be created to persist the data. If the table doesn't exist already, Azure will automatically create one for you! For this example, provide tblUserProfile as the table name.
- Storage account connection: If you don't see the Storage account connection string, click on new (as shown in the following screenshot) to create a new one or choose an existing storage account.
- The Azure Table storage output bindings should be as follows:
- Click on Save to save your changes.
- Navigate to the code editor by clicking on the function name and paste in the following code. The following code accepts the input that's passed by the end user and saves it in Table Storage:
#r "Newtonsoft.Json"
#r "Microsoft.WindowsAzure.Storage"

using System.Net;
using Microsoft.AspNetCore.Mvc;
using Microsoft.Extensions.Primitives;
using Newtonsoft.Json;
using Microsoft.WindowsAzure.Storage.Table;

public static async Task<IActionResult> Run(
 HttpRequest req,
 CloudTable objUserProfileTable,
 ILogger log)
{
  log.LogInformation("C# HTTP trigger function processed a request.");
  string firstname=null,lastname = null;
  string requestBody = await new     StreamReader(req.Body).ReadToEndAsync();
 dynamic inputJson = JsonConvert.DeserializeObject(requestBody);
 firstname = firstname ?? inputJson?.firstname;
 lastname = inputJson?.lastname;
 UserProfile objUserProfile = new UserProfile(firstname, lastname);
 TableOperation objTblOperationInsert =    TableOperation.Insert(objUserProfile);
 await objUserProfileTable.ExecuteAsync(objTblOperationInsert);
 return (lastname + firstname) != null
 ? (ActionResult)new OkObjectResult($"Hello, {firstname + " " + lastname}")
 : new BadRequestObjectResult("Please pass a name on the query" + "string or in the request body");
}

class UserProfile : TableEntity
 {
    public UserProfile(string firstName,string lastName)
    {
      this.PartitionKey = "p1";
       this.RowKey = Guid.NewGuid().ToString();
       this.FirstName = firstName;
       this.LastName = lastName;
    }
    UserProfile() { }
    public string FirstName { get; set; }
    public string LastName { get; set; }
 }
- Let's execute the function by clicking on the Run button of the Test tab by passing the firstname and lastname parameters in the Request body:
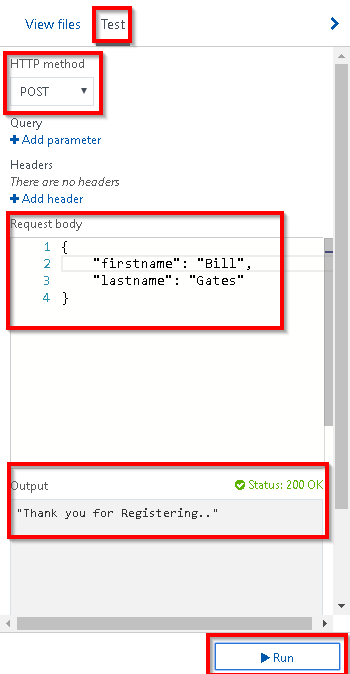
- If everything went well, you should get a Status 200 OK message in the Output box, as shown in the preceding screenshot. Let's navigate to Azure Storage Explorer and view the table storage to see whether the table named tblUserProfile was created successfully:

How it works...
Azure Functions allows us to easily integrate with other Azure services, just by adding an output binding to the trigger. For this example, we have integrated the HTTP trigger with the Azure Storage table binding and also configured the Azure Storage account by providing the storage connection string and the Azure Storage table name in which we would like to create a record for each of the HTTP requests that's received by the HTTP trigger.
We have also added an additional parameter for handling the table storage, named objUserProfileTable, of the CloudTable type, to the Run method. We can perform all the operations on Azure Table storage using objUserProfileTable.
We also created a UserProfile object and filled it in with the values we received in the request object, and then passed it to a table operation.
Understanding storage connection
When you create a new storage connection (refer to step 3 of the How to do it... section of this recipe), new App settings will be created:
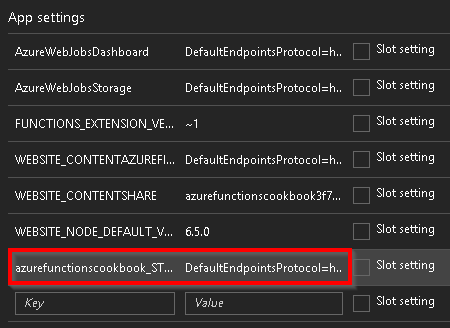
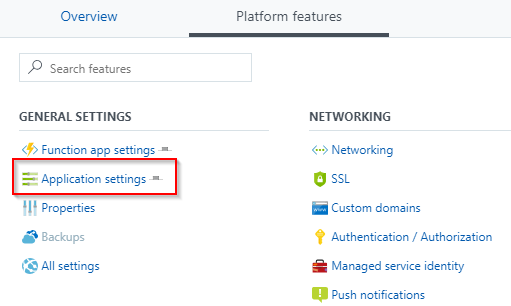
You can navigate to App settings by clicking on the Application settings menu, which is available in the GENERAL SETTINGS section of the Platform features tab:
What is the Azure Table storage service?
The Azure Table storage service is a NoSQL key-value persistent medium for storing semi-structured data.
Partition key and row key
The primary key of the Azure Table storage table has two parts:
- Partition key: Azure Table storage records are classified and organized into partitions. Each record that's located in a partition will have the same partition key (p1, in our example).
- Row key: A unique value should be assigned to each of the rows.
There's more...
The following are the very first lines of code in this recipe:
#r "Newtonsoft.json"
#r "Microsoft.WindowsAzure.Storage"
The preceding lines of code instruct the runtime function to include a reference to the specified library in the current context.
Saving the profile images to Queues using Queue output bindings
In the previous recipe, you learned how to receive two string parameters, firstname and lastname, in the Request body, and stored them in Azure Table storage. In this recipe, we'll add a new parameter named ProfilePicUrl for the profile picture of the user that is publicly accessible via the internet. In this recipe, you will learn how to receive the URL of an image and save the URL in the Blob container of an Azure Storage account.
You might be thinking that the ProfilePicUrl input parameter could have been used to download the picture from the internet in the previous recipe, Persisting employee details using Azure Storage table output bindings. We didn't do this because the size of the profile pictures might be huge, considering the modern technology that's available today, and so processing images on the fly in the HTTP requests might hinder the performance of the overall application. For that reason, we will just grab the URL of the profile picture and store it in Queue, and later we can process the image and store it in the Blob container.
Getting ready
We will be updating the code of the RegisterUser function that we used in the previous recipes.
How to do it...
Perform the following steps:
- Navigate to the Integrate tab of the RegisterUser HTTP trigger function.
- Click on the New Output button, select Azure Queue Storage, and then click on the Select button.
- Provide the following parameters in the Azure Queue Storage output settings:
- Message parameter name: Set the name of the parameter to objUserProfileQueueItem, which will be used in the Run method
- Queue name: Set the value of the Queue name to userprofileimagesqueue
- Storage account connection: Make sure that you select the right storage account in the Storage account connection field
- Click on Save to create the new output binding.
- Navigate back to the code editor by clicking on the function name (RegisterUser, in this example) or the run.csx file and make the changes marked bold that are given in the following code:
public static async Task<IActionResult> Run(
   HttpRequest req,
   CloudTable objUserProfileTable,
   IAsyncCollector<string> objUserProfileQueueItem,
   ILogger log)
   {

      ....

      string firstname= inputJson.firstname;
      string profilePicUrl = inputJson.ProfilePicUrl;
      await objUserProfileQueueItem.AddAsync(profilePicUrl);

      ....
      objUserProfileTable.Execute(objTblOperationInsert);
   }
- In the preceding code, we added Queue output bindings by adding the IAsyncCollecter parameter to the Run method and just passing the required message to the AddAsync method. The output bindings will take care of saving the ProfilePicUrl into the Queue. Now, Click on Save to save the code changes in the code editor of the run.csx file.
- Let's test the code by adding another parameter, ProfilePicUrl, in the Request body and then click on the Run button in the Test tab of the Azure Function code editor window. The image that's used in the following JSON might not exist when you are reading this book. So, make sure that you provide a valid URL of the image:
{
 "firstname": "Bill",
 "lastname": "Gates",
 "ProfilePicUrl":"https://upload.wikimedia.org/wikipedia/ commons/1/19/Bill_Gates_June_2015.jpg"
}
- If everything goes well you will see a Status : 200 OK message. The image URL that you have passed as an input parameter in the Request body will be created as a Queue message in the Azure Storage Queue service. Let's navigate to Azure Storage Explorer and view the Queue named userprofileimagesqueue, which is the Queue name that we provided in step 3. The following is a screenshot of the Queue message that was created:

How it works...
In this recipe, we added Queue message output binding and made the following changes to the code:
- Added a new parameter named out string objUserProfileQueueItem, which is used to bind the URL of the profile picture as a Queue message content
- Used the AddAsync method of IAsyncCollector to use the Run method, which saves the profile URL to the Queue as a Queue message
Storing the image in Azure Blob Storage
In the previous recipe, we stored the image URL in the queue message. Let's learn how to trigger an Azure Function (Queue Trigger) when a new queue item is added to the Azure Storage Queue service. Each message in the Queue is the URL of the profile picture of a user, which will be processed by the Azure Functions and stored as a Blob in the Azure Storage Blob service.
Getting ready
In the previous recipe, we learned how to create Queue output bindings. In this recipe, you will grab the URL from the Queue, create a byte array, and then write it to a Blob.
This recipe is a continuation of the previous recipes. Make sure that you have implemented them.
How to do it...
Perform the following steps:
- Create a new Azure Function by choosing Azure Queue Storage Trigger from the templates.
-
Provide the following details after choosing the template:
- Name your function: Provide a meaningful name, such as CreateProfilePictures.
- Queue name: Name the Queue userprofileimagesqueue. This will be monitored by the Azure Function. Our previous recipe created a new item for each of the valid requests that came to the HTTP trigger (named RegisterUser) into the userprofileimagesqueue Queue. For each new entry of a queue message to this Queue storage, the CreateProfilePictures trigger will be executed automatically.
- Storage account connection: The connection of the storage account where the Queues are located.
- Review all the details and click on Create to create the new function.
- Navigate to the Integrate tab, click on New Output, choose Azure Blob Storage, and then click on the Select button.
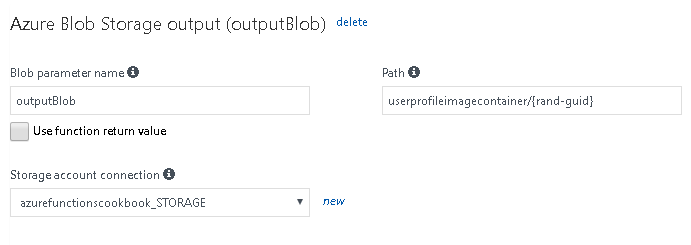
- In the Azure Blob Storage output section, provide the following:
- Blob parameter name: Set it to outputBlob
- Path: Set it to userprofileimagecontainer/{rand-guid}
- Storage account connection: Choose the storage account where you would like to save the Blobs and click on the Save button:
- Click on the Save button to save all the changes.
- Replace the default code of the run.csx file of the CreateProfilePictures function with the following code. The following code grabs the URL from the Queue, creates a byte array, and then writes it to a Blob:
        using System;
        public static void Run(Stream outputBlob,string myQueueItem,
         TraceWriter log)
        {
           byte[] imageData = null;
           using (var wc = new System.Net.WebClient())
           {
              imageData = wc.DownloadData(myQueueItem);
           }
           outputBlob.WriteAsync(imageData,0,imageData.Length);
        }
- Click on the Save button to save changes. Make sure that there are no compilation errors in the Logs window:

- Let's go back to the RegisterUser function and test it by providing the firstname, lastname, and ProfilePicUrl fields, like we did in the Saving the profile images to Queues using Queue output bindings recipe.
- Navigate to the Azure Storage Explorer and look at the userprofileimagecontainer Blob container. You will find a new Blob:

- You can view the image in any tool (such as MS Paint or Internet Explorer).
How it works...
We have created a Queue trigger that gets executed as and when a new message arrives in the Queue. Once it finds a new Queue message, it reads the message, and as we know, the message is a URL of a profile picture. The function makes a web client request, downloads the image data in the form of a byte array, and then writes the data into the Blob, which is configured as an output Blob.
There's more...
The rand-guid parameter will generate a new GUID and is assigned to the Blob that gets created each time the trigger is fired.
You can only use Queue messages when you would like to store messages that are up to 64 KB in size. If you would like to store messages greater than 64 KB, you need to use the Azure Service Bus.


 Download code from GitHub
