Download code from GitHub
Web Applications in Azure – Azure App Service
Azure App Service is one of the biggest and most used services available in the Azure cloud. It allows the easy development of web applications with multiple features available (such as support for different platforms, including .NET, PHP: Hypertext Preprocessor (PHP), and Java), manual and automated scaling, and different performance options. It's a general platform and runtime that fuels other services, such as WebJobs and Azure Functions. This chapter is designed to get you familiar with the basics of web development in Microsoft Azure.
In this chapter, you will learn about the following topics:
- Creating and deploying an Azure App Service resource
- Working with different operating systems and platforms
- Choosing the right App Service plan and exploring what its features are
- Securing App Service resources using different security providers
- Configuring networking for Azure App Service
Technical requirements
To perform the exercises in this chapter, you will need the following:
- Access to an Azure subscription.
- Visual Studio 2022 with the Azure development workload installed. All editions would suffice (Community/Professional/Enterprise).
- Visual Studio Code (VS Code) installed (available at https://code.visualstudio.com/).
- The Azure command-line interface (Azure CLI) (https://docs.microsoft.com/en-us/cli/azure/).
Creating and deploying an Azure App Service resource
To get started with Azure App Service, you must learn how to create that service and deploy your code. Throughout the chapter, you will see how many ways Azure provides for doing so. Depending on your current needs and the specification of your application, each path can be easier or harder; still, the strength of a cloud and Platform-as-a-Service (PaaS) offering lies in the straightforward and intuitive process of provisioning new components of your system.
Note
PaaS is one of the several cloud infrastructure models available. In general, it stands between Infrastructure-as-a-Service (IaaS) and Software-as-a-Service (SaaS), offering a balance between the ability to manage underlying infrastructure and abstraction over used components.
Let's now check the different ways to deploy your very first Azure App Service resource.
Creating an Azure App Service resource using the Azure portal
To begin, you will deploy your service using the Azure portal. All you will need is a browser with access to the internet. Enter https://portal.azure.com to get started.
Selecting Azure Web Apps from the available services
To create an Azure App Service resource in the Azure portal, you must first find the option to do so in the list of available services. The easiest way to do so is to click on the + Create a resource button and then click on Web App, as shown in the following screenshot:
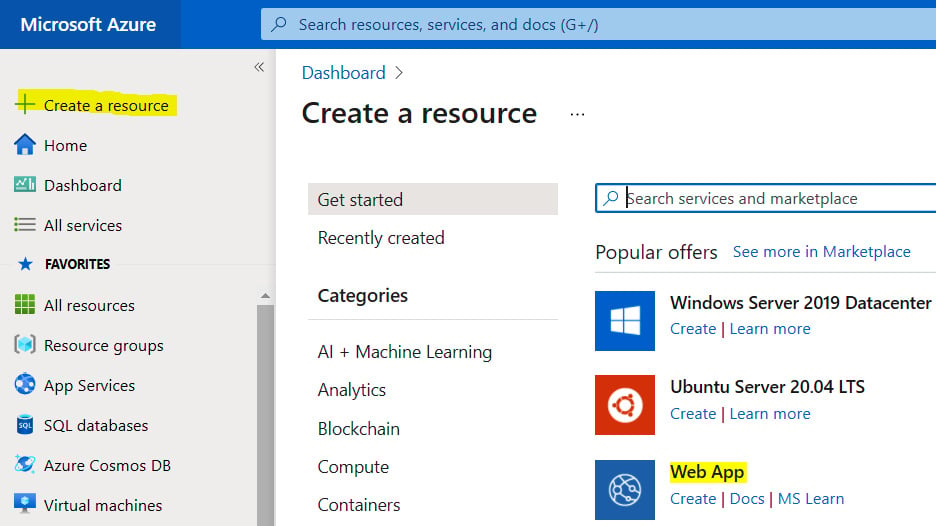
Figure 1.1 – Create a resource screen
Alternatively, you can utilize the search box at the top of the screen to quickly access any service, as shown in the following screenshot:
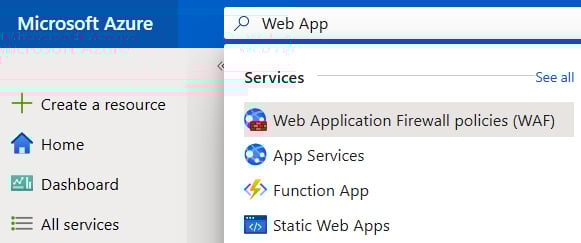
Figure 1.2 – Searching for a resource via the search box
As you can see, the Azure portal already displays the most popular services. If for some reason the Web App/App Service resource is not displayed, use the search box by entering the name of a service you are looking for.
When you click on the Web App item, you will see the first step of a resource creator, which will guide you through the process of provisioning your application. Now, we will go through all the steps and describe in detail the different parameters that are available to you.
Tip
Here, we are using the raw version of Azure App Service, which comes without any additional tools installed. When you gain more experience and become more familiar with the available services, you will see that Azure offers many useful preconfigured setups (such as an integrated Web Apps and Structured Query Language (SQL) Database instance), which can be used to shorten development and configure all services in one place.
Configuring an Azure web app
Provisioning any Azure service requires going through creators consisting of different steps. In general, not all fields will be required. It is worth remembering that all the mandatory parameters are marked with an * (asterisk) symbol.
The first tab available is the Basics tab, which is divided into three different sections: Project Details, Instance Details, and App Service Plan. The very first thing is entering a combination of Subscription and Resource Group details. Remember that in Azure, resources cannot exist in a vacuum—they require a container for logical separation. Here, you can use any combination you have access to (or you were asked to choose). The process is illustrated in the following screenshot:
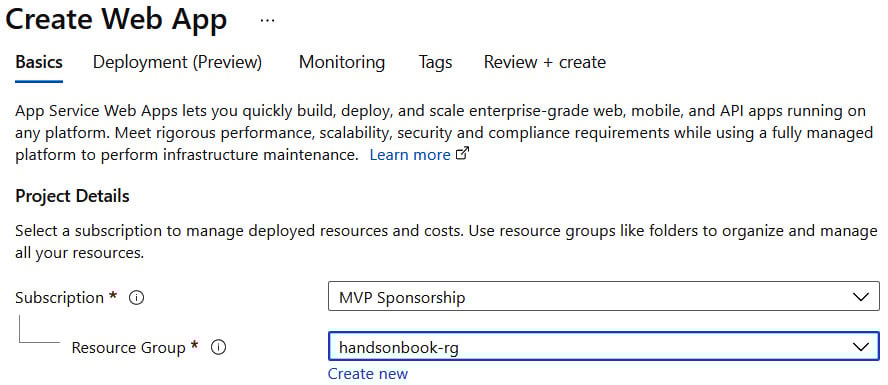
Figure 1.3 – Project Details section
Next, we have the Instance Details section, which requires a few more details to be provided. Here, we need to enter the name of our web application (it has to be globally unique), the method used to publish it (Code versus Docker Container), and Runtime stack, Operating System, and Region details, as illustrated in the following screenshot. While the Publish/Runtime stack/Operating System parameters seem self-explanatory and depend on your technology stack, let's talk a little bit about regions next:
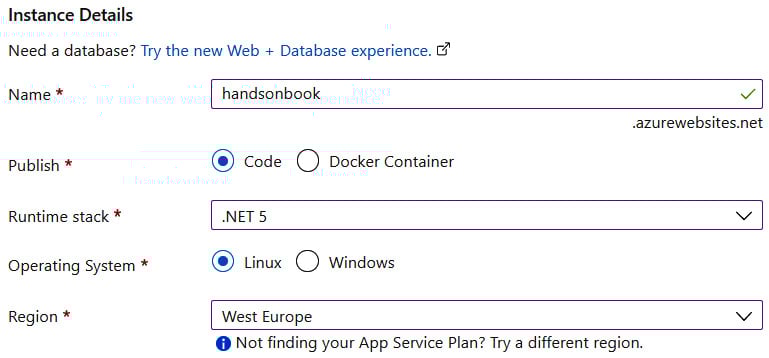
Figure 1.4 – Instance details section
In Azure, each region represents a co-located set of data centers and directly affects the geographic location of your cloud resources. That also has some legal implications (if you are about to process users' data, it is often forbidden to store it outside the user's origin). Each instance of an Azure service must be deployed to one of the available regions.
Tip
One of Azure's best practices is to deploy resources to the same region as the resource group they are in. This allows for the best performance and reliability.
The last section of the Basics tab is App Service Plan. Since you are just starting with Azure, you probably do not have any App Service plans created. As we cannot create an App Service resource without an App Service plan, we will sort this now. Note that if you have an existing App Service plan, the Azure portal may automatically choose it here based on the chosen region. It will also generate a random name if there is no App Service plan available.
Creating an App Service plan
When you click on Create new, you will see a popup allowing you to enter the plan name. Click on it, enter the name of your new plan, and then click the OK button. It should look like this:

Figure 1.5 – Configuring an App Service plan
The last thing required here is to select the Sku and size option. This parameter will directly affect the features available for your web application, its performance, and finally, the price. To make a choice, click on Change size. Now, the Spec Picker screen should appear, presenting you with the options available, as illustrated in the following screenshot:
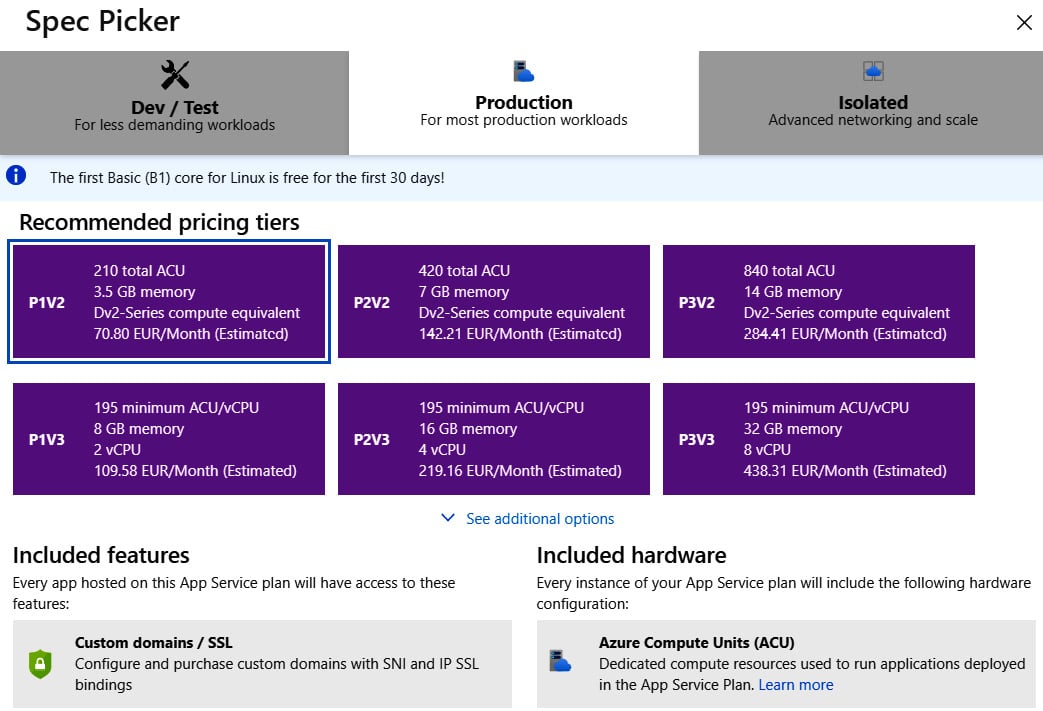
Figure 1.6 – Spec Picker for App Service plan
As you can see in the preceding screenshot, we have three categories of App Service plans, as follows:
- Dev / Test: This contains F, D, and B tiers (which stand for free, shared, and basic). They are designed for simple development/test (dev/test) scenarios and lightweight web applications that do not need features such as autoscaling or backups. Note that the shared tier is unavailable for Linux.
- Production: This offers powerful machines and advanced features that are useful in many day-to-day scenarios, such as application programming interfaces (APIs), e-commerce, and popular portals.
- Isolated: This uses the same hardware as the Production tier, but with even more features and possibilities to isolate your web apps on the hardware level. This is the most expensive category but can be helpful when creating systems that cannot be made available publicly.
Tip
It is important to remember that tiers F and D have a limited amount of computing time per day. That means that once you exceed the limit (60 minutes for the F tier, and 240 minutes for the D tier) of your processing time, your application will become unavailable and be suspended until the next day.
For this exercise, let's select any tier from the Dev / Test category. Once you are satisfied with the option you've selected, you can click the Apply button. My configuration, for example, looks like this:
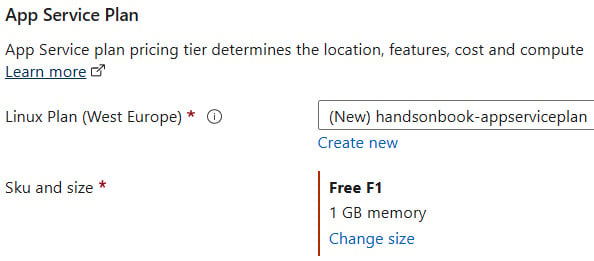
Figure 1.7 – Configure App Service plan with a free tier
Tip
Remember that you can always upgrade (or scale up) the instance of your App Service plan. For example, if you need a specific feature, or the popularity of your application has grown, revisit the Spec Picker screen and choose the options that suit you the most. This is one of the biggest advantages of cloud over on-premises, where you would have to buy and set up new machines on your own.
Now, you can click Next: Deployment (Preview), which will bring us to the next tab in our creator, as follows:
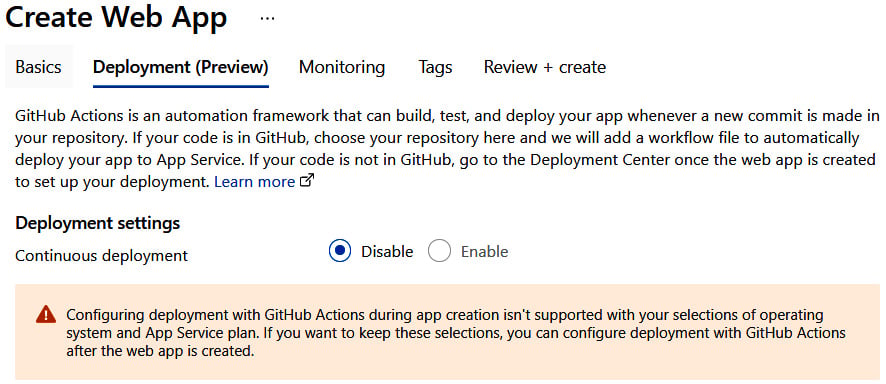
Figure 1.8 – Deployment tab
This tab allows us to configure the Continuous deployment setting for our application using GitHub Actions. Unfortunately, that kind of automated deployment is beyond the scope of this book. If you want to learn more, you can read about it here: https://docs.microsoft.com/en-us/azure/app-service/deploy-github-actions?tabs=applevel. For now, we can skip this and click the Next: Monitoring button to enable monitoring of our Web Apps resource using Azure Application Insights, as illustrated in the following screenshot:
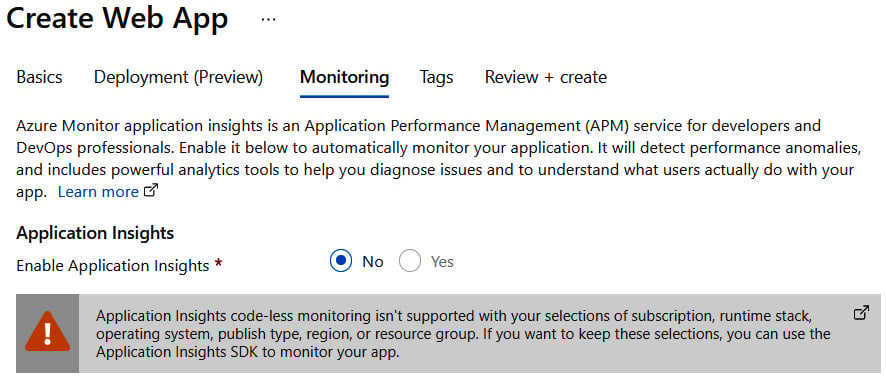
Figure 1.9 – Monitoring tab
Here, depending on the platform we chose, we can decide whether we want to enable monitoring by choosing the Yes option. Unfortunately, because my choice was Linux, the creator disables that for me (although it will be available to you if you selected Windows). Azure Application Insights will be described in detail further in this book, so to keep things simple, let's choose No.
We will skip the last tab, Tags, for now, so the only thing left is to click on the Review + create button and, after confirming all the details are correct, click on Create. If Azure detects that something is wrong with your input, it will highlight all the invalid fields and block the process of provisioning a resource.
Now, wait several seconds for the creation of a new resource. During this time, Azure will validate the template and parameters, and orchestrate multiple underlying controllers to create a service. Once a new resource is created, you should see a notification and be able to see your resources. To quickly validate this, click on the All resources button on the left and filter all of them using, for example, the name of the App Service resource you have created. The process is illustrated in the following screenshot:
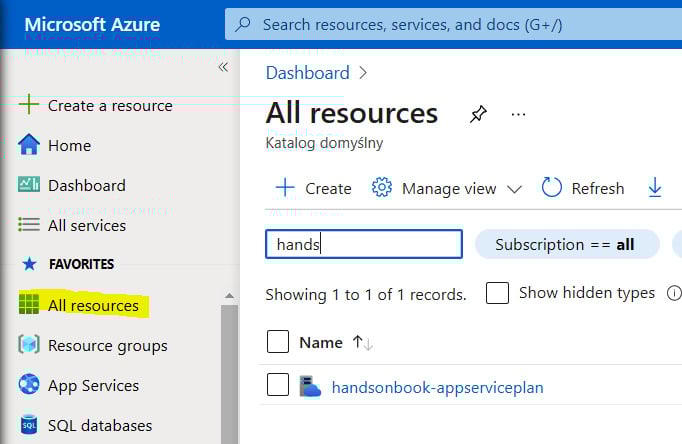
Figure 1.10 – Created App Service plan visible in the Azure portal
Let's now switch our focus to creating an Azure App Service resource using a different toolset.
Creating an Azure App Service resource using Visual Studio
If you do not want to create your web apps using the Azure portal, you can use Microsoft Visual Studio, which has built-in integration for many different Azure services. As Visual Studio is an integrated development environment (IDE) designed mostly for .NET application development, all the exercises will use .NET as a development platform. For a more generic approach, please look at the next section, where we will describe working with VS Code as an alternative.
Note
This exercise was created using Microsoft Visual Studio Community 2019 (16.8.4) with Azure workloads installed. If you want to configure your instance and ensure everything is set up correctly, please follow the short tutorial available at https://docs.microsoft.com/en-us/dotnet/azure/configure-visual-studio.
In Visual Studio, click on File | New | Project. This will display a Create a new project window, where you can find plenty of different templates for starting with a new application. Because we are aiming at deploying a web application, let's choose a template for ASP.NET Core Web Application, as illustrated in the following screenshot:

Figure 1.11 – Creating a new project in Visual Studio
When a template is selected, click on the Next button in the bottom-right corner of the window. All that's left to do now is enter a project name and its location on our hard drive, as follows:
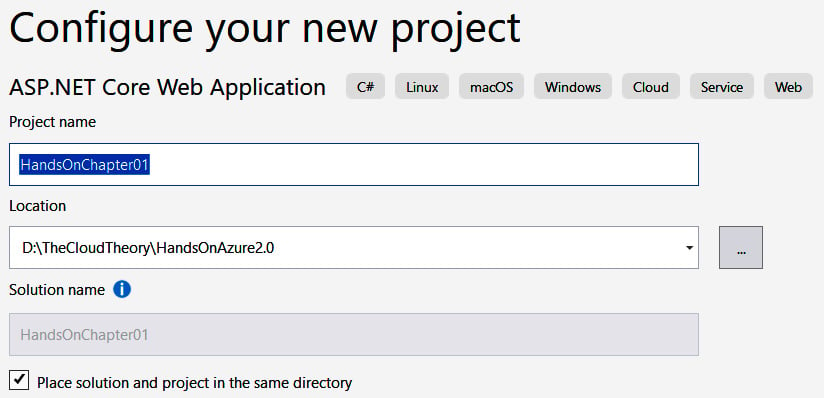
Figure 1.12 – Configuring a new project
Enter any name you feel works for you and select a location where the files will be created. When everything is ready, click the Create button. The last step is choosing a template for this application. To make things easier, we will go for Web Application as this will give us some content to work with. You can see the available templates in the following screenshot:
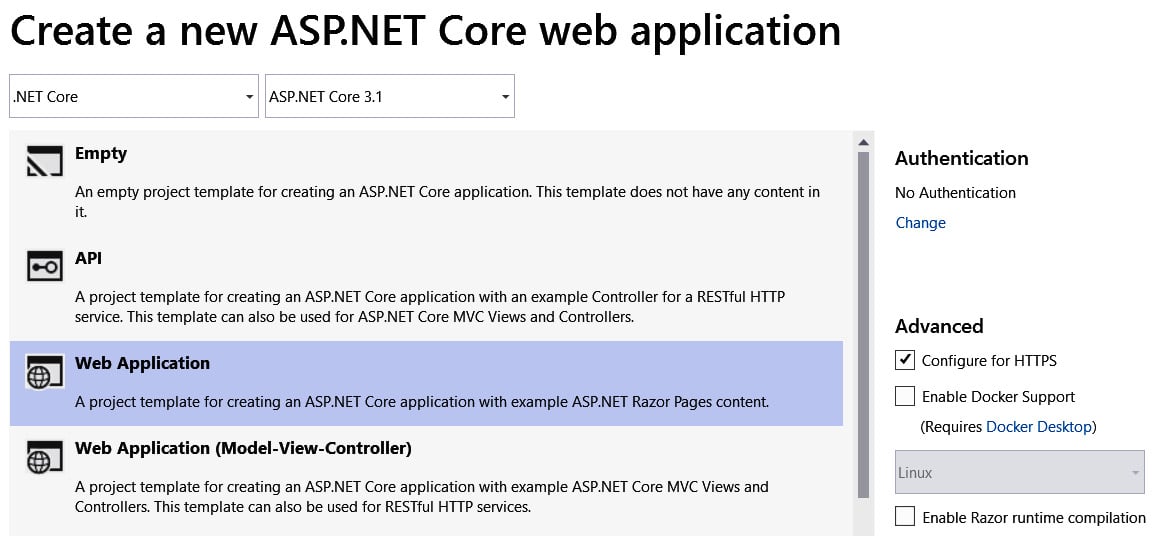
Figure 1.13 – Creating an ASP.NET application
Tip
You have probably noticed an Authentication section, which I have not described. It allows you to select the method used for authenticating access to your web application. We will cover that feature in the Securing App Service resources using different security providers section.
Let's leave all other options with their default values and click Create. After several seconds, Visual Studio should generate your new application, which is ready to work. To ensure that everything is correct, press the F5 button to run your website locally. After a few seconds, you should see a screen like mine here:
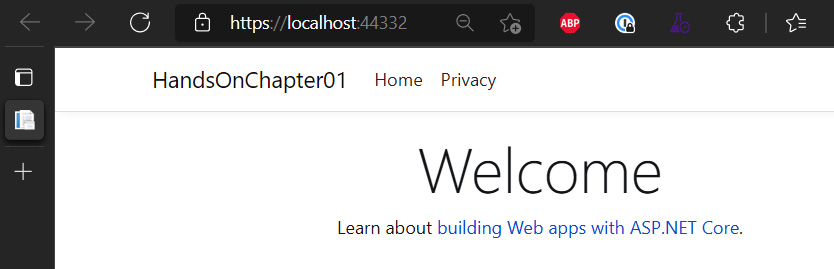
Figure 1.14 – Locally working application
If everything works as expected, there is one question remaining: how can we deploy it to Azure to have our website working in the cloud? Let's go back to Visual Studio for a moment and close the debugger. When you right-click on a project in Solution Explorer, you will see a context menu. There, between various menu options, click on Publish..., as illustrated in the following screenshot:
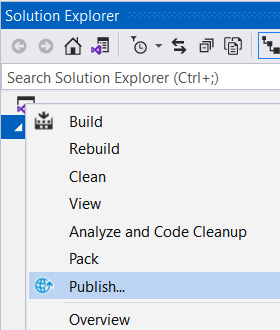
Figure 1.15 – Context menu of a project
As we are building a web application hosted in a cloud environment, our choice for the publish location will be Azure, as illustrated in the following screenshot:
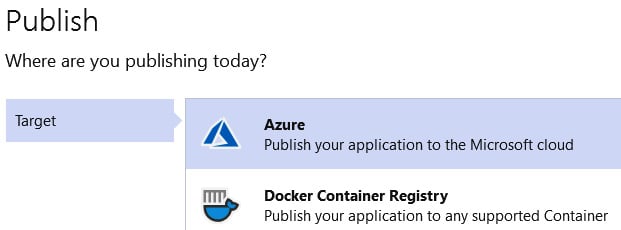
Figure 1.16 – Selecting a publish target
Now, click the Next button to select a particular Azure service used for our deployment. Currently, we are getting started with Azure App Service, so options for containerization will be a no-go. You will learn more about them in the next chapters. However, depending on your desired platform, you can choose between Linux and Windows machines. If you do not have specific requirements related to your hosting environment, I recommend using Linux for our deployment. The Linux service is shown in the following screenshot:
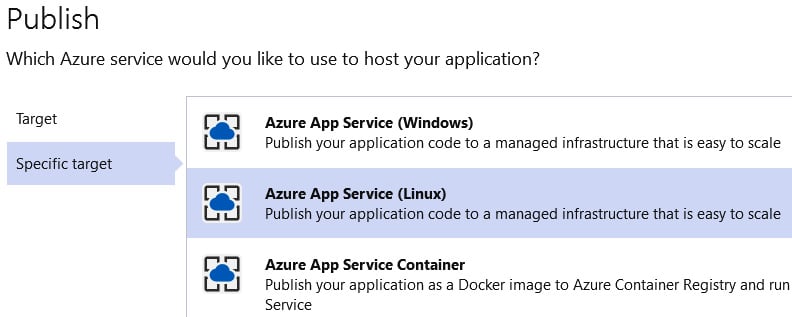
Figure 1.17 – Publish
Let's click Next one more time. The last step is selecting an actual Azure App Service resource for the application. If you do not have one, look at the beginning of this chapter, where we went through the process of creating one in detail. After selecting the desired instance, use the Finish button to complete deployment. The process is illustrated in the following screenshot:

Figure 1.18 – Specifying a publish target
Note
If you do not see any Azure subscription, you may need to authenticate first to your cloud environment. Use the dropdown in the top right of the Publish window to select an alternative account or sign in to a new one.
Before Visual Studio sends our files, it will display a summary of the whole process. This is the last moment to reconfigure things such as target framework, deployment mode, or runtime. If everything seems fine, use the Publish button, as illustrated in the following screenshot, to publish the site to the selected Azure App Service resource:
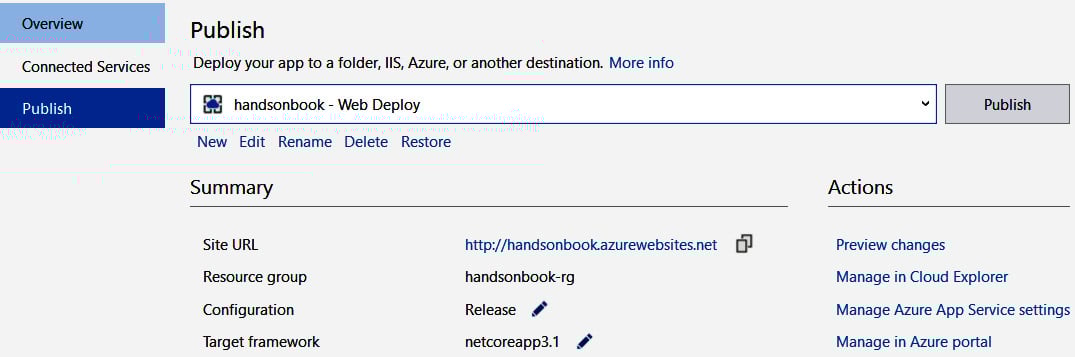
Figure 1.19 – Publish screen summary
Once deployment is completed, you should see your web application open automatically on your default browser, as follows:
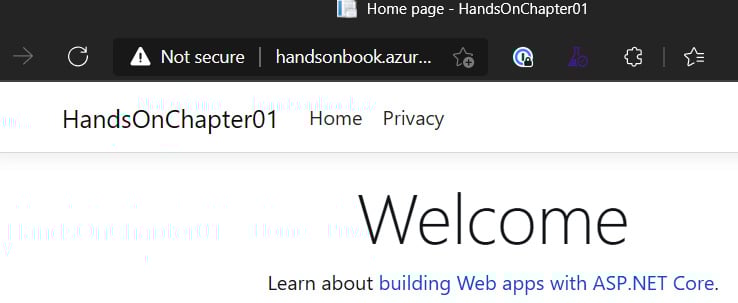
Figure 1.20 – Working application in Microsoft Azure
Congratulations! You have just created and deployed your very first App Service resource. If you look at the Uniform Resource Locator (URL), you'll see that it contains the name you set in the Visual Studio wizard. All web apps in Azure can be accessed using the following URL format: http(s)://{appservicename}.azurewebsites.net.
This also explains why a name must be unique: since, by default, all web applications hosted as Azure Web Apps resources are available publicly, you must select a name that is not already in use in another URL. In the next section, we will use the Azure CLI to deploy our application, as an alternative to using Visual Studio.
Deploying Azure App Service resources using the Azure CLI
Using Visual Studio for deployments is a good idea for testing things and for development, but for sure, it cannot be used for deploying production environments. An alternative, which can be also used on our build agents (if you are using a continuous integration/continuous deployment (CI/CD) approach), is to leverage the Azure CLI. As you will see, it allows for a variety of different deployment options that should satisfy most setups.
Deploying Azure App Service resources with a ZIP file
One of the easiest options for deployment is archiving your application package as a ZIP file and sending it to Azure. To use it, you will have to prepare your application using the following structure (this is just an example; in reality, your structure will be more specific to your project):
Root
|---- Dir1
|---- Dir2
| entry_file (index.html / index.php / app.js / …)
| package_management_file (project.json / bower.json / package.json / …)
Tip
Consider using build automation instead of packaging all the dependencies into an archive. This will save both time and bandwidth when deploying an application and will make the process much safer. See the rest of this section for more details.
Once you have described the structure, you can package it using any kind of archiving tool (this can be a desktop application or a CLI command)—the important thing is to have a <filename>.zip archive that we can send using the Azure CLI. To do so, we will need to execute the following command:
az webapp deployment source config-zip --resource-group <group-name> --name <app-name> --src <filename>.zip
You will have to provide the name of your Azure App Service resource, its resource group, and the path to the archive you created. The following screenshot shows the result of running that command:
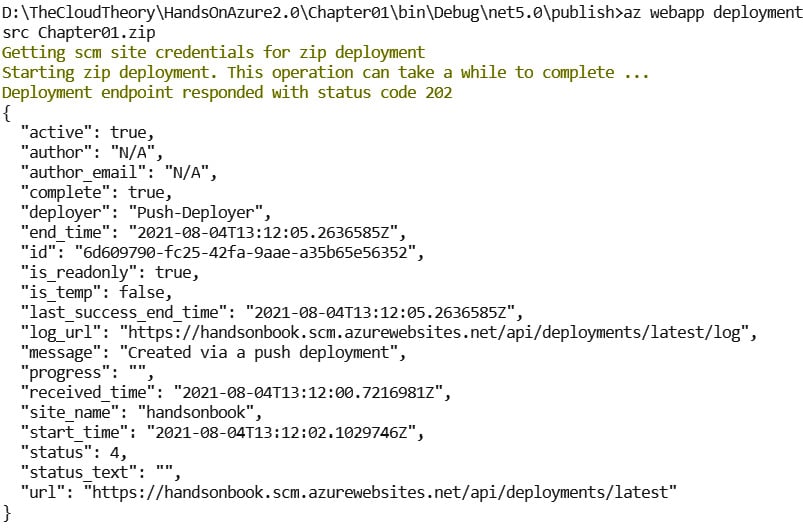
Figure 1.21 – Result of publishing a web app via Azure CLI
Once your code is pushed and extracted, a new version of your application should be available and ready to serve the newest content.
Enabling build automation
A caveat of the preceding method of deployment is the need to prepare all the build artifacts upfront and send them to Azure. There are pros and cons to that approach, as outlined here:
- You are sending the final structure of your application and there are no additional steps needed, so any kind of process debugging should be minimal.
- Your application artifacts may be big, which can make the whole process slower as you need to pass all the files and wait until they are uploaded.
As an alternative, you can enable a feature called build automation. This instructs Azure to use your project/package files and run commands such as npm install or dotnet build before running an application. To enable automation, use the following command:
az webapp config appsettings set --resource-group <group-name> --name <app-name> --settings SCM_DO_BUILD_DURING_DEPLOYMENT=true
If you enable automation, remember not to build your application on your side to avoid duplicated work.
Running from the package
There are some caveats of deploying your application as a ZIP file and then extracting files. As it is running, the extraction and overwriting of files may cause some undesired side effects such as locking or partial updates of the content. To avoid such artifacts, you can use a feature called Run from Package. First, you will have to enable the feature using the Azure CLI, like this:
az webapp config appsettings set --resource-group <group-name> --name <app-name> --settings WEBSITE_RUN_FROM_PACKAGE="1"
Then, we can once again use the command you are already familiar with, as shown here:
az webapp deployment source config-zip --resource-group <group-name> --name <app-name> --src <filename>.zip
Because Run from Package is enabled, instead of extracting your files, Azure App Service will mount the whole package as a read-only directory and run your application from it. As the application will be restarted, all the side effects should be mitigated.
Creating Azure App Service resources using VS Code
Microsoft Visual Studio is not the only available IDE that allows you to work with Azure App Service resources. Because this Azure service supports different technology stacks, including .NET, JavaScript (JS), PHP, Java, and so on, you can easily leverage its capabilities to host different websites using different runtimes. For instance, let's assume that we have the following PHP code that displays a Hello World message:
<?php
echo('Hello world from Azure App Service - PHP here!');
?>
Such a simple PHP application can be easily created in any available IDE that supports the PHP language. For this exercise, I chose VS Code, an open source editor, as it can easily be extended using many different plugins. As you can see in the following screenshot, all you need is a single file within your project directory:
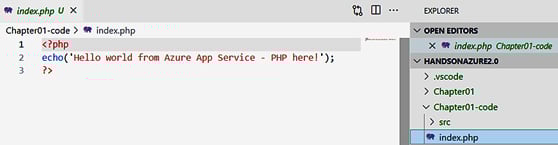
Figure 1.22 – PHP project structure
To make things easier, you can install the following extensions:
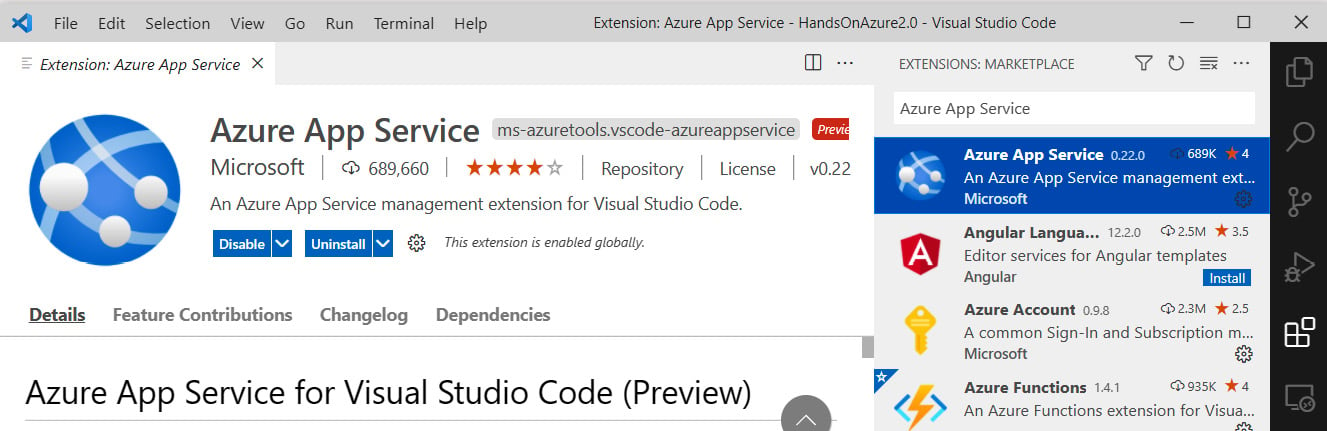
Figure 1.23 – Extensions screen in VS Code
With the Azure App Service plugin installed, you will be able to easily deploy your applications from within the IDE, without the need to go to the portal or use other methods.
Note
Before the first use of these extensions, you may need to authenticate them. Follow the displayed instructions, and VS Code will connect to your subscriptions.
Before we deploy our simple PHP application, we must create an Azure App Service resource. Go to the AZURE tab (you can also use the Ctrl + Shift + A shortcut) and find the APP SERVICE section. After that, click on the Create New Web App... button, as illustrated in the following screenshot:
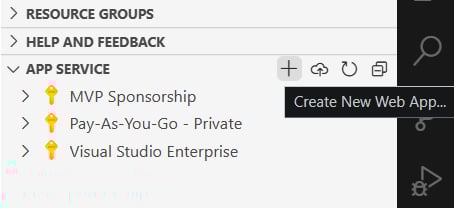
Figure 1.24 – AZURE extension tab with app services
The wizard is a little bit different than in Microsoft Visual Studio, as it acts similarly to a command line, where you provide all fields and information one after another. In VS Code, you will have to enter the following:
- Subscription where an app should be deployed
- The Azure App Service resource name
- Runtime stack (.NET/Node.js/Python/PHP/Ruby/Java)
- App Service plan tier
Note
Using the creator described previously will not give the option to select a resource group and other, more advanced settings. If you want to have full control over the provisioning process, use Command Palette (Ctrl + Shift + P) and search for the Azure App Service: Create New Web App (advanced) option.
In this example, I specified the following:
- Name:
handsonchapter01-code - PHP 8.0
- Free tier
Once the provisioning is complete, VS Code will ask you whether to deploy the application. Select Deploy, and then choose a folder to deploy from, as illustrated in the following screenshot:
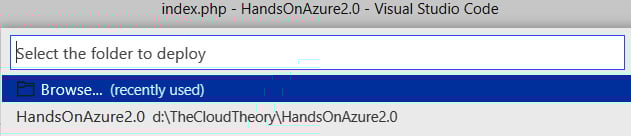
Figure 1.25 – Selecting a folder to deploy from
Next, you will have to select a subscription and the exact instance of the web application in Azure (VS Code may not ask you for that input if it saved your previous choices). The following screenshot illustrates this:
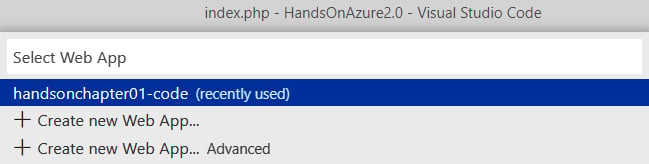
Figure 1.26 – Selecting a web app as a deployment target
Select the instance and confirm the new deployment. Once everything is set and ready, you will see a notification informing you that you are now able to browse the website, as illustrated in the following screenshot:
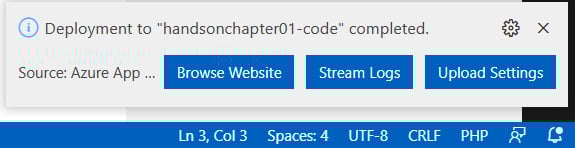
Figure 1.27 – Deployment confirmation
When you click on the Browse Website button, you will be forwarded to the web application you have just deployed. Here, you can see a working example:

Figure 1.28 – Working application in Azure
Note that this extension allows you to directly manage the service from within the IDE and gives you access to different features, including application settings, deployment slots, and even streaming logs.
The important thing here is that by using the same path, you will be able to host a variety of different runtimes inside different Azure App Service resources. It doesn't matter whether it is a Java application, a Python script, or a Node.js backend—they are all supported and can be easily developed using IDEs such as VS Code.
Working with different operating systems and platforms
Currently, App Service supports a couple of different configurations when it comes to selecting the operating system, runtime, and platform. Here are some of the possible options for running your website using App Service:
- .NET Core 2/3
- .NET 5/6
- ASP.NET 3.5/4.8
- Node.js 12/14
- PHP 7/8
- Java 8/11
- Python 3
- Static HyperText Markup Language (HTML) website
Additionally, you can select a platform (32-bit or 64-bit), the HyperText Transfer Protocol (HTTP) version (1.1 or 2.0), an underlying operating system (Windows, Linux, or container), or even a Java web server powering your website. Let's start by selecting a proper operating system for our application.
Selecting an operating system
To select an operating system to run your web app, we must create a new application in Azure. Currently, there is no possibility to change this setting after an App Service resource is created.
Note
Be careful when planning to deploy web applications using different operating systems to the same resource group because of some hardware limitations—for example, once a Linux Azure App Service plan is deployed, you cannot create a Windows one next to it. You will need an additional resource group for that.
To create a new website, go to the beginning of this chapter, where we discussed the way to deploy a web application using the Azure portal. Once you see the creator, look at the Basics tab. The Instance Details section presents the information we are interested in, as follows:
- Publish: This offers a way to deploy code or a Docker container. Choosing the Docker Container option will hide the Runtime stack parameter as it is no longer valid.
- Operating System: You can select either Windows (which is the most common option for .NET applications, suitable for running .NET Framework, Java, Node.js, or PHP sites) or Linux, which can be used for running an application written in .NET Core. Additionally, you can run Java, Node.js, PHP, and Python applications as well.
- Runtime stack: Depending on your technology stack, here, you can select exactly what you need to get started with your application.
The choice is yours. Each operating system has different characteristics: Linux is perfect for running Python applications, as Windows has some performance issues regarding this language; on the other hand, you may have many websites written in .NET Framework, which is optimized for Windows systems. Each of the operating system options also has different pricing. Let's compare Windows and Linux here, assuming the West Europe region is chosen:
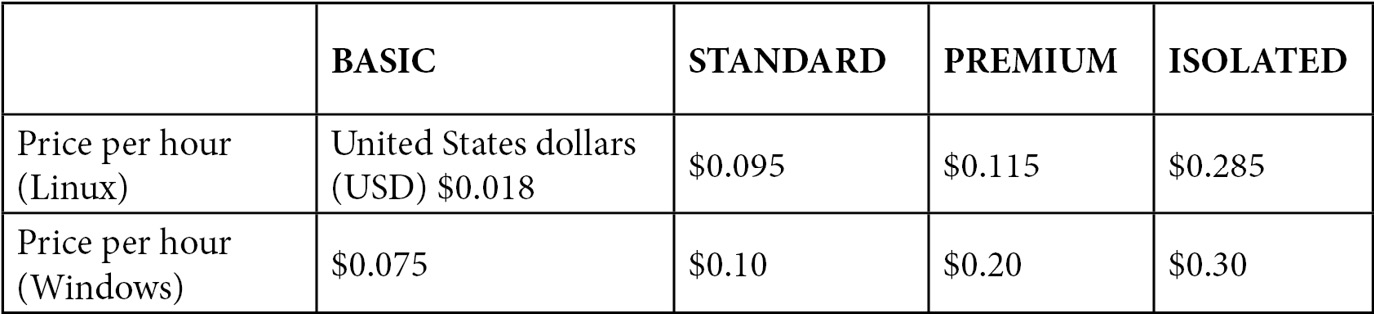
Figure 1.29 – App Service plan pricing comparison
As you can see, there are some differences between these two operating systems. More importantly, Linux does not currently support the Shared tier. The Isolated tier is something you should consider if in need of hardware isolation or strict network connectivity requirements. When you have considered all the pros and cons, you can create an App Service resource powered by the operating system of your choice.
Selecting different platforms
In the previous section, you learned how to choose a proper operating system for your application. This is, of course, not everything needed to run a website—you must also enable a specific language if you want to deploy (for example, PHP code). To do so, go to your App Service resource (you have many options by which to do this: either choose App Service from the Azure portal menu on the left and select your Web App resource or go to the resource group you created by choosing it from the Resource Groups blade) and then select the Configuration blade, as illustrated in the following screenshot:
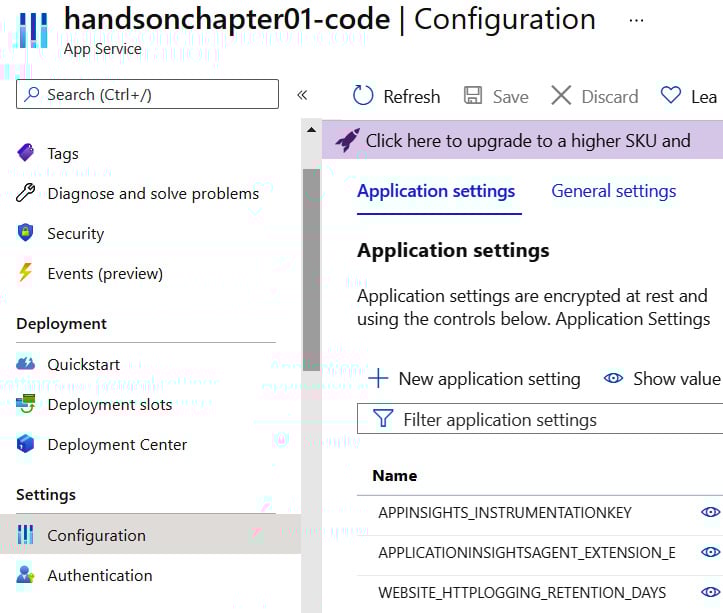
Figure 1.30 – Configuration blade
Initially, you could feel a bit overwhelmed by all those options available, but soon, as you gain more and more experience, all will become clear. You might have noticed the Click here to upgrade... notification here—some features, such as Scaling out or Always on, are only available from the B1 tier upward.
Tip
Remember that the Always on feature could become crucial in some specific scenarios, as it defines whether your application is always running or not (so it can become idle when no one uses it). As you will learn in the coming sections, enabling Always on is recommended when running, for example, continuous WebJobs or Azure Functions.
Currently, we are interested in all options mentioning a programming language. These options are available in the General settings tab and include the following:
- .NET version
- PHP version
- Python version
- Java version
- Node version
- Ruby version
As opposed to selecting the operating system, which cannot be changed later, you are free to change the stack powering your website anytime. This is unlikely in most cases, but if you ever need to do that, you will not have to recreate the whole App Service instance.
Tip
As mentioned earlier, always select the correct operating system powering your App Service instance, depending on the language that you chose for your application. While it is possible to run PHP or Python on Windows, selecting Linux is recommended as many libraries and packages can run only under this particular operating system.
Let's now check how we can work with web application settings.
Working with application settings
The Configuration blade offers more than simply enabling or disabling available features. As you can see, you have three different tabs giving access to various features, as follows:
- Application settings: This tab contains settings used by your application while running. It allows you to set parameters available as environment variables and connection strings transmitted over an encrypted channel.
- General settings: This tab contains settings for controlling technology stack and platform settings such as WebSocket, HTTP version, or File Transfer Protocol (FTP) access.
- Path mapping: This is used so you can mount Azure files/blobs and access them from within your application without additional configuration.
Tip
Remember that Application settings features for .NET applications are injected at runtime and will override existing settings stored in your web.config file. When it comes to other platforms (.NET, Java, Node.js), settings from this section will be injected as environment variables to which you can refer. This is also true for Connection strings features.
Application settings features in Azure are always hidden when stored. What is more, you can easily secure them by disallowing all users from accessing them or even integrating them with Azure Key Vault for further protection.
Tip
Connection strings features for platforms other than .NET are always prefixed with the appropriate connection type. There are four possibilities: SQLCONNSTR_, MYSQLCONNSTR_, SQLAZURECONNSTR_, and CUSTOMCONNSTR_.
Now, as we learned a bit about various configuration settings, we can focus our attention on additional basic functionalities App Service offers.
Choosing the right App Service plan and exploring what its features are
We touched on this topic at the beginning of this chapter, so you should have an idea of what we are going to cover now. As you remember, when an App Service resource is created, you must select (or create) an App Service plan, which defines both available performance and additional features. Let's cover all three categories, this time focusing on the differences between each tier. To see your options without going to an Azure App Service creation screen, go to the Scale up (App Service plan) blade, as illustrated in the following screenshot:
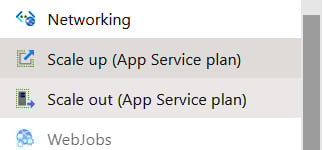
Figure 1.31 – Scale up blade
You will see a screen where all available tiers for the App Service plan will be displayed.
Dev / Test App Service plans
App Service plans designed for development and testing environments can be found in the Dev / Test category, as illustrated in the following screenshot:
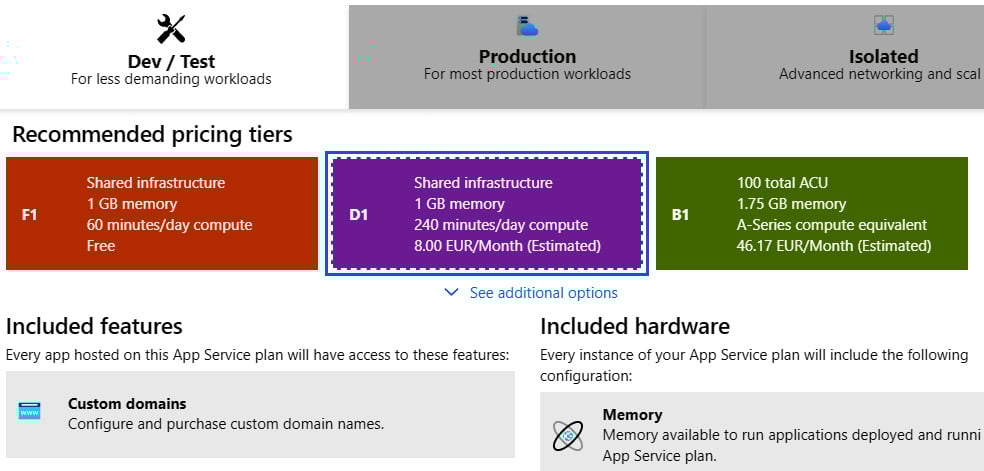
Figure 1.32 – Selecting a tier
We have three different tiers available, as follows:
- Free (F1): The most basic option, with shared infrastructure, 1 gigabyte (GB) of memory available, and 60 minutes of compute per day. When using shared tiers, some features of App Service are unavailable (such as Always on). F1 is perfect for quick-testing or deploying an application for a presentation or demonstration. You will not be charged for using this App Service plan.
- Shared (D1): Like F1, but this also allows for setting a custom domain for your App Service resource. What is more, you can run your application four times longer than when using the Free tier. Still, this is a shared infrastructure, so some features cannot be used, and there will be other Azure customers on the same machine. Unfortunately, it's not available for Linux.
- Basic (B1): This is the first tier that can be considered for running production workloads. It guarantees dedicated A-series machines, and more memory and storage. It is also the first tier that you can scale—though only manually. The Basic tier comes with additional versions (B2 and B3), which provide more compute power.
Note
If you are obligated to run your application in Azure in services defined by a service-level agreement (SLA), remember that you cannot use the Free or Shared tiers, as they do not support this.
Production App Service plans
In this category, there are many more options when it comes to choosing different features available. Remember that, in terms of hardware, the Basic tier offers the very same performance as the Standard tier. You can see a list of the Production category tiers here:
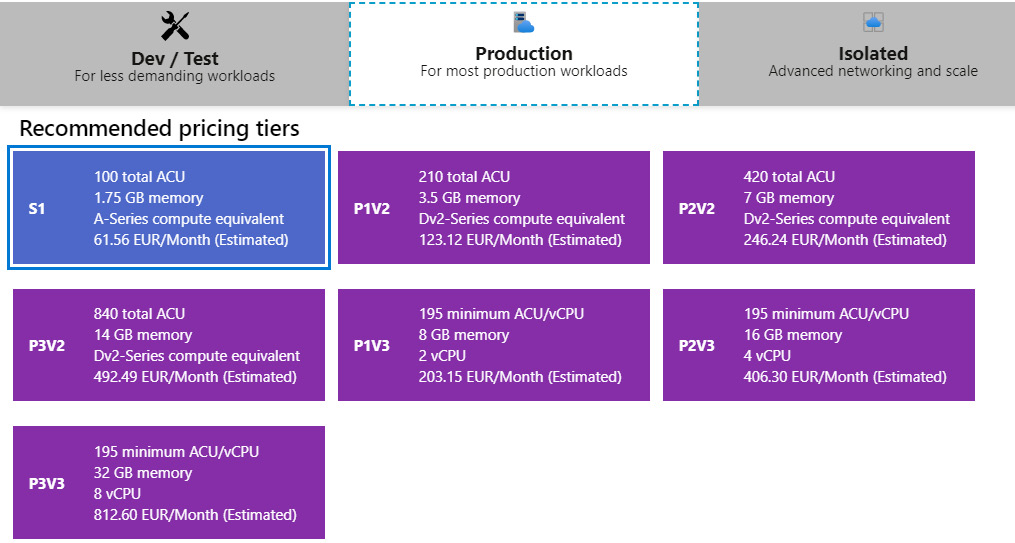
Figure 1.33 – List of production tiers
Here, we can choose between the following:
- Standard (S1): The same A-series as B1. What we are getting here is autoscaling, staging slots, backups, and the possibility to use Traffic Manager (which will be described in the coming chapters). This used to be the best tier for most production applications, as it supports blue-green deployment scenarios and can handle a bigger load (thanks to integration with Traffic Manager). Currently, the price/value ratio is in favor of Premium tiers.
- Premium (P1v2): Offers better performance and higher limits when it comes to scaling (a maximum of 20 instances, compared to 10 in Standard) and staging slots. You also have the option to choose P2 or P3. If you need the best price/value ratio, this is the tier you are looking for.
Tip
Remember that the maximum number of instances when scaling out in particular tiers is subject to availability. In most cases, these are only soft limits that can be raised after contacting support.
In general, Standard should meet most requirements when it comes to performance, reliability, and automation possibilities. However, if you are going to run a very popular website in Azure, you may need Premium, as this offers more flexibility and better scalability.
Note
One of the most important things to remember is how scaling affects pricing. In general, you have two options: either you scale up (changing tier to a higher one) or scale out (by deploying multiple instances of the same application). If you are paying, for example, $40 for an S1 instance, when you scale out to 10 instances, you will pay $400 in total—$40 for each instance running.
Isolated App Service plans
Sometimes, you need even more than the Premium tier has to offer. Maybe you must isolate your application from an external network. Maybe you would like to isolate it on a hardware level. Maybe 20 instances are still not enough. Therefore, Microsoft introduced the Isolated category, which is a slightly different tier as it requires you to deploy the Azure App Service environment first and then provision isolated instances that will use it. This category is shown in the following screenshot:
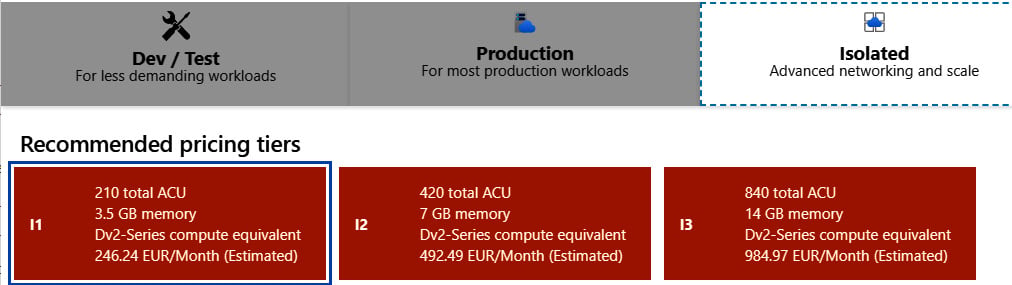
Figure 1.34 – Isolated tiers for App Service plan
In this category, we have only one tier divided into three versions, as follows:
- Isolated (I1V2/I2V2/I3V2): It has the same virtual machines (VMs) as in the Premium tier (DV2). It also includes huge storage to store your files (1 terabyte (TB)), private app access, an integrated virtual network (so that you can access, for example, internal applications), and a more stable environment. This is the most expensive tier but offers the most when it comes to functionality and the range of features provided.
Tip
In general, the Isolated tier is the most stable one when it comes to handling a huge load. While Standard or Premium tiers become unresponsive quickly when utilization hits 100%, Isolated App Service resources need more time to return the HTTP 503 Service Unavailable response. Take this into account if you need a reliable service that cannot be broken easily.
However, there is one thing worth remembering here—besides paying for each isolated instance, purchasing an Isolated plan will also require paying a stamp fee. A stamp fee is a price for isolating your hardware from other Azure customers. As of now, the cost is ~$1,071/month.
Isolated V2 plan
To avoid paying the stamp fee, you can buy an upgraded Isolated V2 plan. This eliminates additional costs due to the redesign of the underlying infrastructure. As for now, the cost for an I1 instance of the upgraded plan is ~$412.45/month.
After describing details of different tiers of Azure App Service plans, we can now switch our attention to security providers that web apps offer and how they can integrate with your application.
Securing App Service resources using different security providers
Most web applications must be secured in some way, either by using your own security system or third-party identity providers (IdPs), such as Facebook, Google, or Twitter. While working with the traditional application hosted on-premises, you often must configure everything on your own. PaaS solutions, such as Azure App Service, already possess this functionality and make it easily accessible, thanks to the Authentication feature. In this section, you will learn how to set this up so that users will be prompted to log in.
Configuring authentication in the Azure portal
As with most PaaS services, you can configure the features of App Service directly from the portal. Thanks to such an approach, you have all options in one place and can easily switch between them.
Using Azure Active Directory to secure App Service resources
Go to your App Service resource and then find the Authentication blade on the left, next to Configuration, as mentioned previously. When you click on it, you will see a screen for configuration, as illustrated here:
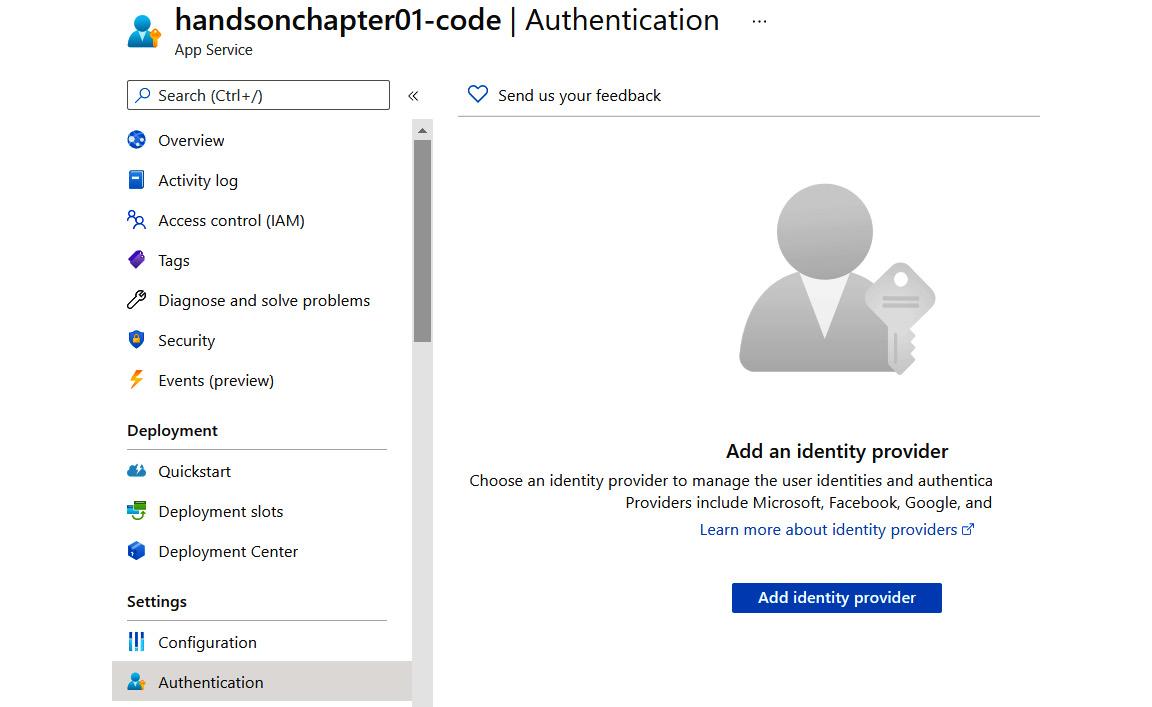
Figure 1.35 – Authentication blade
As you can see, it is currently disabled. When you click the Add identity provider button, you will see new options available, as illustrated in the following screenshot. We will use them to configure how authentication is performed for our application:
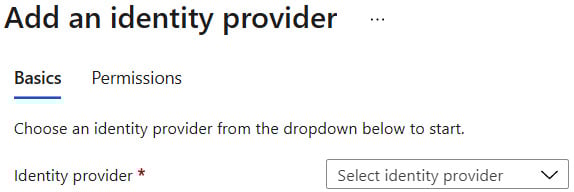
Figure 1.36 – Adding an IdP
Change the Identity provider setting to Microsoft. The screen will change its appearance and display additional options, as illustrated here:
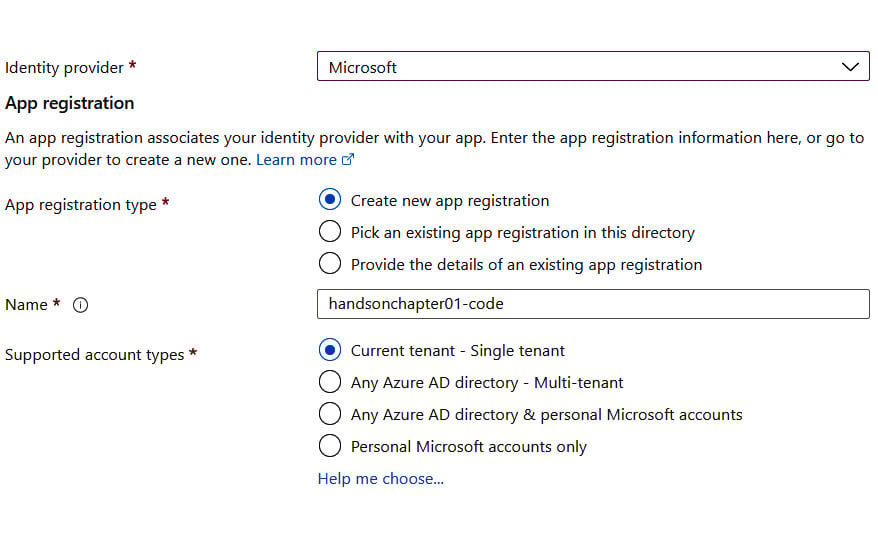
Figure 1.37 – Microsoft IdP configuration
Note
You do not have to be an expert in Azure Active Directory (Azure AD) to use it with App Service, especially now that there is the possibility to let the Azure portal configure it for you. However, if you would like to learn more about this service, the best place to start is its documentation: https://docs.microsoft.com/en-us/azure/active-directory/active-directory-whatis.
To avoid going into unnecessary details, we will use a shortcut and let Azure configure everything for us. Let's leave the default options provided by the wizard (as you can see in Figure 1.38) and verify the authentication settings, as illustrated here:
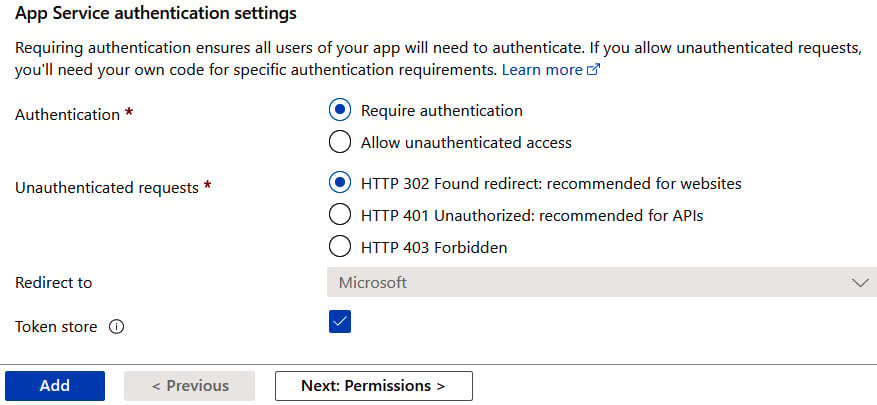
Figure 1.38 – Default authentication settings
As you can see, once we enable authentication, unauthenticated access will be disallowed, and such requests will receive HTTP 302 as a response. You can go for any option you like.
Now, let's click the Add button. After a moment, everything should be set, and you can now access your application to see whether securing it works. Go to the Overview blade and click on the URL link or enter it directly in your browser. When a default page is loaded, you will not see it, but rather will be redirected to the login page and asked to give the application permissions, as illustrated in the following screenshot:
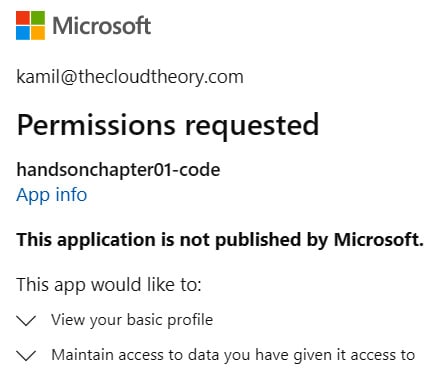
Figure 1.39 – Requesting permissions screen
Note
For this exercise, I have assumed that you have your application already deployed. If you did not, please go back to the previous sections and deploy your code with one of the described deployment methods.
Since we configured Azure AD as our authentication provider, a user will be asked to give this application consent to access their information.
Note
We will not cover in this book how to create an application in other authentication providers. However, proper instructions can be found at https://developers.facebook.com/docs/apps/register/, https://developers.google.com/identity/sign-in/web/sign-in, and https://developer.twitter.com/en/docs/basics/authentication/guides/access-tokens.html.
The last topic in this chapter will give you some insights related to networking in Azure App Service.
Configuring networking for Azure App Service
Web applications must often connect with various services. Those can be other apps, databases, container registries, and many more. Some of them will not be available publicly, hence you will have to find a way to reach them. Remember that Azure App Service is a public service and if you are not using an App Service environment, by default it will not be integrated with your networks. Let's verify what options we have to overcome that problem.
The Networking blade
The very first thing you will need to do is go to the Networking blade of your App Service resource, as illustrated in the following screenshot:

Figure 1.40 – Networking blade
This will provide all the necessary information about your app networking stack, as follows:
- Inbound/outbound addresses
- Access restrictions
- Private endpoints
- Virtual network (VNet) integrations
- Hybrid connections
Note
To have access to all networking features, you will need to scale up your application to at least the P1V2 tier.
Access Restrictions
Let's consider a scenario—you want your application to respond only to a single Internet Protocol (IP) address. If a user reaches it using a different one, they should not have access. This feature is especially useful if you allow users to access your web APIs via API managers (such as Azure API Management). As such, a manager usually offers a static IP, and you normally blacklist all the IPs but this one. This can be done using the Access Restrictions feature, as illustrated in the following screenshot:

Figure 1.41 - Enabling Access Restrictions
Once such a rule is set, and if I try to access my website and my IP is not whitelisted, I will get an HTTP 403 Forbidden response, as follows:

Figure 1.42 – Effect of enabling Access Restrictions
As you can see, with only a few simple clicks, you can block access to your application and whitelist only a specific set of IP addresses.
Private endpoints
Private endpoints are an advanced networking feature of Azure. They are used to ensure that all the traffic stays within the Azure backbone network and never reaches the public internet. They usually work in connection with Azure Private Link to secure a connection between different networks and act as an entry point for communication. We will not go into details of these advanced concepts, but if you are interested in learning more, see an overview of the service here: https://docs.microsoft.com/en-us/azure/private-link/private-endpoint-overview.
VNet integration
This feature is an interesting capability of Azure App Service and allows you to reach services enclosed in a VNet while preserving the public availability of your web application. It is worth remembering that even if VNet integration is enabled and you can fetch data, for example, from a database, the database will not be able to call your application. If in the integrated VNet you have a service, it will not be able to communicate with App Service, though opposite communication is possible.
VNet integration is enabled via the Add VNet button, as illustrated in the following screenshot:

Figure 1.43 – VNet configuration
You will be able to choose a network and subnet that you would like to use for the integration. Remember, though, that you will be able to see networks that are in the same region as your Azure App Service resource. Once a connection is established, the VNet Configuration view will change its appearance so that it looks like this:

Figure 1.44 – VNet integration enabled
However, take into consideration that VNet integration is not that simple—you will have to consider additional scenarios, such as these:
- Connectivity with service endpoints, which will require connecting to a specific subnet and configuring those endpoints against the selected subnet.
- Connectivity with private endpoints, for which you will have to ensure that Domain Name System (DNS) lookups resolve to them. This implies integrating a DNS server with your VNet and managing it.
- Using network security groups (NSGs) for control over outbound traffic.
If you find those scenarios interesting, check out the following link to learn more: https://docs.microsoft.com/en-us/azure/app-service/web-sites-integrate-with-vnet.
Summary
In this chapter, you have learned what App Service is, and how to build and deploy a simple application that can easily be pushed to Azure. Learning the basics of this service is crucial for understanding other topics mentioned in this book, such as Azure Functions. Always remember that you can initially use the Free tier to avoid paying for an application when testing or developing, and then scale up when you need to do so. I strongly recommend you play around a little bit with Web Apps, as the cloud component has a lot more to it, and some other features are not that obvious initially. We will cover more advanced features such as integration with Traffic Manager, Azure SQL Database, and scaling scenarios in the next chapters, but you can now continue your journey and learn something about Azure Container Registry (ACR) in Chapter 2, Using Azure Container Registry for Storing and Managing Resources.
Questions
The following are some of the key questions to summarize the chapter:
- Do the terms App Service and Web Apps refer to the same Azure service?
- How many categories of App Service plans are there currently in Azure?
- Why should Free and Shared tiers not be used for running production workloads?
- How many authentication providers can you set up in App Service?
- Is there any difference in hardware between the Basic, Standard, and Premium tiers?
- Can you attach a custom domain to each tier available in App Service?
- Can you attach more than one App Service resource to an App Service plan?
- Which operating systems are available for App Service?
- Can you change the operating system after App Service resource creation?
- What is the difference between scaling up and scaling out?
- Let's say that you pay $50 for one instance of App Service per month. How much will you pay if you scale up to 10 instances?
- What is the purpose of using the Isolated tier in App Service?
- Is it possible to run a Go application in App Service?
Further reading
For more information, refer to the following resources:
- Azure App Service documentation: https://docs.microsoft.com/en-us/azure/app-service/
- Best practices for Azure App Service: https://docs.microsoft.com/en-us/azure/app-service/app-service-best-practices
- Reference architectures for Web Apps: https://docs.microsoft.com/en-us/azure/architecture/reference-architectures/app-service-web-app/basic-web-app?tabs=cli
- Deployment slots: https://docs.microsoft.com/en-us/azure/app-service/web-sites-staged-publishing
- Azure App Service pricing: https://azure.microsoft.com/en-gb/pricing/calculator/
- Azure App Service networking: https://docs.microsoft.com/en-us/azure/app-service/networking-features